In most vector illustrations, the underlying objects are pretty simple. It’s the details and polish you add that really bring them to life. In this tutorial, we’ll start with basic building blocks, then use texture and effects to add realism. Let’s get started!
GET STARTED
Step 1
This tutorial will use raster effects, such as Gaussian Blur. Before you start, go to the Effects menu and choose Document Raster Effects Settings and set it to High.
I’m also going to use the VectorScribe plugin from Astute Graphics. You can download a free trial here.
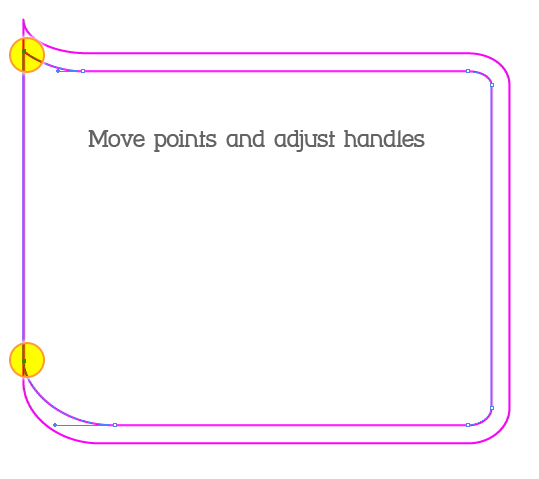
First, draw a rectangle 500 pixels wide by 400 pixels deep. Under the Window menu, go to VectorScribe > Dynamic Corners Panel.

Step 2
Using the Direct Selection Tool (A), select the two points on the right side of the rectangle. Click the Dynamic Corners panel to activate the tool. Enter 45 in the radius field, then press Apply to Selection.


Step 3
Do the same with the lower left corner, but this time enter 100 in the radius field.

Step 4
Draw an Ellipse 130 x 70. Align it it to the rounded rectangle shape as shown. Turning on Smart Guides (Command + U) will help.

Step 5
Add a point to the rectangle at the tangent where the ellipse and the rectangle meet. It can be tricky to get it just right. Again, Smart Guides can help. You can also drag out a regular guide and/or lock the ellipse so you don’t accidentally add a point to it.

Step 6
Using the Direct Selection Tool, drag the corner point up until it aligns with the left point on the ellipse.

Step 7
Now take the Shape Builder Tool (Shift + M) and drag it from the ellipse to the overlapping area. This will create a curved corner with a radius that matches the ellipse. You will now have two shapes that look like the image below.


Step 8
Draw a new rectangle for the back part of the wallet. Left-align it to the original shape. Make a corner as before, using the Dynamic Corners Tool.

Step 9
Using the Shape Builder Tool, remove the upper left corner by holding down the Option/Alt key as you drag across it. Then add to two remaining shapes. You can then delete the extra rectangle. You now have the basic structure of the wallet.


FRONT
Step 10
We’re going to work on the front part first, so you can drag the back section out of the way for now. Select the shape and go to Object > Path > Offset Path, then enter -18.

Step 11
Move the two left points so they line up with the edge of the main shape. Adjust the corner handles on the upper point so the curve is smooth.
Step 12
Fill both shapes with a warm brown. Apply an Inner Glow effect (Effect > Stylize > Inner Glow) to the offset shape, as shown in the image below. Use a darker brown for the glow color, and Multiply blending mode.

Step 13
Copy the inner shape and paste it in front (Command + F). Go to the flyout menu on the Appearance panel, and select Clear Appearance. Stroke this shape with the same darker brown used in the Inner Glow. Increase the width to 12 points. Use the Scissors to cut the offset path at the points shown, and discard the leftover stroke.

Step 14
Keep the brown path selected and go to Object > Path > Outline stroke. Use the Shape Builder Tool to remove shapes that hang off the edge.

Step 15
To give a little dimension to the edges of the wallet, add a couple of rounded shapes on the left, at the top and bottom. If you’re using the VectorScribe plugin, you can easily do this using the PathScribe Tool. Add a point near the top of the dark brown band, then just drag the path out to make it curved.


Your illustration should look like the image below.

Step 16
Now for the polish that will bring this object to life. Duplicate the inside shape, the one with the Inner Glow effect. Remove the right half of this shape by marquee-dragging with the Eraser Tool while holding the Option/Alt key.

Step 17
Fill this new shape with a white-to-black linear gradient. Change its blending mode to Screen in the Transparency panel and reduce its Opacity to 30%. Place it on the left edge as shown. You can fine tune the gradient by adding a dark gray stop on the left edge for added dimension.


Step 18
To give the edges some roundness, draw 1 or 2 point strokes that follow the edges. Use an oval width profile for the strokes, Apply a Gaussian Blur effect of about 3 pixels, then change their blending modes to Screen or Overlay.
You can build up several strokes with different colors and opacities for a richer look. Make the corner strokes slightly brighter. Your illustration should look like the image below.


Step 19
We’ll give the wallet an overall texture using Live Trace. To create a texture, first find an abstract textured photograph. I’m using a photo of a stucco wall. Place it in the Illustrator document, then got to Object > Live Trace > Tracing Options. Choose Black and White as the mode, and make sure Ignore White is checked. Click the Preview button and adjust the Threshold slider until you get a trace that is about 50% black. Click Trace, then expand the trace.

If your source image and trace are bigger than the wallet, you can erase part of the texture, or select only the area you want with the Lasso tool and delete the rest.
Place the texture over the wallet. Change the color to a medium-to-dark brown, then change the blending mode to Screen in the Transparency panel. Reduce the Opacity to about 10 percent. The idea is to give richness and realism to the form, but to avoid distracting.
Make a duplicate of the main wallet shape. Bring it in front on the texture, select them both, then got to Object > Clipping Mask > Make.

Step 20
Position the texture on the wallet shape. You can add scratches to the wallet using thin chalk brush strokes, with Screen as the blending mode, like the texture.

The front of the wallet is done, and should look like the image below.

BACK
Step 21
Grab the back shape you set aside earlier. Make a copy of it. Fill it with a dark-to-light gradient, so it appears to have a shadow on it. Now send it to the back.

Step 22
On the copy of this shape, cut the path at the places shown. Discard the bottom section and give the remaining path a thicker stroke and a lighter brown color. Place it on top of the gradient-filled shape as shown.

Step 23
Add a gradient to the new shape, to give the illusion of depth, as shown.

Step 24
As you did in step 18, add paths to give the edges the appearance of roundness. You can just copy the ones from step 18 and use them on the back. You don’t need to add any to the center, as it will be obscured later. If necessary, move the objects so they align with the front part of the wallet, as shown.

Step 25
For a more finished look, draw a thin shape as shown, and place it on the top edge of the composite wallet objects. Zoom in a make any fine tuning, if necessary.


CLASP
Step 26
For the strap or clasp, draw a rectangle 130 x 90. Use the Dynamic Corners Tool as you did in Step 2 to round the lower left corner 15 points.

Draw a circle 90 x 90. Using Smart Guides to help, center the circle inside the rectangle, and align its left edge to the left edge of the rectangle.

Use the Shape Builder Tool to remove the two left corners (hold down Option/Alt while dragging). Then add the remaining two shapes.

Step 27
Add a point near the top right corner, then drag the corner point up just a bit. Use the PathScribe Tool to create a curve, as in Step 15.

Step 28
As you did in Step 17, create a highlight for the right side of the clasp. Instead of copying the clasp shape, this time we’ll just draw a simple rectangle and fill it with a linear gradient, and mask it in the next step. Set the blending mode to Screen, as before, and adjust the Opacity.

Step 29
Add some texture as you did in Step 19. Place it on the clasp shape and adjust the blending mode and opacity. Now copy the basic clasp shape and bring it to the front. Select the rectangle and the texture, then make a Clipping Mask. Place it on top of the clasp shape.

Step 30
As you did in Step 25, add a thin shape that follows the contour of the clasp shape, to give the clasp some dimension. You can use a duplicate of the original shape, cut the path, then add width, as shown.

SNAP
Step 31
For the snap, draw a circle and fill it with a radial gradient colored with brass tones, as shown.

You can add a texture if you like for an antique look.

Add highlights by creating thin crescent shapes and placing them on the edges. Fill them with a radial gradient and use Screen blending mode.

As in step 18, you can create depth by adding a darker, blurred stroke on the bottom edge.

For a shiny highlight, create an oval and fill it with a black and white linear gradient. Change its blending mode to screen and place it center top.

Step 32
For the shadow of the snap on the leather clasp, draw a circle slightly larger than the snap. Fill it with a radial gradient that’s black in the center, then light brown and then white. Change its blending mode to Multiply.

Step 33
Arrange the clasp and snap on the wallet shape. For a shadow for the clasp, duplicate the basic shape and erase the right side, as you did in Step 16. Fill it with a darker brown, add a Gaussian Blur effect, and change its blending mode to Multiply. Place it behind the clasp and nudge it down a bit for a shadow effect.

Step 34
There is a gap where the clasp “wraps around” the wallet. Draw a D-shaped object, fill it with black and place it behind the clasp to fill in the gap.

Conclusion
The wallet is done, now you can fill it with cash, cards, and ID!
Anyone can throw a few shapes together to make a vector illustration. Spending the time to add detail and polish will make your illustrations stand out from the crowd.

