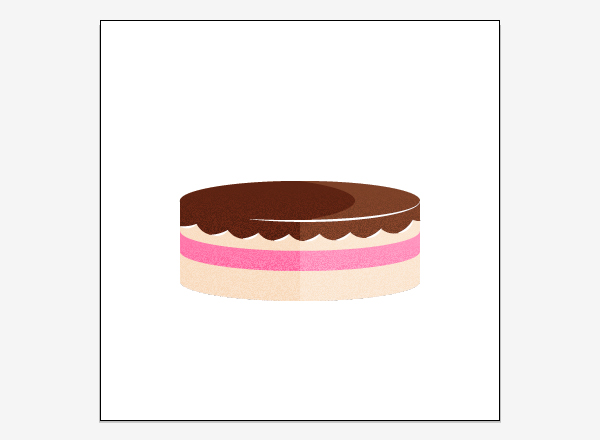
In this tutorial you will learn how to quickly illustrate a retro-inspired stylized birthday cake, layered with cream filling and covered with chocolate icing and candles on top. We will use the Pathfinder Panel and basic Pen Tool techniques to create our shapes. With the help of shortcuts, it is easy to speed up one’s workflow in order to create simple and stylish illustrations with little time effort.
Step 1
I opened a new document in Adobe Illustrator 400 × 400 px big, RGB and 72 dpi. The size of your document however is not important for the illustration, as it is meant to stand alone anyway.
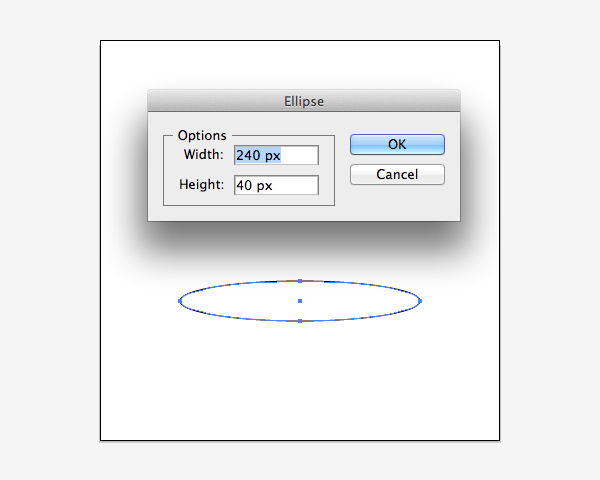
The base shape we will use throughout the whole process is a 240 × 40 px ellipse. Select the Ellipse tool and click anywhere on your canvas. A dialogue window will appear, asking you to enter the dimensions of your ellipse. This is a quicker way to create the shape than editing it with the Transformation Panel later on. Another benefit of this way is, that Illustrator remembers the size of the last ellipse you drew and puts those numbers into the dialogue window.
I tend to keep a copy of this shape for later reference and uncheck its visibility in the Layer panel.
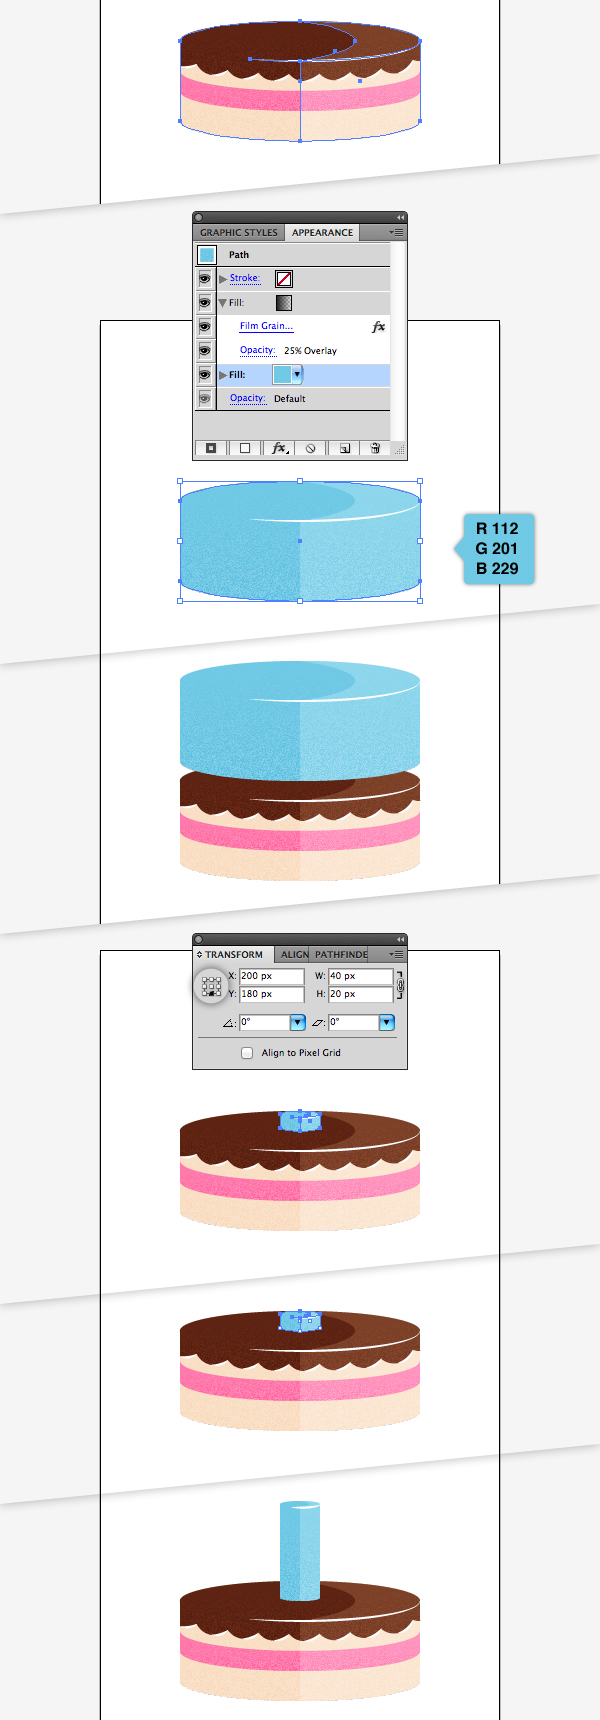
Step 2
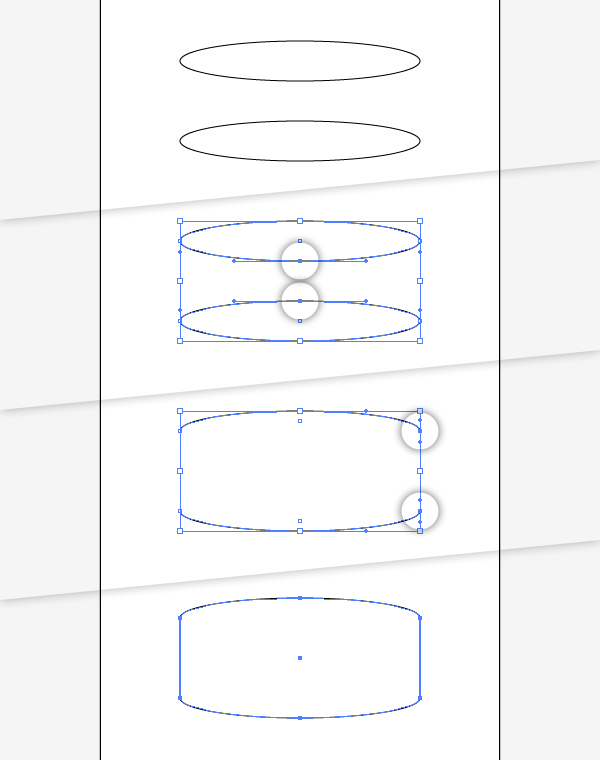
We will now create the main body of our cake.
To do this, copy the shape (Command + C) and paste it into the same position (Command + F). Move it up a couple of pixels upwards until you are happy with the height. To move 10px at a time, simply hold Shift while using the arrow keys to move your shape.
Using the Direct Selection Tool (A) select the bottom Anchor Point of the top shape and the top Anchor Point of the bottom shape and delete them. Now select the right anchor point of each shape and join the two shapes (Command +J). Press (Command +J) again to close the shape.
Step 3
To make the middle layer of the cake, place 2 copies of the first ellipse we created in the middle of the cake’s main body shape. With the Direct Selection Tool, delete the 2 top Anchor Points of each shape.
Similar to the first shape we created, select 2 outside Anchor points and join the two shapes (Command + J). Joining them again, to close the shape.
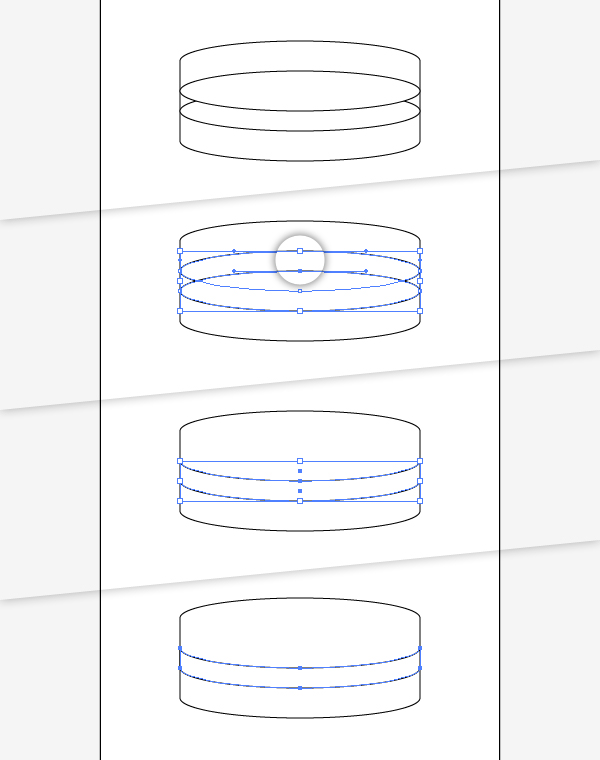
Step 4
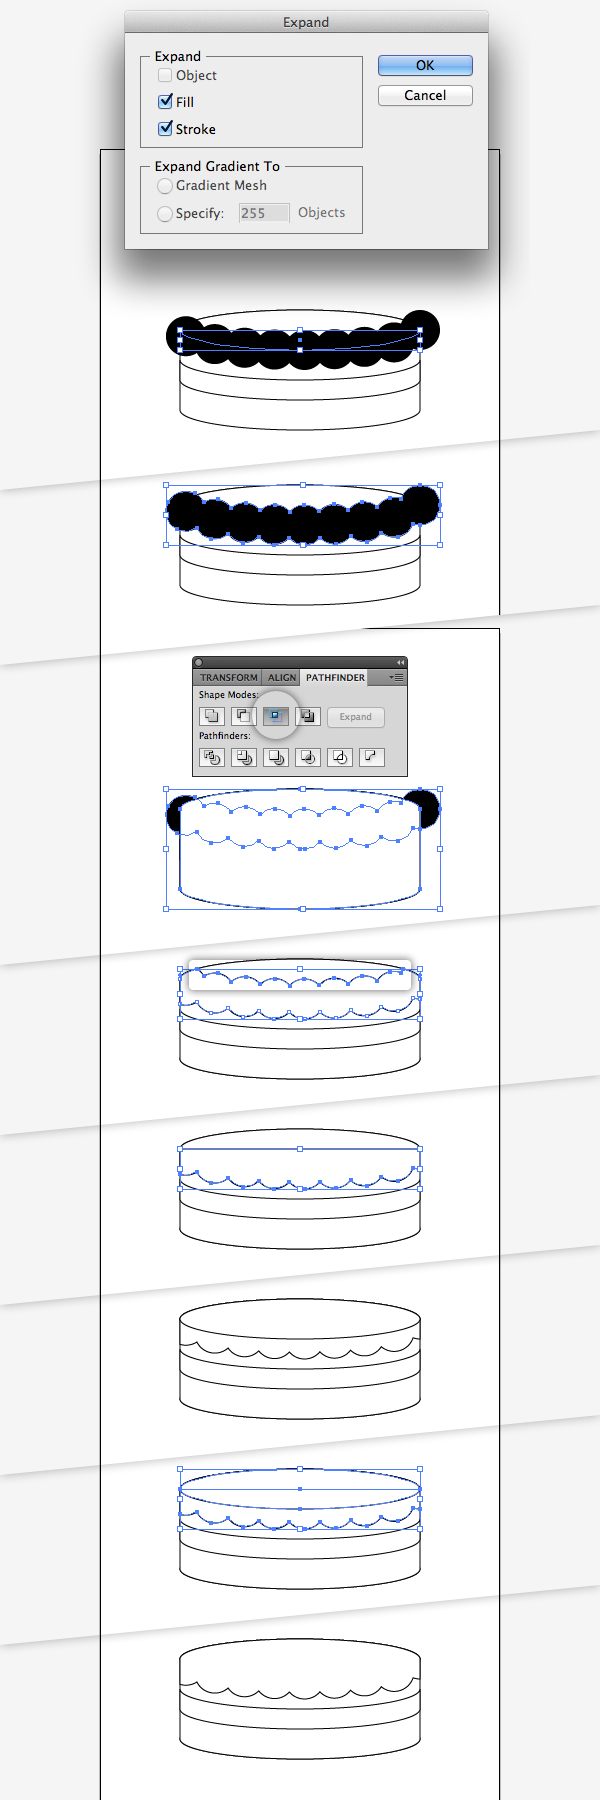
Next up will be the icing of the cake. We will use a copy of our basic shape and align it with the main body shape of the cake. Duplicate this shape and delete the top Anchor Point from the Duplicate.
Create a Dashed Line. The width of the Stroke will be 40pt. In the Dashed Line options enter 0px for the first field and 30pt for the second. This will result in a "Pearl String" Stroke appearance.

Expand the Appearance of the Stroke so it becomes a Fill Shape (Menu Object > Expand Appearance). Ungroup the resulting object and delete the shape with a white fill, so that only the "Pearls" are left.
Place a Duplicate of the cake’s main body shape above the “Pearls” and create an Intersection with the Pathfinder Panel.
Delete the top Anchor Points of the resulting shape and join the shape (Command + J).
Paste the basic shape into your document again and place it on top of the cake. Select this shape and the “Pearl” shape and combine them using the Pathfinder panel again.
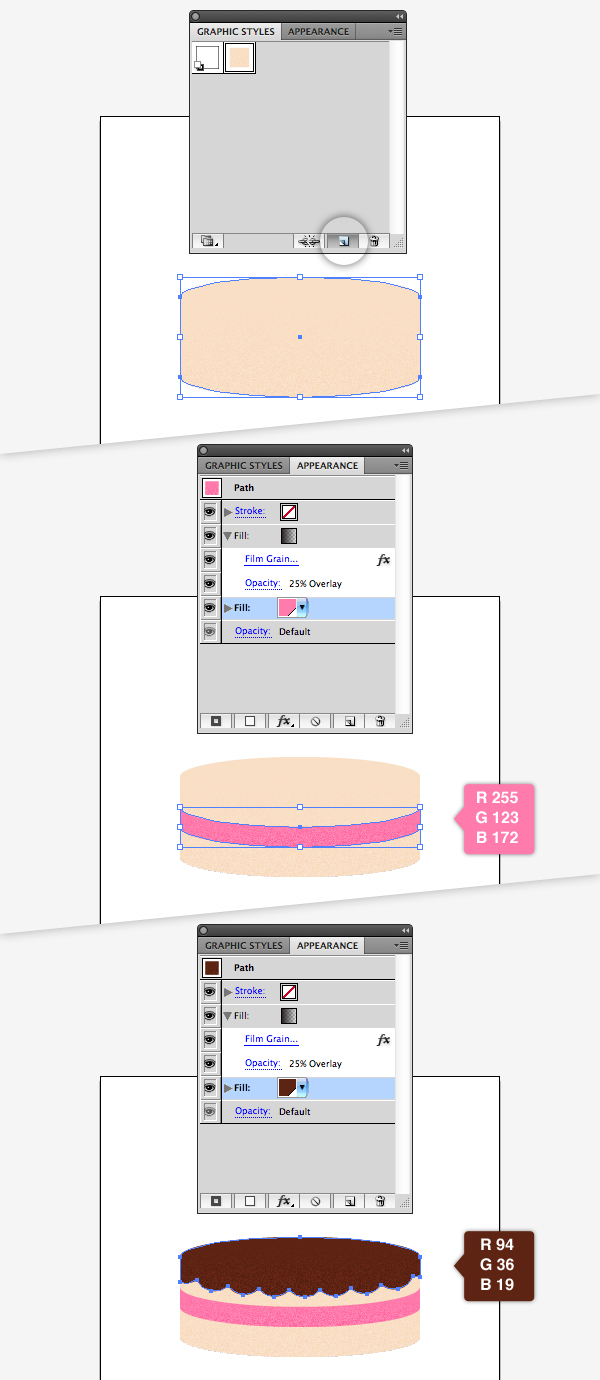
Step 5
In the next step we will apply a grainy texture to the shapes. Our main body shape will be filled with a bright peach color (R: 2249 / G: 223 / B:197).
Open the Appearance Panel, select our fill and create a new fill. Apply a Gradient to the new fill, from 0 to 100% Opacity Black.
Go to Effects > Artistic > Film Grain and edit the Effect to your liking. I increased Grain and Highlight Area to the maximum and Intensity to 0.
Back in the Appearance Panel the Blend Mode is set to Overlay and the Opacity of the Gradient Layer to 25%.

Step 6
Open the Graphic Styles Panel and save the Appearance as a new Graphic Style. Apply this style to the other 2 shapes you created. Switch back to the Appearance Panel and change the color of the middle layer to pink and the icing shape to a dark brown.
Step 7
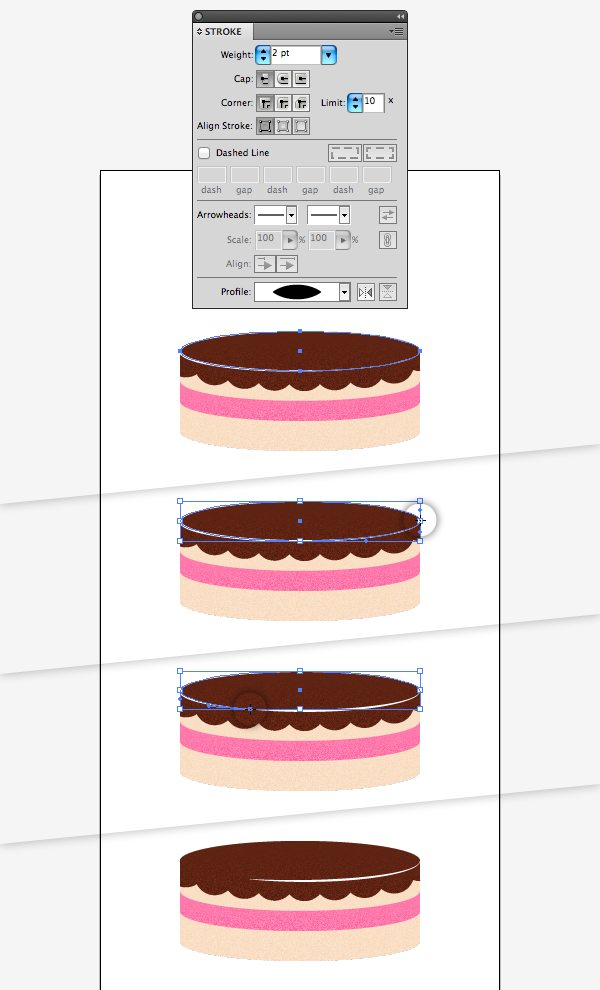
In the next step, we will apply some glossy highlights to the icing. Therefore we need our basic shape again and copy it to the top. Clear the shape’s fill and apply a white outline. In the Stroke Panel, we will change the width to 2pt and apply Width Profile 1 to the Stroke.
Use the Scissor Tool (C) to divide the shape into 2 parts. The first cut I made at the right Anchor Point of the shape, the second cut somewhere two thirds along the edge to the left. Delete the Path on top.
Place the icing shape on top and apply the same white Stroke to it like before. We only want the highlight to be on the right side, so we will have to delete parts of the path.
Zoom in and add Anchor Points on each left curve. Select those newly created Anchor Points with the Direct Selection Tool and delete them. You will end up with one path for each right curve.

Step 8
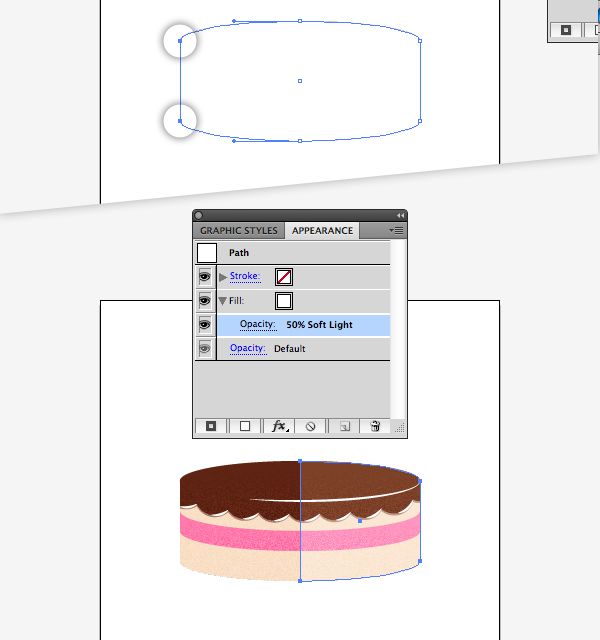
To create a general highlight for the whole cake, place a duplicate of the main body atop all other elements. Deleting the two left Anchor Points will leave us with a perfect half of the cake. Join the path (Command +J).
Set the shape’s Blend Mode to Soft Light and its Opacity to 50%.
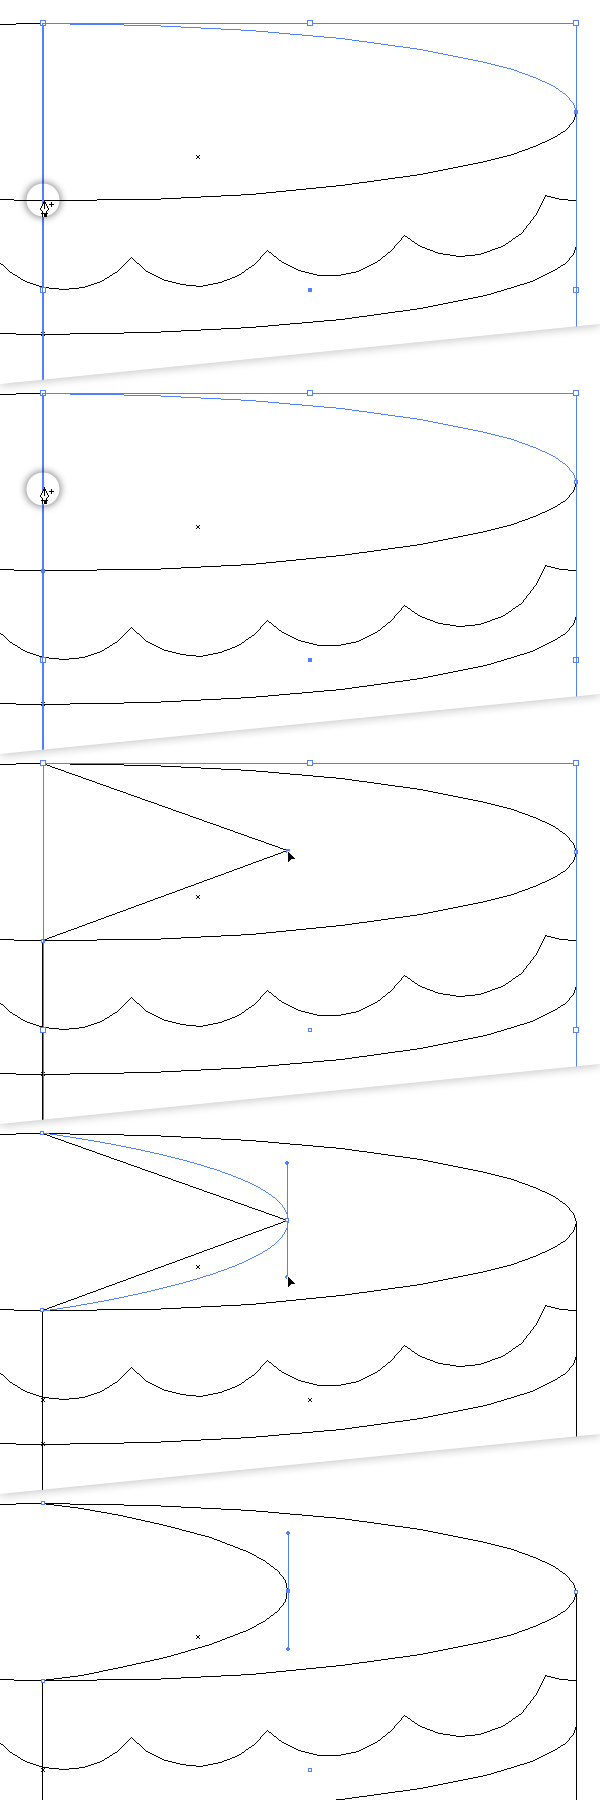
On top of the cake it is more appropriate to leave the straight highlight line. To best see what you are doing in the next step, switch to View > Outline (Command +Y). Zoom in and add an Anchor Point where the vertical line meets the highlight Stroke.
Add another Anchor point in the middle of the top of the cake. Move that Anchor Point out to the right, roughly half way to the right edge. Holding down Option and Shift drag the Handles of the Anchor Point until you have a nice curve.
Step 9
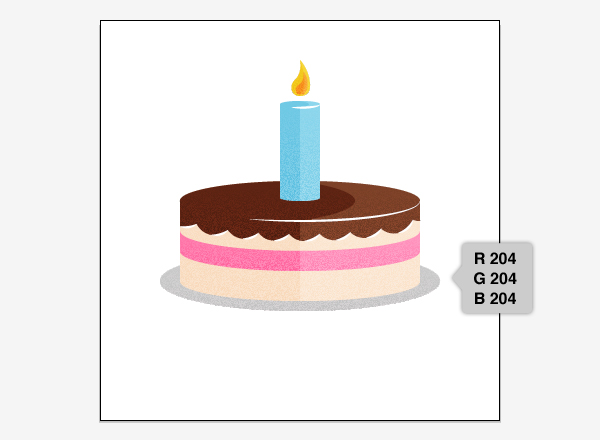
And this is our cake! In the next step we will create a candle using elements we already created for the cake.
Step 10
Select the cake’s main body shape, the general highlight and the stroke for the top. Place duplicates of them on the top layer. In the Appearance Panel change the color of the main body to a light blue. Move the three elements up, so they are above the cake.
Open the Transform Panel and set the reference point to the bottom. Locking height and width, give the elements a new smaller size. I chose 40 × 20 px.
With the Direct Selection Tool, select the top Anchor Point of all three elements. Move those Anchor Points upwards until you like the height of the candle.
Step 11
We will now add a flame to the candle. Using the Pen Tool I drew a drop like shape, applied the Graphic Style we saved previously to it, changing the fill color to yellow. I duplicated the shape, filled it orange and edited its size and shape slightly.
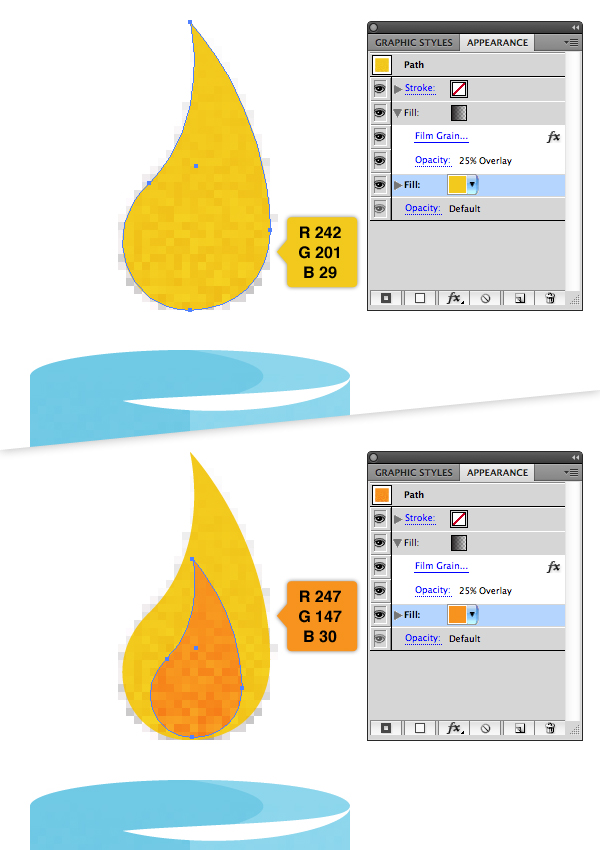
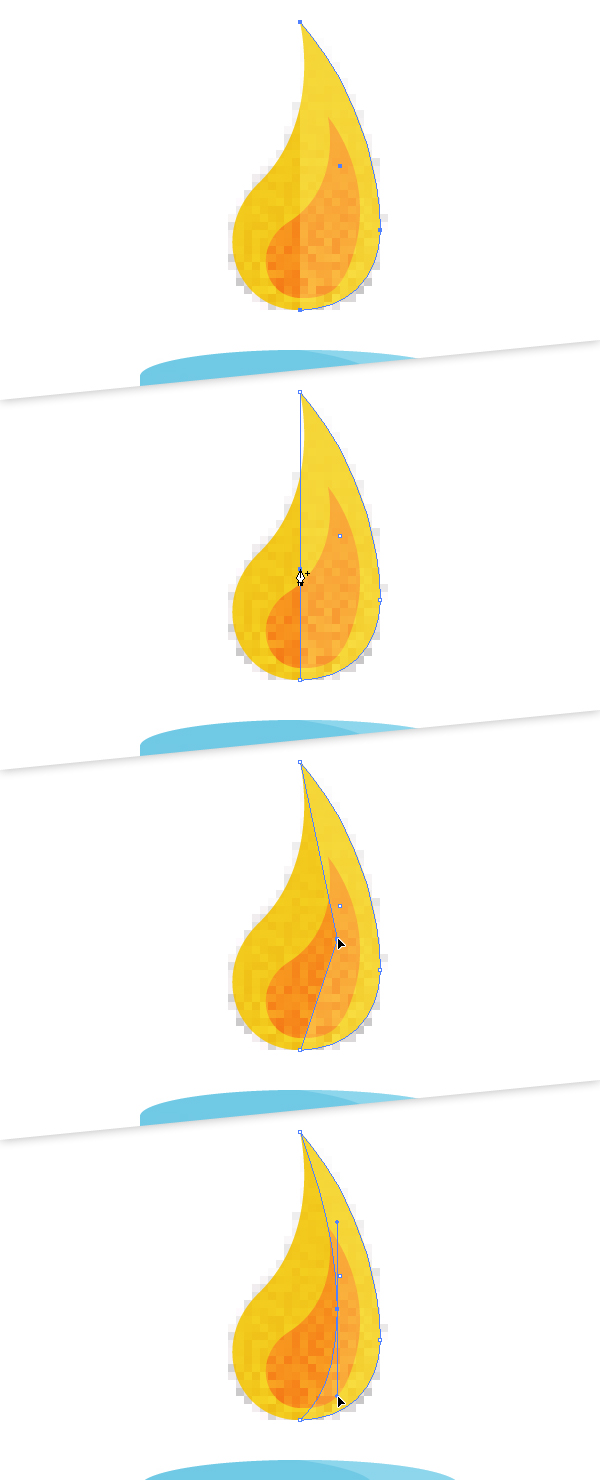
Now we will add a highlight to the flame, the process being similar to the highlight we created earlier for the cake. Duplicate the yellow shape, delete the gradient fill and set its fill color to white and Opacity to 25% and Soft Light.
Delete the left Anchor Point and join the path (Command + J) like we did before. Using the Pen Tool, add an Anchor Point to the shape. With Direct Selection move the Anchor Point to the right and use the Pen Tool again to drag out the handles and create a nice curve.
Step 12
We are going to add a plate for the cake to stand on. Simply place a Duplicate of your very first shape below all other shapes. Add our Graphic Style, changing the color to grey and resize it so it looks reasonable enough for the cake to stand on.
Step 13
To finish the illustration we will add a simple background, using our Graphic Style with a new Fill color again. You can also duplicate the candles and add as many as you like to the cake. I decided to go with 4 candles and placed them in a nice perspective. The front candle is a bit bigger, the one in behind a bit smaller.
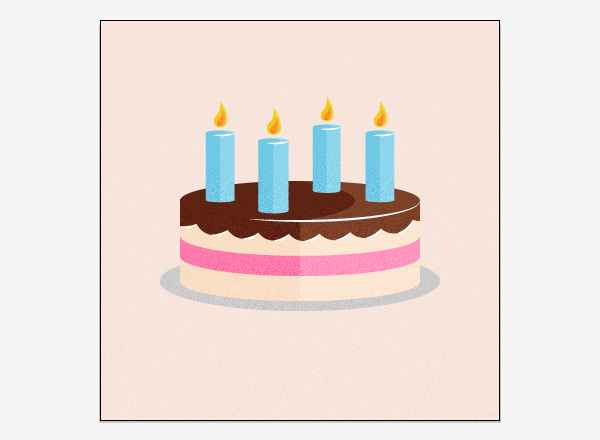
Conclusion
And there you have it, a retro inspired birthday cake. Have a play around with different illustrations to make a collection of items. I hope you’ve enjoyed this tut.