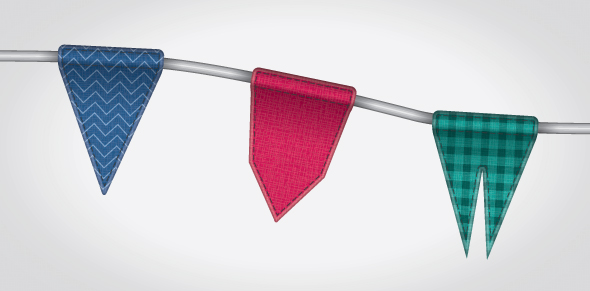
In today’s tutorial I’m going to show you how to create a textured bunting decoration, which you can use to add detailing to a variety of projects including posters and illustrations. This tutorial is specifically aimed at those who regard themselves as beginners.
Step 1
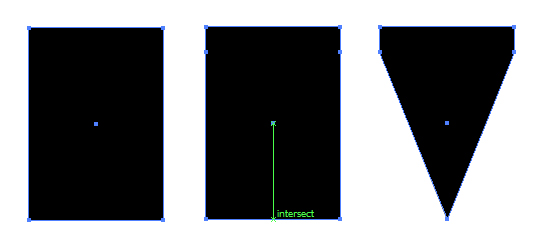
Use the Rectangle Tool (M) to draw a tall rectangle with a black fill. Keep the rectangle selected. Enable Smart Guides (Command + U) to help you locate the middle of the bottom side of the shape and add a point using the Pen Tool (P). Do this by slowly hovering over the bottom line until it is highlighted with "Intersect" and then click on the line. Then add a point on each side, about a sixth of the way down. Then with the Pen Tool (P) to remove the points in the bottom corners by clicking on them.
Step 2
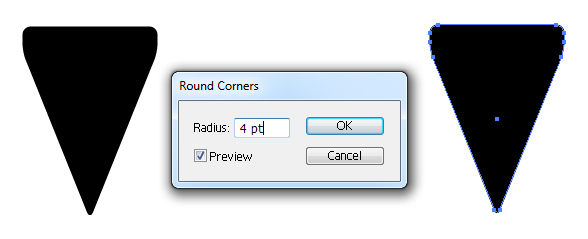
While your shape is still selected, go to Effects > Stylize > Round Corners and input the value 4pt and click on Ok. This will apply a live effect to the shape, which you can go back in to modify. However I want to remove the live effect and just be left with the curved corners, so while selected go to Object > Expand and click on Ok.
Step 3
We’re going to work in the Appearance panel now, so if you’ve not got it open go to Window > Appearance. You can also find other panels in this way should you need them in the future.
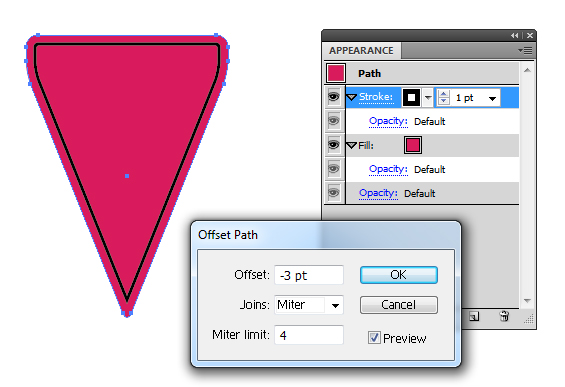
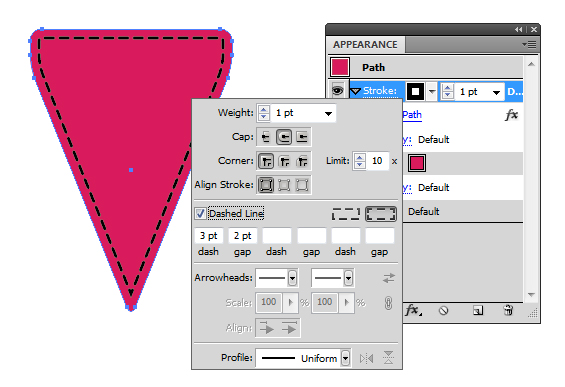
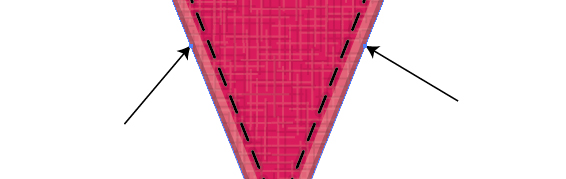
I’m going to give the shape a pink/purple fill however you can use any color you wish. In the Appearance panel, set the stroke color as off black (C=0, M=0, Y=0, K=90). Highlight the Stroke section in the Appearance panel and click on the "fx" button or Effects button along the bottom of the panel and go to Path > Offset Path and enter the value -3pt, click on Ok. A positive value will set the line beyond the boundary of the original shape… a negative value will set the line within the boundary of the shape.
Step 4
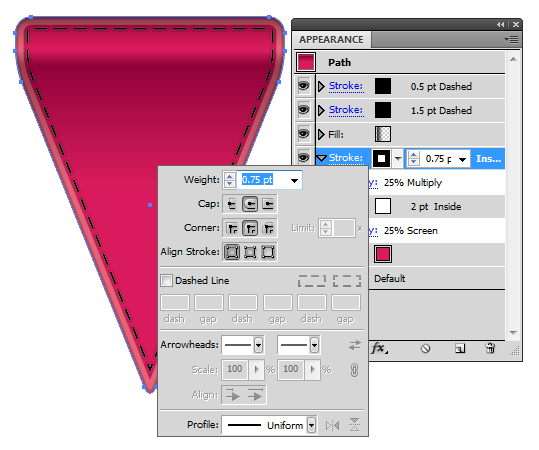
Click on the "Stroke" link in the Appearance panel and you’ll be able to access the Stroke panel settings. From here, change the Cap to Round Cap and tick "Dashed Line". Enter the values 3pt for the dash and the gap in between will be 2pt. Although it’s not displayed here, change the Stroke Weight to 1.5pt by clicking into the Weight box and typing in the value.
Step 5
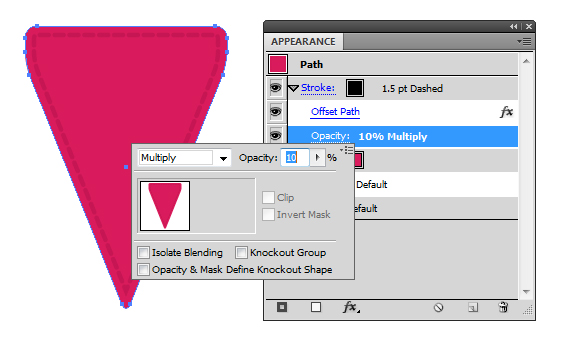
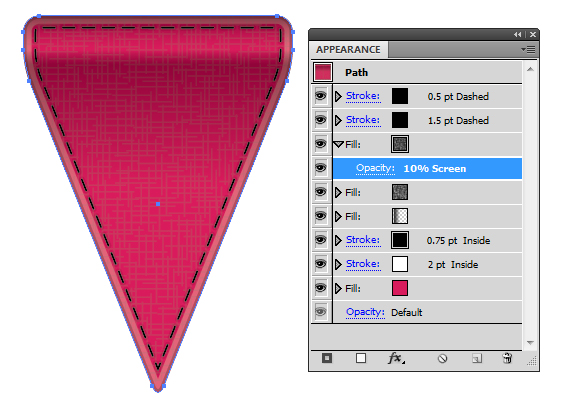
Now you’ve set your Stroke settings, you can modify the Transparency settings by click on "Opacity". Change the Blending Mode from Normal to Multiply and then change the Opacity to 10%.
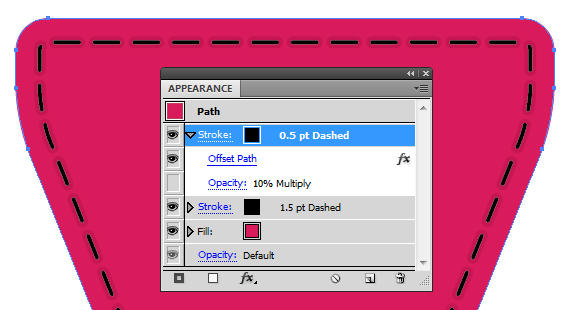
Highlight the Stroke section and go into the drill down menu in the top right of the panel and select "Duplicate Item". This will duplicate all elements, including any Effects and Opacity settings applied to the highlighted Stroke or Fill. In this case, we’ve duplicated the Stroke. Here click into Stroke and change the Stroke Weight to 0.5pt and then in the panel, click on the eye to hide the Opacity setting. When you hide the Opacity setting, this will return the element it’s relating to (in this case the Stroke) to Blending Mode Normal, Opacity 100%.
Step 6
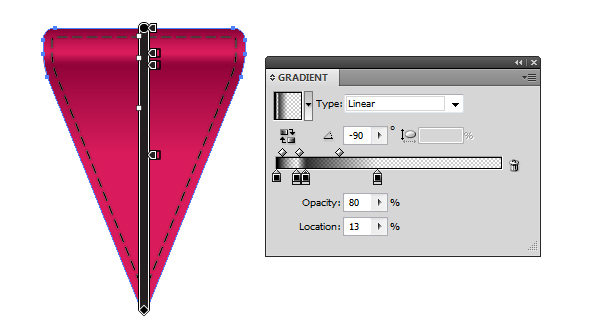
Go back into the drill down menu and select Add New Fill. For this fill, add in the black to black transparent linear gradient which is in your default CMYK Swatch palette. Set the Blending Mode to Multiply and Opacity to 50%. Go into the Gradient panel and enter the value -90 for the angle. This will give you a vertical gradient.
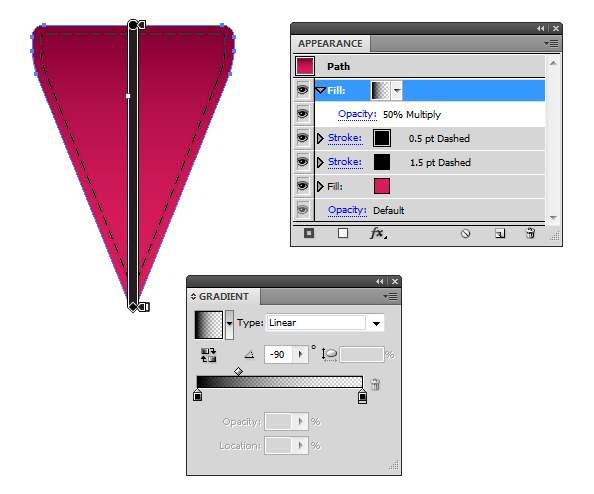
Then drag and drop the black from your Swatch panel into the Gradient interface to add new Gradient sliders. Move them around to produce what will look like a raised section at the top of the flag and curved out at the bottom as shown below. You can move the sliders around either via the Gradient panel or along the Gradient bar when you use the Gradient Tool (G). The benefits of using the Gradient Tool (G) is that you can see in real time where the gradient sliders are placed.
Then drag the gradient fill all the way underneath the Stroke elements of the Appearance panel.
Step 7
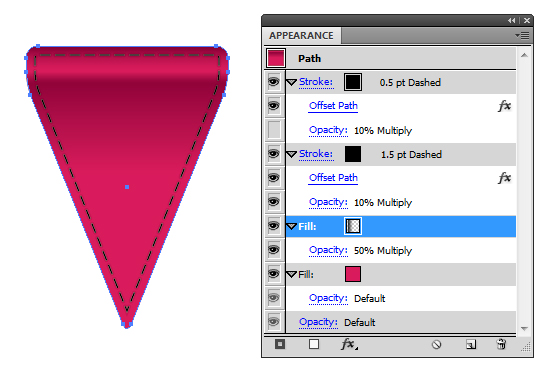
Add New Stroke from the drill down menu and give it a white stroke color. Drag this element below the gradient fill you created in the previous step. This is so it will benefit from the gradient. As before, click on Stroke to access the Stroke panel options and give it a Stroke Weight of 2pt. This time around, select the Align Stroke option Align Stroke Inside. Set to Blending Mode to Screen and Opacity to 25%.

Duplicate this stroke and change the stroke color to black and Stroke Weight to 0.75pt. Set the Blending Mode to Multiply and Opacity to 25%.
Step 8
I’m going to add a texture by using one of the default seamless patterns available in the Swatch libraries. First start by Add New Fill and place it on top of the gradient fill. In the Swatch panel, go into the drill down menu and select Open Swatch Library > Patterns > Basic Graphics > Basic_Graphics_Textures and select the Burlap pattern. Change the Blending Mode to Multiply and Opacity to 10% as shown below.

Step 9
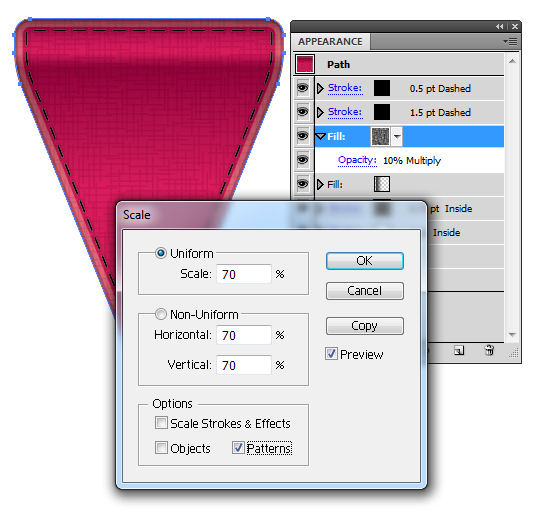
The texture is a bit large for the object I’ve created, so I’m going to reduce the scale of the pattern. Highlight the pattern fill in the Appearance panel and go to Object > Transform > Scale. I’m going to change the Scale to 70% and within the Options box select only "Patterns". Then click on Ok. This will alter the scale of the pattern only and not change the size of the object.
Step 10
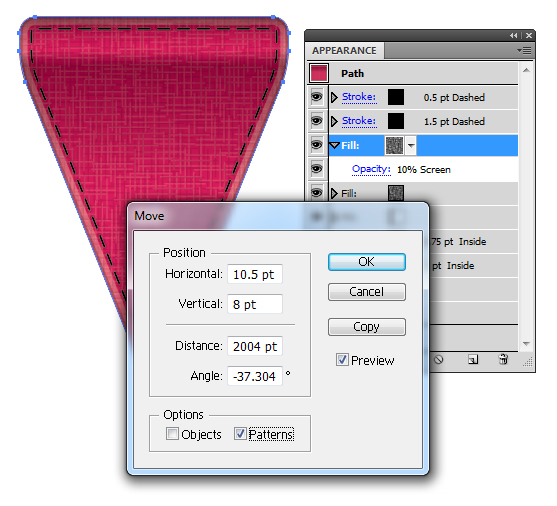
The previous pattern has added a dark texture to the flag, I want to add highlights to it now. So select the fill with the pattern and Duplicate Item. Change the Blending Mode to Screen and Opacity to 10%. As you can see from below, they are just overlapping each other and kind of cancel each other out. Not good at all!
So I’m going to move the pattern slightly. Select the pattern fill and go to Object > Transform > Move and enter the values 10.5pt Horizontal and 8pt Vertical. In the Options section, have only the Patterns box ticked and then click on Ok.
Step 11
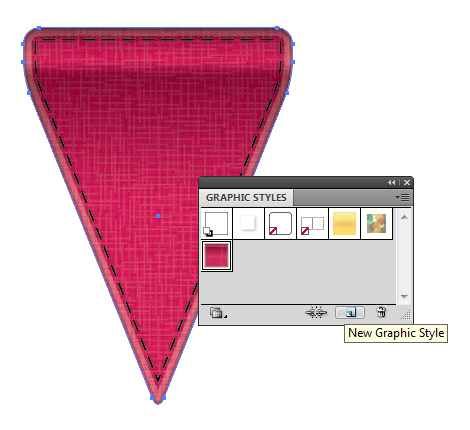
Now that you’ve got the basic flag look, go into the Graphic Styles panel and click on New Graphic Style to add it to the panel to use at a later time.
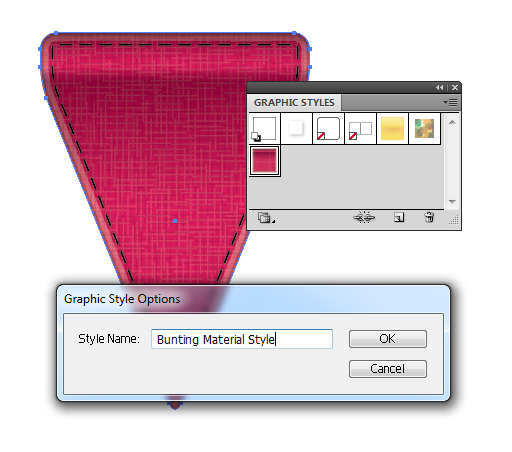
Double click on the style in the panel and name it, I’ve just called mine "Bunting Material Style". Click on Ok once done. You don’t need to name your styles, but it’s good practice to do so.
Step 12
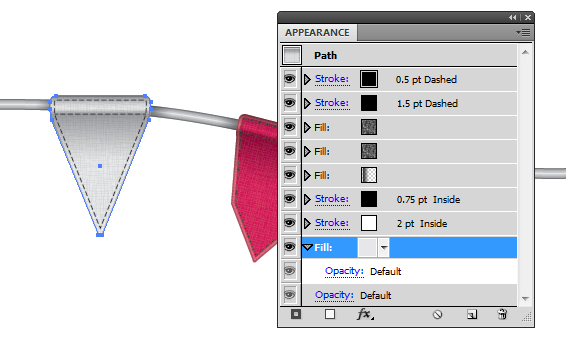
We have the base of our flag, we need to add some additional stitching along the top of the flag. Use the Line Segment Tool (\) to add a horizontal line along the fold of the flag. Use Smart Guides (Command + U) to find the center of the flag and then hold Shift + Alt and pull outwards to produce an even horizontal line. Apply your new Graphic Style to the line, as it will give you the settings you wish for the dashed line effect.
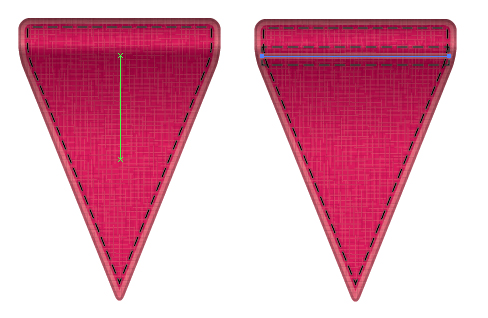
In the Appearance panel, highlight and then Delete the elements you don’t wish to keep. You want to keep only the two dashed line Strokes. Once you’re done, select both the shape and line and Group them (Command + G).

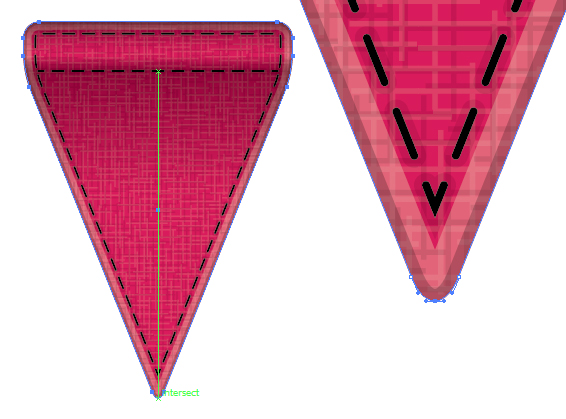
Step 13
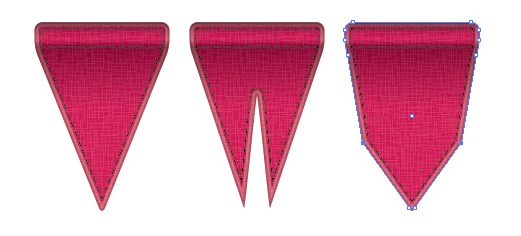
Duplicate the Group so now you have two flags. I’m going to modify one flag to give us a different shape. Open up the group and select the flag. Use the Pen Tool (P) to add a point in the center of the bottom curve. Smart Guides (Command + U) helps a lot here.
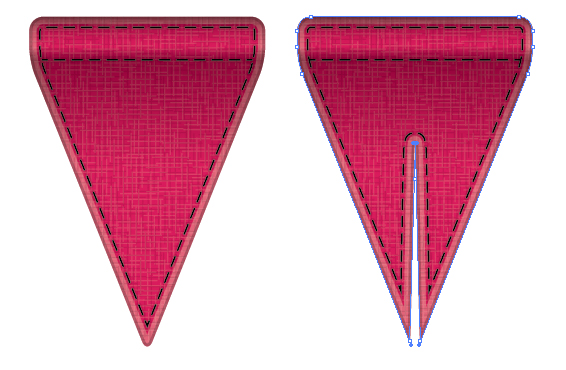
Step 14
Use the Direct Selection Tool (A) to select the point you’ve just created and then use your arrow keys to nudge the point upwards.
Use the Direct Selection Tool (A) to select a point and nudge it 5 strokes away from the center of the flag. Do this on both sides so it’s symmetrical.
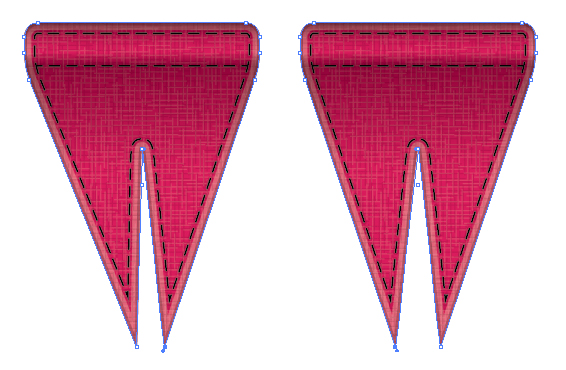
Step 15
Duplicate the original flag group again. I’m going to create another style of flag. This time I’m going to add points further up along the side of the flag.
I’ve then used the arrow keys to nudge the points about 9 strokes away from the center for each side. You can now compare them to the previous flags. You can create a variety of different shapes, as long as you don’t modify the overall length of the shape – as this will knock the gradient out of sync.
Step 16
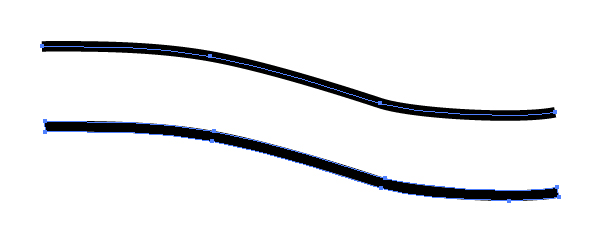
Now we have our three flags, we need to draw some tape to be attached to. With the Pen Tool (P) draw a slightly curved line with a 6pt Stroke Weight. Then Object > Expand it.
Step 17
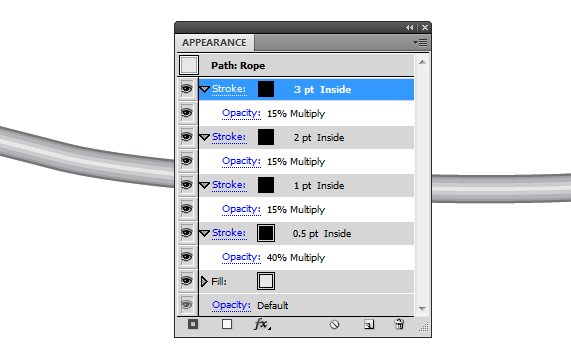
I’m going to use an off white fill and several black Align Stroke Inside strokes to create a quick inner glow effect with the settings below. You can check out more to do with this process by checking out my 100% Vector Drop Shadow tutorial.
Step 18
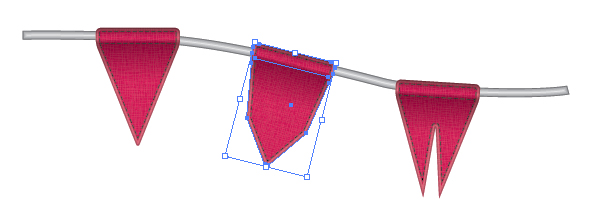
Then using the Free Transform Tool (E) move the flags into place and rotate them slightly so the top of the stitched flag is in line with the tape.
Step 19
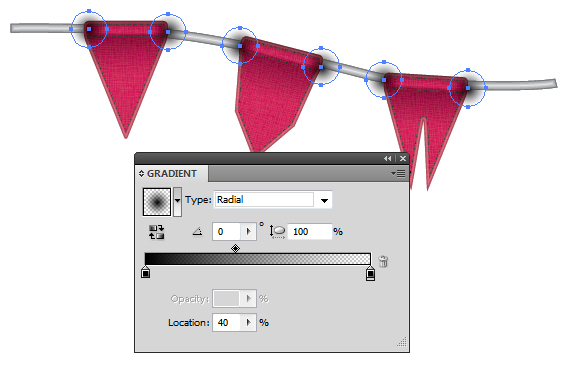
Using the transparent linear gradient, change the type from the drop down menu to Radial. Then drawn circles with the Ellipse Tool (L) either side of the flags on the tape. Hold down Shift + Alt to create perfect circles. Once done, Group all the circles together (Command + G).
Step 20
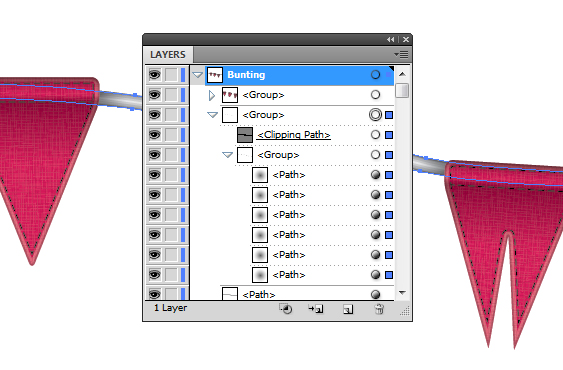
Duplicate the original tape shape and place it above the group with the gradient circles. Then select both the tape shape and group and create a Clipping Mask (Command + 7).
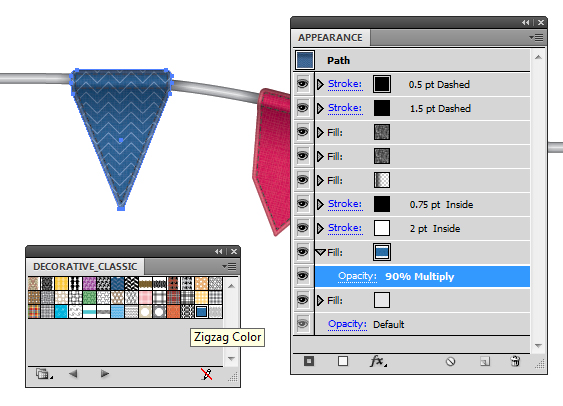
Step 21
I’m going to modify a flag to show you how to change the color and to even add a pattern. If you want to add a color, simply change the color of the pink/purple fill or whatever color you’ve originally selected.
For a pattern, I’d advise first changing the fill to an off white shade…
Then Add New Fill and select the pattern you wish to use. I’m using a Zigzag Color fill which can be found in Open Swatch Library > Patterns > Decorative > Decorative_Classic. Then set it to Blending Mode Multiply, Opacity 90%. This is so the pattern is slightly dulled and allows the contrast of the shading gradient to show through to give it depth.
Conclusion
I hope you’ve enjoyed today’s beginners tutorial and have learnt some great new tricks with the Appearance panel. Once you learn the basics of the Appearance panel you can create so much with only one shape!