This tutorial show you how to create a modern looking resume with Adobe InDesign. You will learn how to create paragraph styles, how to set a baseline grid and how to import and place images. Let’s begin!
Step 1
Looking out for a new job? Impress your future employee with a serious looking job application. With this tutorial you learn how to create a resume with InDesign. Before we begin please install the great free font Miso Regular & Bold by Mårten Nettelbladt.
Step 2
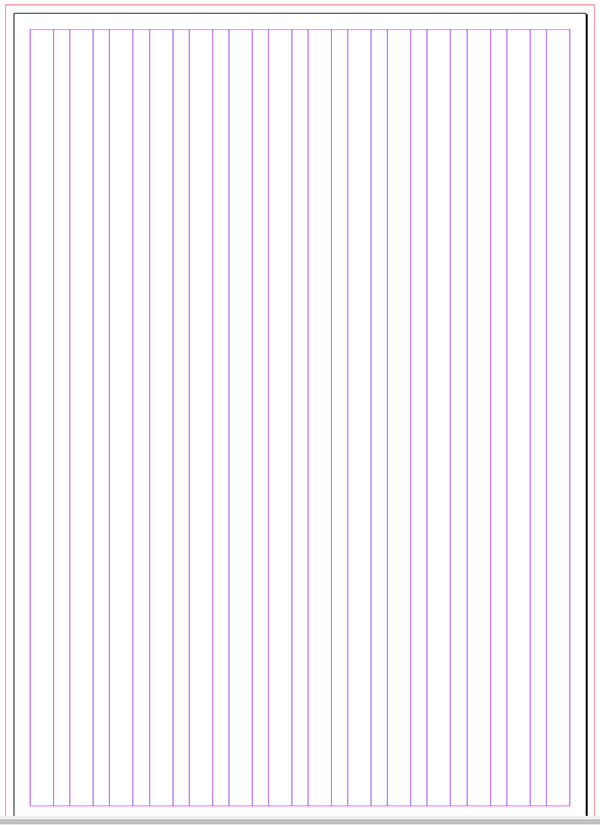
Start InDesign and create a new document from the Menu: File > New > Document. Use the settings from the Picture below.

Your new Document should now look like this:
Step 3
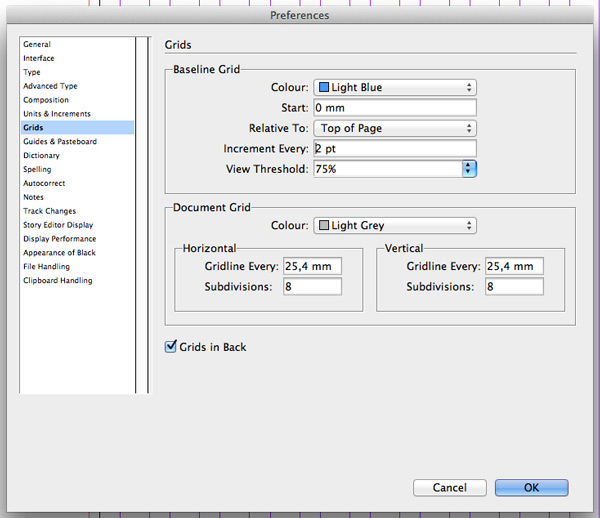
Now we are setting up the Baseline Grid, this is important to align the text to the same horizontal line.
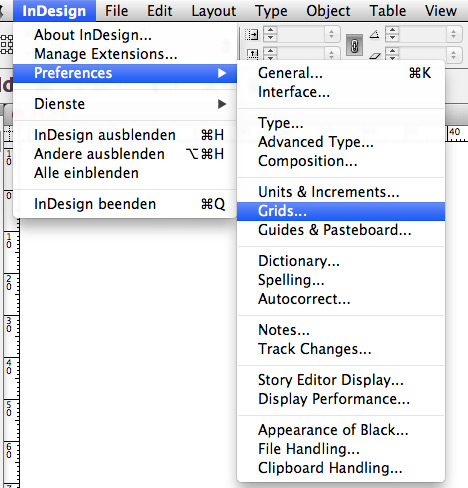
Use the settings in the example image below.
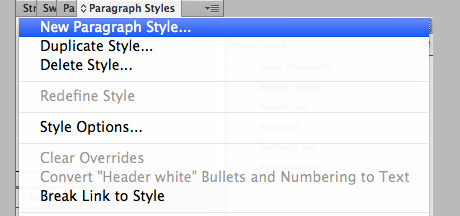
Step 4
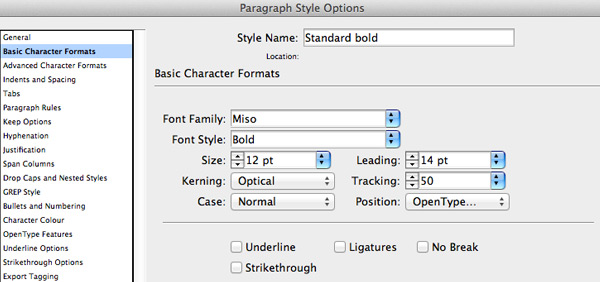
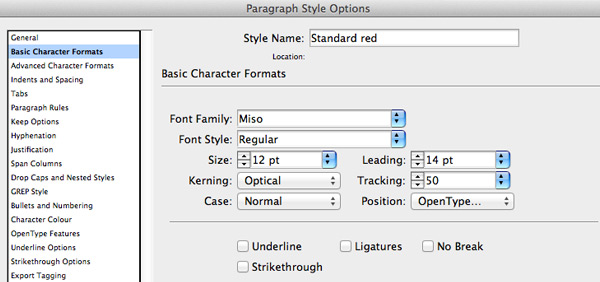
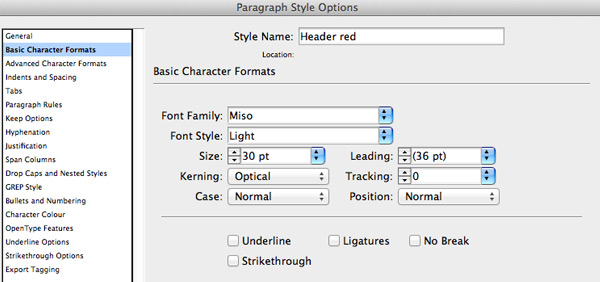
Paragraph Styles are a great way to save time. Before we begin we need to create 5 different styles. Choose "New Paragraph Style" from the Paragraph Styles Panel.
Choose now "Basic Character Formats" and edit the parameters like in the Picture below.
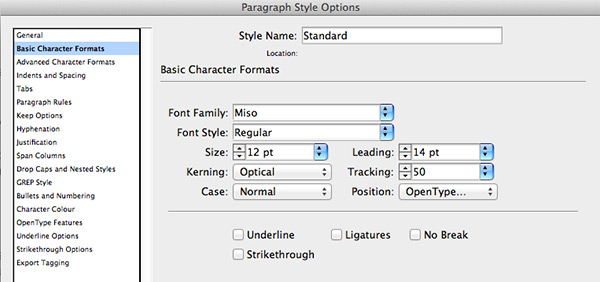
Repeat the step above for the other 4 Paragraph Styles.

Step 5
Create a Rectangle, choose the color "Black" and disable the Stroke. The Size should be 198mm wide and 26mm high. Place the Rectangle at this coordinate x: 6mm and y: 254mm, be sure your reference point is selected to the upper left corner.

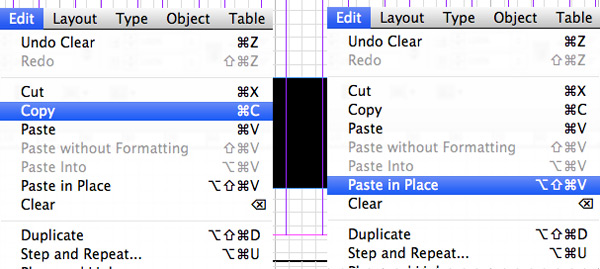
Step 6
Select the rectangle and use the "Edit > Copy" command from the main menu. Scroll to page 2 and use the "Edit > Paste in Place" command. Repeat this step for any page.
Step 7
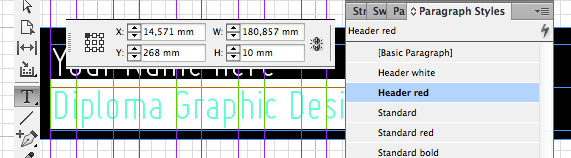
Scroll back to Page 1. Use the Type Tool (T) and write your name. Select the text with the Type Tool and press "Header White" from the Paragraph Styles Panel. Select the text frame and resize it to 181mm wide and 10mm high. Place the text frame at x: 14,571mm and y: 258mm.
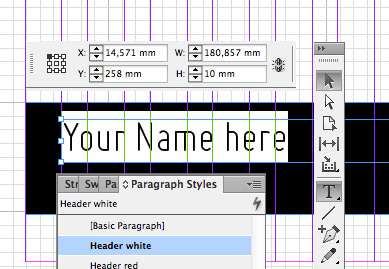
Use the Type Tool (T) again and write now your occupation/job. Select the text with the Type Tool and press "Header Red" from the Paragraph Styles Panel. Select the text frame and resize it to the same size like the one before, 181mm wide and 10mm high. Place the text frame at x: 14,571mm and y: 268mm.
Step 8
Select both text frames (hold shift when selecting) and use the "Edit > Copy" command from the main menu. Scroll to page 2 and use the "Edit > Paste in Place" command. Repeat this step for all pages left.
Step 9
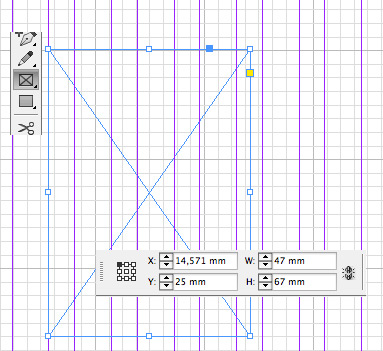
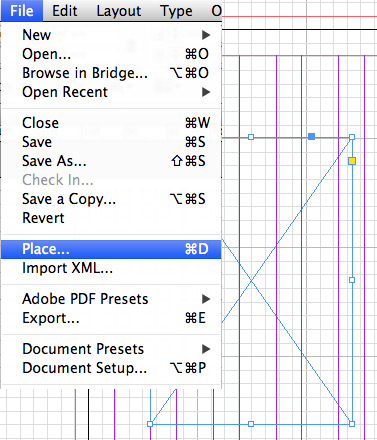
We will now place a rectangle for the profile picture. Select the Rectangle Frame Tool (F) and make it 47mm wide and 67mm high in size. Place it on the coordinates x: 14,571mm and y: 25mm.
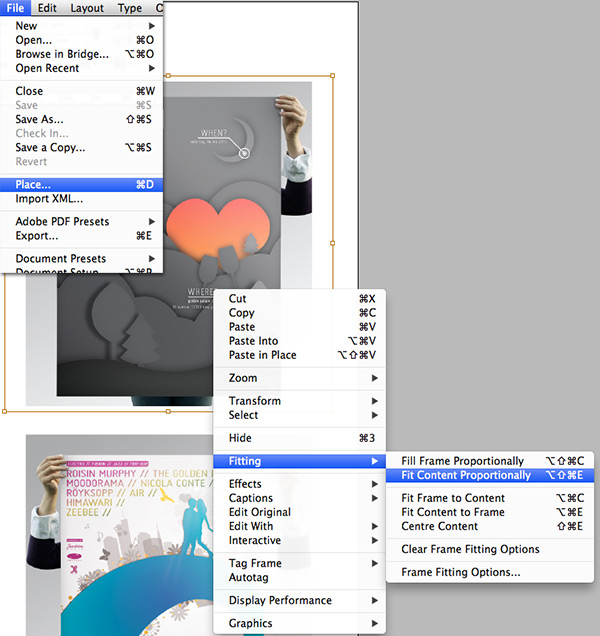
Select the rectangle frame and use the "Edit > Place" command, choose your profile picture.
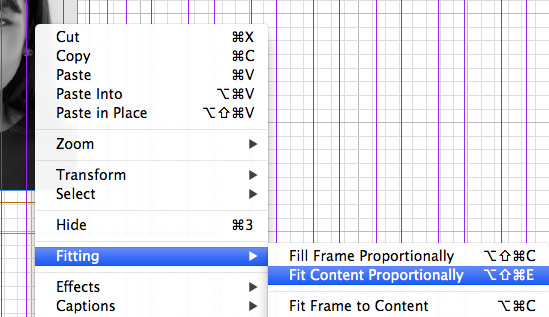
Be sure the frame is still selected, move the mouse cursor over the frame and press the right mouse button. Select Fitting > Fit Content Proportionally. Double click the frame, now you should be able to fit the picture when dragging corners. Hold shift and alt together to maintain the proportions. When you are satisfied, just deselect the profile picture.
Step 10
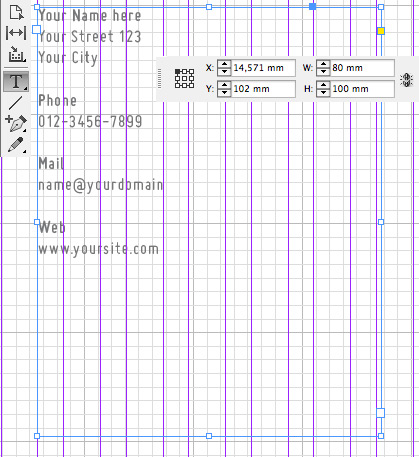
Use the Text Tool (T) and create a text box with the size 80mm wide and 100mm high. Place it at following coordinates x: 14,571mm and y: 102mm. Write the data down like at the image below. Select the complete text and select the Standard Paragraph Style. To give the information a structure we are going to apply some of them a bold style. In this case select your name and press the Standard Bold Paragraph. Do this again for the Phone, Mail and Web text. Congratulations, the first Page is finished!
Step 11
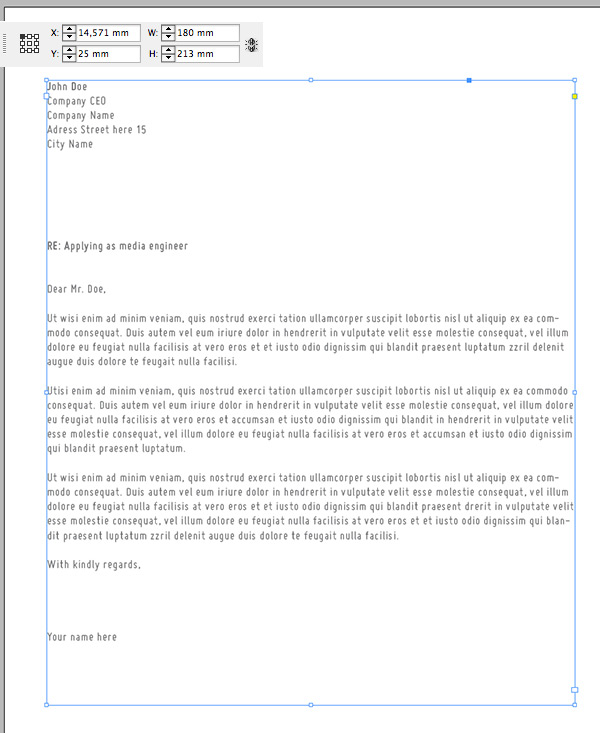
Scroll to the next Page and use the Text Tool (T), create a text box with the size 180mm wide and 213mm high. Write down your Application, take a look at the image to form an idea on how to structure it. Most of the text should be written in Standard Paragraph, except the receiver’s name and the subject. This two should be in Standard bold.
Step 12
Before we are going to the third page change the second header at the bottom to "Application".

Step 13
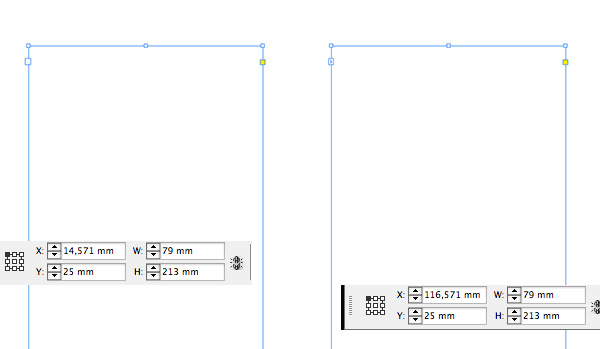
Go to the third page. Select the Text Tool (T) to create a text box with the size 79mm wide and 213mm high. Place it at following coordinates x: 14,571mm and y: 25mm. Select the text box. Use the "Edit > Copy" command and than the "Edit > Paste" command. Place the second text frame at this coordinates x: 116,571mm and y: 25mm.
Step 14
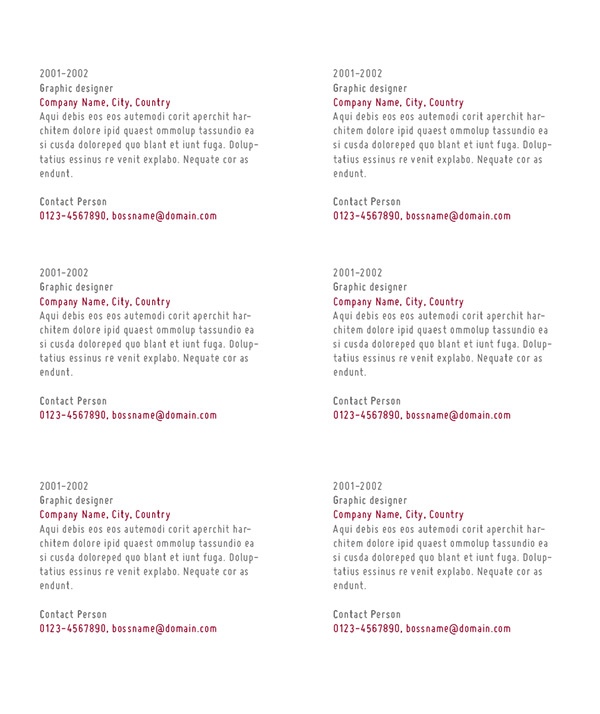
With the two text frames you can write down your Work Experience. Structure it like the image below.
Change the second header at the bottom to "Work Experience / References".

Step 15
Select both text frames (hold shift when selecting) and use the "Edit > Copy" command from the main menu. Scroll to page 4 and use the "Edit > Paste in Place" command.
Step 16
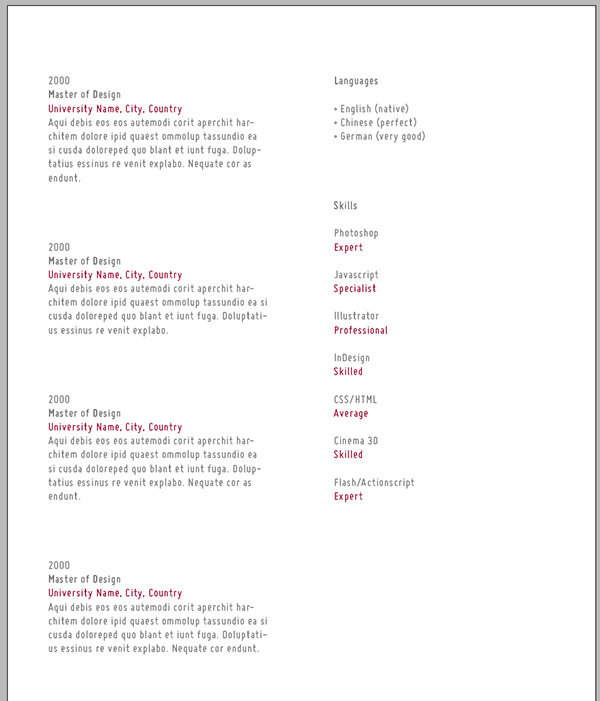
These two text frames are for your education and skill text. The Picture below gives you an idea of how to structure your information.
Change the second header at the bottom to "Education / Languages / Skills". The text depends of course on the information you are providing.

Step 17
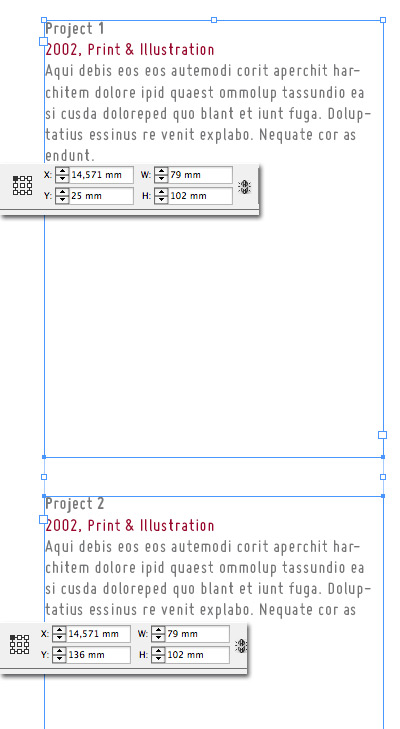
Scroll to page 5. The final page is mostly interesting for designers or coders that like to present there best work. Select the Text Tool (t) to create a text box with the size 79mm wide and 102mm high. Place it at following coordinates x: 14,571mm and y: 25mm. Select the text box. Use the "Edit > Copy" command and than the "Edit > Paste" command. Place the second text frame at this coordinates x: 14,571mm and y: 136mm.
Step 18
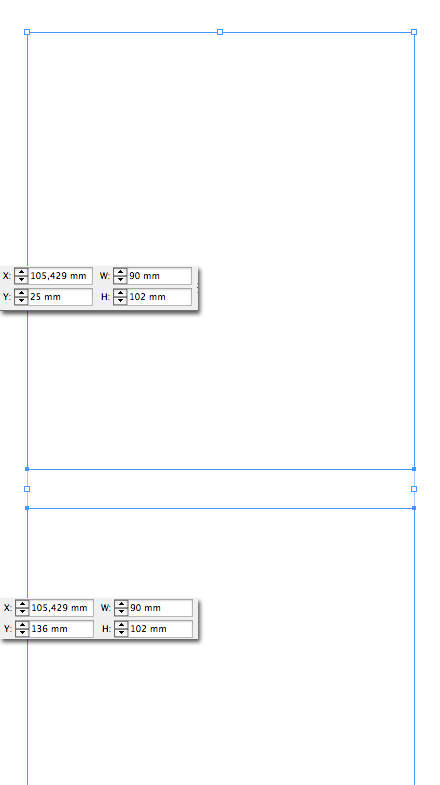
To show of your work we need pictures. Select the Rectangle Frame Tool (F) and make it 90mm wide and 102mm high in size. Place it on the coordinates x: 105,429mm and y: 25mm. Select the picture frame. Use the "Edit > Copy" command and then the "Edit > Paste" command. Place the second frame at this coordinates x: 105,429mm and y: 136mm.
To place the pictures select the frame and use the "Edit > Place" command, choose your picture. Be sure the frame is still selected, move the mouse cursor over the frame and press the right mouse button. Select Fitting > Fit Content Proportionally. Double click the frame, now you should be able to fit the picture when dragging corners. Hold shift and alt together to maintain the proportions. When you are satisfied repeat this step with the second image.
Conclusion
This is how your five pages are looking at the end. Thank you and good luck with your resume!

Tutorial Assets
The following assets were used during the production of this tutorial.