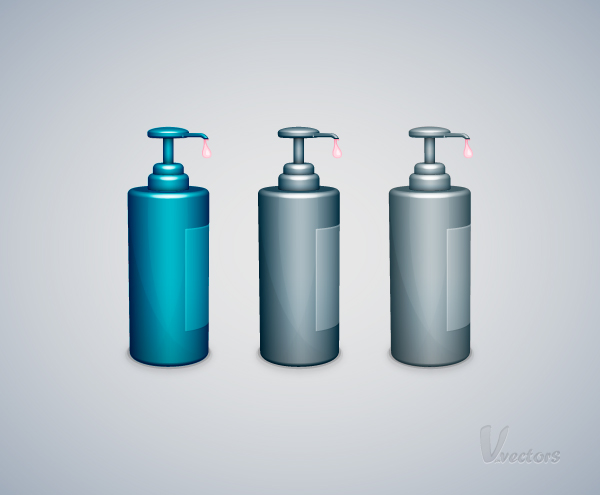
In the following tutorial you will learn how to create a liquid soap bottle illustration. We’ll start with a 3D base and add details and Blending Modes to create a refined stylized vector illustration.
Step 1
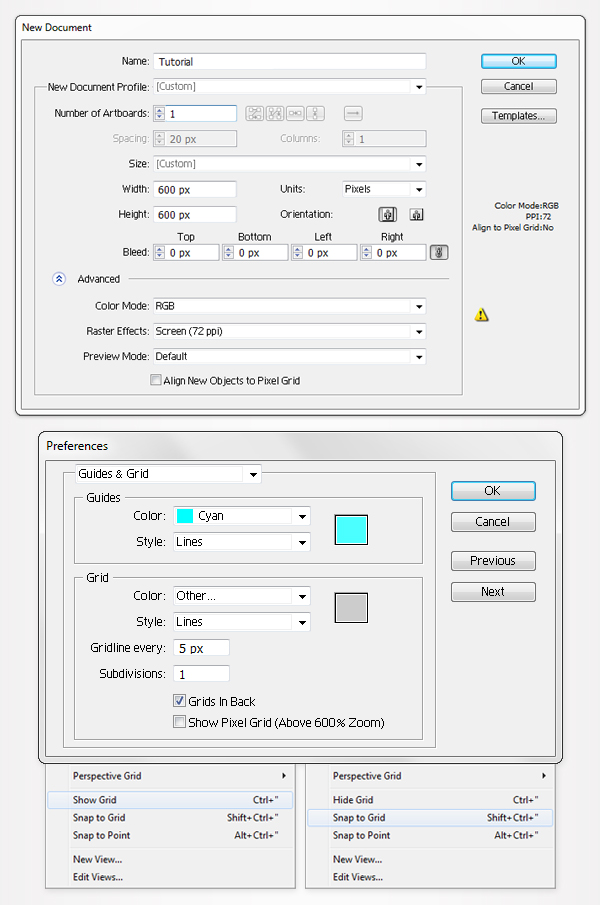
Create a New document by pressing Command + N. Enter 600px in the width box and height boxes then click on the Advanced button. Select RGB, Screen (72ppi) and make sure that the "Align New Objects to Pixel Grid" box is unchecked before your click OK.
Enable the Grid (View > Show Grid) and the Snap to Grid (View > Snap to Grid). Next, you’ll need a grid every 5px. Go to Edit > Preferences > Guides > Grid, enter 5 in the Gridline every box and 1 in the Subdivisions box. You can also open the Info panel (Window > Info) for a live preview with the size and position of your shapes.
Do not forget to replace the unit of measurement to pixels from Edit > Preferences > Unit > General. All these options will significantly increase your work speed.
Step 2
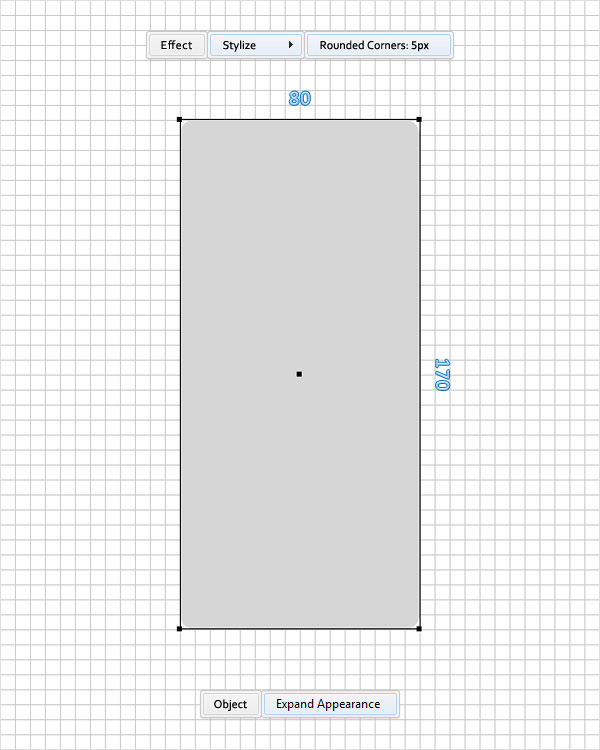
Using the Rectangle Tool (M), create an 80 by 170px shape, fill it with a random grey and go to Effect > Stylize > Rounded Corners. Enter a 5px radius, click OK and go to Object > Expand Appearance.
Step 3
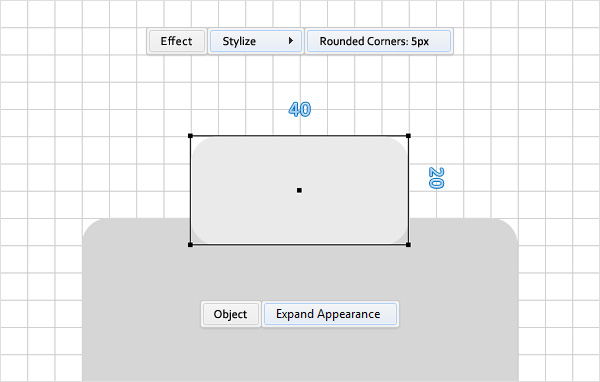
Focus on the top side of the shape made in the previous step. With the Rectangle Tool (M), create a 40 by 20px shape, fill it with a random grey, place it as shown in the following image and go to Effect > Stylize > Rounded Corners. Enter a 5px radius, click OK and go to Object > Expand Appearance.
Step 4
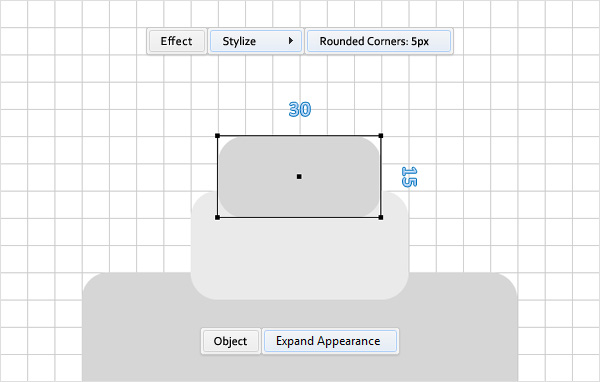
Using the Rectangle Tool (M), create a 30 by 15px shape, fill it with a random grey, place it as shown in the following image and go to Effect > Stylize > Rounded Corners. Enter a 5px radius, click OK and go to Object > Expand Appearance.
Step 5
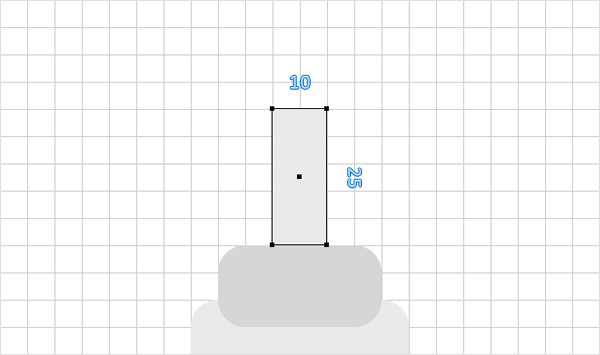
With the Rectangle Tool (M), create a 10 by 25px shape, fill it with a random grey and place it as shown in the following image.
Step 6
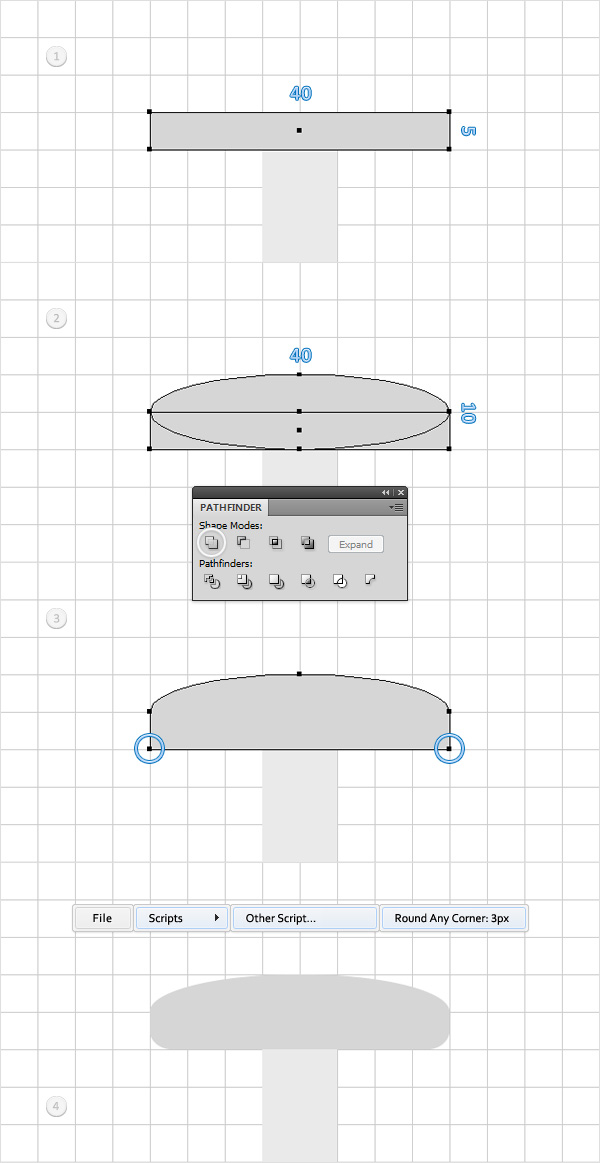
With the Rectangle Tool (M), create a 40 by 5px shape, fill it with a random grey and place it as shown in the following image.
Switch to the Ellipse Tool (L), create a 40 by 10px shape, and place it as shown in the second image. Select it along with the rectangle made in the beginning of the step and click on the Unite button from the Pathfinder panel.
Next, you need the Round Any Corner script. You can find it in the Vectortuts+ article 20 Free and Useful Adobe Illustrator Scripts. Save it to your hard drive, return to Illustrator and grab the Direct Selection Tool (A). Select the two anchor points highlighted in the third image and simply go to File > Scripts > Other Script. Open the Round Any Corner Script, enter a 3px Radius and click OK. In the end your shapes should look like in the fourth image.
Step 7
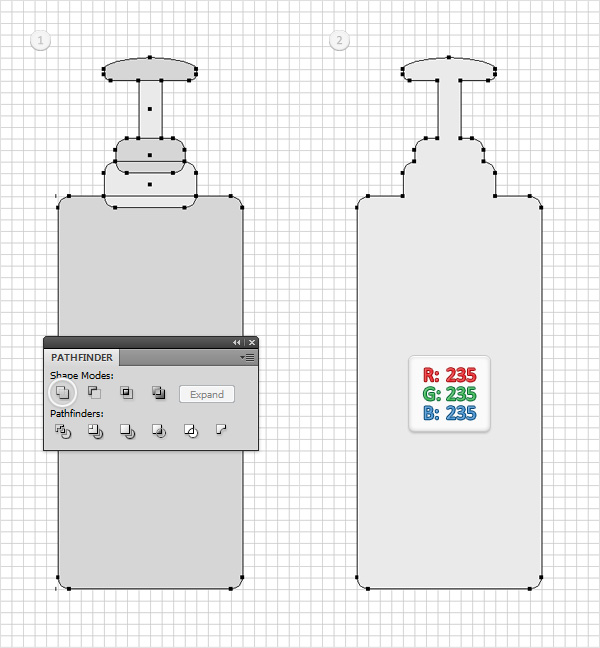
Reselect all the shapes created so far and click on the Unite button from the Pathfinder panel. Fill the resulting shape with R=235 G=235 B=235.
Step 8
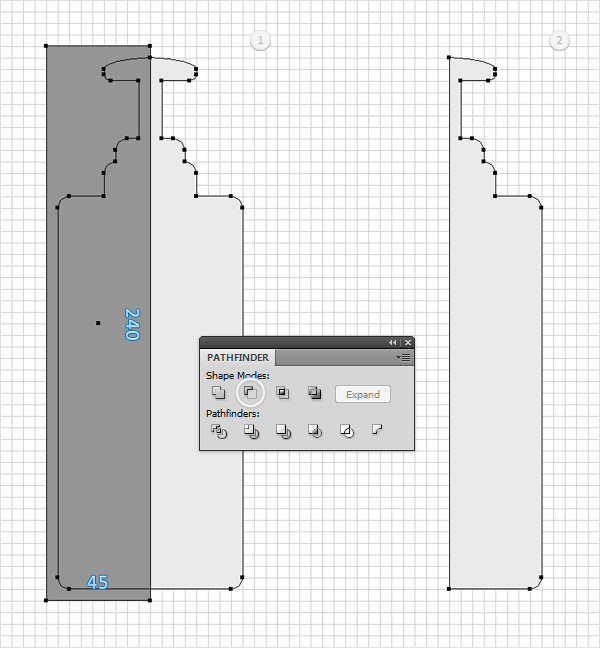
Using the Rectangle Tool (M), create a 45 by 240px shape and place it as shown in the first image. Make sure that it covers the left half of the shape built in the previous step. Select both shapes and click on the Minus Front button from the Pathfinder panel. Move to the Layers panel, double click on this new shape and name it "3D".
Step 9
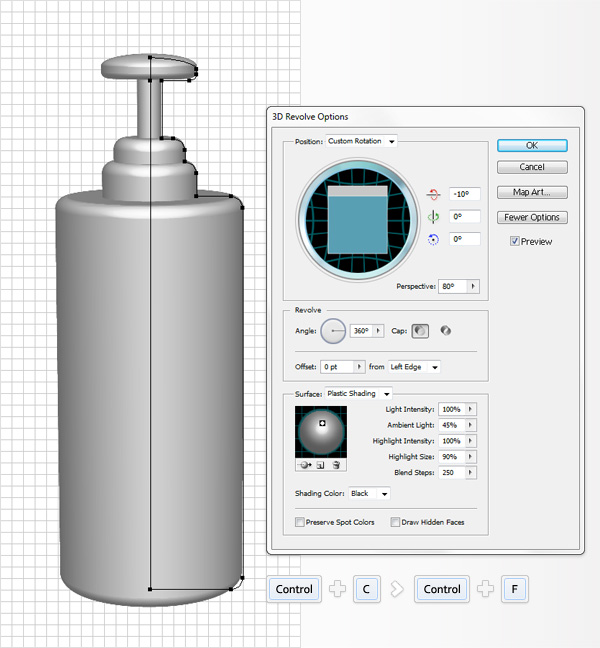
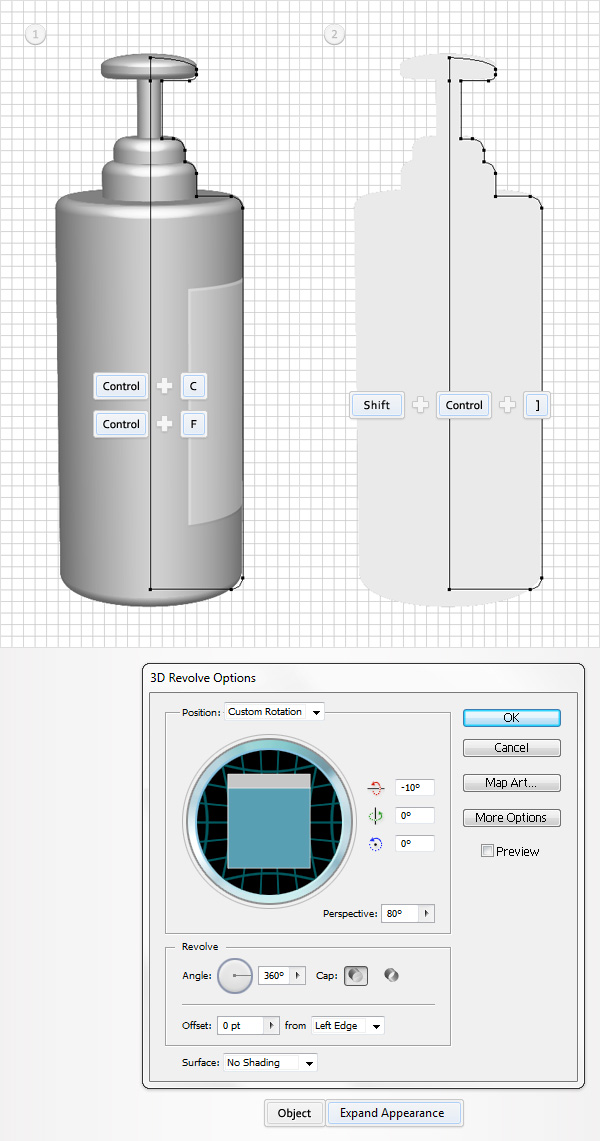
Reselect "3D" and go to Effect > 3D > Revolve. Click on the More Options button, enter all the data shown below then click OK. Now, your shape should look like in the following image. Make sure that it is still selected and make a copy in front (Control + C > Control + F).
Step 10
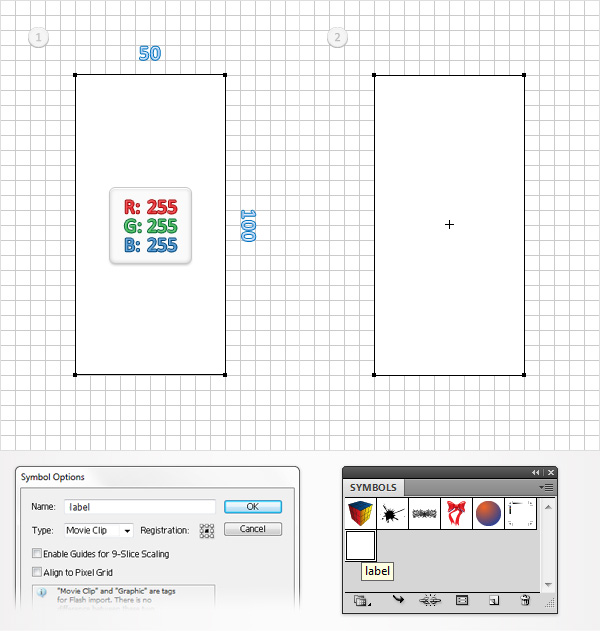
Open the Symbols panel, we need to create a simple symbol. Using the Rectangle Tool (M), make a 50 by 100px shape and fill it with white. Select it and click on the New Symbol button from the bottom of the Symbols panel. Enter "label" in the Name box and click OK. Have a new look inside the Symbols panel and you should find your new symbol.
Step 11
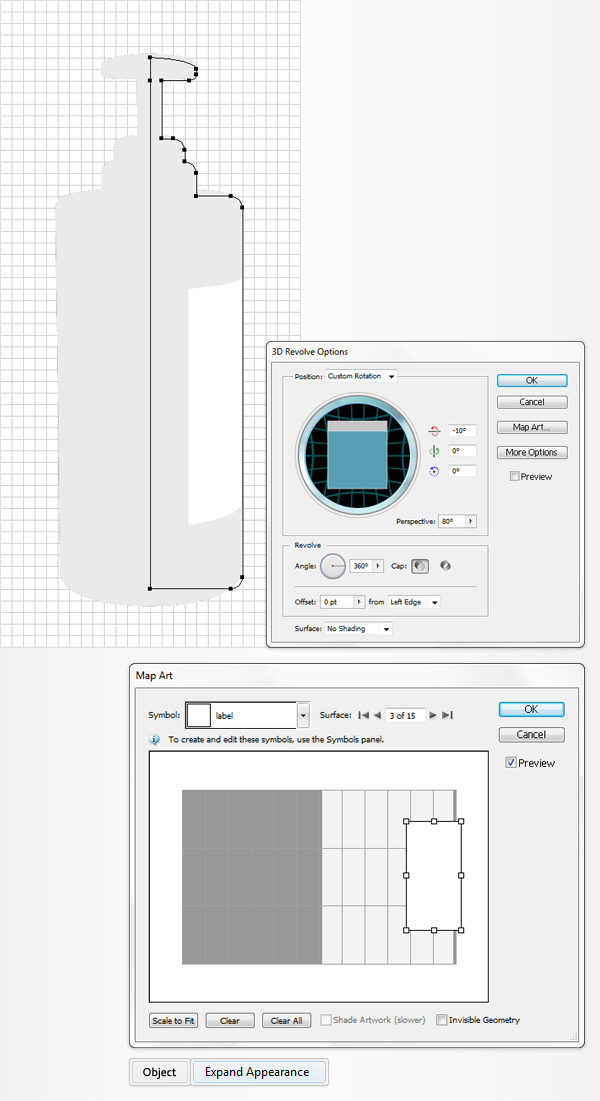
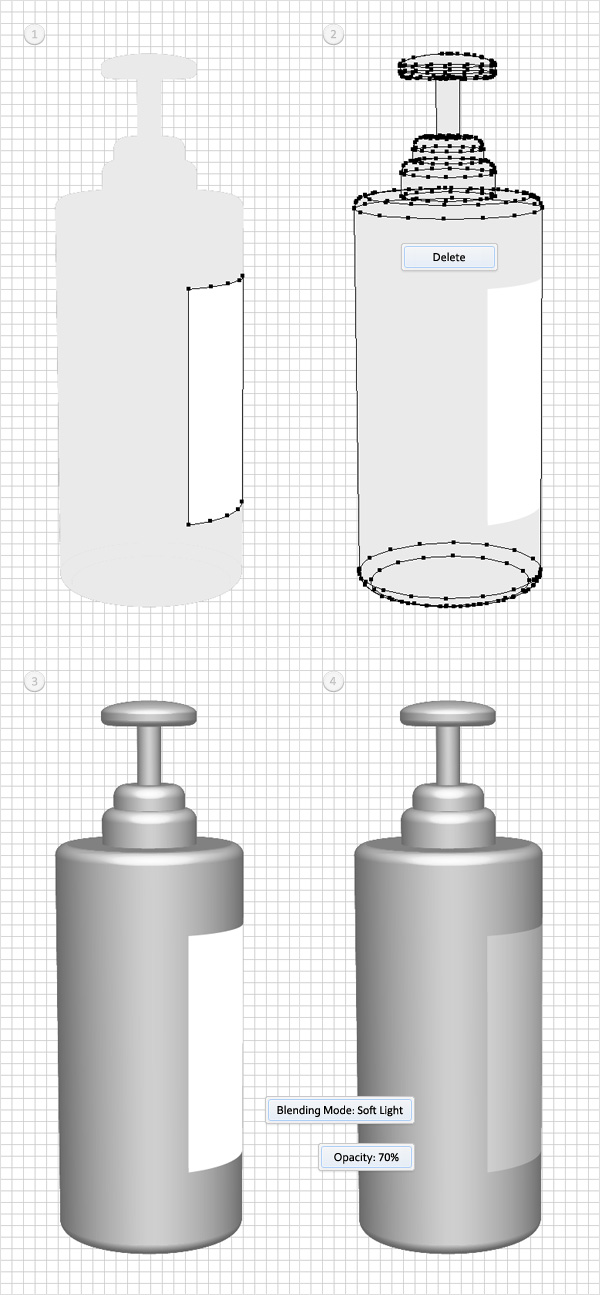
Reselect the copy made in the finale of the ninth step, focus on the Appearance panel and open the existing Revolve effect. Set the "Surface" at "No Shading" and click on Map Art. Go to"Surface 3" and select your "label" symbol from the Symbol drop down menu. Place it as shown in following image, click OK then go to Object > Expand Appearance.
Step 12
Move to the Layers panel and focus on the group resulted from the previous step. Open it, select only the white shape and drag it outside the group. Reselect the entire group and simply delete it. Return to that white shape, lower its Opacity to 70% and change the Blending Mode to Soft Light.
Step 13
Disable the Snap to Grid (View > Snap to Grid) then go to Edit > Preferences > General and make sure that the Keyboard Increment is set at 1px.
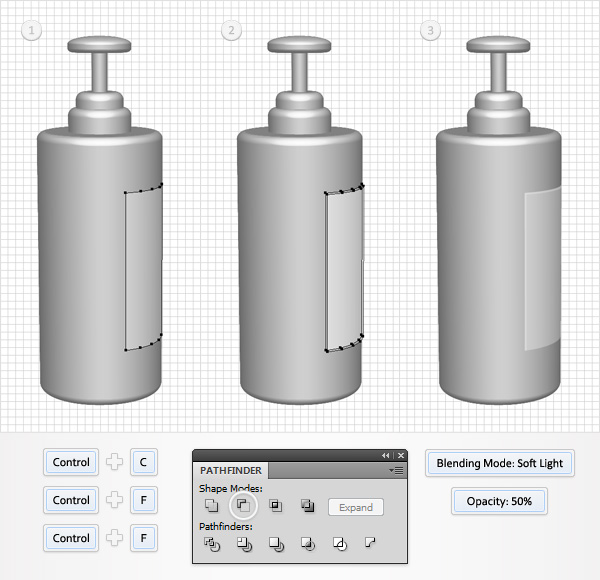
Reselect the white shape from the previous step and make two copies in front (Control + C > Control + F > Control + F). Select the top copy and move it 1px down and to the right using the arrow keys from your keyboard. Reselect both copies and click on the Minus Front button from the Pathfinder panel. Select the resulting shape and set its Blending Mode to Normal.
Step 14
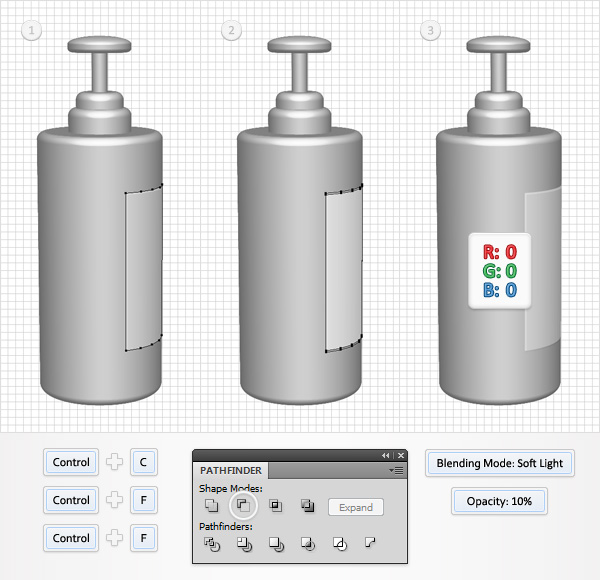
Reselect the white shape created in the twelfth step and make two copies in front (Control + C > Control + F > Control + F). Select the bottom copy and move it 1px down using the down arrow from your keyboard. Reselect both copies and click on the Minus Front button from the Pathfinder panel. Fill the resulting shape with black and lower its Opacity to 10%.
Step 15
Reselect "3D" make a copy in front (Control + C > Control + F) and bring it to front (Shift + Control + [ ). Select this copy, focus on the Appearance panel and open the existing Revolve effect. Set the "Surface" at "No Shading", click OK and go to Object > Expand Appearance.
Step 16
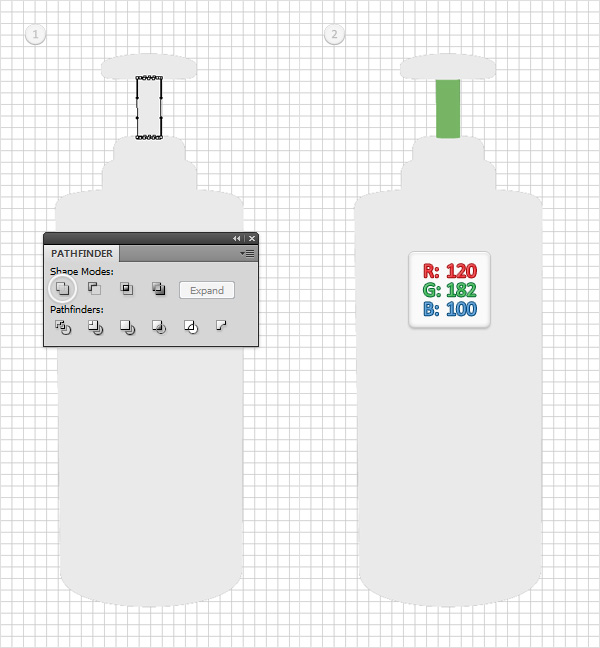
Move to the Layers panel, focus on the group resulted from the previous step and lock the rest of the shapes. Grab the Selection Tool (V), select the shapes highlighted in the first image and click on the Unite button from the Pathfinder panel. Fill the resulting shape with R=120 G=182 B=100.
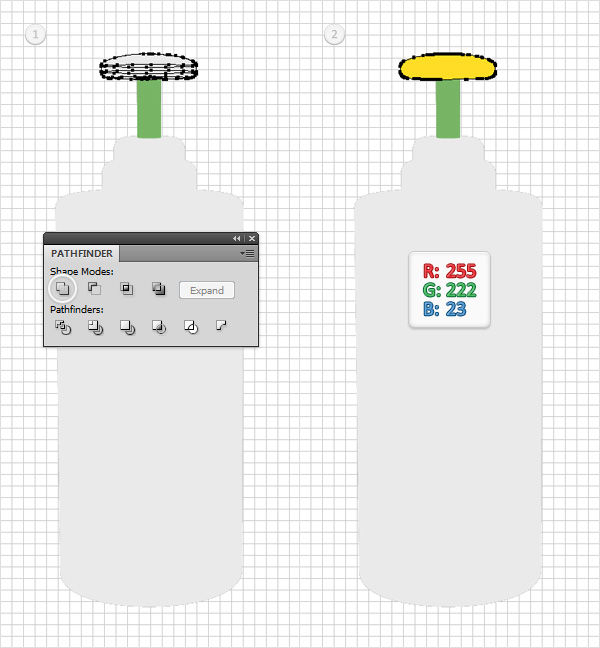
Select the shapes highlighted in the first image and click on the Unite button from the Pathfinder panel. Fill the resulting shape with R=255 G=222 B=23.
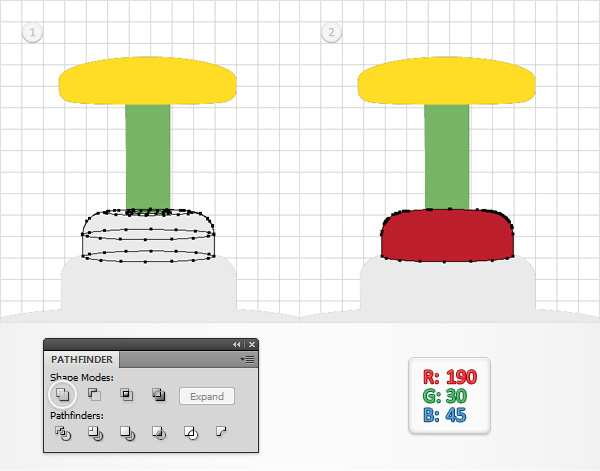
Select the shapes highlighted in the first image and click on the Unite button from the Pathfinder panel. Fill the resulting shape with R=190 G=30 B=45.
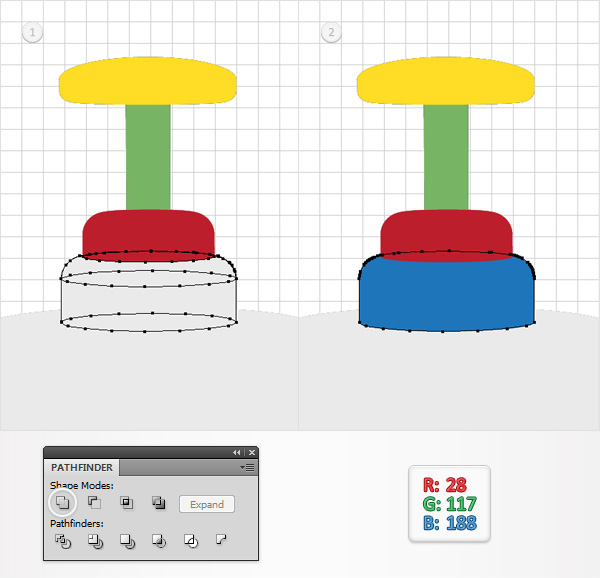
Select the shapes highlighted in the first image and click on the Unite button from the Pathfinder panel. Fill the resulting shape with R=28 G=117 B=188.
Select the shapes highlighted in the first image and click on the Unite button from the Pathfinder panel. Fill the resulting shape with R=255 G=165 B=189.
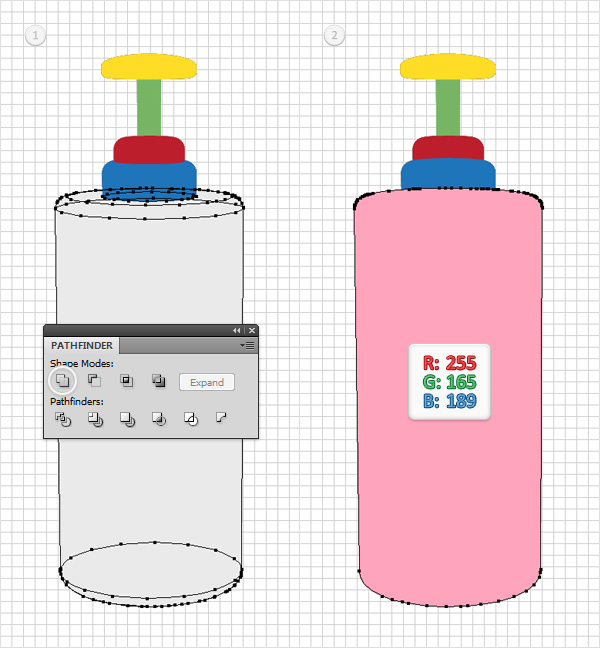
Step 17
Next, you need to organize the shapes made in the previous step. Move to the Layers panel, make sure that the pink shape is at the bottom then continue with the blue, the red, the green and the yellow.
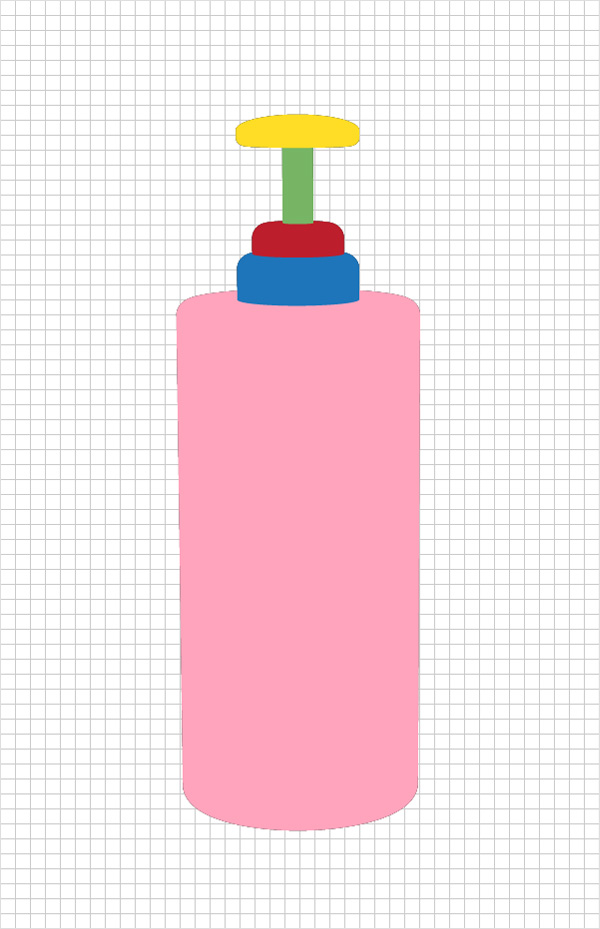
Step 18
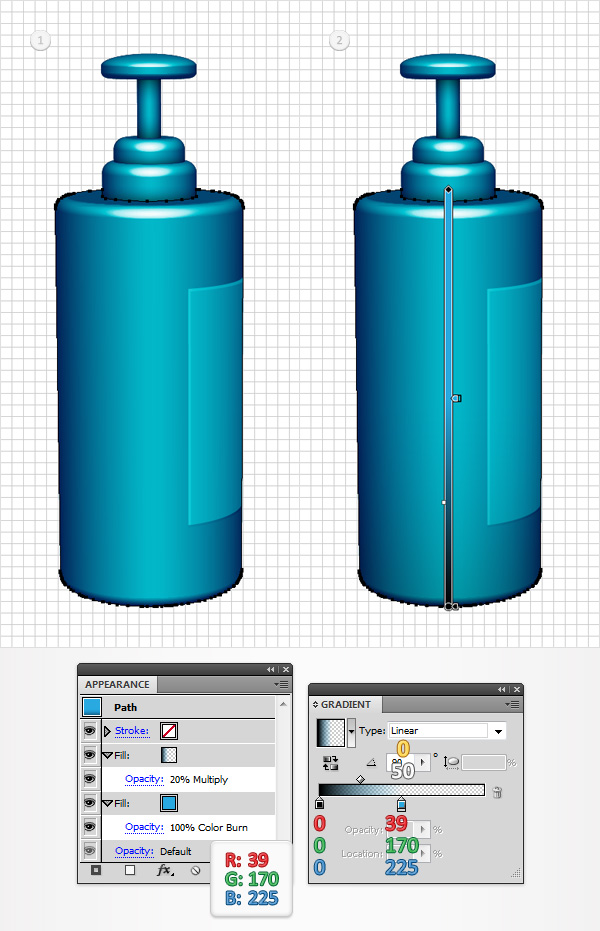
Reselect the yellow shape and focus on the Appearance panel. Select the fill, replace the yellow with R=39 G=170 B=225 and change the Blending Mode to Color Burn.
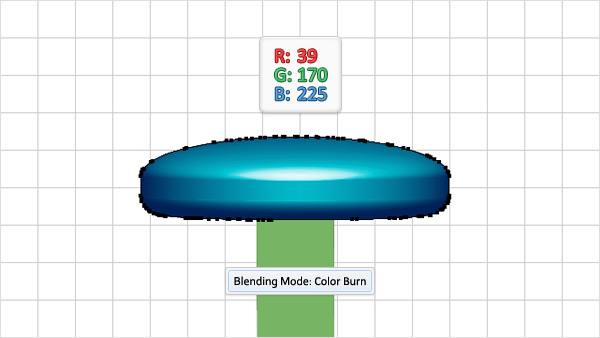
Step 19
Reselect the shape edited in the previous step and make a copy in front (Control + C > Control + F). Select it along with the green shape and click on the Minus Front button from the Pathfinder panel. Select the resulting shape and focus on the Appearance panel. Select the fill, replace the green with R=39 G=170 B=225 and change the Blending Mode to Color Burn.
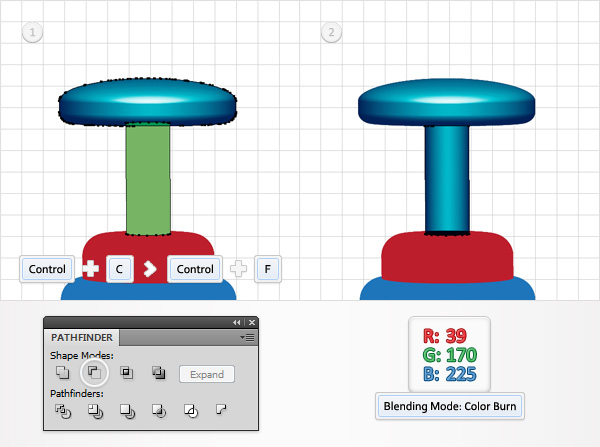
Step 20
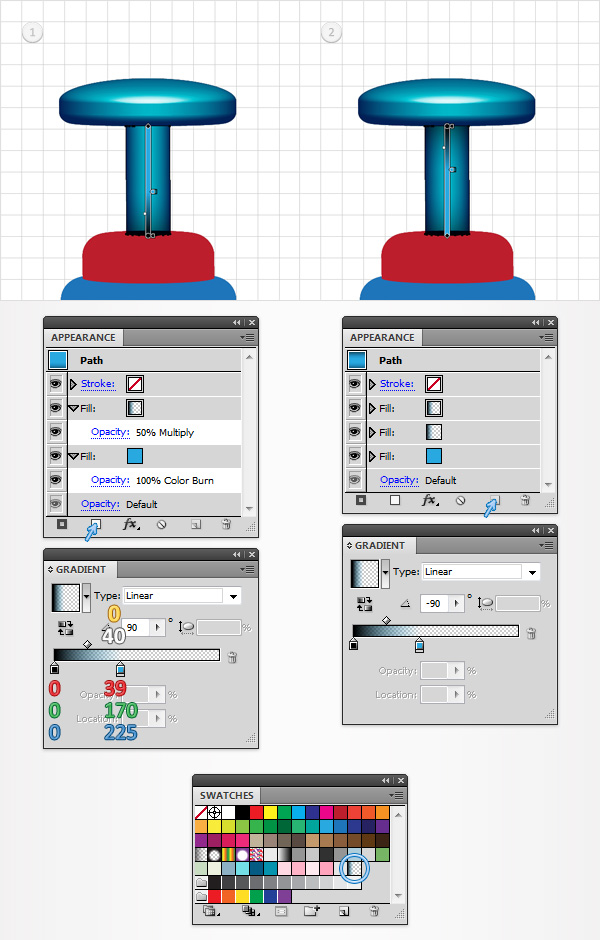
Reselect the shape edited in the previous step, focus on the Appearance panel and add a second fill using the Add New Fill button. Select it, lower its Opacity to 50%, change the Blending Mode to Multiply and add the linear gradient shown below the first image.
Keep focusing on the Appearance panel, make sure that the new fill is still selected and click on the Duplicate Selected Item button to add a third fill. Select it and inverse the angle used for the gradient. Move to the Swatches panel and save the gradient used in this step. You'll need it again.
Step 21
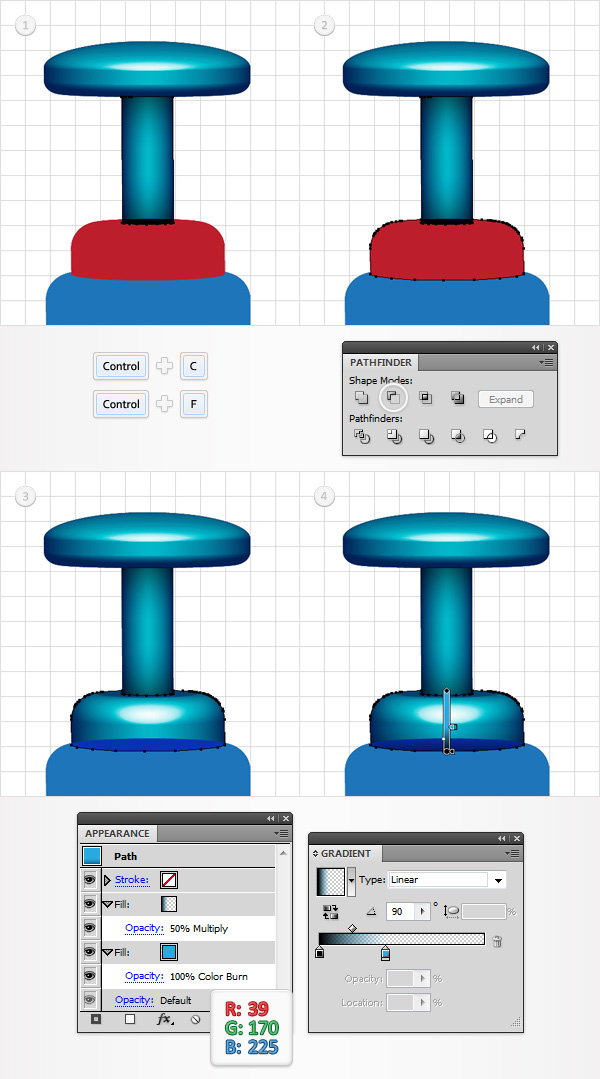
Reselect the shape edited in the previous step and make a copy in front (Control + C > Control + F). Select it along with the red shape and click on the Minus Front button from the Pathfinder panel. Select the resulting shape and focus on the Appearance panel. Select the fill, replace the red with R=39 G=170 B=225 and change the Blending Mode to Color Burn. Add a second fill for this shape and select it from the Appearance panel. Lower its Opacity to 50%, change the Blending Mode to Multiply and add the linear gradient saved in the previous step.
Step 22
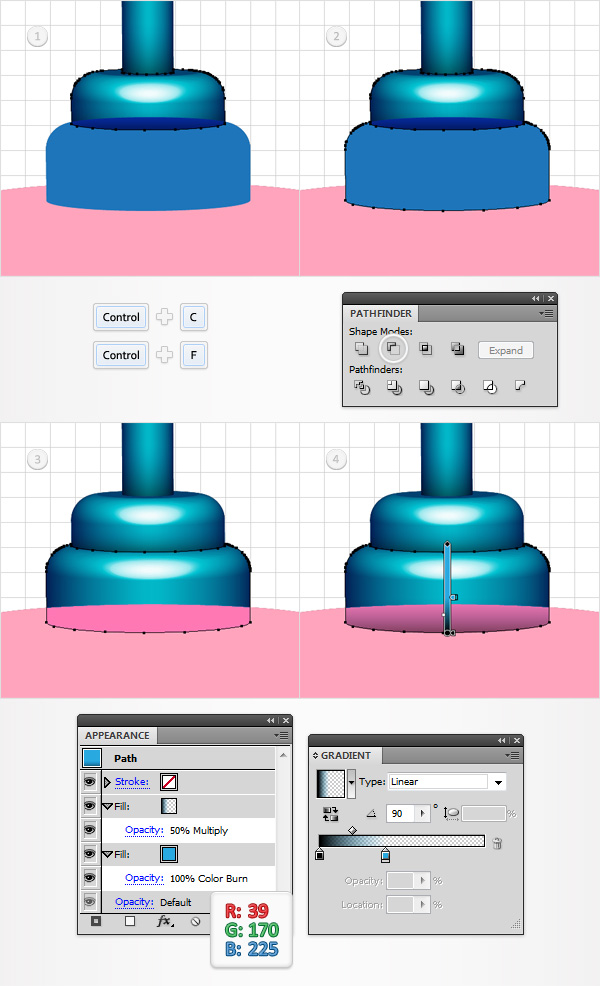
Reselect the shape edited in the previous step and make a copy in front (Control + C > Control + F). Select it along with the blue shape and click on the Minus Front button from the Pathfinder panel. Select the resulting shape and focus on the Appearance panel. Select the fill, replace the blue with R=39 G=170 B=225 and change the Blending Mode to Color Burn. Add a second fill for this shape, lower its Opacity to 50%, change the Blending Mode to Multiply and add the linear gradient saved in the twentieth step.
Step 23
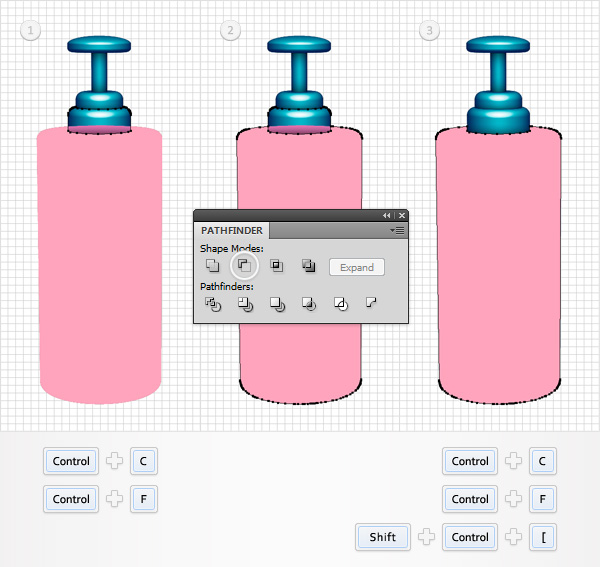
Reselect the shape edited in the previous step and make a copy in front (Control + C > Control + F). Select it along with the pick shape and click on the Minus Front button from the Pathfinder panel. Select the resulting shape, make a copy in front (Control + C > Control + F) and send it to back (Shift + Control + [ ). You'll need this copy later.
Step 24
Select the front, pink shape and focus on the Appearance panel. Select the fill, replace the pink with R=39 G=170 B=225 and change the Blending Mode to Color Burn. Add a second fill for this shape, lower its Opacity to 20%, change the Blending Mode to Multiply and add the linear gradient shown in the following image.
Step 25
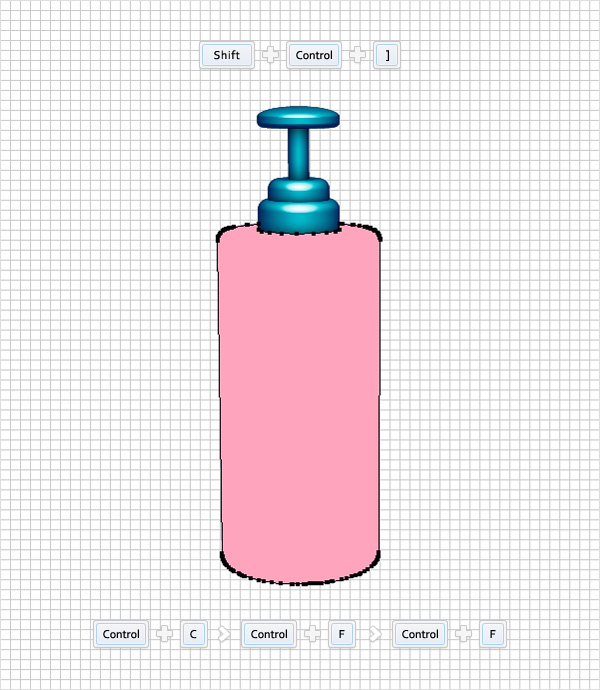
Reselect that pink shape from the bottom of the Layers panel, bring it to front (Shift + Control + ] ) and make two copies in front (Control + C > Control + F > Control + F).
Step 26
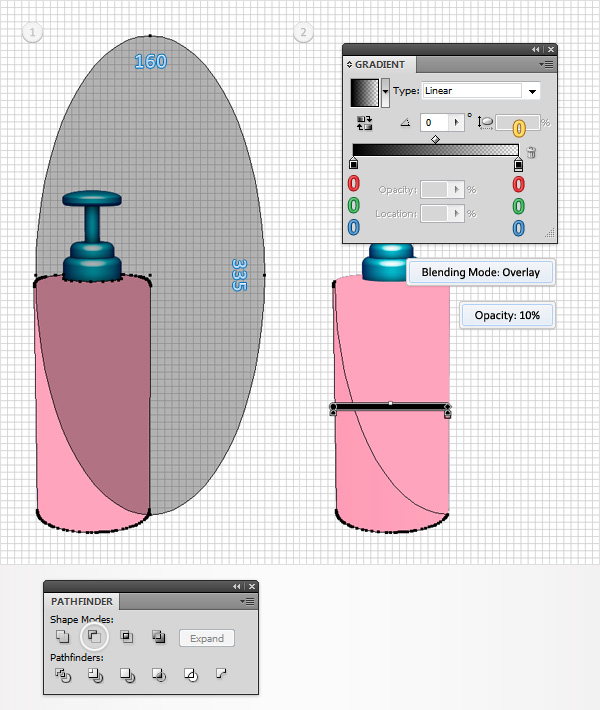
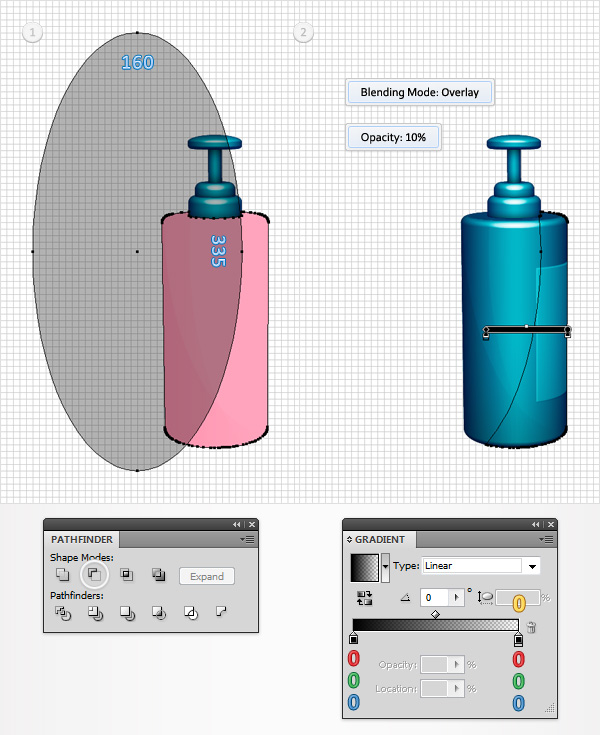
Enable the Snap to Grid (View > Snap to Grid). Grab the Ellipse Tool(L), create a 160 by 335px shape and place it as shown in the first image. Select it along with one of the pink shapes and click on the Minus Front button from the Pathfinder panel. Fill the resulting shape with the linear gradient shown in the following image, lower its Opacity to 10% and change the Blending Mode to Overlay.
Step 27
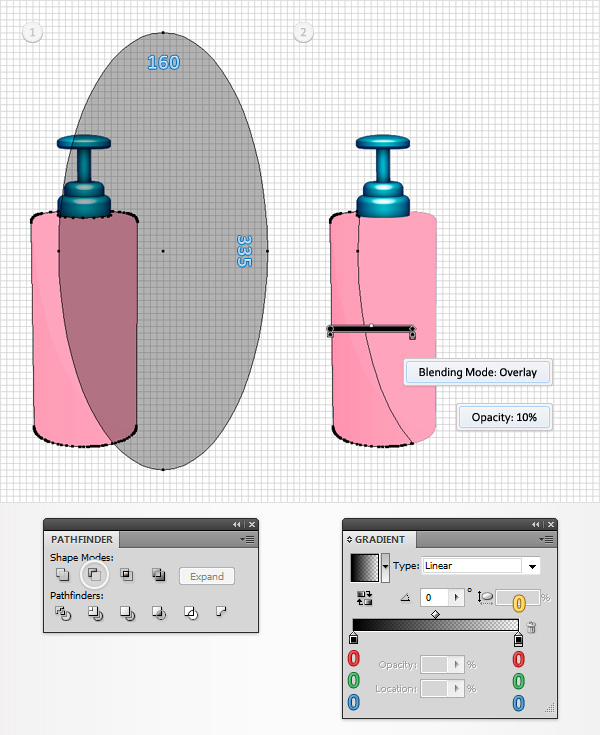
Using the Ellipse Tool (L), create a 160 by 335px shape and place it as shown in the first image. Select it along with one of the pink shapes and click on the Minus Front button from the Pathfinder panel. Fill the resulting shape with the linear gradient shown in the following image, lower its Opacity to 10% and change the Blending Mode to Overlay.
Step 28
Using the Ellipse Tool (L), create a 160 by 335px shape and place it as shown in the first image. Select it along with the remaining pink shape and click on the Minus Front button from the Pathfinder panel. Fill the resulting shape with the linear gradient shown in the following image, lower its Opacity to 10% and change the Blending Mode to Overlay.
Step 29
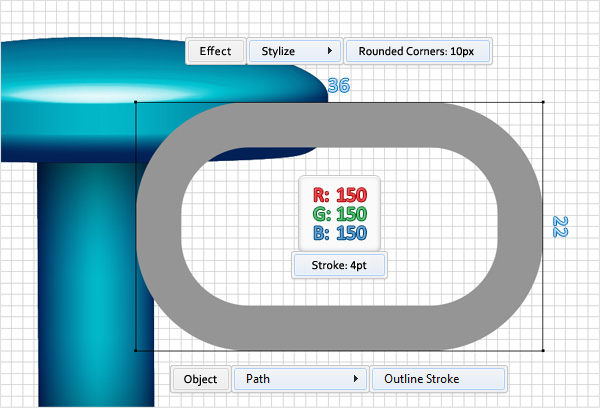
For the following steps you will need a grid every 1px. So, go to Edit > Preferences > Guides & Grid and enter 1 in the Gridline every box. With the Rectangle Tool (M), create a 36 by 22px shape and place it as shown in the following image. Fill it with none, but add a 4pt Stroke Weight, set its color at R=150 G=150 B=150 and align it to inside. Keep focusing on this shape and go to Effect > Stylize > Rounded Corners. Enter a 10px radius, click OK and got Object > Path > Outline Stroke.
Step 30
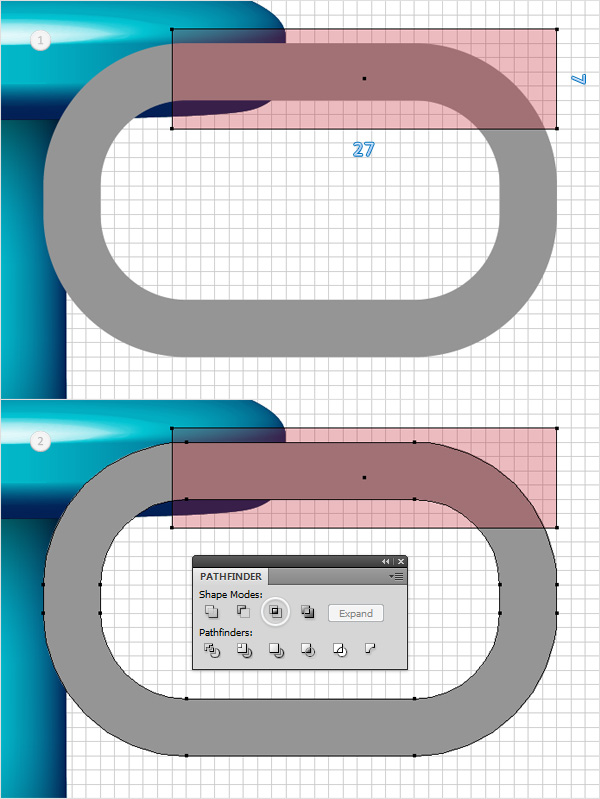
With the Rectangle Tool (M), create a 27 by 7px shape and place it as shown in the first image. Select it along with the shape made in the previous step and click on the Intersect button from the Pathfinder panel.
Step 31
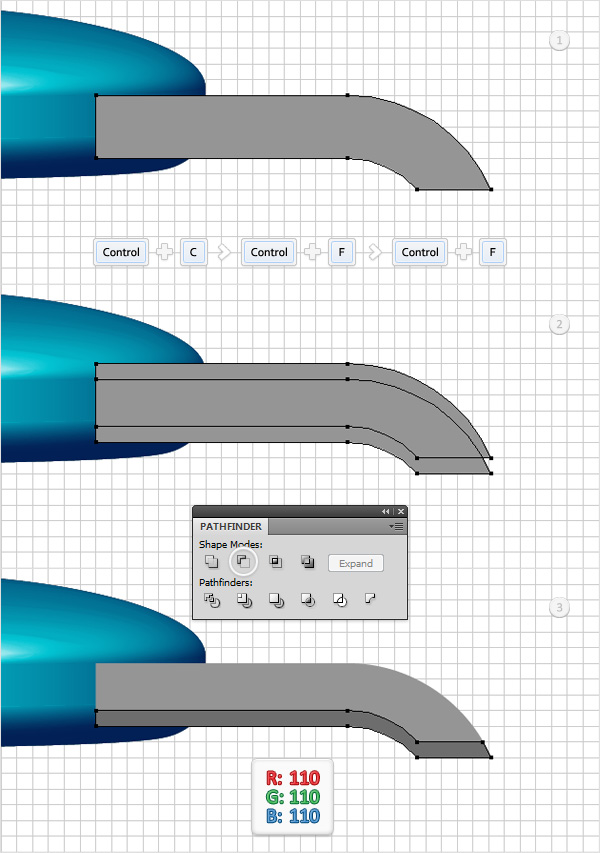
Disable the Snap to Grid (View > Snap to Grid). Reselect the shape made in the previous step and make two copies in front (Control + C > Control + F > Control + F). Select the top copy and move it 1px up and to the right. Reselect both copies and click on the Minus Front button from the Pathfinder panel. Fill the resulting shape with R=110 G=110 B=110.
Step 32
Reselect the shape made in the thirtieth step and make a copy in front (Control + C > Control + F). Select it, move it 1px to the left then duplicate it (Control + C > Control + F). Select this new copy and move it 1px down and to the left. Reselect both shapes created in this step and click on the Minus Front button from the Pathfinder panel. Fill the resulting shape with the linear gradient shown in the final image.
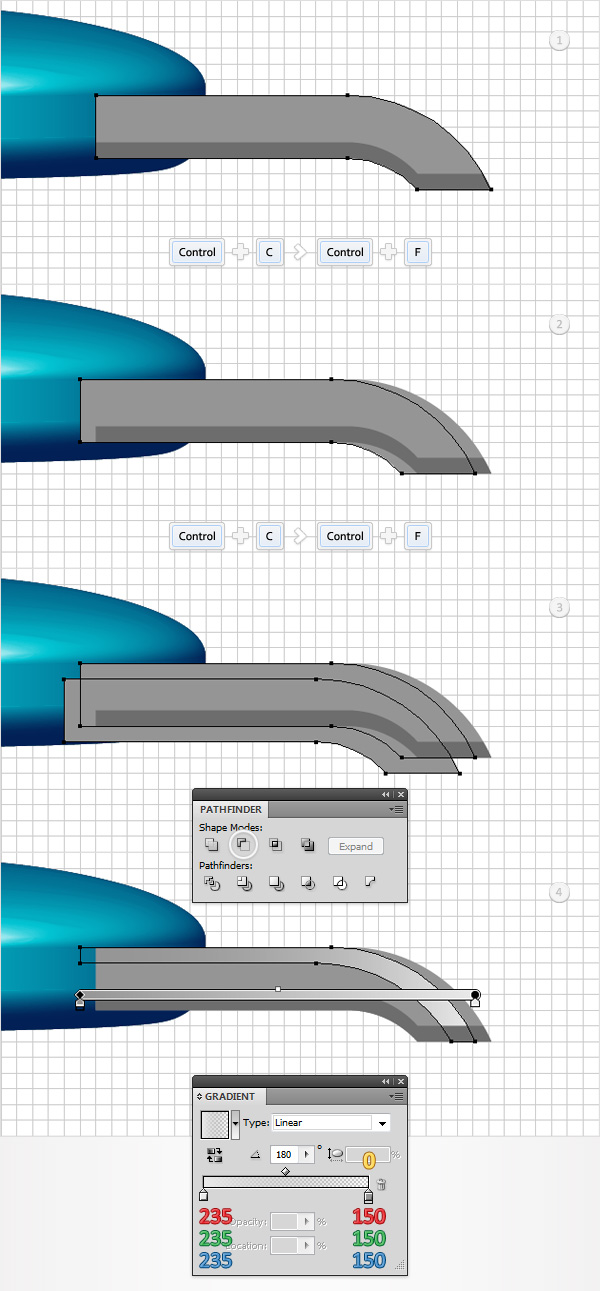
Step 33
Reselect the shape made in the thirtieth step, make a copy in front (Control + C > Control + F) and bring it to front (Shift + Control + [ ). Select it, fill it with R=39 G=170 B=225 and change the Blending Mode to Color Burn.
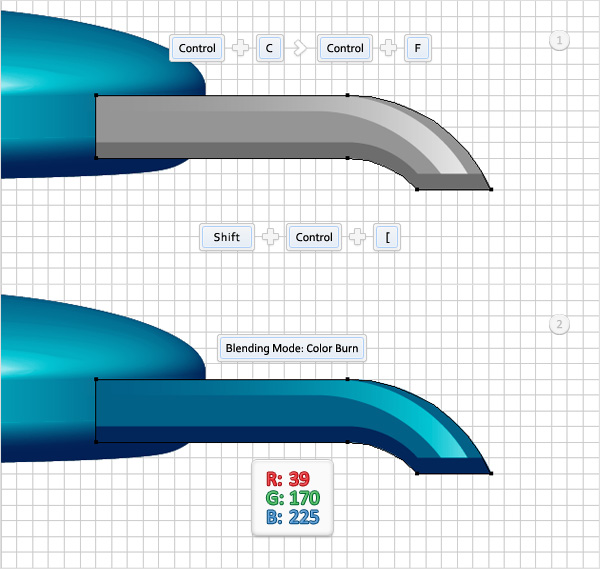
Step 34
Enable the Snap to Grid (View > Snap to Grid). Grab the Rectangle Tool(M), create a 1 by 4px shape, place it as shown in the following image and fill it with the linear gradient shown below.
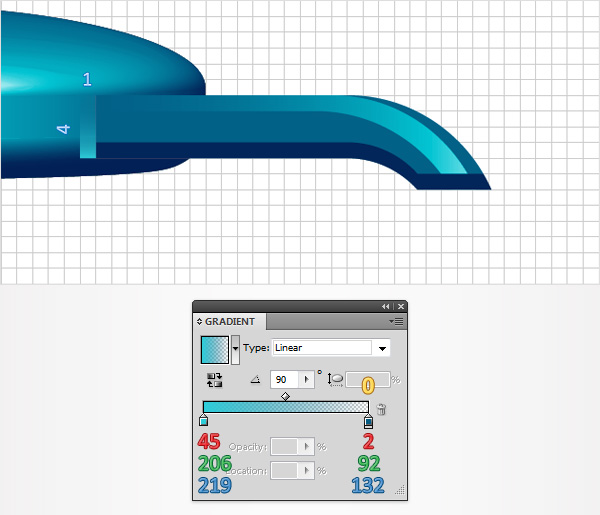
Step 35
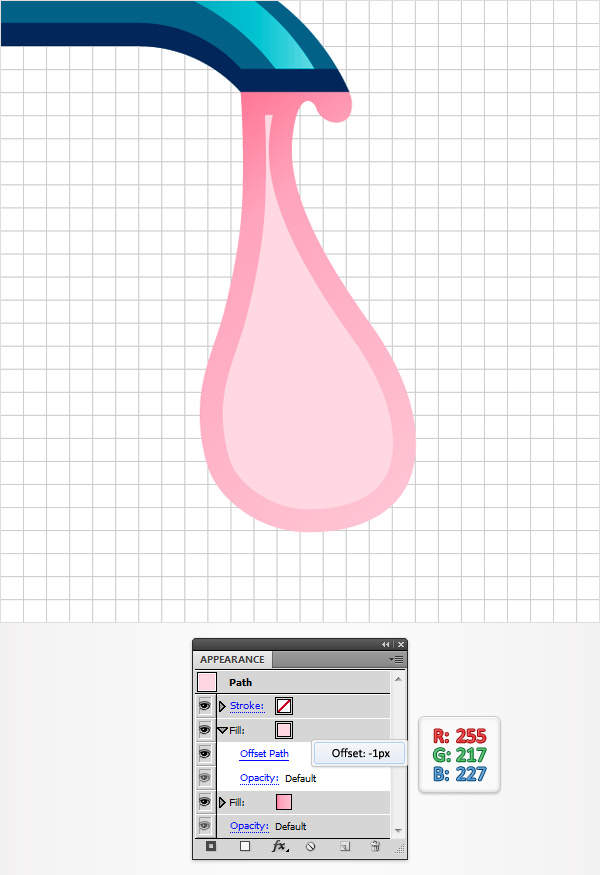
Disable the Snap to Grid (View > Snap to Grid). With the Pen Tool(P), draw a path like the one shown in the following image and fill it with the linear gradient shown below.
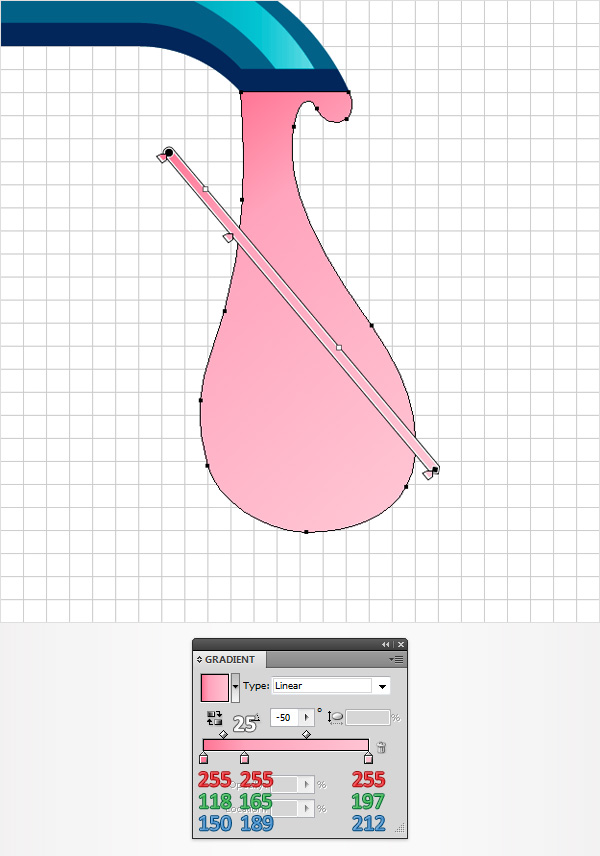
Step 36
Reselect the shape made in the previous step, focus on the Appearance panel and add a second fill. Select it, set its color at R=255 G=217 B=227 and go to Effect > Path > Offset Path. Enter a -1px Offset and click OK.
Step 37
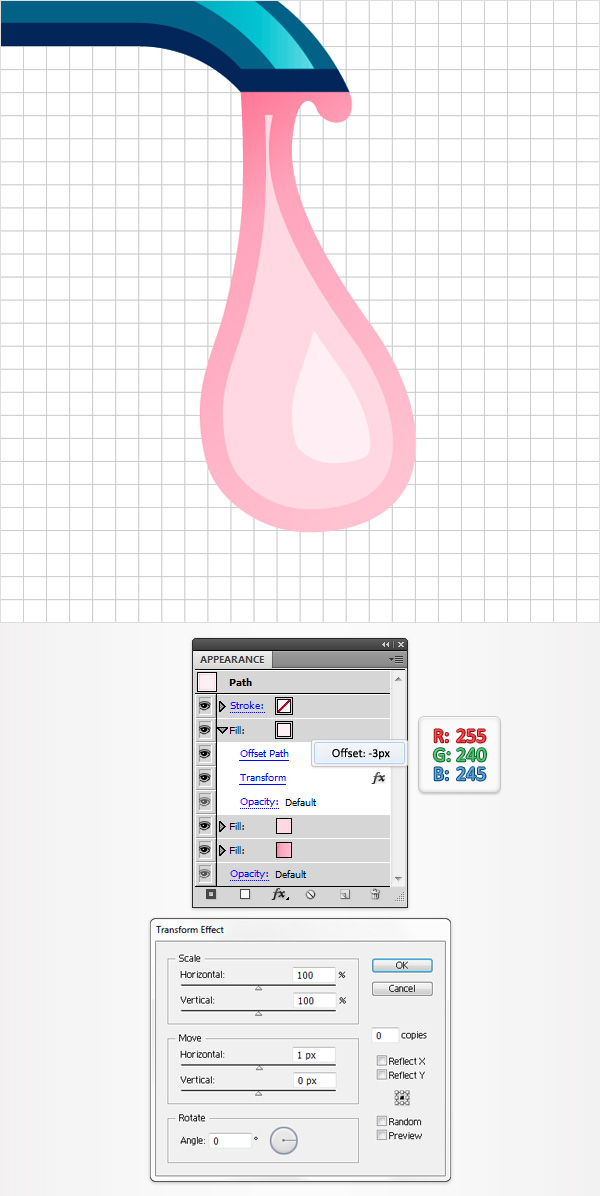
Keep focusing o the pink shape and add a third fill. Select it, set its color at R=255 G=240 B=245 and go to Effect > Path > Offset Path. Enter a -3px Offset, click OK and go to Effect > Distort & Transform > Transform . Enter the data shown below and click OK.
Step 38
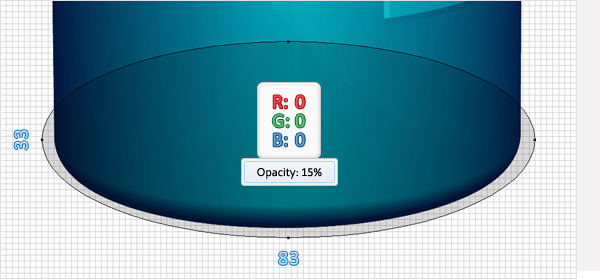
Enable the Snap to Grid (View > Snap to Grid). Grab the Ellipse Tool(L), create an 83 by 33px shape, fill it with black, lower its Opacity to 15% and place it as shown in the following image.
Step 39
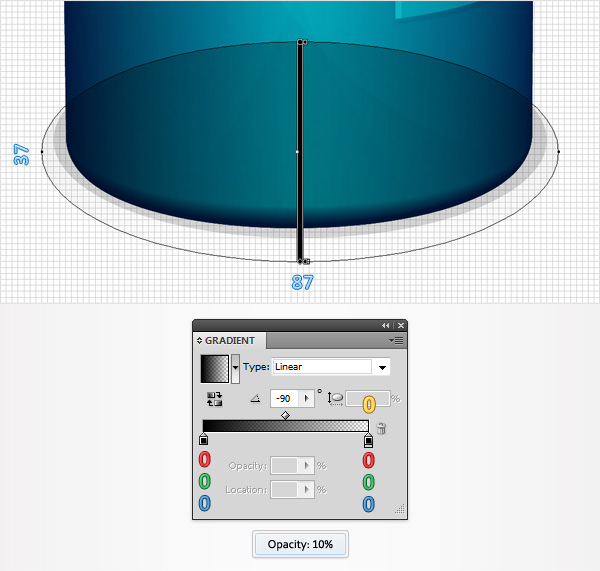
Using the Ellipse Tool(L), create an 87 by 37px shape, fill it with the linear gradient shown below, lower its Opacity to 10% and place it as shown in the following image.
Step 40
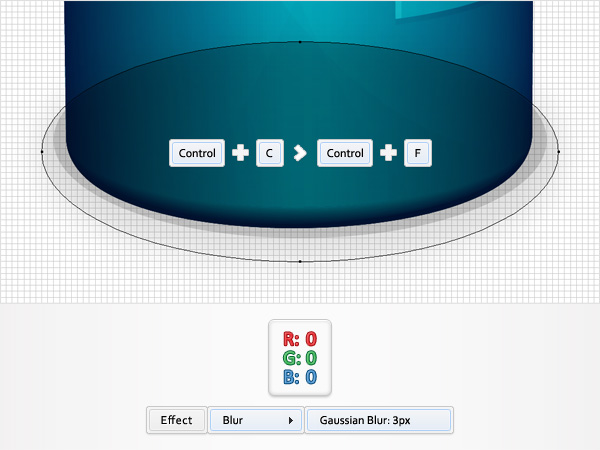
Duplicate the shape made in the previous step (Control + C > Control + F). Select this copy, fill it with black and go to Effect > Blur > Gaussian Blur. Enter a 3px radius and click OK.
Step 41
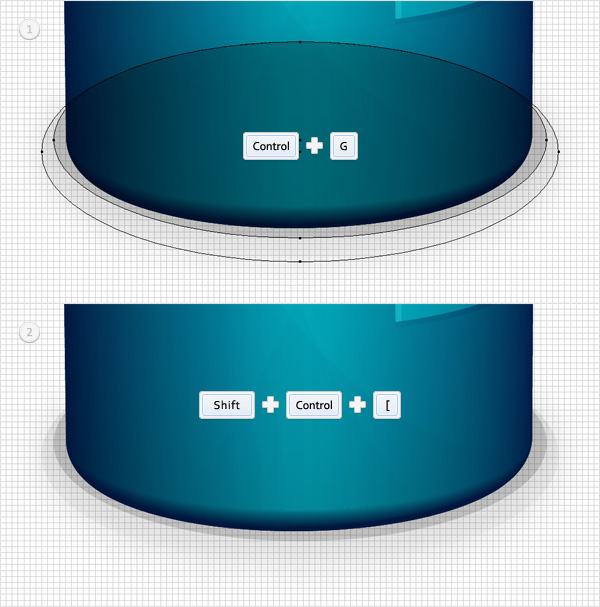
Reselect the three shapes created in the last three steps, Group them (Control + G) then send them to back (Shift + Control + [ ).
Step 42
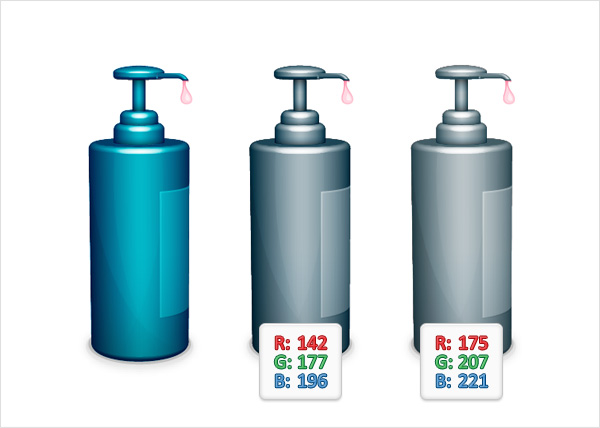
Finally, here’s is how you can easily recolor your bottle. Reselect the shapes filled with R=39 G=170 B=225 and simply change the color.
Conclusion
By chasing the colors slightly, you can create a variety of versions of this bottle illustration. Until next time, I hope you’ve enjoyed this tutorial.
