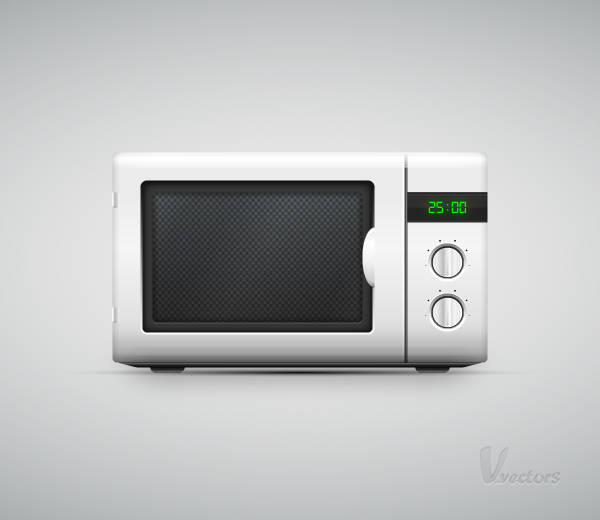
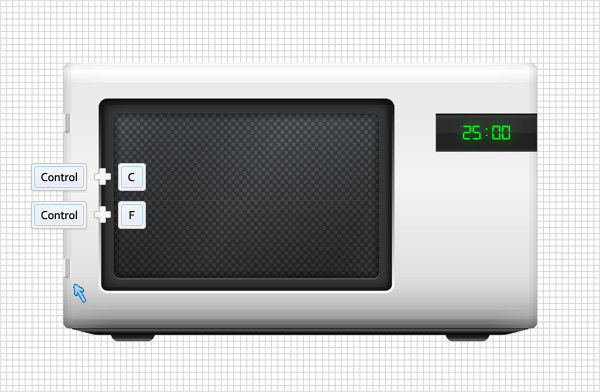
In the following tutorial you will learn how to create a microwave oven illustration using the Appearance panel, a custom pattern and the wonderful Pathfinder panel in Adobe Illustrator.
Step 1
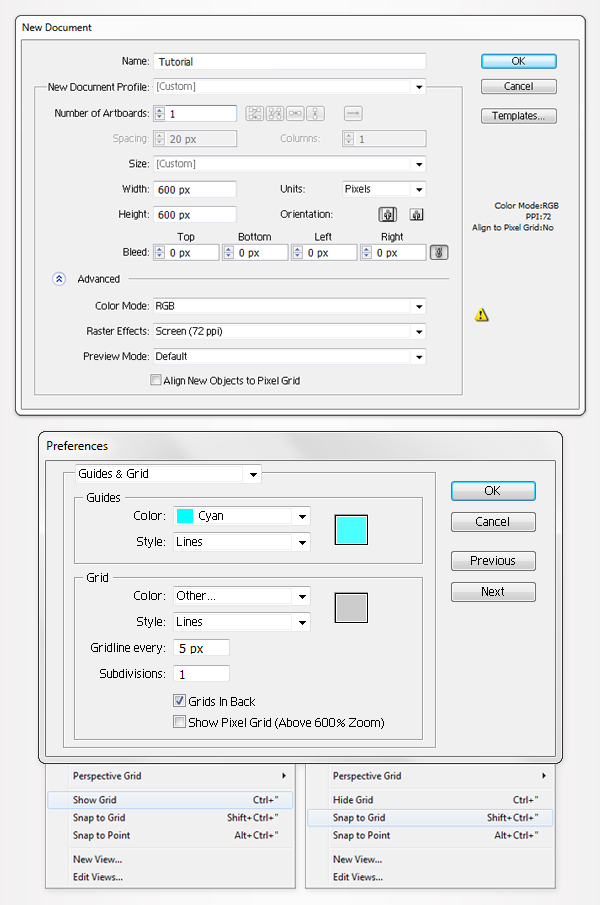
Press Command + N to create a New document. Enter 600 in the width box and height boxes then click on the Advanced button. Select RGB, Screen (72ppi) and make sure that the "Align New Objects to Pixel Grid" box is unchecked before your click OK.
Enable the Grid (View > Show Grid) and the Snap to Grid (View > Snap to Grid). Next, you’ll need a grid every 5px. Go to Edit > Preferences > Guides > Grid, enter 5 in the Gridline every box and 1 in the Subdivisions box. You can also open the Info panel (Window > Info) for a live preview with the size and position of your shapes. Do not forget to replace the unit of measurement to pixels from Edit > Preferences > Unit > General. All these options will significantly increase your work speed.
Step 2
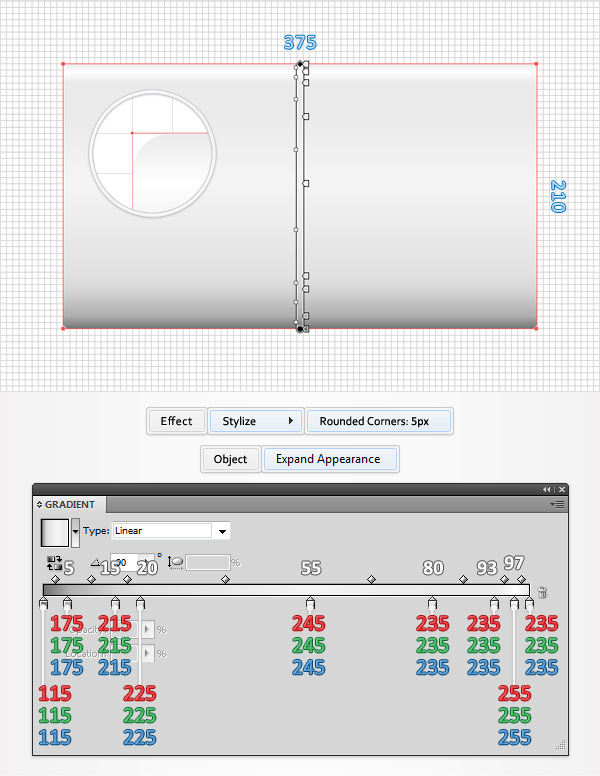
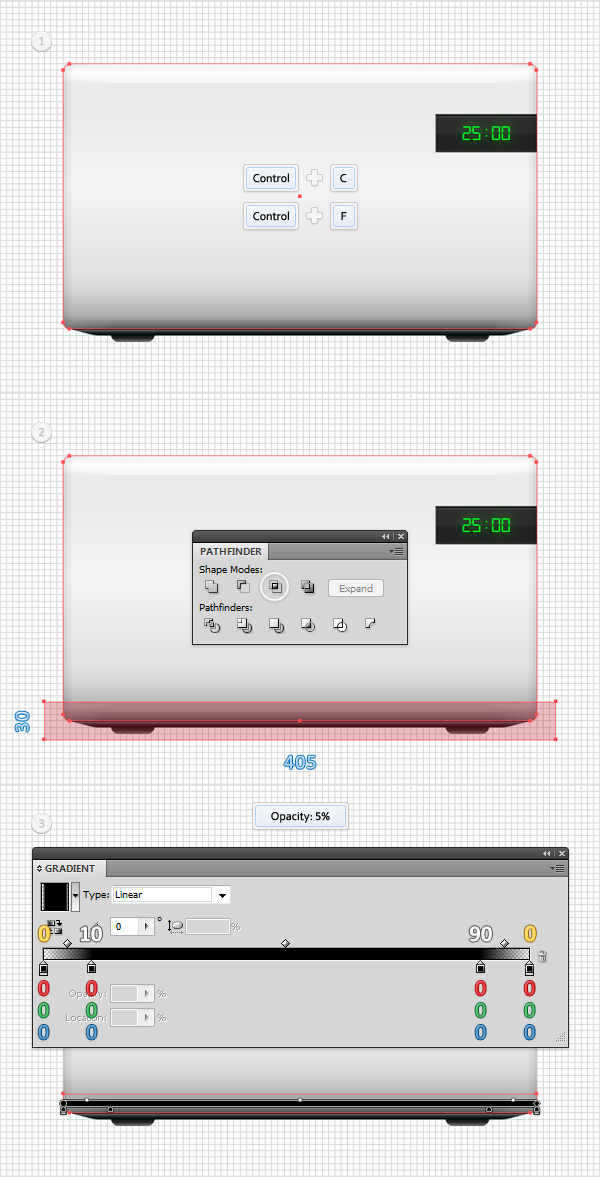
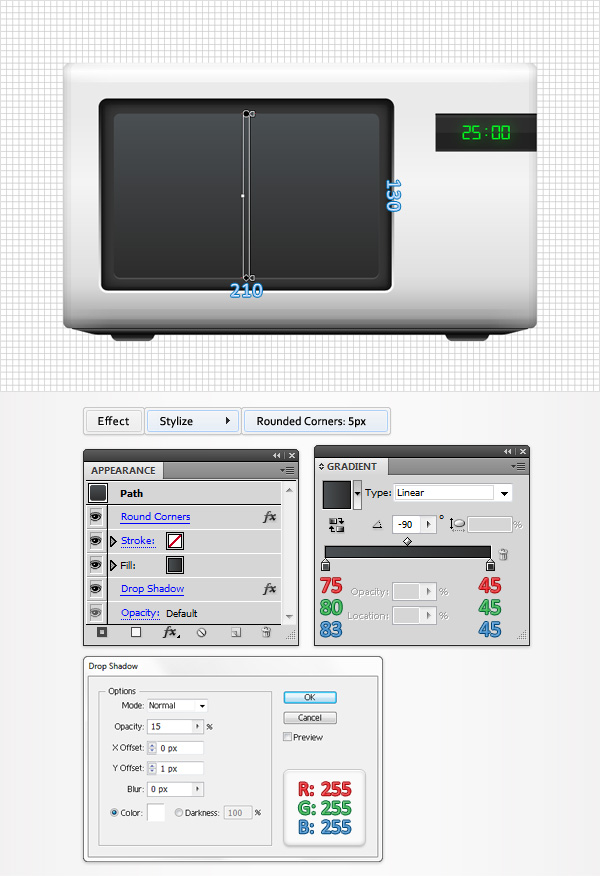
Using the Rectangle Tool (M), create a 375 by 210px shape, fill it with the linear gradient shown below and go to Effect > Stylize > Rounded Corners. Enter a 5px radius, click OK and go to Object > Expand Appearance. The white numbers from the gradient image stand for Location percentage.
Step 3
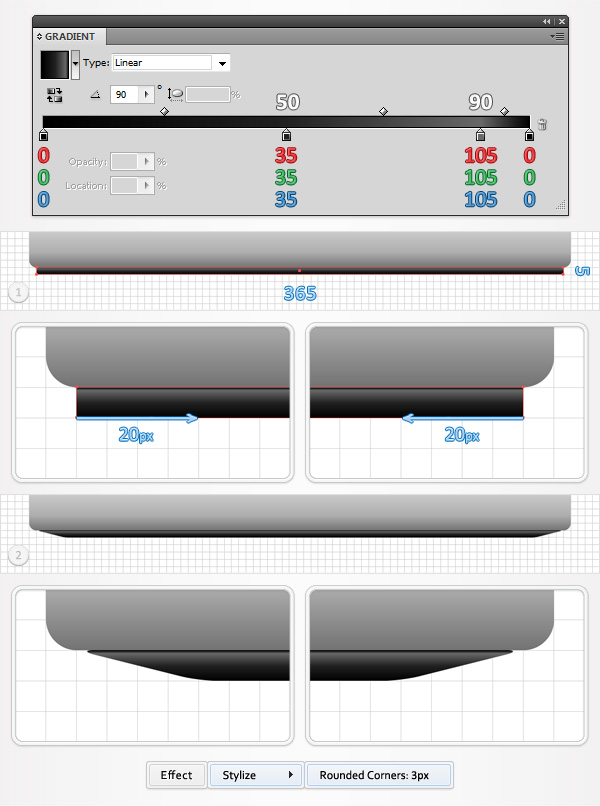
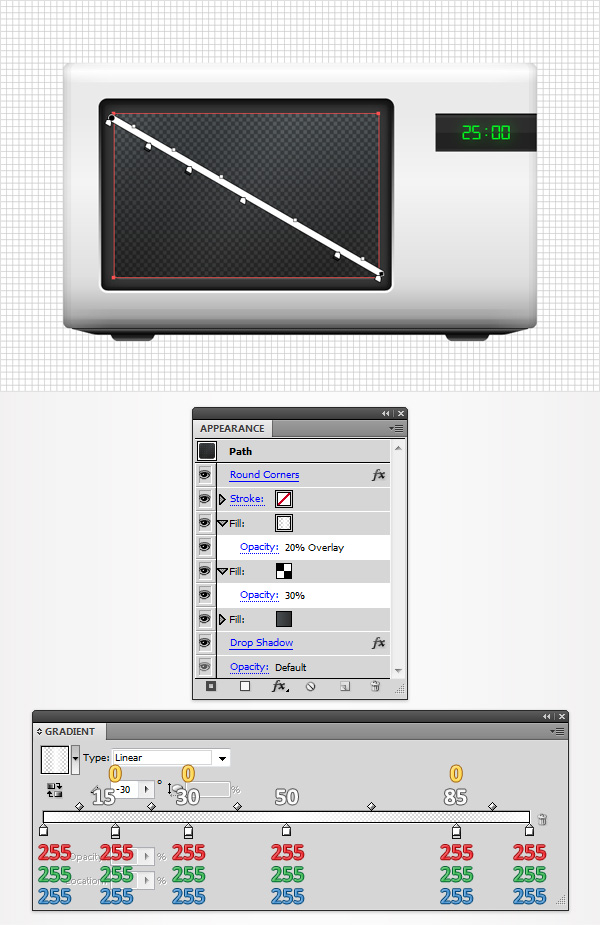
Using the Rectangle Too l(M), create a 365 by 5px shape, fill it with the linear gradient shown below and place it as shown in the following image. With the Direct Selection Tool (A), focus on the bottom side of this new rectangle. Select the right anchor point and move it 20px to the left then select the left anchor point and move it 20px to the right. This should turn your rectangle into a trapezoid. Make sure that it is still selected and go to Effect > Stylize > Rounded Corners. Enter a 3px radius and click OK.
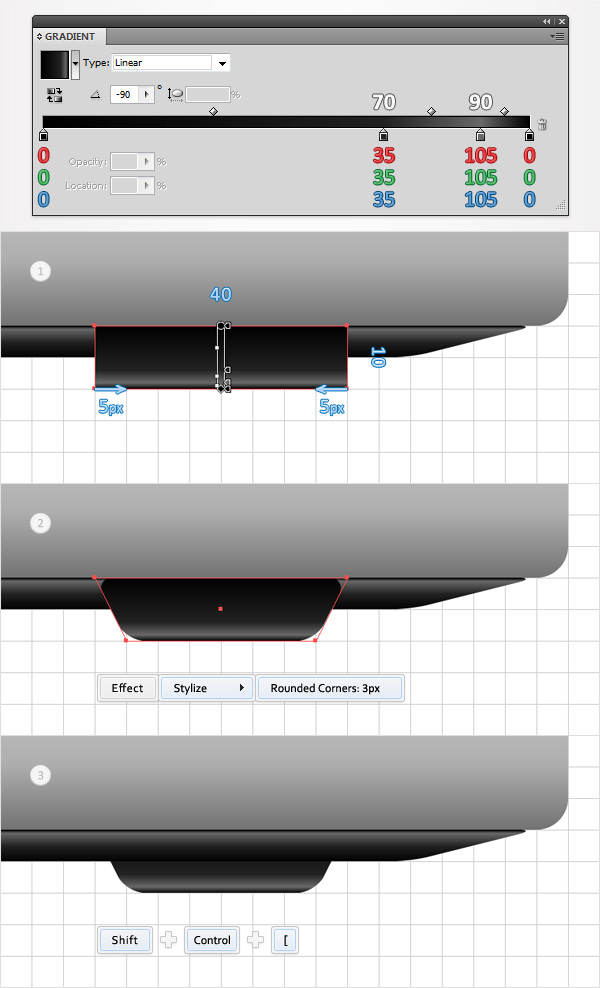
Step 4
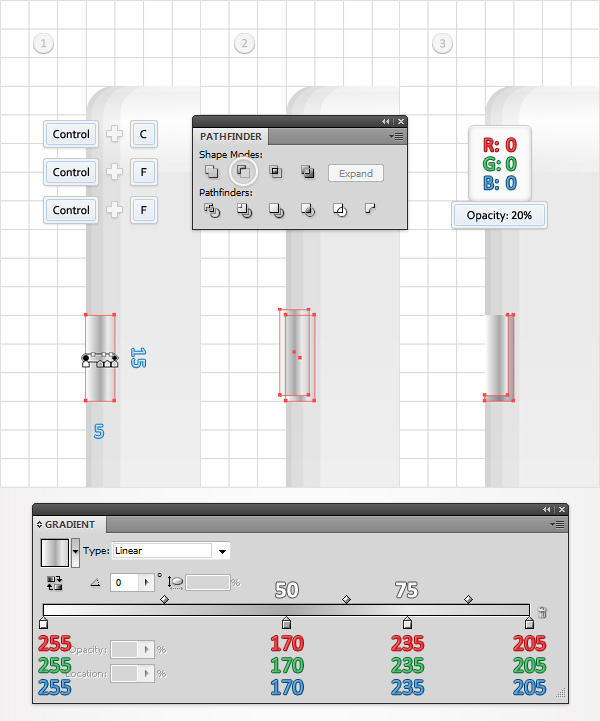
Using the Rectangle Tool (M), create a 40 by 10px shape, fill it with the linear gradient shown below and place it as shown in the following image. With the Direct Selection Tool (A), focus on the bottom side of this new rectangle. Select the right anchor point and move it 5px to the left then select the left anchor point and move it 5px to the right. Make sure that this new trapezoid is still selected, send it to back (Shift + Control + [) and go to Effect > Stylize > Rounded Corners. Enter a 3px radius and click OK.
Step 5
Reselect the shape made in the previous step, make a copy in front (Control + C > Control + F), drag it to the left and place it as shown in the first image. Using the Rectangle Tool (M), create an 80 by 30px shape, fill it with R=35 G=35 B=35 and place it as shown in the second image.

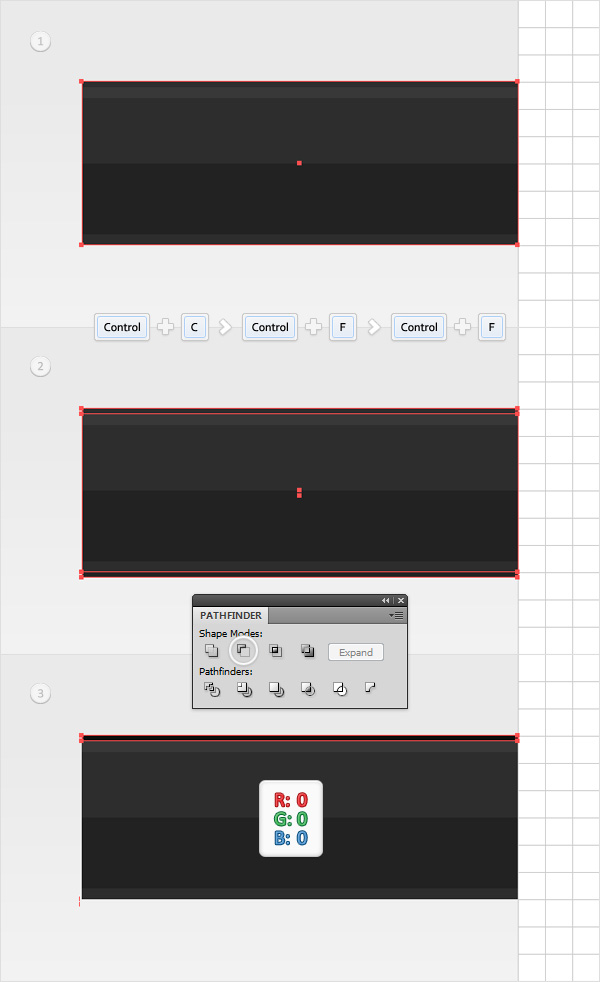
Step 6
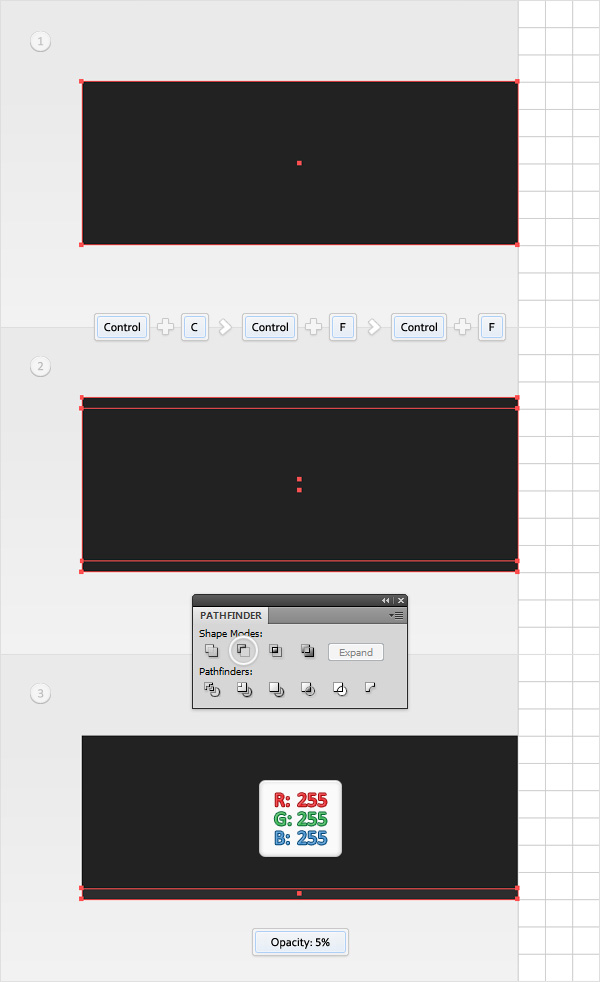
Disable the Snap to Grid (View > Snap to Grid) then go to Edit > Preferences > General and make sure that the Keyboard Increment is set at 1px. Reselect the rectangle made in the previous step and make two copies in front (Control + C > Control + F > Control + F). Select the top copy and move it 1px up using the up arrow from your keyboard. Reselect both copies, open the Pathfinder panel and click on the Minus Front button. Fill the resulting shape with white and lower its Opacity to 5%.
Step 7
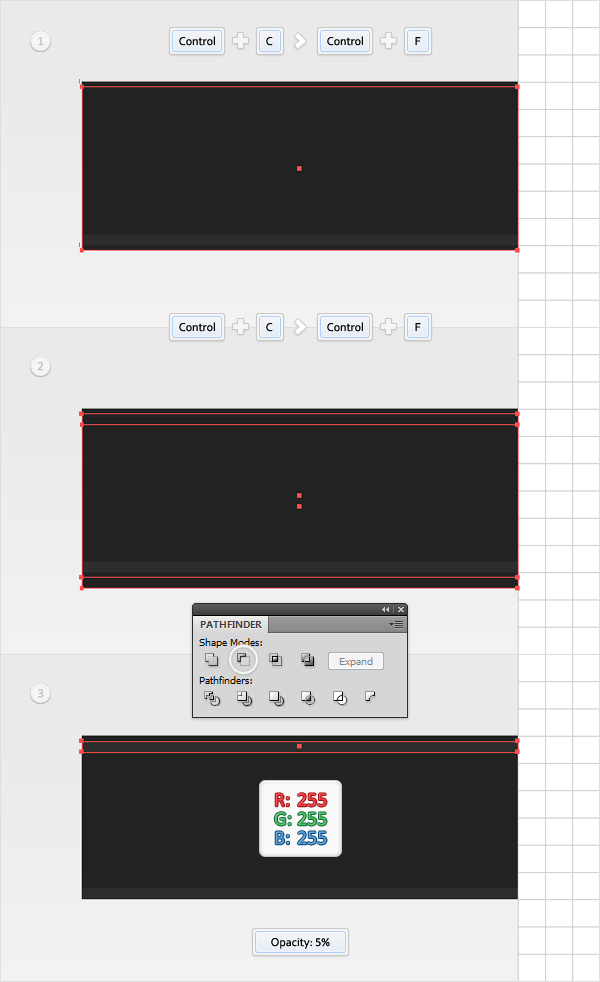
Reselect the rectangle made in the fifth step and make a copy in front (Control + C > Control + F). Select it, move it 1px down then duplicate it (Control + C > Control + F). Select this new copy and move it 2px down. Reselect both copies and click on the Minus Front button from the Pathfinder panel. Fill the resulting shape with white and lower its Opacity to 5%.
Step 8
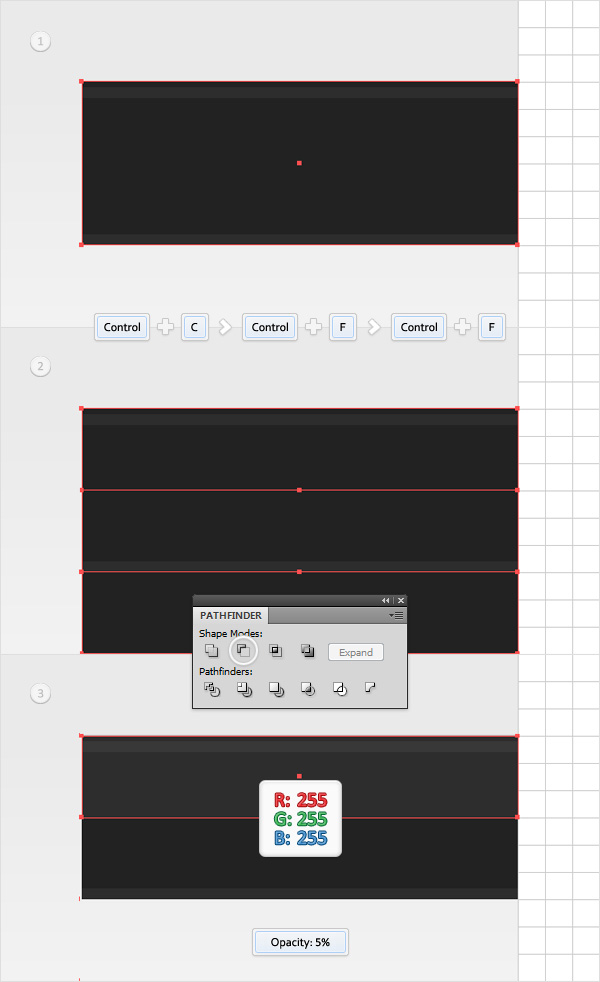
Reselect the rectangle made in the fifth step and make two copies in front (Control + C > Control + F > Control + F). Select the top copy and move it 15px down. Reselect both copies and click on the Minus Front button from the Pathfinder panel. Fill the resulting shape with white and lower its Opacity to 5%.
Step 9
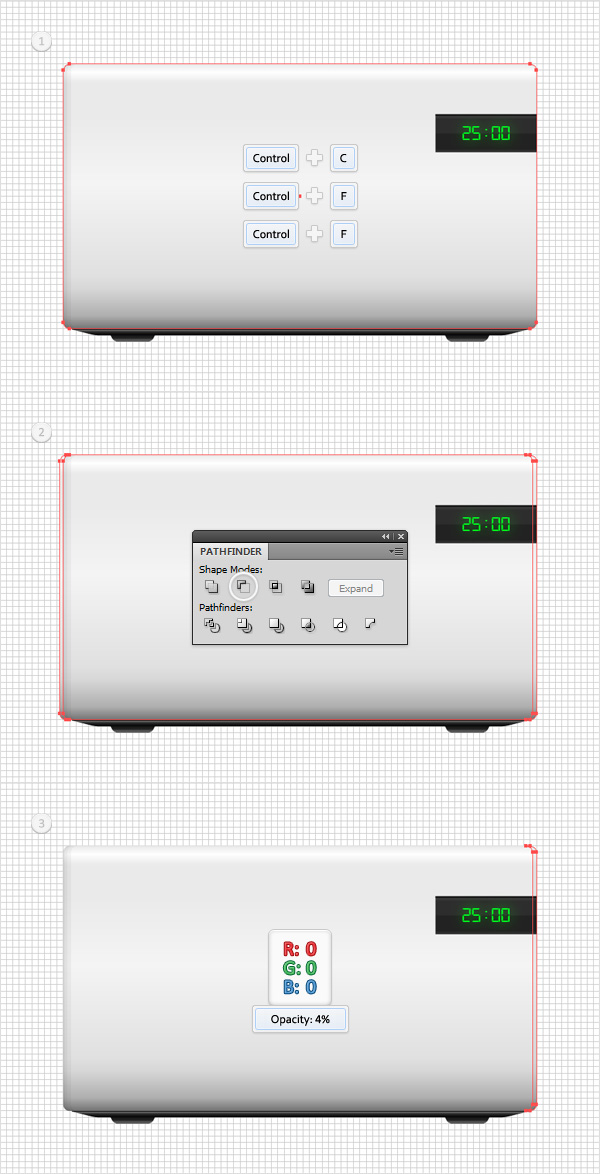
Reselect the rectangle made in the fifth step and make two copies in front (Control + C > Control + F > Control + F). Select the top copy and move it 1px down. Reselect both copies and click on the Minus Front button from the Pathfinder panel. Fill the resulting shape with black.
Step 10
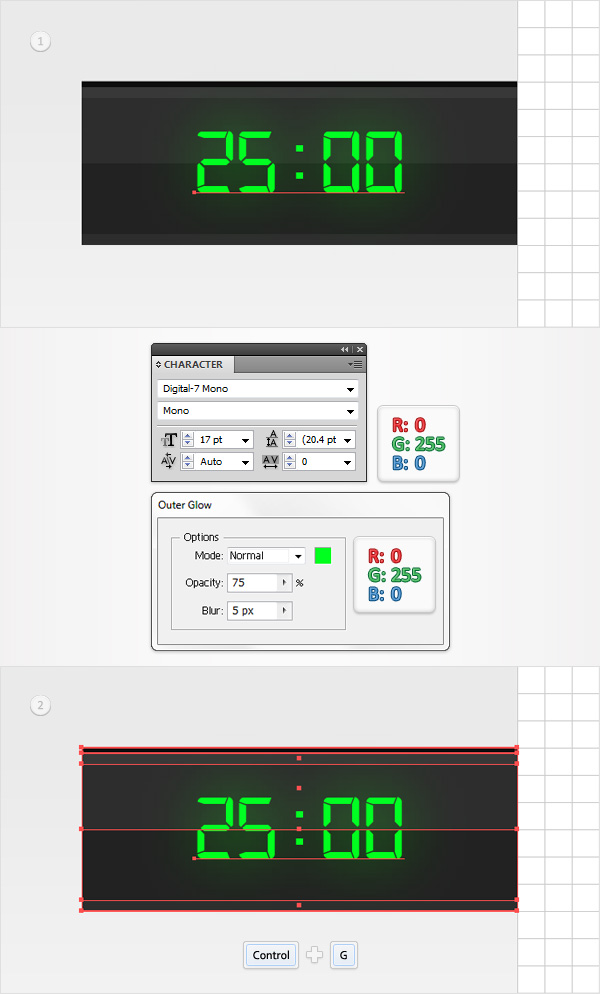
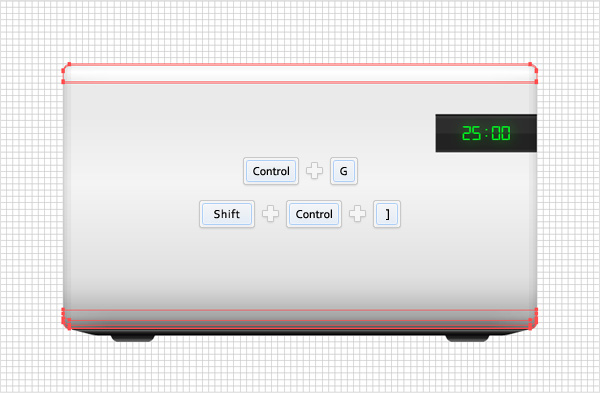
Using the Type Tool (T) and add a simple piece of text as shown in the following image. Use the "Digital-7 Mono font", set the size at 17pt and the color at R=0 G=255 B=0 then go to Effect > Stylize > Outer Glow. Enter the data shown below and click OK. Reselect this piece of text along with the dark rectangle made in the fifth step and all the smaller rectangles created in the last four steps then Group them (Control + G).
Step 11
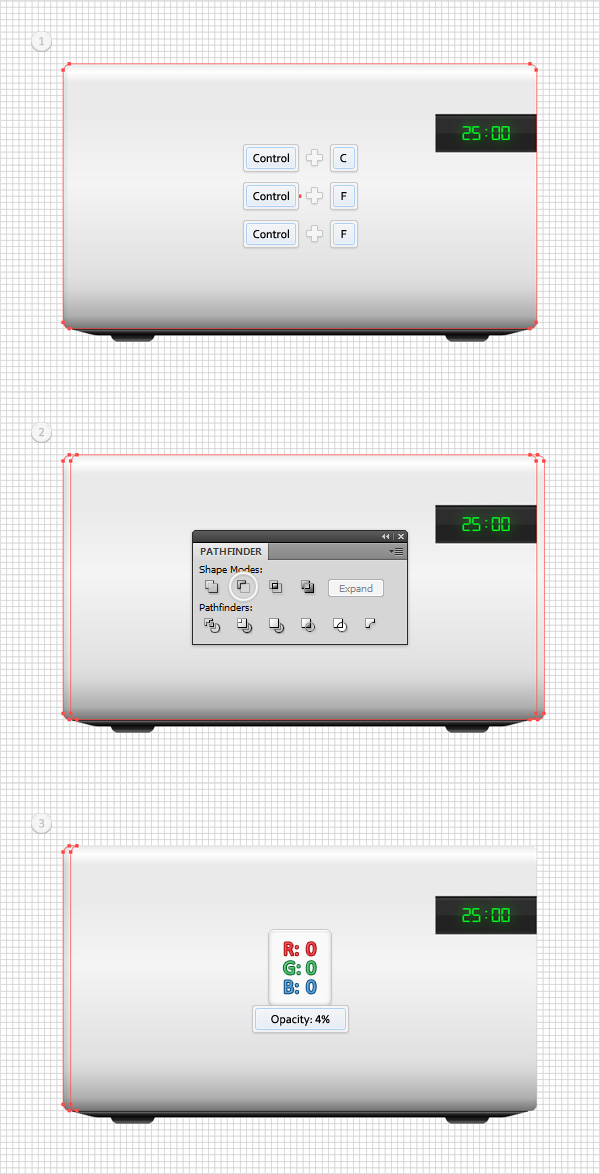
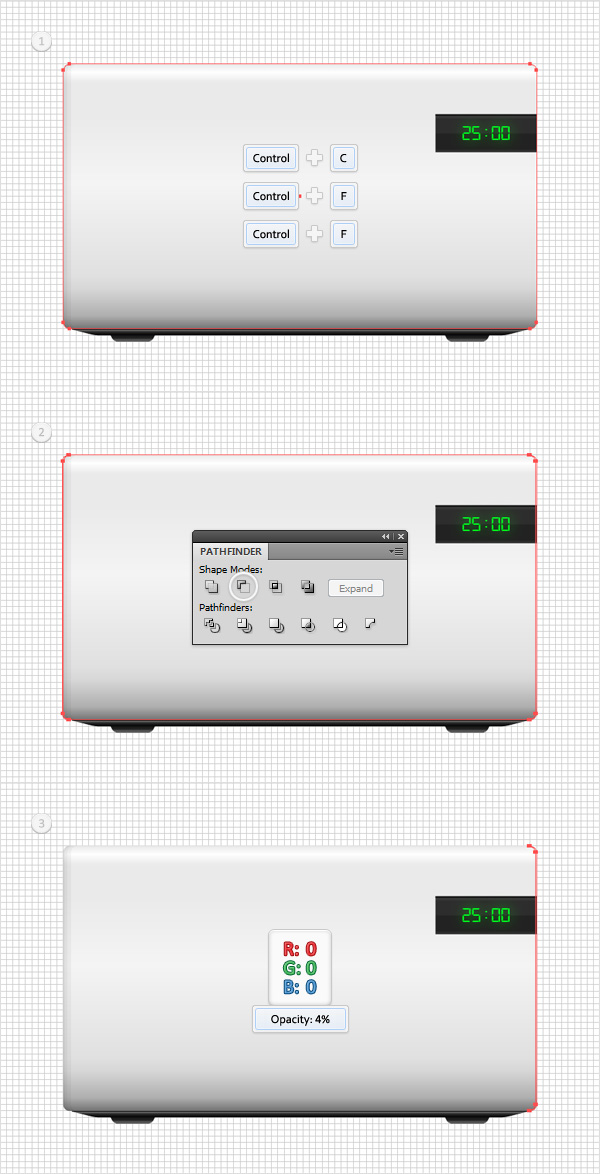
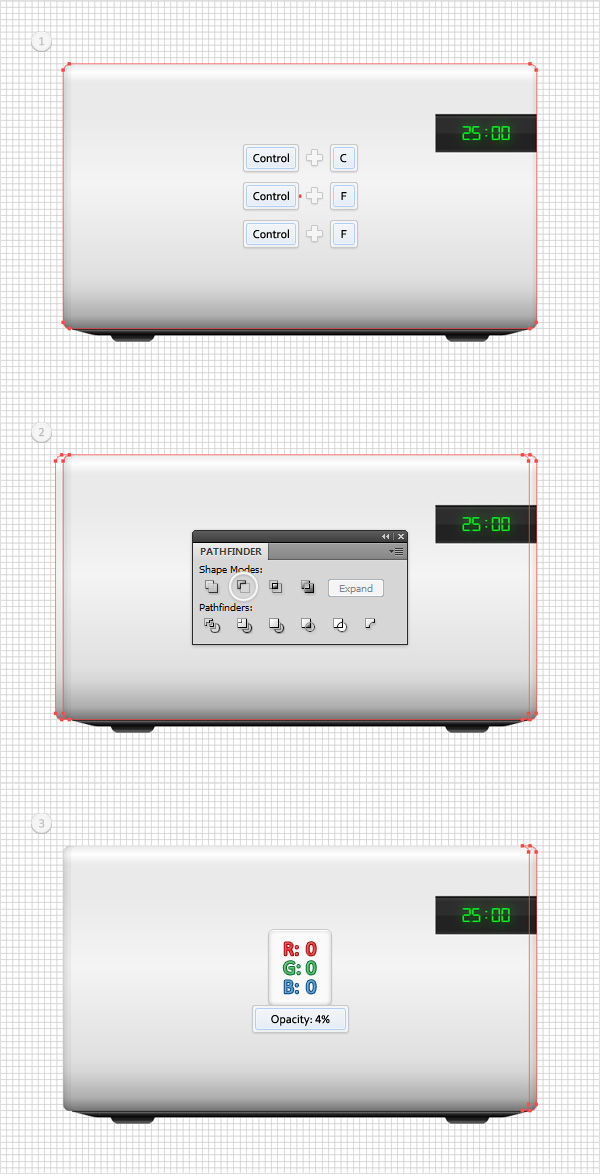
Reselect the rounded rectangle made in the second step and make two copies in front (Control + C > Control + F > Control + F). Select the top copy and move it 1px to the right. Reselect both copies and click on the Minus Front button from the Pathfinder panel. Fill the resulting shape with black and lower its Opacity to 4%.

Step 12
Reselect the rounded rectangle made in the second step and make two copies in front (Control + C > Control + F > Control + F). Select the top copy and move it 3px to the right. Reselect both copies and click on the Minus Front button from the Pathfinder panel. Fill the resulting shape with black and lower its Opacity to 4%.

Step 13
Reselect the rounded rectangle made in the second step and make two copies in front (Control + C > Control + F > Control + F). Select the top copy and move it 6px to the right. Reselect both copies and click on the Minus Front button from the Pathfinder panel. Fill the resulting shape with black and lower its Opacity to 4%.
Step 14
Reselect the rounded rectangle made in the second step and make two copies in front (Control + C > Control + F > Control + F). Select the top copy and move it 1px to the left. Reselect both copies and click on the Minus Front button from the Pathfinder panel. Fill the resulting shape with black and lower its Opacity to 4%.
Step 15
Reselect the rounded rectangle made in the second step and make two copies in front (Control + C > Control + F > Control + F). Select the top copy and move it 3px to the left. Reselect both copies and click on the Minus Front button from the Pathfinder panel. Fill the resulting shape with black and lower its Opacity to 4%.
Step 16
Reselect the rounded rectangle made in the second step and make two copies in front (Control + C > Control + F > Control + F). Select the top copy and move it 6px to the left. Reselect both copies and click on the Minus Front button from the Pathfinder panel. Fill the resulting shape with black and lower its Opacity to 4%.
Step 17
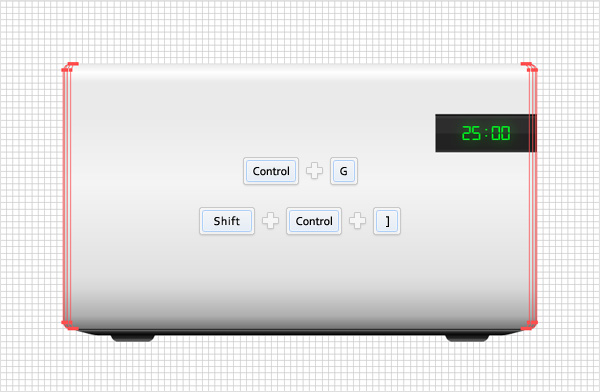
Select all the shapes created in the last six steps and Group them (Control + G). Select this new group and bring it to front (Shift + Control + ] ).
Step 18
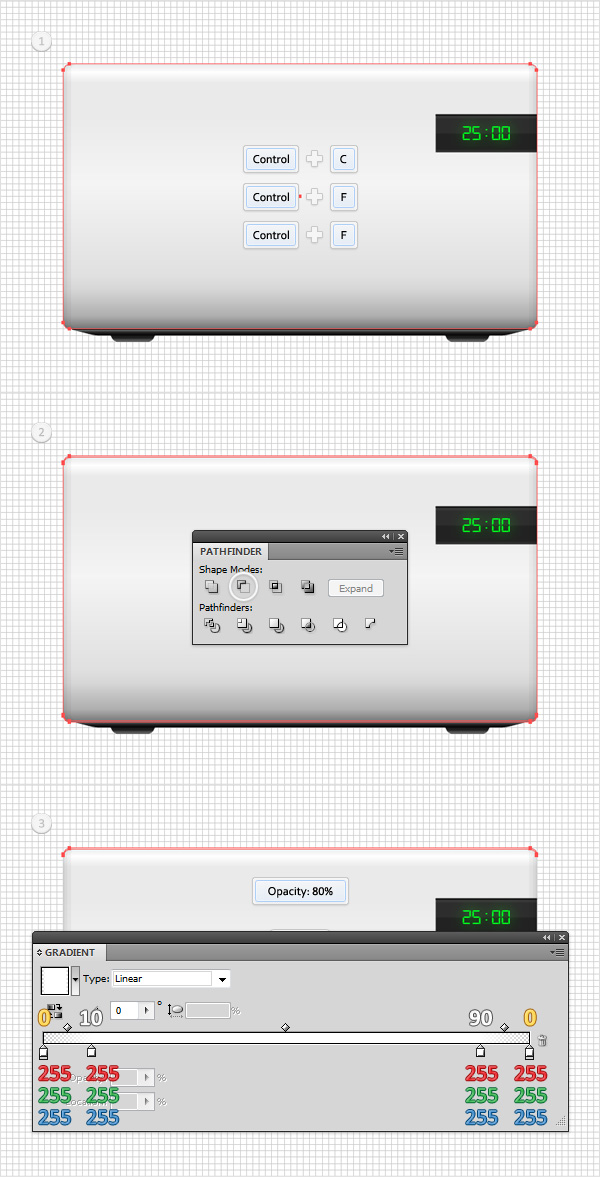
Reselect the rounded rectangle made in the second step and make two copies in front (Control + C > Control + F > Control + F). Select the top copy and move it 1px down. Reselect both copies and click on the Minus Front button from the Pathfinder panel. Fill the resulting shape with the linear gradient shown below and lower its Opacity to 80%. The yellow zeros from the gradient image stand for Opacity percentage.
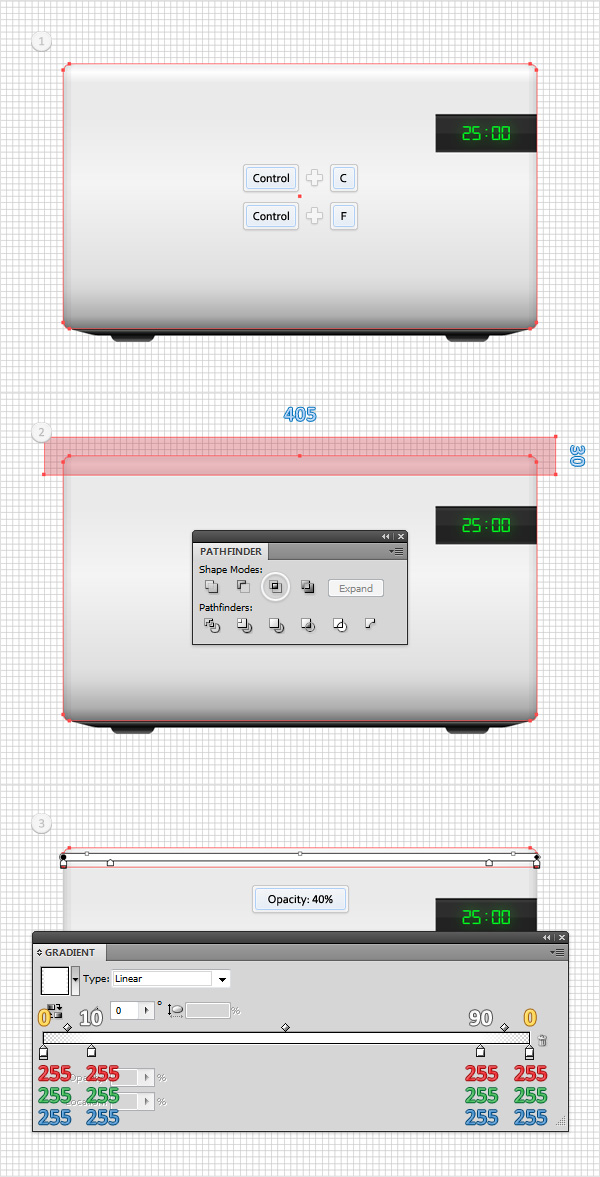
Step 19
Reselect the rounded rectangle made in the second step and make a copy in front (Control + C > Control + F). Enable the Snap to Grid (View > Snap to Grid), using the Rectangle Tool (M), create a 405 by 30px shape and place it as shown in the second image. Select this new rectangle along with the copy made in the beginning of the step and click on the Intersect button from the Pathfinder panel. Fill the resulting shape with the linear gradient shown below and lower its Opacity to 40%.
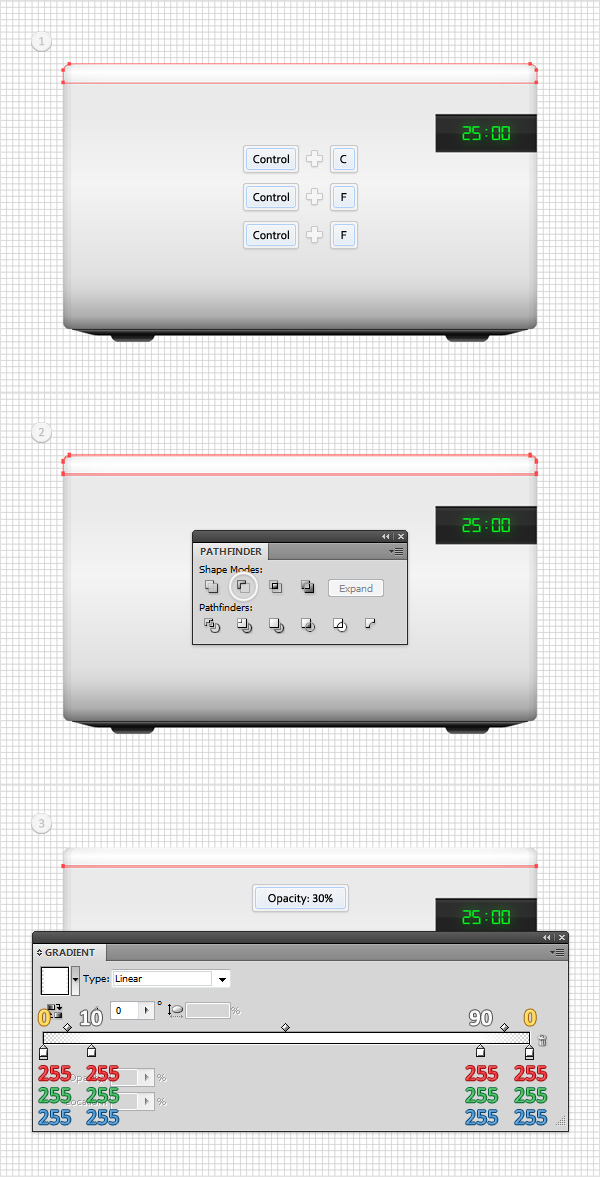
Step 20
Disable the Snap to Grid (View > Snap to Grid). Reselect the shape made in the previous step and make two copies in front (Control + C > Control + F > Control + F). Select the top copy and move it 1px up. Reselect both copies and click on the Minus Front button from the Pathfinder panel. Select the resulting shape and lower its Opacity to 30%.
Step 21
Reselect the rounded rectangle made in the second step and make two copies in front (Control + C > Control + F > Control + F). Select the top copy and move it 1px up. Reselect both copies and click on the Minus Front button from the Pathfinder panel. Fill the resulting shape with the linear gradient shown below and lower its Opacity to 10%.
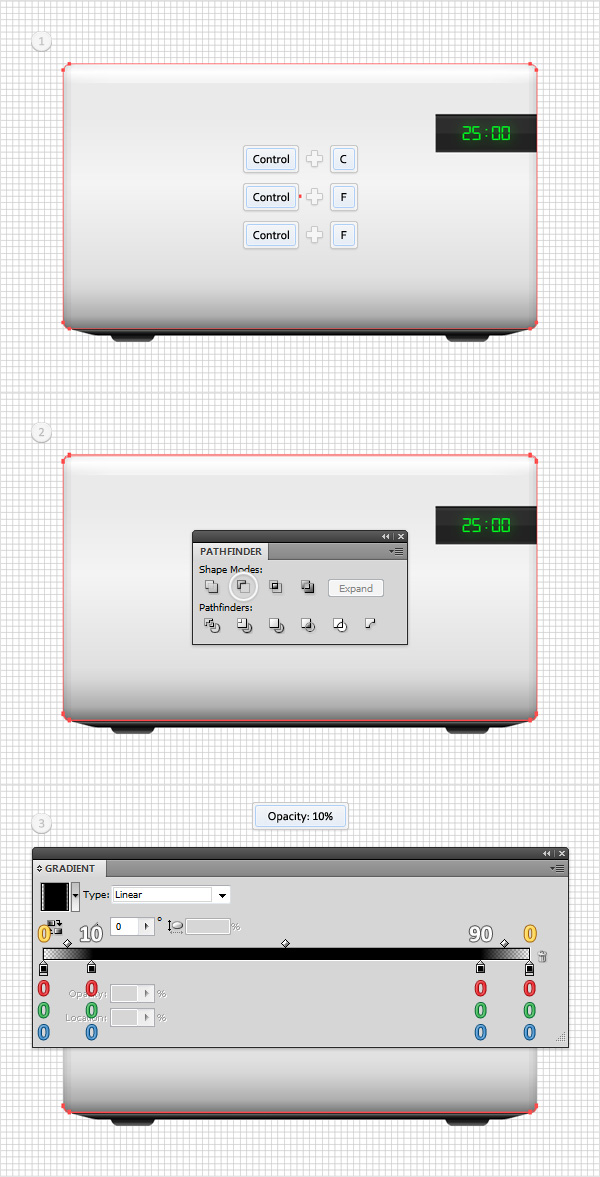
Step 22
Reselect the rounded rectangle made in the second step and make two copies in front (Control + C > Control + F > Control + F). Select the top copy and move it 3px up. Reselect both copies and click on the Minus Front button from the Pathfinder panel. Fill the resulting shape with the linear gradient shown below and lower its Opacity to 10%.

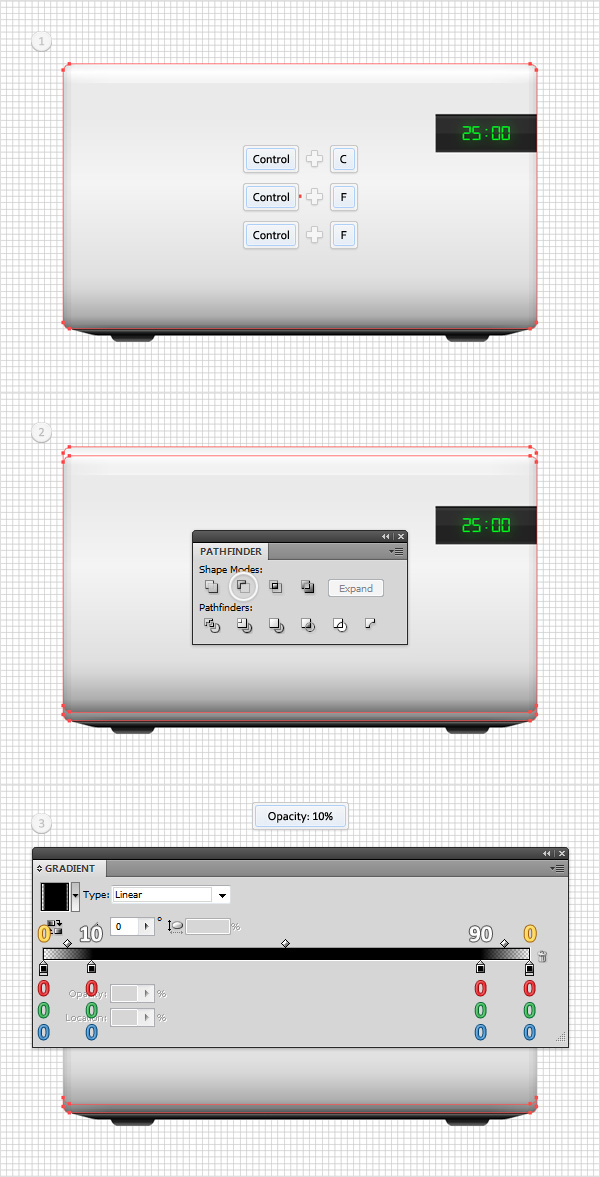
Step 23
Reselect the rounded rectangle made in the second step and make two copies in front (Control + C > Control + F > Control + F). Select the top copy and move it 7px up. Reselect both copies and click on the Minus Front button from the Pathfinder panel. Fill the resulting shape with the linear gradient shown below and lower its Opacity to 10%.
Step 24
Reselect the rounded rectangle made in the second step and make a copy in front (Control + C > Control + F). Enable the Snap to Grid (View > Snap to Grid), using the Rectangle Tool (M), create a 405 by 30px shape and place it as shown in the second image. Select this new rectangle along with the copy made in the beginning of the step and click on the Intersect button from the Pathfinder panel. Fill the resulting shape with the linear gradient shown below and lower its Opacity to 5%.
Step 25
Select all the shapes created in the last seven steps and Group them (Control + G). Select this new group and bring it to front (Shift + Control + ] ).
Step 26
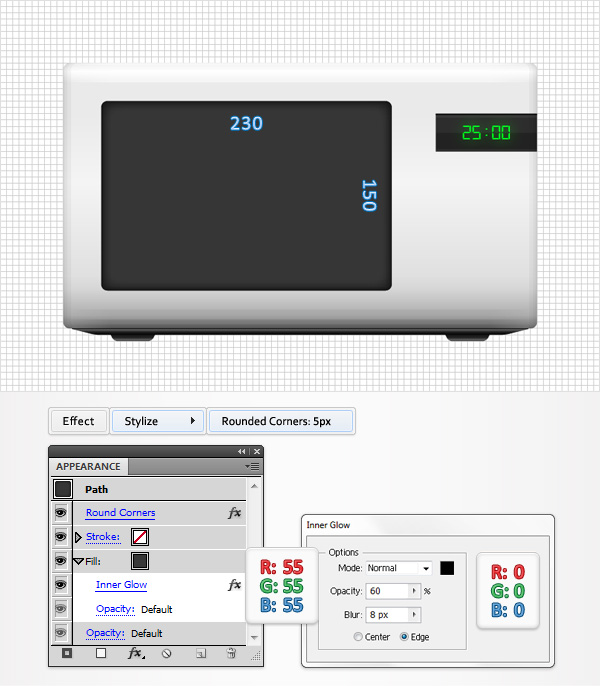
Using the Rectangle Tool (M), create a 230 by 150px shape, fill it with R=55 G=55 B=55 and place it as shown in the following image. Select it and go to Effect > Stylize > Rounded Corners. Enter a 5px radius and click OK. Make sure that this rectangle is still selected and focus on the Appearance panel. Select the fill and go to Effect > Stylize > Inner Glow. Enter the data shown below and click OK.
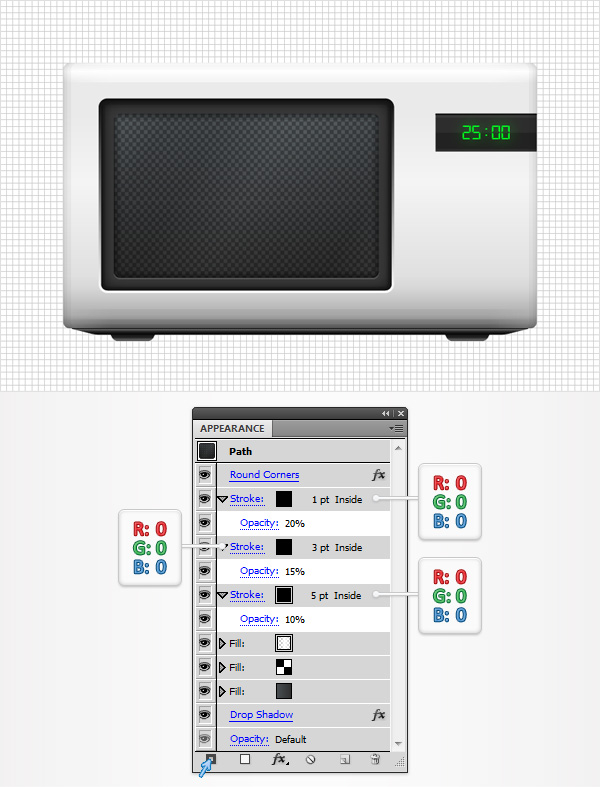
Step 27
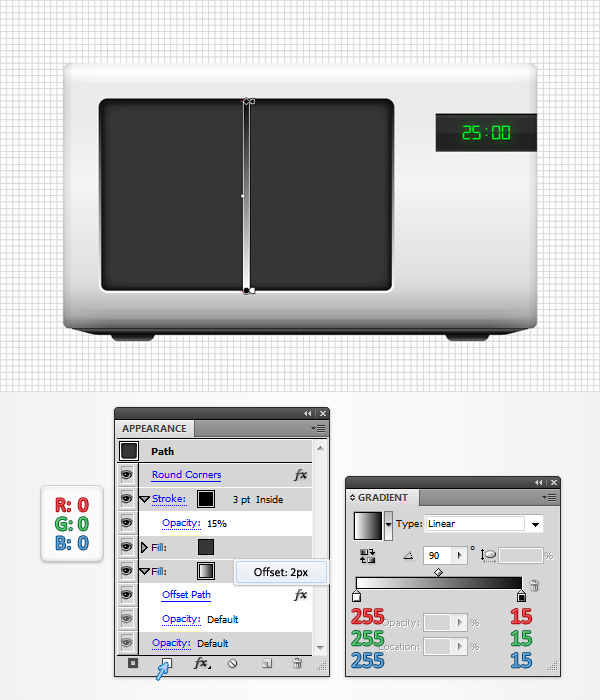
Reselect the rectangle made in the previous step and focus on the Appearance panel. First, add a 3pt, black stroke. Select it, a it to inside and lower the Opacity to 15%. Keep focusing on the Appearance panel and add a second fill for your shape using the Add New Fill button. Select this new fill, drag it in the bottom of the Appearance panel, add the linear gradient shown below and go to Effect > Path > Offset Path. Enter a 2px offset and click OK.
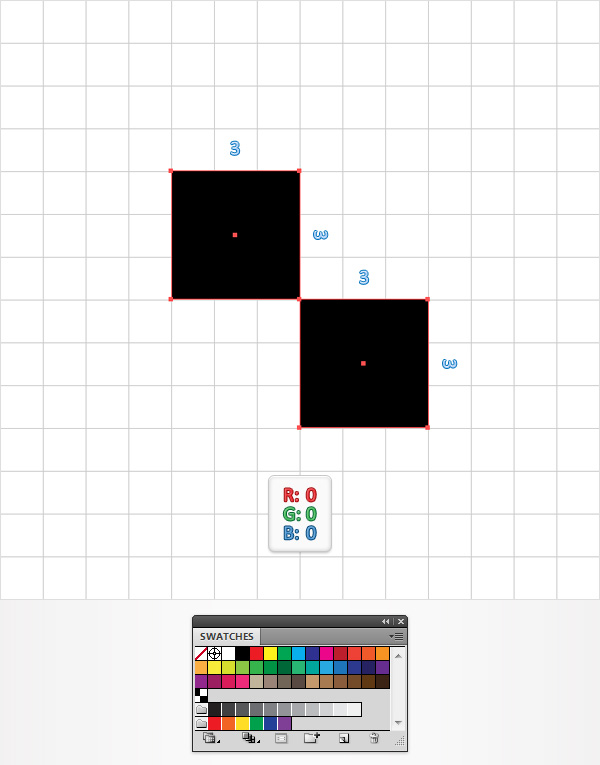
Step 28
Next, let’s create a simple pattern. First, you will need a grid every 1px. So, go to Edit > Preferences > Guides & Grid and enter 1 in the Gridline every box. Using the Rectangle Tool (M), create a two, black, 3px squares and place them as shown in the following image. Select both shape, simply drag them inside the Swatches panel and you got the pattern. Once you got your pattern you can remove those black squares from the Layers panel.
Step 29
Return to "gridline every 5px". So, go to Edit > Preferences > Guides & Grid and enter 5 in the Gridline every box. Using the Rectangle Tool (M), create a 210 by 130px shape, fill it with the linear gradient shown below and place it as shown in the following image. Select it and go to Effect > Stylize > Rounded Corners. Enter a 5px radius, click OK and go to Effect > Stylize > Drop Shadow. Enter the data shown below and click OK.
Step 30
Reselect the shape made in the previous step and add a second fill. Select it, lower its Opacity to 30% and add the pattern made in the twenty-eighth step. Keep focusing on the Appearance panel and add a third fill for your shape. Select it, lower its Opacity to 20%, change the Blending Mode to Overlay and add the linear gradient shown in the following image.
Step 31
Make sure that the shape made in the previous step is still selected, focus on the Appearance panel and add a 5pt, black stroke. Select it, align it to inside and lower the Opacity to 10%. Add a second stroke for your shape using the Add New Stroke button from the bottom of the Appearance panel. Select this new stroke, set the color at black, make it 3px wide, align it to inside and lower the Opacity to 15%. Add a third stroke for this shape, set the color at black, make it 1px wide, align it to inside and lower the Opacity to 20%.
Step 32
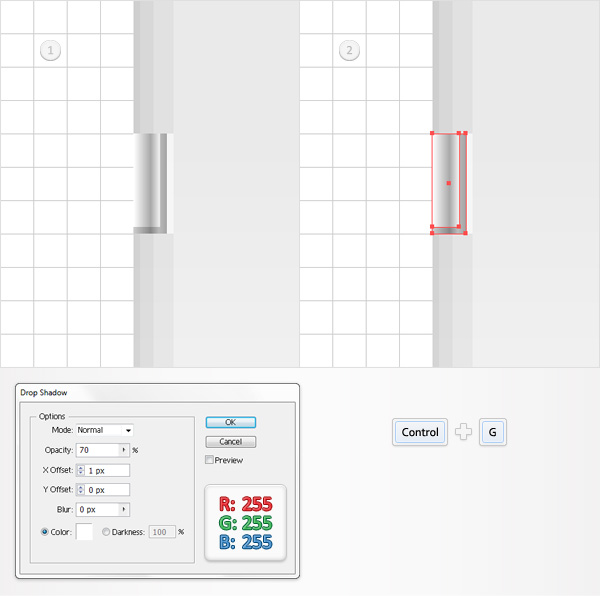
Using the Rectangle Tool (M), create a 5 by 15px shape, fill it with the linear gradient shown below and place it as shown in the first image. Disable the Snap to Grid (View > Snap to Grid), select this new rectangle and make two copies in front (Control + C > Control + F > Control + F). Select the top copy and move it 1px up and to the left. Reselect both copies and click on the Minus Front button from the Pathfinder panel. Fill the resulting shape with black and lower its Opacity to 20%.
Step 33
Enable the Snap to Grid (View > Snap to Grid). Select the rectangle made in the previous step and go to Effect > Stylize > Drop Shadow. Enter the data shown below and click OK. Reselect the rectangle along with the other shape made in the previous step and Group them (Control + G).
Step 34
Reselect the group made in the previous step and duplicate it (Control + C > Control + F). Select this group copy, drag it down and place it as shown in the following image.
Step 35
Using the Ellipse Tool (L), create a 545 by 10px shape, fill it with the radial gradient shown below and place it as shown in the following image.

Step 36
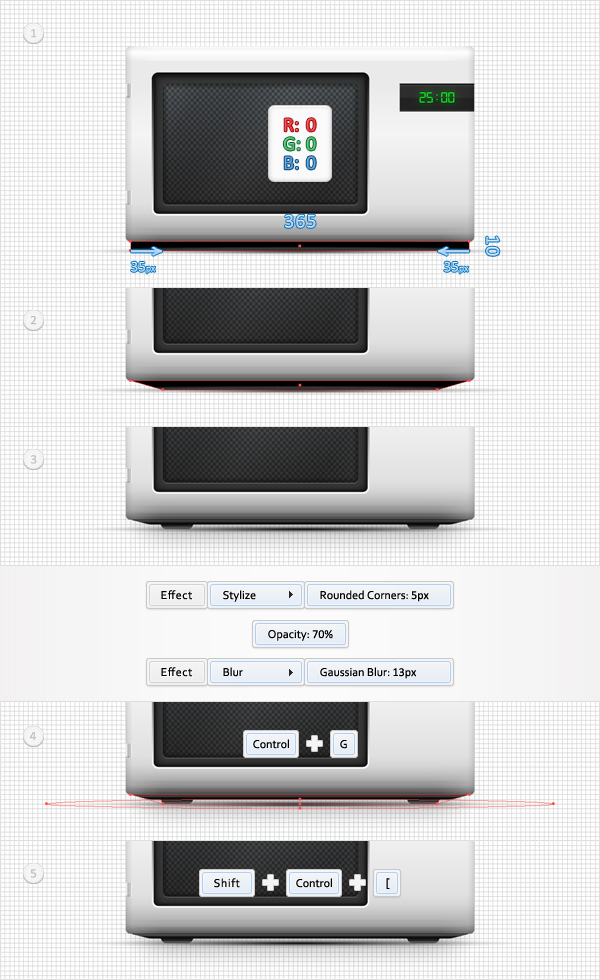
Using the Rectangle Tool (M), create a 365 by 10px shape, fill it with black and place it as shown in the following image. With the Direct Selection Tool (A), focus on the bottom side of this new rectangle. Select the right anchor point and move it 35px to the left then select the left anchor point and move it 35px to the right. Make sure that this new shape is still selected, lower its Opacity to 70% and go to Effect > Stylize > Rounded Corners. Enter a 5px radius, click OK and go to Effect > Blur > Gaussian Blur. Enter a 13px radius and click OK. Reselect this blurred shape along with the path made in the previous step and Group them (Control + G). Select this new group and send it to back (Shift + Control + [ ).
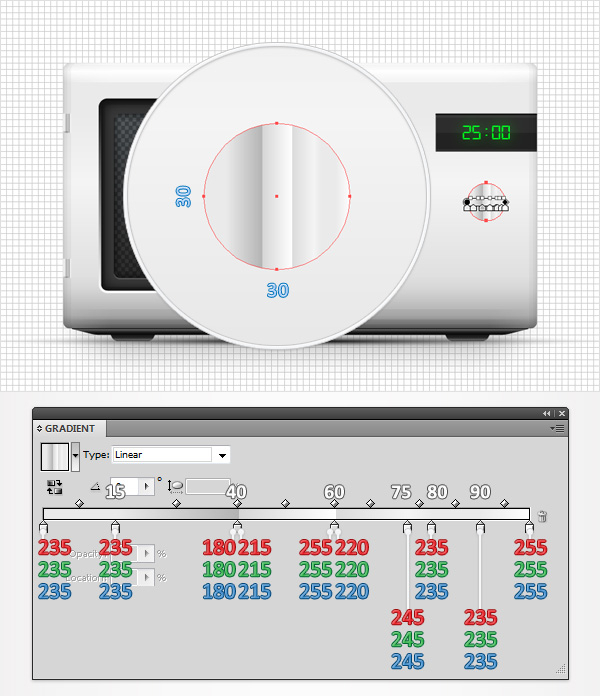
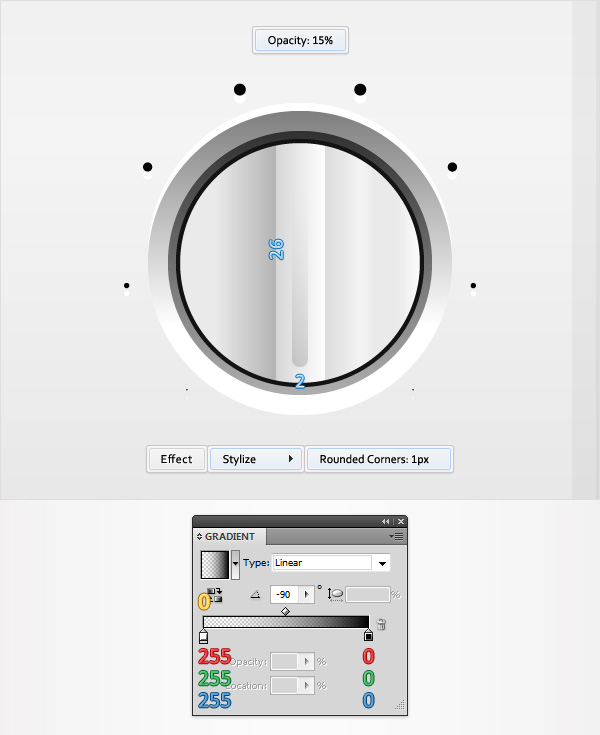
Step 37
Using the Ellipse Tool (L), create a 30px circle, fill it with the linear gradient shown below and place it as shown in the following image.
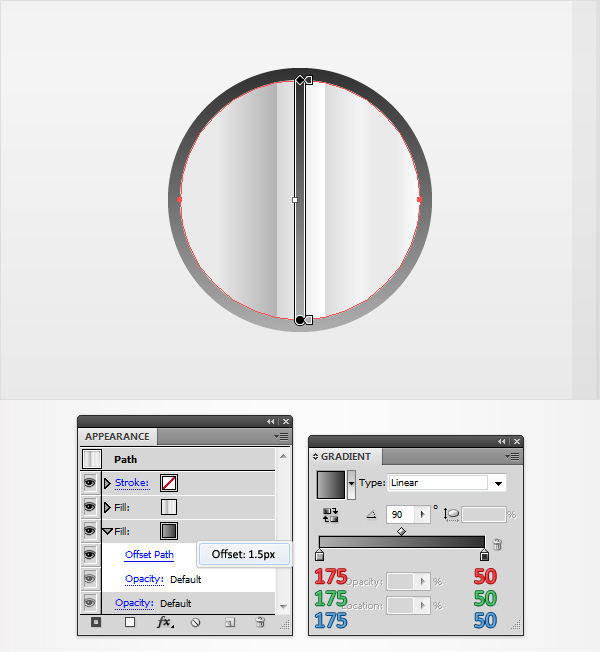
Step 38
Reselect the circle made in the previous step, add a second fill, drag it in the bottom of the Appearance panel and use the linear gradient shown below. Select this new fill and go to Effect > Path > Offset Path. Enter a 1.5px Offset and click OK.
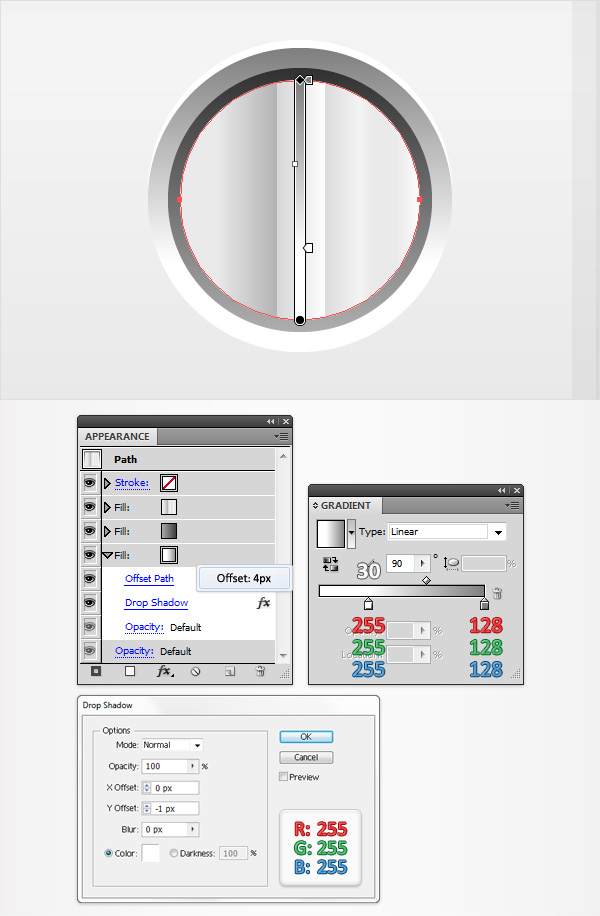
Step 39
Reselect the circle edited in the previous step and add a third fill. Select it, drag it in the bottom of the Appearance panel, add the linear gradient shown below and go to Effect > Path > Offset Path. Enter a 4px Offset, click OK and go to Effect > Stylize > Drop Shadow. Enter the data shown below and click OK.
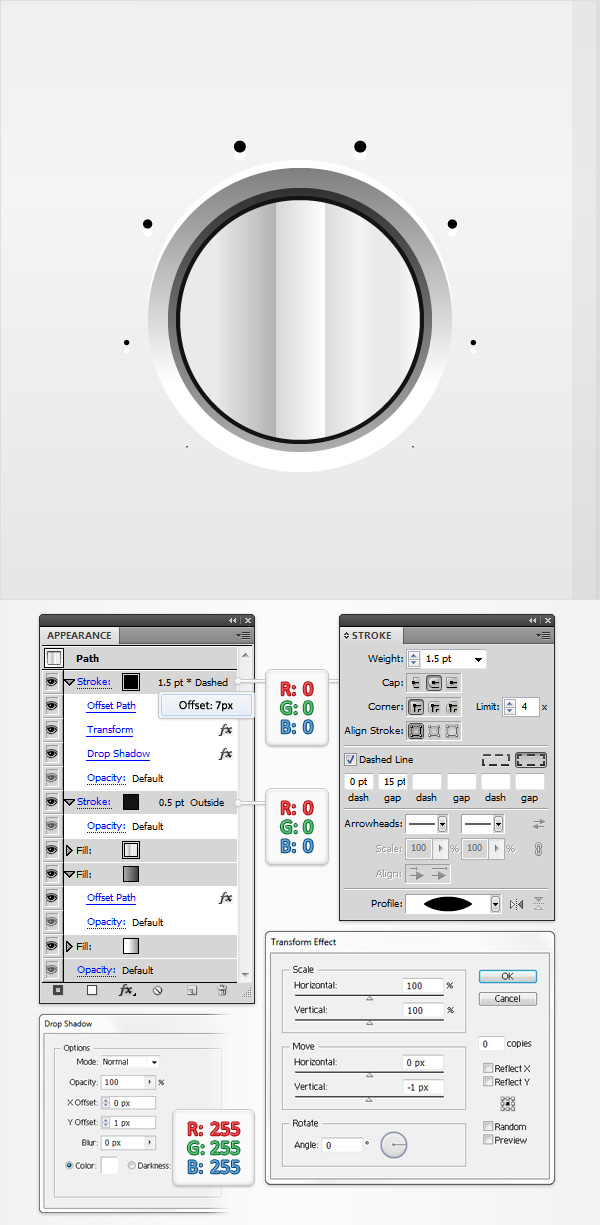
Step 40
Reselect the circle edited in the previous step, add a 0.5pt, black stroke and Align it to Outside. Keep focusing on the Appearance panel and add a second, black stroke for this circle. Select it, make it 1.5pt wide and open to the Stroke panel (Window > Stroke). First, check the Round Cap button from the Cap section.
Next, check the Dash box and enter 0pt in the dash box and 15pt in the gap box. Move to the right and check the button that “aligns dashes to corners and paths ends, adjusting length to fit”. Finally, move to the Profile section, open the drop down menu and select the “Width Profile 1".
Return to the Appearance panel, make sure that your top stroke is still selected and go to Effect > Path > Offset Path. Enter a 7px Offset, click OK and go to Effect > Distort & Transform > Transform. Enter the data shown below, click OK and go to Effect > Stylize > Drop Shadow. Enter the data shown in the following image and click OK. In the end your stroke should look like that in following image.
Step 41
For the final steps you will need a grid every 1px. So, go to Edit > Preferences > Guides & Grid and enter 1 in the Gridline every box. Using the Rectangle Tool (M), create a 2 by 26px shape, fill it with the linear gradient shown below, lower its Opacity to 15% and go to Effect > Stylize > Rounded Corners. Enter a 1px radius and click OK.
Step 42
Reselect the rectangle and the circle made in the last five steps, Group them (Control + G) then duplicate this group (Control + C > Control + F). Select this new group, make a copy in front (Control + C > Control + F), drag it down and place it as shown in the second image.

Step 43
Using the Rectangle Tool (M), create a 3 by 210px shape and place it as shown in the first image. Fill this new rectangle with the first linear gradient shown below, lower its Opacity to 70% and change the Blending Mode to Multiply. Continue with the Rectangle Tool (M), create a 2 by 210px shape, fill it with the second linear gradient and place it as shown in the second image.
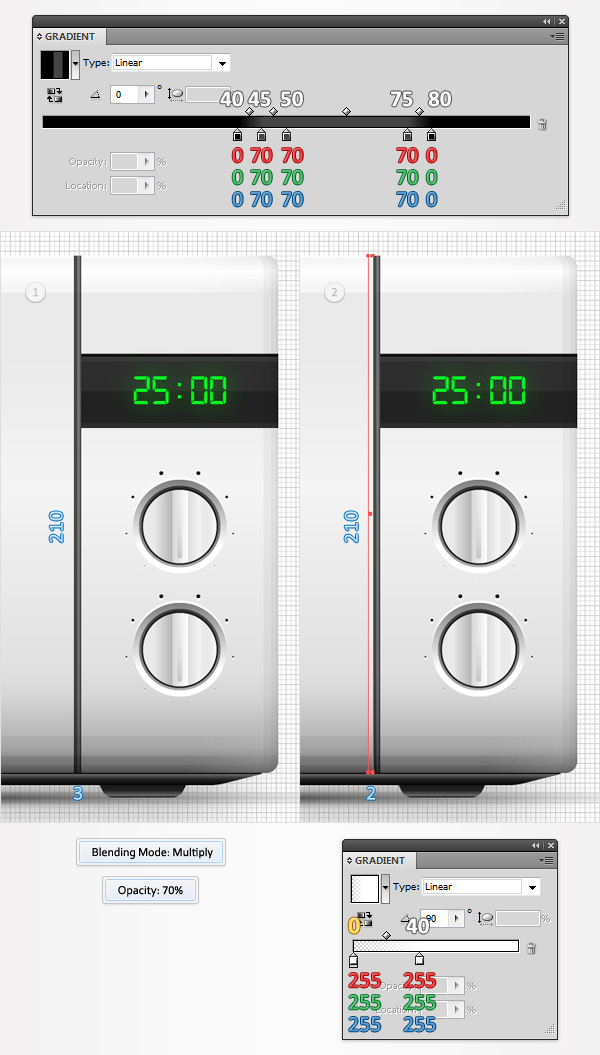
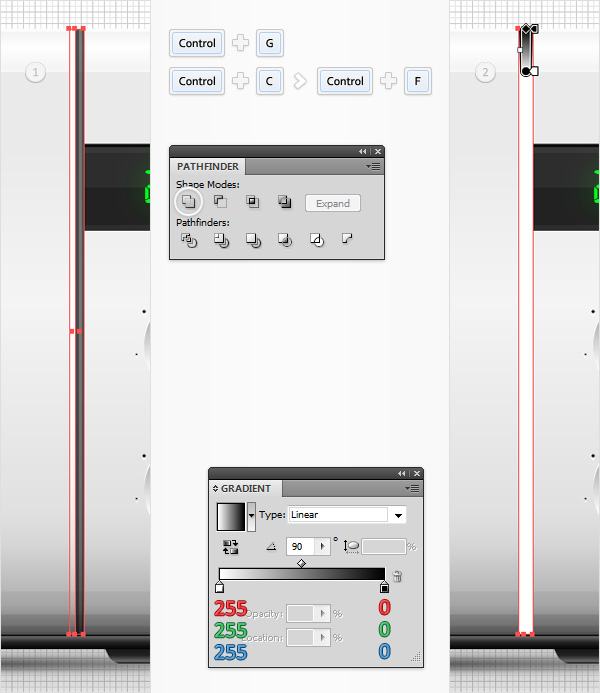
Step 44
Reselect both shapes created in the previous step, Group them (Control + G) then make a copy of this group (Control + C > Control + F). Select this group copy and click on the Unite button from the Pathfinder panel. Fill the resulting shape with the linear gradient shown below.
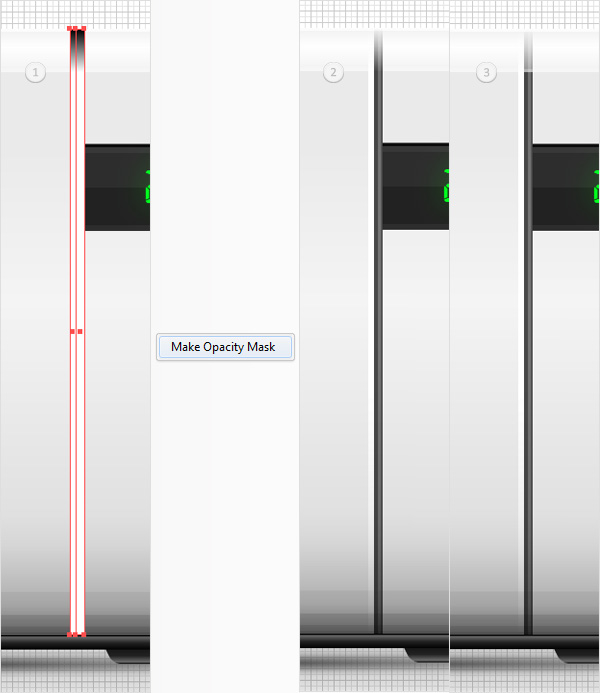
Step 45
Open the Transparency panel. Select the group and the shape made in the previous step, open the fly-out menu of the Transparency panel and click on Make Opacity Mask. Move to the Layers panel, select this masked group and drag it below the group of shapes made in the twenty-fifth step.
Step 46
Using the Ellipse Tool (L), create a 25 by 60px shape, fill it with the linear gradient shown below and place it as shown in the first image. Switch to the Rectangle Tool (M), create a 15 by 64px shape, fill it with black and place it as shown in the second image. Reselect both shapes created in this step and click on the Minus Front button from the Pathfinder panel.
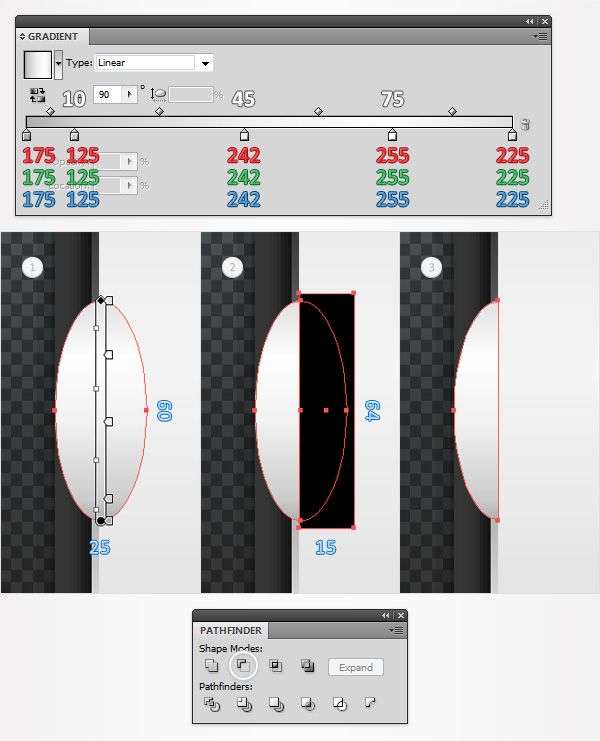
Step 47
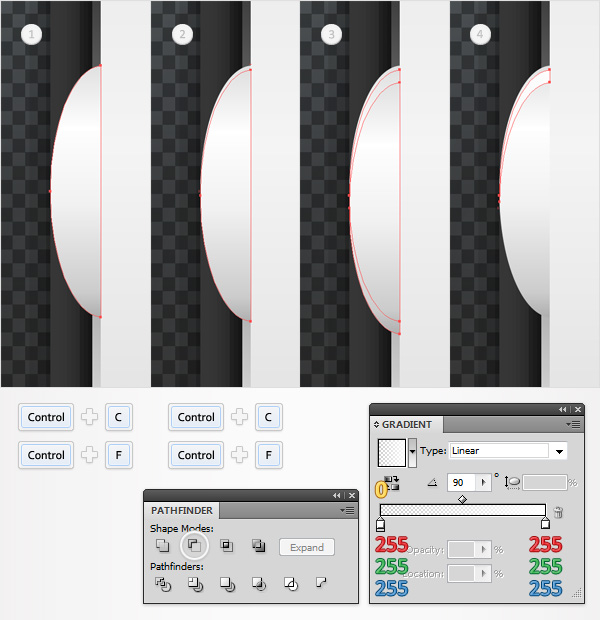
Reselect the shape made in the previous step and make a copy in front (Control + C > Control + F). Select this copy, move it 1px down then duplicate it (Control + C > Control + F). Select this new copy and move it 2px down. Reselect both copies and click on the Minus Front button from the Pathfinder panel. Fill the resulting shape with the linear gradient shown below.
Step 48
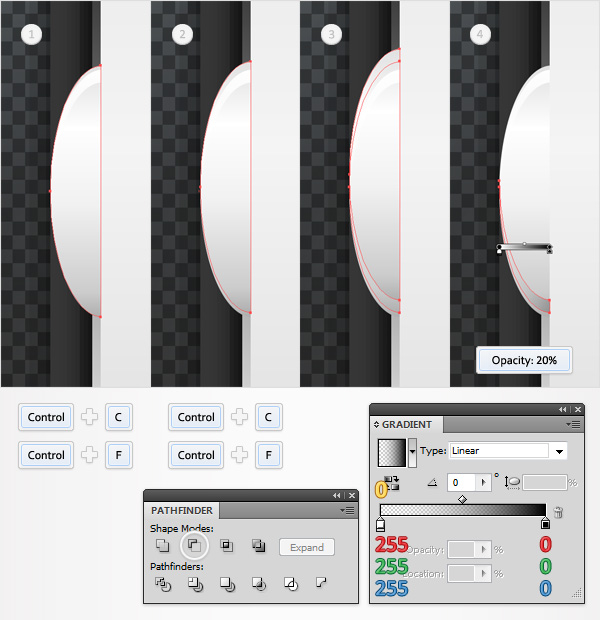
Reselect the shape made in the forty-sixth step and make a copy in front (Control + C > Control + F). Select this copy, move it 1px up then duplicate it (Control + C > Control + F). Select this new copy and move it 2px up. Reselect both copies and click on the Minus Front button from the Pathfinder panel. Fill the resulting shape with the linear gradient shown below and lower its Opacity to 20%.
Step 49
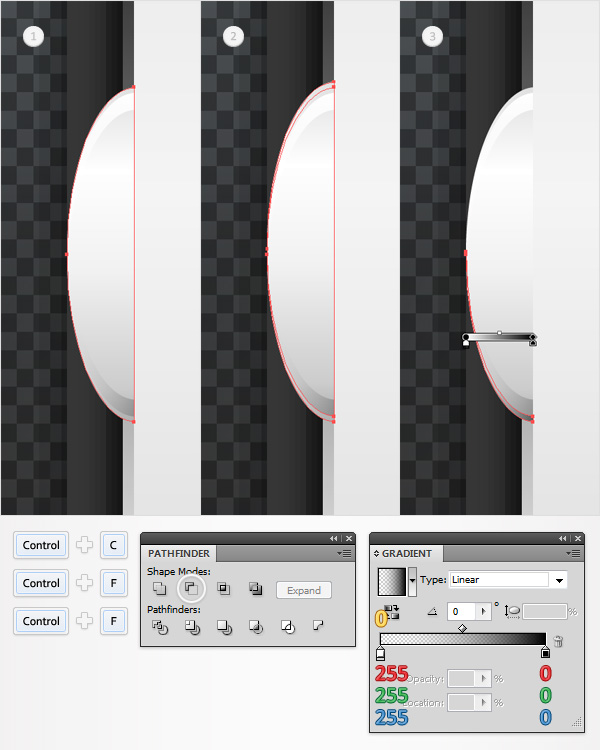
Reselect the shape made in the forty-sixth step and make two copies in front (Control + C > Control + F > Control + F). Select the top copy and move it 1px up. Reselect both copies and click on the Minus Front button from the Pathfinder panel. Fill the resulting shape with the linear gradient shown below.
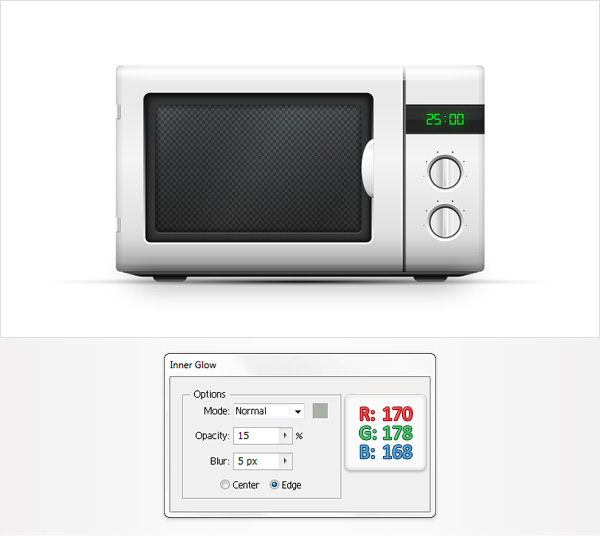
Step 50
Finally, select the rounded rectangle made in the second step and go to Effect > Stylize > Inner Glow. Enter the data shown below, click OK and you’re done.
Conclusion
Now your work is done. Here is how it should look. Hope you’ve had fun with the Appearance panel and creating shapes for highlighting and depth with the Pathfinder panel.