You will all agree, Christmas is the most cheerful day of the year. We are in the good mood, we are buying presents for the people we love, warping them, singing Carols and, of course, we are sending greeting cards with best wishes. Today we will be learning how to create neat Christmas card with a nice abstract Christmas tree in Adobe Illustrator. We will be using a lot of Pen Tool, combining some simple shapes and coloring with vivid color gradients. So, let’s get started.
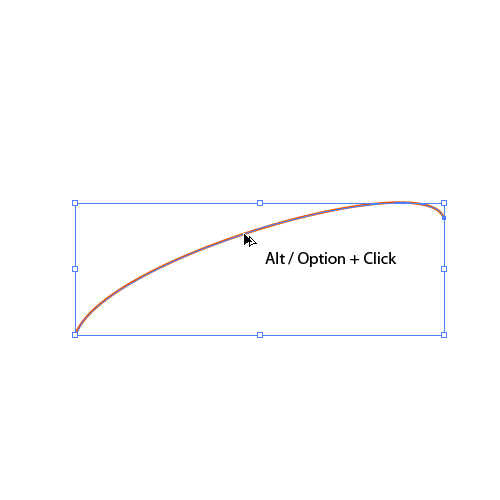
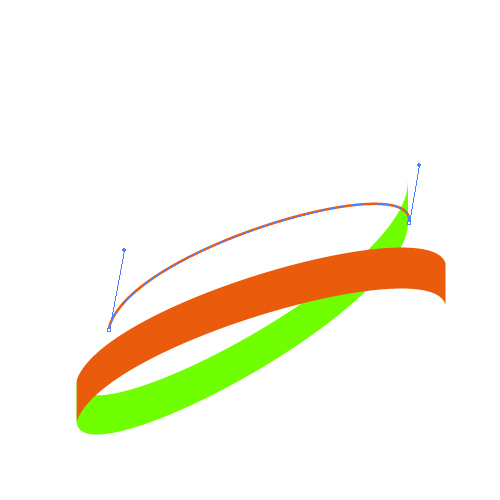
Step 1
We will start with the Pen Tool (P). Grab it from the Toolbar and draw the shape as it shown on the picture below. It should be a simple path with only two anchor points, on its endpoints. Make sure to remove the Fill color and set the Stroke color to any color you like (color is not important at this moment).

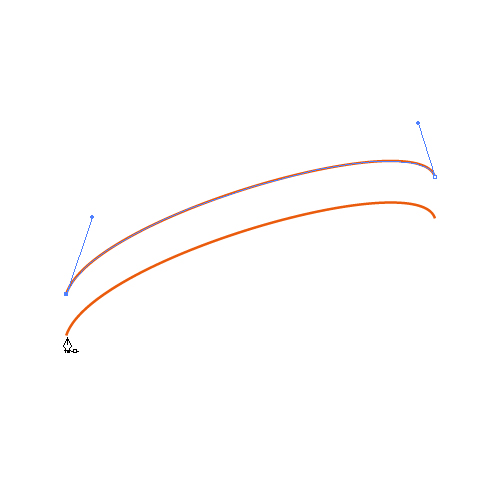
Step 2
Let’s create a copy of the path we have just created. Press the Alt/Option key on your keyboard, click on the path we have created and drag it upwards. It will instantly create a new copy.

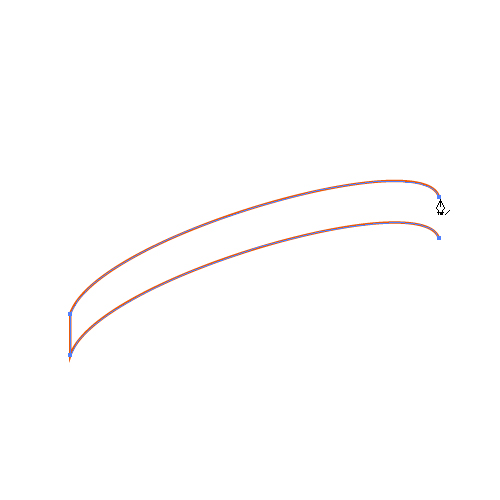
Step 3
To connect these paths grab the Pen Tool (P) from the Toolbar again and click on the endpoints of both paths in order to create a closed shape.

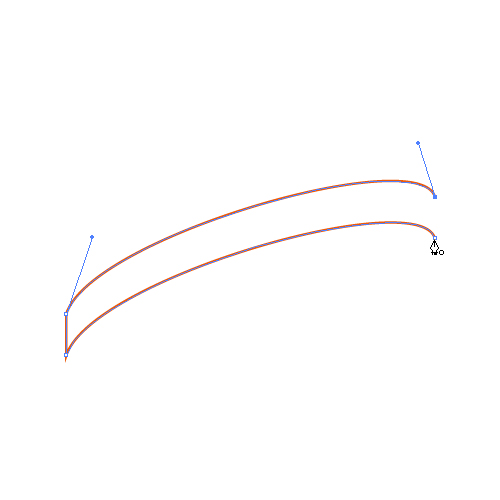
Step 4
Remove the Stroke color and set the Fill color to any color you like. This is our front shape of the ribbon.

Step 5
Let’s create the inner side of the ribbon. Grab the Pen Tool (P) from the Toolbar and create the path as it shown on the picture below. Try to draw the new shape like it’s connected to the front side of the ribbon. If you are not able to achieve nice a smooth transition don’t worry. We will fix it later.

Step 6
Create the copy of the new path by holding the Alt/Option + Click on the path and move it upwards (just like we did earlier).


Step 7
Grab the Pen Tool (P) again and close the paths. Remove the Stroke color and set the Fill color to any color you like. Also, send the new shape behind the front part of the ribbon ( Shift + Ctrl / Command + [ ).

Step 8
We are going to repeat previous step several times in order to create other parts of warped ribbon. Grab the Pen Tool (P) from the Toolbar again and draw the new path. This time a bit shorter than we did in previous steps.
Step 9
Create the copy of the new path (Alt/Option + Click and Drag) and place it as it shown on the picture below. As usual, using the Pen Tool (P) create the connection between the paths.


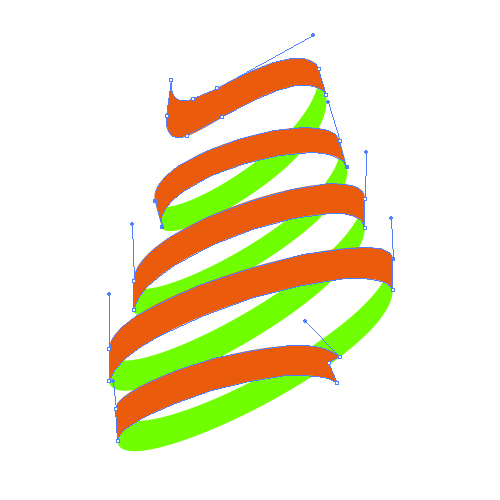
Step 10
Repeating previous steps create few more segments of the warped ribbon.

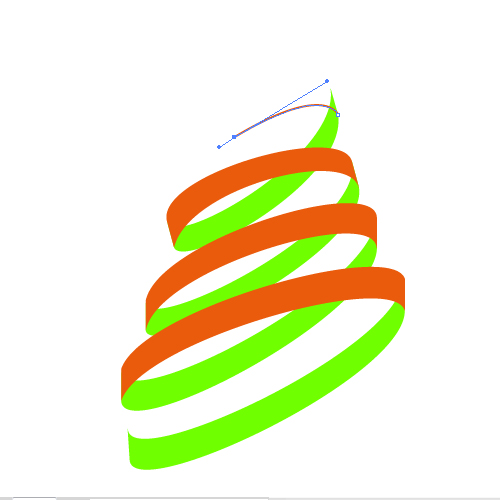
Step 11
Using the same technique we will try to create interesting "start and end" of our ribbon.


Step 12
As you can see, our warped ribbon is not perfect. Some parts of the ribbon are uneven and some transition between front and inner side of the ribbon are not quite smooth. We need to fix that. Grab the Direct Selection Tool (A) from the Toolbar and feel free to adjust positions of the anchor points and their handles.
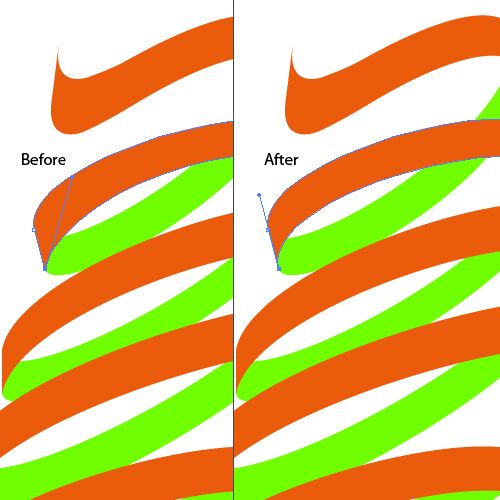
Step 13
This is how handles should look like after adjustments.
Step 14
Our Christmas tree is ready to get some colors. We will try to achieve a nice silky look of the ribbon by using simple color gradients. So let's get started.
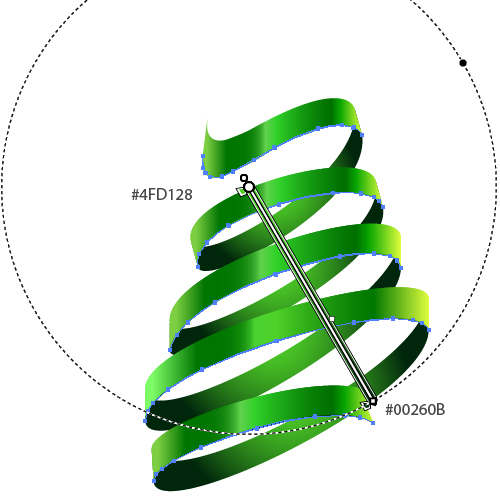
For the front side of the ribbon we will be using nice green linear gradient.
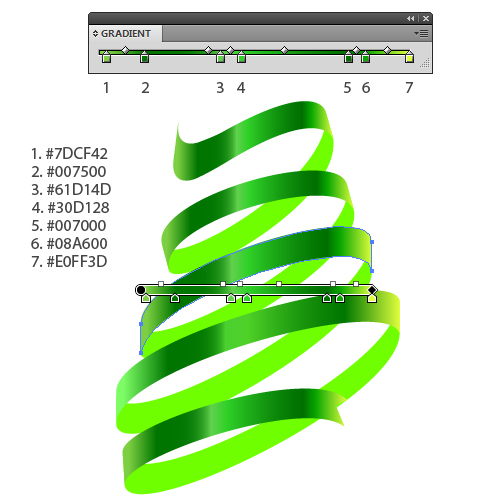
Step 15
For the inner side of the warped ribbon we will be using simple radial gradient.
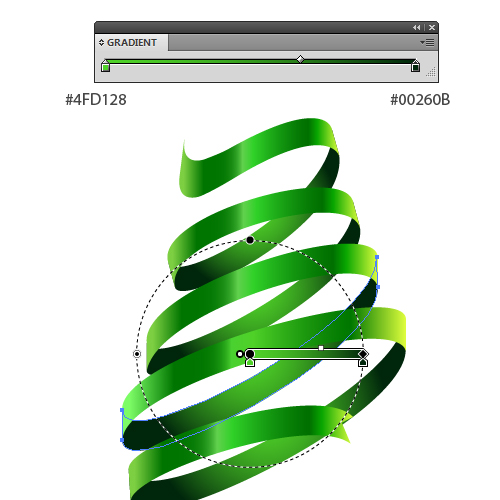
Step 16
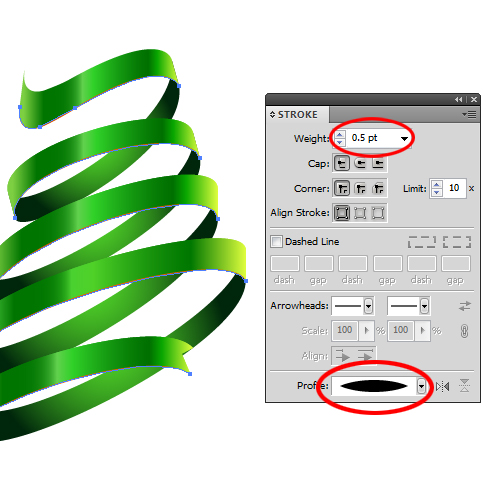
In order to improve the look of our Christmas tree we will try to add thickness to the ribbon. To do that we will duplicate (Ctrl/Command + C, Ctrl/Command + F) frond side of the ribbon. With the Direct Selection Tool (A) select anchor points marked with red arrow and remove them by hitting Delete on your keyboard.


Step 17
Remove the Fill color of the new paths and set the Stroke color to any color you want. We need to adjust the Stroke a bit. Under the Stroke Panel set the Stroke Weight to 0.5 pt and Profile to Width Profile 1.
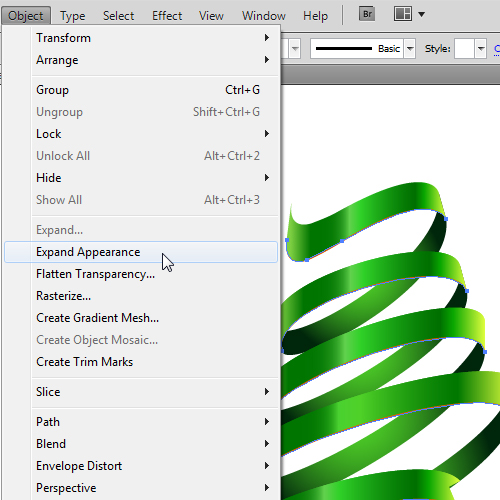
Step 18
Under the Object select Expand Appearance. It will turn our paths into the shapes so we can apply nice radial gradient (the same one we have applied to the inner side of the ribbon).
Step 19
Let's repeat the previous step for the inner side of the ribbon as well. Set the Fill color to #007500. You should end up with something like this.

Step 20
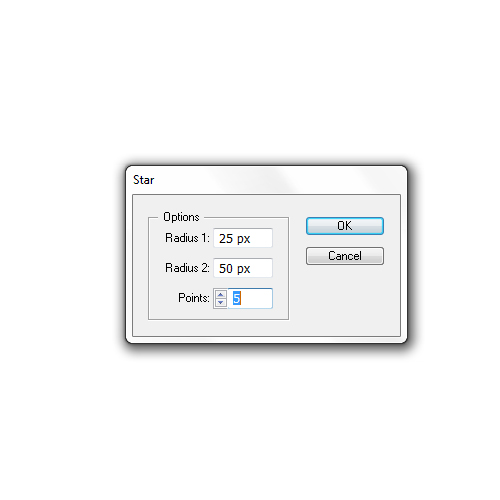
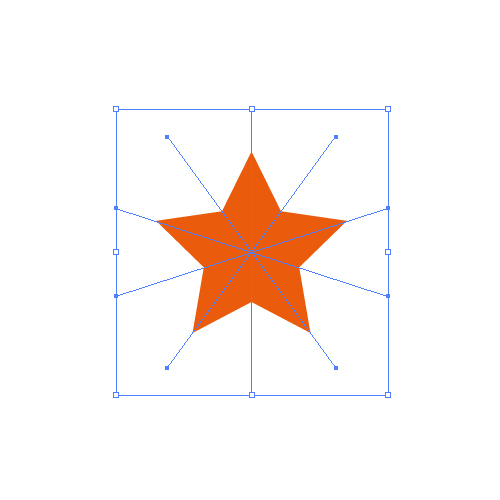
We are going to create a nice star for the top of the Christmas tree. Grab the Star Tool from the Toolbar and click somewhere on the Artboard. Star Options box will pop up. Leave everything as it is and click the OK button.

Step 21
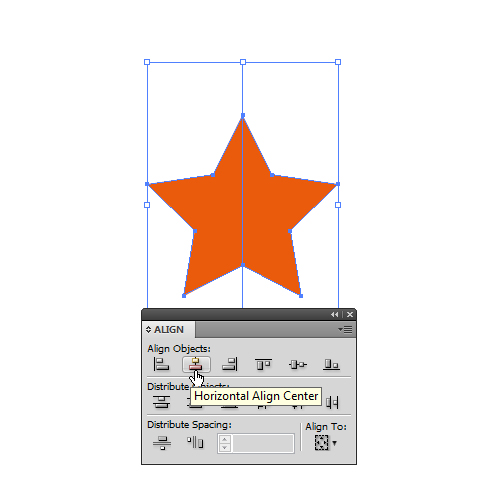
Now, grab the Line Segment Tool (/) from the Toolbar and create vertical straight path (don't forget to hold the Shift key on your keyboard for straight dragging). Align the new path with the star by selecting Horizontal Align Center.
Step 22
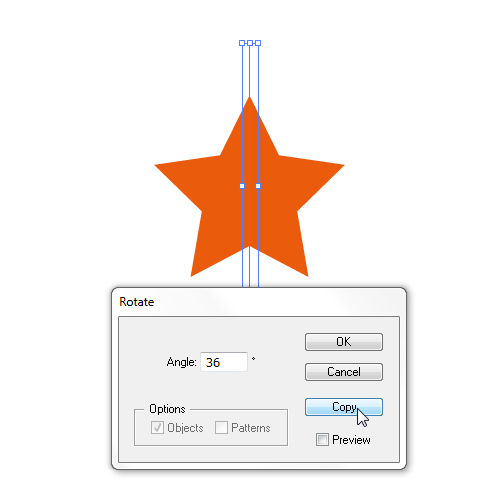
Since the star has ten corners we need to make four copies of existing path. Each individual copy needs to be rotated for 36˚. To do that select Object > Transform > Rotate. Set the Angle to 36˚ and hit the Copy button. It will create another path, rotated for 36˚.
Step 23
In previous step we have created another extra path and now we need three more paths. To do that just hit three times shortcut Ctrl/Command + D. If you need to adjust the position of the paths feel free to do it. You should end up with something like this.
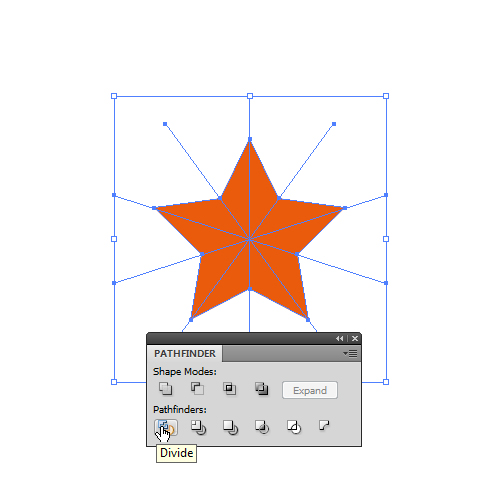
Step 24
Select both, paths and the star, and under the Pathfinder panel use Divide button. It will divide our star into 10 new segments.
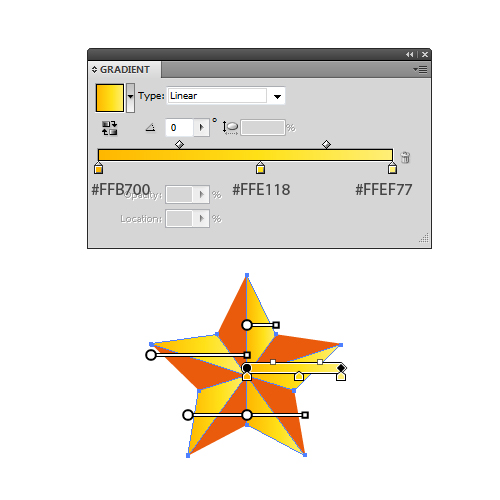
Step 25
Ungroup (Shift + Ctrl / Command + G) the star and apply nice linear gradient. Make sure to apply the same gradient to each segment, changing gradients direction.

Step 26
Select all parts of the star and Group them (Ctrl / Command + G). Place it on the top of our Christmas tree (make sure to bring the Christmas tree to Front by hitting shortcut Shift + Ctrl / Command + ] ).

Step 27
As you can see we are almost there. Select the lower inner part of the ribbon and duplicate it (Ctrl / Command + C, Ctrl / Command + F). Grab the Direct Selection Tool (A) from the Toolbar and remove the anchor points as it shown on the picture below.

Step 28
Remove the Fill color of the new path and set the Stroke color to any color you like (just to make it visible). Place it as it shown on the picture below.

Step 29
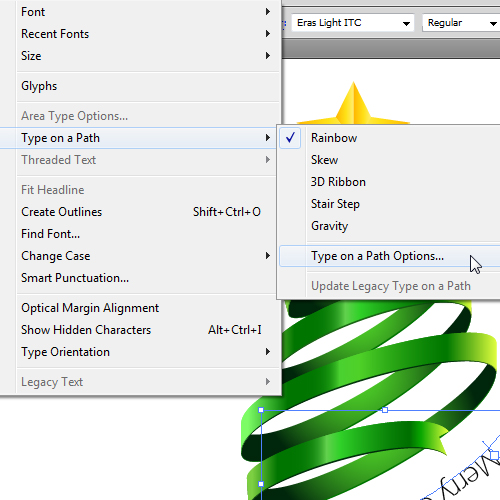
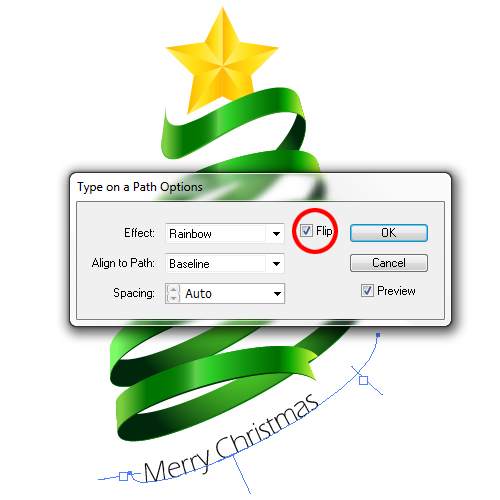
Grab the Type on a Path Tool from the Toolbar (it can be found under the Type Tool (T)), select nice Font, set the Font size and click on the path we have just create. Type "Merry Christmas". Don’t surprise if your text appear upside down. We will fix that.

Step 30
Select your text (along with the path) and under the Type select Type on Path > Type on a Path Options. Under the Type on a Path Options window leave everything as it is and make sure to check Flip box. It will set your text as it should be. All you have to do is to adjust the position of the text.

Conclusion
Today we had an opportunity to practice the usage of Pen Tool. There are other techniques that we could use to create our greeting card, but Pen Tool has allowed us to create shapes with just few anchor points which made the adjustments and shape manipulations much easier. Try to experiment with the angle of Christmas tree, you might get even nicer look.
I hope you enjoyed reading this tutorial as much as I enjoyed creating it. Thank you for following along and Merry Christmas.
