
Ombré is a French word describing anything that starts with one color and then gradually fades into another. Usually, a gradient fill or a gradient overlay is used to achieve this effect. This tutorial, however, will show you a super easy way to get a different version of the Ombré effect using two layers of Bevel and Emboss.
Tutorial Assets
The following assets were used during the production of this tutorial:
- Sail Regular font
- Texture 358 by Sirius-sdz
- Broken noise pattern by Vincent Klaiber
- Green Fibers pattern by Matteo Di Capua
1. Creating the Background
Step 1
Create a new 1100 x 700px document. Set the Foreground color to #760928 and the Background color to #3d1722, pick the Gradient Tool, click the Radial Gradient icon in the Options bar, and then click and drag from the center of the document to one of the corners.

Step 2
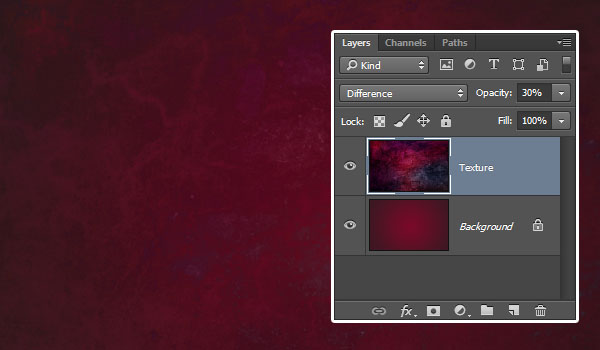
Place the Texture 358 image on top of the Background layer, rename its layer to Texture, then go to Edit > Transform > Rotate 90° Clockwise. Change the layer's Blend Mode to Difference and its Opacity to 30%, and then resize it as needed.
2. Creating the Text
Step 1
Create the text using the font Sail Regular, the Size300 pt, and the Color#d70f35. Then, change the Kerning value to Optical, and the Tracking value to -10.

Step 2
Duplicate the text layer and change the copy's Fill value to 0.

3. Styling the First Text Layer
Double-click the first text layer to apply the following layer style:
Step 1
Add a Bevel and Emboss with these settings:
- Technique: Chisel Hard
- Size: 16
- Gloss Contour: Cone—Asymmetrical
- Check the Anti-aliased box
- Highlight Mode: Linear Light
- Shadow Mode—Color:
#462020

Step 2
Add a Contour with these settings:
- Contour: Guassian—Inverse
- Check the Anti-aliased box.

Step 3
Add a Texture with these settings:
- Pattern: Broken noise
- Depth: 50%

Step 4
Add a Stroke with these settings:
- Size: 1
- Fill Type: Gradient
- Style: Reflected
- Angle: 90
- Click the Gradient box to create the gradient

Step 5
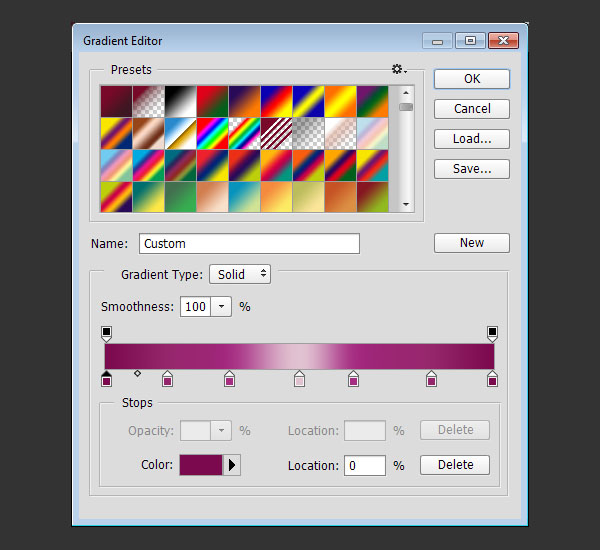
To create the gradient, you’ll need to click below the gradient bar to add Color Stops, and when you click each Color Stop, you can change its Color and Location values. Here are the Color Stop values used from left to right:
Color - Location
#7b094e- 0%#95266b- 16%#a52e82- 32%#e1c2d1- 50%#a52e82- 64%#95266b- 84%#7b094e- 100%
Step 6
Add an Inner Shadow with these settings:
- Color:
#c47b8e - Distance: 0
- Size: 7

Step 7
Add an Inner Glow with these settings:
- Blend Mode: Vivid Light
- Opacity: 40%
- Noise: 100%
- Color:
#c3858c - Size: 10

Step 8
Add a Drop Shadow with these settings:
- Distance: 9
- Spread: 9
- Size: 8

Step 9
This will style the first text layer with the main color.

4. Styling the Copy Text Layer to Create the Ombré Effect
Double-click the copy text layer to apply the following layer style:
Step 1
Add a Bevel and Emboss with these settings:
- Size: 30
- Uncheck the Use Global Light box
- Angle: 95
- Altitude: 50
- Gloss Contour: Half Round
- Check the Anti-aliased box
- Highlight Mode: Linear Light
- Color:
#e8db87 - Shadow Mode:
- Color:
#721a31 - Opacity: 30%
The Highlight Mode color is the color that will be added to create the gradient, so you can try different shades if you like.

Step 2
Add a Contour with these settings:
- Contour: Half Round
- Check the Anti-aliased box.

Step 3
Add a Texture with these settings:
- Pattern: Green Fibers

Step 4
Add an Inner Shadow with these settings:
- Color:
#505b5b - Distance: 21
- Size: 21

Step 5
Voilà! The styled copy text layer will add in a different color creating a nice gradient.

5. Adding a Subtle Vignetting
Step 1
Click the Create new fill or adjustment layer icon at the bottom of the Layers panel and choose Gradient.

Step 2
Change the Style to Radial and the Scale to 550, then click the Gradient fill box to create the gradient used.

Step 3
Use a Transparent to Fill Color gradient using the colors #432d23 to the left and #6e625c to the right. You can click at the top of the gradient bar to add Opacity Stops, and then click those stops to modify their values, just as you did for the Color Stops previously.

Step 4
Change the adjustment layer's Blend Mode to Multiply. This will add a subtle vignetting to the final result.

Congratulations! You're Done
In this tutorial, we used a gradient fill and a texture to create a simple background. Then we created two layers of text and modified a couple of their settings.
We styled each text layer with various effects using shades of the colors we want for the final result. We used two layers of Bevel and Emboss to create a gradient and get a nice Ombré effect.
Finally, we added some vignetting using a Gradient adjustment layer.
Please feel free to leave your comments, suggestions, and outcomes below.