
Eagles are some of the most imposing and graceful birds in the skies today, and I always marvel at their dominating presence and serious expressions. For Americans they are held very dear indeed, taking pride as the country's national bird.
So for this tutorial, come with me and learn how to draw a striking portrait of this marvellous creature.
What You Will Need


- Drawing paper or newsprint
- Drawing board (optional)
- Masking tape
- Pencils (Types 7B to 3H)
- Mechanical pencils (Types 6B to 2H)
- Charcoal sticks (extra soft)
- Pencil sharpener
- Steel ruler
- T-ruler
- Black coloured pencil
- Charcoal pencil
- Tissue/toilet paper
- Cotton buds
- Kneaded eraser
- Gum eraser
- Tombow Square and Circular detailed erasers
- Varied size blending nubs
- Tub of graphite powder
- Artists fixative
1. Set Up the Reference and Grid on Your Computer
Step 1
Firstly, ensure you have a good quality photo of an eagle in Photoshop that you wish to use as reference. You can find this one on PhotoDune.

Step 2
To set up a basic grid, click the View button on the top toolbar. Look for the Show option within this and click Grid to show a default grid on your image.

Step 3
This may need adjustment in order to make it easier to draw the image, so look for the Preferences option within the Edit button and adjust the grid lines to the size you require. For this tutorial we are going on a gridline division of 3.14 inches by a subdivision of 0.78 inches.

Step 4
Once your grid is set up correctly, press Shift-Command-4 to take a screenshot from the computer, and then paste the screenshot on top of your original photo layer.
Using the resize command Command-T, adjust your image so it matches the canvas size, and then crop the edges with the Crop Tool found to the left of the screen.

Step 5
You may want to label your grid axes both across the top and down the side, as shown below. I prefer to label mine 1, 2, 3 across the top and A, B, C down the sides. Doing this can help you keep track of your grid and can ensure you do not get lost in the reference.

2. Prepare Your Paper
For this tutorial we will be working on A4 smooth Bristol board (11¾ x 8¼ inches). If you have a drawing board, secure your paper onto it with masking tape so that it does not slide around as you are drawing.

3. Draw Your Grid
Step 1
Start by measuring out how big you want this drawing to be. You can either work to the exact size of the paper or, as I will be doing for this tutorial, you can work slightly smaller. With your T-ruler or steel ruler, measure out a box whose width is half a centimetre smaller than the size of the paper.

Step 2
Use your ruler to measure out the size of your grid. It would be best to avoid drawing too small a box, as this can complicate the construction of the image. My best advice would be to use a box that is either 1 x 1 inches or larger. For this tutorial I have decided to use a box measuring 1.75 x 1.75 inches exactly.

Step 3
Draw out your grid on the paper using a sharp 2B pencil with a moderate touch, as you may need to erase these lines later as we progress. Remember that pressing too hard on the paper or using too hard a lead can leave unwanted indentations that you may not be able to erase.

Step 4
If you wish to do so, label your grid axes 1, 2, 3 across the top and A, B, C down the sides. Make sure the labelling is identical to the one on the photograph reference.

4. Draw Your Image
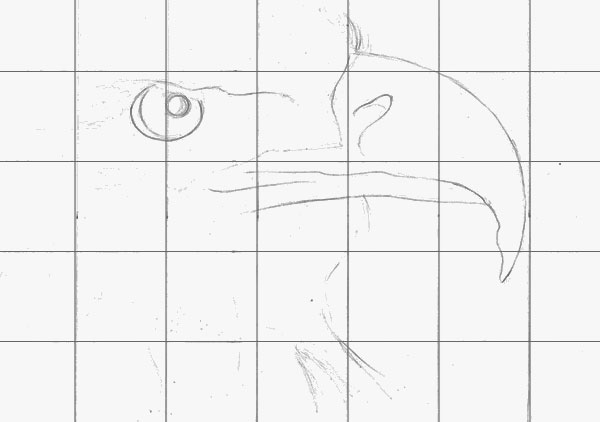
Step 1
To draw our eagle's head, it is best to continue using a sharpmechanical 2B pencil, so be sure to sharpen it if you haven’t already done so!
Now, using our reference, choose a focus point to begin your drawing. Personally, I would choose to start with a basic shape such as the eagle's eye, as in this image I see it as a main point of the image and it's easy to construct with a simple circle. Use a moderate to light touch with your pencil when drawing, as you may need to erase some lines later on.

Step 2
Continue drawing out basic shapes to define areas of the image. If you have labelled your grid as explained earlier it should be easy for you to draw these points on the image.
To make areas like the eagles beak simpler to draw, you might find it useful to use only short, straight lines to build it up. Once you have a basic layout, drawing the big curves on the beak will be much simpler.

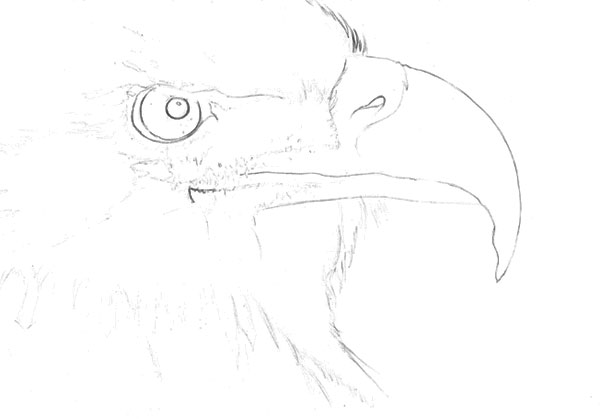
Step 3
Once you have all the basic shapes in place, we now have to fill in the details. At this point, take care when drawing and be sure to go back to your reference regularly, as a poor drawing at this stage will reflect when we come to the rendering stage.
For the feathers of the eagle, which of course are the main focus of this tutorial, your best route to drawing these at this stage is to draw in areas where the darker feathers are on the eagles head.
Do not be too precious about drawing perfect feathers this early on, because as we progress you will see that some of our under-drawing will be lost when it comes to the rendering stage.
Step 4
Now we shall begin to clean up any loose lines on our paper and hopefully we should be left with a nice, clean piece of line art.
First, with your putty eraser and with light to moderate pressure, carefully erase any loose lines on the page. Because this eraser is kneadable, it should be easy to get into hard-to-reach spaces. However, if you have any harder lines that need removing, you take your gum eraser and use moderate to hard pressure to get rid of these.
If any lines are accidentally removed, once you have finished, take your mechanical pencil and re-draw them.

Step 5
You should now have a nice, clean piece of line art on your
paper. Now, if you wish to do so, you can erase your grid and begin the next
step with clean line art. For the purpose of the tutorial I shall be removing
this.
5. Render Your Image
Step 1
Now we have the outline of the image, we can begin to fill in the details and create our feather effects. We shall be working from left to right on the paper to avoid smudging the graphite and charcoal, although if you are left-handed you can do the opposite to this.
We will be using two methods of applying graphite to the paper with pencils and graphite powder:
- Circulism
- Cross hatching

Circulism involves rotating your pencil with moderate pressure in a circular motion whilst moving the pencil across the page as shown below. Like hatching, this can be used to build up tone depending on pressure applied to the paper and how many times you repeat the motions. I use circulism more for darker tones, and it is especially useful for black areas as it gives good coverage on the paper.
Cross hatching is applied by a series of strokes in a diagonal direction going one way, then repeating the motion in the opposite direction. Levels of tone can be built up in this method by bringing hatchings closer together or repeating the motions time and again. You can also choose to blend the area you have shaded afterwards with a cotton bud or tissue paper if you so wish.
We shall be making great use of our mechanical pencils in this stage, because with feathers such as the ones we are drawing here, details are very fine and normal pencils may not be enough to do justice to this piece.
To begin with, get a smallamount of graphite powder on your soft paintbrush and, using the circulism method, start working this into a section of the paper.

Step 2
For some darker sections, you may need to reload your brush with powder and work on top of the base we have laid down. At this stage it doesn’t matter too much if your work looks messy, as we'll work with our mechanical pencils and Tombow erasers later on in this tutorial.

Step 3
Now you have a good base laid down on the paper, take a sharp 4B or 5B pencil and use tight cross hatching to begin tightening down the darker areas of tone that you have picked out in the previous step.

Step 4
Now for some fine details, take your 2B mechanical pencil and using loose cross hatching work in the very fine shading that will represent the vane (surface) of the feather. It is best at this stage to work in only lighter tones and then move on to darker ones.

Step 5
Once you have your lighter feathers rendered, take either your 4B or 6B mechanical pencils and work in darker feathers. This method of rendering may seem tedious, but if you want an accurate and detailed picture at the end, then this is the best way to do it.

Step 6
To represent the shaft (backbone) of the feather there are two ways to go about it:
- You can use either your 6B mechanical pencil or sharp black coloured pencil to draw these in.
- You can take a cotton bud (preferably one that has been used for blending graphite powder) and carefully using HARD, short, sweeping strokes, you will find the backbone of the bud itself acts as a pencil and creates the shafts we are after.

Step 7
You may notice that some feather vanes have very fine white barbs that make up their surface. To make these, take your circular Tombow eraser and carefully erase parts of the base tone layer we laid down earlier.
Hopefully, if you have done this previous step correctly, you should have no problems seeing your white barbs emerge from the paper. Make sure you pay close attention to your reference, as it is very easy to get carried away, and if you do that you will have to repeat previous steps to fix the problem!

Step 8
For really dark feathers, I find it best to use our black coloured pencil to fill in these details. It is also best to leave this step until the end, after you are sure all of your mid-tones are correct and are following our reference accordingly.
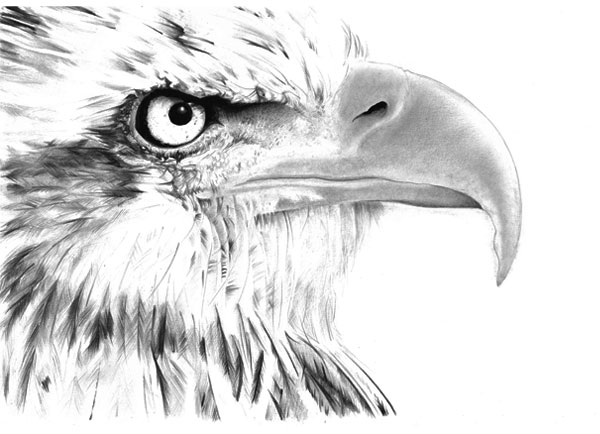
Step 9
Now we should have a fine set of feathers to look at, and they don’t come much more majestic than those of a Bald Eagle. Now we move across the image, section by section from left to right, or vice versa if you are left-handed, following the same steps we have covered.

6. Work on the Eyes
Step 1
One of the other focal points of this image undoubtedly is this eagle’s eye. Eagle eyes always have a seriousness and majesty about them, so it is important that we spend as much effort on these as the rest of the image.
Start by taking one of your compressed charcoal sticks and, with a moderate touch, begin working in the black areas such as the pupils and shadow around the eye.

Step 2
Avoid filling the edges near the iris with your charcoal stick as it can be a messy tool and difficult to control. To solve this, take your charcoal pencil and carefully finish the edges of the pupil and the eye itself. Then, take a HB or a B pencil and, using light cross hatching, blend in lighter tones in the iris and then take a small blending nub to blend these together. Any fine details in the iris can be drawn in with a mechanical HB or 2B pencil.

Step 3
Finally, for the specular highlights in the eye, take your circular Tombow eraser and remove any traces of graphite in this area. Now you should have an eye that will strike any viewer of your work!

7. Work on the Beak
Step 1
The beak of the eagle is one of its sharpest weapons for both catching and dissecting its prey, and like the eyes, we need to devote plenty of time and energy to it. Begin by laying down a base with graphite powder. Unlike the feathers, you can apply the powder using your small paint brush rather than a cotton bud.

Step 2
You can choose to apply a small second layer of graphite powder with a clean cotton bud or carefully build up tone using a H, HB or a B pencil and use the circulism method. The eagle's beak does not have much shadow on it, so do not go overboard on this step.
Step 3
You should now have your base tones built up, and we can now go and work on the fine details. To do these we shall be using our circular Tombow erasers.
Paying close attention to your reference, carefully carve in the fine details on the eagle’s beak. For dull highlights, use only a light to moderate touch, and for brighter highlights a harder touch may be required.
I must mention that ideally you need your erasers to have a sharp edge rather than a rounded one. If you need to create a sharp edge, I suggest rubbing your eraser upright on a scrap piece of paper or hard board to create the sharp edges we are after.

Step 4
If needed, you can add small areas of tone to tighten up your erasures using a 2H or HB mechanical pencil.

8. Work on the Background
Step 1
Luckily the background in our reference is a very simple one, and hopefully it will not cause you any problems.
To start, take your extra soft charcoal stick and a cotton wool pad and first draw in a little amount of charcoal onto the paper. Then take your wool pad and begin working the charcoal into the paper using circular motion.
Repeat the above step to build up the layers if you need to do so, and once you have done this you should have a virtually complete background. If more blending is needed, take your tissue paper and, as with your cotton wool pad earlier, work the charcoal using circulism.

Step 2
The last touches we need to make are the fine details around the beak and on the eagle’s forehead.
For around its beak, you can take your charcoal pencil and work in a small section of charcoal around the edge of the beak, and then blend it using a medium sized blending nub.
If more refinement is needed, take your black coloured pencil and carefully outline the beak but, as has been mentioned before in this tutorial, ensure your lead is SHARP!

Step 3
For the feathers on the eagle's forehead, take either your square or circular Tombow erasers and erase the fine barbs that make up the bright white feathers. Completing this section should complete one of the main highlight sections on this image.

Awesome Work, You're Done!
We should now have an almost complete picture! It is at this point I would recommend you go over your work and check it carefully against our reference to make sure you have not missed any details.
To seal your work, you should now spray your drawing with artist’s fixative. Using this will prevent any accidental smudging of your drawing when it is in storage or on display.

