Clik here to view.

Everybody loves to go the zoo, right? It's very exciting to meet all the different animals, watch their movements, and see the cute little baby animals. Of course you love the panda, lion, giraffe and… the koala! Did you know that it's not a bear? I had no idea, but the koala is not a bear! It is a marsupial, like a kangaroo.
Today I'm going to show you how to create a koala climbing on a tree. It's an easy, fun tutorial for those who've just started to learn Adobe Illustrator.
1. Creating the Head and Face
Step 1
First, let’s open your Adobe Illustrator and create a new document. For this, go to File > New. Let’s create a New document with 600 x 600 px Width and Height. Then click OK.
Now we are going to create the koala's head. Look at the left panel on your workspace—the Tools panel (to open it go to Window > Tools). There, you can find the Ellipse Tool (L), which you will use to create the head.
So, let's take the Ellipse Tool (L) and draw an ellipse. Set the color to R=171 G=175 B=166. Take the Direct Selection Tool (A) from the Tools panel and select the left and right anchor points. Move them down using the arrows on your keyboard.
Clik here to view.

Step 2
Now we want to give the koala's head a slightly fluffy effect. Take a look at the top panel of your workspace and find Effect on the tool bar. Go to Effect > Distort and Transform > Roughen. In the new dialogue window, enter the following options:
Clik here to view.

Step 3
Let's create the ear. Keep the fill color, and use the Ellipse Tool (L) to create a circle. To create a nice, even circle, hold the Shift key while drawing. You can see that your circle is already becoming rougher.
Then add a smaller circle with the fill color R=221 G=223 B=218. This
smaller circle is already roughened, but we don’t need the
roughening effect. To delete the rough effect, on the Appearance panel
(Window > Appearance), grab the word “Roughen" and move to the trash
icon. In the second image you can see how to remove this effect. Look at the circle now!
Clik here to view.

Here is how to move the word “Roughen" to the trash.
Clik here to view.

Step 4
Keep the whole ear selected and right-click your mouse. In the pop-up window, select Transform > Reflect. Select Vertical axis of reflection and press Copy.
Move the second ear and place it on the upper right side of the head. To
make the ears align correctly, you can select both ears, right-click
the mouse and select Group. While holding down the Shift key, select the
head and the ears together. Go to the Align panel (Window > Align)
and press Horizontal Align Center.
Clik here to view.

Step 5
Now on to the eyes. Choose a dark gray fill color, which you can see in the image below, and draw an oval using the Ellipse Tool (L). Draw a small white circle to give a sparkle to the eye. Then create another eye—keep the existing eye selected and while holding the Alt key, move it to the right. You can see that you just created a copy of the eye by holding the Alt key.
Clik here to view.

Step 6
Using the Ellipse Tool (L), create an ellipse. Move down the left and right anchor points, just as you did for the koala's head. You will get an egg shape. Then create a copy of it (Control-C, Control-V) and make it smaller. Change the fill color to R=75 G=76 B=72. Place it as shown in the image below:
Clik here to view.

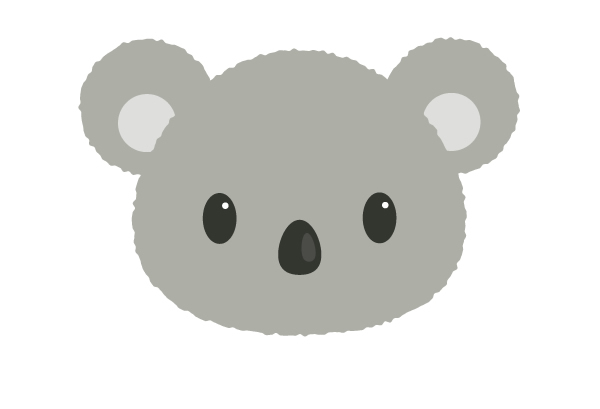
Step 7
Place the whole nose on the koala's face. Try to put the nose right between the eyes. Look how cute it is!
Clik here to view.
2. Creating the Trunk of the Tree
Step 1
Now, we need create the tree trunk. Take the Rectangle Tool (M) and create a rectangle. You can see the fill color on the image below, or feel free to choose any color of your choice.
Look closely at the Tools panel and try to find the Warp Tool (Shift-R). Do you see a hand with a finger holding some strange thread? That's it. But before using it, let's adjust the options on this tool. Double-click on it and in the new dialogue window, enter:
Clik here to view.

Once you have created the tree trunk and adjusted the options on the Warp Tool (Shift-R), draw the branch using this tool. In the image below, you can see the directions of the movement.
Clik here to view.

Step 2
Make the fill color darker (R=86 G=52 B=29) and draw a few long rectangles around the trunk. Use the Warp Tool (Shift-R) over them again.
Clik here to view.

Step 3
Place the koala's head behind the trunk. To place it behind, select the whole head, group it together (right-click > Group) and press Control-X, Control-B. Rotate the head a little bit to the right.
Clik here to view.

3. Creating the Paws
Step 1
To draw the paws, start with an oval. Set the fill color to R=189 G=191 B=183. Add a rough effect for the paw as you did for the head and ears (go to Effect > Distort & Transform > Roughen). Enter the options you see below.
Clik here to view.

Step 2
Copy-paste the paw to have four of them, and place them as shown:
Clik here to view.

4. Creating the Leaves
Step 1
We’re almost there! Once you have an ellipse, with fill color R=163
G=165 B=16, pick the Convert Anchor Point Tool (Shift-C), and make sharp
anchor points by clicking on the top and bottom anchor points. You'll
get a simple leaf shape.
Clik here to view.

Step 2
Copy-paste to create as many leaves as you want, and put them on the tree.
Clik here to view.

Step 3
Let's create a background for this illustration. Set the fill color to R=237 G=234 B=239 and click on your art board. In the new dialogue
window, enter Width 600 px, Height 600 px and click OK. Place the square
behind everything (keep it selected and press Control-X, Control-B).
Voila! We’re done!
Clik here to view.

Awesome Work! You're Now Done!
Congratulations, you did a good job! Now you know how to create a koala on a tree. And if you use your imagination, you can turn a koala into any other animal. For example, why not try creating a panda, brown bear or kitten.
Clik here to view.
 Image may be NSFW.
Clik here to view.
Clik here to view.