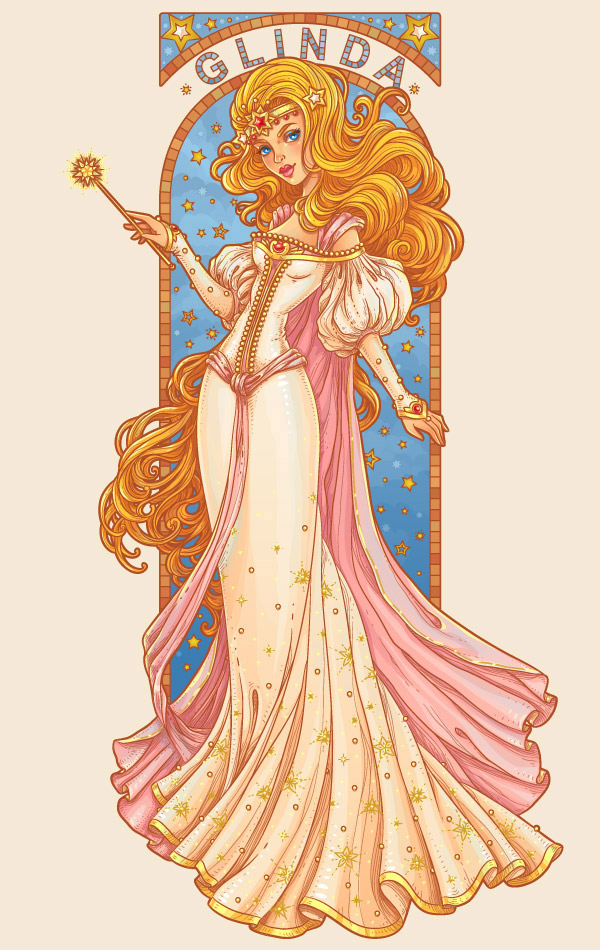
In this tutorial you'll learn to create a character from children's novel “The Wonderful Wizard of Oz”—the Good Witch of the South.
1. Make a Sketch
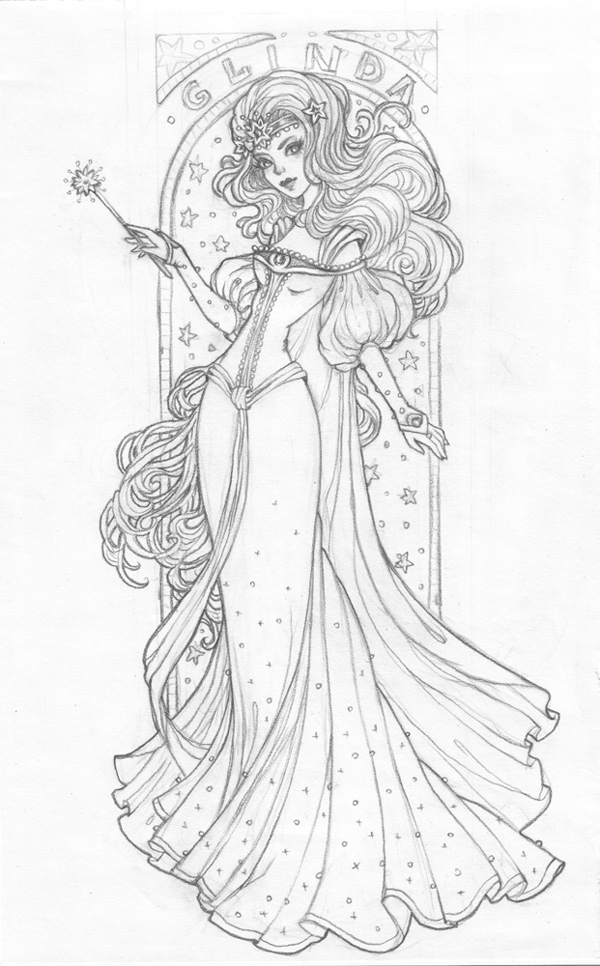
Step 1
At the beginning, let's draw a sketch. I was inspired
by artists who created in Art Nouveau style. To draw a sketch we need to use
recognizable features of our character. In the books, Glinda is the most
powerful sorceress of Oz. She is a beautiful young woman with long, wavy hair and big, blue eyes. She wears a beautiful ball dress with a plume behind her, a golden
crown with stars upon her head, and carries a magic wand that helps her cast
only good spells to protect Oz.
Step 2
Create aNew document, 600 x 950 px, RGB. Then File > Place your sketch in Adobe Illustrator. Change the layer name to "sketch". In the Layer Options choose Template and change Dim Images to 50%.

2. Create a Brush and Draw the Contour of the Character
Step 1
Create a New Layer for the lines. We'll draw all lines in this layer, because all detail colors will be the same.
Step 2
Now let's create a brush. Make a black ellipse with the Ellipse Tool (L) with 100% fill (Ellipse Options: Width: 100 px; Height: 3 px). Drag this shape to the Brushes panel and go to New Brush > New Art Brush.
Then press OK,
and the window Art Brush Options will appear. Choose the Tints method.

Step 3
Let's draw the contour of our character. Choose the Paintbrush Tool (B), and make the trial line. In our case, we’ll see that the line is too thick. Change its Weight to 0.35 pt on the Stroke panel.

Step 4
The most convenient method is to start drawing the contour of the face. Draw lines as smoothly as you like, following the sketch. Cut unnecessary pieces using the Scissors Tool (C), select the segment and press Delete.

Step 5
Next draw the hairstyle, making just the main lines. Later we'll add details made of very thin lines.

Step 6
Let's create a brush “string of beads” for the dress decoration. Use the ellipse from the diadem. Drag it to the Brushes panel and create aNew Pattern Brush as shown below.

Step 7
Choose the brush and draw lines to decorate the bodice of the dress.

Step 8
Draw the entire character using our first art brush. It's easier to make some of the long lines on the dress folds using the Pen Tool (P); otherwise use the Paintbrush Tool (B).

Step 9
On the new layer draw some stars for the skirt decoration. Select each of them and press Control-G.

Step 10
Duplicate these stars, pressing Alt, and place them on the skirt randomly as you like. Delete unnecessary details on the creases using the Eraser Tool (Shift-E),diameter: 4-5 pt.

Step 11
Make the "lines" and "dress stars" layers invisible. Now create a New Layer under "lines", and here we'll draw the background lines.
Let's begin to create the archway by making a rectangle 280 x 580 px. Use the basic brush for the lines, weight 1 pt. Select this rectangle and go Effect > Warp > Arc Upper. On the Warp Options panel change theBend to 100%, and press OK.
Create the inner part of the archway this way, using a
rectangle 260 x 580 px.

Make a rectangle 280 x 74 px for the upper decorative arch and apply the options shown below.

Step 12
Now let's create a Pattern Brush for the arch mosaic. Draw a vertical line 10 px long and change the brush options as shown in the screenshot.

Draw the line exactly in the middle of the two arch lines and apply our mosaic brush.

Step 13
Create a New Layer for the text. I chose Arial Bold font, because its letters are convenient and simple for the mosaic pattern.
Type the word “GLINDA” on the circular arc using the Type Tool (T), and change the font size to
42 pt. Then press the right mouse button and choose Create Outlines. Change the Fill
to the Stroke.

Step 14
Now create a Pattern Brush for the letters the same way as the previous brush was made for the mosaic. Here use a vertical line 5.5 px long.

Draw the line in the middle of the letter shape and apply the brush we have just created. Fill the empty spaces up using short, straight lines.

Step 15
Well, it's time to draw the stars for the background decoration. Create a star using theStar Tool on a New Layer, choosing the size 4 x 8 px, 5 points. Cut the five internal points of the star using the Scissors Tool (C). Then create some additional stars using the first one.

Place some stars on the internal part of archway, changing their size and angle of rotation as you wish. Add some circles for diversity in the end.

Step 16
Now let's return to our character. Make the layers "lines" and "dress stars" visible, but all the others, including "sketch", invisible.
Create a New Layer over the
"lines"; here we'll draw thin lines. Choose our art brush and change
its Weight to 0.15 pt on the Stroke panel. We have to draw the lines
where the creases and the shadows are.

Step 17
Here is how the character looks now.

3. Create the Main Shapes
Step 1
First let's color the contour of the character. Select all lines and go to Object > Expand Appearance, filling them with brown color. Select the thin strokes separately and change the Opacity to 70%. Fill the stars with gold color.

Fill the background lines with brown too.

Step 2
Now we need to create the swatch of the main colors. In the books, Glinda is a redhead beauty, her dresses are white or pink, her eye color is blue and the diadem is gold with red diamonds. Choose sky blue and brick colors for the archway.

Step 3
Now it's time to begin painting. Choose the colors from your swatch. Use the Pen Tool (P) for convenience. Start drawing the main shape following the brush contour. If required, use the Pathfinder panel to Unite shapes or Minus Front.

For a convenient work process, we'll create separate layers for each part of the character and the background. Organize the layers as shown in the screenshot below.

Step 4
Here's what we've got at this stage.

Step 5
It's time to make the outer contour of the character a bit thicker. Create a New Layer. Select all the layers with lines and main shapes of our character and copy them by pressing Control-C. Then go to the “outer contour” layer and press Control-F.

Now we'll go to the Pathfinder panel and press Unite.

Change the Fill
to the Stroke.On the Stroke panel
choose Align Stroke to Outside.

I noticed that the outer contour on the magic wand is unnecessary. Delete the excess points using the Delete Anchor Point Tool (-).

Step 6
Make the outer contour of the archway thicker following this method. Select the arch shapes, and apply Expand Appearance. Change the Fill to the Stroke and choose Align Stroke to Outside.
The main part of the drawing is done. Here is how the image
looks now.

4. Add Shadows and Highlights to the Character
Step 1
Let's add some volume to the face. First change the color of the lines of the eyes to make them more expressive. Delete the outline from the white round shapes.

Then add some linear gradients from the main skin color to peach color on the face.

Add the same gradients on the chest and hands.

Step 2
Add some blushes to the nose and cheeks. Create a radial gradient, reducing the Opacity to 0% on the outer slider. Then select all blush shapes and change the Opacity to 20%.

Step 3
Add some shadows to the face. Chose the brick color, and reduce the Opacity to 5%. Draw the shapes one on the top of the other using Pencil Tool (N) until you get the desired result.

Step 4
Let's choose the color for the falling shades. Select the contour color using the Eyedropper Tool (I), reduce the Opacity to 50%, and draw some shadows under the eyes, lips, diadem and hair.

Step 5
Next let's add some highlights. Choose the bright-yellow color and draw some highlight shapes on the places where light of the magic wand has fallen.

Add shades from the background. Select the blue color, change Opacity to 5% and draw some shapes on the lighter part of the face.

Step 6
Now we'll get to work on the eyes and lips. Draw the eye shadows using a blue color with 30% Opacity. Add some falling shades under the eyelashes, and some bright twinkles.
Go to the layer with lines, select the upper eye line, and fill it with the linear gradient from brown to dark-brown, and the bottom line from light-brown to brown.
Also change the color of the lines of the lips. The upper part of the lips is shaded, so make it darker. Make volume by drawing a shadow between the lips and adding some highlights to the bottom part.
Add bright highlight to the eyebrows.

Step 7
Draw the same shadows and highlights on the hands and chest as described above.

Step 8
Let's start coloring the hairstyle. Select the upper part of the hair and fill it with linear gradient from yellow to orange, and the back part of the hair from orange to brown.

Draw the shapes of the shadows, and then select them and press Unite on the Pathfinder panel. Fill this shape with vertical linear gradient from orange to brown, reducing the Opacity to 75%.
Next draw shapes for
the dark shadows, unite them and fill with a darker gradient.

Now draw the highlights using the same steps. Fill the shape with the gradient from light yellow to yellow, 80% Opacity.
In the end, add some blue shapes and gloss to the lightest area of the hair.

Use the same principles to draw the back part of the hairstyle.

Step 9
It's time to add highlights and shadows to the dress. First color it with vertical linear gradient from ivory to cream. Apply the same gradient on the sleeves and gloves.

Step 10
Now draw the shapes of the shadows, unite them and fill with gradient from cream to peach, as you can see below.

Apply these principles to draw dark shades and highlights, using darker or lighter gradients respectively. Play around with the Opacity where possible.

Then add some blue shapes and white gloss to the lightest area of the dress.

Step 11
Now we'll draw the shawl and belt. They are of the same color, so we'll draw them both at the same time, switching between layers. First color them with the gradient from light pink to pink.

Next use appropriate gradients to draw shadows, fallen shades and highlights. Don't forget about the blue shades and gloss.

Step 12
It's time to add highlights and shadows to the golden details. We'll draw on the “decoration” layer.
Let's start from the diadem. Choose an orange color
for the shadows and bright yellow for the highlights. Add some blue shapes and
gloss. Then choose wine and peach colors for the red diamonds. For the white
stars apply the colors of the dress shadows.

Now we'll make volume on the beads as shown below. Select each of them and press Control-G. Place them on the proper part of the diadem. Draw some shadows under the golden beads.

Step 13
We'll add some volume to the dress's decorative elements and magic wand following this method.

Step 14
It's time for the final touch. Let's add some gloss to the stars on the dress and draw the decorative line on the shawl using our art brush.

Step 15
Finally our character is ready!

5. Add Shadows and Highlights to the Background
Step 1
First let's fill the blue archway with linear gradient from dark to light color.

Step 2
Let's create some clouds. Draw random shapes, unite and fill them with gradient as shown in the screenshot, reducing the Opacity to 50%.

Repeat this process a couple of times. Reduce the Opacity to 30% and 15% on the next two groups of shapes to make these clouds airy.

Step 3
Select all stars on the background and fill them with gold radial gradient.

Create little blue stars to fill up the empty spaces of the arch. Draw the star made of two parts: a main shape with Opacity 100% and a dark-blue shape behind with Opacity 20%. Then select both shapes and press Control-G.

Change their size and opacity, duplicate them, and move them as you wish. Reduce the opacity of the bottom stars. The lower the star, the less opacity it has.

Step 4
Let's decorate the upper part of arch with blue stars and add some volume to the gold stars.

Step 5
Now we'll make the mosaic more variegated. Create some rectangles 10 x 10 px and fill them with darker and lighter tints than the main color. Then place them on the cells randomly.
Color the mosaic on the letters the same way.

Wow! We're Finished!
We did a great job, and I hope you liked the process. Enjoy and share your result!

