In this tutorial we will make a cute fox character, learn how to draw fur for animals, and create our own custom brush in Paint Tool SAI. Let's get started!
1. Make a Sketch of the Animal Character
Step 1
Our first step is to make a sketch of our animal character. You can look at pictures and photos to understand how animals look and what their body structure is like.
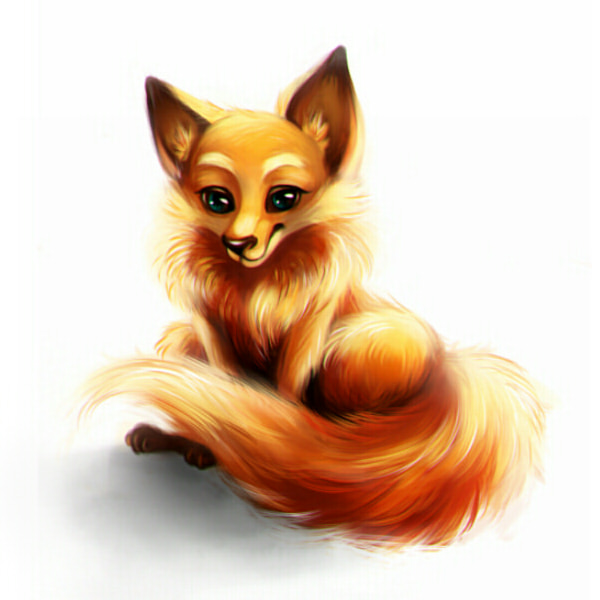
As there is such a big choice of cute animals, I've decided to stop on foxes. They are cute, red and furry—that’s all I want for now! My fox will have a name: Mr. Waffle. Because why not?
So, let’s get to sketching. Create a New Canvas about 3200 x 2400 px. We need it that big, because we will work on small details and want our work to be comfortable.
Take a Sketch or Pen and start sketching out our fox. We begin with overall shapes, for all its body parts using mostly round and smooth shapes, such as circles. For legs we just use lines—so we know where they’ll be placed on the drawing. Look at real foxes to get the feel of their body structure.

After you’ve finished with the main shapes, turn the opacity of the current layer to 20-30% and create a New Layer on top. Now we can refine our sketch and add more details. But also, as we're drawing in cartoon style, we can make some considerations and draw some parts bigger or smaller. So, we can draw bigger ears and eyes, add more volume to the fur, and whatever else comes to your mind. At this stage, be creative, and have fun with sketching.
I also decided to experiment with the tail and drew four of them to see which one I liked the most. You can do that by creating a New layer for each variation and turning its visibility on and off for comparison.

Step 2
In the end, I go with the tail that covers his legs. I chose it because it makes the fox more interesting, as if he has something to hide.
After choosing the tail, delete all other variants and Merge Down Layer, and then turn its opacity to 20-30% and create a New Layer on top. Make a new sketch for Mr. Waffle, refining all the details, but don’t work too much on that—we need it only to apply colors in the right places, and in the results we’ll paint on these lines.
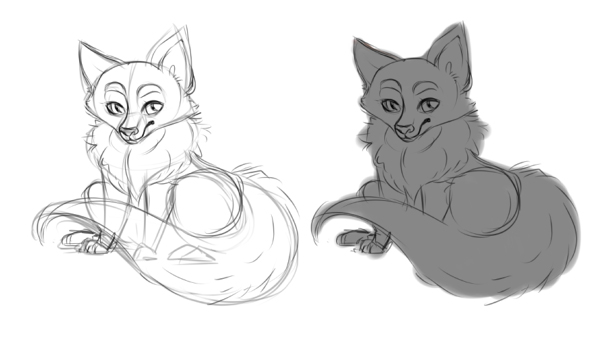
Our clean sketch is ready for coloring! Create a New Layer under this line-art layer, take the Pen, and fill our fox with solid gray color. We need that to always stay inside the lines while painting.
Now we'll add color to this sad gray… Make him bright and happy.
2. Basic Coloring
Step 1
Lock the gray shape of our fox by choosing Preserve Opacity, and take the main color for our fox—in this case orange. Then take the Bucket tool and fill the gray shape with orange. If some parts remained gray, paint on them with the Pen.

Then create a New Layer on top, and Clipping Group it to the main color layer. Take an AirBrush and apply the basic colors for our fox. At this stage you can be rough and untidy, but that’s fine, because we need this layer only to envision the color placement.

Continue putting colors under the line art layer. When you feel satisfied with them, create a New Layer on top, and now we came to the fun part: coloring the line art. Don’t worry about how clean is it, because we’ll get into detailing soon.
Step 2
After you've painted colors on the line art, we can move on to the detailing. We'll start with his face. Add volume to the nose, eyes and ears. It's starting to look like a cunning little fox!
Some detailing is fine, but don’t put too much work in—enjoy the process. What about the small details, such as fur? I’ll show you a trick for them soon.

Step 3
It’s time to add life to Mr. Waffle! On top of our coloring details layer, create a New Layer and set its mode to Multiply. Take the AirBrush and choose a pale brown color for the shadows. Why not black, you may ask? One tip: pure black color for shadow is never a good idea. It makes colors look dirty and too dark. When using a Multiply layer, paint with soft colors, and you’ll get better results. So, take this color and apply it to the dark areas of our fox.

And… we’re done with shadows.
Step 4
Now let’s make highlights. Create a New Layer on top of the shadows layer, and set its mode to Overlay. At first, take warm brown and paint all highlighted areas. In this case, the light source will be from Mr. Waffle’s back. Then, for more effect, choose bright orange and add it to the areas where the light will fall directly.

Step 5
Looks a lot better! Now that our shadows and highlights are all in the right places, we can add more details, especially to the face of our fox. Pay close attention to the eyes, because they are one of the most important parts of our drawing.

3. Create Your Own Custom Brush
Now that our coloring is close to being finished, we can move to the fun part and create our very own custom brush for the fox’s fur.
You can download brushes from the web and save them in your elemap folder in Paint Tool SAI, but it's important to know how to create your own brush for specific purposes.
Here are some useful links:
- http://painttoolsaibrushes.deviantart.com/
- http://ptsbrushes.tumblr.com/
- http://painttoolsaibrushes.splstc.com/painttool-sai-textures/
- http://saibrushsetting.tumblr.com/
Step 1
Open the brush template from the Attachments. Don’t change the size! It should stay its original size, otherwise this brush won’t be opened by the program.
Create a New Layer on top of the template layer and take the Pixel tool (in some cases it can be named the Binary tool). With solid black—and black only—paint dots inside the circle. Make sure you choose 100% black, because if you have gray or any other color, the program will take them as blank. And you can’t draw with a blank brush.

When finished, save this file as BMP, because it’s the brush format for Paint Tool SAI. I named this brush 'fur'.

Step 2
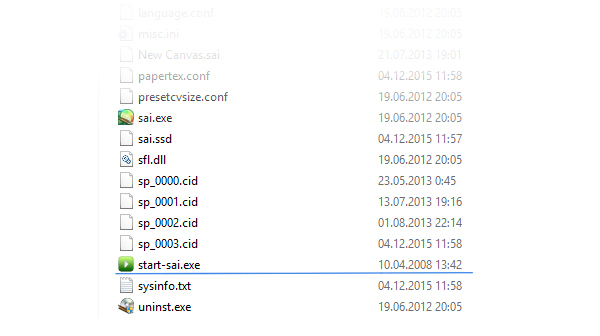
Open your Paint Tool SAI folder; you’ll see something like this. Save or copy your brush to the elemap folder. You can also find all the brushes you use in this folder, and if you want, modify them.

Then open you Paint Tool SAI with start-sai.exe. If you open it as usual—with sai.exe—it won’t open your new brush.
Step 3
When the program loads, you will find your new brush in the brush setting area, where you can also change these settings for different effects and actions.
See the difference between Fur 100 and 0 Brush shape affection. Change this setting to see which one will act best as fur. You can play with them and get different interesting results.

4. Continue With Detailing and Fur
Step 1
And finally, we can make fur! Take your new custom fur brush and draw the fur for our Mr. Waffle. You can take the colors that are already on your drawing using the Color Picker or by clicking the button on your graphic pen (at least this feature is possible with Bamboo Fun). Make this little fox furry.

Step 2
We don’t want Mr. Waffle to float in the air, so make a shadow under him, and it will look as if he is sitting on the ground. Create a New Layer under all other layers, take the AirBrush with some texture, and apply dark gray as a shadow. Don’t forget where your light source is located! In this case, from the back of the fox.

Step 3
Put some extra work into the highlights: we can make it look as if our character is shining in the light. Just draw soft yellow and white on the edges of the fox on the New Layer, and it will add a shining effect.

Step 4
If you like, add finishing touches, such as fur or highlights on the eyes, some separate fur strokes, and other details.

And We've Made It!
We finished our animal character and Mr. Waffle says, "Thank you!" Hopefully you've found some interesting techniques and learned how to create your own brush in Paint Tool SAI. Have fun drawing, and always enjoy the process!

