In this tutorial I will be showing you how to animate a character throwing a ball! This is a fun thing to animate because it really gets the character moving. As you learn and grow as an animator, it's fun to animate a character interacting with a prop (such as a ball in this case).
Everyone's animation might be slightly different. Is your character a lefty or a righty? It's your special animation, so make it yours! Let's go!
1. Thumbnail Out the Action
Step 1
When animating an action, I like to sketch my poses down to get it right. Sometimes I'll actually act out the action and sketch it down as I go along. Be careful throwing a ball in the house! You can pantomime the ball-throwing action if necessary without having to break any vases in the process.
Step 2
I like to take my thumbnails and line them up and see how my actual thumbnail sketches animate. Looks good, but will definitely need some sweetening. Let's move on to animating our main poses.
2. Let's Animate!
What I love about thumbnails is that they are made to be changed. If you do a set of thumbnails and the animation more or less works, that's great, and you can change details and tweak here and there.
In this case, I started off with what appeared to be a baseball, but I decide to make the ball bigger. All the animation books have characters throwing baseballs, so let's think outside the (batter's) box and have a big rubber ball. I'm envisioning a big, fun rubber ball such as one you'd see in a school yard.
Step 1
Let's add a floor line so we can keep track of where the feet are so that the character looks grounded.
Step 2
I'm animating straight ahead for this one instead of doing four or five poses and in-betweening them as I do in a lot of my tutorials. I am working from my thumbnails, using them as reference but improving as I go along. Let's do drawing 1. We have our character holding the ball. This is our start pose.
Step 3
Now for drawing 2. Go ahead and act out the motion of throwing a ball. What do you notice? It's barely noticeable, but you'll see in just about every case you lean forward slightly before bringing your arm back to throw the ball. In animation, this is known as an anticipation pose.
Here's drawing 2 superimposed on drawing 1 so you can see how the character's body shifted forward.
Step 4
For drawing 3, the arm starts to come back. The character is planning on really lobbing that ball! As the arm goes back, the right foot (the foot closest to the left of the screen) leaves the ground.
Step 5
Let's start on drawing 4. That arm is going way back—see how the foot goes higher up, left arm coming forward for balance as his right arm brings the ball back.
Step 6
For drawing 5, I deviated from my thumbnails a little and added a drawing where the arm goes further back. Let's bring that arm way back! Aim for the fences! That leg is way up now!
See drawing 5 in comparison to drawing 4. Look at how far back the character's arm is!
Step 7
For drawing 6, let's start to bring that arm and body forward. The head swivels on the neck a little as the body comes forward, and the character's head drags a little. This helps to give the character some flexibility and life. The right leg is coming down now.
Step 8
Let's do drawing 7. Here is where the character should let the ball fly. Both feet are planted as the body comes forward.
Step 9
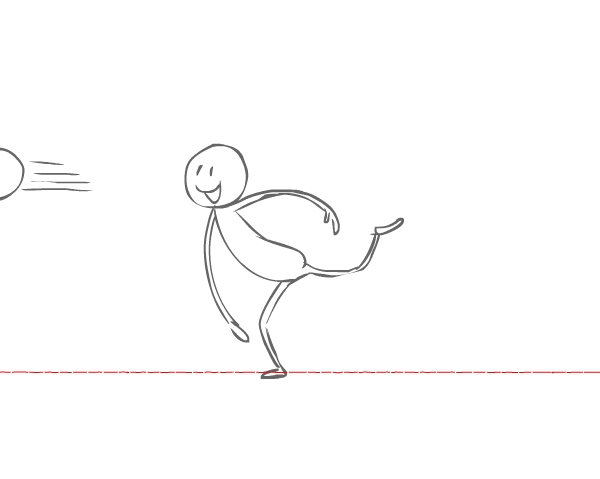
For drawing 8, as the ball flies off the screen, the character's body is carried forward from the momentum of the force of throwing the ball. Now the character's left leg leaves the ground.
See how far forward the character's body bends from the momentum.
Step 10
Momentum continues to carry the character's body forward in drawing 9. The character swivels on the leg that is planted on the ground, and the back leg continues to come up.
Step 11
And now, for drawing 10, let's have the character start to straighten up. The character's left leg goes lower to return to the ground as the body straightens up.
Step 12
For drawing 11, the character should almost be back to a normal standing pose. The character's left foot is almost back on the ground but not planted yet.
Step 13
And now we have the final pose, in which the character is back to a normal standing pose. This is our end pose. Good job! Let's see how it looks!
That looks great! That ball is really being lobbed! Good job!
3. Add Some Color
Step 1
I had so much fun animating this, so I thought the ball deserved to be a big red rubber ball. Let's add some color accents and color the ball!
Remember, it's your special animation, and you can make the ball any color you want! For this first drawing I colored the ball bright red and gave it a highlight, and I gave the character light grey shadow accents.
Step 2
Let's color drawing 2.
Step 3
Keep going! Drawing 3 is looking great! That's a nice bright ball!
Step 4
Keep going! Color the rest of the drawings!
Congrats! That Looks Great!
Animation is fun and even interactive if you roll up your sleeves and act it out and sketch it out! It helps you to figure out how an action will work, plus it's fun!
Whether you're animating a character throwing a ball, jumping over a stream or swinging a bat, the sky's the limit to what you can animate! Keep animating!