Clik here to view.

In this tutorial I'll show you how to create a fantasy pathway scene. First we'll build the background from grassy ground and a forest. Later we'll add the tree, gate, small forest and pathway. After that we'll add the child and grass, and we'll make the basic light and color. Finally we'll add the light texture and make some lighting effects.
Tutorial Assets
The following assets were used during the production of this tutorial:
1. Build the Background
Step 1
Create a new 1800 x 1357 px document in Photoshop with the settings below:
Clik here to view.

Step 2
Open the ground image. Use the Rectangular Marquee Tool (M) to select the grass area only and move it to the white canvas using the Move Tool (V). Place it in the lower half of the canvas:
Clik here to view.

Clik here to view.

Step 3
Go to Filter > Blur > Gaussian Blur and set the Radius to 30 px:
Clik here to view.

Select the filter mask and use a soft round brush with black color (soft black brush) to erase the blur effect in the foreground:
Clik here to view.

Step 4
Go to Layer > New Adjustment layer > Hue Saturation and set it as Clipping Mask. Change the Master Saturation, Reds and Yellows values:
Clik here to view.

Clik here to view.

Step 5
Create a Curves adjustment layer and reduce the lightness. On this layer mask, use a soft black brush to reveal some light on the background:
Clik here to view.

Clik here to view.

Step 6
Drag the forest image into our main document and place it in the upper half:
Clik here to view.

Use a layer mask to make a smooth transition between the ground and the forest:
Clik here to view.

Step 7
Apply a Gaussian Blur of 12 px to the forest. Use a soft black brush on the filter mask to reduce the effect along the transition between the ground and forest. Here are the results on the filter mask and on the picture:
Clik here to view.

Clik here to view.

Clik here to view.

Step 8
In this step we'll make shadows for the trees in the forest. We aim to make the main light source come from the middle of the forest so the shadows of the trees must be more visible. Create a new layer and use thePolygonal Lasso Tool (L) to select the big tree on the right (no need to be so precise) and fill it (Shift-F5) with black .
Clik here to view.

Flip it vertically (Edit > Transform > Flip Vertical) and move it under the tree. Use the Free Transform Tool (Control-T) to distort the shadow to fit the light direction:
Clik here to view.

Apply a Gaussian Blur of 15 px to this shadow:
Clik here to view.

Step 9
Use the same method to make shadow for the other trees:
Clik here to view.

Step 10
Create a Curves adjustment layer on top of the layers and increase the lightness. On this layer mask, use a soft black brush to make the light effect visible only in the middle of the background:
Clik here to view.

Step 11
Create
a new layer and change its mode to Soft Light 100%. Use a soft white
brush to paint more light for the middle of the forest.
Clik here to view.

2. Add the Tree
Step 1
Isolate the tree and add it to the midground. Use Control-T to decrease the length a bit.
Clik here to view.

Use a layer mask to remove the hard edges and blend the tree with the ground:
Clik here to view.

Step 2
Apply a Gaussian Blur of 4 px and erase the blur effect on the filter mask, leaving it visible only on the tree contour to fit the softness of the background:
Clik here to view.

Step 3
Create a new layer, change the mode to Overlay 100% and fill with 50% gray:
Clik here to view.

Activate the Dodge and Burn Tool(O) with Midtones Range, Exposure about 10-15% to brighten the tree contour and darken the middle a bit to fit the light and shadow of the background. You can see how I did it with normal mode and the result with Overlay mode:
Clik here to view.

Step 4
Use a Hue/Saturation adjustment layer and bring the Saturation value down to -62:
Clik here to view.

Step 5
Make a Color Balance adjustment layer and change the Midtones settings:
Clik here to view.

Step 6
Use a Curves adjustment layer to darken the tree. Paint on the tree contour to reveal the lightness there:
Clik here to view.

Step 7
Create a new layer and use a soft white brush with a low opacity (about 15-20%) to paint along the tree contour to make some hazy light on
there.
Clik here to view.

3. Add the Gate and Small Forest
Step 1
Open the gate image. Remove the part inside the gate and add it to the bottom of the tree:
Clik here to view.

Use a layer mask to blend the gate with the tree.
Clik here to view.

Step 2
Create a Color Balance adjustment layer and change the Midtones values:
Clik here to view.

Step 3
Make a Curves adjustment layer and change the lightness of the gate to fit the tree. Erase the lower parts as shown in the screenshot below because we aim to add another light source there:
Clik here to view.

Step 4
Duplicate the forest layer and make it much smaller. Set this layer under the gate layer and above the tree ones.
Clik here to view.

Use a layer mask to remove the forest part outside the gate.
Clik here to view.

Step 5
Make a Curves adjustment layer to increase the light and haze of this small forest:
Clik here to view.

4. Add the Pathway
Step 1
Select the pathway from the original image and place it in the
foreground. Use Control-T with Warp mode to bend the pathway a bit.
Clik here to view.

Step 2
Remove the edges of the pathway using a layer mask:
Clik here to view.

Step 3
Duplicate this layer twice and resize them down. Arrange them inside the gate and the small forest. The further away they are, the smaller they should be.
Clik here to view.

Step 4
Select all the pathway layers and press Control-G to make a group for
them. Change the group mode to Normal 100%. Create a new layer and use the Clone Tool (S) to remove the unwanted plant shown on a step of the
pathway.
Clik here to view.

Step 5
Use a Color Balance adjustment layer to match the pathway color with the scene:
Clik here to view.

Step 6
Create a Curves adjustment layer to darken the pathway as it looks too bright compared with the background at the moment. Paint on the top of the pathway (the part inside the gate and small forest) in order not to change its lightness.
Clik here to view.

Step 7
Add another Curves adjustment layer to increase the hazy light of the pathway top. Erase the rest to make it still dark.
Clik here to view.

5. Add the Child
Step 1
Cut out the child and place her onto the step on which we removed the unwanted plant.
Clik here to view.

Step 2
Make a new layer under the child one and use a medium-soft black brush with a low opacity (20%) to paint a shadow for her. The child is far from the two light sources so the shadow should be very light and soft.
Clik here to view.

Step 3
Add a Hue/Saturation adjustment layer and reduce the Saturation value to -38:
Clik here to view.

Step 4
Use a Curves adjustment layer to darken the child. Paint on the parts which are towards the light (the front) and keep the others dark.
Clik here to view.

6. Add the Grass
Step 1
Open the grass images pack. As the images have a transparent background, simply move them into our main document and arrange them on both sides of the lower foreground:
Clik here to view.

Step 2
Apply a Gaussian Blur of 8 px to each of these grass layers.
Clik here to view.

Step 3
Make a group for these grass layers and use a Hue/Saturation adjustment layer to change their color:
Clik here to view.

Step 4
Use a Curves adjustment layer to darken the grass a bit. The selected areas show where to paint on the layer mask.
Clik here to view.

7. Make the Basic Adjustment
Step 1
Create a Color Fill layer on top of the layers and pick the color #160101. Change this layer mode to Exclusion 100%:
Clik here to view.

Step 2
Make a Color Balance adjustment layer and alter the Midtones and Highlights settings:
Clik here to view.

Clik here to view.

Step 3
Add a Channel Mixer adjustment layer and change the values of the Red channel:
Clik here to view.

Step 4
Create a Curves adjustment layer and change the color a bit with the Blue channel:
Clik here to view.

Step 5
Use another Curves adjustment layer and increase the light in the middle. Paint on the rest of the scene:
Clik here to view.

Step 6
Continue changing the color with a Hue/Saturation adjustment layer:
Clik here to view.

Step 7
Make a Photo Filter adjustment layer with the same purpose. Pick the color #01ec96:
Clik here to view.

Step 8
Make a Vibrance adjustment layer to enhance the whole effect. Reduce the
saturation on the tree and the pathway on its layer mask to make them less blue.
Clik here to view.

8. Add the Light
Step 1
Open the light texture image pack. Choose "starry 4" image to add it to the canvas, and change the mode to Screen 100%:
Clik here to view.

Use a layer mask and erase the effect on the tree, making it appear more subtle.
Clik here to view.

Step 2
Create a Hue/Saturation adjustment layer to change the light color from red to pink:
Clik here to view.

Step 3
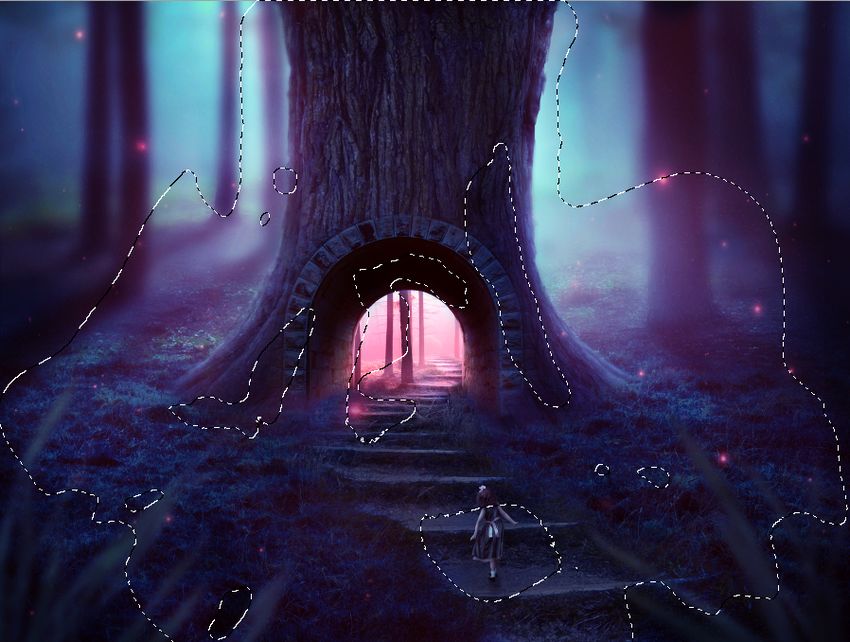
We're going to change the color of the small forest to make it look like another world. Use the Lasso Tool to select the small forest area with the Feather Radius = 30. Go to Layer > New Adjustment Layer > Channel Mixer:
Clik here to view.

Step 4
Make a new layer and use a medium-hard brush with the color #ffadc4 to
paint the pink/purple light reflection from the small forest on the gate and the steps of the pathway which are located inside this forest.
Clik here to view.

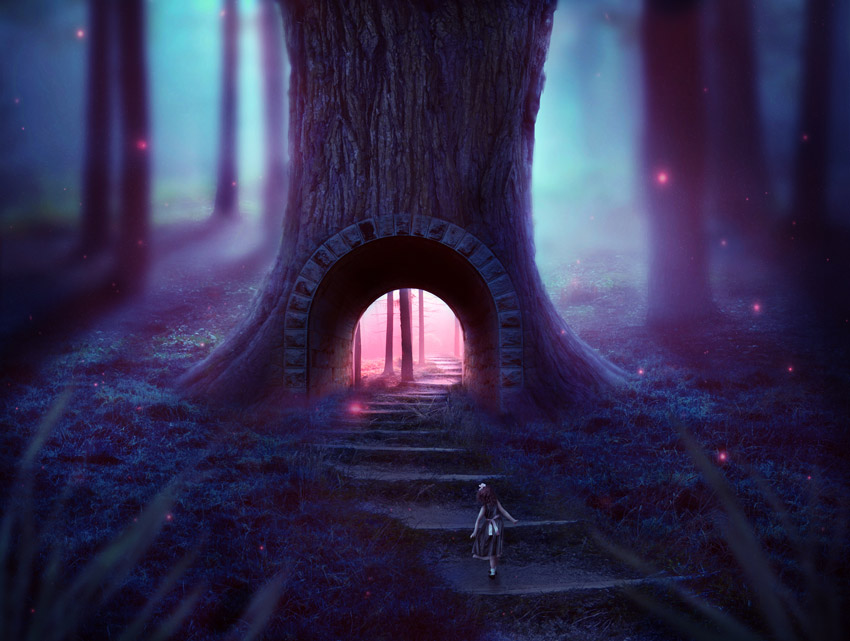
Step 5
Use a Curves adjustment layer to change the light and contrast of the whole scene, darkening the edges and leaving the light in the middle.
Clik here to view.

Clik here to view.
Congratulations, You're Done!
I hope that you've learned something useful for your future projects. Feel free to leave your comments in the box below—I'd love to see them. Enjoy Photoshopping!
Clik here to view.
Clik here to view.
 Image may be NSFW.
Clik here to view.
Clik here to view.