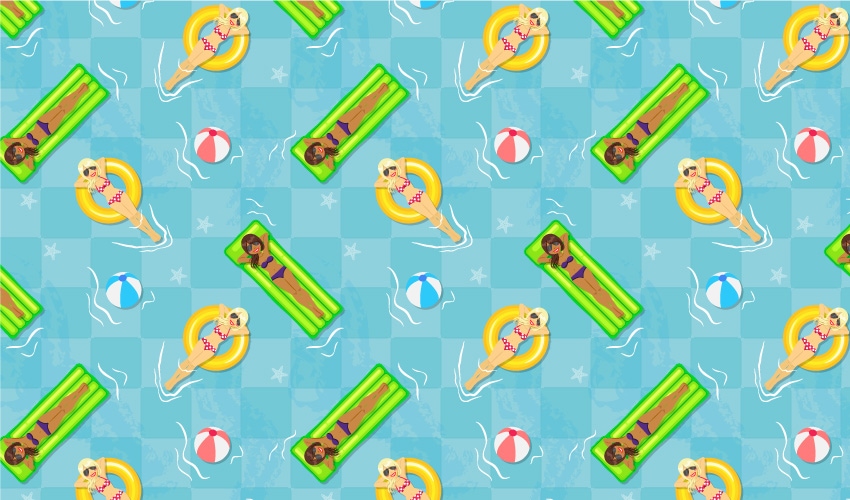
Life is better by the pool in the summer, so follow this tutorial and learn how to create a seamless pattern inspired by this. At the beginning you'll draw all the elements that compose this pattern: the pool floor, the women, the float mat, the float ring, beach balls, and waves. After that, all you have to do is to create the seamless pattern.
We won't use the Pattern Tool this time, nor the method of adding and subtracting a specific value to the X and Y coordinates, which sounds very confusing. Instead, we'll do it with the help of the Move effect, which is my favorite method and pretty easy.
If you need more patterns in your life, be sure to check out Envato Market for inspiration. Whether it's a summer-inspired pattern or aseamless pattern in general, you'll surely find what you're looking for there. Let's start before the summer ends!
1. Start a New Project
LaunchIllustratorand go to File> New to open a blank document. Type a name for your file, set up the dimensions, and then select PixelsasUnitsandRGBasColor Mode. Make sure that Align New Objects to Pixel Grid is not checked.
Next, go to Edit> Preferences > General and set the Keyboard Increment to1 px and while there, go to Unitsto make sure they are set as in the following image. I usually work with these settings, and they will help you throughout the drawing process.

2. Create the Blond Woman
Step 1
Let's start with the head of the woman and for that, take the Ellipse Tool (L) and draw a 54 x 70 px ellipse (1). Next, take the Pen Tool (P) and draw the neck (2) followed by the shape of the body like in the image below (3).

Step 2
Now, draw the hands and use the same beige color to fill them. After that, send them behind everything by going to Object > Arrange > Send to Back (Shift-Control-[).

Step 3
Take your time and draw the legs with the Pen Tool (P) as shown in the next image.

Step 4
Now draw the bikini bottom and the bikini top followed by the straps, and fill all the shapes with dark pink.

Step 5
Use the Ellipse Tool (L) to draw some white circles on the swimsuit and also a few half-circles along the edges. After you are done, Group (Control-G) all these circles.
Draw a small black rectangle in the center of the bikini top in order to add a shadow. Set the Blending Mode to Multiply and reduce theOpacity to 30%.

Step 6
Select the bikini bottom and then Copy and Paste in Place (Shift-Control-V) in order to get a copy of it (the orange shape). Copy and Paste in Place (Shift-Control-V) the bikini bottom again and move it 2 px upwards by pressing the Up Arrow key on your keyboard twice (the blue shape). Now, select the orange and blue shapes and press Minus Front in the Pathfinder panel. Fill the resulting shape with black, and set it toBlending Mode Multiply and 20% Opacity.

Step 7
Following the technique explained above, create the shadow under the bikini top and apply the same settings.

Step 8
Draw two shapes like below as the knees, and use light brown as the fill color (1).
Now, focus on the feet and draw four small paths with the Pen Tool (P) or the Pencil Tool (N) in order to define the toes of the left foot. Select a 1 pt Stroke and the Width Profile 5 in the Stroke panel. The thinner end of the brush should go downwards; otherwise, press the Flip Along option. After you are done, repeat the same thing for the right foot (2).

Step 9
Focus on the legs, and let's create a shadow between them (1). Use the Pen Tool (P) to draw two paths as shown below (2); then select a 2 pt Stroke and the Width Profile 1 in the Stroke panel (3).

Step 10
To create a shadow under the arms, take the Pen Tool (P) and draw two paths following the outer edge. Select a 3 pt Stroke and the Width Profile 1 in the Stroke panel (1).
To create the fold on the arms, draw two paths as shown below and then select a 1 pt Stroke and the Width Profile 1 (2).

Step 11
Let's add more details on the body. Draw a path at the base of the neck and a short path as the belly button. Select a 1 pt Stroke and the Width Profile 2 for both of them (1).
Next, draw two paths on the chest and select a 1 pt Stroke with the Width Profile 4this time (2).

Step 12
Use the Pen Tool (P) to draw the shape of the hair like in the next image (1). After that, follow the hair line and draw five paths (2) and give them a 1 pt Stroke with the Width Profile 1(3).

Step 13
To make the hair shiny, draw two random shapes with the Pen Tool (P) or the Pencil Tool (N) and fill them with the color indicated.

Step 14
To create the ponytail, grab the Pencil Tool (N) and draw as many wavy paths as you want. Use the Width Profile 4 for all of them and make sure that the tip of the brush goes downward; otherwise, press the Flip Along option in the Stroke panel. Select different values for theWeight like 2 pt, 3 pt and up to 5 pt, and also use two stroke colors to add more definition (1).
Group (Control-G) all the stroked hair paths and then Copy and Paste in Back (Control-B). Move and rotate the copy a little in order to make the tail thicker (2).

Step 15
Let's create the sunglasses. Start with the shape of the lenses and after you draw them, select a gray fill and a dark gray stroke (1). Next, draw the bridge between the lenses (2) followed by four thin rectangles as the reflection on the glasses (3).
Group (Control-G) all the shapes that make up the sunglasses and move them over the woman's face but behind the hair (4).

Step 16
Take the Pen Tool (P) and draw the shape of the mouth (1) and after that, draw two paths as the top and bottom lips. Give them a 2 pt redStroke and use the Width Profile 1 (2). At the end, draw a white shape as the teeth (3).

Step 17
Draw a short path as the nose and give it a 2 pt Stroke with the Width Profile 1 (1). For the rosy cheeks, draw two ellipses filled with pink and send them behind the sunglasses (2).

3. Create the Brunette Woman
Step 1
At this point the blond woman is ready and you can make a copy of it. By making a few changes, you will get the brunette woman, so let's do that.
Use the colors indicated below and change the fill color of the hair, the shine on the hair, the blush and also change the stroke colors of the ponytail.

Step 2
Change the fill color of the neck, the knees and the skin in order to make the girl tanned (1). Next, select all the paths shown and use a darker shade of brown as the stroke color (2). You can see the final result in the image below (3).

Step 3
Delete the white circles on the swimsuit and also the straps. Select purple as the fill color for the bikini top and bottom (2) and after that, increase the Opacity for the two shadow shapes from 20% to 50% to make them more visible (3).

Step 4
Here are the two women. They are ready now.Group (Control-G) all the shapes that make up each woman and name the groups “blond woman” and “brunette woman” respectively.

4. Create the Pool Float Mat
Step 1
Use the Rounded Rectangle Tool to draw a rectangle with the dimensions shown, and select green as the fill color. Go to Effect > Path > Offset Path and apply a 2 px Offset (1).
Add a New Fill above the first and use lime green as the fill color. While this Fill attribute stays selected, go to Effect > Stylize > Inner Glow and apply the settings shown below (2).
Add a New Fill again, but this time move it below the first one in theAppearance panel. Select light green as the fill color, and then go toEffect > Path > Offset Path and apply an 8 px Offset. Still having this Fill attribute selected, go to Effect > Distort & Transform > Zig Zag and apply the settings shown below (3).

Step 2
Next, draw a new rounded rectangle with the dimensions shown. Select light green as the fill color; then go to Effect > Distort & Transform > Zig Zag and apply the settings shown.

Step 3
Draw four other rounded rectangles, select green as the fill color, and then go to Effect > Path > Offset Path and apply a 2 px Offset. Add a New Fill above the first, change the fill color to lime green, and then apply the Inner Glow effect.

Step 4
To add some highlights, draw five smaller rounded rectangles as shown in the following image. To add more shine, draw a few thinner rounded rectangles on top and fill them with light yellow.
Group (Control-G) all the shapes that make up the float and name the group “float mat”.

5. Create the Pool Float Ring
Step 1
Grab the Ellipse Tool (L) and draw a 63 x 63 px circle. In the Appearance panel add the five strokes shown below, the first one being at the bottom. At each step, apply a bigger Offset value in order to create the stroke layers.

Step 2
Use the Pen Tool (P) to draw two curved paths on the ring. For the smaller path on the lower left side, select a 2 pt white Stroke and the Width Profile 6in the Stroke panel. Reduce the Opacity to 60%. For the bigger path on the upper right side, select a 3 pt white Stroke and the Width Profile 6. Reduce the Opacity to 80%.
Group (Control-G) all the shapes that make up the float and name the group “float ring”.

6. Create the Beach Ball
Step 1
Use the Ellipse Tool (L) to draw a 35 x 35 px circle (1) and then a smaller circle at the top (2). Switch to the Pen Tool (P) and draw the three pink stripes on the ball between the two circles (3-5).

Step 2
The beach ball is ready, and you can Group (Control-G) all the shapes. Name the group “pink ball”. You can also create a “blue ball” by making a copy of the first and just changing the fill colors.

7. Create the Pool Tiles
Step 1
Take the Rectangle Tool (M) and draw a 50 x 50 px square filled with light blue (1). Now, use the Pen Tool (P) or the Line Segment Tool (\) to draw four straight paths between the corners of the square (2).
With the help of the Direct Selection Tool (A), move the top end point of the green path 3 px downwards by pressing the Down Arrow key on your keyboard three times. After that, move the bottom end point of the green path 3 px upwards by pressing the Up Arrow key three times. Do the same thing for the other three paths to make them shorter (3). When you are done, select a 1 pt Stroke for these paths using a slightly darker shade of blue (4).
Before you continue, make sure that your square is 50 x 50 px in size and the four paths are 44 px in length each. It's very important to keep everything symmetrical, otherwise the pattern won't be seamless.

Step 2
Group (Control-G) the square along with the four paths and name the group “single tile”. While this group stays selected, go to Effect > Distort & Transform > Transform and apply this effect twice using the settings shown below. After that, select Expand Appearance from the Object menu in order to expand the two effects.

Step 3
Use the Direct Selection Tool (A) to select every second tile, like a chess board (1), and change the fill color to a darker shade of blue. Name the entire group of tiles “pool floor” (2).
Use the Rectangle Tool (M) to draw a 300 x 300 px square, which will be the size of the pattern tile. This square should have no stroke and no fill and should be behind everything, so go to Object > Arrange > Send to Back (Shift-Control-[).
Now, select the “pool floor” group along with this empty square, and press Horizontal Align Center followed by Vertical Align Center in the Align panel. If you followed the exact dimensions in the previous steps, these two objects should fit perfectly at this point as shown in the close-up, and you are so much closer to a seamless pattern. Make sure that the bounding square stays in the back at all times.

Step 4
Next, take the Pencil Tool (N) and draw two wavy paths over the "pool floor" as shown in the following image. Stroke the paths with the Chalk-Scribble Art Brush, which you can find in the Brush Libraries Menu > Artistic > Artistic_ChalkCharcoalPencil. Increase the Weight to 3 pt and 5 pt respectively. Before you continue, make sure that the brush strokes don't go over the edges of the “pool floor”, otherwise you will lose the “seamlessness”. Reduce the Opacity to 15% for both paths.

8. Scale and Prepare All the Components
Step 1
Go to Edit > Preferences > General and make sure that Scale Stroke& Effects is checked. Hit OK and now you can scale everything whilst keeping the appearances exactly the same.
The “float ring” has the appropriate size, so select the “blond woman” and scale it to fit inside the ring.

Step 2
Focus on the blond woman. Select the left leg and then Copy and Paste in Place (Shift-Control-V) in order to get a copy of it. Use the Pen Tool (P) to draw a curved path right under the knees, and before you continue, make a copy in front of this path because you will need it for the other leg (1).
Now, select the copy of the left leg and the curved path and press Divide in the Pathfinder panel. This will cut the leg in two separate shapes. Ungroup (Shift-Control-G), delete the top shape because you don't need it, and fill the bottom shape with the color indicated (2). Repeat the same thing for the right leg using the copy of the curved path.
This will create the appearance of a shadow because the girl's legs are in the water. At this point the knees are not visible, so don't forget to bring them in front of the legs again using the Layers panel (3).

Step 3
Select the “float mat”, go to Object > Transform > Scale and type22% in the Scale field. The result should be a little bigger than the blond woman on the float ring.
Now, select the “brunette woman” group and scale it to fit on the "float mat". The two women should be the same size!

Step 4
Move the blond woman on the float ring and the brunette woman on the float mat over the pool floor. Grab the Pencil Tool (N) and draw a few wavy paths around them as shown in the next image. Select a 1 pt or 2 pt whiteStroke and the Width Profile 2 for all of them, and this will create the appearance of movement in the water.

9. Create the Pool Seamless Pattern
Step 1
Select the “blond woman” and the “float ring” along with the three waves at the legs, and rotate them 45 degrees using the Transform panel. Arrange them in the lower right corner of the “pool floor” (1).
Select the “brunette woman” and the “float mat” along with the four waves around them and rotate 135 degrees. Arrange them over the “pool floor” as shown below (2).
Let's add some shadows. Select the following groups: “blond woman”, “brunette woman”, “float mat”, and “float ring” (without the waves), and go to Effect > Stylize > Drop Shadow. Apply the settings shown to each group (3).

Step 2
Now, select all the elements that you have arranged in the previous step and Copy and Paste in Front (Control-F). Rotate the copies -90 degrees and arrange them in the upper left corner of the “pool floor” as shown in the next image. Notice how the Drop Shadow effect is updated live when you rotate the elements.

Step 3
At this point, you'll have elements that go over the edges of the “pool floor”, and in a seamless pattern, those elements need to be copied to the opposite edge in order to obtain the repeated seamless effect.
The woman from the left side is hanging off the edge, so select the “blond woman” and the “float ring” along with the waves at the legs, and go to Object > Transform > Move. Type 300 px in theHorizontal field and hit Copy. Why 300 px? Because that is the size of the bounding square, remember?

Step 4
The woman at the top is hanging off the edge, so select the “brunette woman” and the “float mat” along with the four waves around them, and go to Object > Transform > Move. Type 300 px in theVertical field and hit Copy.

Step 5
The first woman is also hanging off the bottom edge, so select the “blond woman” and the “float ring” along with the waves at the legs, and go to Object > Transform > Move. This time, type -300 px in theVertical field and hit Copy. Pretty easy, right?

Step 6
Let's add more elements to this pattern. Move the “blue ball” in the empty space from the upper right corner and apply the Drop Shadow effect using the same settings. Take the Pencil Tool (N) and draw three paths around it in order to create more waves. Use the same settings as before.

Step 7
Make a copy of the “blue ball” along with the waves around it, or use the “pink ball” and arrange it in the empty space from the bottom left corner. Since this element hangs off the left edge, you need to copy it to the opposite side, so select the “pink ball” and the waves around it and go to Object > Transform > Move. Type300 px in the Horizontal field and hit Copy.

Step 8
You wouldn't normally find a starfish on the bottom of a pool, but let's add some just for decoration. Draw the shape of the starfish and then arrange some tiny blue circles along its legs. Group (Control-G) all the shapes and name the group “starfish”.
Make a few copies of the “starfish” and arrange them over the “pool floor”, but make sure to keep them inside the bounding square. Reduce the Opacity to 40% for all of them.

Step 9
The pattern tile is pretty much ready at this point. Select the 300 x 300 px bounding square and go to Object > Arrange > Send to Back (Shift-Control-[) just to make sure that it is behind everything. This square must have no stroke and no fill, and because this empty square stays behind your pattern tile, Illustrator will know that those are the edges of the seamless pattern.
All you have to do is to select all the elements that make up the pattern tile, including the bounding square, and go to Edit > Define Pattern.

Step 10
You can now find the new pattern in the Swatches panel. Use the Rectangle Tool (M) to draw a rectangle of any size and apply the pattern to see the result. If you did everything right and all the elements are symmetrical, the pattern should be seamless.

Congratulations! You're Done
Now you know how to create a seamless pattern in Adobe Illustrator using my favorite method. I think it's very easy with the help of the Move effect.
I hope you learned new things, and don't forget to show me your recreations of this “life by the pool” inspired pattern. Here are my two versions:


