In this tutorial you will learn how to create a realistic image of headphones using simple and understandable techniques. It turns out that to get a good result there is no need to do it in a complex way. This tutorial is easy for any beginner to complete.
Step 1
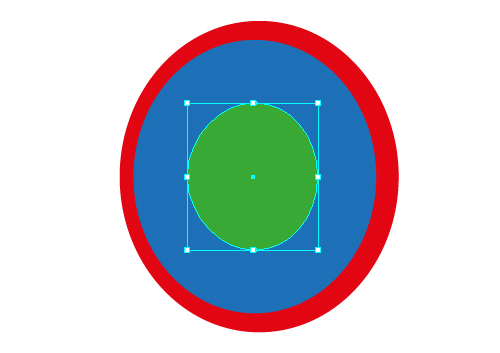
Start creating the closer to the viewer ear cup. Take the Ellipse Tool (L) and create an ellipse with a fill with no stroke of any color except white, of course.

Copy the created ellipse, and paste it in front. Reduce the upper ellipse in size, so that its sizes changed proportionally. To do this, hold down Shift key when making it smaller. Now move the upper ellipse slightly to the left.

Step 2
Copy the upper ellipse (it has a blue fill on the image) and paste it in front. Now make the copy smaller by holding down the Shift key.
Duplicate blue ellipse again. Select it and the red ellipse and hit the Minus Front button from the Pathfinder palette.

As a result of these actions, we obtain three objects: two ellipses and Compound Path.

Step 3
Take the Pen Tool (P) and create a shape as a bridge between the green ellipse and red Compound Path.

Select these three shapes and hit the Unite button from the Pathfinder palette.

Step 4
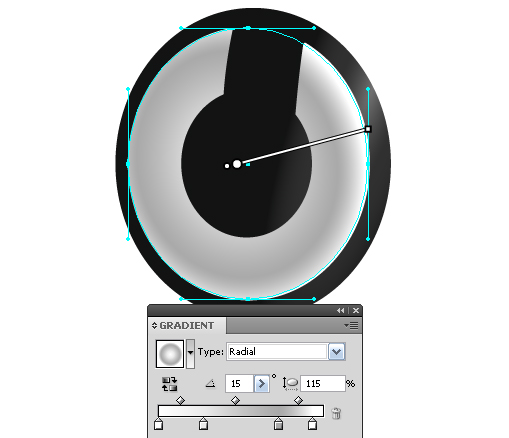
Let’s assume that the light source is located on the top right. We will have to place lights and shadows on the headphones according to this. Fill the shape achieved in the previous step with an elliptical gradient with the parameters shown in the figure below.

The colors that I used here will be applied to all elements of the headphones made of black plastic. Well, now the light – (C = 53; M = 43; Y = 42 and K = 27); penumbra – (C = 70; M = 60; Y = 56 and K = 67); and the shadow – (C = 80; M = 69; Y = 61 and K = 88).
Step 5
Fill the inner blue ellipse with a white color.

Duplicate the white ellipse, slightly reduce it, and shift it to the left.

I want to entrust you with a little secret on how to change the size or position of an object by a certain value. You will see the object’s height and width values on the Control Palette when it is selected. So, these values can be changed using arithmetic operations of addition and subtraction. Let’s assume that the object should be reduced by 2px, no problem, enter – 2px after the digital values of the width or height, and press Enter. In order for the object to be changed proportionally, click on the Constrain Width and Height Proportions icon.

Fill the ellipse with an elliptical gradient with parameters indicated in the figure below.
To reproduce chiaroscuro on the light plastic, I use the following colors: light – white; penumbra – (C = 10; M = 7; Y = 8 and K = 0); and shadow – (C = 36; M = 27; Y = 28 and K = 7).
Step 6
Create a new ellipse using the techniques described above, and fill it with a solid light gray color.

Duplicate it, shift it slightly to the left, and fill it with an elliptical gradient with the parameters shown in the figure below.

Gradient colors: Light – (C = 47; M = 36; Y = 37 and K = 18) and Shadow – (C = 70; M = 60; Y = 56 and K = 67).
Step 7
To complete this ear cup, we need to build a few more ellipses, I will only specify their location, I hope, the procedure of designing is clear at this point.


Step 8
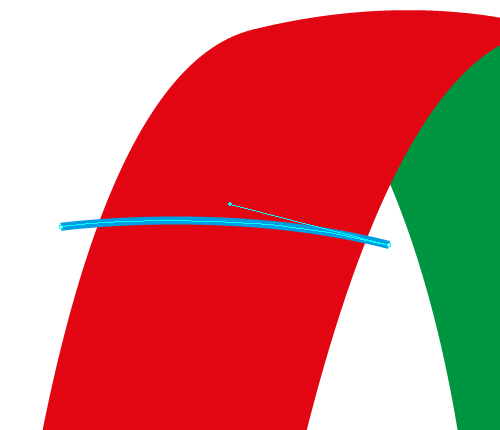
Create the highlight at the junction of the plastic surfaces. Take the Pen Tool (P) and create a broken line shown in the figure below.

To round the corners I use the Round Any Corner script. You can download this script and read how to use it in my article: 20 Free and Useful Adobe Illustrator Scripts. Then, select a corner point using the Direct Selection Tool (A) and launch the script, set the corner radius in the dialogue box.

Step 9
Keep the line selected, apply the Width Profile 1 to it from the Stroke palette, and pick the width, it is 1.5px in my case.

Those who are not proud owners of Adobe Illustrator CS5 will have to create a brush of a similar shape. This shape can be achieved from an ellipse by converting its right and left anchor points from smooth to corner ones. To do this, select these points using the Direct Selection Tool (A) and hit the corresponding Convert button in the Control Palette.

Now drag the achieved shape into the Brushes palette, and save your brush as an Art Brush.

Now select the curve and apply the created brush.
Step 10
Keep the line selected, go to Object > Expand Appearance and fill the shape with a linear gradient using the colors specified in step 4.

Step 11
Proceed to creating the headband. Take the Pen Tool (P) and create a parabola-like line.

Duplicate this line, then move to the right and slightly rotate it.

Connect the ends of these lines using the Pen Tool (P), as shown in the figure below.

Connect the closer to the viewer part of the headband in an arc, and connect the further one in a straight line (it will not be visible, as it is located under the further ear cup).
Step 12
Convert intersecting path into two objects – the front and back of the headband. Take the Scissors Tool (C) and cut the path at two upper points.

Lock the rear piece of the path in the layers palette, and use the Pen Tool (P) connect the front path in an arc.

Now lock the front piece of the headband, unlock the rear one, and connect the upper points of the rear part of the headband.


Step 13
Divide the front part of the headband into two parts. Take the Pen Tool (P) and create a curved line 2 pixels in width.
Keep it selected, go to Object > Expand. Now select the achieved shape, the front piece of the headband and hit the Minus Front button from the Pathfinder palette.

Fill both pieces with linear gradients using the colors mentioned in step 4.

Fill the back of the headband with the same gradient, which we should place so that the back of the headband looked darker than the front. The Gradient Tool (G) will be very helpful in performing this job.

Step 14
Create the thickness of the lower front part of the headband. Copy and paste it in back. Now move the copy slightly to the right in order to create the illusion of volume and change the configurations of the gradient to form the shadow on the edge of the headband.

Step 15
Proceed to the creation of design elements on the front surface of the headband. It represents a cylindrical object with a facet. Take the Ellipse Tool (L) and create an ellipse , fill it with an elliptical gradient.

Duplicate this ellipse and shift it slightly to the left and up. Now create a conical gradient on this ellipse similar to one shown in the figure below.

How to create a conical gradient is described in detail in my tutorial, Quick Tip: Create a Conical Gradient with Adobe Illustrator, in Two Minutes. Create a new ellipse of white color above the ellipse with a conical gradient.

Copy and paste this ellipse in front, fill it with a linear gradient consisting of two colors (C = 34; M = 25; Y = 26 and K = 5) and (C = 19; M = 14; Y = 14 and K = 0 ). Now move the ellipse slightly to the left so that the lower ellipse could create a highlight on the edge of our cylindrical element.

Step 16
Select the lateral surface of the front of the headband, take the Scissors Tool (C) and cut at two points, as shown in the figure below.

Delete the upper part of the lateral surface, and connect the cuts of the lower lateral surface using the Pen Tool (P).

Step 17
Create the lateral surface of the remaining part of the headband. Take the Pen Tool (P) and create a shape as shown in the figure below.

Move it into the layers palette so that it was between the upper and lower part of the headband.

Now fill this shape with an elliptical gradient with the parameters shown in the figure below and the colors that were mentioned in step 4.

When you create a gradient, your task is to create a lighter edge on the inner surface lateral part of the headband.
Step 18
Create the back of the decorative element. To do this, copy the lower ellipse of the decorative element and paste it in back. Now move the object in the Layers palette so that it is located below all the objects. Replace the object fill with a linear gradient.

Our goal is to achieve the distinction between the adjacent elements and at the same time do not forget about the proper distribution of light. The figure below shows abnormal distribution of light on this element (I accidentally made this mistake while creating this artwork and I only noticed when I was creating the tutorial).

Step 19
Now create a rear surface of another decorative element on the rear surface of the headband. Create four circles. The sequence of their creation and filling is shown in the figures below.


The circle on the bottom is the shadow of the element, and therefore should not go beyond the headband margins. Cut off the protruding part. Those who have Adobe Illustrator CS5 can do this with the help of the Shape Builder Tool, the rest will have to copy the inner surface of the headband and paste it in front, select the circle and the inner surface of the headband and press the Intersect button from the Pathfinder palette.

Step 20
Create a soft part on the inner surface of the headband. Take the Pen Tool (P) and create the shape shown in the figure below.

Fill it with an elliptical gradient. Your task is to achieve a light edge on the soft part and uneven color in its center.

Step 21
Make our headphones look nicer with another element. Take the Pen Tool (P) and create a line 20px in width (pick this value in accordance with the size of your headphones).

Keep it selected, go to Object > Expand and fill it with a solid color.

Using this technique create two more objects of a smaller width and length with one solid color fill, but with unlike opacity.


Select these two objects, and go to Object > Blend > Make.

Step 22
It is time to focus on creating highlights on the parts of headphones. The technique of their creation does not differ at all from the one described in steps 8 and 9. I will only specify here the location and shape of the highlights.


Step 23
Proceed to the creation of the last element of headphones – the further cup. Create an ellipse and fill it with an elliptical gradient. The under layer with this element should lie below all the under layers in the Layers palette.

Continue creating ellipses forming the further cup.


Well, the headphones are ready.

Step 24
Proceed to the creation of the design for the icon. Group up all the elements of the headphones. Now rotate the headphones, as shown in the figure below.

Create shadow under the closer cup of the headphones, using the technique described in step 21.

Step 25
Now create the reflection of the headphones. Select the headphones and go to Object > Transform > Reflect … and press the Copy button in the dialog box.

My headphones are 388px in height. Keep this value in your mind (you memorize your own value, of course).

Keep the copy selected, go to Object > Transform > Move … and set 388px of Vertical parameter in the dialog box, click OK.

Step 26
Take the Rectangle Tool (M) and create a rectangle with vertical gradient from black to gray. The size of rectangle should cover all the whole reflection of the headphones.

Select the reflection of headphones and rectangle, click on the Make Opacity Mask from the menu of the Transparency palette.


Step 27
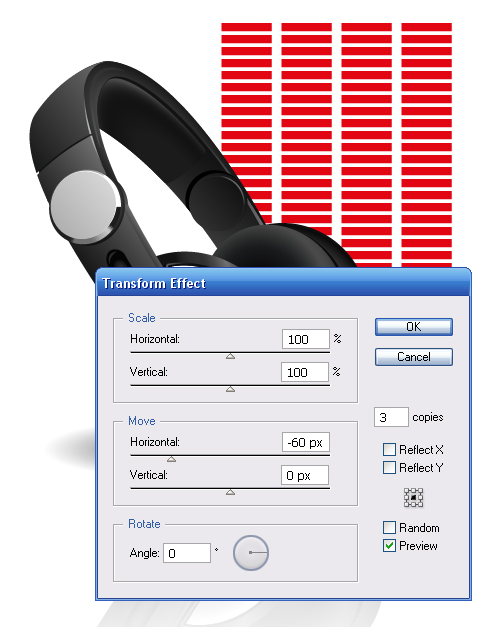
Our icon is monochrome, I doubt that looking like that it will attract somebody’s attention. Therefore, I offer to add any color element associated with the music. Having thought it over, I realized that this should be a stylized image of an equalizer. Proceed to its creation. Take the Rectangle Tool (M) and create a rectangle (in my case its sizes are 50 by 8 px).

Keep the rectangle selected, go to Effect > Distort & Transform > Transform … and set the values indicated in the figure below.

The created icon will hardly be used in its original size. Therefore, you have to make sure that the icon looks good in reduced size as well. Let’s reduce our image by three times (zoom 33,33%).

Equalizer rectangles merge together, therefore, they need to be slightly edited. Open Transform Effect dialogue box and adjust the distance between the rectangles, in order to achieve a clear image.

Keep the rectangle selected, go to Effect > Distort & Transform > Transform … and set the values indicated in the figure below.
Now go to Object > Expand Appearance. And delete some rectangles to achieve the image of equalizer.

Step 28
Now pick colors for the equalizer. I decided to color equalizer rectangles in 4 colors: purple, blue, light blue and green.

It is convenient to use CMYK color model for color mixing. This model is user-friendly, but it contains fewer colors than the RGB model. Since we are creating a computer icon, and the image will not be printed out, we can use the RGB model for bright colors. First install the Document Color Mode (File > Document Color Mode > RGB Color). Now adjust the colors of the equalizer in RGB Color Mode.


After the adjustment, I decided upon these colors: purple – R: 191, G: 0, B: 255; blue – R: 29, G: 0, B: 255, Blue – R: 0, G: 163, B: 255, green – R: 0, G: 235, B: 0. Tip: Use CMYK color model for color mixing, finish them in RGB Color Mode for brightness. Then apply the created colors to the equalizer rectangles.

Conclusion
In this tutorial, I used elliptical gradients, which are a special kind of radial gradient. This kind of gradient is available starting from the CS 4 version of the program. Honestly, you can do with the radial gradient by itself. Here is an icon for the creation of which I have only used radial gradients.

Can you see the difference? You can use the Blend and Clipping Mask to reproduce the elliptical gradient. You should know what I’m talking about. Why do I emphasize this topic? The thing is that when you save a file in EPS format, an elliptical gradient transforms into a set of objects that are located under the Clipping Mask. As if the Expand command was applied to a Blend object, at best. Or worse, such objects will simply rasterize, what may increase the file size by 10 times!
The techniques I used in this tutorial are simple and obvious. Though several times I wanted to apply the Gradient Mesh. Try to draw an object you use so often, using simple techniques described in this tutorial. It can be a computer mouse, speakers, monitor, or spoon ![]() . The main thing is to learn to be able to see, rather than copying other people’s work.
. The main thing is to learn to be able to see, rather than copying other people’s work.
Final Image