
At some point, you’ve probably come across a cat statue with one of its paws raised and swaying back and forth. This is Maneki-neko or the Beckoning Cat, a common Japanese figurine, which is often believed to bring luck to its owner.
Such talismans usually come in different
color variations and have different meanings, depending on which paw is raised
and what the cat holds in its other paw. For example, there is a belief that a
raised left paw attracts money, while a raised right paw protects it. However,
there are a lot of other versions and meanings, so be sure to check this article about Maneki-neko if you’re
interested in its origin and significance.
It might be hard to imagine all the minor details of the figurine if you haven’t seen Maneki-neko before, so I highly recommend that you head to Envato Market and look through these photo references on PhotoDune, which will help you to see it from different angles and in different colors.
And now that we’re ready, let’s start making our lucky charm!
1. How to Create a Cat’s Head
Step 1
First of all, take the Rectangle Tool (M) and create an 800 x 600 px rectangle for the background to make all the white details visible on the canvas. Apply a vivid purple radial gradient and use the Gradient Tool (G) to edit the position of the fill.

Let’s take the Ellipse Tool (L) and form the head from a 195 x 195 px circle. Apply a radial gradient from white in the center to light beige at the edges. Use the Gradient Tool (G) to position the gradient as shown in the image below, creating a subtle shadow at the bottom of the head, thus making it spherical. We’ll be using a lot of linear and radial gradients throughout this tutorial, applying them to every single object that we create.
Now take the Direct Selection Tool (A) and select both side anchor points of the shape. Move them down and to the sides a bit, making the bottom of the shape flatter and wider.

Step 2
Copy the head and Paste in Front twice (Control-C > Control-F > Control-F). Move the top copy up a bit.
Select the two copies and use the Minus Front function of Pathfinder to cut the objects, leaving a narrow crescent shape at the bottom of the head.
Fill the new shape with linear gradient from white to blue and switch it to Multiply Mode in the Transparency panel, making the shape semi-transparent. This way we’ve added a gentle bluish overtone.

Step 3
Let’s add a bright spot on top of the head. Make a 120 x 120 px circle and fill it with bright-orange linear gradient. Select both the head and the orange circle and take the Shape Builder Tool (Shift-M). Hold down Alt and click the upper part of the orange circle that we want to delete. There we have it!

Step 4
Now let’s draw the facial details. Use the Ellipse Tool (L) again to make a 50 x 50 px circle. Set its Fill color to none and its Stroke color to a linear gradient of brown tints.
Head to the Stroke panel, set the Width to 6 pt, and switch Cap to the middle position.

Step 5
Take the Scissors Tool (S) and click the left and right anchor points of the shape to split the circle into two halves. Delete the lower half. Rotate the shape a bit, depicting a closed eyelid.
Keeping the shape selected, double-click the Reflect Tool (O) and flip the shape over the Vertical Axis. Click Copy to make a reflected second eye.

Step 6
Use the same half-circle shapes to create a mouth.
Copy the head shape and Paste in Front (Control-C > Control-F). Bring the copy to Front (Shift-Control-]) and make it much smaller.
Fill the copy with linear gradient from orange to black and switch its Blending Mode to Screen, thus making a bright highlight on the forehead.

Step 7
Now let’s form the ears. Use the Polygon Tool to make a 120 x 100 px triangle (you can change its size either in the control panel on top or in the Transform panel (Window > Transform)).
Fill the triangle with a gentle linear gradient of the same white-beige colors as the head.
Select the top anchor point with the Direct Selection Tool (A) and pull down the circle marker of the Live Corner to make the top of the ear rounded.
Make a smaller rounded triangle inside the ear. Fill it with bright-orange linear gradient, picking it from the top of the head with the help of the Eyedropper Tool (I).

Step 8
Rotate the ear and attach it to the head. Move the ear to Back (Shift-Control-[). Use the Curvature Tool (Shift-') to make the edges of the ear slightly arched.
Use the Reflect Tool (O) to attach a mirrored copy to the other side of the head.

2. How to Make the Body of Maneki Neko
Step 1
Take the Rounded Rectangle Tool and let’s form the body from a 195 x 190 px shape with smooth corners. Fill it with radial gradient, creating a subtle shadow at the edges.
Use the Direct Selection Tool (A) to select the anchor points of the top corners and move them closer to each other with the arrow keys, while holding Shift to make the shape narrower at the top.
Send to Back (Shift-Control-[), placing the body beneath the head.

Step 2
Add a light-blue reflection at the bottom of the body, using the same technique as for the head.

Step 3
Let’s make a paw from a 70 x 45 px ellipse, filled with linear gradient from white to light beige. Select both side anchor points and move them down, making the bottom of the shape flat.
Use the Line Segment Tool (\) while holding Shift to make three short vertical lines for the claws. Apply the same brown linear gradient for the Stroke as we did for the eyes. Set the Weight to 4 pt in the Stroke panel and make the tips of the lines rounded.

Step 4
Now let’s create a little bell to decorate our figurine. Make a 72 x 72 px circle and fill it with radial gradient from yellow in the center to orange at the edges, making it spherical and three-dimensional.
Copy the circle and Paste in Front twice (Control-C > Control-F> Control-F). Move the top copy down a bit and fill it with linear gradient from yellow to black.
Select the two copies and apply Intersect to cut the top copy. Switch the Blending Mode to Screen, making a bright highlight.

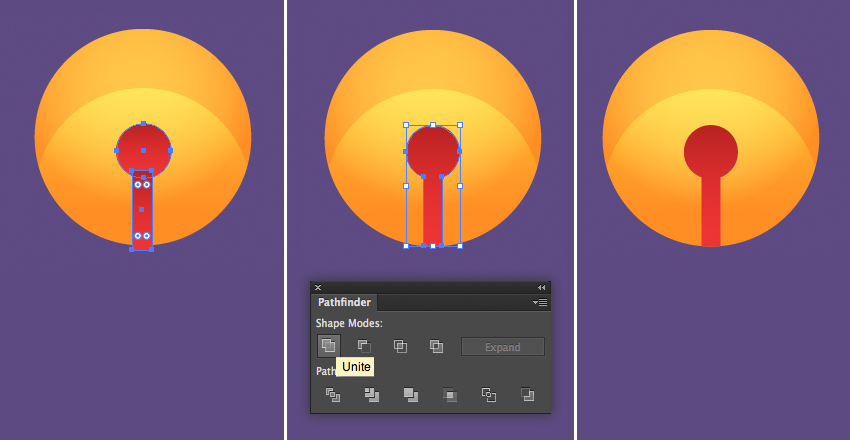
Step 5
Create a small circle and a small narrow rectangle and fill them with bright red linear gradient. Combine the two objects, using the Unite function of the Pathfinder.
Make the shapes fit the circle by deleting its bottom part, either by applying the Intersect function of the Pathfinder, as we did in the previous step, or using the Shape Builder Tool (Shift-M) as we did earlier (Part 1, Step 3).
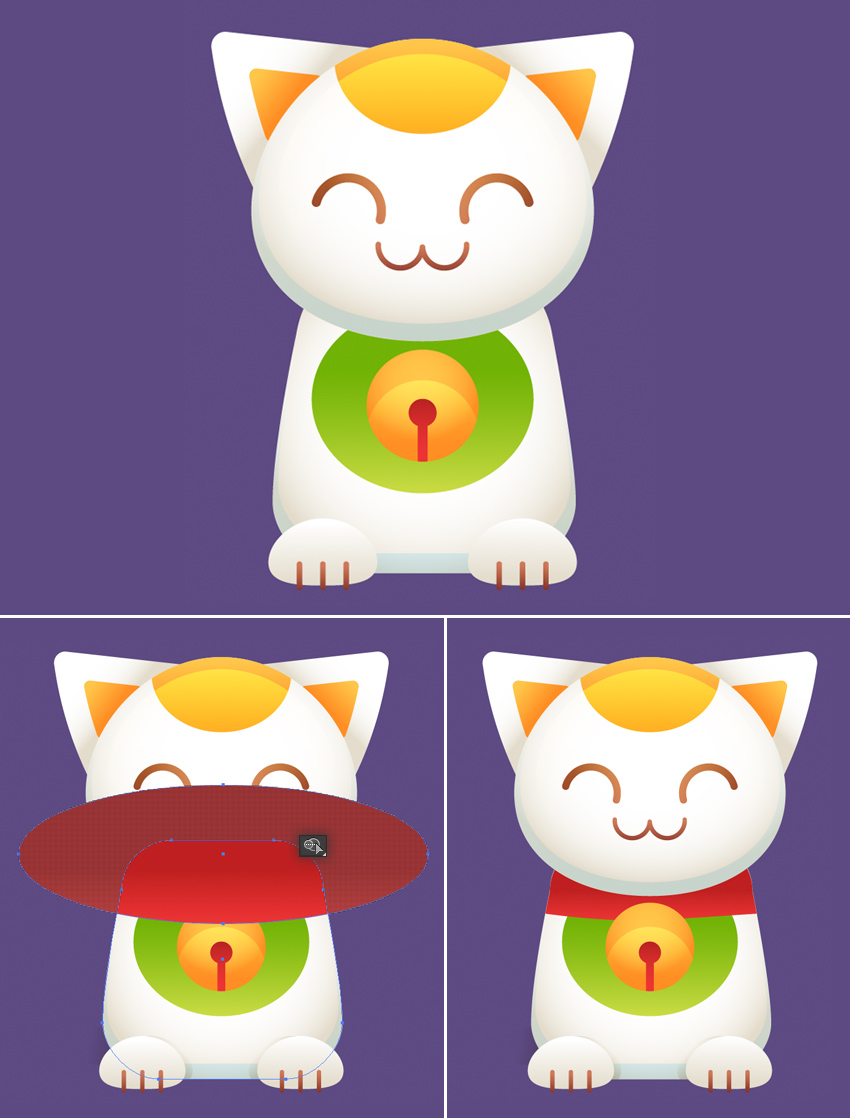
Step 6
Attach the bell to the cat’s neck and place a bright yellowish-green ellipse beneath it.
As for the collar, let’s create a bright-red ellipse above the top part of the body. Select both the body and the ellipse and use the Shape Builder Tool (Shift-M) while holding Alt to click and delete the unneeded piece. Send the collar Backward (Control-[) a few times, placing it beneath the head and the bell.
Don’t forget to add the paws to the bottom of the body.
Step 7
In order to make the figurine more realistic, we need to add some gentle shadows to it. Let’s see how we can make a shadow from the bell.
Copy the bell circle and Paste in Back (Control-C > Control-B). Move the copy down a bit and fill it with a vertical linear gradient from beige on top to white at the bottom.
Switch the Blending Mode to Multiply, creating a subtle semi-transparent shadow.
Use the same method to add the shadows from the head and paws. Remember to cut off and delete the unneeded pieces using theShape Builder Tool (Shift-M).

Step 8
Let’s add the arms and front paws to our Maneki Neko. Place a paw on the left (or right) side of the face, to your liking. Use the Rounded Rectangle Tool to make a 50 x 90 px shape with 20 px Corner Radius for the arm and fill it with the same vertical linear gradient, from light beige to white, as we have for the other body parts.
Add a light-blue overtone in the bottom part of the arm, and don’t forget to create a gentle shadow from the paw, placing it over the face.

Step 9
Now let’s draw a fish that we’re going to place in the second paw of our cat. Use the Ellipse Tool (L) to make an 115 x 55 px ellipse for the body and fill it with vivid linear gradient from lighter pink on top to darker pink at the bottom.
Make another ellipse, fill it with light-pink color, and place it over the body, covering its right part. Select both shapes and use the Shape Builder Tool (Shift-M) while holding Alt to delete the pieces of the shape around the body.
Now we’ve formed the head of our fish. Let’s add more details!

Step 10
Make a smaller oval of 40 x 20 px size and fill it with a horizontal linear gradient of darker pink shades.
Use the Direct Selection Tool (A) to select both side anchor points and Convert selected anchor points to corner from the control panel on top, making the shape pointed.
Make a copy of the created object and create a fishtail by combining the two indicated shapes.
Finish up the fish by adding a half-circle for the eye.

Step 11
Put the fish into the cat’s paw and attach it to the body. Make a shadow from the paw as well as from the fish, creating semi-transparent shapes in Multiply mode.
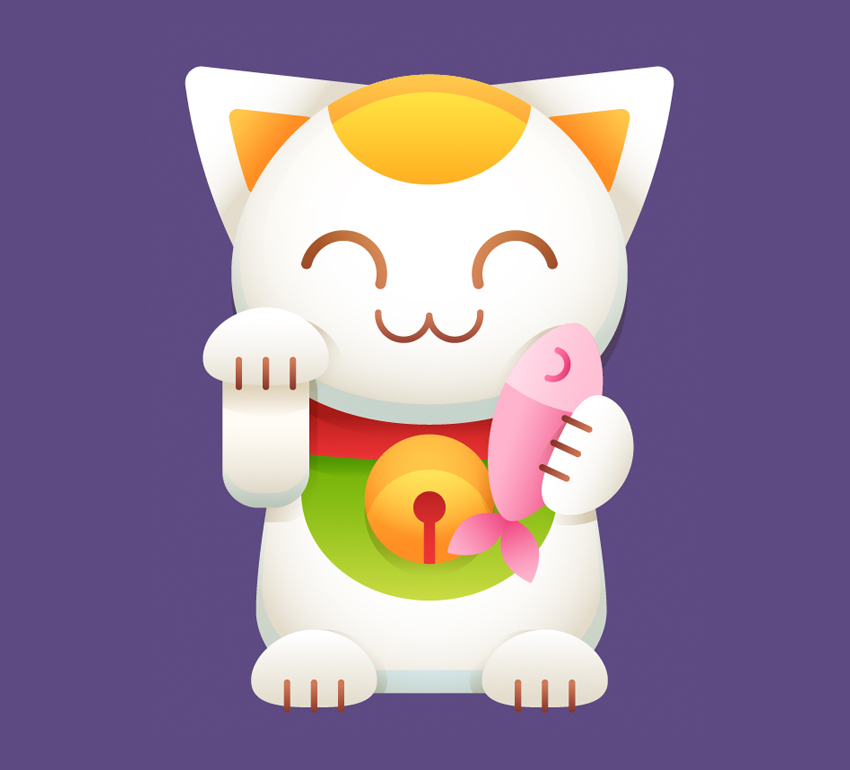
Step 12
Finally, let’s add a curved smooth tail to our cat. Use the Arc Tool to attach a nice arched shape to the left side of the cat’s body and apply a 30 pt Stroke with round caps.

Step 13
Let’s Object> Expand the tail to turn it into an editable shape. Now we can apply a linear gradient and add minor details.
Place a bright yellowish-orange ellipse on top of the tail and use the Shape Builder Tool (Shift-M) while holding Alt to delete the unneeded piece around the tail.
Copy the orange piece and Paste in Front (Control-C > Control-F). Make the copy smaller and turn it into a bright-yellow highlight by picking the appearance from the forehead highlight with the Eyedropper Tool (I).

3. How to Create a Background in Oriental Style
Step 1
Let’s create some elements for a simple Asian background in order to make our image look balanced and complete.
Use the Ellipse Tool (L) to create a set of overlapping circles. Switch to the Rectangle Tool (M) and place a narrow stripe in the bottom of the cloud to make its lower part flat.
Unite all the shapes in the Pathfinder to make a single object.

Step 2
Place the cloud beneath the cat and add a darker blue overtone in the bottom of the shape, making it more three-dimensional.
Use the Ellipse Tool (L) to add two small circles on both sides of the cloud and create a large red circle beneath all the objects, depicting a rising sun.
Add a shadow from the cloud, placing it above the sun shape.

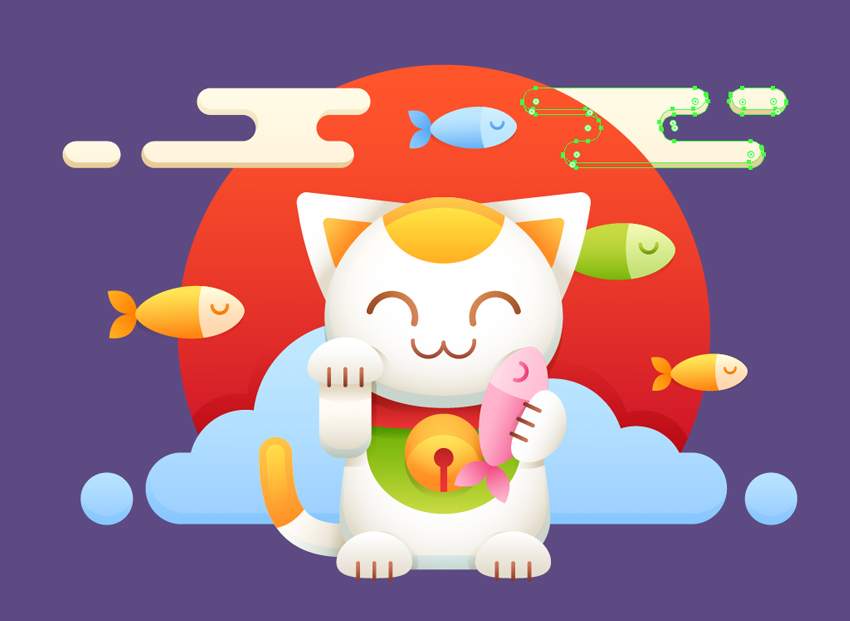
Step 3
Make a few more copies of the fish and recolor them, making our composition more detailed and colorful.

Step 4
Let’s create another cloud of a slightly different shape. Use the Rectangle Tool (M) to make a 200 x 25 px light-yellow stripe. Add two more stripes above, varying their width.
Unite all three shapes in the Pathfinder and select the entire shape with the Direct Selection Tool (A). Pull the circle marker of the Live Corners to make all the corners equally rounded and smooth.

Step 5
Add minor details to the cloud and place it on top of the sun. Create a reflected copy using the Reflect Tool (O) and Send to Back (Shift-Control-[), placing it beneath the sun.
Step 6
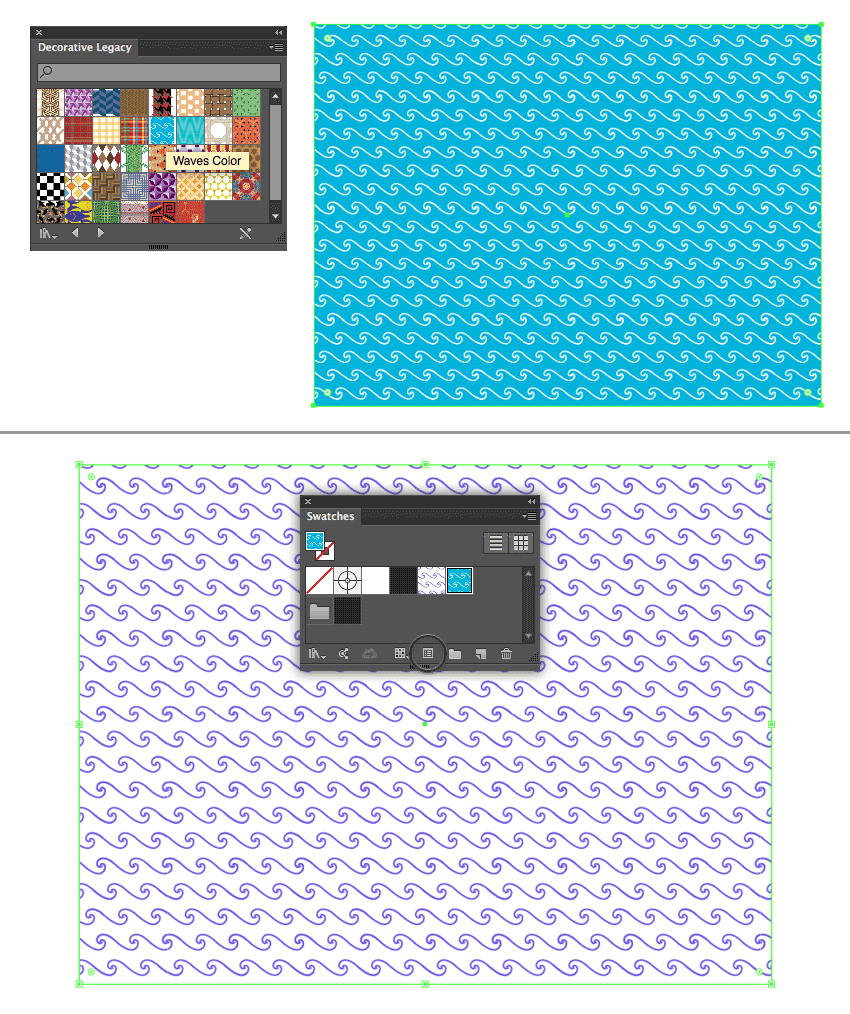
Now let’s apply a pattern to our dark-purple background. Create a rectangle of the same size as the background (800 x 600 px). Head to the Swatches panel (Window > Swatches), open the Swatch Libraries Menu, and find Patterns> Decorative > Decorative Legacy.

Step 7
Find the Waves Color pattern and apply it to the rectangle. You can change the Fill and Stroke colors of the pattern by clicking the Edit Pattern button in the Swatches panel.
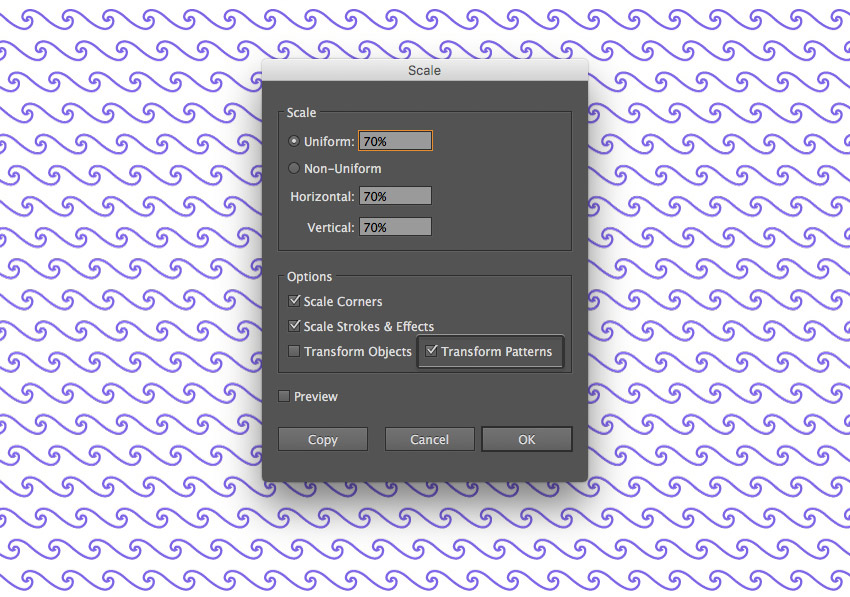
If you want to make the scale of the pattern larger or smaller, use the Scale Tool (S). Double-click it and set the desired value in the Uniform field, but don’t forget to uncheck the Transform Object box in order to Transform Patterns only.
Step 8
Place the pattern over the background and lower its Opacity to 10%, switching the Blending Mode to Screen to make the pattern barely visible.

Subarashii! Our Maneki Neko Is Finished!
Great job! I hope you’ve enjoyed following this tutorial and learned some new techniques while working with basic shapes, gradients, and various functions of Adobe Illustrator. Go ahead and create another lucky charm that will not only bring you fortune, but will also bring your skill and creativity to a new level.
Have fun!

