Clik here to view.

In this tutorial I'll show you how to create a flying owl artwork using simple photo manipulation techniques.
We'll use three stock images: one for the background, one for the main subject, and one for the foreground. You'll learn how to combine and arrange the elements based on their lightness using adjustment layers, masking, and brushes.
In the final section, you'll learn how to create light using an easy technique that can be applied to a variety of photos.
Tutorial Assets
The following assets were used during the production of this tutorial:
1. How to Add the Forest Background
Step 1
Create a new 2000 x 1333 px document in Photoshop with the given settings:
Clik here to view.

Step 2
Open the forest image. Drag this image into the white canvas using the Move Tool (V).
Clik here to view.

Step 3
The busy background will make the main subject (the owl) less outstanding. We'll use a popular technique to make it look separate from the main subject.
Go to Filter > Blur > Gaussian Blur and change the Radius. The Radius will depend on the sharpness of the background image you're using and how large it is. Drag the Radius button until you get a similar result to the one below or your desired result. In this case, I've set it to 8 px.
Clik here to view.

Step 4
The background looks a bit too dark and full of contrast, while we're aiming to make it brighter and more foggy. Go to Layer > New Adjustment Layer> Curves and increase the lightness.
Clik here to view.

Select the Curves layer mask and activate a soft round brush with black
color (soft black brush) to paint on the following area. We'll add light to the middle
section and will brighten it at a later stage.
Clik here to view.

Step 5
Add another Curves adjustment and make the light on the both sides stronger. Use a soft black brush to erase the middle section for the same reason as in the previous step.
Clik here to view.

2. How to Add the Tree
Step 1
Open the tree image. Isolate the tree using the Polygonal Lasso Tool (L) and place it on the right side of the canvas.
Clik here to view.

Flip the tree horizontally by choosing Edit > Transform > Flip Horizontal to create a better frame for the whole scene.
Clik here to view.

Step 2
There are some unwanted details on the tree. Hit Control-Shift-N to
create a new layer above the tree layer. Set it as Clipping Mask by
pressing Control-Alt-G and activate the Clone Tool (S). Use this tool to
remove the indicated details.
Clik here to view.

Step 3
The right part of the tree looks missing (lopped branch). To correct it, select the left branch of the tree using the Lasso Tool and add it to the missing area of the existing tree.
Clik here to view.

Click the second icon at the bottom of the Layers panel to add a mask to
this layer. Use a medium-hard black brush to remove the hard edges and blend the branch with the
big tree.
Clik here to view.

Step 4
Make a new layer above the branch and set it as Clipping Mask. Use theClone Tool to remove the unwanted leaf on the top of this branch.
Clik here to view.

Step 5
Select the tree, the branch, and the cloning layers, and press Control-G to make a group for them. Change this group mode from Pass Through to Normal 100%. Add a Hue/Saturation adjustment layer and bring the Saturation value down to -87.
Clik here to view.

Step 6
Use a Photo Filter adjustment layer and pick the color #8fc9eb.
Clik here to view.

Step 7
Make a Curves adjustment layer and decrease the lightness. It's to strengthen the shadow on the hidden areas of the tree. On this layer mask, use a soft black brush to erase the contour and the front of the tree. We're aiming to add light to the left, so the front of the tree should be bright.
Clik here to view.

Step 8
Add another Curves adjustment layer to brighten the front of the tree. Select the Curves layer mask and paint on the shaded areas of the tree so they will not be affected by this adjustment layer.
Clik here to view.

Step 9
Some parts on the front of the tree are still not bright and look a bit flat. To fix it, make a new layer above the clone layer, change the mode to Overlay 100%, and fill with 50% gray.
Clik here to view.

Select the Dodge and Burn Tool (O) with Midtones Range, Exposure about20-25% to brighten the front of the tree and paint more details for this area. Vary the brush size to achieve a better result. You can see how I did it with Normal mode and the result with Overlay mode.
Clik here to view.

Clik here to view.

Step 10
Apply dodging and burning to the branch using the same method.
Clik here to view.

3. How to Import the Owl
Step 1
Open the owl image. As it has a white background, use the Magic Wand
Tool (W) to isolate the owl and add it to the left section of the main
canvas.
Clik here to view.
Step 2
Create a Curves adjustment layer and increase the lightness. On this
layer mask, use a soft black brush to erase the light on the hidden
areas (below and inside the wings and the lower body) and the middle top of
the owl's head (as it's bright enough). We need the effect to be visible only on
the areas which are exposed to the light.
Clik here to view.

Step 3
Add a Photo Filter adjustment layer and pick the color #43bff2.
Clik here to view.

Step 4
Make a new layer, change the mode to Overlay 100% and fill with 50%
gray. Use the Dodge and Burn Tool to refine some details on the wings,
tail, and claws.
Clik here to view.

Clik here to view.

4. How to Do the Base Adjustment
Step 1
Create a Gradient Map adjustment layer on top of the layers and pick the
colors #e10019 and #00601b. Lower the Opacity of this layer to 20%.
Clik here to view.

Step 2
Make another Gradient Map adjustment layer and pick the colors #052e3c and #91c6e1. Change this layer mode to Soft Light 100%.
Clik here to view.

Step 3
Use a Photo Filter adjustment layer and pick a cyan color (#00acec).
Clik here to view.

Step 4
Create a Curves adjustment layer and increase the lightness a little. Use a soft black brush to paint on the edges, except the middle area, where we're aiming to add light.
Clik here to view.

Step 5
Add a Vibrance adjustment layer to enhance the colors.
Clik here to view.

5. How to Create the Final Light
Step 1
In this stage we'll create light using an easy technique. I use it in most of my projects, and it's very simple.
I use two layers, the first with Linear Dodge mode and the second with Overlay mode. On the first layer, use a dark tone for the brush, usually in colors of red, gold, purple, or yellow, to create a glow of light. The color used will depend on the color of the background—they can be compatible or contrasting colors. You should not use too dark a tone for the brush as with Linear Dodge mode the effect would be mostly invisible.
On the second layer, use a light color to create a highlight. If the background image is too dark, you can paint more highlight on a new layer using a lighter brush color, keeping Normal mode or altering to Overlay mode.
In our case, the background has a cyan color, so a vibrant gold light
will work perfectly on it. First, create a new layer and use a soft brush
with the color #391508 to paint the area above the owl and some areas of the front of the tree. Alter this layer mode to Linear Dodge 100%.
Clik here to view.

Clik here to view.

Step 2
Make a new layer and use a yellow brush (#f7c474) to paint highlight
and the reflected light on the owl and the tree. You can use a layer mask to
reduce the light on the areas which were overly done. As mentioned, set
the layer mode to Overlay 100%.
Clik here to view.

Clik here to view.

Step 3
Create a Vibrance adjustment layer to enhance the final effect.
Clik here to view.

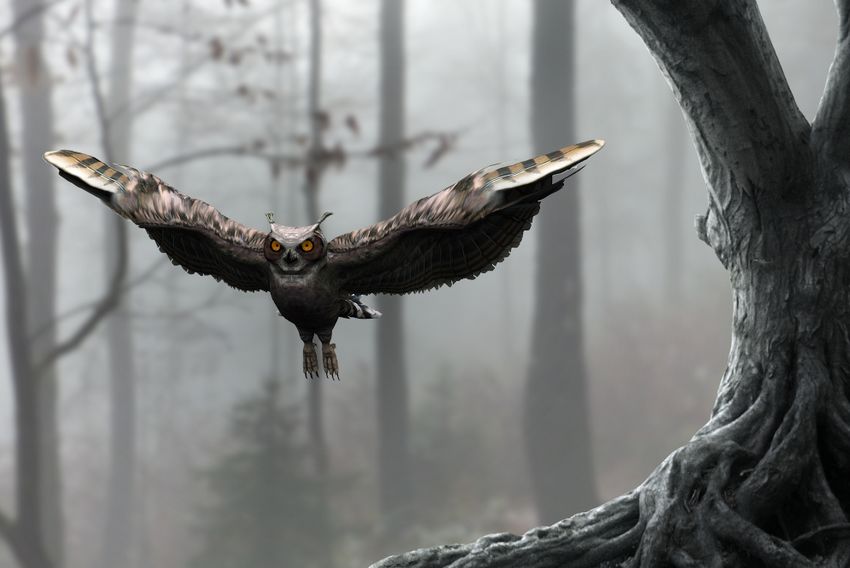
Congratulations, You're Done!
I hope that you've enjoyed my tutorial and learned something new. Feel free to share your ideas or comments in the box below—I'd love to see them. Enjoy Photoshopping!
Clik here to view.

Clik here to view.
 Image may be NSFW.
Clik here to view.
Clik here to view.