
This tutorial will show you how to use textures, layer styles, and brushes to create a colorful, delicious ice-cream scoop text effect. Let's get started!
This text effect was inspired by the many Layer Styles available on GraphicRiver.
Tutorial Assets
The following assets were used during the production of this tutorial:
- Neretto Sans font
- [Stock] Grunge Texture Pack by dimawari
- Ice cream scoop (Multiple) by magone (image no longer available; try this image of ice cream scoops or this one of ice cream cones as alternatives)
- Ice cream scoop (Single) by magone (image no longer available; try this alternative)
1. How to Create the Background and Text Layers
Step 1
Create a 1000 x 800pxNew Document, click the Create new fill or adjustment layer icon at the bottom of the Layers panel, and choose Gradient.
Create the GradientFill using the Colors#7e4569 to the left, #5a1961 in the middle, and #311737 to the right.
Change the Style to Radial and the Scale to 150%, and check the Dither box.

Step 2
Create the text, each letter in a separate layer, in All Caps using the font Neretto Sans. Set the Size to 150 pt and the Color to White.

Step 3
For each letter you have, select its layer, and press Command-T to enter Free Transform Mode.
Rotate and move the letters slightly to create a dynamic result, and hit the Return key to accept the changes.

Step 4
In order to keep things organized, match each layer's name with its letter, and add numbers for any repeated ones.

Step 5
For each letter's layer you have, Duplicate it, and change the copy's Fill value to 0.

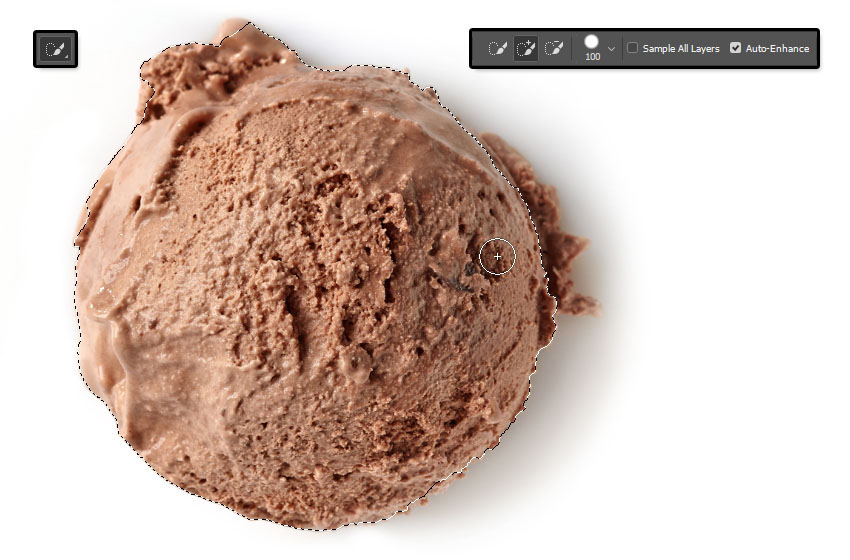
2. How to Select and Add Texture Images
Step 1
Open the Ice cream scoop images, and pick the Quick Selection Tool.
Click the Add to selection icon in the Options bar, and check the Auto-Enhance box if you want to get a precise selection, though this is optional as it might slow things down a little bit.
Click-drag to select a scoop image, and go to Edit > Copy.
Step 2
Back to the original document, go to Edit > Paste.
Right-click the pasted image's layer and choose Convert to Smart Object.
Place the scoop image on top of the letter you want to add it to, right-click the scoop image's layer again, and choose Create Clipping Mask to clip the image to the letter.

Step 3
Press Command-T, and Transform the scoop image until you like how it looks inside the letter.
Hit the Return key to accept the changes.

Step 4
Repeat the same steps to select the other scoop images and add them to the rest of the letters you have.
You can use the same image more than once, but Transform it to make it look different.

3. How to Style a Text Layer
Double-click the first letter's original text layer to apply the following Layer Style:
Step 1
Add a Bevel and Emboss with these settings:
- Size: 35
- Check the Anti-aliased box
- Highlight Mode:
- Color:
#ff988a
- Color:
- Shadow Mode: Color Burn
- Color:
#daaf98 - Opacity: 35%
- Color:

Step 2
Add a Contour with these settings:
- Contour: Half Round
- Check the Anti-aliased box.

Step 3
Add a Texture with these settings:
- Pattern: Ant Farm

Step 4
Add an Inner Shadow with these settings:
- Blend Mode: Linear Burn
- Color:
#b27a67 - Opacity: 35%
- Distance: 0
- Choke: 13
- Size: 24

Step 5
Right-click the styled layer, choose Copy Layer Style, select the remaining original text layers, right-click any of them, and choose Paste Layer Style.

Step 6
You might notice that the style doesn't look good for all the different colors.
So you can double-click each letter's layer, and adjust its Bevel and Emboss's Highlight Mode and Shadow Mode Colors, as well as its Inner Shadow Color.
Match those colors to the letter's texture colors, and you can even sample the colors from the texture itself. No specific values are needed, just whichever ones look good.

4. How to Add Dimension
Step 1
Double-click the first letter's copy text layer to apply a Bevel and Emboss effect with these settings:
- Size: 24
- Uncheck the Use Global Light box
- Angle: 164
- Altitude: 53
- Check the Anti-aliased box
- Highlight Mode: Soft Light
- Color:
#ffe9e9
- Color:
- Shadow Mode:
- Opacity: 0%

Step 2
Copy and Paste the Layer Style to the rest of the copy text layers you have.

Step 3
Place each letter's layers in a Group with its name.

5. How to Create Stroke Layers
Step 1
Create a New Layer on top of all the first letter's layers inside its group, and name it Stroke.

Step 2
Press-hold the Option key, and click-drag the letter's scoop image to create a Copy and place it on top of the Stroke layer.

Step 3
Clip the copy scoop image's layer to the Stroke layer.
Repeat the same steps to create the other letter's Stroke layers.

6. How to Stroke a Work Path With a Modified Brush Tip
Step 1
Pick the Brush Tool, and open the Brush panel.
Choose a Hard Round Tip, and use these settings for the Brush Tip Shape and Shape Dynamics tabs.

Step 2
Right-click the first letter's text layer, and choose Create Work Path.
Make sure to select the Stroke layer afterwards.

Step 3
With the Brush Tool active, hit the Return key once to Stroke the path.
Pick the Direct Selection Tool (A), and hit the Return key one more time to get rid of the work path.

Step 4
Repeat to create the rest of the letters' strokes.

7. How to Style a Stroke Layer
Double-click the first letter's Stroke layer to apply the following Layer Style:
Step 1
Add a Bevel and Emboss with these settings:
- Size: 7
- Uncheck the Use Global Light box
- Angle: 167
- Altitude: 21
- Check the Anti-aliased box
- Shadow Mode: Linear Burn
- Color:
#d5ccb9 - Opacity: 65%
- Color:

Step 2
Add a Drop Shadow with these settings:
- Blend Mode: Linear Burn
- Color:
#6e6e6e - Opacity: 10%
- Distance: 0
- Size: 10

Step 3
Copy and Paste the Layer Style to all the Stroke layers.

8. How to Create a Sprinkles Brush Tip
Step 1
Create a 100 x 100pxNew Document with a WhiteBackground, pick the Rounded Rectangle Tool, and set the Radius in the Options bar to 15.
Click once anywhere in the document to get the Create Rectangle box, change the Width to 15 and the Height to 35, and click OK.
Make sure that the shape's Fill Color is Black, and place it in the center of the document.

Step 2
Go to Edit > Define Brush Preset, change the Name to Sprinkles, and click OK.

Step 3
Go back to the original document, pick the Brush Tool and open the Brush panel.
Choose the Sprinkles tip and use these settings:
Brush Tip Shape

Shape Dynamics

Scattering

Color Dynamics

9. How to Use a Sprinkles Brush Tip
Step 1
Create a New Layer on top of all layers and call it Sprinkles.
Set the Foreground Color to #fe0000 and the Background Color to #1b9be6.
Click-drag slightly inside the text area to add the sprinkles.
You can change the color outcome by changing the Foreground and/or Background Colors.

Double-click the Sprinkles layer to apply the following Layer Style:
Step 2
Add a Bevel and Emboss with these settings:
- Size: 1
- Uncheck the Use Global Light box
- Angle: 128
- Altitude: 37
- Check the Anti-aliased box
- Highlight Mode: Vivid Light

Step 3
Add a Drop Shadow with these settings:
- Blend Mode: Color Burn
- Color:
#010101 - Opacity: 10%
- Distance: 3
- Size: 5

Step 4
Click the Add layer mask icon at the bottom of the Layers panel, and select the mask's thumbnail.

10. How to Create a Mask's Texture Fill
Step 1
Set the Foreground and Background Colors to Black and White, and go to Filter > Render > Clouds.

Step 2
Go to Filter > Filter Gallery > Sketch > Reticulation, and use these settings:
- Density: 12
- Foreground Level: 40
- Background Level: 5

Step 3
Click the New effect layer icon in the bottom right corner, and apply the Photocopy filter with these settings:
- Detail: 7
- Darkness: 8

Step 4
Add another New effect layer, and apply the Bas Relief filter with these settings:
- Detail: 13
- Smoothness: 3
- Light: Bottom

This will apply a Layer Mask that blends the sprinkles with the scoops to make the effect look more realistic.

11. How to Add More Sprinkles
Step 1
Create a New Layer on top of the Sprinkles layer, name it Sprinkles 2, and Copy and Paste the Sprinkles layer's Layer Style to it.
Set the Foreground Color to #fe0000 and the Background Color to #01ffe5, and add some more sprinkles to the text.

Step 2
Add another New Layer on top of all layers, name it Sprinkles 3, Paste the same Layer Style to it, and add some more sprinkles around the text.

Step 3
Put all the sprinkle layers in a Sprinkles group.

12. How to Style a Drip Layer
Step 1
Create a New Layer on top of all the first letter's layers, and name it Drip.
Press-hold the Option key to click-drag the letter's scoop image on top of the Drip layer, and Clip it to it.
Right-click the scoop image and choose Convert to Smart Object.

Double-click the Drip layer to apply the following Layer Style:
Step 2
Add a Bevel and Emboss with these settings:
- Size: 16
- Soften: 1
- Uncheck the Use Global Light box
- Angle: 30
- Altitude: 48
- Gloss Contour: Cone
- Check the Anti-aliased box
- Shadow Mode: Vivid Light
- Color:
#a1a1a1
- Color:

Step 3
Add a Contour with these settings:
- Contour: Rounded Steps
- Check the Anti-aliased box.

Step 4
Add an Inner Shadow with these settings:
- Blend Mode: Color Burn
- Opacity: 35%
- Uncheck the Use Global Light box
- Angle: 90
- Distance: 3
- Choke: 33
- Size: 3

Step 5
Select the Drip layer's scoop image, go to Filter > Noise > Median, and change the Radius to 5.

Step 6
Go to Filter > Blur > Gaussian Blur, and change the Radius to 2.

13. How to Paint Drips
Step 1
Pick the Brush Tool, use the same settings of the stroke brush tip, but change the Spacing value under the Brush Tip Shape tab to 1%.

Step 2
Select the Drip layer, and start painting the drips by slowly dragging the brush into the shape you like.

Step 3
Use the Eraser Tool to get rid of any areas you don't like.

Step 4
Repeat all the steps to add drips to the rest of the letters you have.

14. How to Add Shadows and a Background Texture
Step 1
Double-click the first letter group you have to apply a Drop Shadow effect with these settings:
- Blend Mode: Color Burn
- Opacity: 7%
- Distance: 45
- Size: 20

Step 2
Copy and Paste the Layer Style to the rest of the letter groups.

Step 3
Place the MGrunge005 image on top of the Gradient Fill layer, resize it as needed, and change its layer's Blend Mode to Soft Light and its Opacity to 25%.

15. How to Make Global Adjustments
Step 1
Create a New Layer on top of all layers, name it High Pass, and press the Shift-Option-Command-E keys to create a stamp layer.
Right-click the High Pass layer and choose Convert to Smart Object.

Step 2
Go to Filter > Other > High Pass, and change the Radius to 1.5.

Step 3
Change the High Pass layer's Blend Mode to Soft Light and its Opacity to 50%.

Step 4
Add a Gradient Map layer on top of all layers, and create the Gradient Fill using the Colors#55456b to the left, #79566e in the middle, and #d4977c to the right.
Check the Dither box, and change the Gradient Map layer's Blend Mode to Soft Light and its Opacity to 50%.

Congratulations! You're Done
In this tutorial, we created a couple of text layers, and added ice-cream scoop textures to them.
Then, we used brushes and layer styles to style the textured letters and add strokes, drips, and sprinkles to them.
Finally, we used textures and adjustment layers to finish off the effect.
Please feel free to leave your comments, suggestions, and outcomes below.

