In the following tutorial you will learn to create a grungy launch button. You will learn how to make a 3D style button and an industrial looking background with a few simple techniques some vector texture. Let’s begin!
Step 1
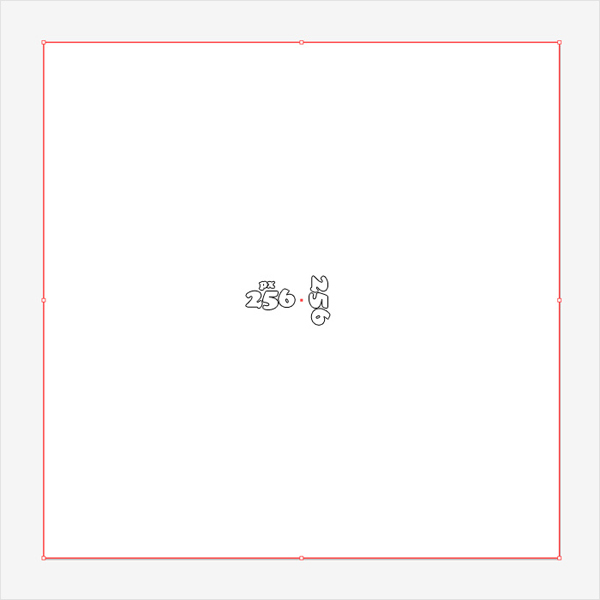
Create a 700 by 700px document then select the Rectangle Tool (M). Create a 256 by 256px square, fill it with white and name it "Grid".
Step 2
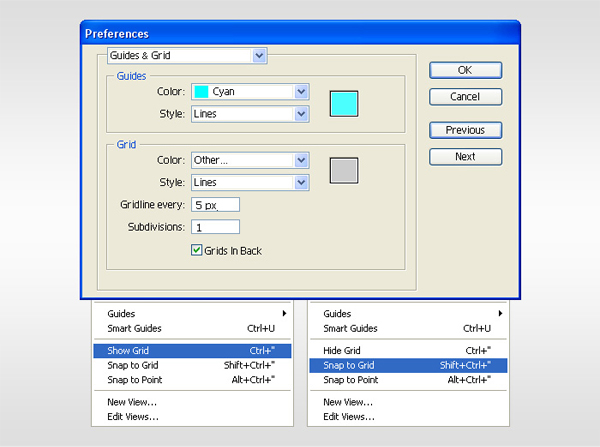
Enable the Grid (View > Grid) and the Snap to Grid (View > Snap to Grid). Next, you’ll need a grid every 5px. Go to Edit > Preferences > Guides & Grid, enter 5 in the Gridline every box and 1 in the Subdivisions box. You can also open the Info panel (Window > Info) for a live preview with the size and position of your shapes. Do not forget to replace the unit of measurement to pixels from Edit > Preferences > Unit > General. Al these options will significantly increase your work speed.
Step 3
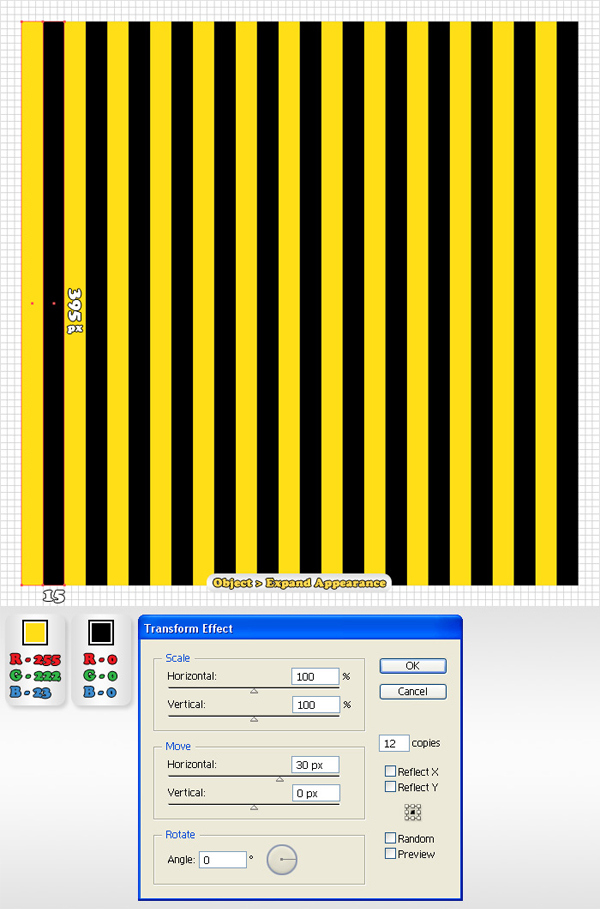
Pick the Rectangle Tool (M) and create a 15 by 395px shape. Fill it with R=255 G=222 B=23 then duplicate it. Select this copy, move it 15px to the right and fill it with black. Reselect both rectangles and go to Object > Distort & Transform > Transform. Enter 12 in the "Copies" box and 30px in the Move-Horizontal box then click OK and go to Object > Expand Appearance.
Step 4
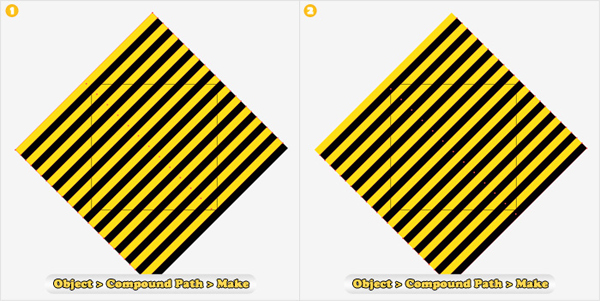
Select the shapes made in the previous step, rotate them and place them above the shape made in the first step (as shown in the image below). Make sure that you cover the entire square. Select the yellow shape and go to Object > Compound Path > Make then select the black shapes and go again to Object > Compound Path > Make.
Step 5
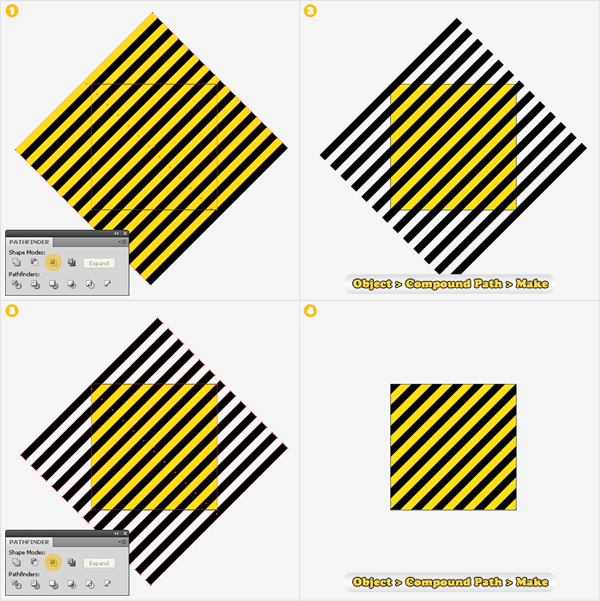
Make two copies of "Grid". Select the yellow shape along with a copy of "Grid" and click on the Intersect button from the Pathfinder panel. Select the resulting shapes and go to Object > Compound Path > Make. Select the black shape along with the other copy of "Grid" and click on the Intersect button from the Pathfinder panel. Select the resulting shapes and go to Object > Compound Path > Make.
Step 6
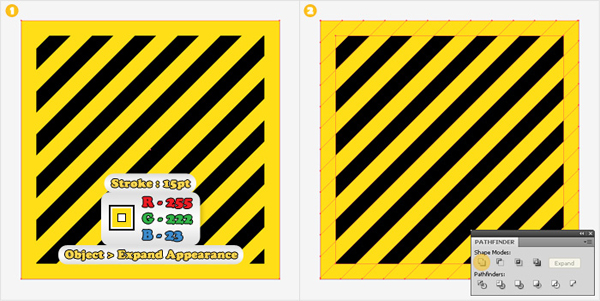
Select the original "Grid" shape and Bring it to Front (Shift + Control + ]). Fill it with none, add a 15px, aligned to inside stroke (R=255 G=222 B=23) then go to Object > Expand Appearance. Select the resulting shape along with the other yellow shapes and click on the Unite button from the Pathfinder panel.
Step 7
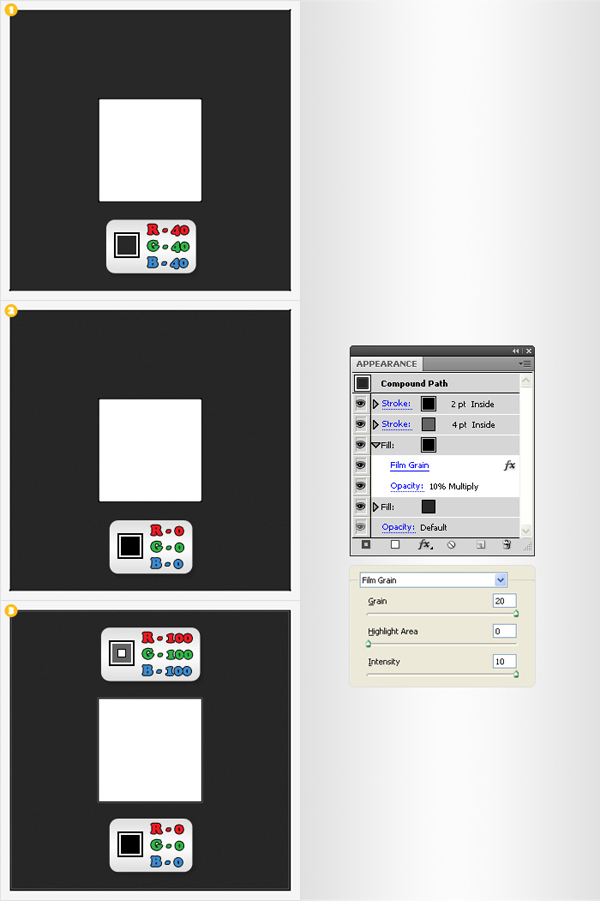
Select the yellow shape, add a new fill (from the flyout menu of the Appearance panel) and use the linear gradient shown in the second image. Take a closer look at the gradient, the yellow text stands for Opacity and the white text stands for Location. Add a third fill, make it black, lower its opacity to 5% and change its blending mode to Multiply. Select this fill (from the Appearance panel), go to Effect > Artistic > Film Grain, enter the data shown below image #3 and click OK. Finally, add a 2px, aligned to inside stroke. Make it white and lower its opacity to 15%.

Step 8
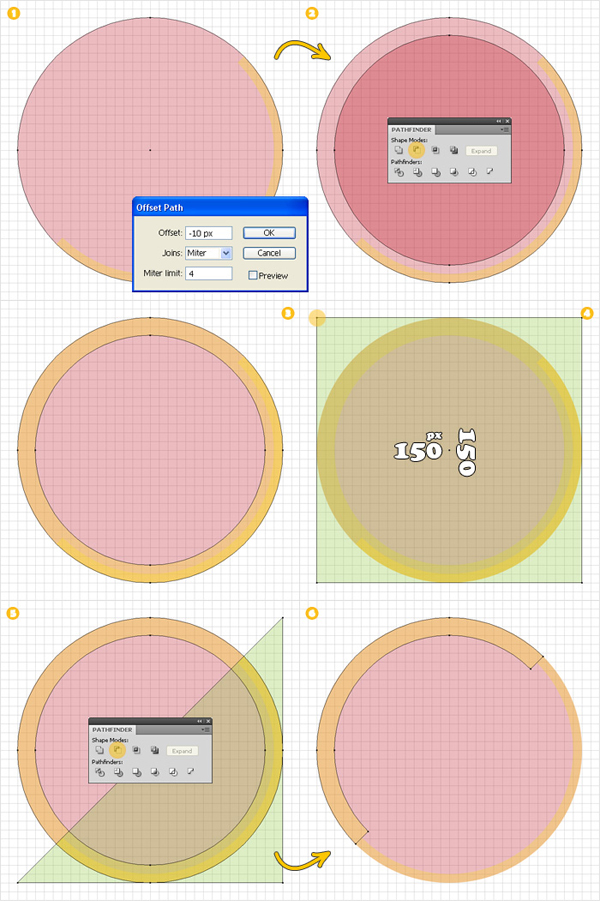
Pick the Ellipse Tool (L), hold Shift and create a 150 by 150px shape. Double click on it (in the Layers panel) and name it "Button". Duplicate this shape (Control + C > Control + F) then select the copy and go to Object > Path > Offset Path. Enter a -5px Offset and click OK. Select the resulting shape along with the copy and click on the Minus Front button from the Pathfinder panel. Pick the Rectangle Tool (M), create a 150 by 150px shape and place it as shown in the fourth image. Grab the Delete Anchor Point Tool (-) and click on the bottom, right anchor point. Select the resulting shape along with the thin shape and click on the Minus Front button from the Pathfinder panel. Name this newly created shape "Right".

Step 9
Make another copy of "Button". Select this copy and go to Object > Path > Offset Path. Enter a -10px Offset and click OK. Select the resulting shape along with the copy and click on the Minus Front button from the Pathfinder panel. Pick the Rectangle Tool (M), create a 150 by 150px shape and place it as shown in the fourth image. Grab the Delete Anchor Point Tool (-) and click on the top, left anchor point. Select the resulting shape along with the thin shape and click on the Minus Front button from the Pathfinder panel. Name this newly created shape "Left".
Step 10
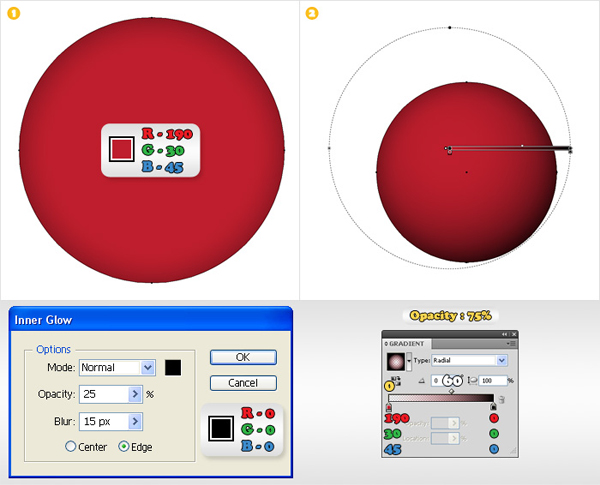
Select shape "Button" and fill it with R=190 G=30 B=45. Select the fill (from the Appearance panel) and add the Inner Glow effect (Effect > Stylize > Inner Glow) shown below image #1. Add a new fill for this shape and use the radial gradient shown below. Select this second fill and lower its opacity to 75%.
Step 11
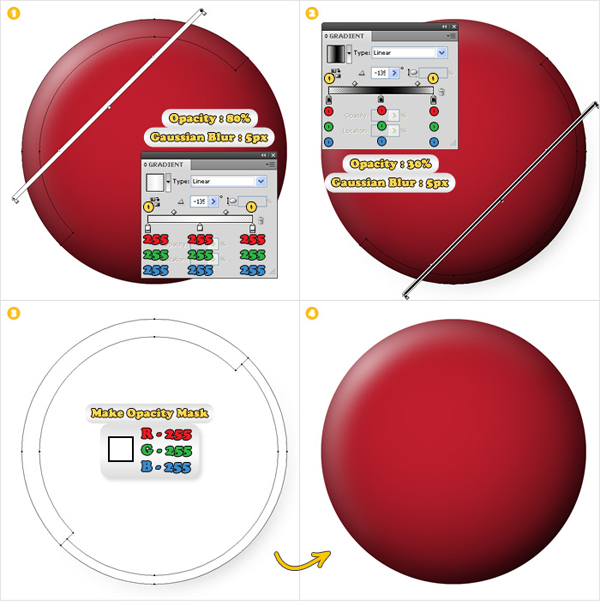
Select "Left", fill it with the linear gradient show in the first image, lower its opacity to 80% then add a 5px Gaussian Blur effect (Effect > Blur > Gaussian Blur). Select "Right", fill it with the second linear gradient, lower its opacity to 30% then add a 5px Gaussian Blur effect. Next, you need to mask these two shapes. Group them (Control + G) and open the Transparency panel. Duplicate "Button". Select this copy, Bring it to Front (Shift + Control + Right Square Bracket) and fill it with white (remove the extra fills and effects). Select this white shape along with the the group, open the flyout menu of the Transparency panel and click on Make Opacity Mask. Now your group should look as shown in the fourth image.
Step 12
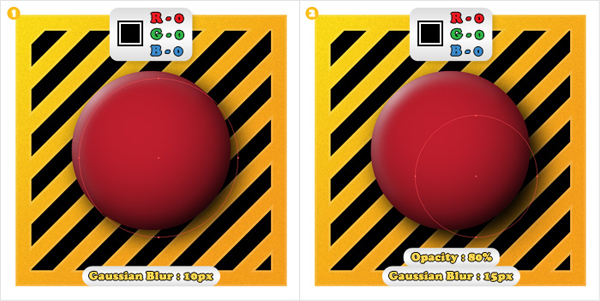
Select the shapes made in the last four steps and place them as shown in the following image. Make a new copy of "Button" and move it below the original shape (in the Layers panel). Select this copy, move it several pixel down and to the right then fill it with black and add a 10px Gaussian Blur effect. Pick the Ellipse Tool (L), create a smaller circle and place it as shown in the second image. Fill it with black, lower its opacity to 80% then add a 15px Gaussian Blur effect.
Step 13
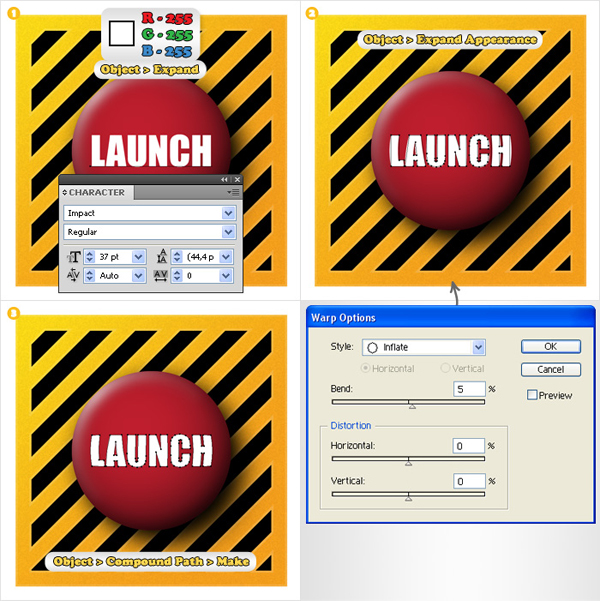
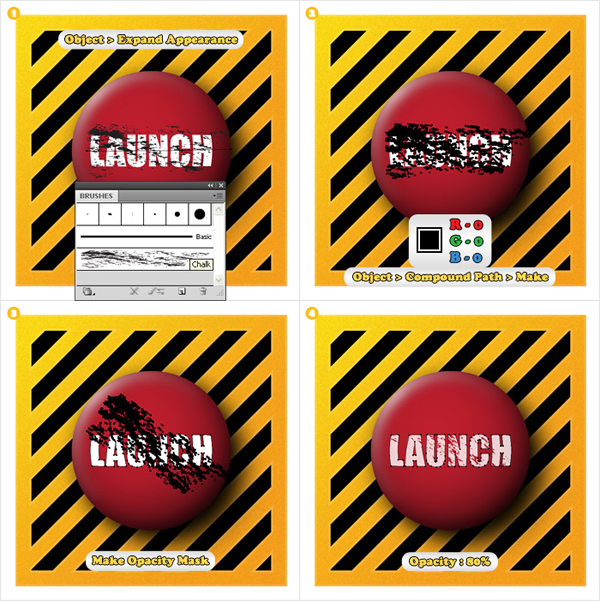
Pick the Type Tool (T), click on your Artboard and add the white "Launch" text. Use the info shown in the Character panel then go to Object > Expand. Select the resulting group, add the Inflate effect (Effect > Warp > Inflate) then go to Object > Expand Appearance. Select the resulting shapes and go to Object > Compound Path > Make.
Step 14
Now, let’s add a grunge effect for the text. Open the Brushes panel (Window > Brushes). Open the flyout menu and go to Open Brush Library > Artistic > Artistic_ChalkCharcoalPencil. Pick the Pen Tool (P), draw a horizontal path (as shown in the first image), click on the Chalk brush then go to Object > Expand Appearance. Select the resulting shapes, fill them with black and go to Object > Compound Path > Make. Open the Transparency panel. Select the text along with the black path, open the flyout menu of the Transparency panel, click on Make Opacity Mask then uncheck the Clip box. Finally, select this masked shape and lower its opacity to 80%.
Step 15
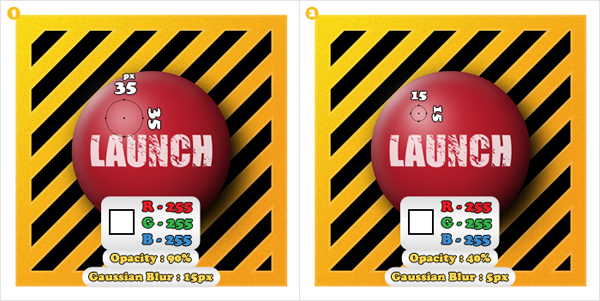
Pick the Ellipse Tool (L), draw a 35by35px shape and place it as shown in the first image. Fill it with white, lower its opacity to 90% then go to Effect > Blur > Gaussian Blur. Enter a 15px Radius and click OK. Reselect the Ellipse Tool (L) and draw a 15by15px shape. Place it as shown in the second image, lower its opacity to 40% then add a 5px Gaussian Blur effect.
Step 16
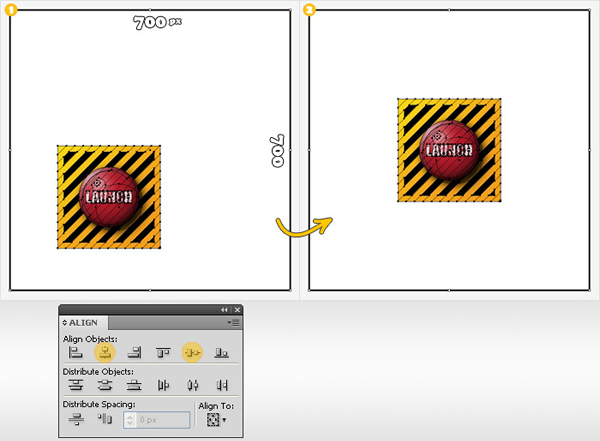
Group all the shapes created so far (Control+G) and grab the Rectangle Tool (M). Draw a shape the size of your artboard (700 by 700px) and Send it to Back (Shift + Control + Left Square Bracket). Select this rectangle along with the group, pick the Selection Tool (V), click on the border of the rectangle (it should get emphasized), then click on the Horizontal Align Center and Vertical Align Center buttons from the Align panel (Window > Align). Now, your group should be placed in the center of your artboard.
Step 17
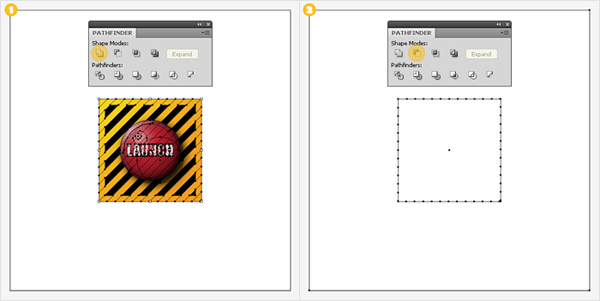
Duplicate the group made in the previous step. Select it and click on the Unite button from the Pathfinder panel. Select the resulting shape along with the larger rectangle and click on the Minus Front button from the Pathfinder panel.
Step 18
Select the shape made in the previous step, fill it with R=40 G=40 B=40 then add a new fill. Select this second fill, make it black, lower its opacity to 10%, change its blending mode to Multiply then go to Effect > Artistic > Film Grain. Enter the data shown below then click OK. Finally, add a 4pt, aligned to inside stroke (R=100 G=100 B=100) and a 2pt, black, aligned to inside stroke.
Step 19
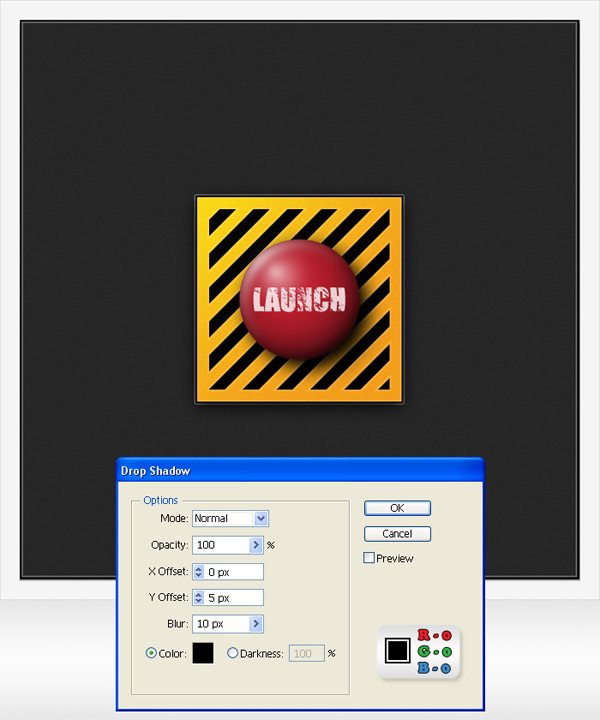
Reselect the group made in the sixteenth step, move it in the top of the Layers panel and go to Effect > Stylize > Drop Shadow. Enter the data shown below, click OK and you’re done.
Conclusion:
Now that the button is complete, you can apply it to a variety of uses, such as icons, web designs or user interfaces. You can even use the techniques you’ve learned in this tutorial to make additional icons and elements for a pretty cool looking web design.