Clik here to view.

A business card is arguably the most powerful networking tool you can have in your pocket. It's the very first impression of you and the business you're representing. Although we're in this digital age where social media dominates, a physical business card is still highly relevant as it forms a real human connection between you and your peers, where social media is unfortunately lacking.
In this tutorial, I will be using Adobe Photoshop CS6 to guide you on a step-by-step basis on how to create a professional business card using basic shapes, custom shapes, simple text formatting, and neat positioning.
This business card we are about to create is part of the 4-in-1 Business Card Bundle from my portfolio on GraphicRiver. Feel free to check out my extensive business cards collection for ideas and inspirations as well.
Clik here to view.

Tutorial Assets
Before we begin, download and install the following assets:
1. How to Install or Load Photoshop Custom Shapes
Go to Edit > Presets and select Preset Manager. In the Preset Type drop-down menu, select Custom Shapes and press Load. Now browse to the location where you've unzipped the file and select Tutorial-Shapes.csh. Press Load and you're done.
Clik here to view.

2. How to Set Up a New Document for a Business Card
Go to File > New and enter the following:
- Name: Business-Card-Front
- Width: 3.25 Inches
- Height: 1.75 Inches
- Resolution 300 Pixels/Inch
- Color Mode: CMYK Color 8bit
- Background Contents: White
Now press OK to create the document.
Clik here to view.

3. How to Create Safe, Trim and Boundary Guidelines for a Business Card
Step 1
Before we start, make sure the following options are enabled. If there is a check next to the option, it's already enabled, and you may skip to the next step.
Press Control-R or go to View > Rulers to show Rulers. Next, go to View and check Snap. Finally, go to View > Snap To and check Guides, Layers and Document Bounds.
Clik here to view.

Step 2
Let's begin with the Safe Area guidelines, within which all important images and text should be kept. Simply click on the Ruler and Drag a guideline to all four sides of the document. It should snap into position easily.
Clik here to view.

Step 3
Now let's increase the canvas size to 3.5 x 2 inches. Go to Image > Canvas Size and set the Width: 3.5 inches followed by Height: 2 inches. Press OK.
Clik here to view.

Step 4
Next, we will create the Trim guidelines. Anything beyond this guideline will be trimmed away after printing. Now click on the Ruler and Drag a guideline to all four sides of the document.
Clik here to view.

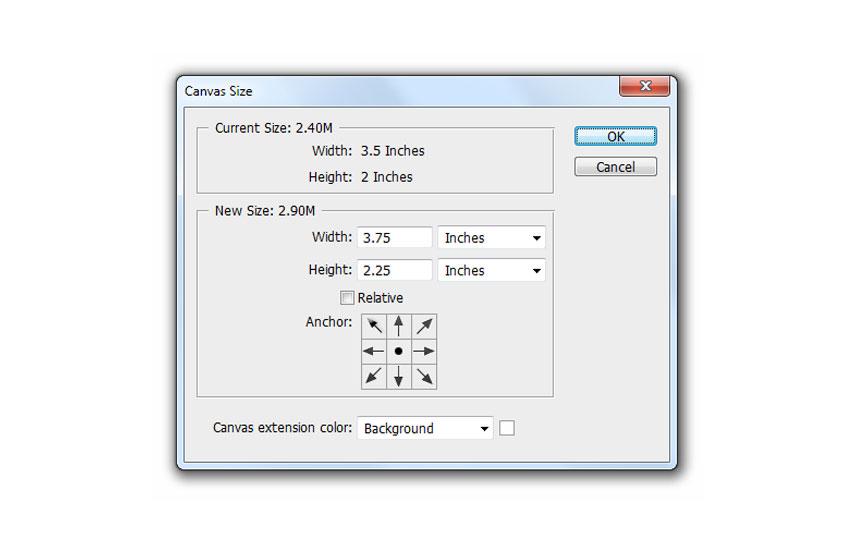
Step 5
Increase the canvas size one last time. Go to Image > Canvas Size and set Width: 3.75 inches followed by Height: 2.25 inches. Press OK to apply the changes.
Clik here to view.
Step 6
Create the Boundary guidelines. Although not necessary, having this guideline will definitely help when aligning objects to the edge. Simply click on the Ruler and Drag a guideline to all four sides of the document.
Clik here to view.

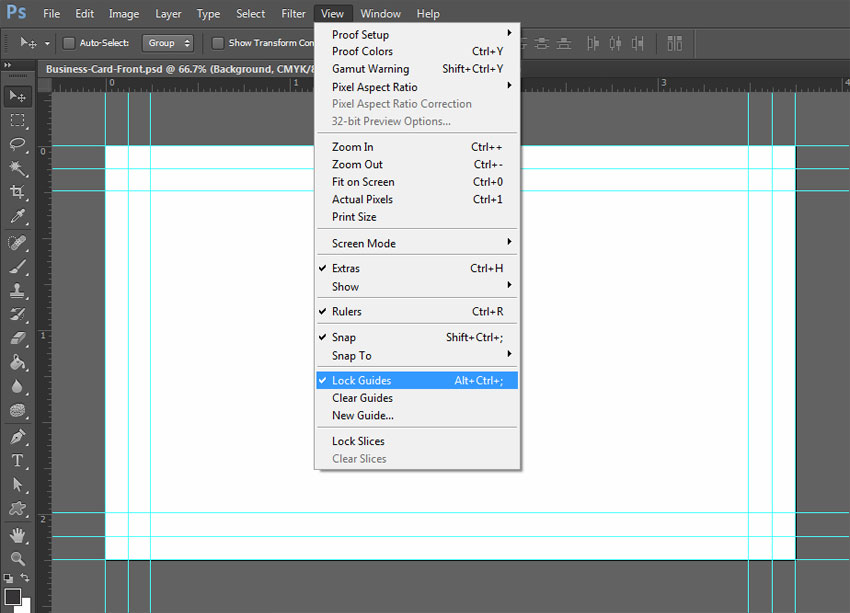
Step 7
Now that it's done, let's go ahead and lock the guidelines in their current position. Go to View and check Lock Guides.
Clik here to view.
4. How to Create a Background for the Address
Step 1
Select Rounded Rectangle Tool from the Toolbar and click anywhere on the canvas. Set Width: 820 px, Height: 80 px, Radius: 15 px and press OK.
Clik here to view.

Step 2
Go to Layer > Rename Layer. Name this layer Address Bg and press Enter.
Clik here to view.

Step 3
Double-click on the Layer Thumbnail. Enter C:0 M:20 Y:80 K:0 and press OK.
Clik here to view.

Step 4
Press Control-T or go to Edit > Free Transform Path and set the Horizontal Skew to H: -20. Press Enter twice to confirm.
Clik here to view.

Step 5
Press Control-T or go to Edit > Free Transform Path. Set the Horizontal Position to X: 337 px and Vertical Position to Y: 540 px. Press Enter twice to confirm.
Clik here to view.

Step 6
Select the Rectangle Tool (U). Press Path Operations and select Subtract Front Shape. Now draw a rectangle overlapping the excess shape as shown in the image below.
Clik here to view.

Step 7
To complete the trim, press Path Operations and select Merge Shape Components.
Clik here to view.

5. How to Create a Background for the Tagline
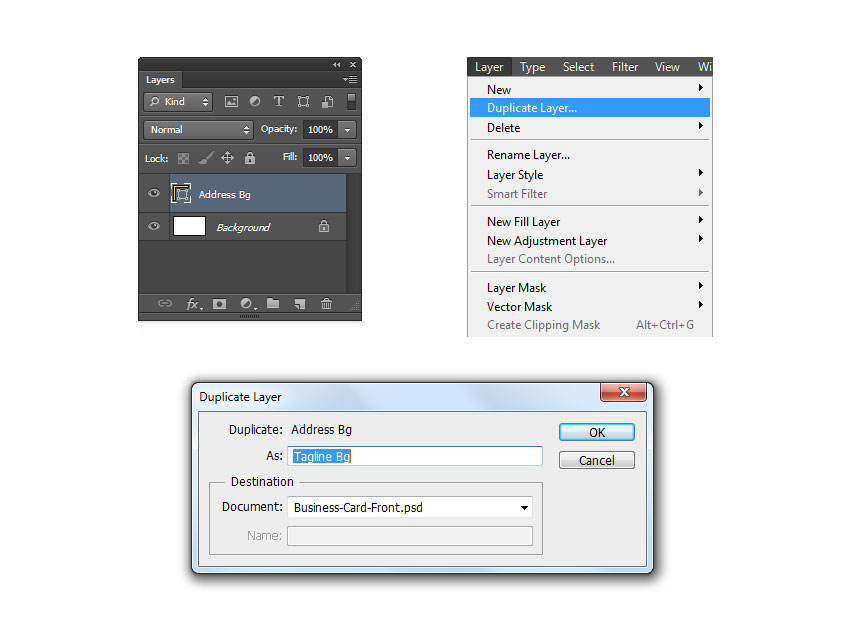
Step 1
Select Address Bg from the Layers panel. Go to Layer > Duplicate Layer and name this layer Tagline Bg. Press OK.
Clik here to view.
Step 2
Double-click on the LayerThumbnail. Enter C:0 M:0 Y:0 K:95 and press OK.
Clik here to view.

Step 3
Now let's Rotate this layer. Go to Edit > Transform Path > Rotate 180 Degrees.
Clik here to view.

Step 4
Press Control-T or go to Edit > Free Transform Path. Set the Horizontal Position to X: 1126.5 px and Vertical Position to Y: 540 px. Press Enter twice to confirm.
Clik here to view.

Step 5
Select the Rectangle Tool (U) and then press Path Operations and select Subtract Front Shape. Draw a rectangle overlapping the excess shape.
Clik here to view.

Step 6
Press Path Operations and select Merge Shape Components.
Clik here to view.

6. How to Create a Rectangle Separator
Step 1
Go to Layer > New > Group and name this group Separator.
Clik here to view.

Step 2
Select the Rectangle Tool (U) and click anywhere on the canvas. Set the Width to 530 px and Height to 8 px, and then press OK.
Clik here to view.

Step 3
Double-click on the Layer Thumbnail and enter C:0 M:0 Y:0 K:18. Press OK.
Clik here to view.

Step 4
Press Control-T or go to Edit > Free Transform Path. Set the Horizontal Position to X: 370 px and Vertical Position to Y: 286 px. Press Enter twice to confirm.
Clik here to view.

Step 5
Go to Layer > Rename Layer. Name this layer Left and press Enter.
Clik here to view.

Step 6
Go to Layer > Duplicate Layer. Name this layer Right and press OK.
Clik here to view.

Step 7
Select the Rectangle Tool (U). Set the Width to W: 80 px and press Enter.
Clik here to view.

Step 8
Double-click on Layer Thumbnail. Enter C:0 M:20 Y:80 K:0 and press OK.
Clik here to view.

Step 9
Press Control-T or go to Edit > Free Transform Path. Set the Horizontal Position to X: 675 px and Vertical Position to Y: 286 px. Press Enter twice to confirm.
Clik here to view.

7. How to Create a Background for the Contact Icon
Step 1
Go to Layer > New > Group. Name this group Icons Bg and press OK.
Clik here to view.
Step 2
Select Ellipse Tool from the Toolbar and click anywhere in the canvas. Enter Width: 35 px, Height: 35 px and press OK.
Clik here to view.

Step 3
Double-click on Layer Thumbnail. Enter C:0 M:0 Y:0 K:95 and press OK.
Clik here to view.

Step 4
Press Control-T or go to Edit > Free Transform Path. Set the Horizontal Position to X: 122.5 px and Vertical Position to Y: 541 px. Press Enter twice to confirm.
Clik here to view.

Step 5
Go to Layer > Rename Layer. Name this layer Address and press Enter.
Clik here to view.

Step 6
Go to Layer > Duplicate Layer. Name this layer Website and press OK.
Clik here to view.

Step 7
Press Control-T or go to Edit > Free Transform Path. Set the Horizontal Position to X: 122.5 px and Vertical Position to Y: 453 px. Press Enter twice to confirm.
Clik here to view.

Step 8
Double-click on Layer Thumbnail. Enter C:0 M:20 Y:80 K:0 and press OK.
Clik here to view.

Step 9
Go to Layer > Duplicate Layer. Name this layer Email and press OK.
Clik here to view.

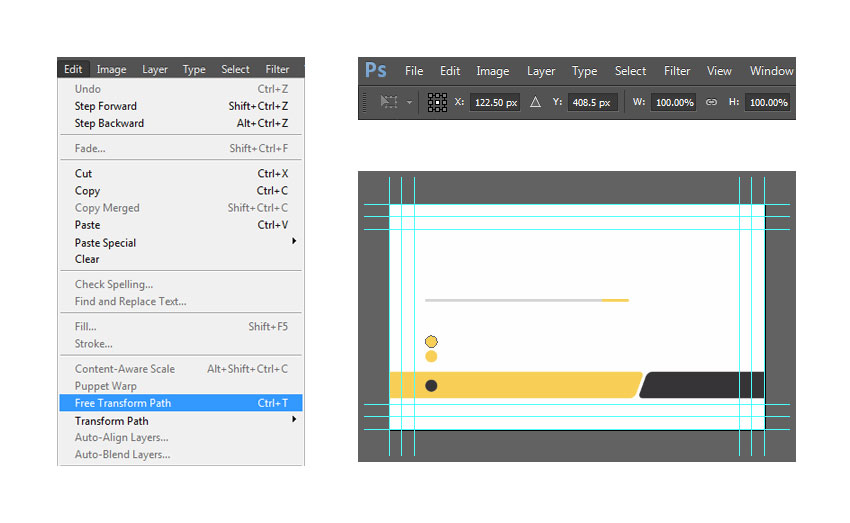
Step 10
Press Control-T or go to Edit > Free Transform Path. Set the Horizontal Position to X: 122.5 px and Vertical Position to Y: 408.5 px. Press Enter twice to confirm.
Clik here to view.
Step 11
Go to Layer > Duplicate Layer. Name this layer Phone and press OK.
Clik here to view.

Step 12
Press Control-T or go to Edit > Free Transform Path. Set the Horizontal Position to X: 122.5 px and Vertical Position to Y: 364.5 px. Press Enter twice to confirm.
Clik here to view.

8. How to Create Contact Icons Using Custom Shapes
Step 1
Now that we've completed the icon's background, let's move on to create the icons. Go to Layer > New > Group. Name this group Contact Icons and press OK.
Clik here to view.
Step 2
Let's start by creating the address icon. Select Custom Shape Tool from the Toolbar. Press Custom Shape Picker and select the Address Icon.
Clik here to view.

Step 3
Click anywhere on the canvas. Check Preserve Proportions, enter Width: 16 px and press OK.
Clik here to view.
Step 4
Go to Layer > Rename Layer. Name this layer Address and press Enter.
Clik here to view.

Step 5
Double-click on the Layer Thumbnail. Enter C:0 M:0 Y:0 K:0 and press OK.
Clik here to view.
Step 6
Press Control-T or go to Edit > Free Transform Path. Set the Horizontal Position to X: 123 px and Vertical Position to Y: 540.5 px. Press Enter twice to confirm.
Clik here to view.
Step 7
Now we move on to create the website icon. Select Custom Shape Tool from the Toolbar. Press Custom Shape Picker and select Website Icon.
Clik here to view.

Step 8
Click anywhere on the canvas. Check Preserve Proportions, enter Width: 20 px and press OK.
Clik here to view.
Step 9
Go to Layer > Rename Layer. Name this layer Website and press Enter
Clik here to view.

Step 10
Press Control-T or go to Edit > Free Transform Path. Set the Horizontal Position to X: 123 px and Vertical Position to Y: 453 px. Press Enter twice to confirm.
Clik here to view.
Step 11
Create the email icon. Select Custom Shape Tool from the Toolbar. Press Custom Shape Picker and select Email Icon.
Clik here to view.

Step 12
Click anywhere on the canvas. Check Preserve Proportions, enter Width: 20 px, and press OK.
Clik here to view.
Step 13
Go to Layer > Rename Layer. Name this layer Email and press OK.
Clik here to view.

Step 14
Press Control-T or go to Edit > Free Transform Path. Set the Horizontal Position to X: 123 px and Vertical Position to Y: 409 px. Press Enter twice to confirm.
Clik here to view.
Step 15
Now let's create the phone icon. Select Custom Shape Tool from the Toolbar. Press Custom Shape Picker and select Phone Icon.
Clik here to view.

Step 16
Click anywhere on the canvas. Check Preserve Proportions, enter Width: 20 px, and press OK.
Clik here to view.
Step 17
Go to Layer > Rename Layer. Name this layer Phone and press OK.
Clik here to view.

Step 18
Press Control-T or go to Edit > Free Transform Path. Set the Horizontal Position to X: 123 px and Vertical Position to Y: 365 px. Press Enter twice to confirm.
Clik here to view.
9. How to Create the Background Group
Step 1
First we need to unlock the Background layer, indicated with a lock icon. Double-click on Background Layer and name the layer Background. Press OK.
Clik here to view.

Step 2
Make sure Background Layer which you just unlocked is still selected. Hold Shift and clickon the Contact Icons group.
Clik here to view.

Step 3
Now that all layers and groups are selected, go to Layer > New and select Group from Layers. Name this group Background and press OK.
Clik here to view.

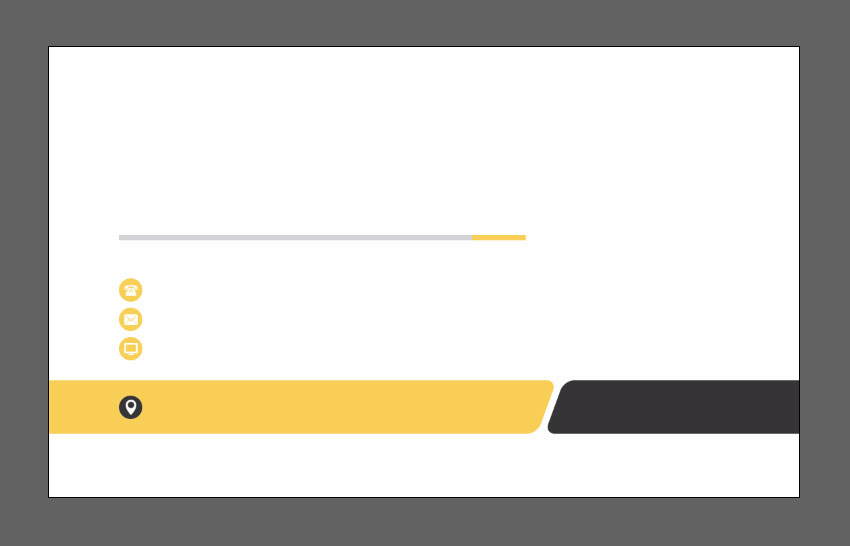
The background of the front of the card is now complete.
Before we move on to insert the text and logo, here's how it should look at this point.
Clik here to view.
10. How to Create a Tagline Text Layer
Step 1
Make sure the Character and Paragraph panels are enabled before we continue. Skip this step and proceed to Step 2 if they're already enabled by default.
Select Horizontal Type Tool (T)from the Toolbar and press the Character and Paragraph panels button.
Clik here to view.

Step 2
Select Right Align Layer in the Paragraph panel. In the Character panel, set the Font to Lato, Font Style to Black, Font Size to 6 pt and Color to C: 0 M:0 Y:0 K:0
Clik here to view.

Step 3
Now click on the Tagline Background shape and type VISUAL EYE CANDY into the text box. Press Control-Enter.
Clik here to view.

Step 4
We will need to change the color and styling for the word VISUAL only. Let's start by selecting that particular word. Make sure the Horizontal Type Tool (T) is still selected, position your cursor right on top of the word VISUAL, and then double-click to select.
Clik here to view.

Step 5
In the Character panel, set Font Style to Regular and Color to C:0 M:20 Y:80 K:0. Press Control-Enter to apply changes.
Clik here to view.

Step 6
Press Control-T or go to Edit > Free Transform Path. Set the Horizontal Position to X: 934 px and Vertical Position to Y: 541 px. Press Enter twice to confirm.
Clik here to view.

11. How to Create the Address Text Layer
Step 1
Go to Layer > New > Layer. Name this layer Address and press OK.
Clik here to view.

Step 2
In the Paragraph panel, select Left align text. While in the Character panel, change the Font Style to Bold Italic and set the Color to C:0 M:0 Y:0 K:95.
Clik here to view.

Step 3
Select the Horizontal Type Tool (T) and click on the Address Background shape. Type 777 Seventh Avenue New York NY 54321 into the text box and press Control-Enter when you're done.
Clik here to view.

Step 4
Press Control-T or go to Edit > Free Transform Path. Set the Horizontal Position to X: 373 px and Vertical Position to Y: 542 px. Press Enter twice to confirm.
Clik here to view.

12. How to Create the Phone, Email and Website Text Layer
Step 1
Go to Layer > New > Layer. Name this layer Phone/Email/Website and press OK.
Clik here to view.

Step 2
In the Character panel, change the Font Style to Regular and set the Leading to 10.5 pt.
Clik here to view.

Step 3
Select Horizontal Type Tool (T) and click on an empty area next to the Contact Icons. Now type "000 1234 5678, madison@email.com"and "www.website.com", each on a separate line. To do so, press Enter after each entry to create a new line. Press Control-Enter when you're done.
Clik here to view.

Step 4
Press Control-T or go to Edit > Free Transform Path. Set the Horizontal Position to X: 269 px and Vertical Position to Y: 409 px. Press Enter twice to confirm.
Clik here to view.

Step 5
Hold Control and select both the Address and Phone/Email/Website layers. Go to Layer > New > Group from Layers and name this group Contact. Press OK.
Clik here to view.

13. How to Create the Name and Job Title Text Layer
Step 1
Let's begin with the job title. Go to Layer > New > Layer. Name the layer Job Title and press OK.
Clik here to view.

Step 2
In the Character panel, set the Font Style to Bold Italic, set the Leading to Auto and the Color to C:0 M:20 Y:80 K:0, and press OK.
Clik here to view.

Step 3
Select the Horizontal Type Tool (T) and click on an empty space above the separator. Now type Graphic Designer into the text box and press Control-Enter to confirm.
Clik here to view.

Step 4
Press Control-T or go to Edit > Free Transform Path. Set the Horizontal Position to X: 194 px and Vertical Position to Y: 224 px. Press Enter twice to confirm.
Clik here to view.

Step 5
Let's create the name layer. Go to Layer > New > Layer. Name this layer Name and press OK.
Clik here to view.

Step 6
In the Character panel, set Font Style to Light, Font Size to 10 pt, and Color to C:0 M:0 Y:0 K:95, and then press OK.
Clik here to view.

Step 7
Select Horizontal Type Tool (T) and click slightly above the Job Title. Now type STEVE MADISON into the text box and press Control-Enter.
Clik here to view.

Step 8
Let's assign a heavier font style for STEVE only. Position your cursor on top of STEVE and double-click to select. In the Character panel, set Font Style to Black and press Control-Enter to confirm the changes.
Clik here to view.

Step 9
Press Control-T or go to Edit > Free Transform Path. Set the Horizontal Position to X: 268 px and Vertical Position to Y: 188px. Press Enter twice to confirm.
Clik here to view.

Step 10
Let's keep the layers organized by grouping Name and Job Title layer together. Hold Control and select both the Name and Job Title layers. Go to Layer > New and select Group from Layers. Name this group Name & Job Title and press OK.
Clik here to view.

14. How to Create the Logo
Step 1
Go to Layer > New > Group. Name this group Logo and press OK.
Clik here to view.
Step 2
In the Paragraph panel, select Center Text. While in the Character panel, set Font style to Light, Font size to 6 pt, Leading to 6.5 pt, and Color to C:0 M:0 Y:0 K:95, and press OK.
Clik here to view.

Step 3
Select Horizontal Type Tool (T) and clickanywhere on the canvas. Type CREATIVE INSPIRATIONS into the text box and press Control-Enter to confirm.
Clik here to view.

Step 4
Let's set a different style for the word CREATIVE only. Position your cursor on top of CREATIVE and double-click to select. In the Character panel, set Font Style to Black followed by Font Size to 12 pt and press Control-Enter to apply changes.
Clik here to view.

Step 5
Press Control-T or go to Edit > Free Transform Path. Set the Horizontal Position to X: 902 px and Vertical Position to Y: 306 px. Press Enter twice to confirm.
Clik here to view.

Step 6
Select Custom Shape Tool from the Toolbar. Press Custom Shape Picker and select Logo Shape.
Clik here to view.
Step 7
Click right above Company Name. Now check Preserve Proportions and set Width: 110 px. Press OK.
Clik here to view.
Step 8
Go to Layer > Rename Layer. Name this layer Logo and press ENTER.
Clik here to view.
Step 9
Double-click on the Layer Thumbnail. Set the color to C:0 M:20 Y:80 K:0 and press OK.
Clik here to view.
Step 10
Press Control-T or go to Edit > Free Transform Path. Set the Horizontal Position to X: 902 px and Vertical Position to Y: 210 px. Press Enter twice to confirm.
Clik here to view.
15. How to Create the Details Group
Step 1
Let's select the layers needed to form this group. First, select the VISUAL EYE CANDY text layer. Now hold Shift and select the Logo group.
Clik here to view.

Step 2
Now that you've selected the necessary layers and groups, go to Layer > New > Group from Layers. Name this group Details and press OK.
Clik here to view.

Great! The front part of the business card is now complete.
It's important to save your progress before moving on to create the back portion. Go to File > Save or press Control-S on your keyboard.
Clik here to view.

16. How to Set Up the Document for the Back Part of the Business Card
Step 1
We won't be creating a new document this time. Instead, we will be duplicating the front part to save the hassle of setting up the document again. Go to Image > Duplicate. Name this new document Business-Card-Back and press OK.
Clik here to view.

Step 2
In the Layers panel, click the Triangle icon beside Details and Background to reveal grouped content. Now hold Control and select the following Groups and Layers:
- Name & Job Title
- Contact
- Visual Eye Candy
- Contact Icons
- Icons Bg
- Separator
Clik here to view.

Step 3
Now remove the selected groups and layers we no longer need. Go to Layer > Delete > Layer and press Yes to confirm.
Clik here to view.

17. How to Set the Logo Position
Select the Logo group in the Layers panel. Press Control-T or go to Edit > Free Transform Path. Set the Horizontal Position to X: 562.5 px and Vertical Position to Y: 338 px. Press Enter twice to confirm.
Clik here to view.
18. How to Create the Website Background
Step 1
First, select the Tagline Bg layer in the Layers panel. Press Control-T or go to Edit > Free Transform Path. Set the Horizontal Position to X: 464.5 px and Vertical Position to Y: 540 px. Press Enter twice to confirm.
Clik here to view.

Step 2
Go to Layer > Duplicate Layer. Name this layer Website Bg and press OK.
Clik here to view.

Step 3
Go to Edit > Transform Path and select Flip Horizontal.
Clik here to view.

Step 4
Press Control-T or go to Edit > Free Transform Path. Set the Horizontal Position to X: 660.5 px and Vertical Position to Y: 540 px. Press Enter twice to confirm.
Clik here to view.

Step 5
Select both Website Bg and Address Bg in the Layers panel. Press Control-E or go to Layer and select Merge Shapes.
Clik here to view.

Step 6
Now select Rectangle Tool (U). Press Path Operations and select Merge Shape Components.
Clik here to view.

19. How to Create Decorative Backgrounds
Step 1
Select Address Bg layer in the Layers panel and go to Layer > Rename Layer. Name this layer Left and press Enter.
Clik here to view.

Step 2
Press Control-T or go to Edit > Free Transform Path. Set the Horizontal Position to X: -94 px and Vertical Position to Y: 540 px. Press Enter twice to confirm.
Clik here to view.

Step 3
Select the Rectangle Tool (U). Press Path Operations and select Subtract Front Shape. Now draw a rectangle overlapping the excess shape.
Clik here to view.

Step 4
With the Rectangle Tool (U) still selected, press Path Operations and select Merge Shape Components to complete the trim.
Clik here to view.

Step 5
Go to Layer > Duplicate Layer. Name this layer Right and press OK.
Clik here to view.

Step 6
Go to Edit > Transform Path and select Flip Horizontal.
Clik here to view.

Step 7
Select the Move Tool (V) from the Toolbar. Hold Control and select both Right and Background layer in the Layers panel. Now press Align right edges on the Options Toolbar.
Clik here to view.

20. How to Create the Website Text Layer
Step 1
We will be creating a new text layer within the Details group. First let's select Details Group in the Layers panel.
Clik here to view.

Step 2
Next, select Center Text in the Paragraph panel. In the Character panel, set Font to Lato, Font Style to Regular, Font Size to 6 pt, Leading to Auto, Color to C:0 M:0 Y:0 K:0 and press OK.
Clik here to view.

Step 3
Select the Horizontal Type Tool (T). Click on the Website Background shape and type www.website.com into the text box. Press Control-Enter to confirm.
Clik here to view.

Step 4
Let's set a different styling for the word website only. Select the Horizontal Type Tool (T). Position your cursor right on top of website and double-click to select. In the Character panel, set Font Style to Black, Color to C:0 M:20 Y:80 K:0 and press OK. Press Control-Enter to apply the changes.
Clik here to view.

Step 5
Press Control-T or go to Edit > Free Transform Path. Set the Horizontal Position to X: 563 px and Vertical Position to Y: 540 px. Press Enter twice to confirm.
Clik here to view.

Awesome! Your Business Card Is Now Complete
Good job! You've reached the end of the tutorial. By now, you should have learned how to create and transform shapes, create simple text formatting, and use custom shapes to speed up the process of creating a business card.
Clik here to view.

But don't just stop here.
Go beyond it and use the skills you've just learned to further enhance the overall design. If you need ideas or inspirations, head on over to my business cards collection.
Need this business card in a hurry? Simply download this and three other business cards from my 4 in 1 Business Card Bundle on GraphicRiver.
Clik here to view.
Clik here to view.
 Image may be NSFW.
Clik here to view.
Clik here to view.