Here's an ode to 80s power suits and supreme boss chicks. Learn how to create an epic 80s-inspired photo manipulation in Adobe Photoshop.
Today, I'll cover how to style a person from scratch before adding cityscape images for an awesome double exposure effect.
Get inspired! Find more 80s-inspired effects on Envato Market.
Tutorial Assets
The following assets were used in the production of this tutorial:
Finding Retro Inspiration
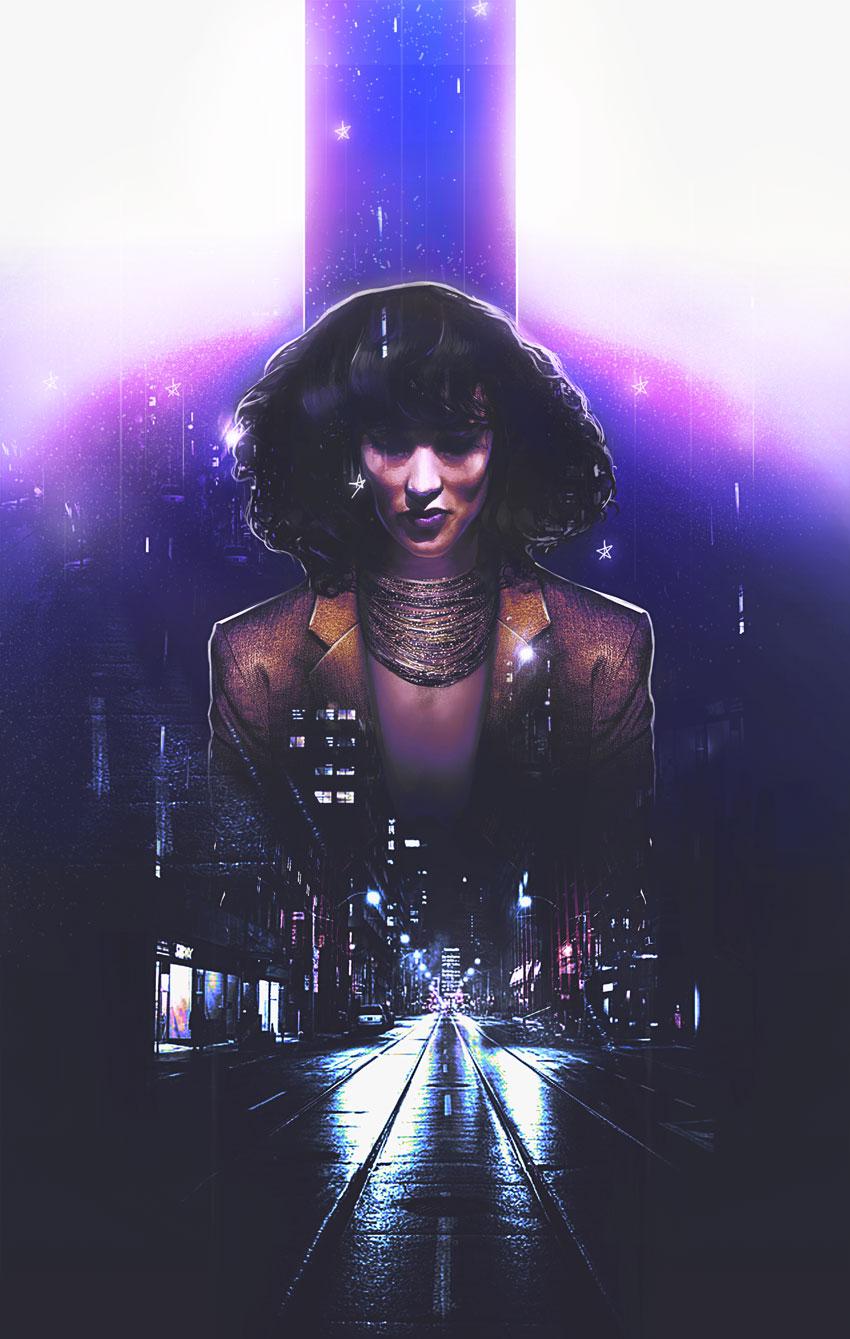
Let's take a look at the before and after. I love this part.
This manipulation combines a few of my favorite trends from the past year. It mixes a double exposure effect with a 1980s vibe for a cool movie-poster-like effect.

Pictures always shape the result! So make sure you pick photos that fit the vibe you're trying to achieve. I was inspired by this simple Business Woman stock because she reminds of Jennifer Beals in the movie Flashdance.
And I just know we can do magic with that hair!
With that in mind, I've also gathered cityscape images to fit the retro 80s vibe because of their bright lights and neon colors. Always bookmark extra stocks for more variations.
Now for the tutorial! Let's begin.
1. How to Style and Manipulate Your Subject
Step 1
Our subject seems a little distracted, so we'll have to restyle the photo a bit for a fierce look. First, create a New Document at 1780 x 2800 pixels and 100 dpi.
Note: these dimensions are not traditional poster dimensions by any means (though it resembles a poster), so make sure you alter the numbers accordingly.
Use the Magnetic Lasso Tool (L) to extract the subject from the photo. Copy and Paste it into your document, Free Transforming (Control-T) her body slightly to make it straighter.

Step 2
For this next part, we want to create powerful, boss chick body language. Let's make her shoulders more forward!

- Use the Polygonal Lasso Tool (L) to create a selection around the right side of her suit. Since this side is the straighter of the two, we'll use it to create stronger body language.
- Copy and Paste the right side of the suit onto its own New Layer. Then Control-J to Duplicate it. Flip the copy by going to Edit > Transform > Flip Horizontal.
Here is the result so far with the new shoulders in position.

Step 3
Continue to modify her suit and style.

- Use the Rectangular Marquee Tool (M) to cut the top half of her body off, specifically the area right above her collar. We'll need to insert a necklace here soon.
- Her
blouse makes her look super corporate, so let's add another realm of
fierceness with some Grace Jones vibes! Create a New Layer below the suit layers and use a Hard Round Brush to paint tan
#be9b84below her neck. Use the Eraser Tool (E) at a low Opacity (10-20%) to erase the color for a subtle skin-like gradient.
Step 4
Let's add that necklace!
Copy and Paste a selection of this Beaded Necklace onto the canvas.
Position it onto a New Layer above the skin before adding a Layer Mask. Mask away any remnants from the previous photo until there's only the necklace left.
Don't worry—we'll fill any gaps left over later!

Step 5
Time for her curls!
Have fun with this step—it'll add a lot of personality to the manipulation.
Make a selection of her hair using the Polygonal Lasso Tool (L). Copy and Paste this selection onto a New Layer. Resize her hair using the Free Transform Tool (Control-T).
Pull her hair wider and taller for voluminous 80s hair!

For even more volume, consider using Liquify. Select the hair layer and go to Filter > Liquify. Use the Forward Warp Tool (W) to push her hair, stretching the curls out until it looks full and teased.

Here is the result when we're through. Epic 80s hair!
Feel free to use a Layer Mask to feather out the edges.

Step 6
This next step is optional. So let me first say, there is nothing wrong with her face. I just want it to look more symmetrical.
To do this, we'll first Copy and Paste a selection of the left side of her face onto a New Layer. Then Flip this side to mirror the other by going to Edit > Transform > Flip Horizontal. Use the Eraser Tool (E) to blend any harsh edges.

2. How to Adjust the Skin
Step 1
Before we move on to the double exposure effect, let's adjust the colors.
Create a New Layer and set it to Saturation. Use the Brush Tool (B) to paint a golden yellow color #b37f1a over the subject's skin. This will make her appear more tanned. Lower the Opacity to 38%.

Step 2
On another New Layer above the model, smooth out her skin with a Soft Round Brush.
Paint a light tan color #dd9364 over her skin to minimize the uneven light hitting her face.
Keep the brush Opacity low (15-30%) as well as the Hardness (0%) for the best result.

3. How to Set Up the Graphic Elements
Step 1
Let's start piecing together the rest of this scene!
Create a New Layer underneath the model.
Use the Rectangular Marquee Tool (M) to make a selection in the shape of a skinny rectangle above her head. Fill this section in with a light #959aa1 to medium gray #8b909a gradient using the Paint Bucket Tool (G).
This top bar will draw the focus to our subject for more drama.

Step 2
Do the same for the bottom, this time creating a medium gray #383938 to dark gray #1c1e1d gradient.

4. How to Create the Double Exposure Effect
Step 1
The magic of this manipulation is behind the double exposure look. We'll be creating this by blending our two city photos together.
Let's start with the first photo.

- Copy and Paste the City #1 stock onto a New Layer above all the others.
- Set the Layer Blend Mode to Lighten. Add a Layer Mask to mask out the top portions with a Soft Round Brush.
Step 2
Control-J this layer to create a Duplicate. Set the Layer Blend Mode to Lighten.
Now turn it upside down. Go to Edit > Transform > Flip Vertical.
Position this copy layer (named "flip" below) higher than the other. Try to make some of the lights from the buildings blend into her hair. Adjust the Layer Mask accordingly.

Step 3
Now add the second city.
All we really need from this photo is a subtle hint of those bright red buildings.
So Copy and Paste the City #2 stock onto a New Layer above the others. Position it to align with the first city photo.
Set the Layer Blend Mode to Color Dodge, and then add a Layer Mask to mask out everything else besides the red buildings.

Continue experimenting with this method, add more bits of glittery city lights to her face as well as the top gray bar.
5. How to Blend All the Colors Together
I've tried to set up this tutorial in the order that would work best for this effect.
Some parts might look a little trippy at first, but these next steps will help bring all the colors of the manipulation together.
It's a lot. But you'll love it, I promise!
Step 1
Let's start with the background.

- Create a New Layer above the white background layer. Use the Gradient Tool (G) to create an upward-moving, gray
#484847to transparent Linear Gradient. - Create another New Layerabove the gradient. Use a Soft Round Brush to paint a blue
#5674aecircle behind the model.
Step 2
Adjustment Layers are the best way to get cool results!
Add a New Adjustment Layer of Color Lookup above all the other layers in the panel.
Set the 3DLUT File to:
- FoggyNight.3DL

Step 3
Create two New Layers above the Color Lookup layer.
Set the first one to Overlay. Create a white to transparent downward-moving Linear Gradient (30-50% Opacity).
On the layer above it, Fill it with purple #362f58 using the Paint Bucket Tool (G). Adjust the Opacity to 74% and set the Blend Mode to Lighten.

Step 4
Time for more adjustments!
Add a New Adjustment Layer of Curves. Adjust the curves for the RGB, Blue, and Green Channels for a cool color effect.

Step 5
Add a second Curves adjustment. This time, adjust the curves for the Blue and RGB Channels like the following ones below.

Follow up with a New Adjustment Layer for Levels.
Add the following values for the RGB and Blue Channels.
Blue Channel:
- 0, 0.76, 162
- 0, 255
RGB Channel:
- 26, 0.84, 204
- 21, 255

Here's the result.

6. How to Add the Final Touches
Step 1
Ready to finish? Me too!
Create a New Layer above all the others. Set the Blend Mode to Hue and paint purple #1c083b across the top to recolor the yellow parts.
This layer will also add some shadow to the bar, so play with the softness for more depth.

Step 2
Add some color to the suit too! We'll use Layer Styles.
Remember to keep some of your layers separated. Right-click the right suit layer and go to Blending Options. Add a yellow #ffbb35Color Overlay and black Satin Effect with the following settings.

Recreate this easily on the left side! Simply Right-click the right suit layer and go to Copy Layer Style. Then Paste this style onto the left layer.
Here's the result below.

Step 3
Take some time to add crisp white highlights to the edges of the model and top bar.
Use a tapered Hard Round Brush to create the backlight, and then add some vertical lines in varying Opacities for a surreal look.

Step 4
Continue the highlights onto her hair and suit.
I love adding texture! Use this Star Brush from our essential Photoshop Brush pack to create tiny areas of grainy white texture which blend into the rest of the composition.
Get creative! Draw some fun stars by hand for a cool graphic effect!

Step 5
Almost there!
Add some beautiful glow to the manipulation.
Create a New Layer and set it to Overlay. Use a Soft Round Brush to paint soft yellow #e6d98f onto the model's hair and suit. Paint some yellow onto the white background for a beautiful effect too!

Finish with a New Adjustment Layer for Gradient Map.
Use the Gold-Copper preset, and then set the Layer Blend Mode to Luminosity and the Opacity to 40%.

Check out the final result below!
7. How to Add a Quick 80s Text Effect
Turn this look into an epic 80s movie poster with a quick text effect! Just download one of the many amazing premade text effects from Envato Elements.
Here, I used the third file from this 80s Text Effect Volume 1 package.

Merge only the text layers together before extracting and inserting your title into the manipulation.
Check out this alternate version below!

All Done, Great Job!
Photo manipulations help us learn how to use Photoshop in new ways. Continue creating beautiful effects inspired by your favorite retro styles!
I hope you've enjoyed this tutorial! Feel free to add your comments and share your results with us below.
For more fun photo manipulations, check out these great tutorials:
![]() Photo ManipulationHow to Create an Enchanted Rose Photo Manipulation in Adobe Photoshop
Photo ManipulationHow to Create an Enchanted Rose Photo Manipulation in Adobe Photoshop![]() Photo ManipulationHow to Create an Energetic Paint Splashing Effect in Adobe Photoshop
Photo ManipulationHow to Create an Energetic Paint Splashing Effect in Adobe Photoshop


