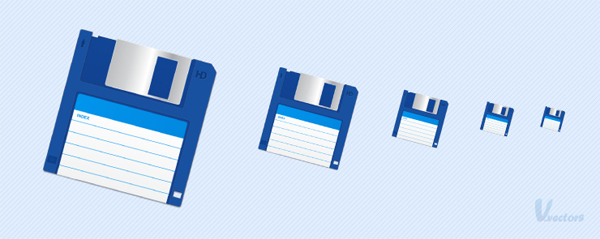
In the following tutorial you will learn how to create a floppy disk icon. We’ll use basic shape building methods, and numerous Adobe Illustrator effects, which will combine to create the final illustration.
Step 1
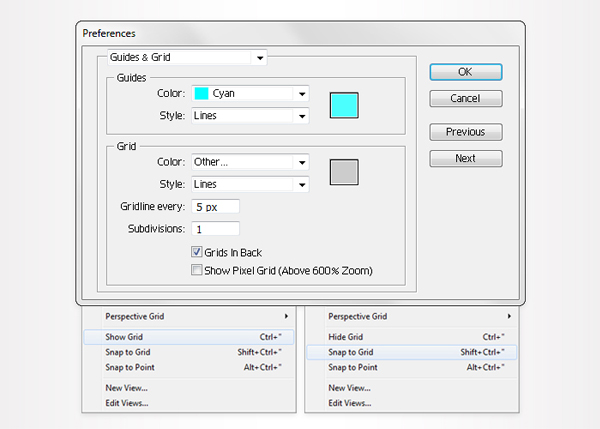
Create a 255 px by 255 px document. First, turn on the Grid (View > Grid) and the Snap to Grid (View > Snap to Grid). Next, you’ll need a grid every 5 px. Go to Edit > Preferences > Guides > Grid, and enter 5 in the Gridline every box and 1 in the Subdivisions box.
You can also open the Info panel (Window > Info) for a live preview with the size and position of your shapes. Do not forget to replace the unit of measurement to pixels from Edit > Preferences > Unit > General. All these options will significantly increase your work speed.
Step 2
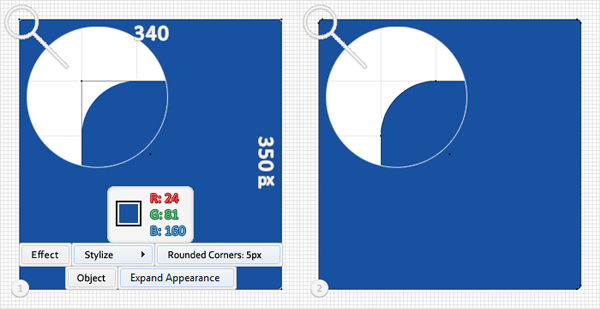
Pick the Rectangle Tool (M) and draw a 340 px by 350 px shape. Fill it with R=24, G=81, B=160. Now go to Effect > Stylize > Rounded Corners. Enter a 5 px radius, click OK, then apply to Object > Expand Appearance.
Step 3
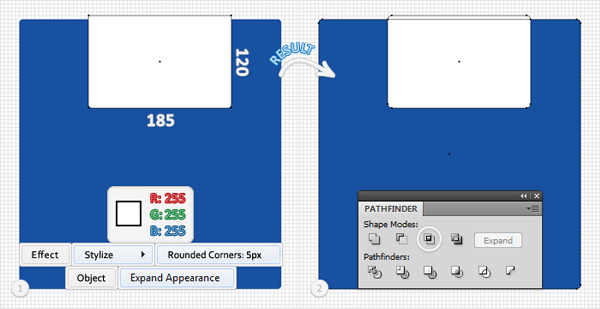
Duplicate the shape made in the previous step (Command + C > Command + F) and continue with the Rectangle Tool (M). Create a 185 px by 120 px shape and place it as shown in the first image. Fill it with white, then go to Effect > Stylize > Rounded Corners.
Enter a 5 px radius, click OK, then go to Object > Expand Appearance. Select the resulting shape, along with the fresh copy, and click on the Intersect button from the Pathfinder panel. Turn off the visibility for the resulting shape, as you will need it later.
Step 4
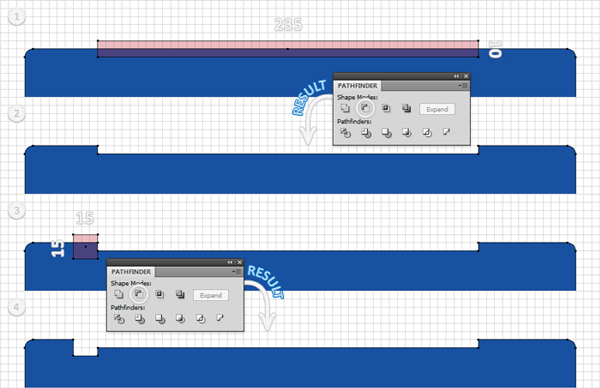
Now, let’s focus on the top side of the blue shape. Pick the Rectangle Tool (M), draw a 235 px by 10 px shape and place it as shown in the first image. Select it along with the blue shape and click on the Minus Front button from the Pathfinder panel.
Now, your shape should look like the second image. Reselect the Rectangle Tool (M), create a 15 px by 15 px shape and place it as shown in the third image. Select this small shape, along with the blue shape, and click again on the Minus Front button from the Pathfinder panel. In the end, your blue shape should look like the fourth image below.
Step 5
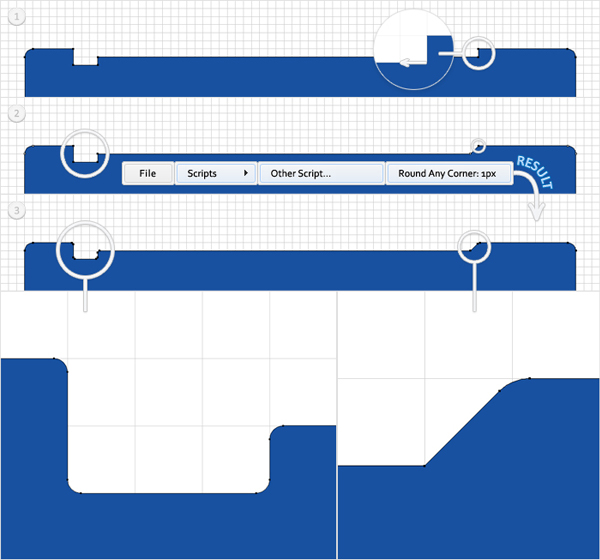
Keep focus on the top side of the blue shape. Pick the Direct Selection Tool (A), select the anchor point highlighted in the first image, and move it 5 px to the left. The Snap to Grid should ease your work. Next, you will need the Round Any Corner script, which can be found in the Vectortuts+ article 20 Free and Useful Adobe Illustrator Scripts.
Save it to your hard drive, then pick the Direct Selection Tool(A). Select the five anchor points highlighted in the second image and go to File > Scripts > Other Script. Open the Round Any Corner Script, enter a 1 px Radius, and click OK. This will add a discrete roundness effect for the selected anchor points, as shown in the zoomed images.
Step 6
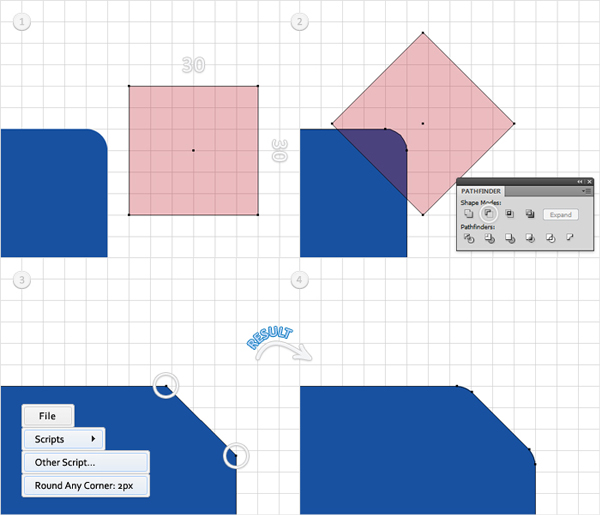
Pick the Rectangle Tool (M) and create a 30 px by 30 px shape. Rotate it 45 degrees and place it as shown in the second image. Select it, along with the blue shape, and click on the Minus Front button from the Pathfinder panel.
Again, you will need the Round Any Corner script. Pick the Direct Selection Tool (A), select the anchor point highlighted in the third image, and go to File > Scripts > Other Script. Open the Round Any Corner Script, enter a 2 px Radius and click OK.
Step 7
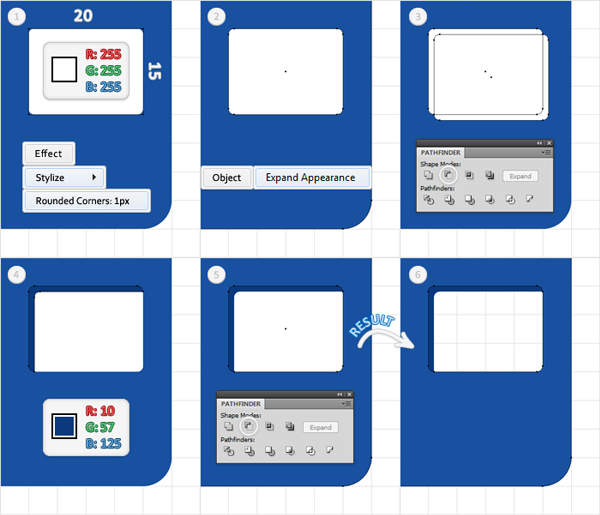
Now, focus on the bottom, right corner of the blue shape. Pick the Rectangle Tool (M), create a 20 px by 15 px shape and place it as shown in the first image. Fill it with white and go to Effect > Stylize > Rounded Corners. Enter a 1 px radius, click OK, then go to Object > Expand Appearance. Select the resulting shape and make two copies in front (Command + C > Command + F > Command + F).
Disable the Snap to Grid, select the top copy, then hit the right arrow and the down arrow once. Reselect both copies and click on the Minus Front button from the Pathfinder panel. Fill the resulting shape with R=10, G=57, B=125. Select the remaining white shape along with the large, blue shape and click on the Minus Front button from the Pathfinder panel. This will create a hole in your blue shape.
Step 8
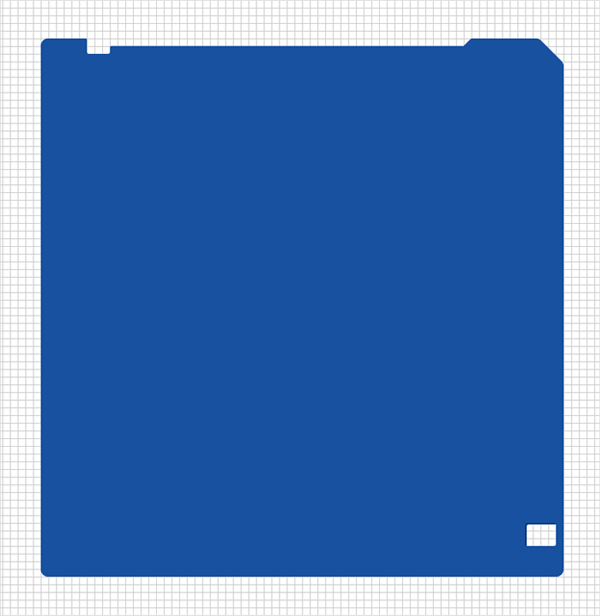
Here is what your work should look like so far. Now, enable the Snap to Grid again.
Step 9
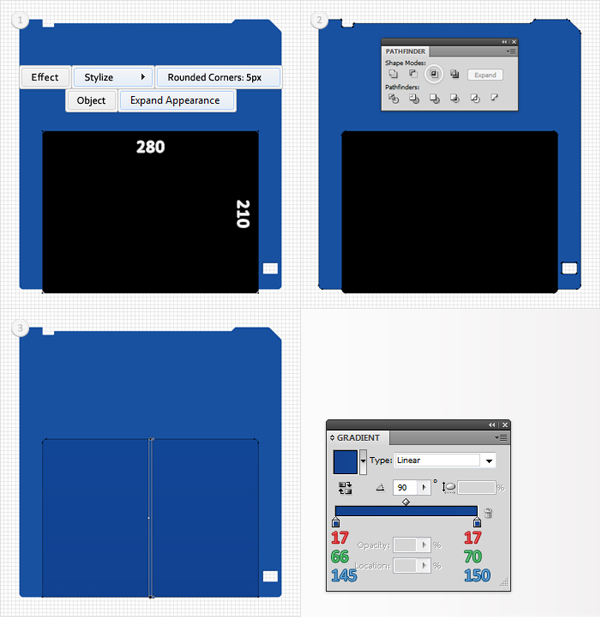
Make a new copy of the blue shape (Command + C > Command + F). Pick the Rectangle Tool (M), create a 280 px by 210 px shape, and place it as shown in the first image. Fill it with any color, then go to Effect > Stylize > Rounded Corners. Enter a 5px radius, click OK, then apply Object > Expand Appearance.
Select the resulting shape, along with the copy of the blue shape, and click on the Intersect button from the Pathfinder panel. Fill the resulting shape with the linear gradient shown below.
Step 10
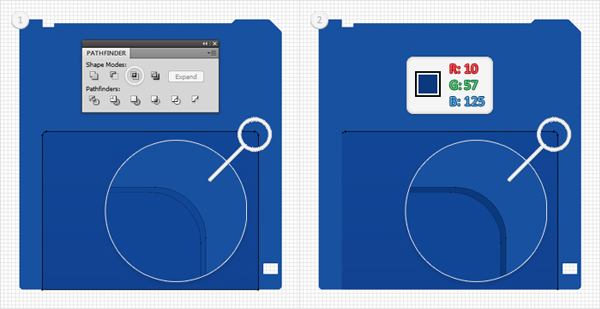
Disable the Snap to Grid, then go to Edit > Preferences > General and enter 0,5 in the Keyboard Increment box. Select the shape made in the previous step and make two copies.
Select the top copy, then hit the down arrow and the left arrow once. Reselect both copies and click on the Minus Front button from the Pathfinder panel. Fill the resulting shape with R=10, G=57, B=125.
Step 11
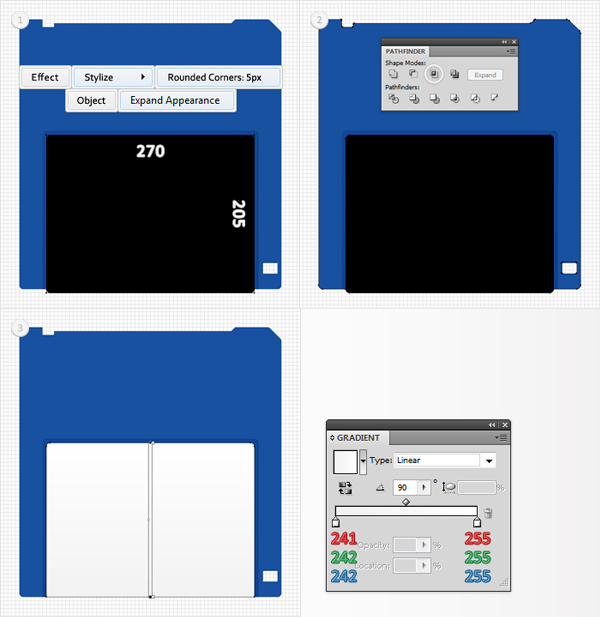
Re-enable the Snap to Grid and duplicate the large, blue shape. Pick the Rectangle Tool (M), create a 270 px by 205 px shape, and place it as shown in the first image. Again, fill it with any color, then go to Effect > Stylize > Rounded Corners. Enter a 5px radius, click OK, then go to Object > Expand Appearance.
Select the resulting shape, along with the copy of the blue shape, and click on the Intersect button from the Pathfinder panel. Fill the resulting shape with the linear gradient shown below.
Step 12
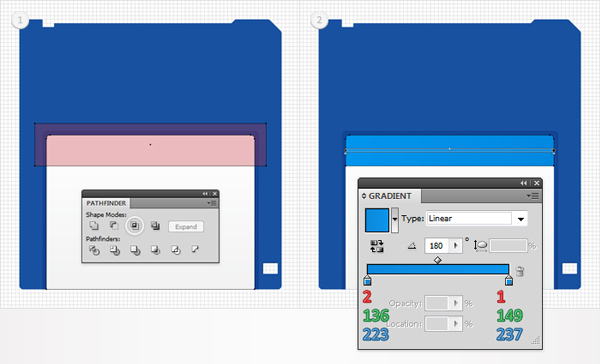
Duplicate the shape made in the previous step, then grab the Rectangle Tool (M) and draw a shape like the red one shown in the first image. Select it along with the fresh copy and click on the Intersect button from the Pathfinder panel. Fill the resulting shape with the linear gradient shown in the second image.
Step 13
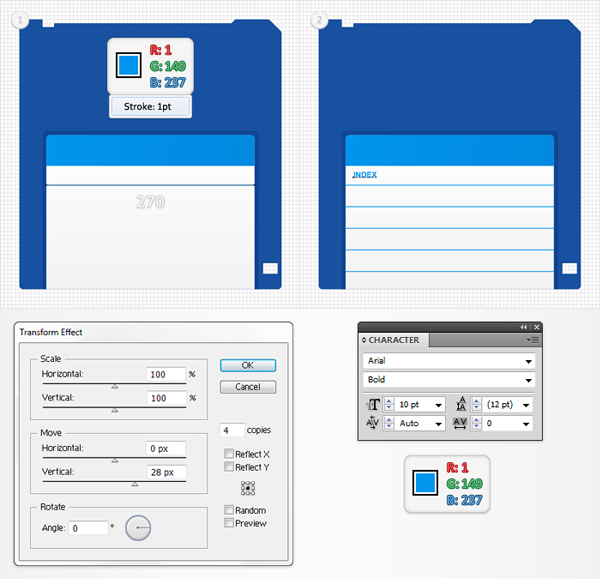
Pick the Pen Tool (P), draw a 270 px horizontal path, and place it as shown in the first image. Add a 1pt stroke (R=1, R=149, B=237) for this path, then go to Effect > Transform > Distort & Transform. Enter 4 in the copies box, drag the Move-Vertical slider to 28 px, then click OK. Select the Type Tool (T) and add a small, blue text, as shown in the second image.
Step 14
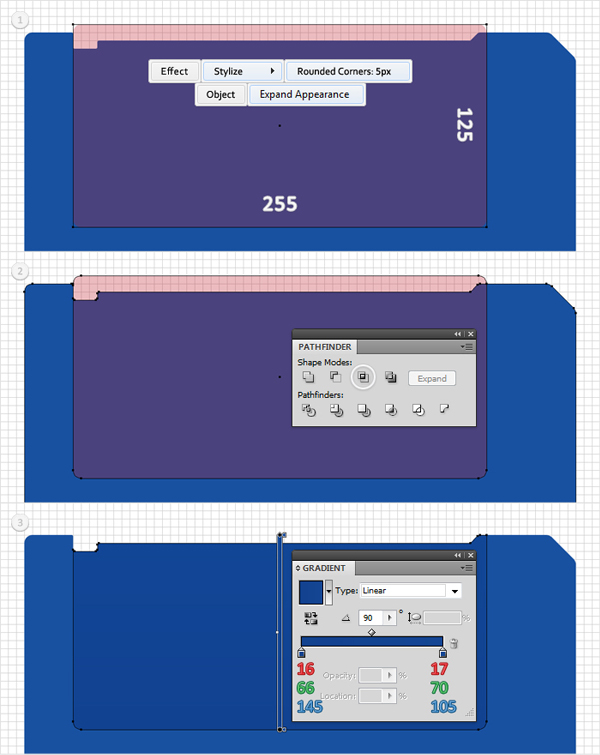
Once again, duplicate the large blue shape. Grab the Rectangle Tool (M), create a 255 px by 125 px shape, and place it as shown in the following image. Fill it with any color, then go to Effect > Stylize > Rounded Corners. Enter a 5px radius, click OK, then go to Object > Expand Appearance.
Select the resulting shape, along with the copy of the blue shape, and click on the Intersect button from the Pathfinder panel. Fill the resulting shape with the linear gradient shown in the third image.
Step 15
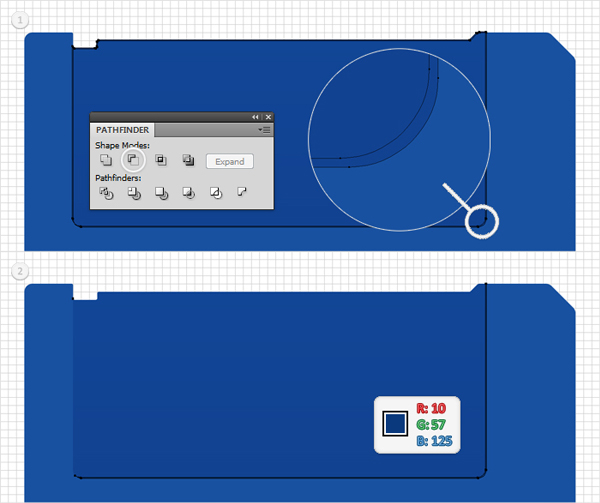
Disable the Snap to Grid and make two copies of the shape from the previous step. Select the top copy, then hit the left arrow, and up arrow once. Reselect both copies and click on the Minus Front button from the Pathfinder panel. Fill the resulting shape with R=10, G=57, B=125.
Step 16
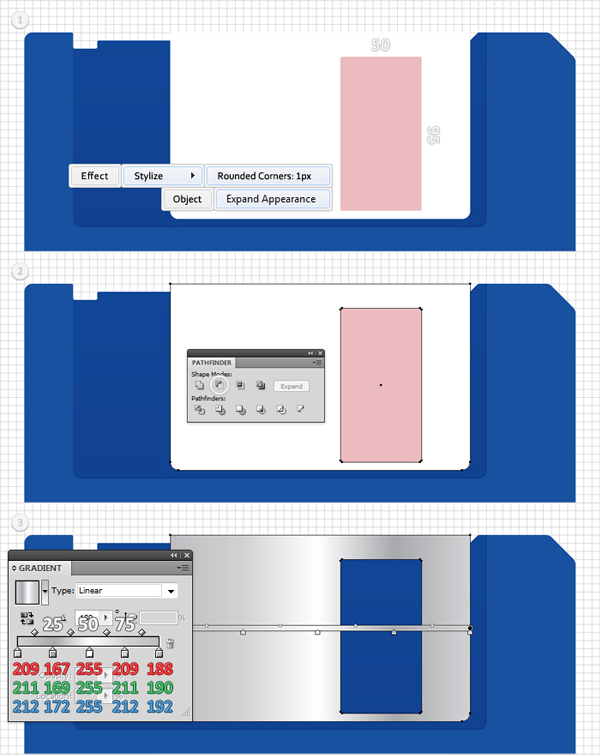
Enable the Snap to Grid, then turn on the visibility for the white shape made in the third step. Select it and bring it to front (Shift + Command + Right Bracket key). Pick the Rectangle Tool (M), create a 50 px by 95 px shape, and place it as shown in the first image. Fill it with any color and apply Effect > Stylize > Rounded Corners. Enter a 1px Radius, click OK, then apply Object > Expand Appearance.
Select the resulting shape, along with the white shape, and click on the Minus Front button from the Pathfinder panel. Fill this newly created shape with the linear gradient shown in the third image. The white numbers from the gradient image stand for location percentage.
Step 17
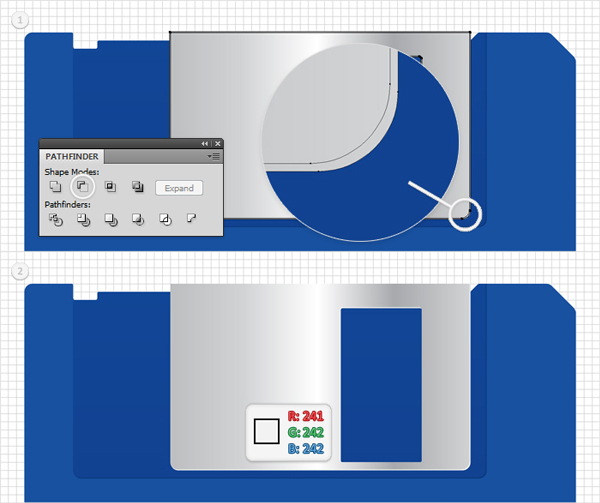
Disable the Snap to Grid. Select the shape created in the previous step and make two copies. Select the top copy, then hit the up arrow and the left arrow once. Reselect both copies and click on the Minus Front button from the Pathfinder panel. Fill the resulting shapes with R=241, G=242, B=242.
Step 18
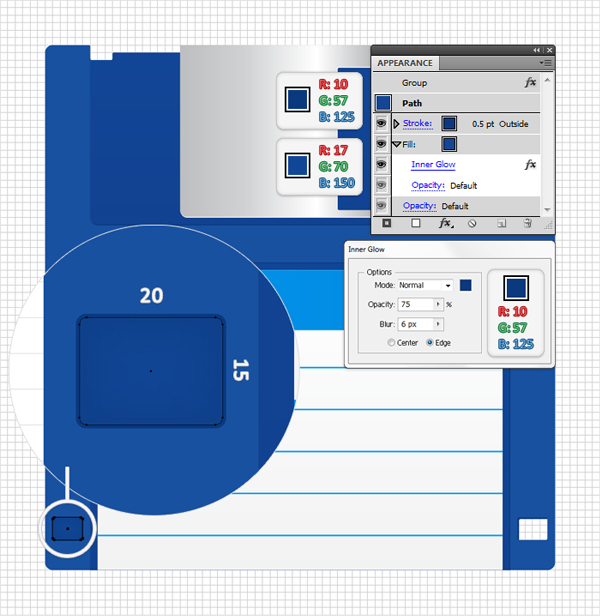
Enable the Snap to Grid. Pick the Rectangle Tool (M), create a 20 by 15 shape, and place it as shown in the following image. Fill it with any color, then go to Effect > Stylize > Rounded Corners. Enter a 1px radius, click OK, then apply Object > Expand Appearance.
Fill the resulting shape with R=17, G=70, B=150, add a 0.5, aligned to outside stroke (R=10, G=57, B=125), then go to Effect > Stylize > Inner Glow. Enter the data shown below and click OK.
Step 19
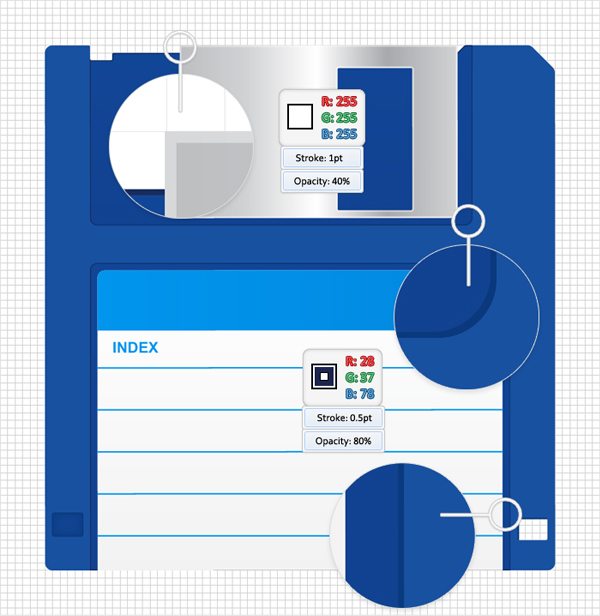
Now, let’s add some discrete strokes for some of your shapes. Start with the gray one. Add a 1pt, white, aligned to inside stroke, and lower its Opacity to 40%. Continue with the dark blue shapes (made in the ninth and fourteenth step). For both shapes, add a 0.5pt, aligned to inside stroke (R=28 G=37 B=78). Lower the Opacity for each of these strokes to 80%.
Step 20
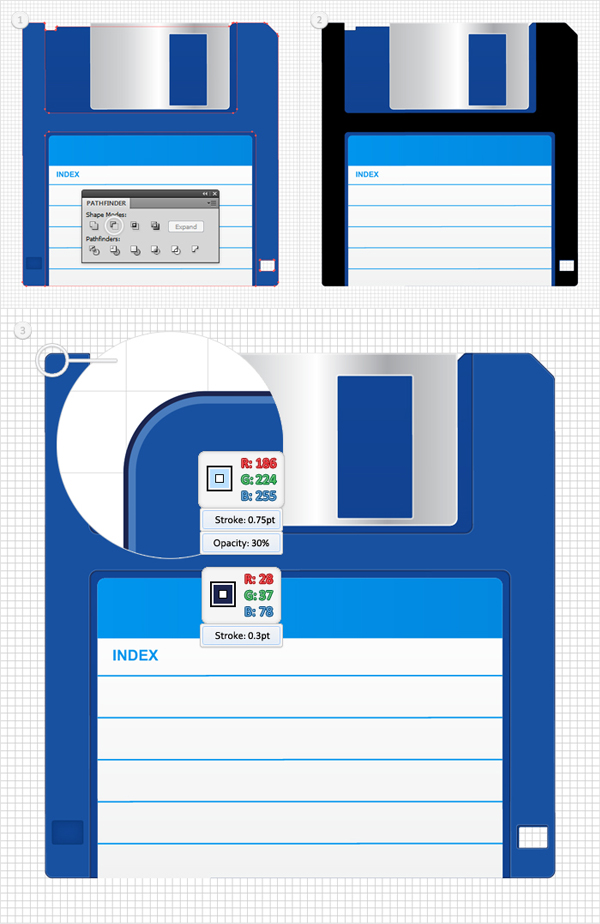
Duplicate the blue shapes edited in the previous step and the large, blue shape. Select these three copies and click on the Minus Front button from the Pathfinder panel. The resulting shape should look like the second image below. It’s filled with black so that you can distinguish it easier. Select it, remove the fill, then add a first stroke. Make it 0.75pt wide, align it to inside, set the color at R=186 G=224 B=255. Now lower its Opacity to 30%.
With the shape still selected go the Appearance panel. Open the fly-out menu and click on Add New Stroke. This will add a second stroke for the selected shape. Select it from the Appearance panel, make it 0.3pt wide and set the color at R=28, G=37, B=78. Keep its Opacity at 100%.
Step 21
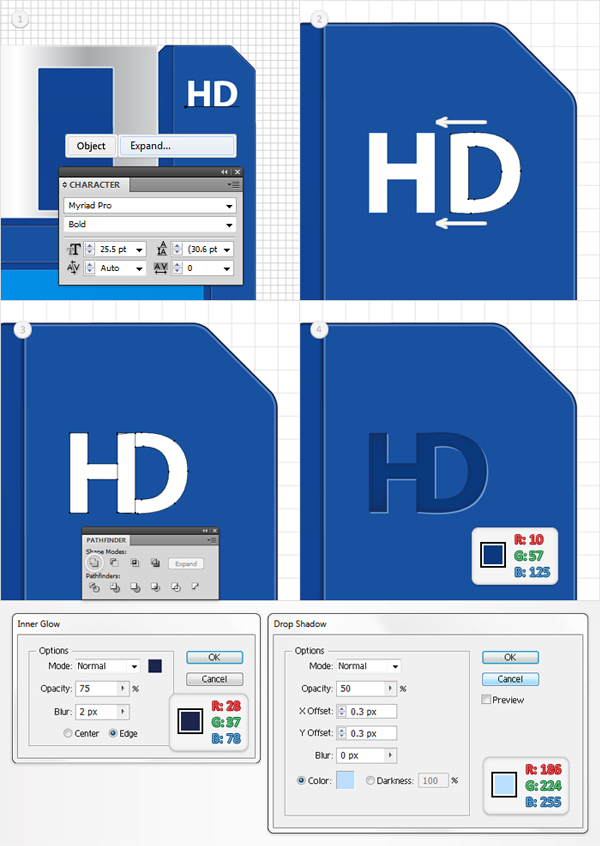
Disable the Snap to Grid. Pick the Type Tool (T). Add the “HD” text, place it as shown in the following image, then apply Object > Expand. Pick the Direct Selection Tool (A), select the “D” shape and move it a few pixels to the left (as shown in the third image). Select both letter shapes and click on the Unite button from the Pathfinder panel.
Fill the resulting shape with R=10, G=5, B=125. Then go to Effect > Stylize > Inner Glow. Enter the data shown below, click OK, then go to Effect > Stylize > Drop Shadow. Again, enter the data shown below and click OK.
Step 22
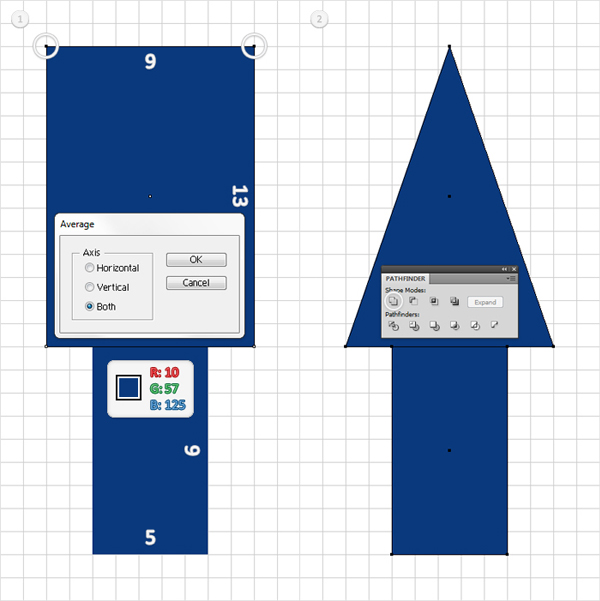
Enable the Snap to Grid. For the following step you will need a grid every 1px. Go to Edit > Preferences and enter 1 in the Gridline Every box. Pick the Rectangle Tool (M) and create two simple shapes: a 5 by 9 rectangle and a 9 by 13 rectangle. Fill them with R=10, G=57, B=125. Place them as shown in the first image, then focus on the top shape.
Pick the Direct Selection Tool (A), select the top anchor points and go to Object > Path > Average. Check the Both button and click OK. This should turn the selected shape into a triangle. Select it along with the remaining rectangle and click on the Unite button from the Pathfinder panel.
Step 23
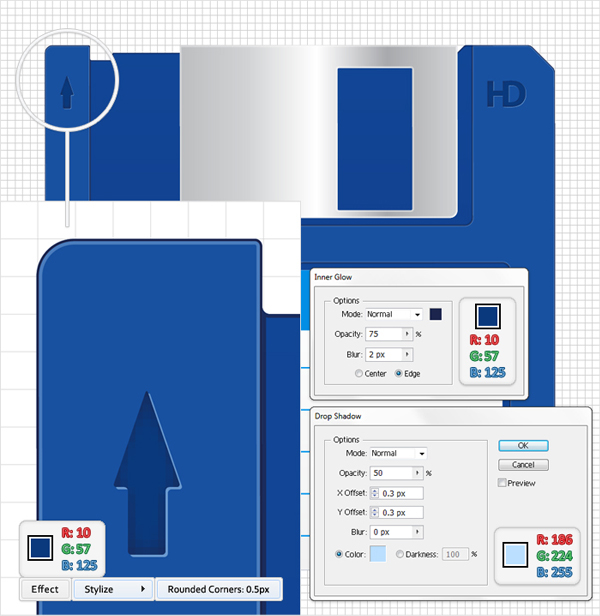
Select the shape made in the previous step and place it as shown in the following step, then go to Effect > Stylize > Inner Glow. Enter the data shown below, click OK, then go to Effect > Stylize > Drop Shadow. Again, enter the data shown below and click OK. Now go to Effect > Stylize > Rounded Corners. Enter a 0,5pt radius and click OK.
Step 24
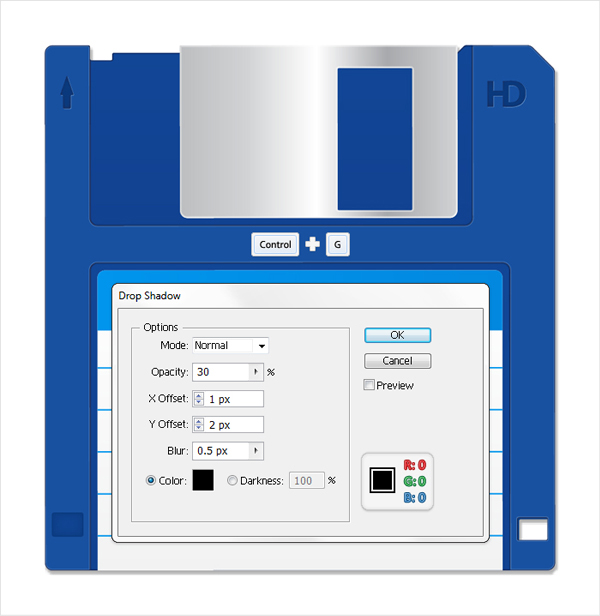
Finally, select all the shapes created so far and hit Command + G to group them. Select this new group and go to Effect > Stylize > Drop Shadow. Enter the data shown below, click OK, and you’re done.
Conclusion
Here is how your final icon should look.
