This tutorial is a response to a request for a more in depth lesson on using Illustrator’s Envelope Distort function with the Rectangular Grid tool. I demonstrated the basic technique in this video. Check it out if you have time, if not, jump right in!
Step 1
I prefer to use some kind of reference when drawing, as I am not very good at drawing from memory or imagination. So to get the proper proportions of a face, I’m using this photo of a mask. You may use a photo or a sketch as a reference. Try to keep it simple and generic for this tutorial.
Place the image on the Artboard (File > Place). Double-click its layer and make it a Template layer, then create a new layer above it.

Step 2
Take a rough measurement of the face, using the Measure Tool. When you drag with the Measure Tool, the Info panel will automatically appear. Remember the width and height. Alternately, you could draw a rectangle around the face and use its measurements.

Step 3
Take the Rectangular Grid tool and click once on the artboard. For the width and height, enter the values from the previous step. Enter a number of horizontal and vertical dividers to give you a fairly tight grid, about 10 pixels apart.

Step 4
The new grid will have a fill and stroke of none. Give it a colored stroke. The color doesn’t matter at this point, just something that’s easy to see.

Step 5
Keep the grid selected and go to Object > Envelope Distort > Make with Mesh. Enter about 5 rows and 6 columns. You’ll be adding some Mesh lines later, so keep it simple for now.


Step 6
Using the Direct Selection tool (A), Move the outside points so they align with the outer edges of the face. You will have to adjust some of the points’ handles to get the outer line to follow the shape. You may need to move some of the adjacent points inward as well.


It may help to view the mesh in outline mode, to ensure the smoothest curves.

You might end up with some lines hanging out beyond the frame of the mesh, but you can deal with those later.
The initial shape should look like the image below.

Step 7
Move the two points above the eyes so the mesh begins to take on the dimension of the eye sockets. If you want them to be symmetrical, select both points (hold down the Shift key when selecting) and move them at the same time.


Step 8
Move the points near the eyes so they align with the tops of the eye shapes.

Step 9
Take the Mesh tool (U) and click on a vertical mesh line to add a new horizontal mesh line below the line you adjusted in the previous step. Move the new points and handles to conform to the bottom of the eye shape.

Step 10
Add two new mesh lines on either side of the nose. This time, click on a horizontal line to create a vertical one. With the Mesh tool, hold down the Option/Alt key and click the center vertical line to delete it.
As before, move the points and handles to follow the curves of the nose. Move the points on the line below the nose to begin shaping the mouth.
Step 11
This is the basic process for forming the image. Keep moving points and lines to follow the contours of the face. Add a new mesh line in places where you need more detail. As with a regular Gradient Mesh, any time you move one point, it affects the points next to it.
So you will probably have a lot of trial and error as you continue to work. You may get sharp corners as in the image below. Depending on where they fall, these corners might help define your image, as in the area below the nose. Other times, you will want them to go away, and you will have to make micro-adjustments to the surrounding points to get rid of them.

To help make the image as symmetrical as possible, draw guides and line up the points on the left and right sides.
Step 12
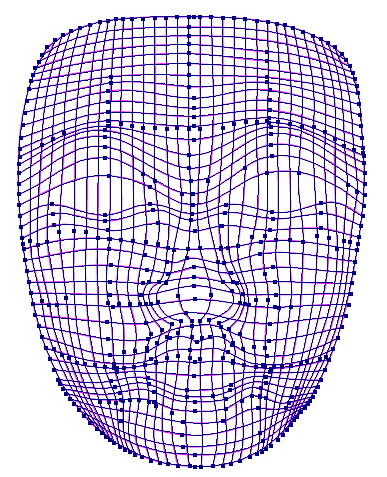
Keep adding new mesh lines as necessary, and moving points. You may get to a point where you have too many mesh lines and want to delete one or two. That’s perfectly fine — it’s hard to stop tweaking and obsessing over each line and curve.
If you should want to change the color of the grid lines and still be able to edit the mesh, go to the Object menu and choose Envelope Distort > Edit Contents. When you are done, go back and choose Edit Envelope.

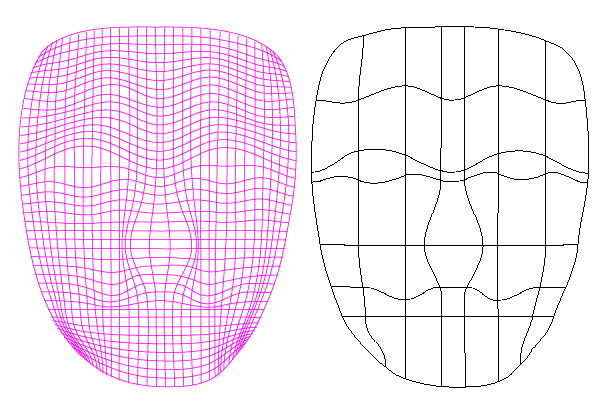
Step 13
Once you are happy with your image, you can expand the effect by going to Object > Expand. The grid lines are expanded to their manipulated shapes. You can now clean up any lines that were hanging outside the edges, and of course you can recolor the strokes.

Step 14
If you want to give the image a gradient fill, you’ll need to outline the strokes by going to Object > Path > Outline Stroke. You can also experiment with different background and other effects.


Conclusion
A lot more work can be done with this illustration, but now that you know the basics, you can start with a tighter grid, or another kind of pattern. Envelope Distort gives you the flexibility to push, pull, twist and shape any vector object to your heart’s content.
