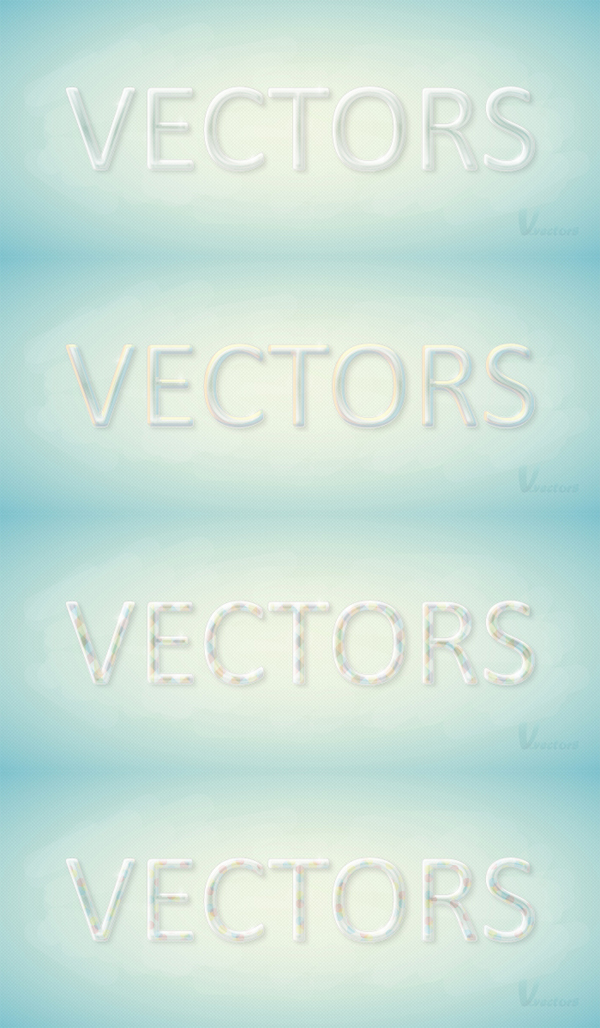
In the following tutorial you will learn how to create a colorful, glass text effect in Illustrator. Learn each step to construct this shiny, vector text effect. We’ll use patterns, transform effects, multiple gradient fills, and more to construct this beautiful lettering.
Step 1
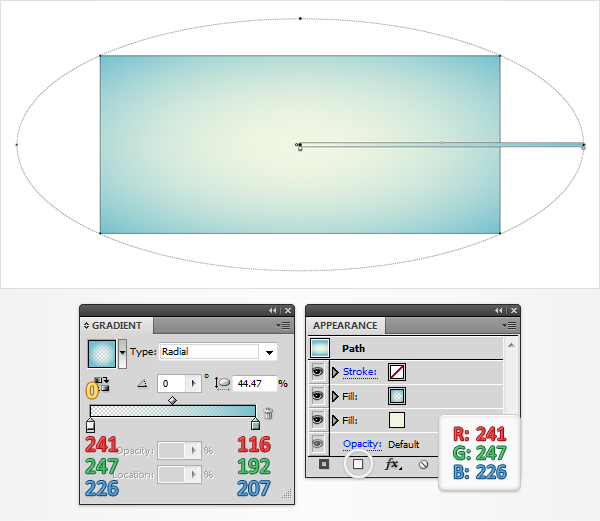
Create a 700 by 300px, RGB document. Grab the Rectangle Tool and create a shape the size of your artboard. Fill it with R=241, G=247, B=226, and remove the color from the stroke. With this shape still selected move to the Appearance panel (Window > Appearance).
Simply click on the Add New Fill button. It’s the little, white square from the bottom bar. Obviously, this will add a second fill for your shape. Select it and use the radial gradient shown below. Have a closer look at the gradient image and you will notice a yellow zero above the left slider. This means that you need to select that gradient slider and lower its Opacity to 0%.
Step 2
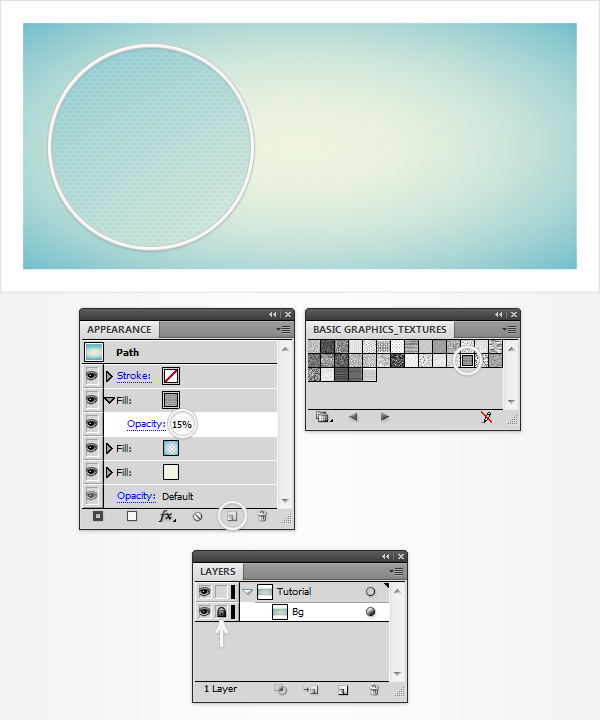
Reselect the shape created in the previous step and add a third fill. For this new fill you will need a built-in pattern. Move to the Swatches panel (Window > Swatches). Open the fly-out menu and go to Open Swatch Library > Patterns > Basic Graphics > Basic Graphics_Textures. A new window with a set of built-in patterns should open.
Return to the Appearance panel, make sure that the third fill is still selected and click on the USGS 19 Land Inundation pattern. Now that the pattern is applied lower its Opacity to 15%. Move to the Layers panel and lock this rectangle.
Step 3
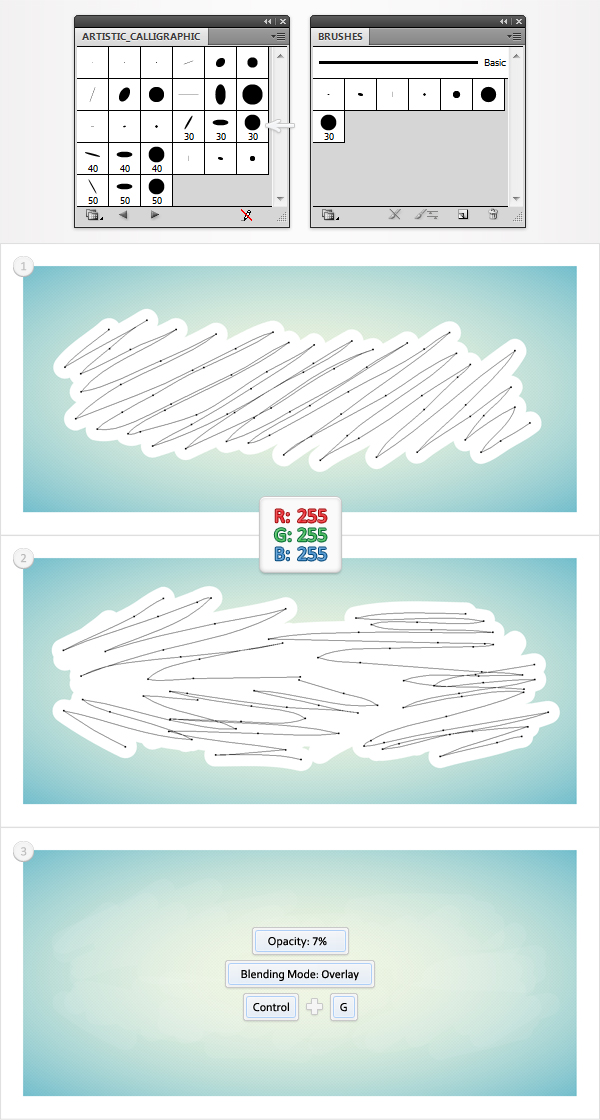
For the following step you will need a built-in calligraphic brush. Move to the Brushes panel (Window > Brushes). Open the fly-out menu and go to Open Brush Library > Artistic > Artistic_Calligraphic. A new window with a set of built-in brushes should open. Pick the Brush Tool (B), select the 30pt Round brush, set the stroke color to white and draw a path like the one shown in the first image.
Continue with the Brush Tool and draw four extra paths as shown in the second image. Select all these paths, lower their Opacity to 7%, change the blending mode to Overlay, then group them (Command + G). Move to the Layers panel, Double-click on this group, name it “Brushes,” and lock it.
Step 4
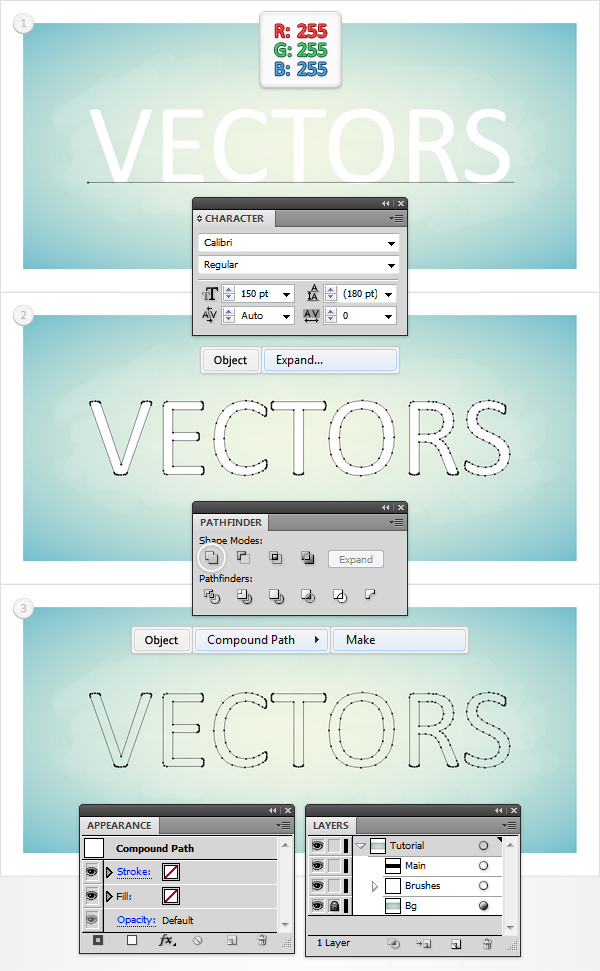
Pick the Type Tool (T), click on your artboard and add some white text. Use the Calibri font with a size of 150pt. Reselect this text and go to Object > Expand (or Type > Create Outlines). Select the resulting group of shapes, click on the Unite button from the Pathfinder panel (Window > Pathfinder) then go to Object > Compound Path > Make.
Select the resulting path, go to the Appearance panel and remove the color from the fill and the stroke. Move to the Layers panel, Double-click on this compound path and name it "Main".
Let’s make a quick recap. So far, you should have two paths (“Bg” and “Main”) and a group (Brushes) in your Layers panel.
Step 5
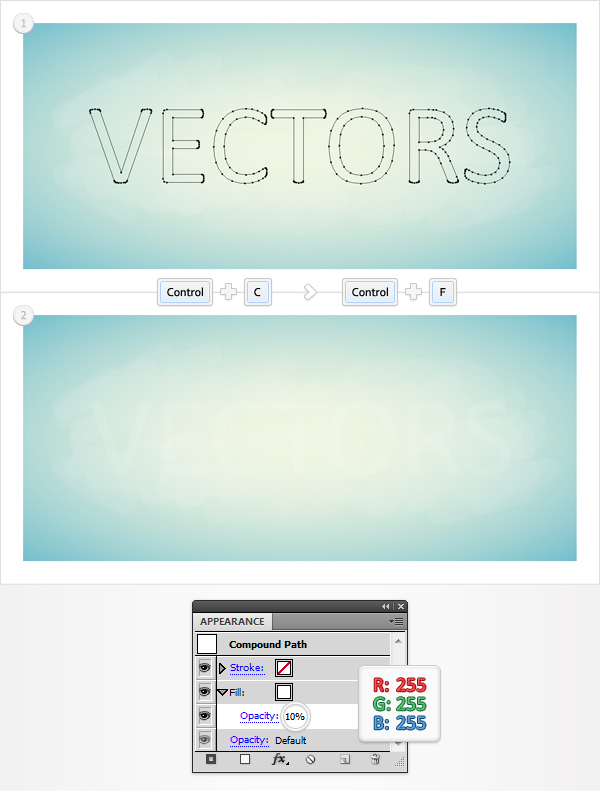
Select "Main" and make a copy in front (Command + C > Command + F). Select this copy and add a white fill. Move to the Appearance panel, select this fill, and lower its Opacity to 10%.
Step 6
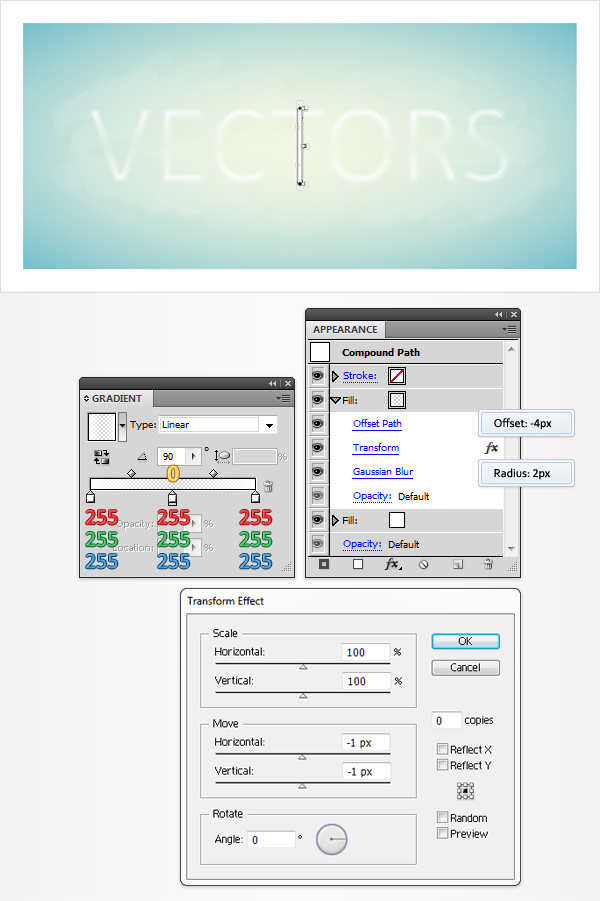
Reselect the white path created in the previous step, add a second fill, and use the linear gradient shown below. Don’t forget about the yellow zero. Select this new fill from the Appearance panel and go to Effect > Path > Offset Path.
Now enter a -4px radius, click OK and go to Effect > Distort & Transform > Transform. Enter the data shown below, click OK, and go to Effect > Blur > Gaussian Blur. Enter a 2px radius and click OK. Move to the Layers panel and name this path "Text".
Step 7
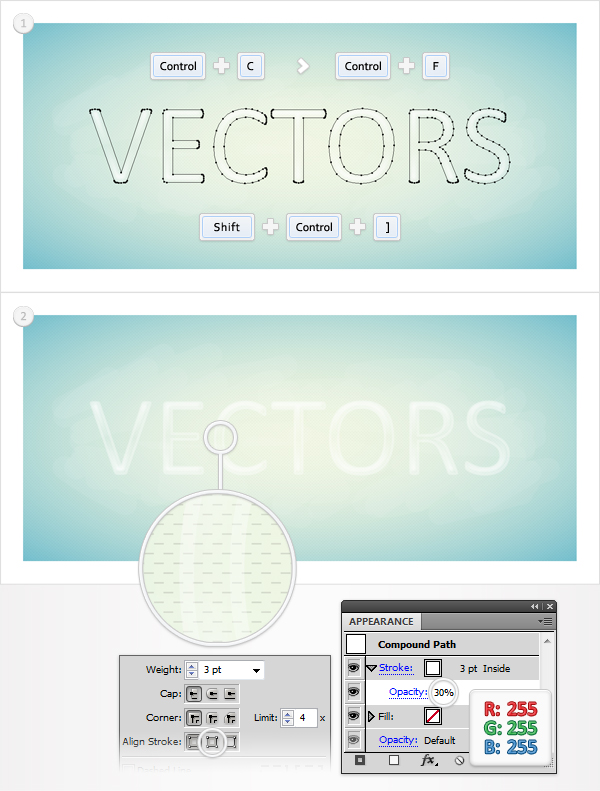
Select "Main", make a copy in front (Command + C > Command + F) and bring it to front (Shift + Command + ] ). Add a 3pt, white stroke for this new path, align it to inside and lower its Opacity to 30%.
Step 8
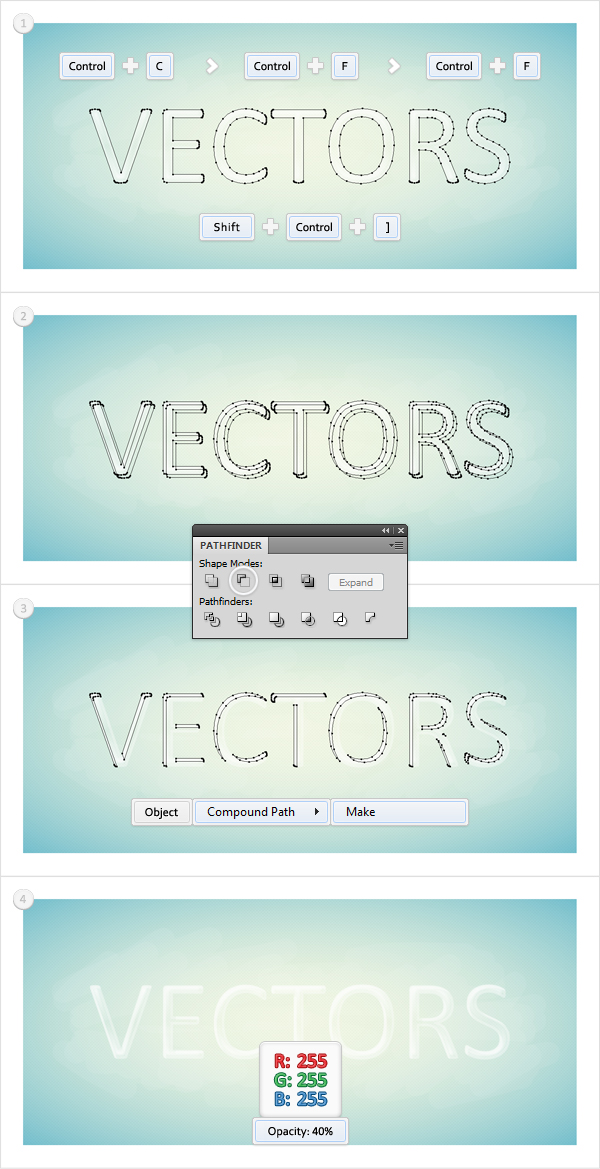
Go to Edit > Preferences > General and make sure that the Keyboard Increment is set at 1px. Select "Main", make two copies in front (Command + C > Command + F > Command + F) and bring them to front (Shift + Command + ] ).
Select the top copy, then hit the right arrow and the down arrows 4 times. Reselect both copies and click on the Minus Front button from the Pathfinder panel. Select the resulting group of shapes and turn it into a compound path (Object > Compound Path > Make). Fill the resulting path with white and lower its Opacity to 40%.
Step 9
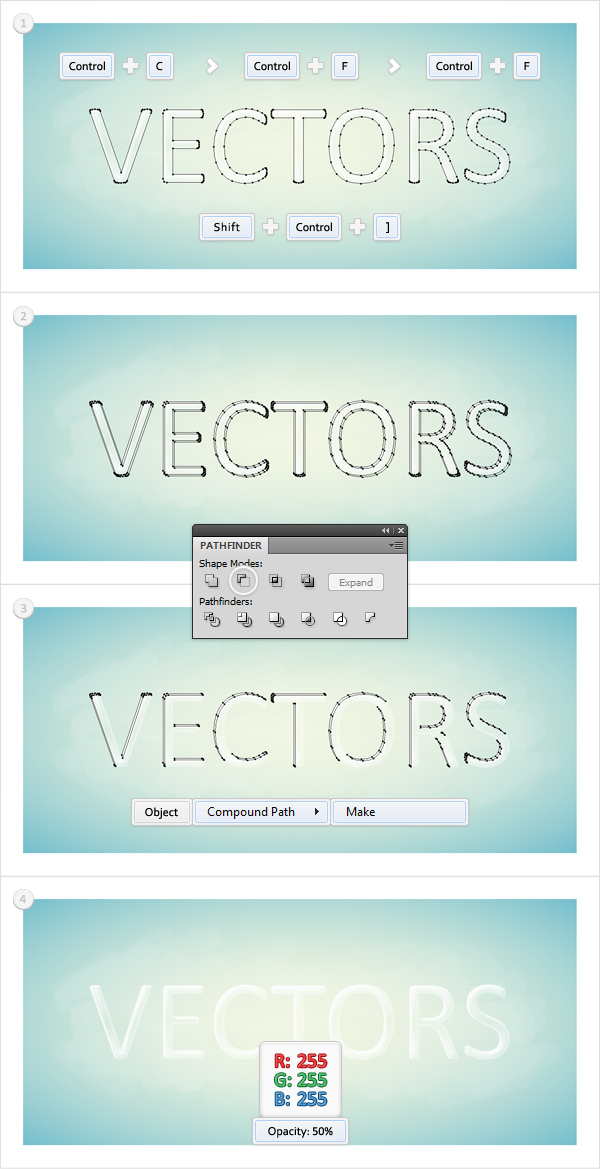
Select "Main", make two copies in front (Command + C > Command + F > Command + F) and bring them to front (Shift + Command + ] ). Select the top copy, then hit the right arrow and the down arrows twice.
Reselect both copies and click on the Minus Front button from the Pathfinder panel. Select the resulting group of shapes and turn it into a compound path (Object > Compound Path > Make). Fill the resulting path with white and lower its Opacity to 50%.
Step 10
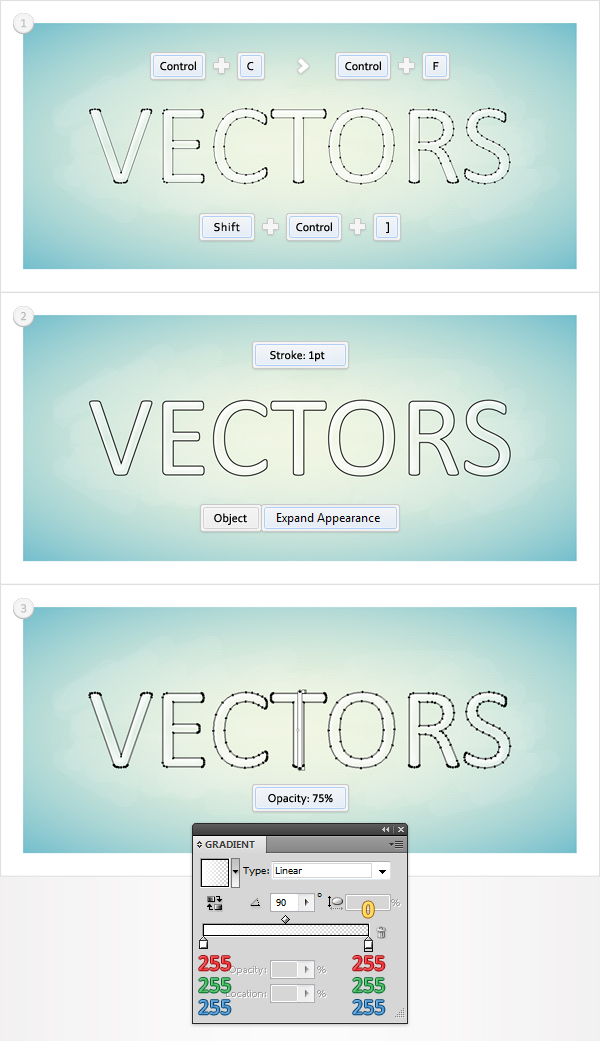
Select "Main", make a copy in front (Command + C > Command + F) and bring it to front (Shift + Command + ] ). Add a 1pt, black stroke for this new path. Align it to outside and then go to Object > Expand Appearance (or Object > Path > Outline Stroke). Fill the resulting path with the linear gradient shown in the third image and lower its Opacity to 75%.
Step 11
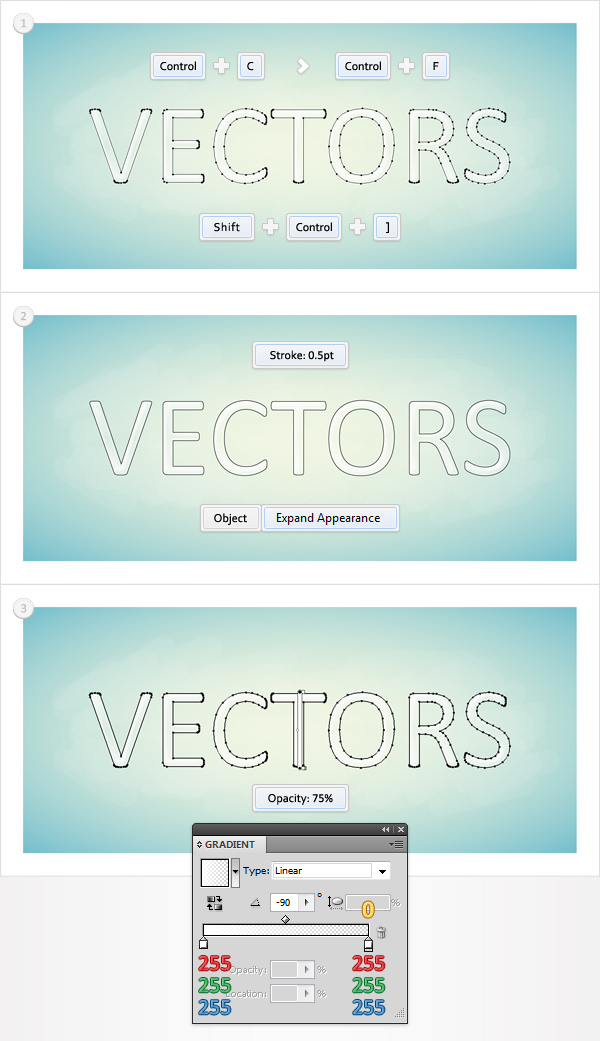
Select "Main", make a copy in front (Command + C > Command + F) and bring it to front (Shift + Command + ] ). Add a 0.5pt, black stroke for this new path. Align it to outside, then go to Object > Expand Appearance (or Object > Path > Outline Stroke). Fill the resulting path with the linear gradient shown in the third image and lower its Opacity to 75%.
Step 12
Select the path created in the previous step and make a copy in front (Command + C > Command + F). Fill it with the linear gradient shown in the second image and lower the Opacity to 15%.
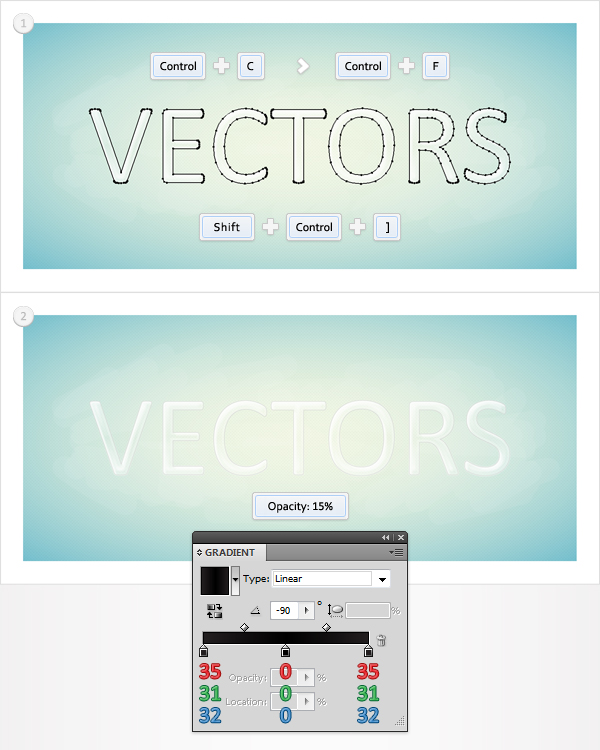
Step 13
Select the three paths created in the last three steps and group them (Command + G). Move to the Layers panel and drag this fresh group above the "Brushes" group.
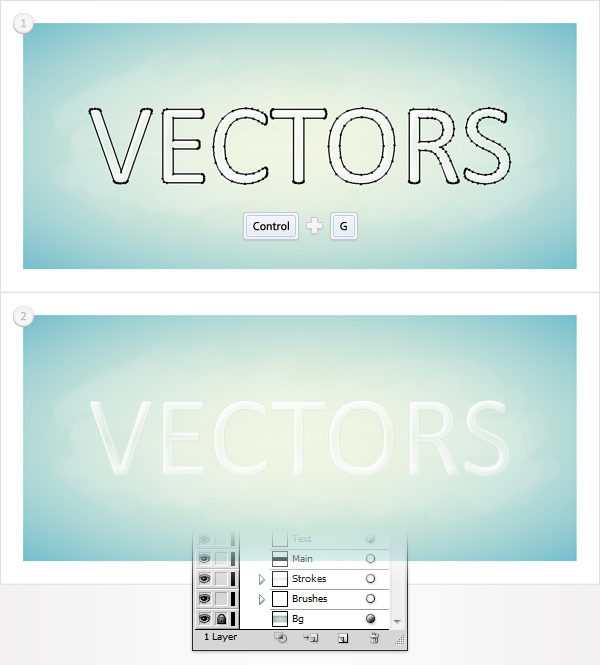
Step 14
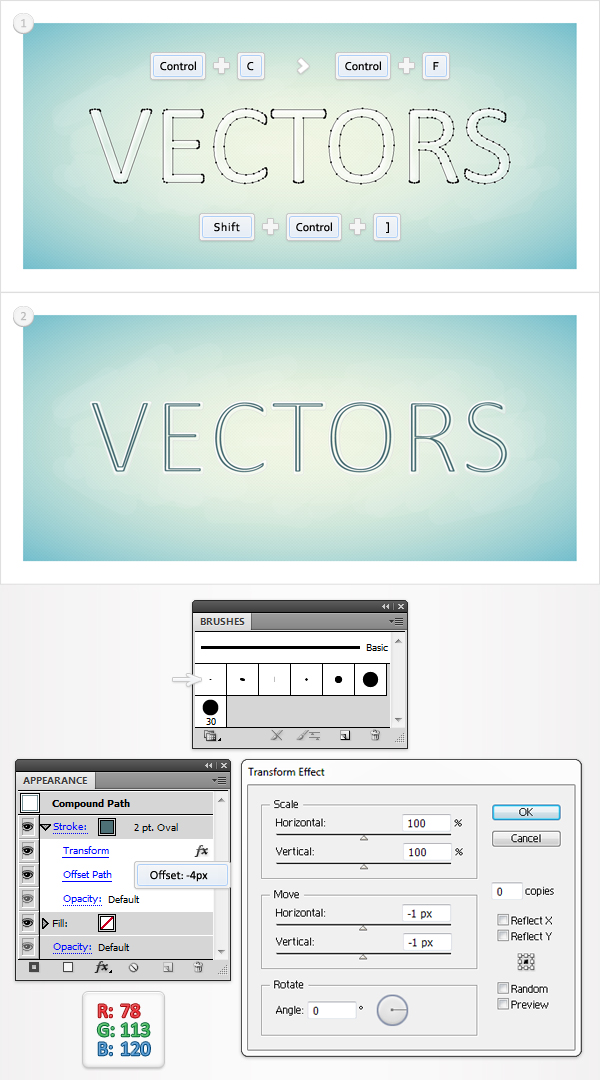
For the following step you will need the 2pt Oval calligraphic brush. You can easily get it from your Brushes panel. Select "Main", make a copy in front (Command + C > Command + F) and bring it to front (Shift + Command + ] ).
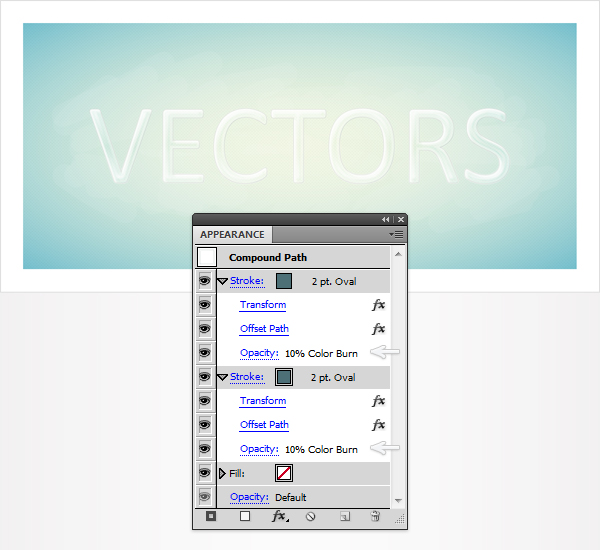
Select it and focus on the Appearance panel. First, add a stroke and set its color at R=78, G=113, B=120. The size is not important. Make sure that your stroke is still selected and click on the 2pt Oval brush from the Brushes panel. Next, go to Effect > Path > Offset Path. Enter a -4px Offset and click OK, then go to Effect > Distort & Transform > Transform. Enter the data shown in the final image and click OK.
Step 15
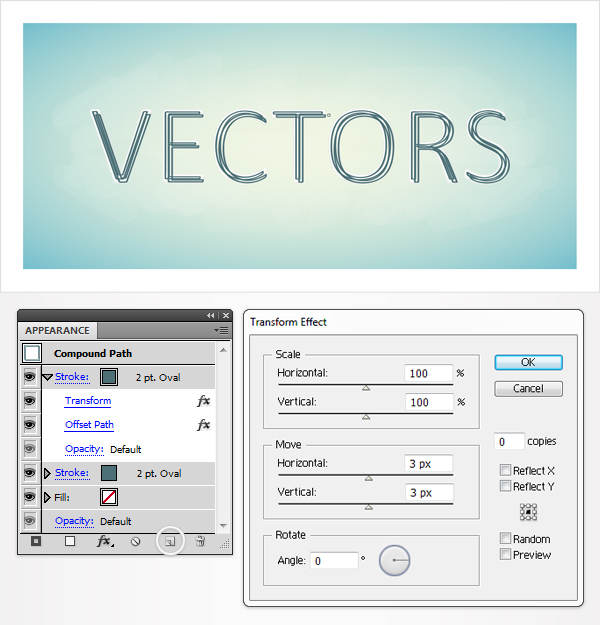
Keep focusing on the path created in the previous step. Select it, move to the Appearance panel, select the stroke and click on the Duplicate Selected Item button (the little file icon from the bottom bar). Obviously, this will add a copy of the selected stroke. Select this new stroke, open the existing Transform effect and enter the data shown below. In the end your it should look like in the following image.
Step 16
Keep focusing on the shape edited in the previous step. Select it and move to the Appearance panel. Select the first stroke, lower its Opacity to 10% and change the blending mode to Color Burn. Move to the second stroke and add the same properties (Opacity of 10% and Blending Mode of Color Burn).
Step 17
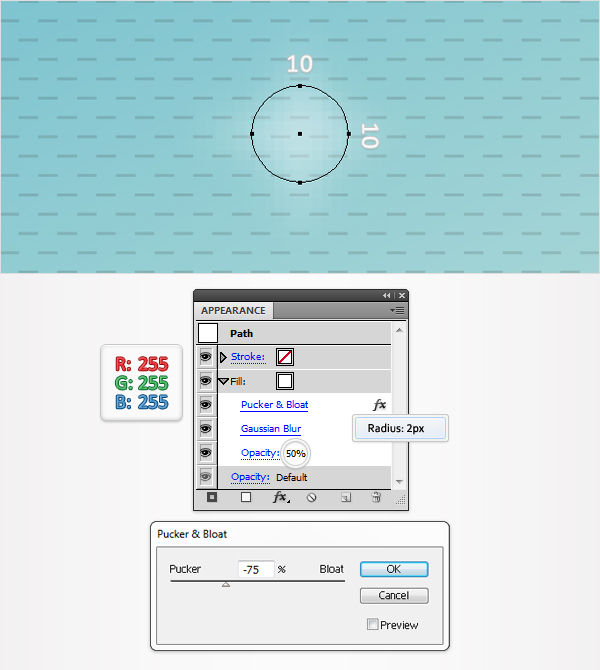
Pick the Ellipse Tool (L) and click once on your artboard. Enter 10 in the width and height boxes, then click OK. This will create a 10px circle. Fill it with white.
Move to the Appearance panel and select this fill. Lower its Opacity to 50% and go to Effect > Distort & Transform > Pucker & Bloat. Drag the slider to -75%, click OK, and go to Effect > Blur > Gaussian Blur. Enter a 2px radius and click OK.
Step 18
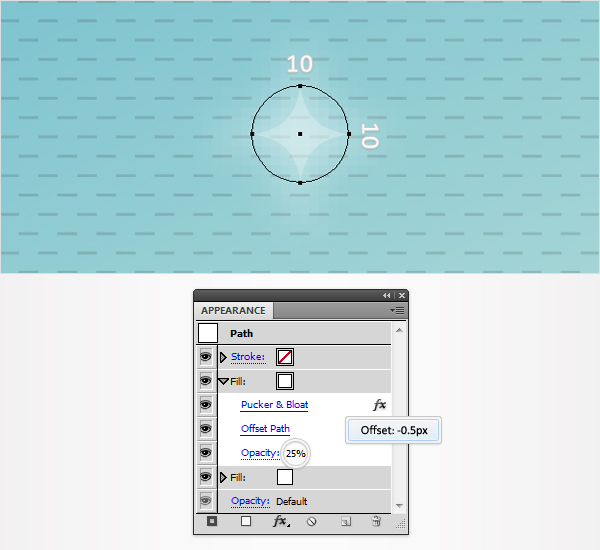
Reselect the shape created in the previous step, add a second fill and make it white. Select it from the Appearance panel, lower its Opacity to 25% and go to Effect > Distort & Transform > Pucker & Bloat. Drag the slider to -75%, click OK, and got Effect > Path > Offset Path. Enter a -0.5 Offset and click OK.
Step 19
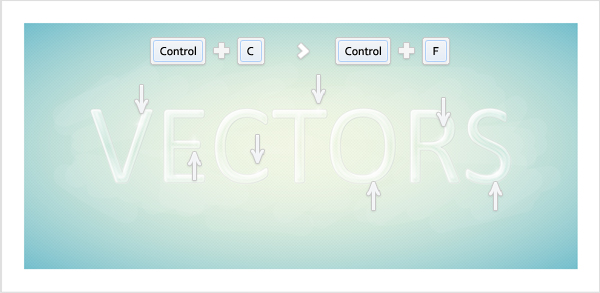
Multiply the shape created in the previous step. Spread these copies as shown in the following image.
Step 20
Select "Main", make a copy in front (Command + C > Command + F) and bring it to front (Shift + Command + ] ). Fill this copy with black, lower its Opacity to 10% then move it 2px down and to the right. Select this fresh path and make a copy in back (Command + C > Command + B). Move this new copy 2px down and to the right, then lower its Opacity to 5%.
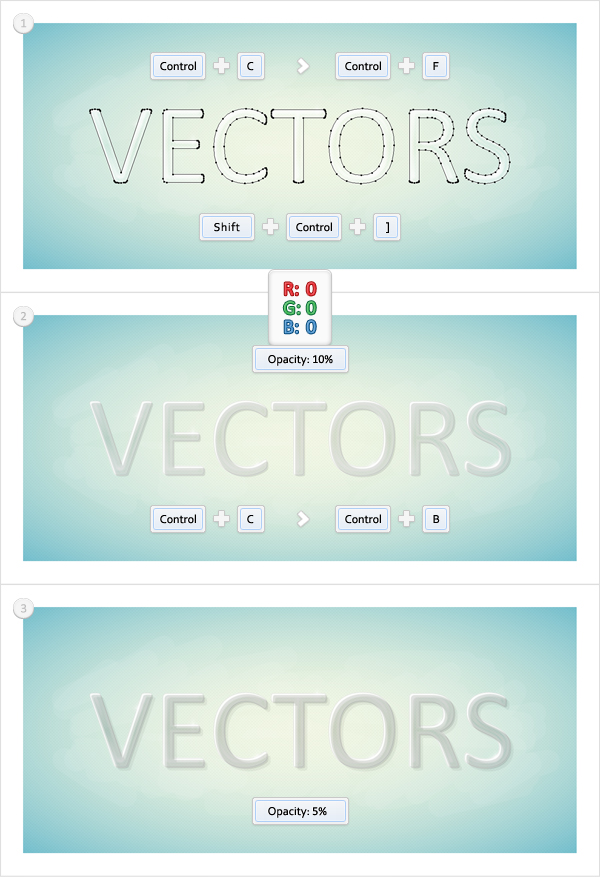
Step 21
Select the two shapes created in the previous step and go to Effect > Blur > Gaussian Blur. Enter a 2px radius, click OK, then group them (Command + G). Move to the Layers panel and drag this group below the "Brushes" group. The glassy text effect is complete.
Continue the tutorial and you will learn how to add three different colorful effects for your text.
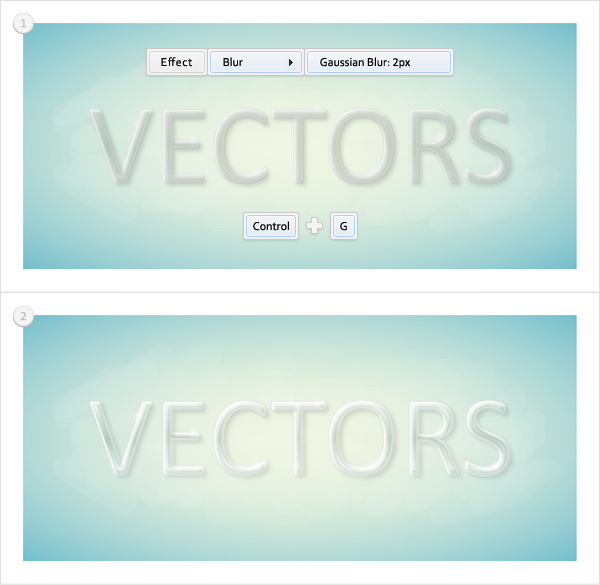
Step 22
Select "Main", make two copies in front (Command + C > Command + F > Command + F) and bring them to front (Shift + Command + ] ). Select the top copy, then hit the right arrow and the up arrows three times.
Reselect both copies and click on the Minus Front button from the Pathfinder panel. Select the resulting group of shapes and turn it into a compound path (Object > Compound Path > Make). Fill the resulting path with R=237, G=28, B=36, and lower its Opacity to 8%.
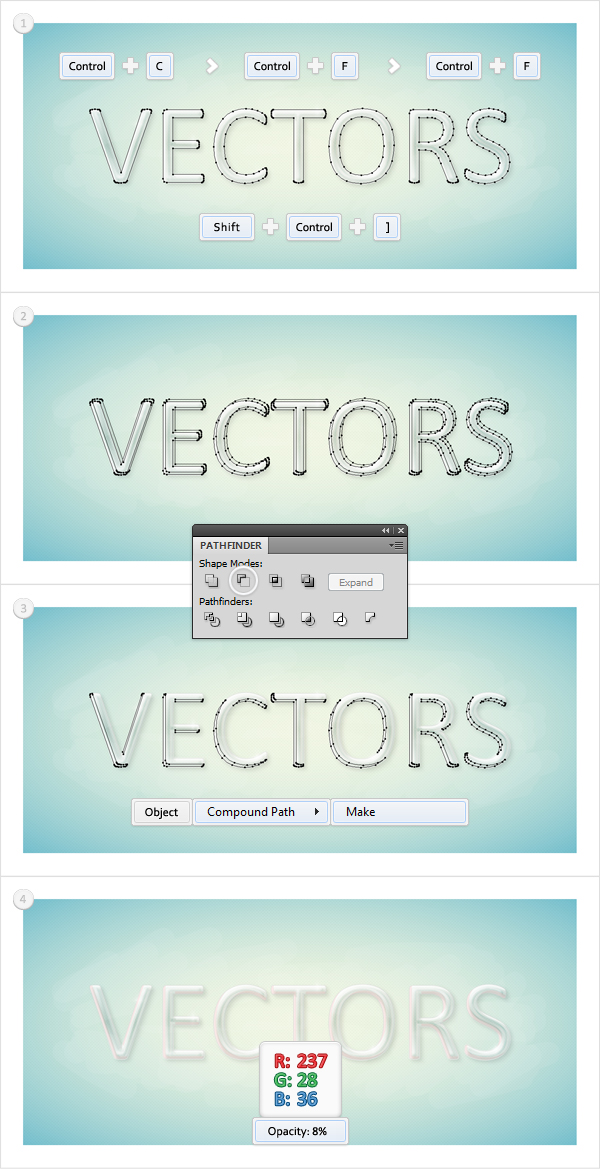
Step 23
Select "Main", make two copies in front (Command + C > Command + F > Command + F), and bring them to front (Shift + Command + ] ). Select the top copy, then hit the left arrow and the up arrows three times.
Reselect both copies and click on the Minus Front button from the Pathfinder panel. Select the resulting group of shapes and turn it into a compound path (Object > Compound Path > Make). Fill the resulting path with R=39, G=170, B=225, and lower its Opacity to 8%.
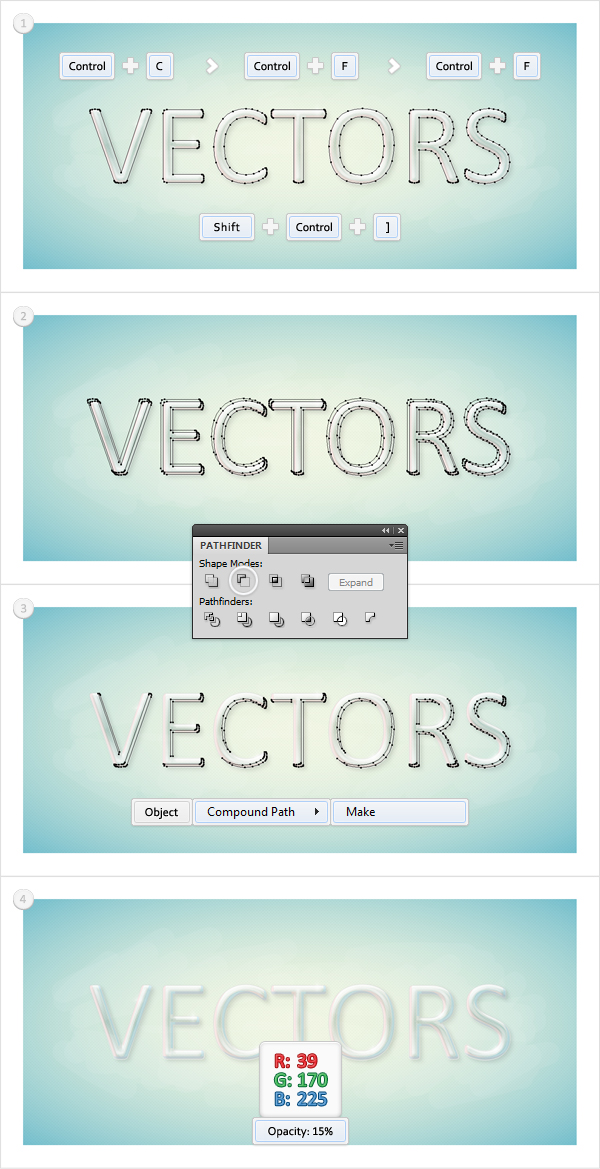
Step 24
Select "Main", make two copies in front (Command + C > Command + F > Command + F) and bring them to front (Shift + Command + ] ). Select the top copy, then hit the right arrow and the down arrows three times.
Reselect both copies and click on the Minus Front button from the Pathfinder panel. Select the resulting group of shapes and turn it into a compound path (Object > Compound Path > Make). Fill the resulting path with R=249, G=237, B=50, and lower its Opacity to 15%. In the end your text should look like the fourth image.
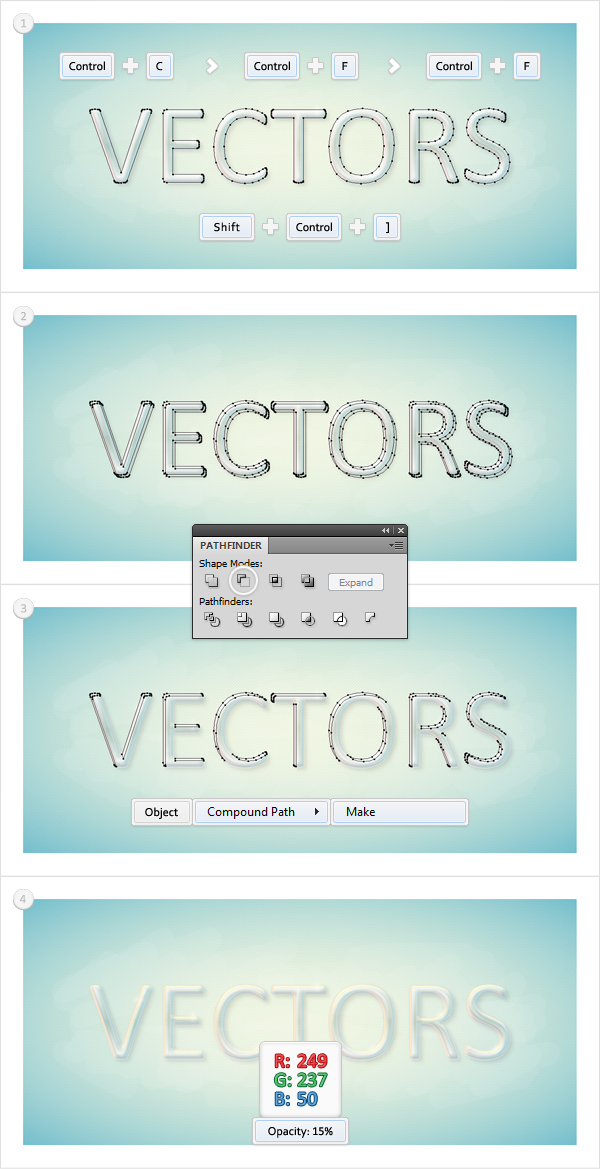
Step 25
Select the paths created in the last three steps and group them (Command + G). Move to the Layers panel and make it invisible.
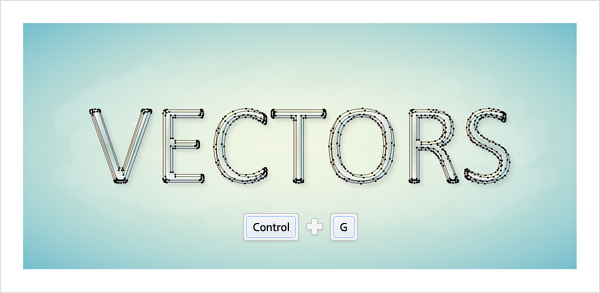
Step 26
Enable the Grid (View > Show Grid) and the Snap to Grid (View > Snap to Grid). For the following steps you will need a grid every 10px. Go to Edit > Preferences > Guides & Grid, enter 10 in the Gridline every box and 1 in the Subdivisions box.
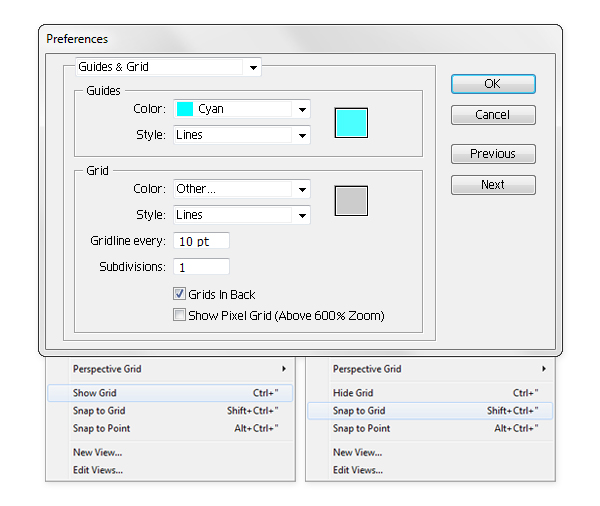
Step 27
Pick the Rectangle Tool (M). Create two 10 by 120px shapes and place them as shown in the first image. The Snap to Grid will ease your work. Fill the left rectangle with R=249, G=237, B=50, and the right one with white. Reselect both shapes, lower their Opacity to 13%, group them (Command + G), and go to Effect > Distort & Transform > Transform. Enter the data shown below and click OK.
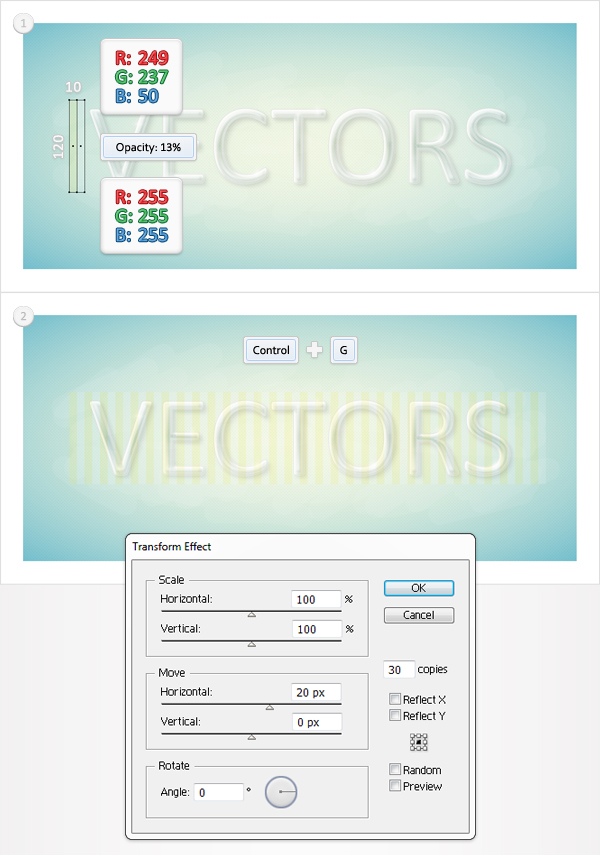
Step 28
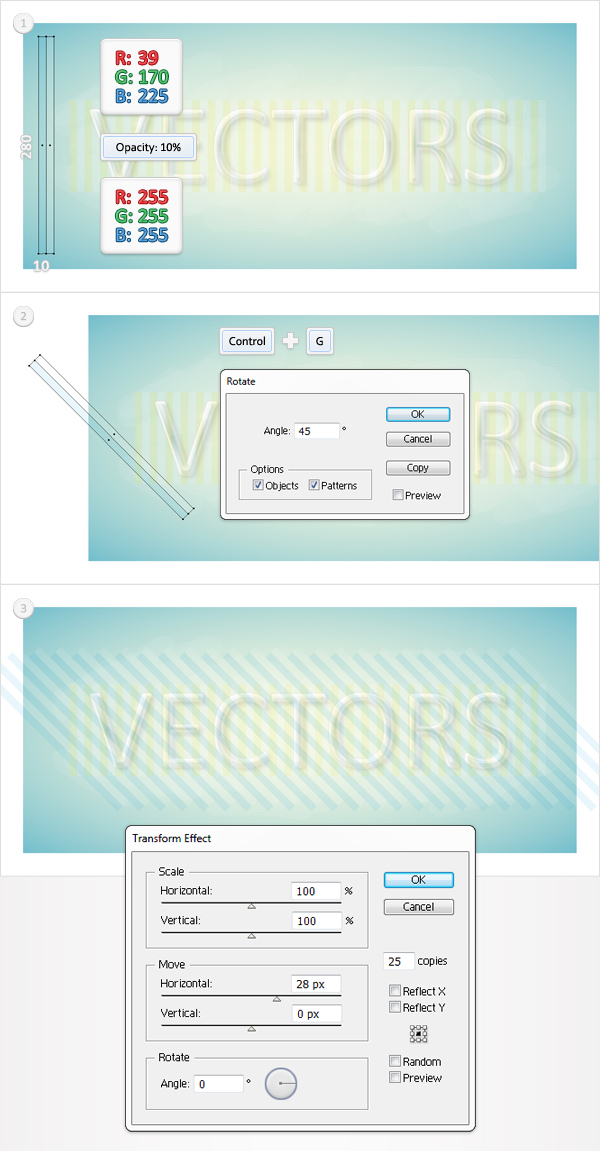
Pick the Rectangle Tool (M). Create two 10 by 280px shapes and place them as shown in the first image. Again, the Snap to Grid will ease your work. Fill the left rectangle with R=39, G=170, B=225, and the right one with white. Reselect both shapes and lower their Opacity to 10%.
Group them (Command + G) and go to Edit > Transform > Rotate. Enter a 45 degrees angle and click OK. Now, your group should look like the second image shown. Reselect it and go to Effect > Distort & Transform > Transform. Enter the data shown in the final image and click OK.
Step 29
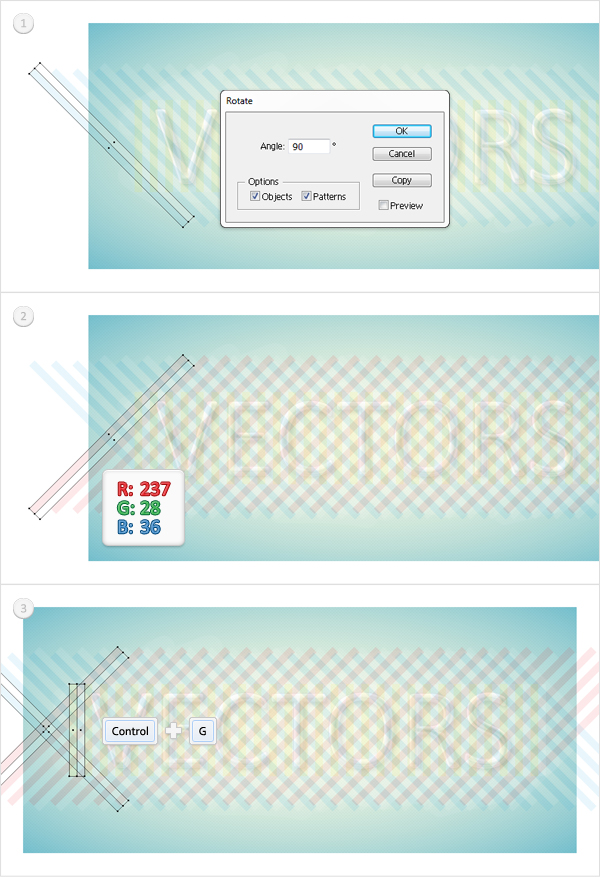
Select the group created in the previous step and go to Edit > Transform > Rotate. Enter a 90 degrees angle and click on the Copy button. This will create a horizontally flipped copy of your group.
Select the blue rectangle from this new group and replace the existing fill color with R=237, G=28, B=36. In the end your group should look like the second image shown. Reselect it along with the other two groups created in the last two steps and group them (Command + G).
Step 30
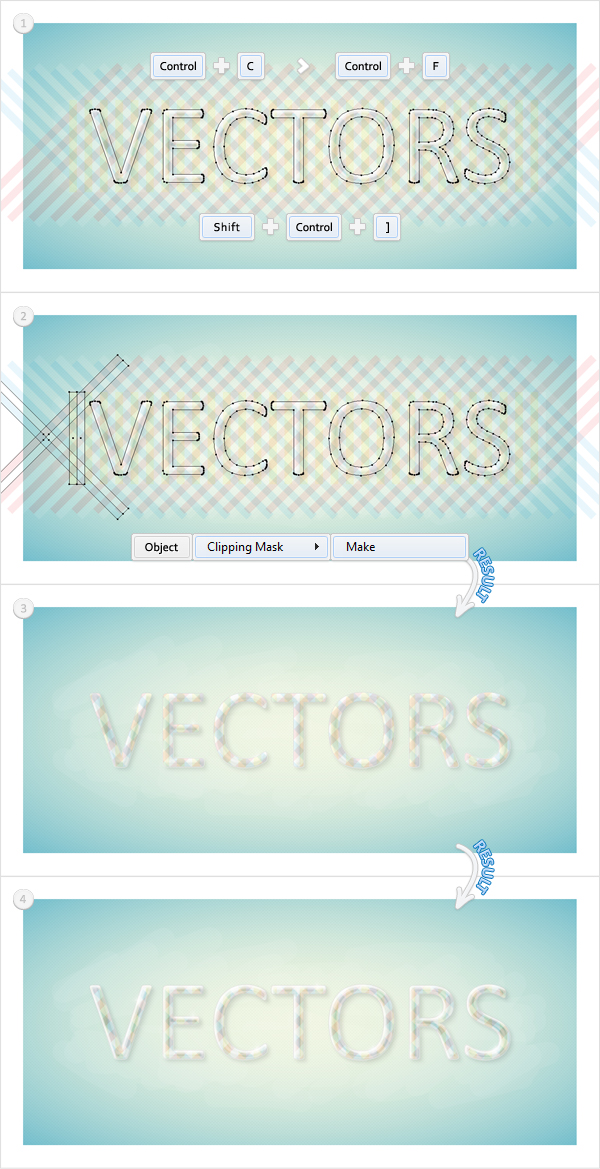
Select "Main", make a copy in front (Command + C > Command + F), and bring it to front (Shift + Command + ] ). Select this copy, along with the group created in the previous step, and go to Object > Clipping Mask > Make.
It should look like the third image shown. Move to the Layers panel and drag this masked group above the "Text" path. In the end, it should look like the fourth image shown. Move to the Layers panel and make it invisible.
Step 31
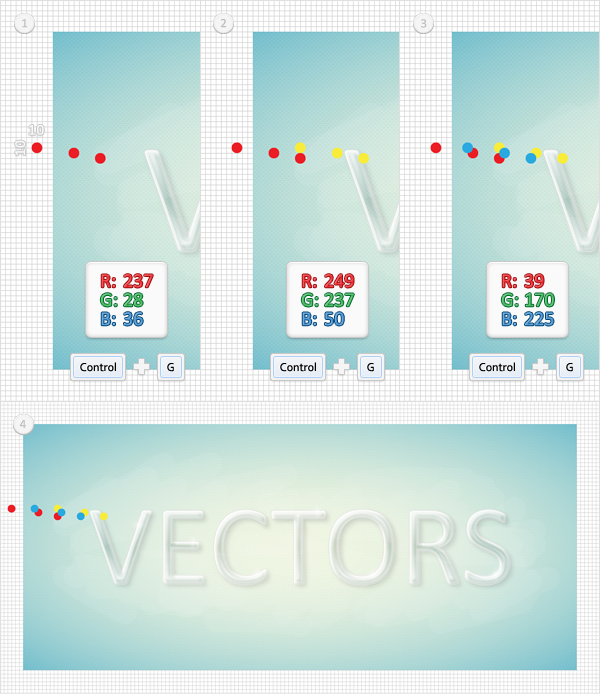
For the following step you will need a grid every 5px. Go to Edit > Preferences > Guides & Grid, then enter 5 in the Gridline every box. Pick the Ellipse Tool (L) and create three, 10px circles. Fill them with R=237, G=28, B=36, place them as shown in the first image, then group them (Command + G).
Create three new circles (10px). Fill them with R=249, G=237, B=50, place them as shown in the second image, then group them (Command + G). Create three new circles (10px). Fill them with R=39, G=170, B=225, place them as shown in the third image, then group them (Command + G).
Step 32
Select the three groups created in the previous step and go to Effect > Distort & Transform > Transform. Enter the data shown below and click OK.
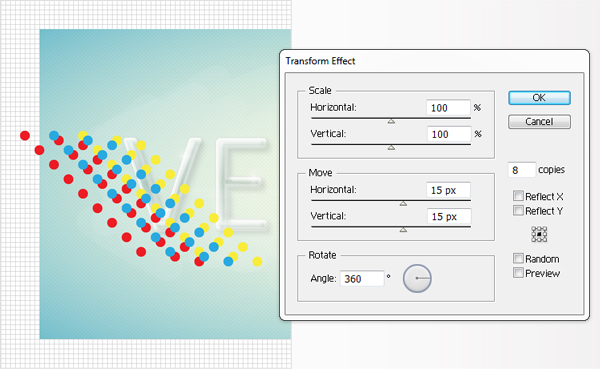
Step 33
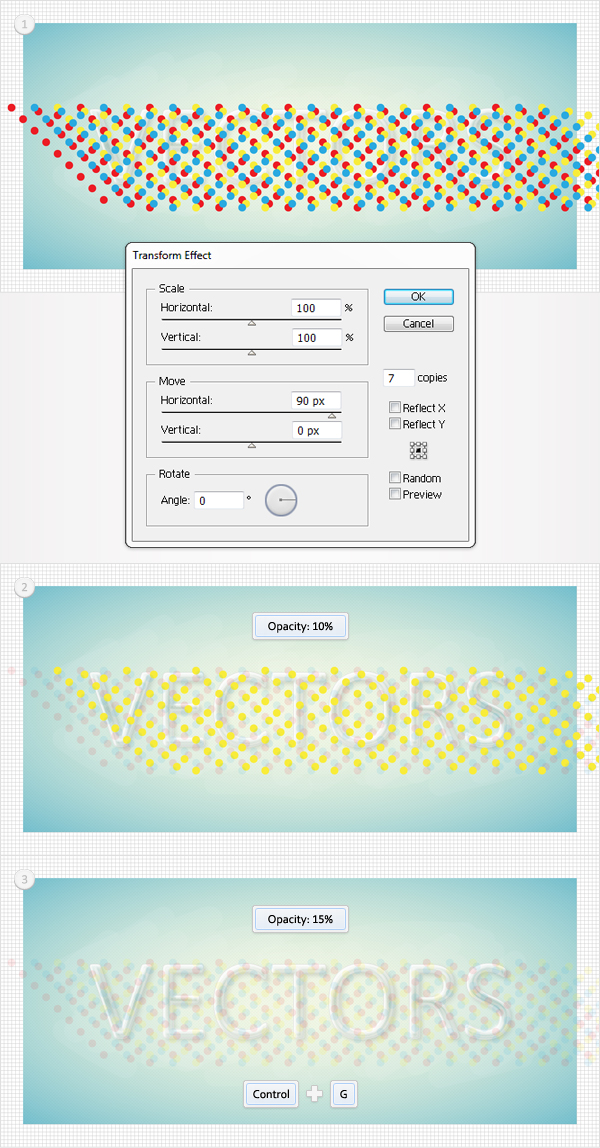
Reselect the three groups edited in the previous step and go again to Effect > Distort & Transform > Transform. Enter the data shown below and click OK.
Select the groups containing the red and the blue circles, then lower their Opacity to 10%. Select the group containing yellow circles and lower its Opacity to 15%. Reselect these three groups and group them (Command + G).
Step 34
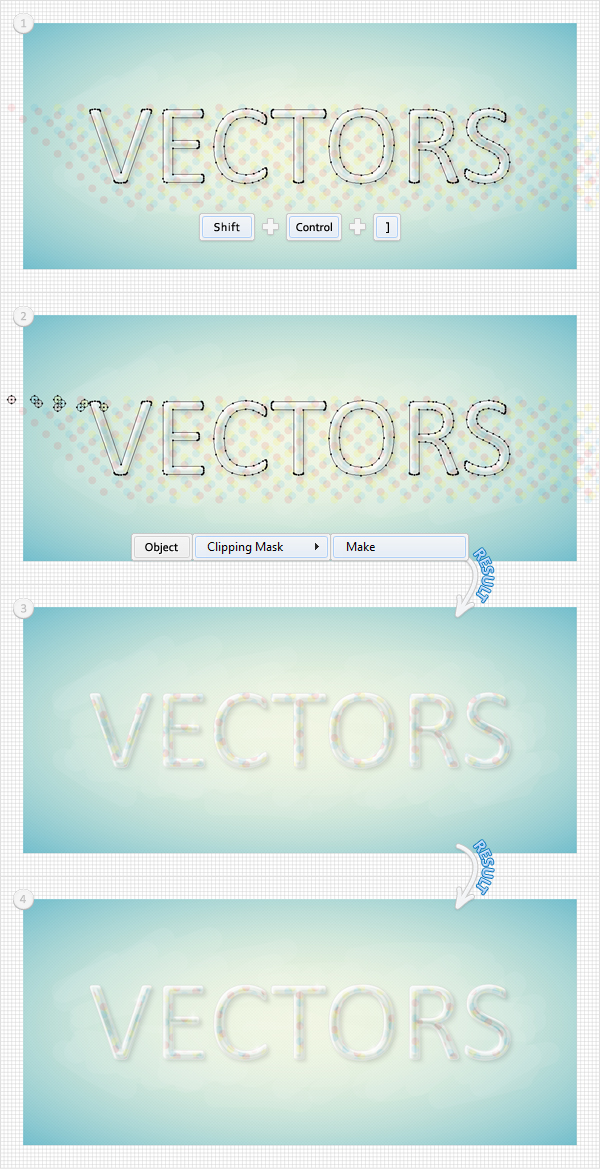
Select "Main", make a copy in front (Command + C > Command + F) and bring it to front (Shift + Command + ] ). Select this copy along with the group created in the previous step and go to Object > Clipping Mask > Make. It should look like the third image shown.
Move to the Layers panel and drag this masked group above the "Text" path. In the end, it should look like the fourth image shown.
Conclusion
Now your work is done. Here is how it should look.
