We’ve previously looked in detail of the theory work and techniques used in skin shading, now we’re going to look into vectoring hair.
Rendering hair in vector is one of the more challenging areas when learning to vector portraits, yet rendering is not the only thing you need to consider. Assuming you’re not following a stock image curve for curve, consider the hair style: what texture do you wish to give the impression of and what color? Depending on the area hair takes up in a portrait and how prominent it is in your work, it will make or break your illustration.
In today’s article, we look closer at ways to render hair, show examples of inspiring hair designs in vector and give you some tips on how to improve your portraits. As with all examples shown, please click on the images to view a much larger size of the original. This will often give you much greater detail to look at.
Styles of Rendering Hair
Let’s look at some of the notable ways to render hair. Whether it is based on stock or from the artists imagination, the way hair is rendered can help set the tone and style for the entire piece.
Zigzag Shaped
It’s hard to actually give this style a name, so let’s go between these two. With zigzagged shaped hair, the artist uses shapes of many points, either neatly arranged with solid color or overlapped with varying opacities to produce a hair texture. This works well in both ends of the detailing spectrum, for example view the works shown below.
Imagine the number of points used to create this amount of delicately placed shapes. One can only assume they are solid shapes, but when you look close up, you’d be forgiven to think they were brush strokes with the number of shapes used.
Going from many shapes now to few with the same style of hair rendering, this time with fewer shapes. Grelin-Machin has used the same style of small lighter shapes, gradually getting darker as the shape increases.
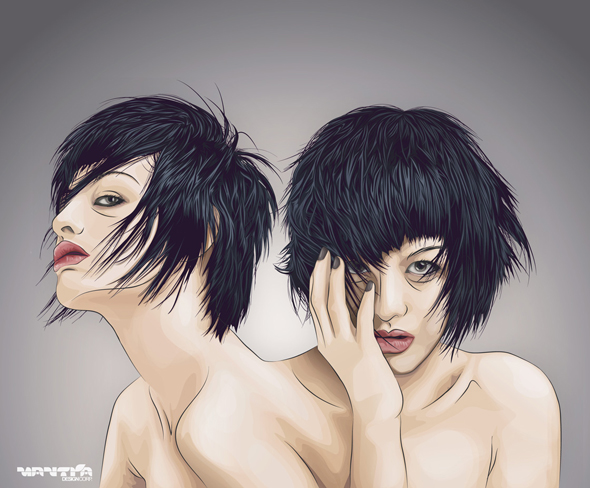
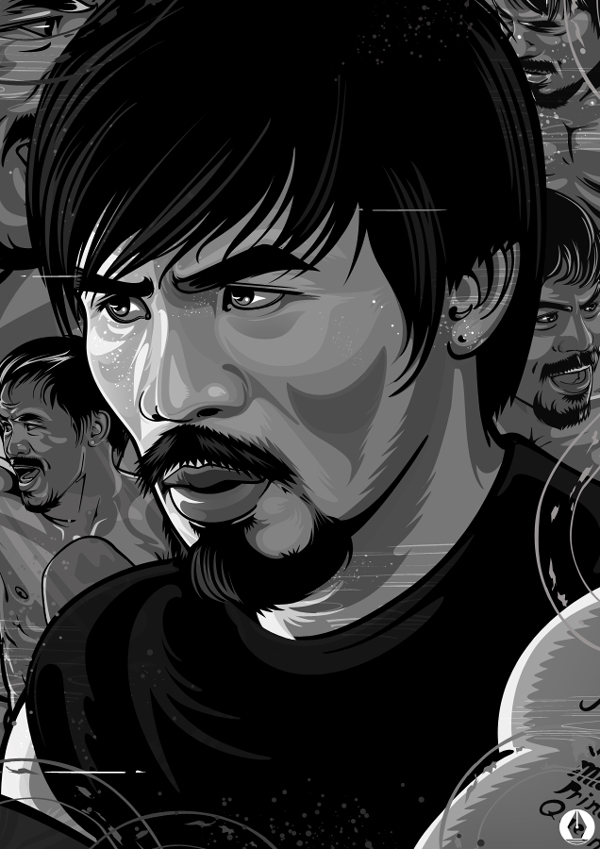
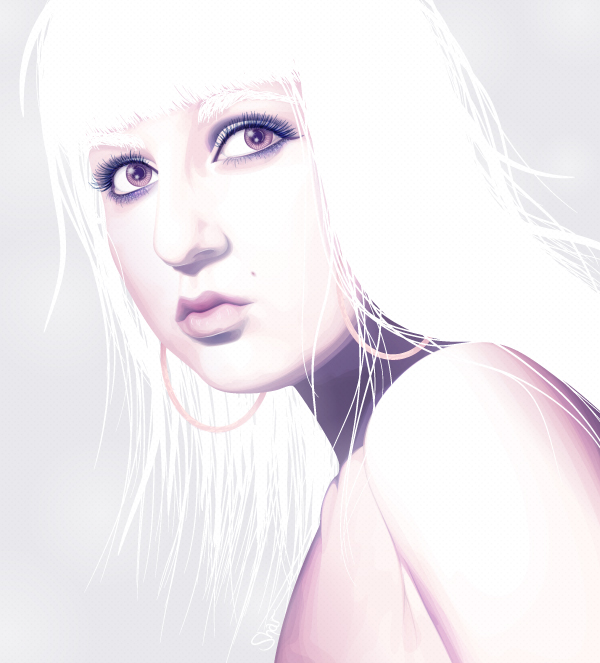
Strands of Hair
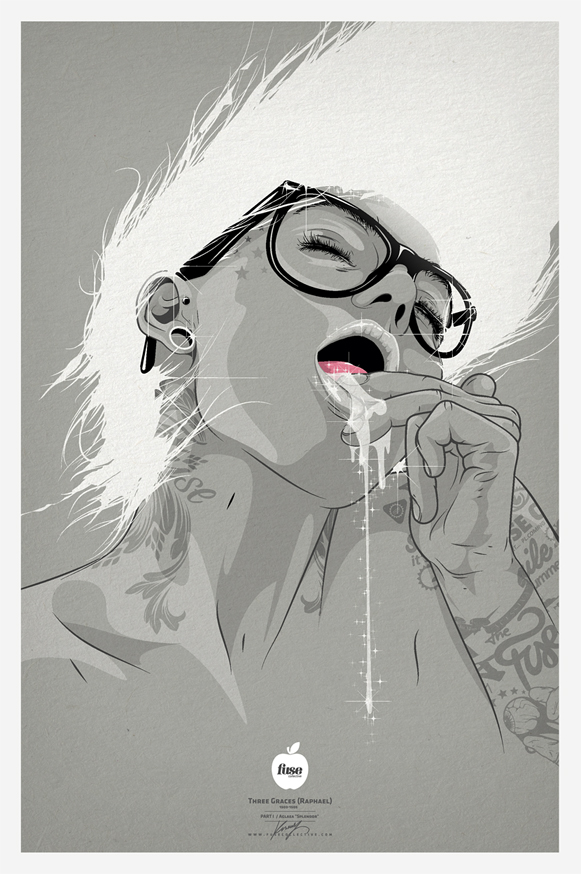
This style is one I do myself, as I find it personally very relaxing to do with a tablet. This is drawing each strand, stroke by stroke. Done with either layering lines with a stroke on top of shapes (sometimes zigzagged shapes) or even just the individual strands themselves. It can be a time consuming style to get into. It works best when the rest of the portrait is greatly detailed, so not one that necessarily would work with minimal shading.
In this example of the stranded hair style, you can see how the individual tapered strands are overlapped on top of initial base shapes. They have created the shape and contrast in the hair. The strands add an extra level of detail, which balances well with the extra detailing of the glitter around the eyes.
In the tutorial above, I go into detail on how I created this strand style hair, as well as general hair style theory. Note that the hair relies mainly on the individual strands and leaves little of the base shapes underneath to help shape it.
Silhouette Hair
If you’re aiming for a minimal style, but still wishing to have a great level of detailing, why not consider doing a silhouette style in hair rendering. You start off creating a solid base layer shape for the majority of overlapping hair covering the scalp and then add individual shapes and strands flowing from the head of the same color. The resulting effect is a single shade hair render.
Assisted by an overlapping texture, this silhouette style has a rough shape and strand flow to the hair. It combines both chunky strands and individual thin strokes, which balances well with the texture, the minimal skin shading, and line art.

Tapered strokes are added to the base of the hair on this portrait to give an otherwise flat shape some body.
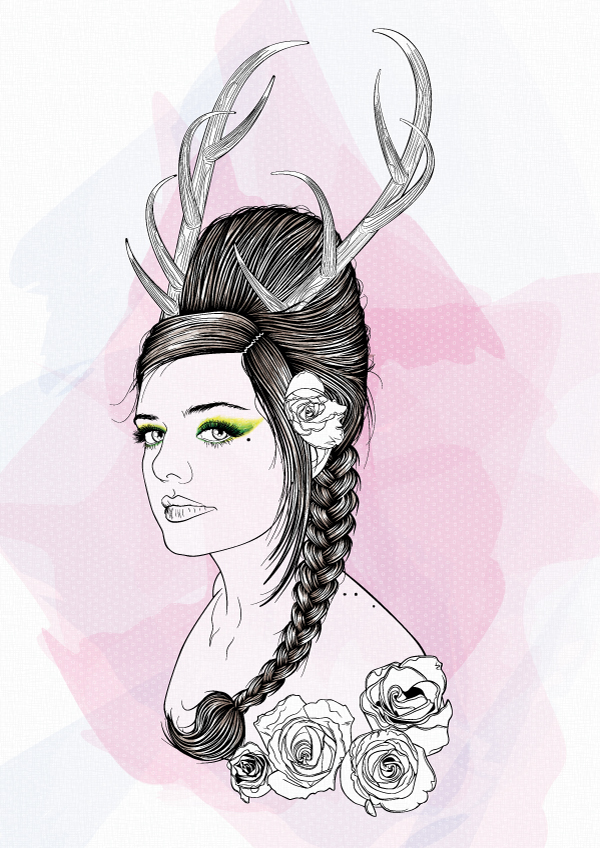
Line Art Emphasized
Using a mixture of shapes and well constructed line art can create a detailed illustrative style. This style is often used to first draw the initial shapes of the hair to create sections. And then used to add further detailing to each individual section. Shapes are laid on top of the line art with a Blending Mode/Opacity or underneath to help add contrast and color.

In this example of line art emphasized hair, the line art as a consistent stroke weight and color. The colors are all of the same hue and the line art almost blends away into the rendering. Of course against the blue/green background, it stands out.
On the flip side, the line art is more central to the rendering of the hair here, as it’s of a different color. The shading is secondary and it’s not until you look deeper that you see it. The line art here is created by white shapes overlapping a black base, with the smaller shapes created initially by tapered brushes. Color with a Blending Mode Multiply is then drawn over the top to give depth.
Gradient Shaded Hair
Gradients can be used to aid shading hair without adding too many complex shapes and strokes. This can give a minimal style that little bit of extra depth. The benefits of using gradients in hair is it can help add subtle shifts in color and emphasize lumps and bumps in the hair structure, while maintaining a softer edge.

A subtle radial gradient has been used to add shading behind the neck and around the edges of the hair.
Alternatively, gradients have been used to help add definition between the locks of hair in this portrait. With a radial gradient added to add a shadow to the roots from the hat.
Short Hair and Fur
You could consider the similarities between rendering fur and rendering shorter hair. Although a stereotype, men’s hair is a lot more coarse and shorter than female hair, therefore can be compared to animal fur.
With more shorter strokes, if rendered in a strand by strand fashion it may take much longer to do with short bursts to draw.
With shorter hair though, the silhouette style can be much harder to pull off and could therefore benefit from perhaps the introduction to one shade or highlight to add that little bit extra detailing.
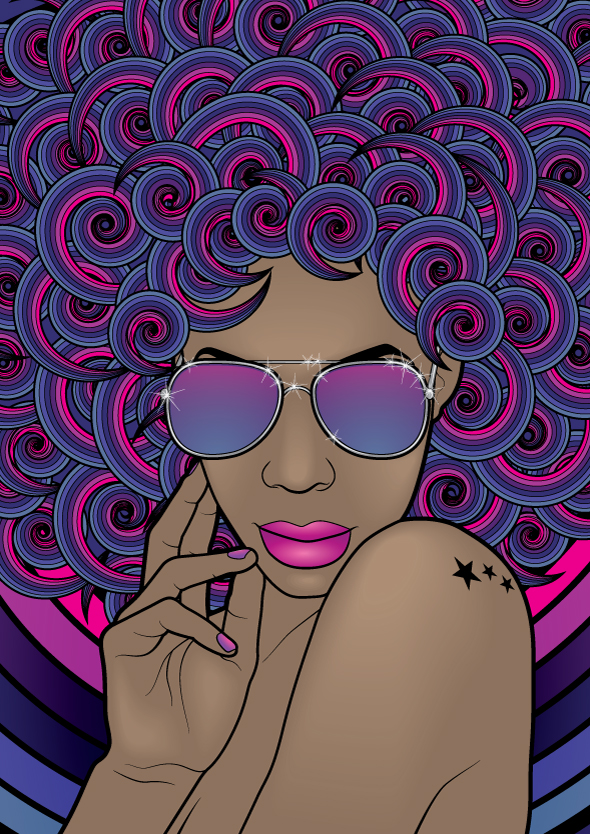
Abstract Hair
Why not consider creating something more abstract coming from the scalp? Let your imagination run wild and try adding flowing shapes and characters or even random patterns and extras to give your portrait something special.
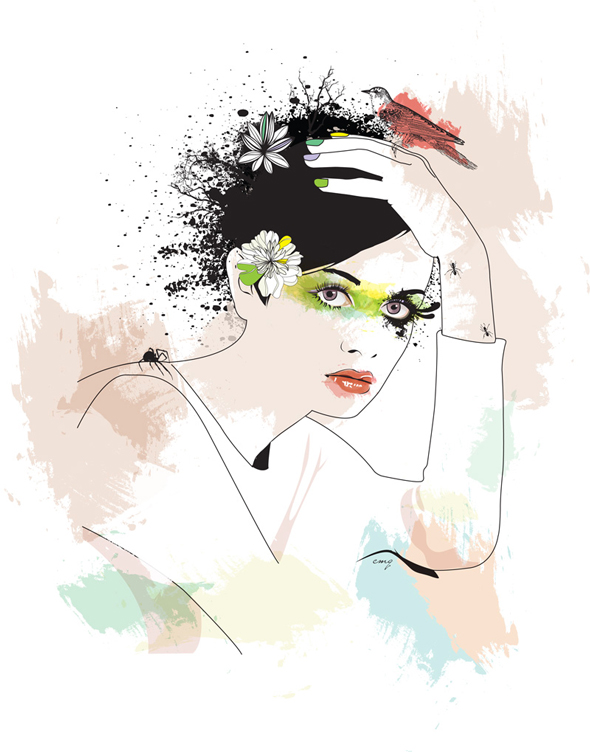
This is a minimal line art based portrait, with a simple, yet complex shaped splatter effect hair style. Possibly brushes or even symbols have been used to create this effect. Colors have then been placed to emphasize key areas, such as: the nails, the petals of the flower, the eyes, and lips. Although the abstract area is the hair, it’s not the area that the color is focused on.
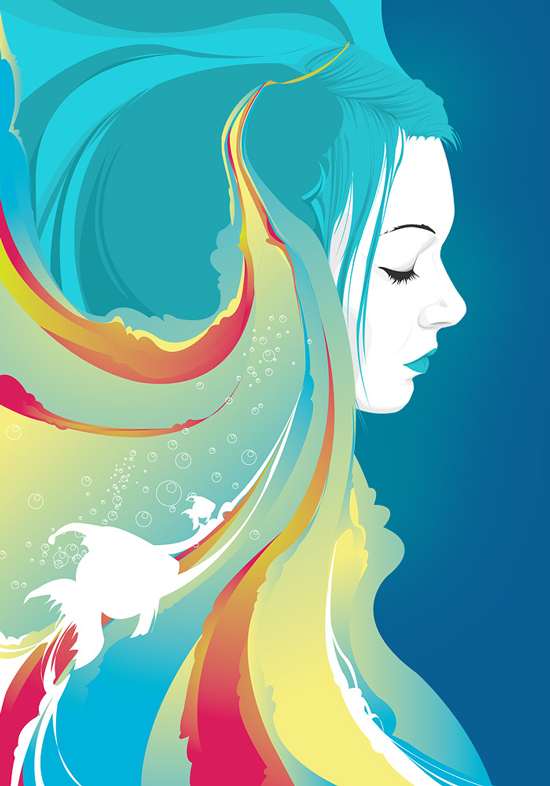
Mixing flowing shapes, marine colors, the odd fish and bubbles with an aquatic themed hair is an interesting direction in this vector portrait. I love the use of gradients within the one central flowing section of the hair. Very well balanced in this abstract style.
Experimentation with Hair
Regular readers of Vectortuts+ may notice that many portraits I have done for tutorials. There is so much to be learned and so many styles with portraits. One of the areas I especially love to play with is the hair, as it can be so dynamic.
Recently, I’ve been experimenting with using more detailed tapered brushes to create hair. Not only does it make it easier for others to duplicate the style, but it pushes what you can do with brushes.

My first jump into more detailed brush hair was for my tutorial for Adobe Illustrator. The hair is created using tapered art brushes, which in itself also contain tapered art brushes.
The next was a recent tutorial I created for Vectortuts+ where a more simple line art based tapered art brush has been applied to strokes made with the Swirl Tool. This makes it even easier for users to duplicate the style as the curves are pre-made!
4 Tips for Rendering Hair
As I’ve shown, there are many different ways to render hair and I couldn’t possibly comment on how to create every single style. However what I can do is offer some tips that will make your hair rendering life that little bit easier.
1. Sketching Hair Styles
When sketching a hair style from scratch, remember to first sketch out the bald head of your subject. You need to know where hair must cover otherwise you may end up with a portrait with an irregular shaped, smaller than usual head! I tend to sketch the remainder of the scalp of my portraits and lower the opacity…

… and then sketch the hair style on top of this. First working with the hair parting and the bangs/fringe at the front, then working on the overall silhouette, and finally sectioning off the hair. This makes it easier to construct the base layers of the hair.

2. Hair Base Layers
As I use mainly strands of hair rendering for hair style, I need to consider looking at the hair in layers. Sections of hair will overlap others and therefore the hair strands drawn may need to be rendered within separate layers or sub layers. This is especially true with rendering curly hair.

If you notice in the above example, sub layers are used for the fringe/bangs and for the scalp. There is then a separate layer beneath the skin layers.
3. Consistent Styles
Consistency between the level of detail of the rest of the portrait and the hair can make for a well rounded illustration. Although maintaining the same level of detail throughout can get tiring and sometimes time consuming if done to a high level, you could work from one extreme to another with the silhouette method. However, you will need to make sure your silhouette is still detailed enough to not be too distracting.
4. Hair Coloring
If you’re going for natural hair colors, there are a couple of things that are worth keeping in mind. The first is that blonde hair is not yellow. If you’re rendering a detailed portrait and the subject is blonde, then opt for light browns and golden light browns to avoid a yellow hue.
Natural hair colors are affected by the sun. With this in mind, remember that the longer the hair, the darker it is towards the root of the hair. This is because hair is bleached by the sun and therefore the closer to the scalp the hair is, the shorter time it’s been exposed to the sun.
Conclusion
Using stock images are a great way of introducing yourself to the natural behavior of hair, how it lies and reacts to light, and it’s also a good way of practice some new found skills. As with everything, practice does make perfect, so keep playing with different techniques and tools to find your own way to render hair.
In the meantime, why not try some of these great Vectortuts+ tutorials that involve rendering hair:
- Create a Sparkly Female Portrait in Illustrator
- How to Create a Hair Braid Pattern Brush in Illustrator
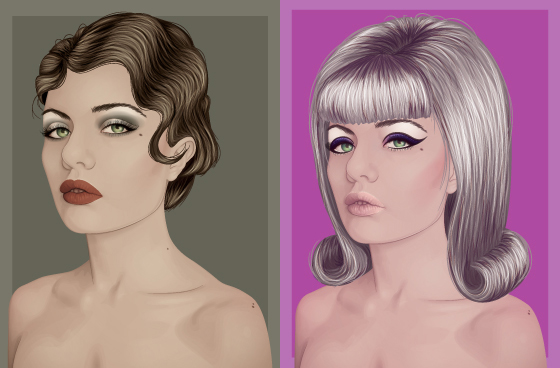
- Changing Hair and Makeup to Create a Retro Style in Vector Portraits
- Easily Make Shiny Realistic Vector Hair
- Create a Male Portrait from a Photo Reference
- Create a Psychedelic, Funky Line Art Portrait
- Creating a Stylish Line Art Portrait with Illustrator CS5
- Creating a Dramatic Portrait with Chunky Line Art
- Creating a Portrait Using Only Four Colors!