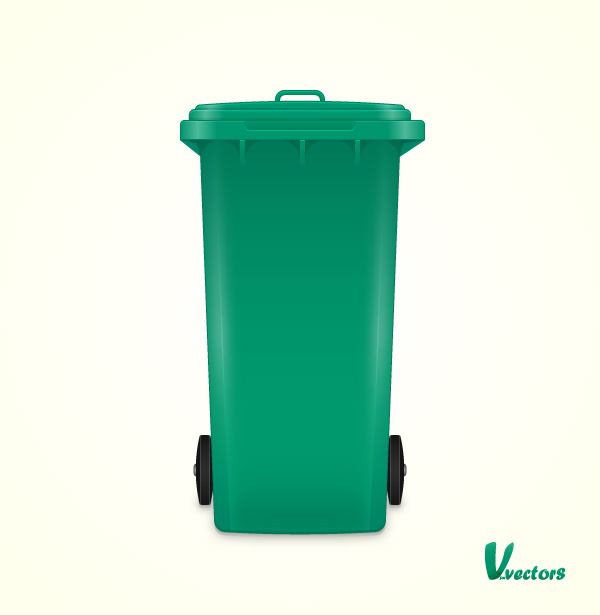
In the following tutorial you will learn how to create a garbage bin illustration. Use a complete Illustrator CS5 workflow, vector shape building techniques, gradient and opacity shading, as well as various vector effects. Let’s get started.
Step 1
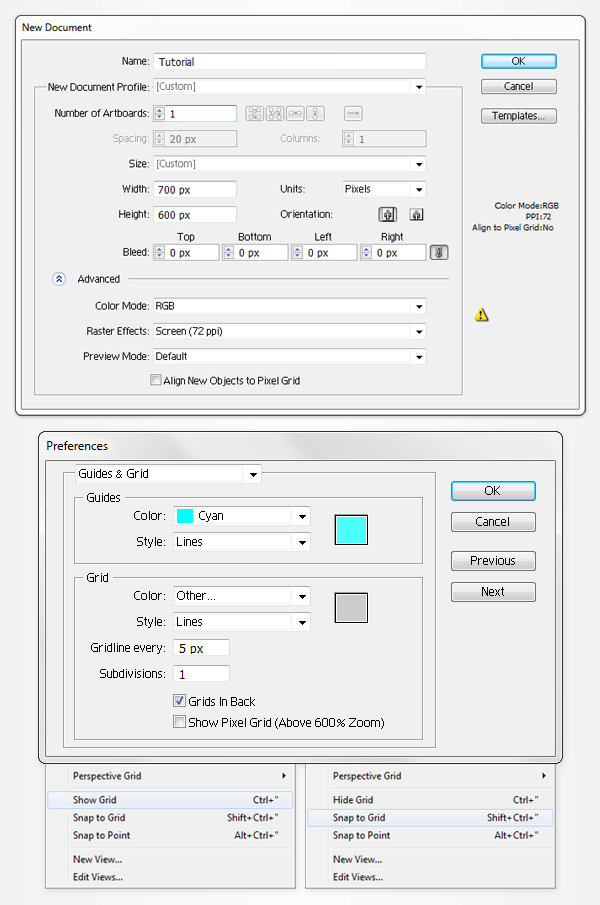
Hit Command + N to create a new document. Enter 700 in the width box and 600 in the height box, then click on the Advanced button. Select RGB, Screen (72ppi) and make sure that the "Align New Objects to Pixel Grid" box is unchecked before your click OK. Now, turn on the Grid (View > Grid) and the Snap to Grid (View > Snap to Grid).
Next, you’ll need a grid every 5px. Go to Edit > Preferences > Guides & Grid, enter 5 in the Gridline every box and 1 in the Subdivisions box. You can also open the Info panel (Window > Info) for a live preview with the size and position of your shapes.
Do not forget to set the unit of measurement to pixels from Edit > Preferences > Unit > General. All these options will significantly increase your work speed.
Step 2
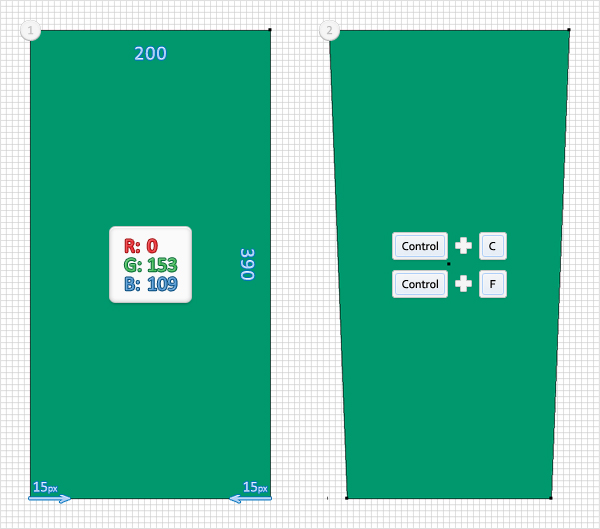
Pick the Rectangle Tool (M), create a 200 by 390px shape, fill it with R=0 G=153 B=109 and remove the color from the stroke. Switch to the Direct Selection Tool (A) and focus on the bottom anchor points.
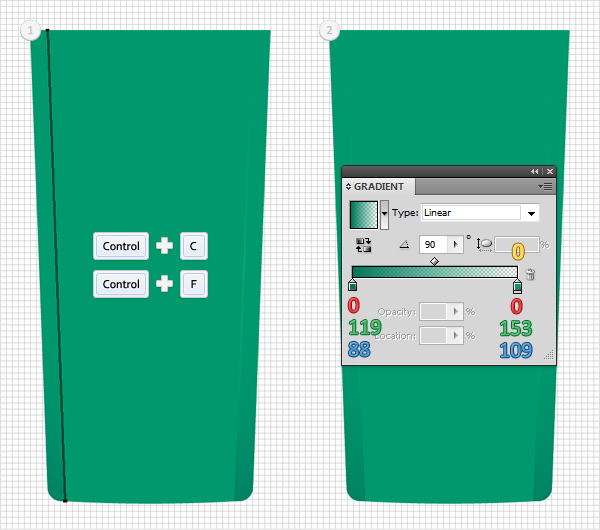
Select the left anchor point and move it 15px to the right, then select the right anchor points and move it 15px to the left. In the end your shape should look like the second image shown. Reselect it and make a copy in front (Command + C > Command + F).
Step 3
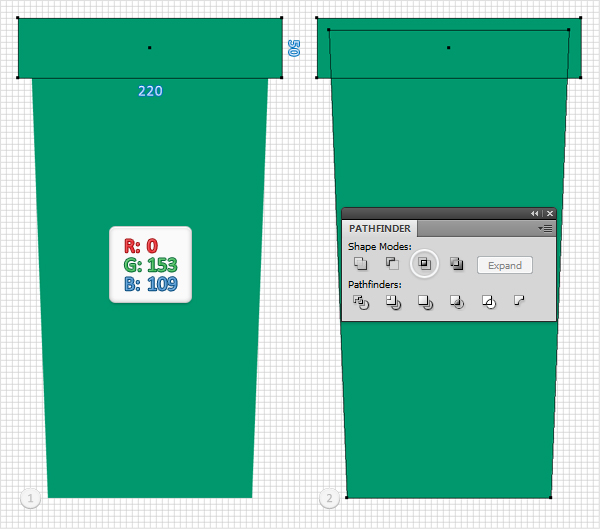
Pick the Rectangle Tool (M), create a 220 by 50px shape and place it as shown in the first image. Select this new shape, along with the copy created in the previous step, open the Pathfinder panel and click on the Intersect button.
Step 4
Reselect the shape created in the second step and go to Effect > Stylize > Rounded Corners. Enter a 10px radius, click OK and go to Effect > Warp > Arc Lower. Enter the data shown in the second image, click OK, and go to Object > Expand Appearance.
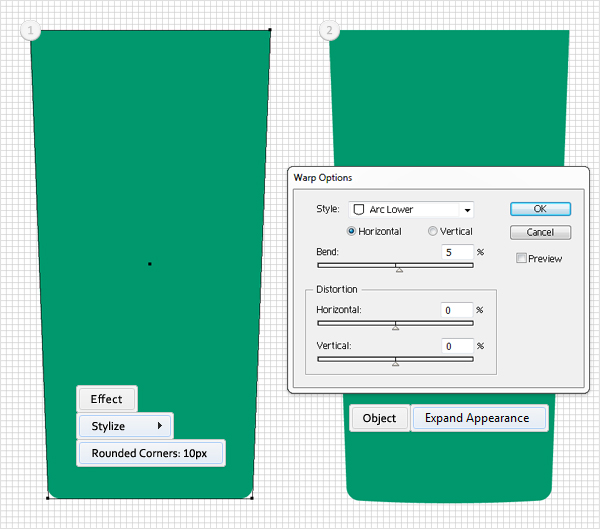
Step 5
Select the shape made in the previous step, along with the shape created in the third step, and click on the Unite button from the Pathfinder panel. Move to the Layers panel (Window > Layers), Double-click on the resulting shape, and name it "Body".
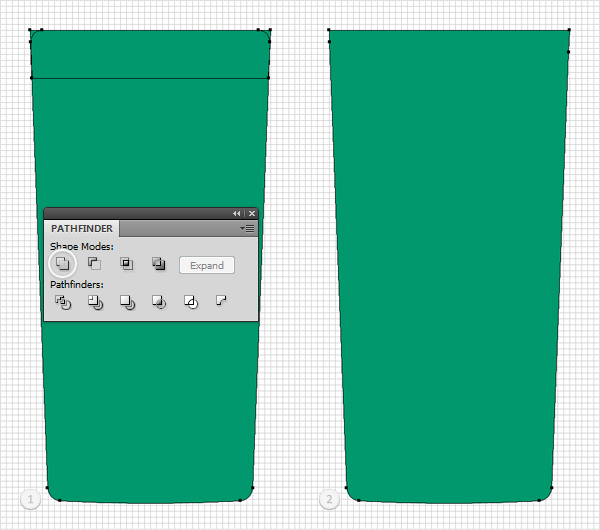
Step 6
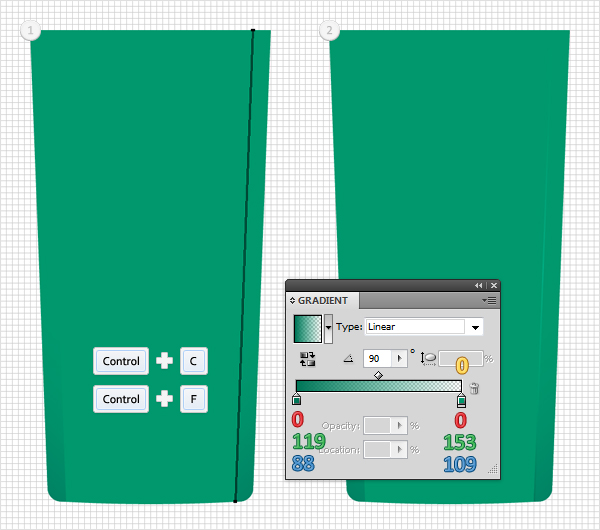
Pick the Pen Tool (P), draw two vertical paths (400px) and place them as shown in the first image. Add a discrete black stroke for these paths. Switch to the Direct Selection Tool (A) and focus on the left, vertical path. Select the bottom anchor point and move it 15px to the right.
Continue with the Direct Selection Tool (A) and focus on the right, vertical path. Select the bottom anchor point and move it 15px to the left. In the end your paths should look like the second image shown. Duplicate them (Command + C > Command + F). Move to the Layers panel, find these fresh copies and make them invisible. You’ll need them later.
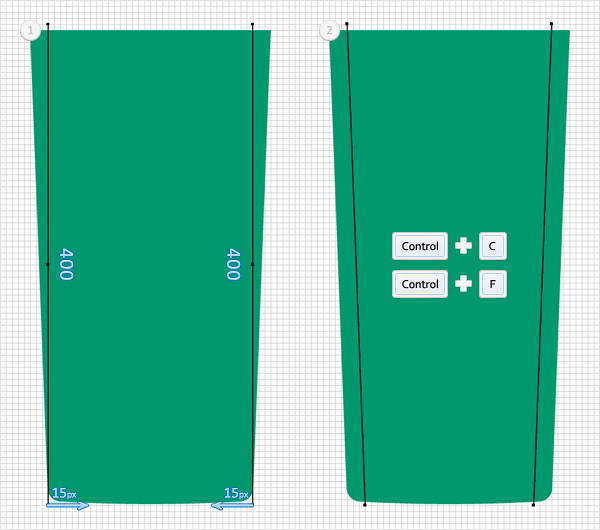
Step 7
Reselect "Body" and make a copy in front (Command + C > Command + F). Select this copy, along withe the visible paths created in the previous step, and click on the Divide button from the Pathfinder panel. Move to the Layers panel and you will find a group with three simple shapes. Ungroup them (Shift + Command + G) and delete the middle shape.
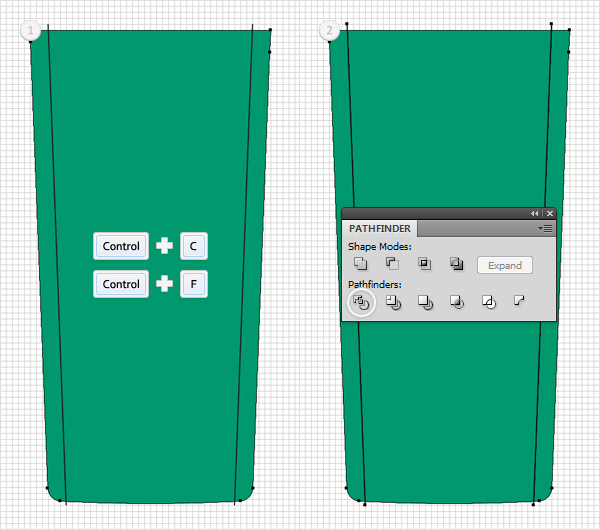
Step 8
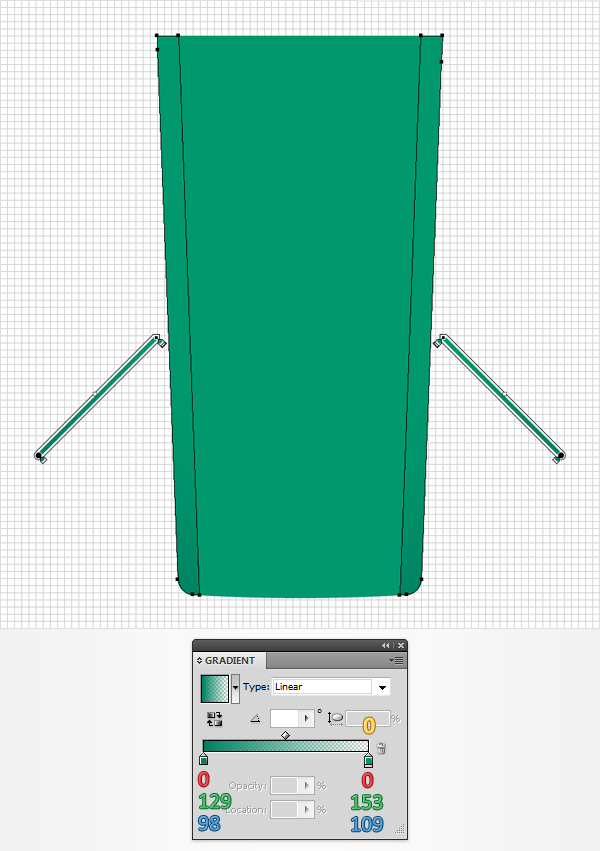
Focus on the two shapes created in the previous step and fill them with the linear gradient shown below. The yellow zero from the gradient image stands for Opacity percentage.
Step 9
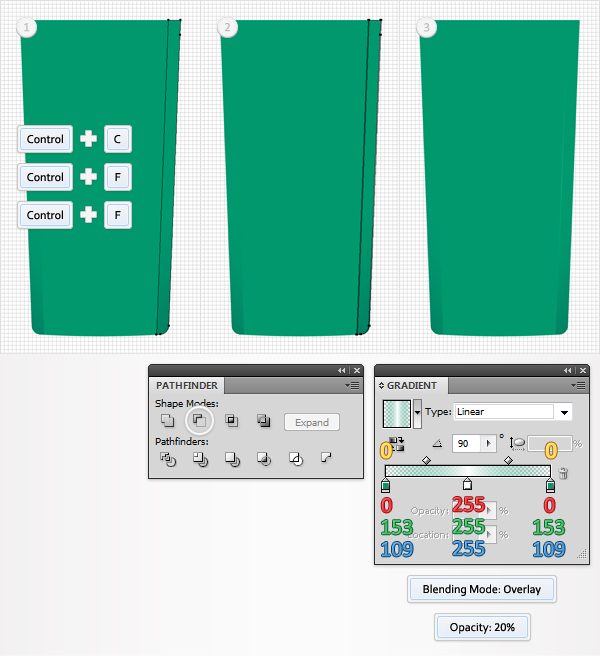
Disable the Snap to Grid (View > Snap to Grid), then go to Edit > Preferences > General, and make sure that the Keyboard Increment is set at 1px. Select the right shape edited in the previous step and make two copies in front (Command + C > Command + F > Command + F).
Select the top copy and hit the right arrow once (to move it 1px to the right). Reselect both copies and click on the Minus Front button from the Pathfinder panel. Fill the resulting shape with the linear gradient shown below, lower its Opacity to 20%, and change the blending mode to Overlay. Remember that the yellow zero from the gradient image stands for Opacity percentage.
Step 10
Reselect the shape created in the previous step and make a copy in front (Command + C > Command + F). Fill it with the linear gradient shown below, raise the Opacity to 100%, and change the blending mode to Normal.
Step 11
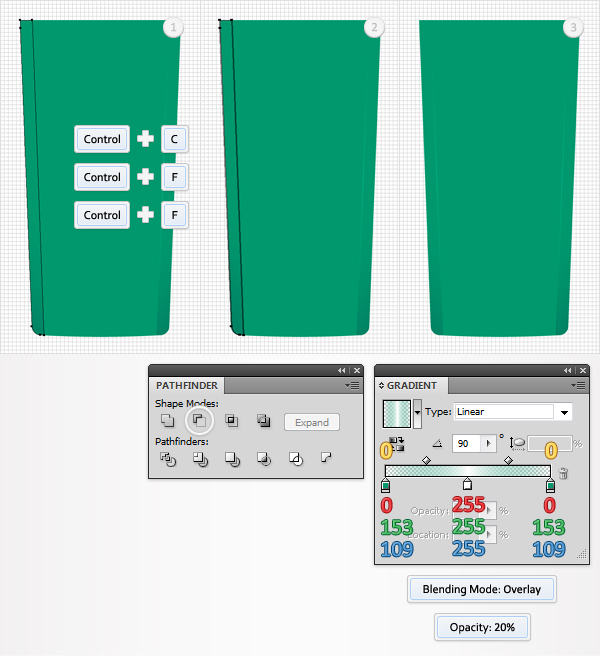
Select the left shape edited in the eighth step and make two copies in front (Command + C > Command + F > Command + F). Select the top copy and hit the left arrow once (to move it 1px to the left). Reselect both copies and click on the Minus Front button from the Pathfinder panel. Fill the resulting shape with the linear gradient shown below, lower its Opacity to 20%, and change the blending mode to Overlay.
Step 12
Reselect the shape created in the previous step and make a copy in front (Command + C > Command + F). Fill it with the linear gradient shown below, raise the Opacity to 100%, and change the blending mode to Normal.
Step 13
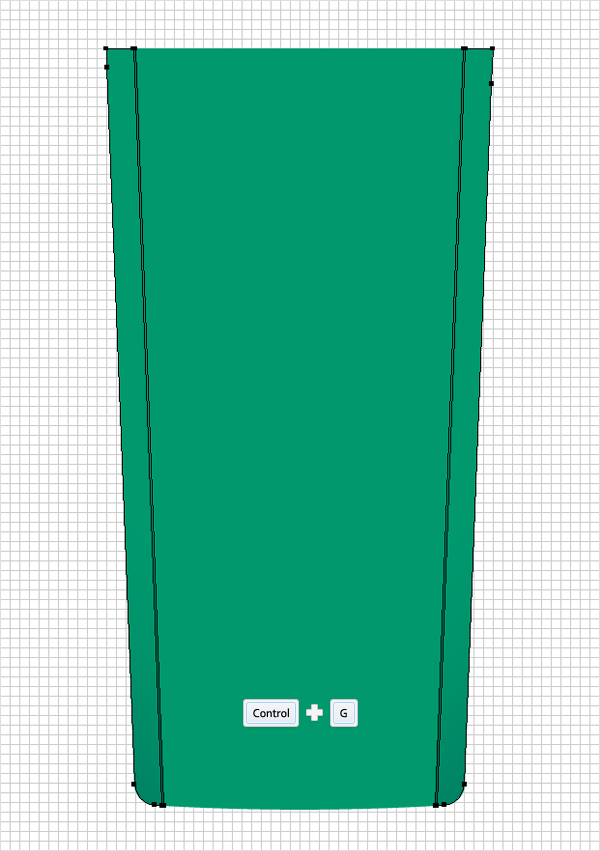
Select all the shape created and edited in the last six steps and group them (Command + G).
Step 14
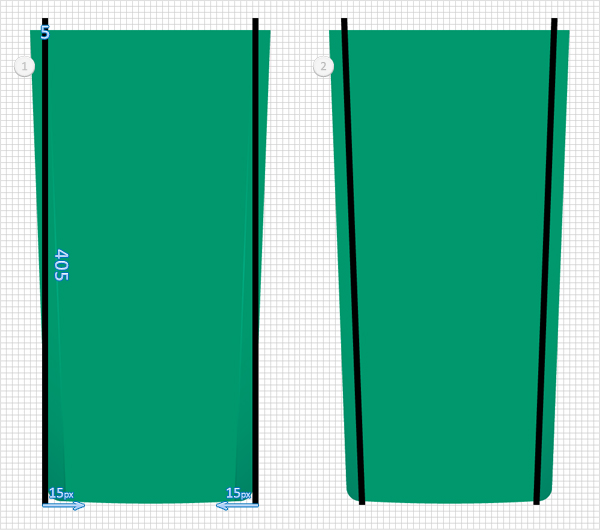
Re-enable the Snap to Grid (View > Snap to Grid). Pick the Rectangle Tool (M), create two, 5 by 405px shapes, and place them as shown in the first image. Switch to the Direct Selection Tool (A) and focus on the left shape.
Select the bottom anchor points and move them 15px to the right. Continue with the Direct Selection Tool (A) and focus on the right path. Select the bottom anchor point and move them 15px to the left. In the end your shapes should look like the second image shown.
Step 15
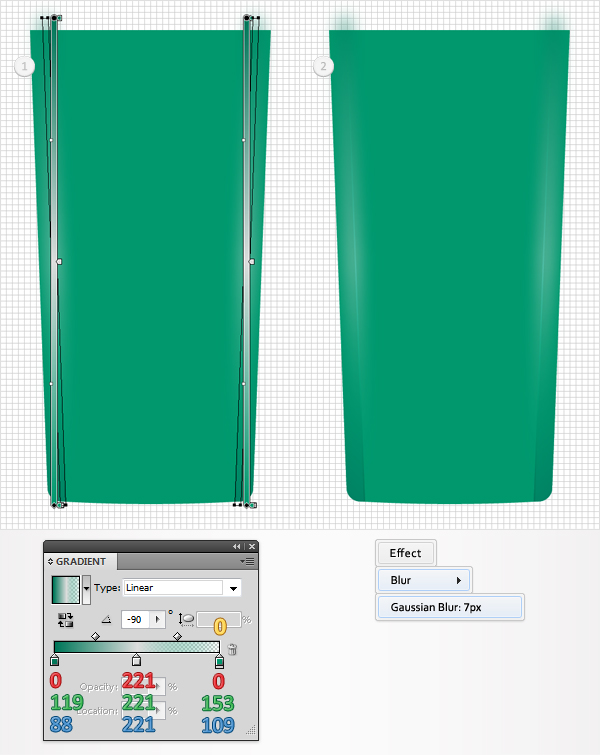
Reselect the two shapes created in the previous step, fill them with the linear gradient shown below, and go to Effect > Blur > Gaussian Blur. Enter a 7px radius and click OK.
Step 16
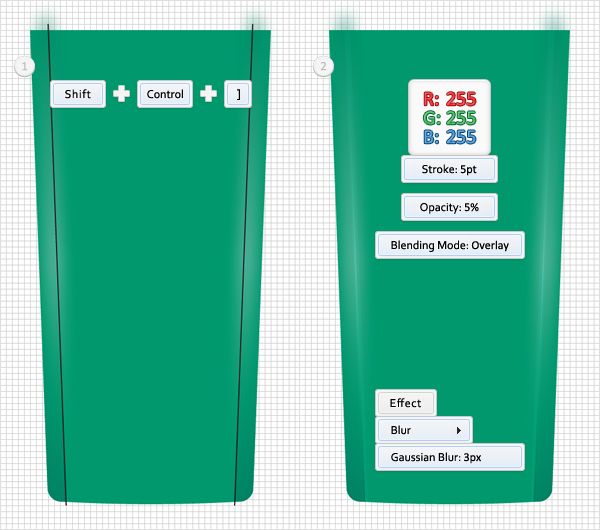
Move to the Layers panel and find the invisible paths created in the sixth step. Make them visible and bring them to front (Shift + Command + ] ). Add a 5pt, white stroke for these paths, lower the Opacity to 5%, change the blending mode to Overlay, and go to Effect > Blur > Gaussian Blur. Enter a 3px radius and click OK.
Step 17
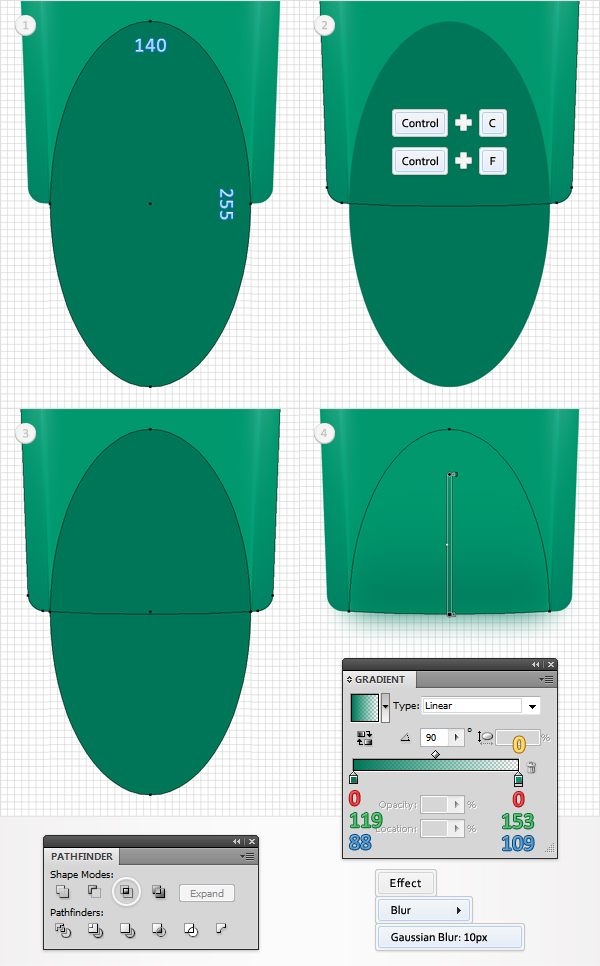
Pick the Ellipse Tool (L), create a 140 by 255px shape, and place it as shown in the first image. Reselect "Body" and make a copy in front (Command + C > Command + F). Select this copy, along with the new shape, and click on the Intersect button from the Pathfinder panel. Fill the resulting shape with the linear gradient shown below and go to Effect > Blur > Gaussian Blur. Enter a 10px radius and click OK.
Step 18
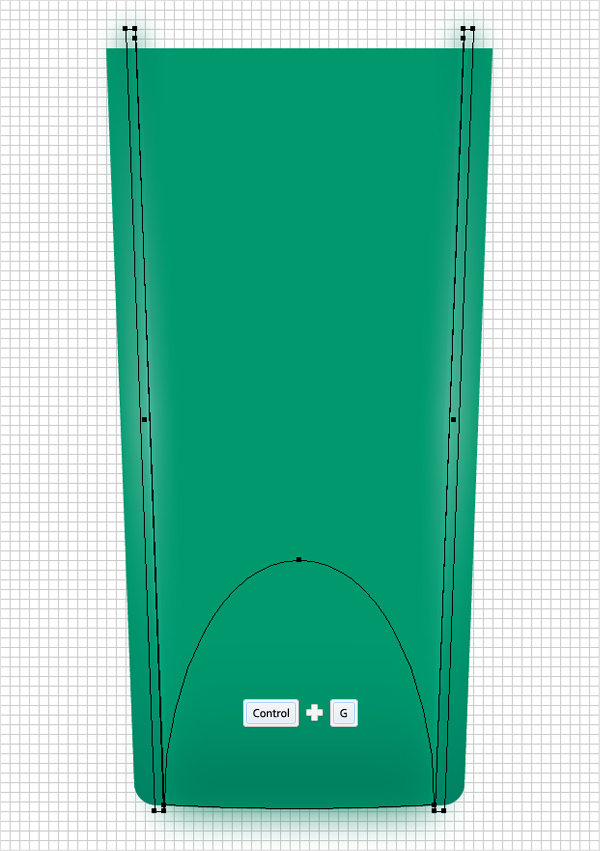
Select all the shapes created and edited in the last four steps and group them (Command + G).
Step 19
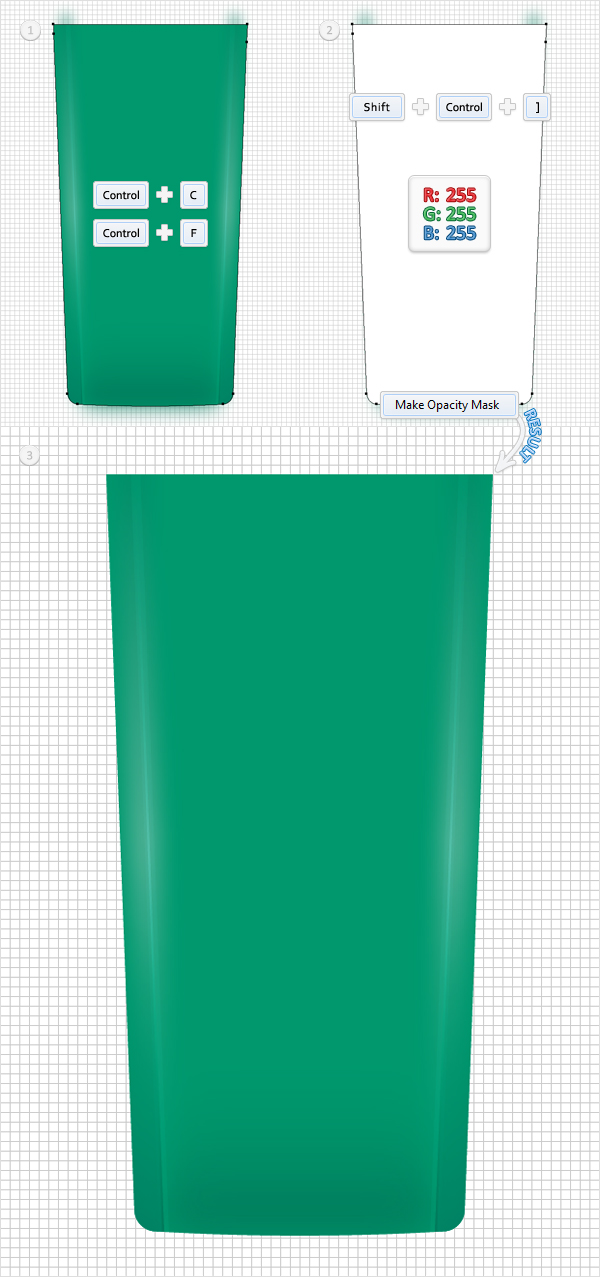
Next, you need to mask the group created in the previous step. Select "Body" and make a copy in front (Command + C > Command + F). Fill it with white, bring it to front (Shift + Command + ] ) and open the Transparency panel.
Select this white shape, along with the group created in the previous step, open the fly-out menu of the Transparency panel, and click on Make Opacity Mask. In the end your masked group should look like the third image shown.
Step 20
Disable the Snap to Grid (View > Snap to Grid). Reselect "Body" and make two copies in front (Command + C > Command + F > Command + F). Select the top copy and hit the up arrow twice. Reselect both copies and click on the Minus Front button from the Pathfinder panel. Now fill the resulting shape with R=0, G=119, B=88. And bring it to front (Shift + Command + ] ).
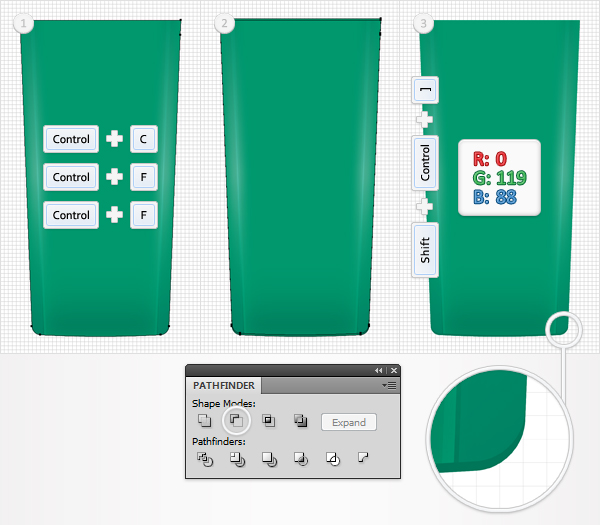
Step 21
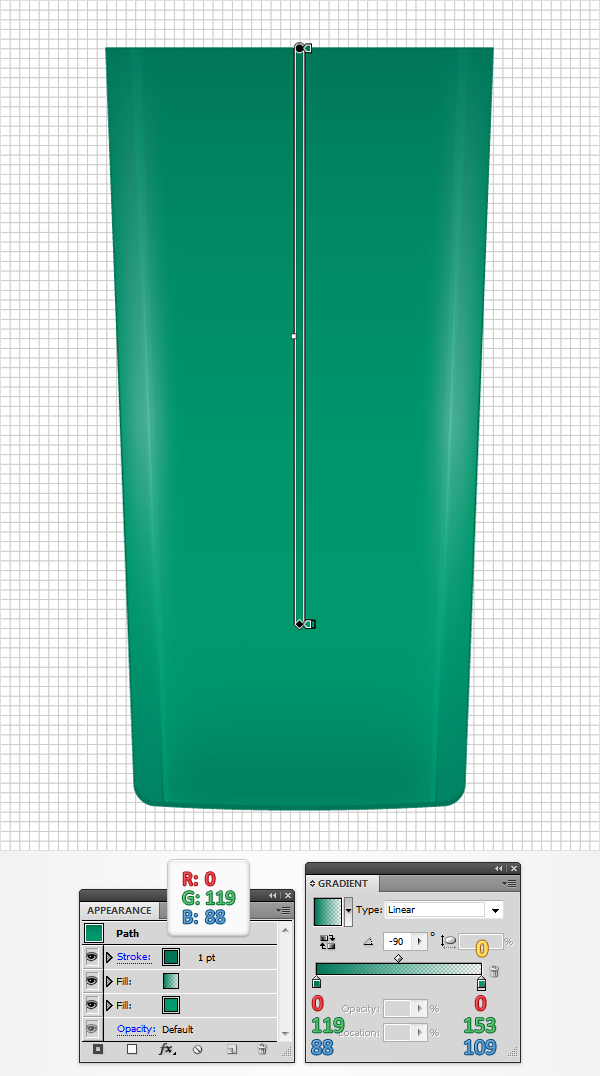
Reselect "Body" add a 1pt stroke. Set its color to R=0, G=119, B=88. Make sure that this shape is still selected, move to the Appearance panel, and add a new fill using the Add New Fill button. It’s the little, white square icon located at the bottom of the Appearance panel. Select this new fill and use the linear gradient shown below.
Step 22
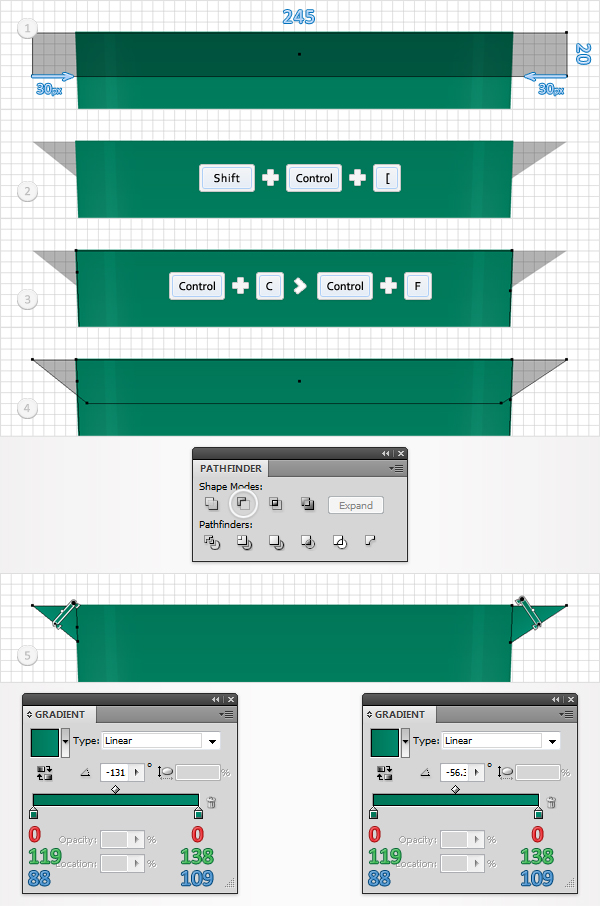
Re-enable the Snap to Grid (View > Snap to Grid). Pick the Rectangle Tool (M), create a 245 by 20px shape and place it as shown in the first image. Switch to the Direct Selection Tool (A) and focus on the bottom anchor points. Select the left anchor point and move it 30px to the right, then select the right anchor points and move it 30px to the left.
Now your shape should look like a trapezoid. Select it and send it to back (Shift + Command + [ ). Reselect "Body" and make a copy in front (Command + C > Command + F). Select this copy, along with the trapezoid shape, and click on the Minus Front button from the Pathfinder panel. This will create a group with two triangle shapes. Fill them with the linear gradients shown below.
Step 23
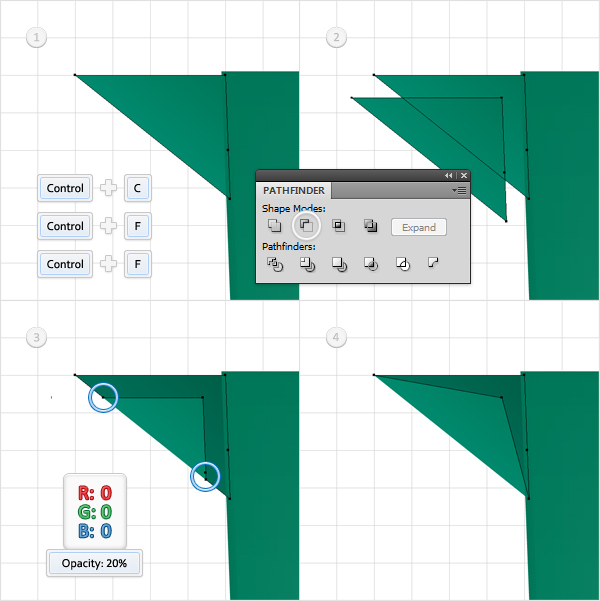
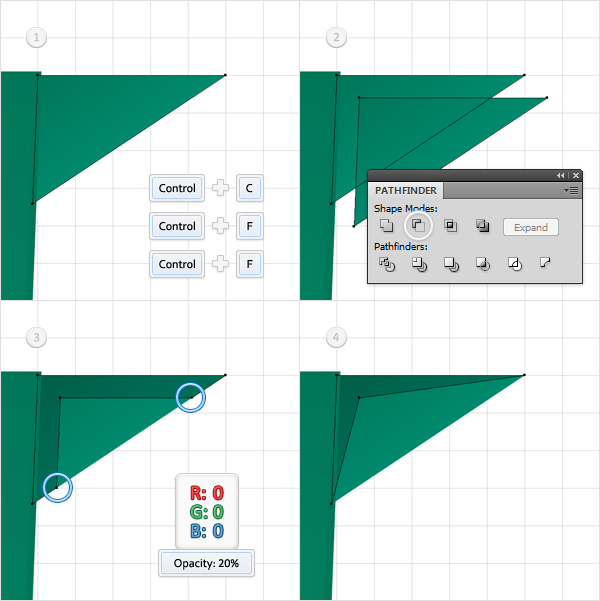
Disable the Snap to Grid (View > Snap to Grid) and focus on the left triangle created in the previous step. Select it and make two copies in front (Command + C > Command + F > Command + F). Select the top copy and hit the down arrow and the left arrow three times.
Reselect both copies and click on the Minus Front button from the Pathfinder panel. Fill the resulting shape with black and lower its Opacity to 20%. Switch to the Delete Anchor Point Tool(-) and click on the three anchor points highlighted in the third image. In the end your shape should look like the fourth image shown.
Step 24
Focus on the right triangle created in the previous step. Select it and make two copies in front (Command + C > Command + F > Command + F). Select the top copy and hit the down arrow and the right arrow three times. Reselect both copies and click on the Minus Front button from the Pathfinder panel.
Fill the resulting shape with black and lower its Opacity to 20%. Switch to the Delete Anchor Point Tool(-) and click on the three anchor points highlighted in the third image. In the end your shape should look like the fourth image shown.
Step 25
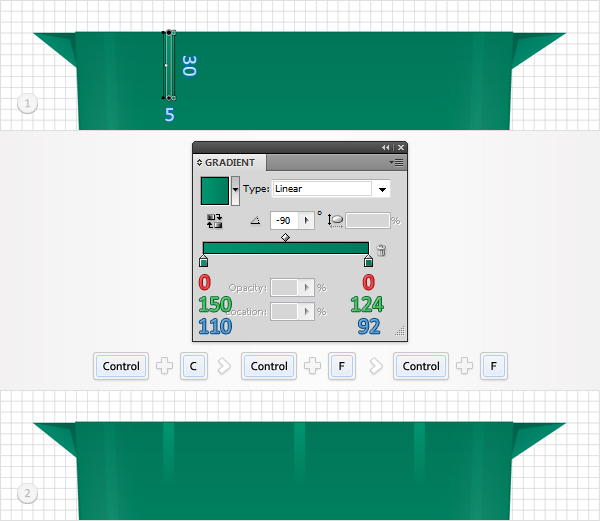
Re-enable the Snap to Grid (View > Snap to Grid). Pick the Rectangle Tool (M) and create a 5 by 30px shape. Fill it with the linear gradient shown below and place it as shown in the first image. Make two copies of this shape and place them as shown in the second image.
Step 26
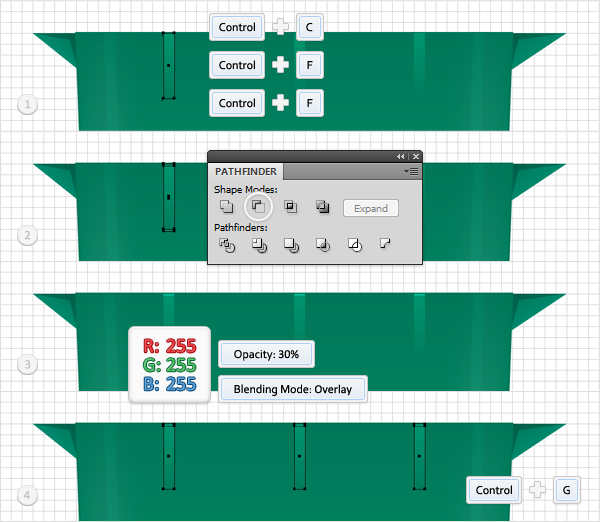
Disable the Snap to Grid (View > Snap to Grid). Select the first shape created in the previous step and make two copies in front (Command + C > Command + F > Command + F). Select the top copy and hit the down arrow once. Reselect both copies and click on the Minus Front button from the Pathfinder panel.
Fill the resulting shape with white, lower its Opacity to 30%, and change the blending mode to Overlay. Repeat this technique for the other two shapes created in the previous step. Select the shapes created in this step, along with the shapes created in the previous step, and group them (Command + G).
Step 27
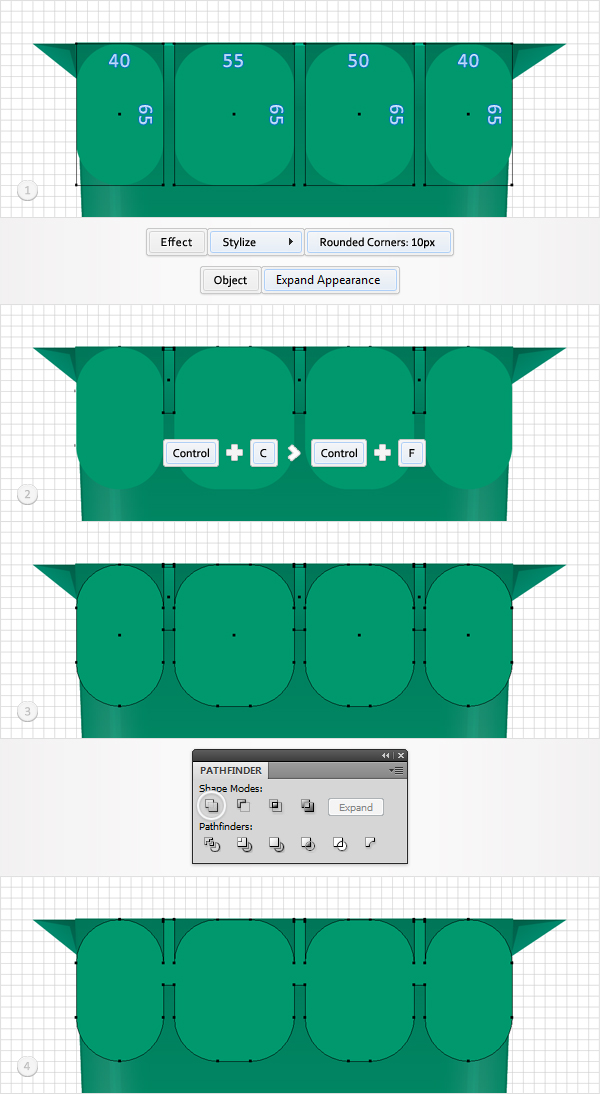
Re-enable the Snap to Grid (View > Snap to Grid). Pick the Rectangle Tool (M), create the four new shapes (use the dimensions mentioned in the first image), and place them as shown in the first image. Fill them with a random color and go to Effect > Stylize > Rounded Corners. Enter a 10px radius, click OK, and go to Object > Expand Appearance.
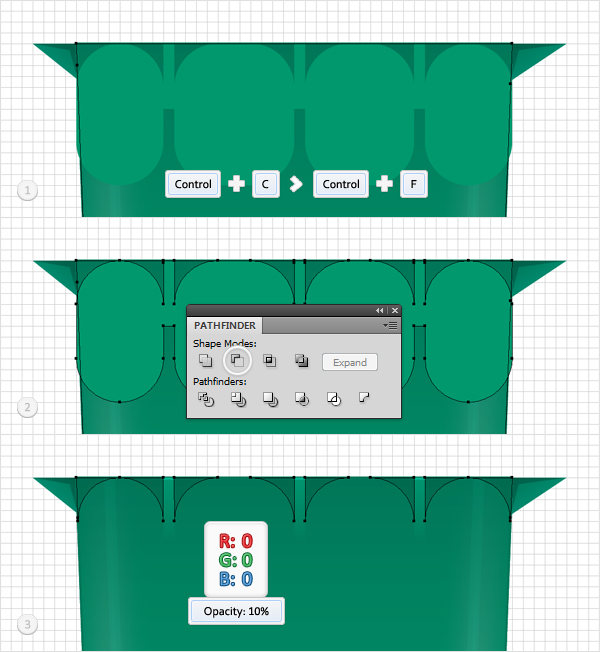
Select the group created in the previous step and duplicate it (Command + C > Command + F). Select this group copy, along with the four, rounded rectangles and click on the Unite button from the Pathfinder panel. The resulting shape should look like the fourth image shown.
Step 28
Reselect "Body" and make a copy in front (Command + C > Command + F). Select this copy, along with the shape created in the previous step, and click on the Minus Front button from the Pathfinder panel.
Move to the Layers panel and you will find a new group with a bunch of shapes. Open it, delete the largest shape, then fill the remaining shapes with black, and lower their Opacity to 10%.
Step 29
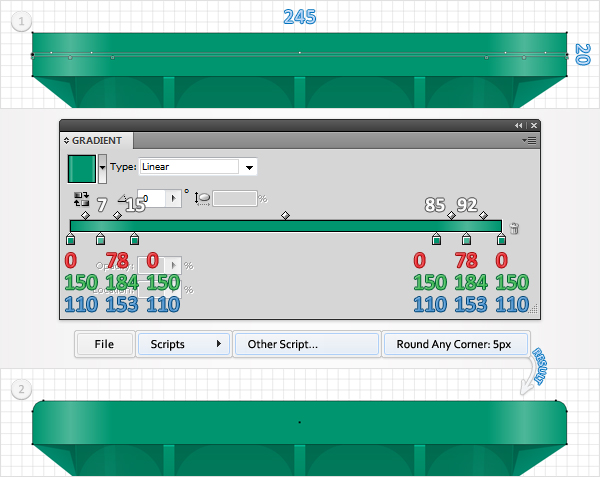
Re-enable the Snap to Grid (View > Snap to Grid). Pick the Rectangle Tool (M), create a 245 by 20px shape, fill it with the linear gradient shown below, and place it as shown in the first image.
Next, you need to add a bit of roundness for this shape. Use the Round Any Corner script. You can find it in the Vectortuts+ article 20 Free and Useful Adobe Illustrator Scripts. Save it to your hard drive, return to Illustrator, and grab the Direct Selection Tool (A).
Select the top anchor points and go to File > Scripts > Other Script. Open the Round Any Corner Script, enter a 5px Radius, and click OK. In the end your shapes should look like the second image shown.
Step 30
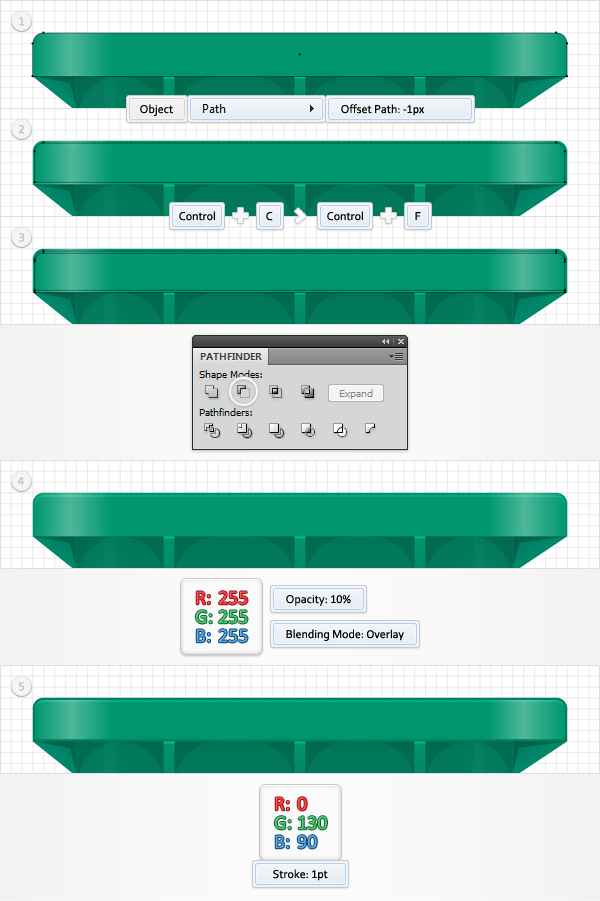
Disable the Snap to Grid (View > Snap to Grid). Reselect the shape created in the previous step and go to Object > Path > Offset Path. Enter a -1px Offset and click OK. Select the resulting shape and make a copy in front (Command + C > Command + F). Select this copy and move it 1px down.
Reselect the two shapes created so far and click on the Minus Front button from the Pathfinder panel. Fill the resulting shape with white, lower its Opacity to 10% and change the blending mode to Overlay. Reselect the shape created in the previous step, add a 1pt stroke, set its color at R=0, G=130, B=90, and align it to inside.
Step 31
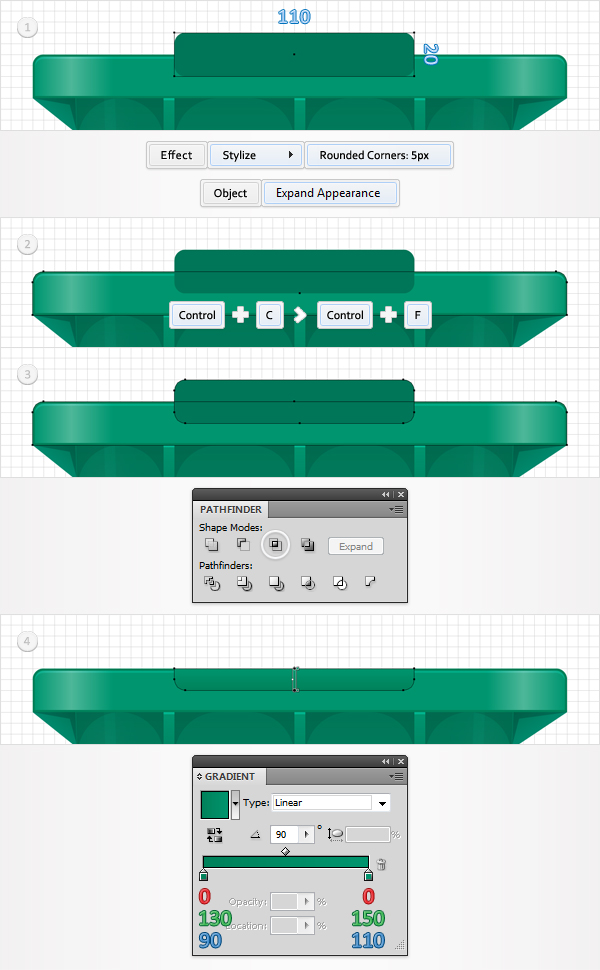
Re-enable the Snap to Grid (View > Snap to Grid). Pick the Rectangle Tool (M), create a 110 by 20px shape, place it as shown in the first image and go to Effect > Stylize > Rounded Corners. Enter a 5px radius, click OK and go to Object > Expand Appearance.
Reselect the shape created in step 29 and make a copy in front (Command + C > Command + F). Select it, along with the new, rounded rectangle and click on the Intersect button from the Pathfinder panel. Fill the resulting shape with the linear gradient shown in the final image.
Step 32
Disable the Snap to Grid (View > Snap to Grid). Reselect the shape created in the previous step and make two copies in front (Command + C > Command + F > Command + F). Select the top copy and hit the down arrow once. Reselect both copies and click on the Minus Front button from the Pathfinder panel. Fill the resulting shape with R=0, G=130, B=90.
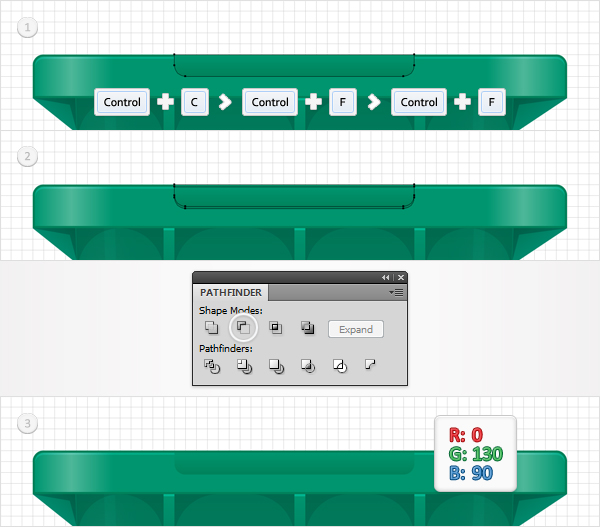
Step 33
Reselect the shape created in step 31 and make two copies in front (Command + C > Command + F > Command + F). Select the bottom copy and hit the down arrow once. Reselect both copies and click on the Minus Front button from the Pathfinder panel. Fill the resulting shape with white, lower its Opacity to 30%, and change the blending mode to Overlay.
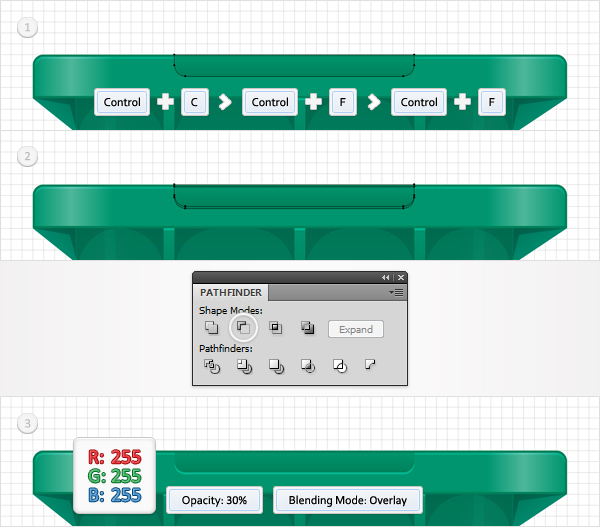
Step 34
Select all the shapes created in the last five steps and group them (Command + G).

Step 35
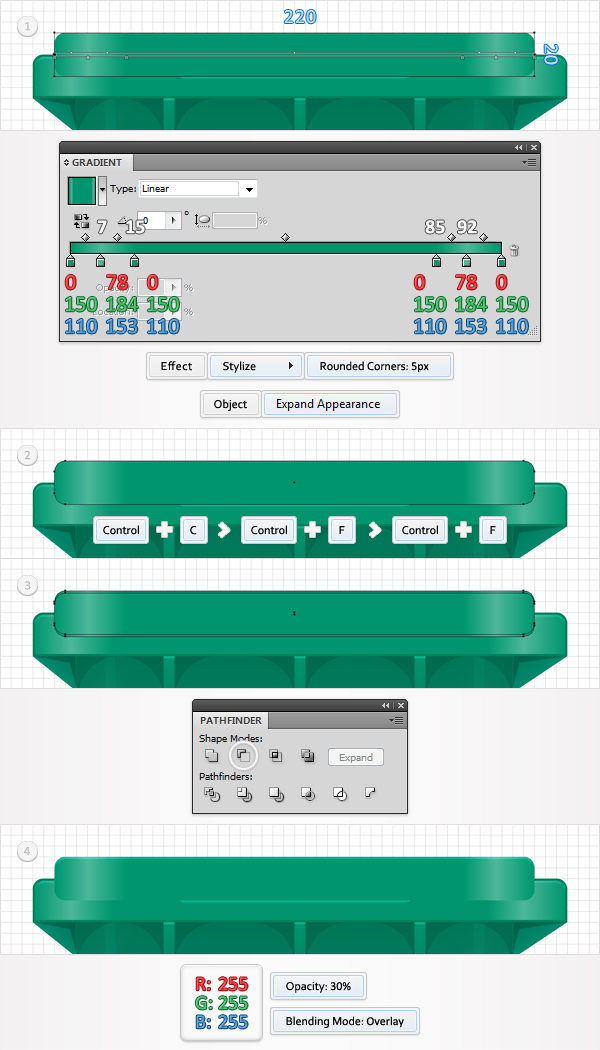
Re-enable the Snap to Grid (View > Snap to Grid). Pick the Rectangle Tool (M) and create a 220 by 20px shape. Fill it with the linear gradient shown below, place it as show in the following image, and go to Effect > Stylize > Rounded Corners. Enter a 5px radius, click OK, and go to Object > Expand Appearance.
Select the resulting shape, make two copies in front (Command + C > Command + F > Command + F), and disable the Snap to Grid (View > Snap to Grid). Select the top copy and hit the down arrow once. Reselect both copies and click on the Minus Front button from the Pathfinder panel. Fill the resulting shape with white, lower its Opacity to 30%, and change its blending mode to Overlay.
Step 36
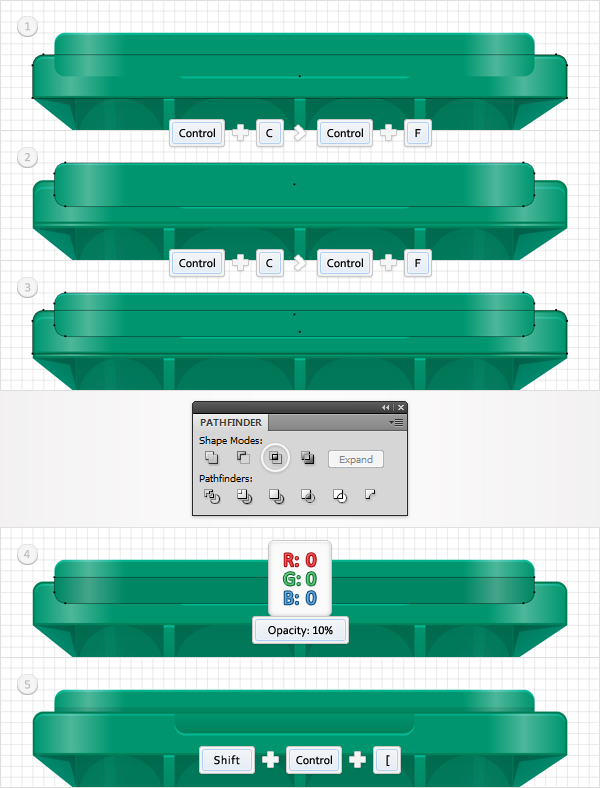
Disable the Snap to Grid (View > Snap to Grid). Select the largest shape from the group created in step 34, make a copy in front (Command + C > Command + F), and move it two pixels up. Reselect the rounded rectangle created in the previous step and make a copy in front (Command + C > Command + F).
Select these two copies and click on the Intersect button from the Pathfinder panel. Fill the resulting shape with black and lower its Opacity to 10%. Select it, along with the shapes created in the previous step, and send them to back (Shift + Command + [ ).
Step 37
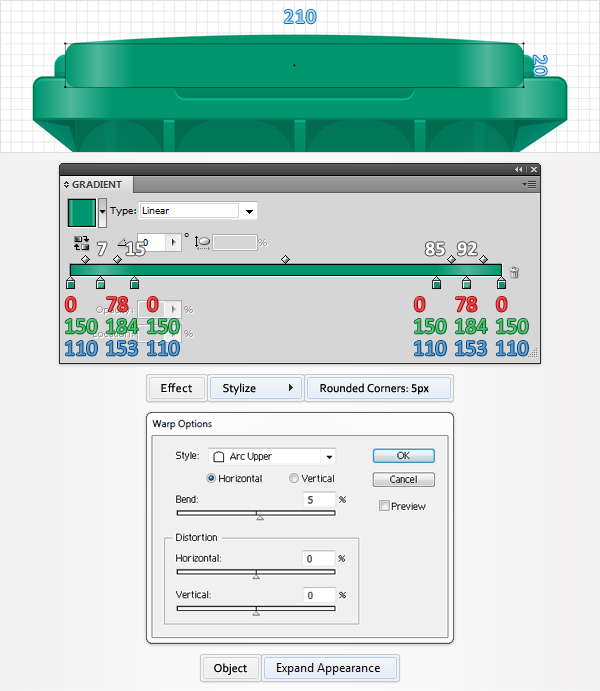
Re-enable the Snap to Grid (View > Snap to Grid). Pick the Rectangle Tool (M) and create a 210 by 20px shape. Fill it with the linear gradient shown below, place it as show in the following image, and go to Effect > Stylize > Rounded Corners. Enter a 5px radius, click OK, and go to Effect > Warp > Arc Upper. Enter the data shown below, click OK and go to Object > Expand Appearance.
Step 38
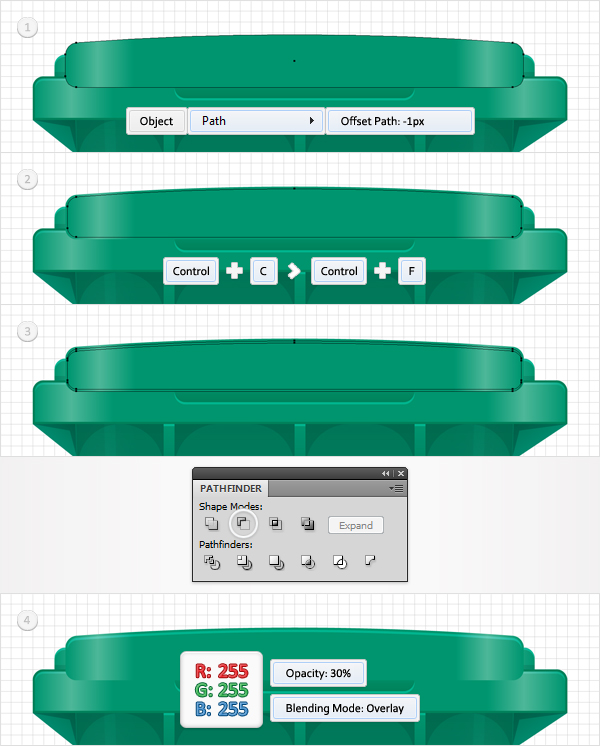
Disable the Snap to Grid (View > Snap to Grid). Reselect the shape created in the previous step and go to Object > Path > Offset Path. Enter a -1px Offset and click OK. Select the resulting shape and make a copy in front (Command + C > Command + F).
Select this copy and move it 1px down. Reselect the two shapes created so far and click on the Minus Front button from the Pathfinder panel. Fill the resulting shape with white, lower its opacity to 30%, and change the blending mode to Overlay.
Step 39
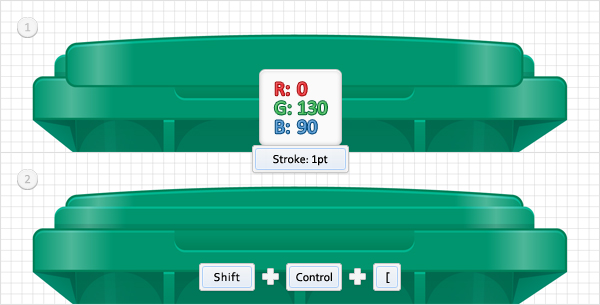
Reselect the shape created in step 37 and add a 1pt stroke. Set its color at R=0, G=130, B=90, and align it to inside. Select the shapes created and edited in the last two steps and send them to back (Shift + Command + [ ).
Step 40
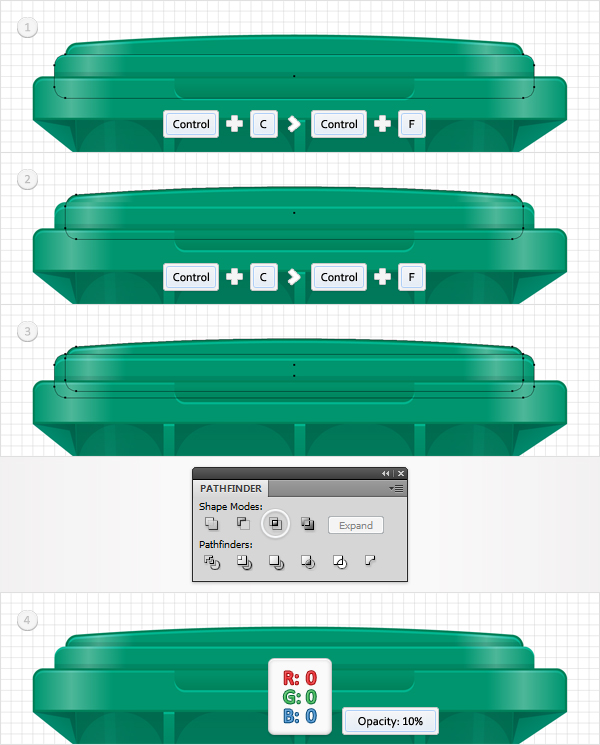
Select the rounded rectangle created in step 35, make a copy in front (Command + C > Command + F), and move it two pixels up. Reselect the shape created in step 37 and make a new copy in front (Command + C > Command + F). Select these two copies and click on the Intersect button from the Pathfinder panel. Fill the resulting shape with black and lower its Opacity to 10%.
Step 41
Select all the shapes created in the last six steps and group them (Command + G). Select the rounded rectangle created in step 35, make a copy in front (Command + C > Command + F), and send it to back (Shift + Command + [ ). Fill it with none and add a 1pt stroke. Set its color at R=0, G=130, B=90, and align it to outside.
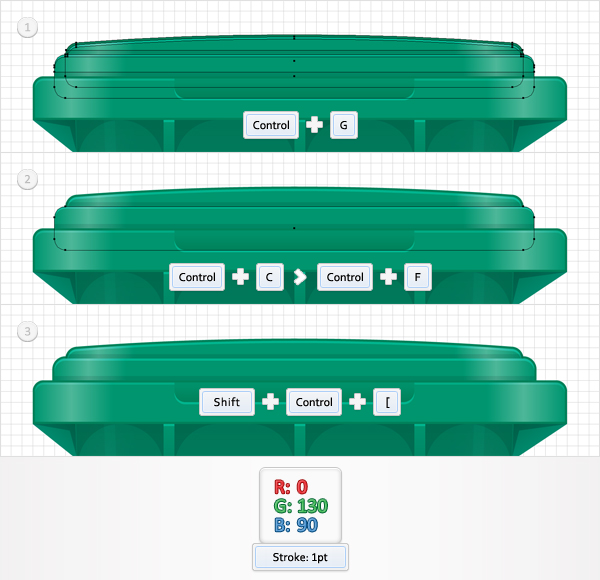
Step 42
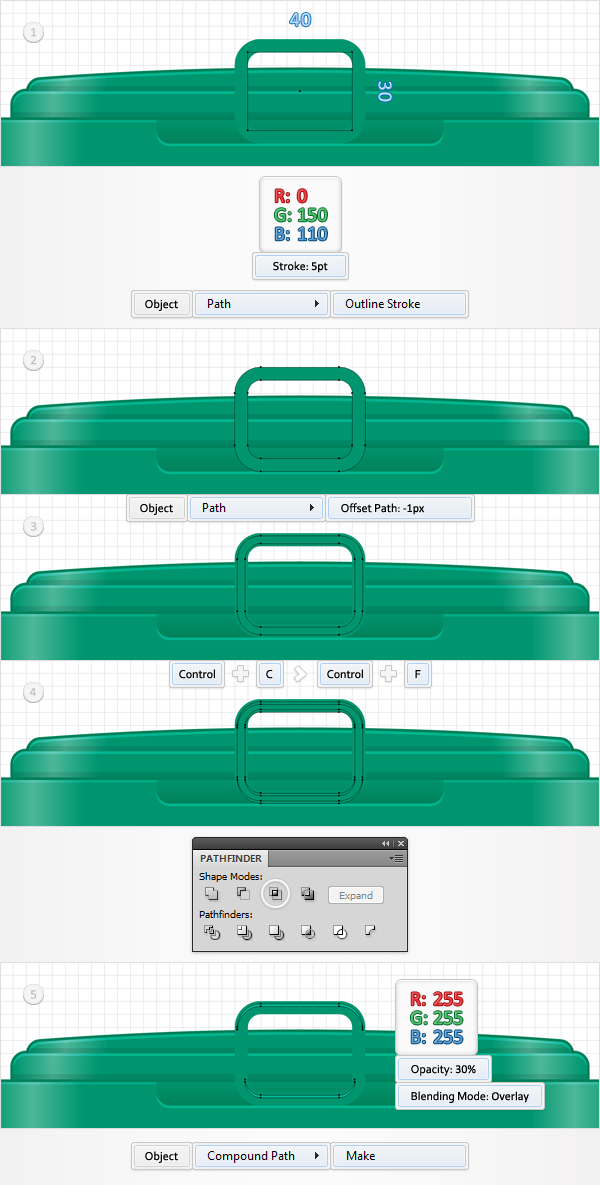
Re-enable the Snap to Grid (View > Snap to Grid). Pick the Rectangle Tool (M) and create a 40 by 30px shape. Fill it with none and add a 5pt stroke. Set its color at R=0, G=150, B=110, align it to outside, and go to Effect > Stylize > Rounded Corners. Enter a 5px radius, click OK, and go to Object > Path > Outline Stroke.
Disable the Snap to Grid (View > Snap to Grid), select the resulting shape, and go to Object > Path > Offset Path. Enter a -1px Offset and click OK. Select the resulting shape and make a copy in front (Command + C > Command + F). Select this copy and move it 1px down. Reselect these two smaller shapes and click on the Minus Front button from the Pathfinder panel.
Turn the resulting group of shapes into a compound path (Object > Compound Path > Make), fill it with white, lower the Opacity to 30%, and change the blending mode to Overlay.
Step 43
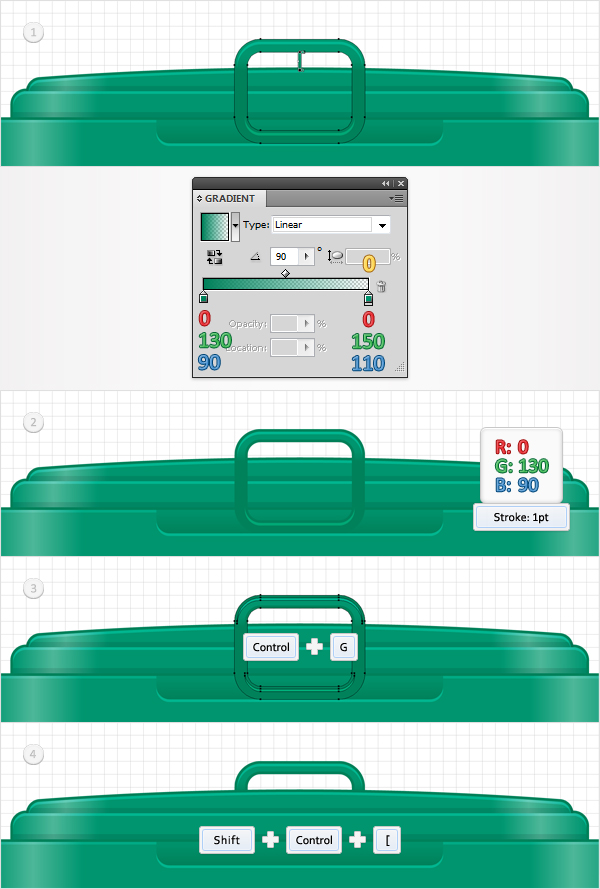
Reselect the first shape created in the previous step, add a new fill, and use the linear gradient shown below. Keep focusing on this shape, add a 1pt stroke, set its color at R=0, G=130, B=90, and align it to inside. Select this shape, along with the compound path created in the previous step, and group them (Command + G). Send this group to back (Shift + Command + [ ).
Step 44
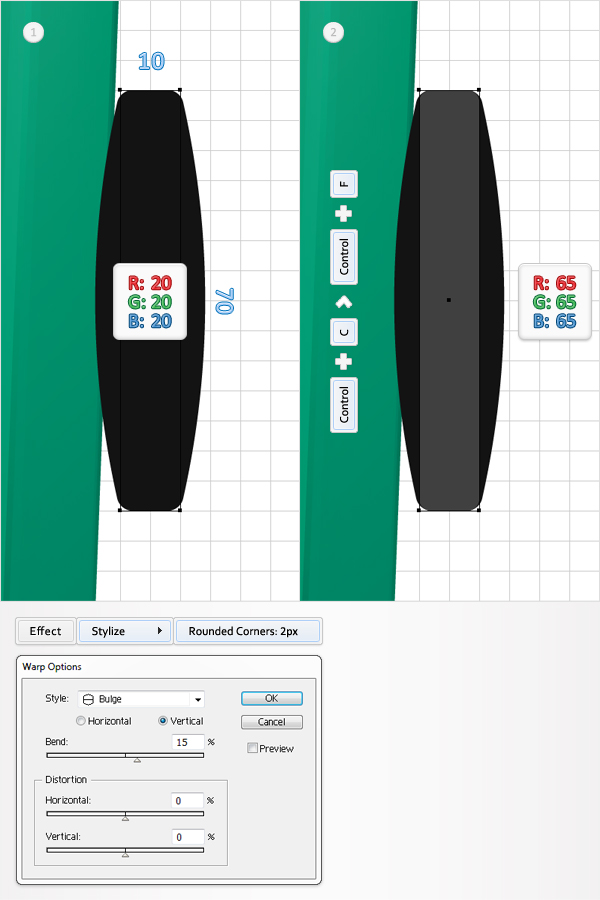
Re-enable the Snap to Grid (View > Snap to Grid). Pick the Rectangle Tool (M) and create a 10 by 70px shape. Fill it with R=20, G=20, B=20, place it as shown in the first image, and go to Effect > Stylize > Rounded Corners. Enter a 2px radius, click OK, and go to Effect > Warp > Bulge. Enter the data shown below and click OK.
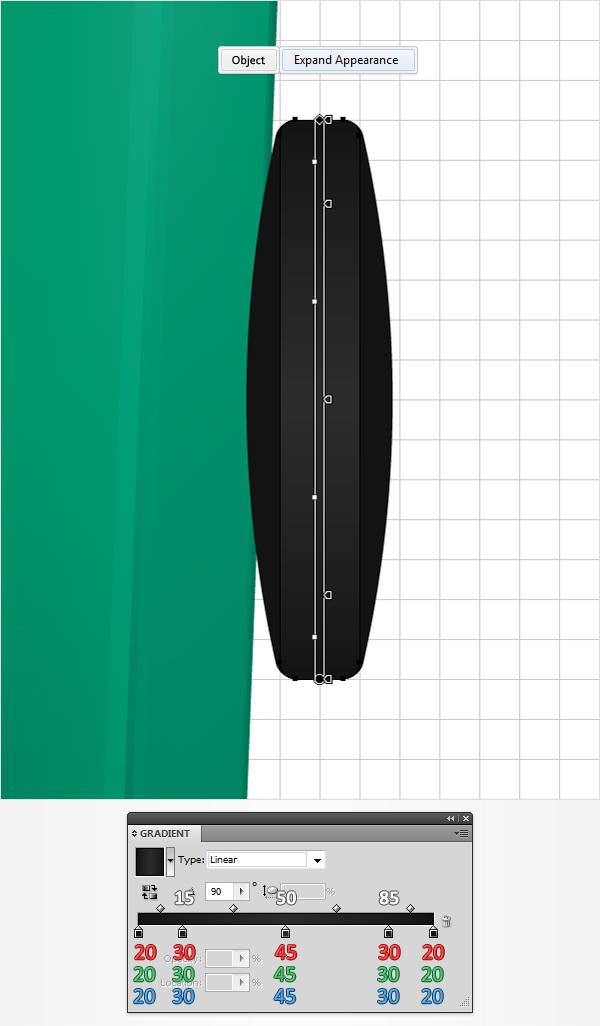
Now, your shape should look like the first image shown. Select it and make a copy in front (Command + C > Command + F). Fill this copy with R=65, G=65, B=65, move to the Appearance panel, and delete the Warp effect.
Step 45
Select the second shape created in the previous step and go to Object > Expand Appearance. Fill the resulting shape with the linear gradient shown below. The white numbers from the gradient image stand for Location percentage.
Step 46
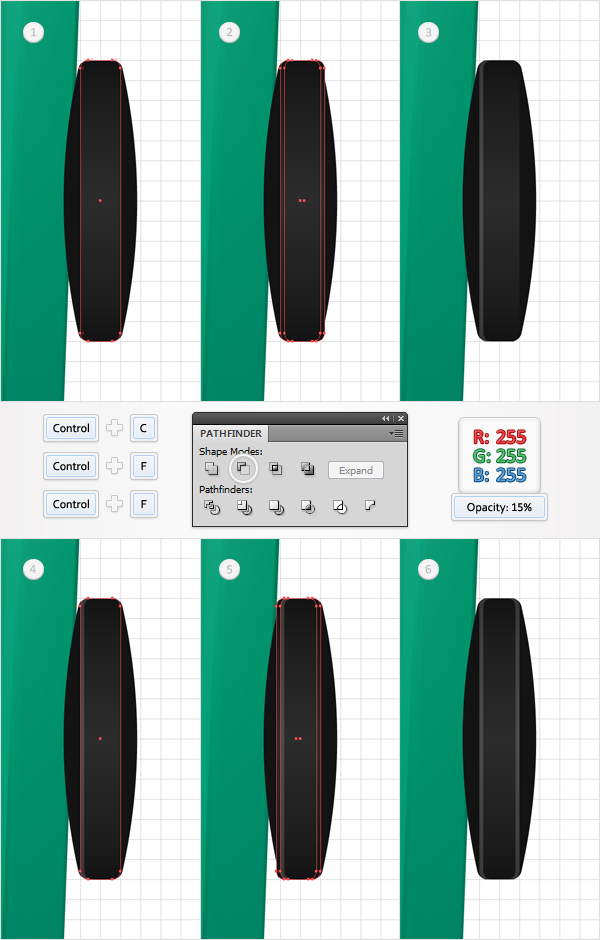
Disable the Snap to Grid (View > Snap to Grid). Select the shape edited in the previous step and make two copies in front (Command + C > Command + F > Command + F). Select the top copy and move it 1px to the right. Reselect both copies and click on the Minus Front button from the Pathfinder panel.
Fill the resulting shape with white and lower its Opacity to 15%. Again, select the shape edited in the previous step and make two new copies in front (Command + C > Command + F > Command + F). Select the top copy and move it 1px to the left. Reselect both copies and click on the Minus Front button from the Pathfinder panel. Again, fill the resulting shape with white and lower its Opacity to 15%.
Step 47
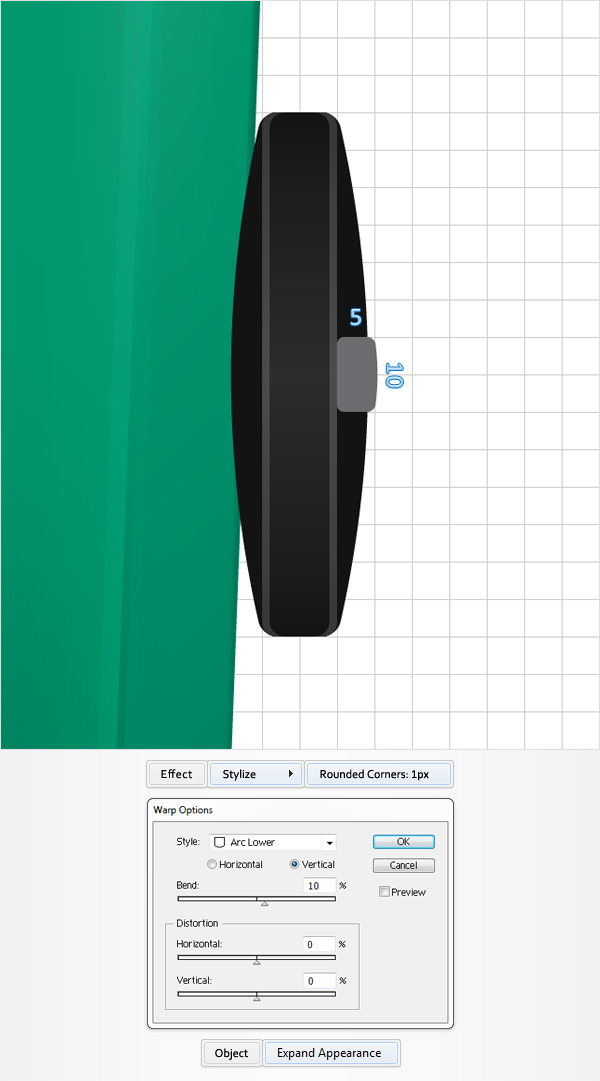
Re-enable the Snap to Grid (View > Snap to Grid). Pick the Rectangle Tool (M), create a 5 by 10px shape, and place it as shown in the following image. Select this new shape and go to Effect > Stylize > Rounded Corners. Enter a 1px radius, click OK, and go to Effect > Warp > Arc Lower. Enter the data shown below, click OK, and go to Object > Expand Appearance.
Step 48
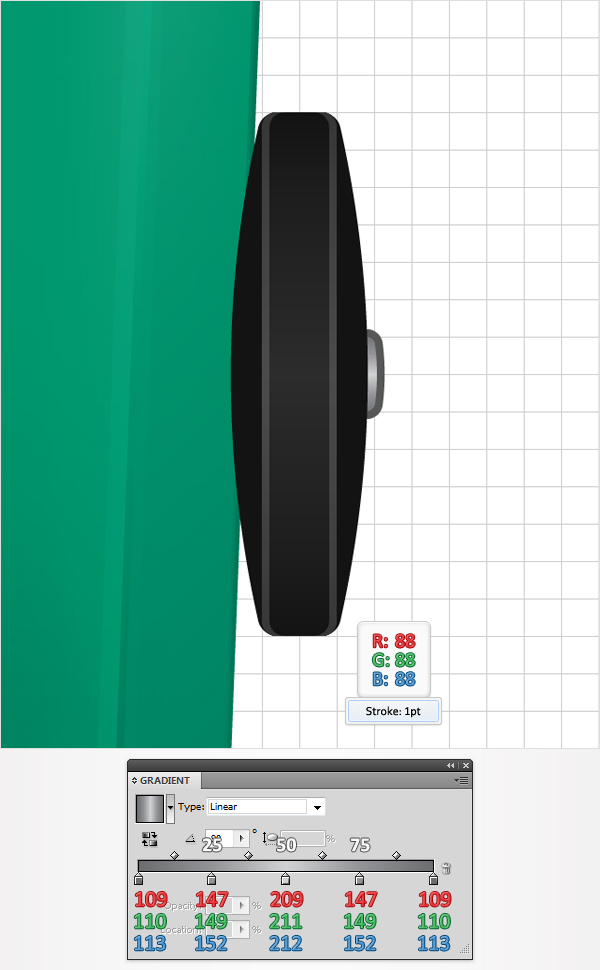
Reselect the shape created in the previous step, fill it with the linear gradient shown below, and add a 1pt stroke. Set its color at R=88, G=88, B=88, and align it to outside.
Step 49
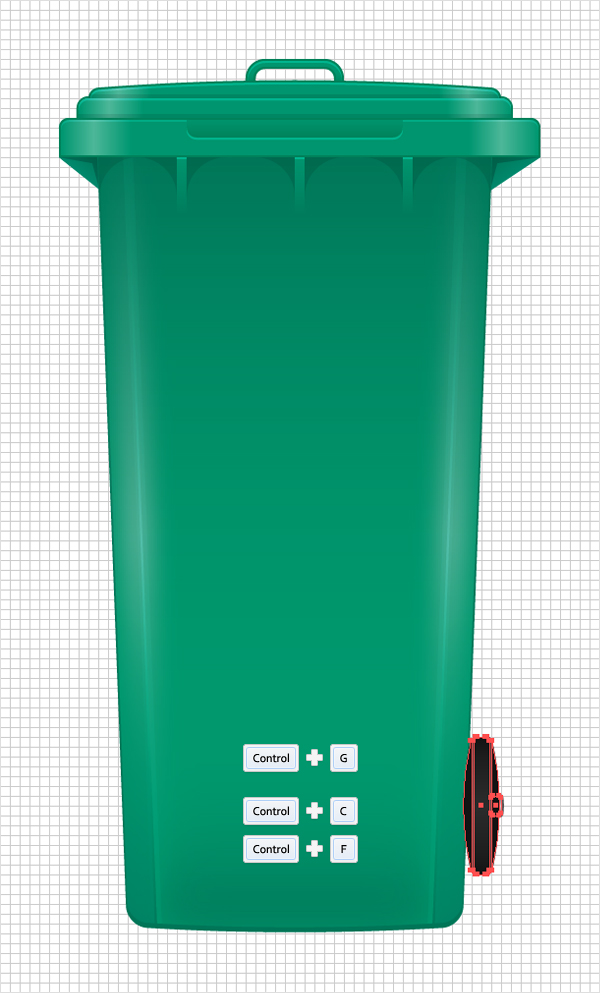
Select all the shapes created in the last five steps and group them (Command + G). Duplicate this group (Command + C > Command + F).
Step 50
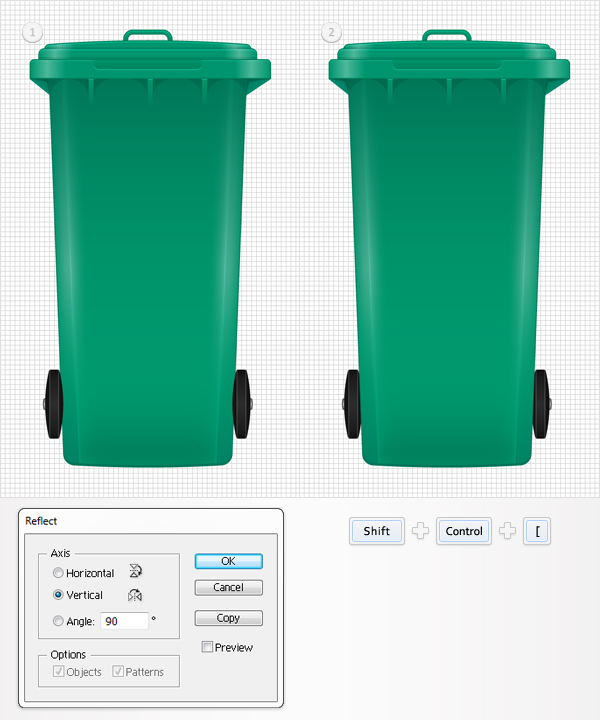
Select the group copy created in the previous step and go to Object > Transform > Reflect. Check the Vertical button and click OK. Drag this flipped group to the left, as shown in the first image. Finally, send both groups to back (Shift + Command + [ ).
Conclusion
Now your work is done. Here is how it should look.
