In the following tutorial you will learn how to create a detailed button and needle illustration. This tutorial uses many different vector techniques including the Appearance Panel, Transparency Settings, Patterns and more. Let’s begin!
Step 1
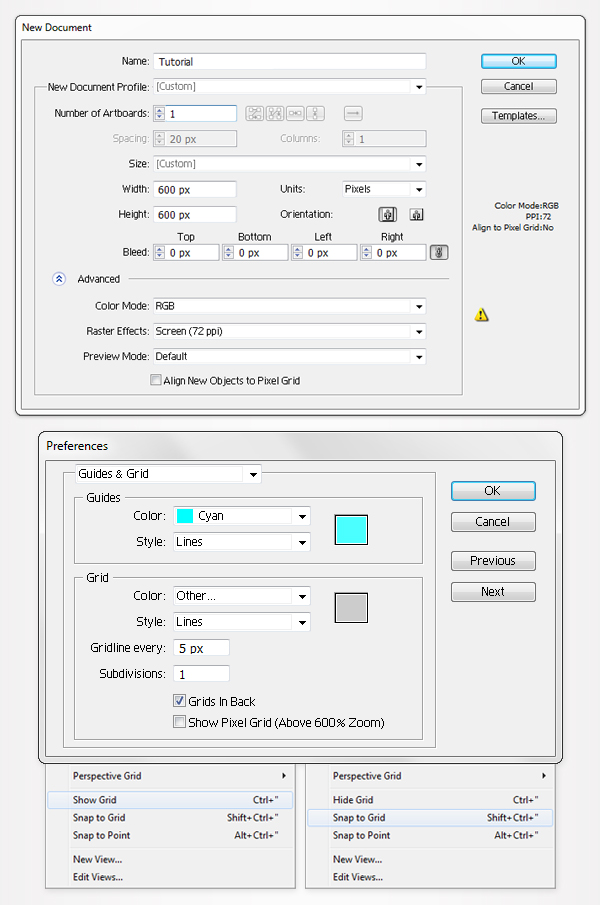
Hit Command + N to create a new document. Enter 600 in the width box and 700 in the height box then click on the Advanced button. Select RGB, Screen (72ppi) and make sure that the "Align New Objects to Pixel Grid" box is unchecked before your click OK. Enable the Grid (View > Show Grid) and the Snap to Grid (View > Snap to Grid). Next, you’ll need a grid every 5px.
Go to Edit > Preferences > Guides > Grid, enter 5 in the Gridline every box and 1 in the Subdivisions box. You can also open the Info panel (Window > Info) for a live preview with the size and position of your shapes. Do not forget to replace the unit of measurement to pixels from Edit > Preferences > Unit > General. Al these options will significantly increase your work speed.
Step 2
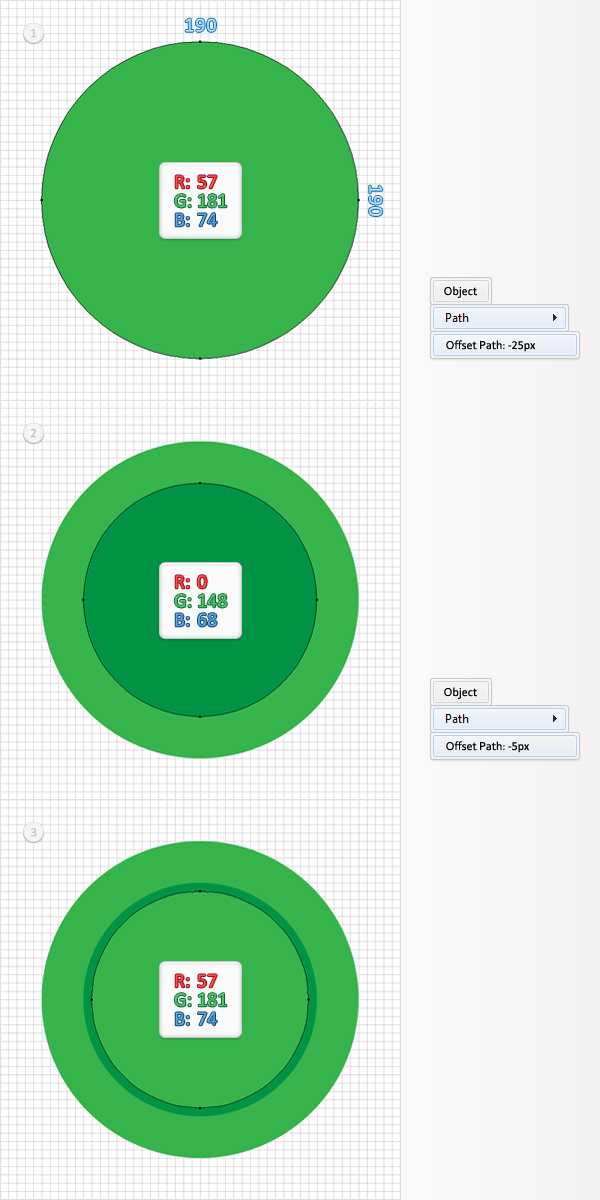
Pick the Ellipse Tool (L), create a 190px circle and fill it with R=57 G=181 B=74. Select it and go to Object > Path > Offset Path. Enter a -25px Offset and click OK. Select the resulting circle, fill it with R=0 G=148 B=68 and go again to Object > Path > Offset Path. Enter a -5px Offset and click OK. Fill the resulting shape with R=57 G=181 B=74.
Step 3
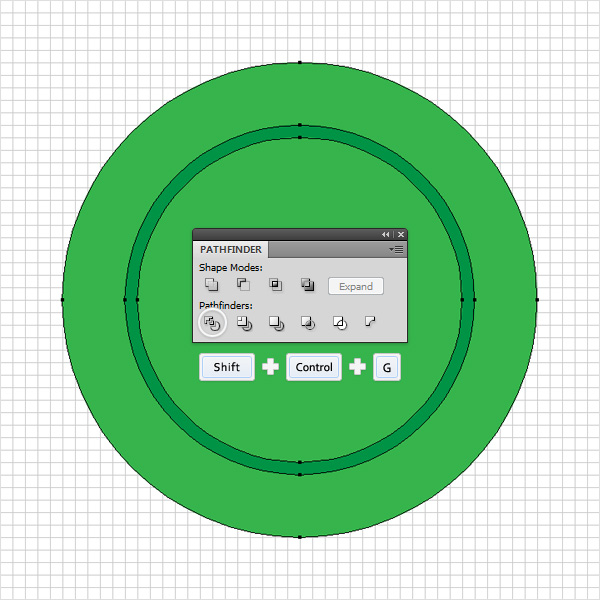
Reselect the three concentric circles created in the previous step, open the Pathfinder panel and click on the Divide button. Move to the Layers panel and you will find a new group with two compound paths and a circle. Select it and ungroup it (Shift + Command+ G).
Step 4
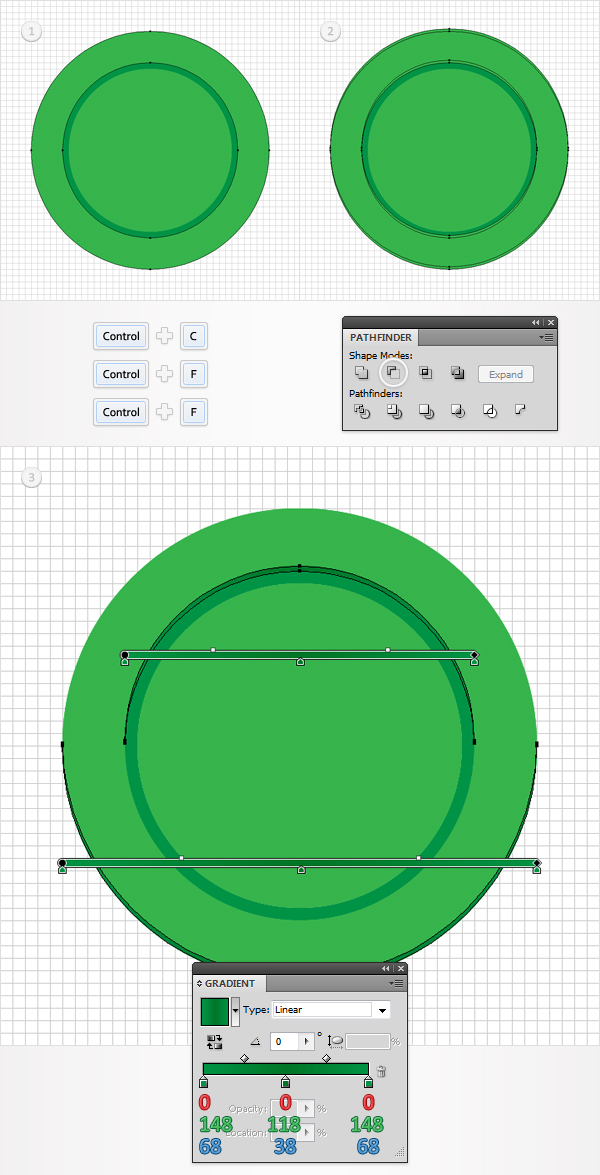
Disable the Snap to Grid (View > Snap to Grid) then go to Edit > Preferences > General and make sure that the Keyboard Increment is set at 1px. Select the larger compound path and make two copies in front (Command+ C > Command+ F > Command+ F). Select the top copy and hit the up arrow twice (to move it 2px up). Reselect both copies and click on the Minus Front button from the Pathfinder panel. Fill the resulting shapes with the linear gradient shown in the final image.
Step 5
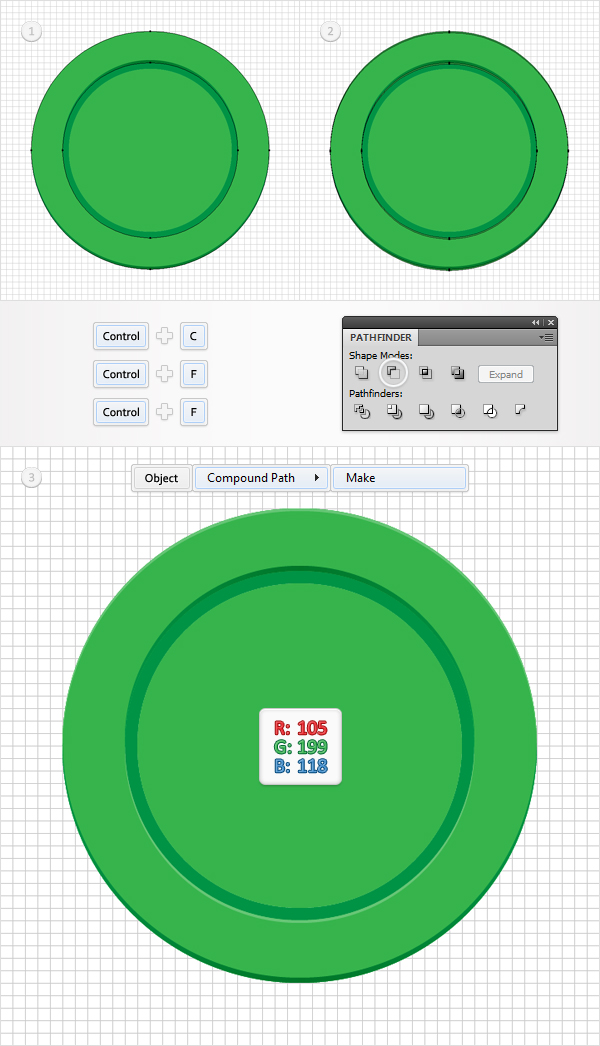
Reselect the larger compound path and make two new copies in front (Command+ C > Command+ F > Command+ F). Select the top copy and move it 1px down. Reselect both copies and click on the Minus Front button from the Pathfinder panel. Select the resulting group of shapes, turn it into a compound path (Object > Compound Path > Make) and fill it with R=105 G=199 B=118.
Step 6
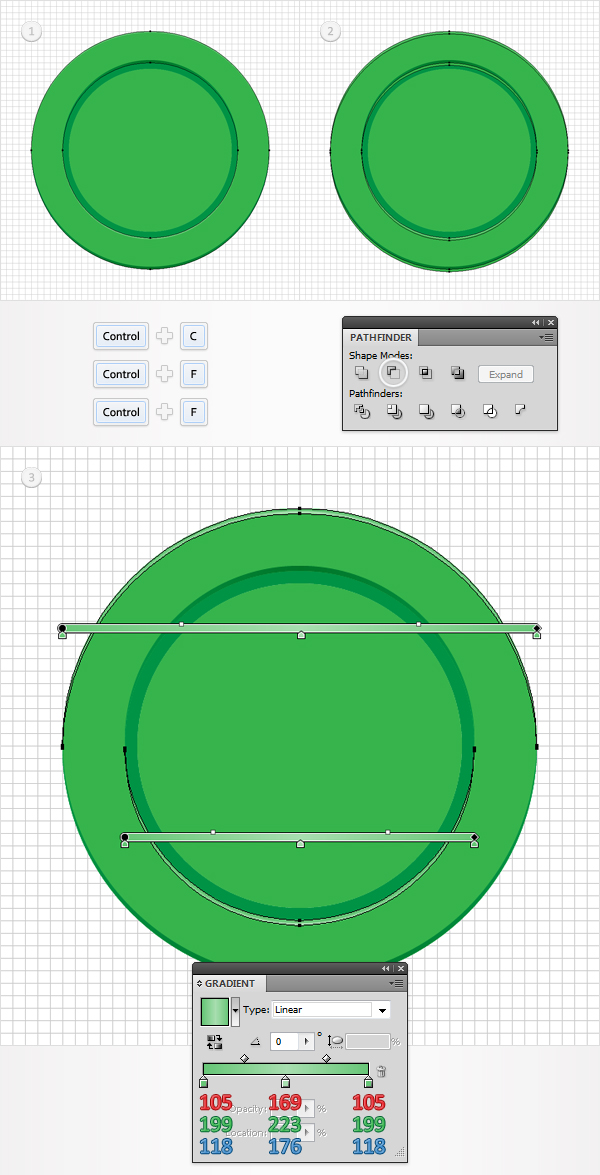
Reselect the larger compound path and make two new copies in front (Command+ C > Command+ F > Command+ F). Select the top copy and move it 2px down. Reselect both copies and click on the Minus Front button from the Pathfinder panel. Fill the resulting shapes with the linear gradient shown in the final image.
Step 7
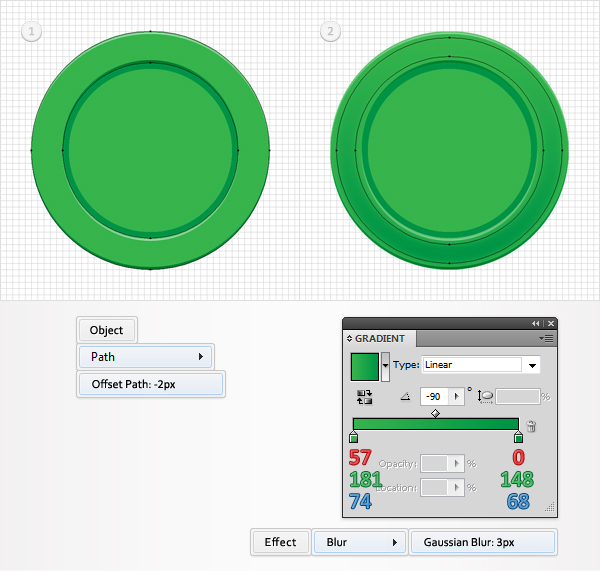
Reselect the larger compound path and go to Object > Path > Offset Path. Enter a -2px Offset and click OK. Fill the resulting shape with the linear gradient shown in the following image and go to Effect > Blur > Gaussian Blur. Enter a 3px radius and click OK.
Step 8
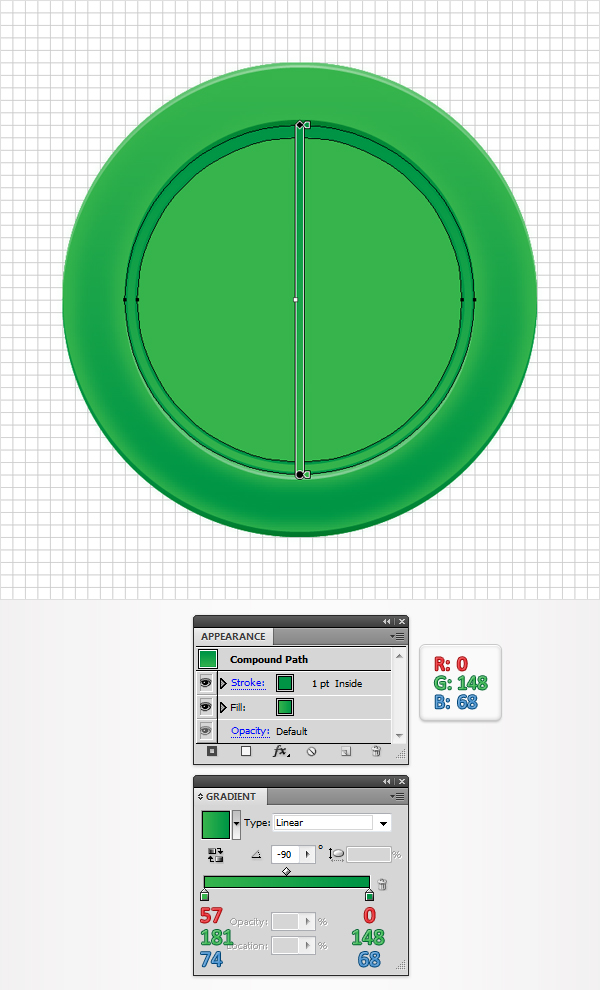
Move to the smaller compound path. Select it, fill it with the linear gradient shown in the following image then add a 1pt stroke. Set its color at R=0 G=148 B=68 and align it to inside.
Step 9
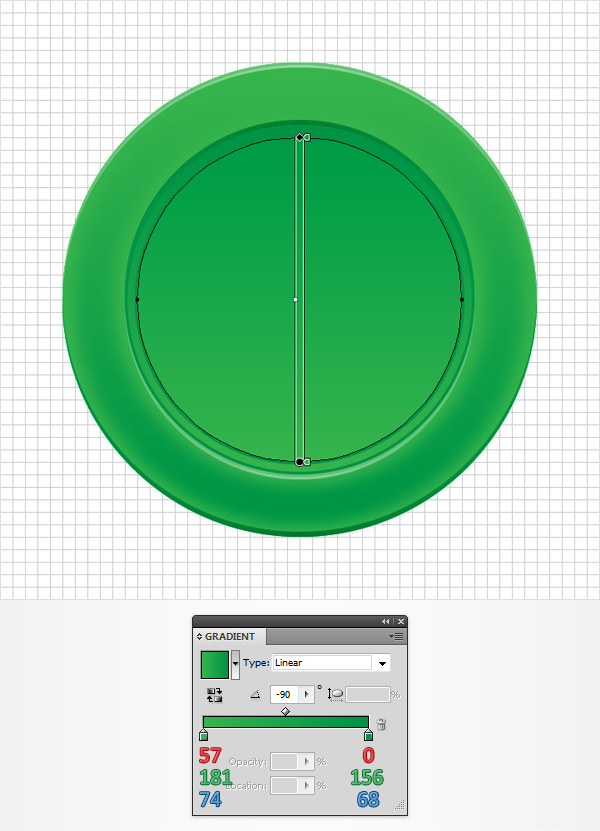
Move to the circle. Select it and replace the flat color used for the fill with the linear gradient shown in the following image.
Step 10
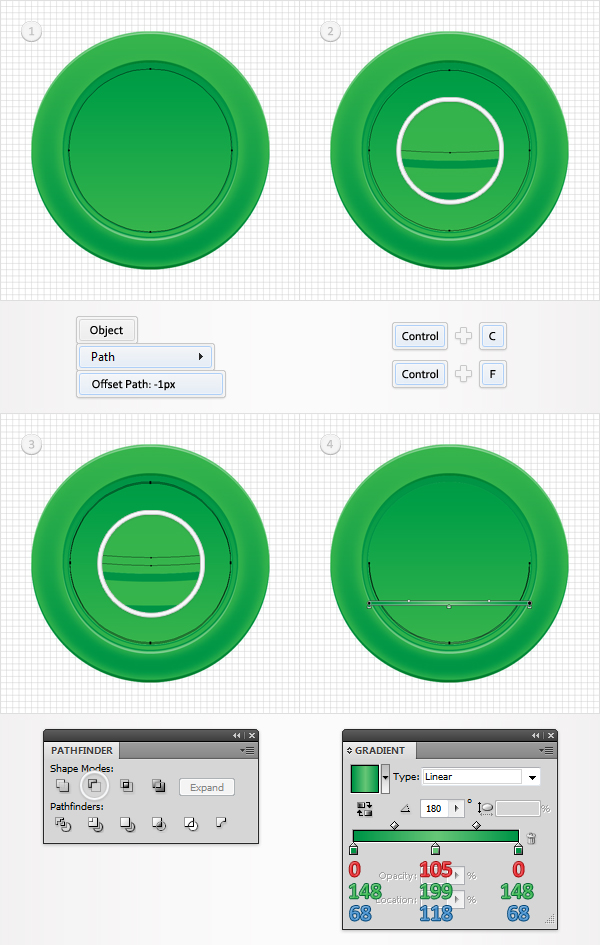
Reselect your circle and go to Object > Path > Offset Path. Enter a -1px Offset and click OK. Duplicate the resulting shape (Command+ C > Command+ F). Select this copy and move it 1px up. Reselect both shapes created in this step and click on the Minus Front button from the Pathfinder panel. Fill the resulting shape with the linear gradient shown in the following image.
Step 11
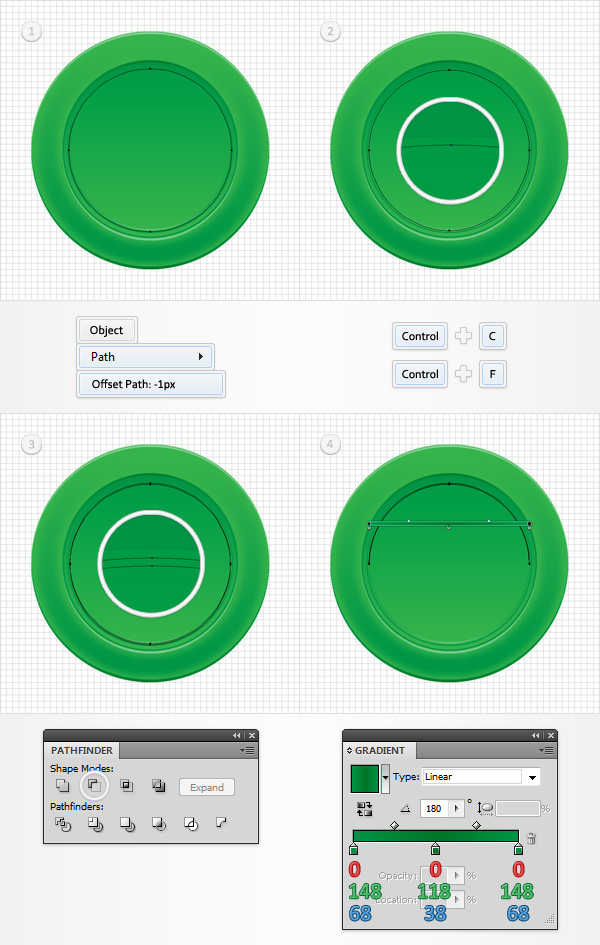
Reselect your circle and go again to Object > Path > Offset Path. Enter a -1px Offset, click OK and duplicate the resulting shape (Command+ C > Command+ F). Select the copy and move it 1px down. Reselect both shapes created in this step and click on the Minus Front button from the Pathfinder panel. Fill the resulting shape with the linear gradient shown in the following image.
Step 12
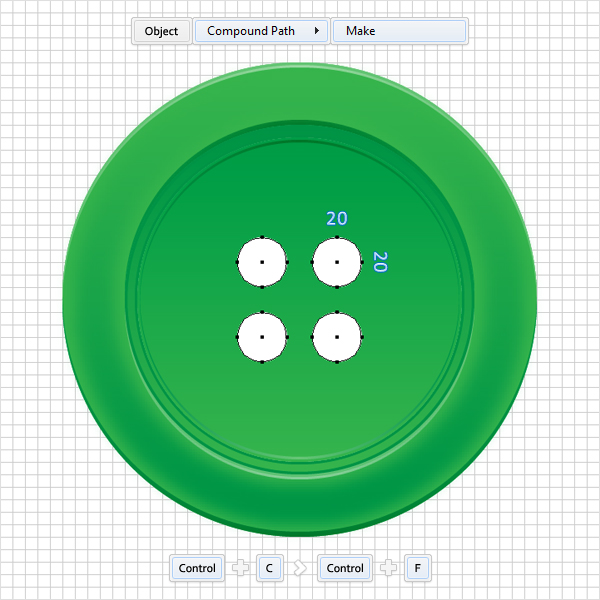
Enable the Snap to Grid (View > Snap to Grid) and grab the Ellipse Tool (L). Create four, 20px circles and fill them with white. Place them as shown in the following image and then turn them into a compound path (Object > Compound Path > Make). Select this new compound path and make a copy in front (Command+ C > Command+ F). You’ll need it for the next step.
Step 13
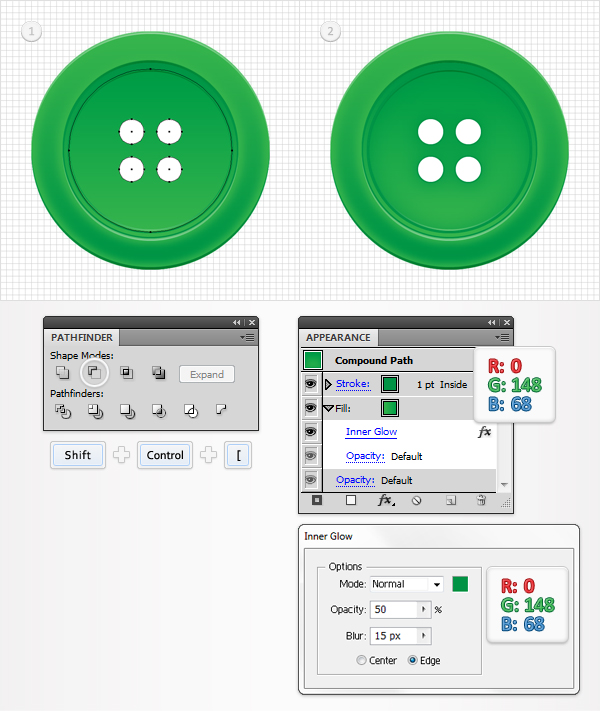
Select the copy of the compound path created in the finale of the previous step along with the circle and click on the Minus Front button from the Pathfinder panel. Select the resulting compound path, send it to back (Shift + Command+ [ ) and focus on the Appearance panel. First, select the fill and go to Effect > Stylize > Inner Glow. Enter the data shown in the following image and click OK. Next, add a 1pt stroke, set its color at R=0 G=148 B=68 and align it to inside.
Step 14
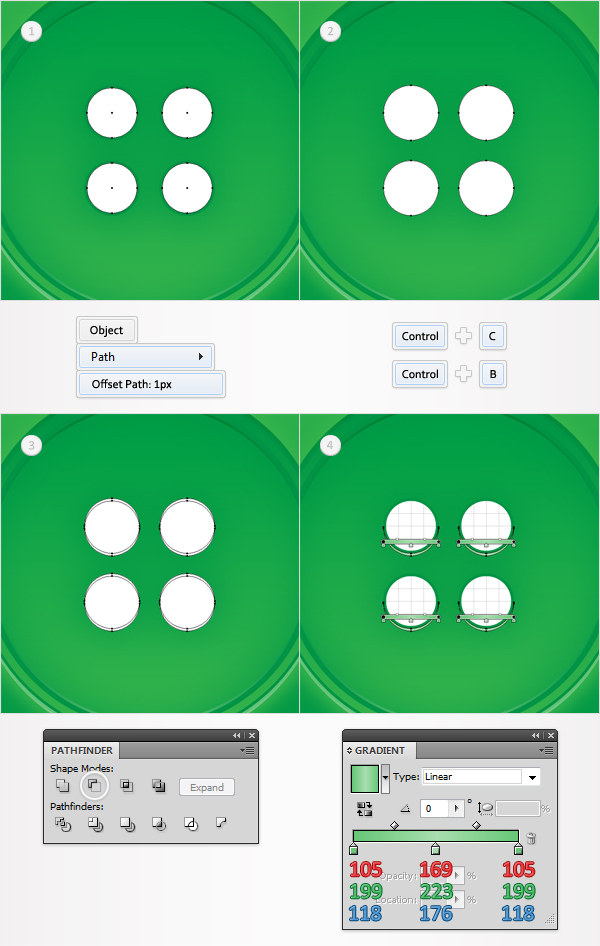
Disable the Snap to Grid (View > Snap to Grid). Reselect the white compound path created in the twelfth step and go to Object > Path > Offset Path. Enter a 1px Offset and click OK. Select the resulting compound path and make a copy in back (Command+ C > Command+ B). Select it and move it 1px down. Reselect the original, white compound path (the one created in the twelfth step) and delete it then reselect the two compound paths created in this step and click on the Minus Front button from the Pathfinder panel. Fill the resulting shapes with the linear gradient shown in the following image.
Step 15
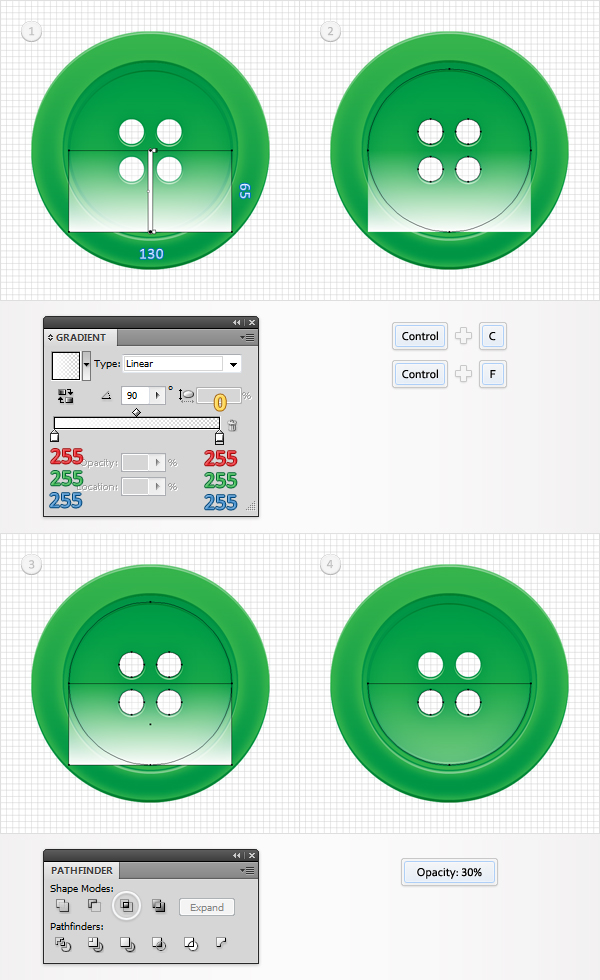
Enable the Snap to Grid (View > Snap to Grid). Pick the Rectangle Tool (M), create a 130 by 65px shape, fill it with the linear gradient shown in the following image and place it as shown in the first image. The yellow zero from the gradient image stands for opacity percentage. Reselect the compound path created in step #13 and make a copy in front (Command+ C > Command+ F). Select this copy along with the fresh rectangle and click on the Intersect button from the Pathfinder panel. Select the resulting shape and lower its opacity to 30%.
Step 16
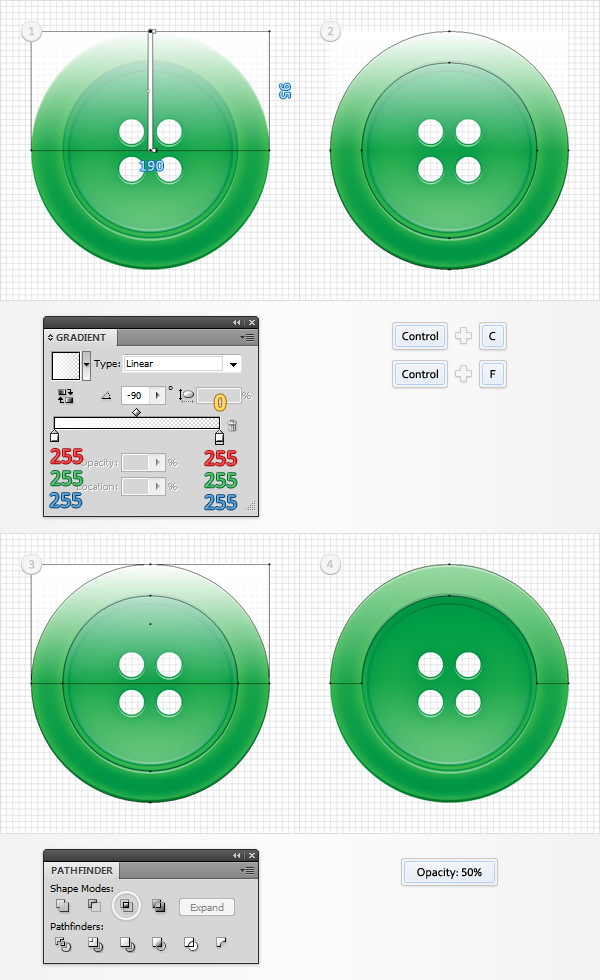
Pick the Rectangle Tool (M), create a 190 by 95px shape, fill it with the linear gradient shown in the following image and place it as shown in the first image. Reselect the large, green compound path and make a copy in front (Command+ C > Command+ F). Select it along with the fresh rectangle and click on the Intersect button from the Pathfinder panel. Select the resulting shape and lower its opacity to 50%.
Step 17
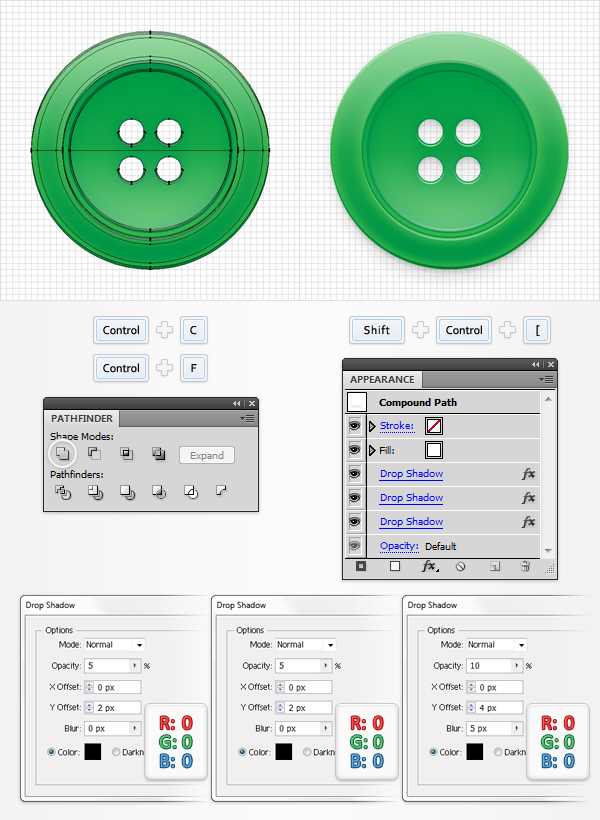
Select all the shapes created so far and duplicate them (Command+ C > Command+ F). Select all these copies and click on the Unite button from the Pathfinder panel. Fill the resulting shape with the white, send it to back (Shift + Command+ Left Square Bracket) and go to Effect > Stylize > Drop Shadow. Enter the data shown in the first window, click OK then go again to Effect > Stylize > Drop Shadow. Enter the properties shown in the middle window, click OK then go one more time to Effect > Stylize > Drop Shadow. Enter the properties shown in the right window and click OK. Select all the shapes created so far and group them (Command+ G). This will be your button.
Step 18
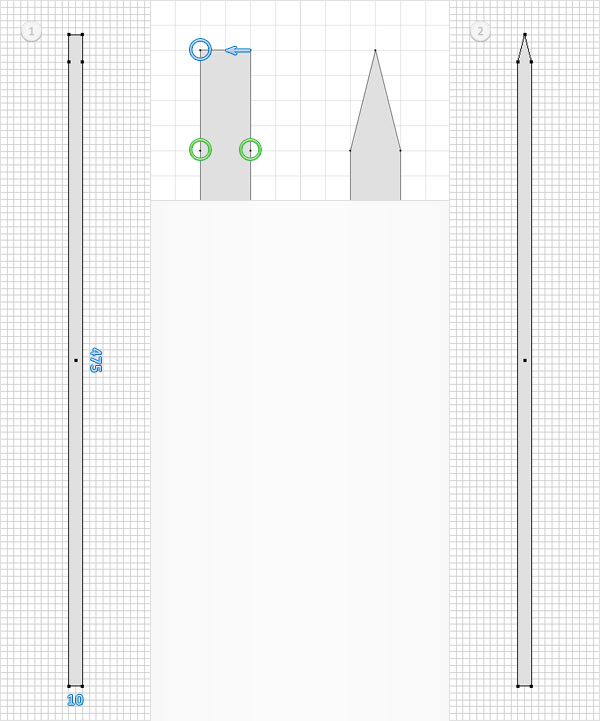
Let’s continue with the needle. Make sure that the Snap to Grid is enabled. Pick the Rectangle Tool (M), create a 10 by 475px shape and fill it with a random color. Make sure that this new shape is selected, grab the Add Anchor Point Tool (+) and focus on its top side. First, add two new anchor points in the points highlighted with green. Next, pick the Delete Anchor Point Tool (-) and remove the top, left anchor point. Finally, select the top, right anchor point and move it 5px to the left. In the end your shape should look like in the second image.
Step 19
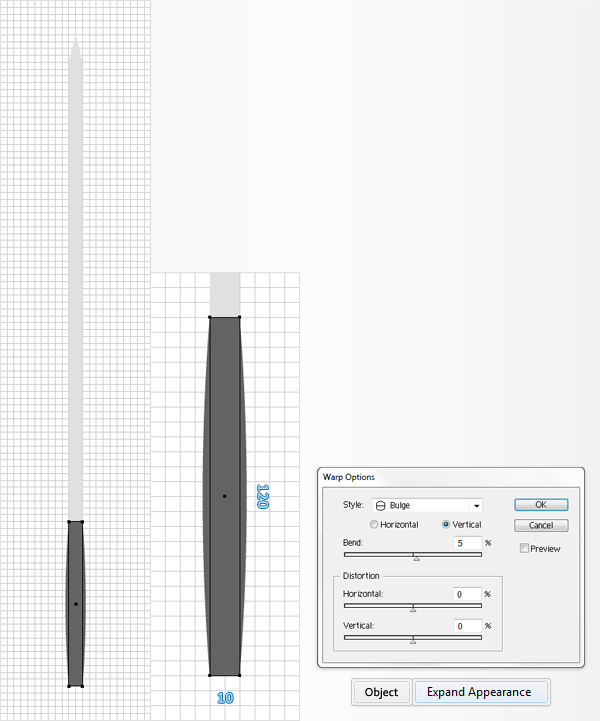
Pick the Rectangle Tool (M) and create a 10 by 120px shape. Place it as shown in the following image and go to Effect > Warp > Bulge. Enter the data shown below, click OK and go to Object > Expand Appearance.
Step 20
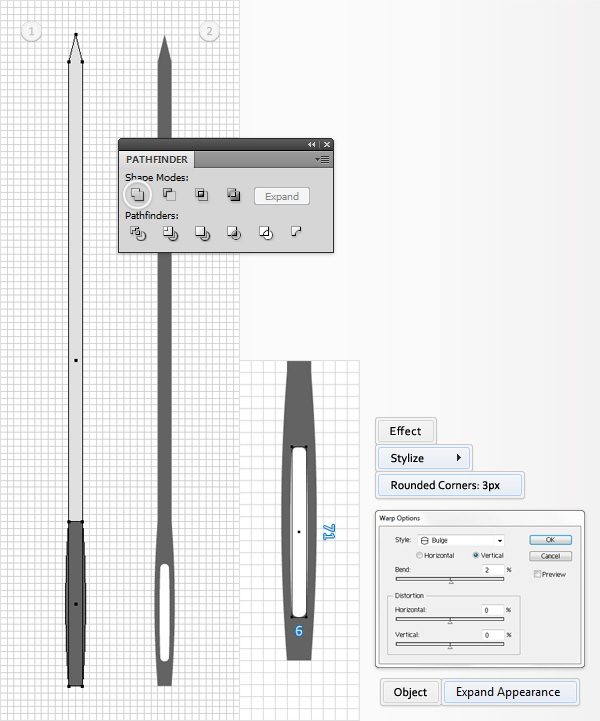
Reselect the two shapes created in the last two steps and click on the Unite button from the Pathfinder panel. Next, you will need a grid every 1px. So, go to Edit > Preferences > Guides & Grid and enter 1 in the Gridline every box. Pick the Rectangle Tool (M), create a 6 by 71px shape and place it as shown in the second image. Select it and go to Effect Stylize > Rounded Corners. Enter a 3px radius, click OK and go to Effect > Warp > Bulge. Enter the data shown below, click OK and go to Object > Expand Appearance.
Step 21
Reselect the two shapes created in the previous step and click on the Minus Front button from the Pathfinder panel. Duplicate the resulting shape (Command+ C > Command+ F). You’ll need this copy for the next step. Pick the Ellipse Tool (L), create a 6 by 80px shape and place it as shown in the following image.
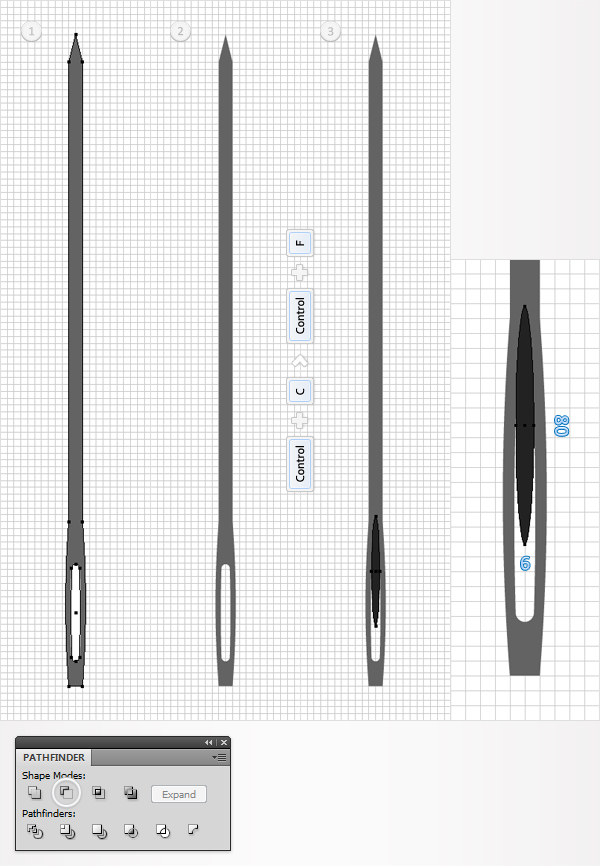
Step 22
Reselect the squeezed circle and the copy of the large compound path created in the previous step and click on the Intersect button from the Pathfinder panel. Fill the resulting shape with the linear gradient shown in the following image.
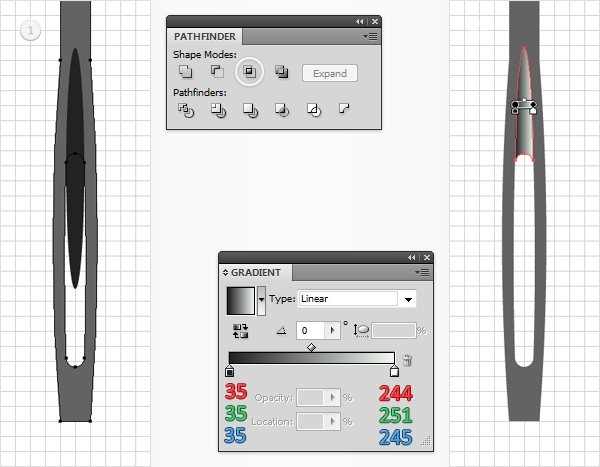
Step 23
Disable the Snap to Grid (View > Snap to Grid). Reselect the shape created in the previous step and make two copies in front (Command+ C > Command+ F > Command+ F). Select the top copy and move it 1px to the left. Reselect both copies and click on the Minus Front button from the Pathfinder panel. Select the resulting group of shapes, turn it into a compound path and fill it with R=225 G=225 B=225.
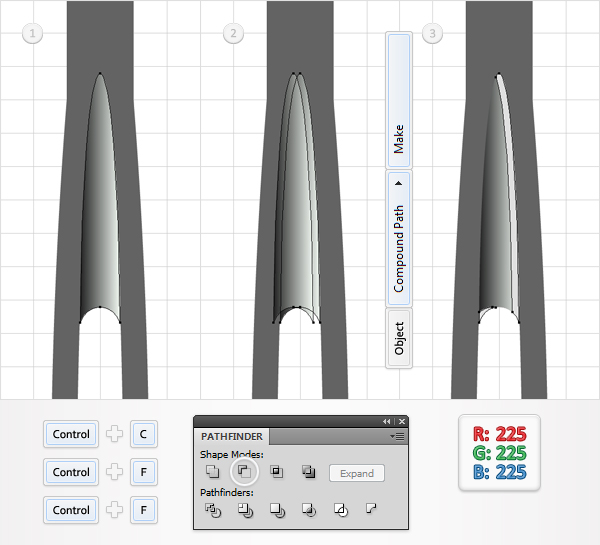
Step 24
For the following step you’ll need the Round Any Corner script. You can find it in the Vectortuts+ article 20 Free and Useful Adobe Illustrator Scripts. Save it to your hard drive, return to Illustrator and grab the Direct Selection Tool (A). Select the four anchor points highlighted with blue and go to File > Scripts > Other Script. Open the Round Any Corner Script, enter a 5px Radius and click OK. Next, select the anchor point highlighted with green and go to File > Scripts > Other Script. Again, open the Round Any Corner Script, enter a 2px Radius and click OK. In the end your shape should look like in the second image.
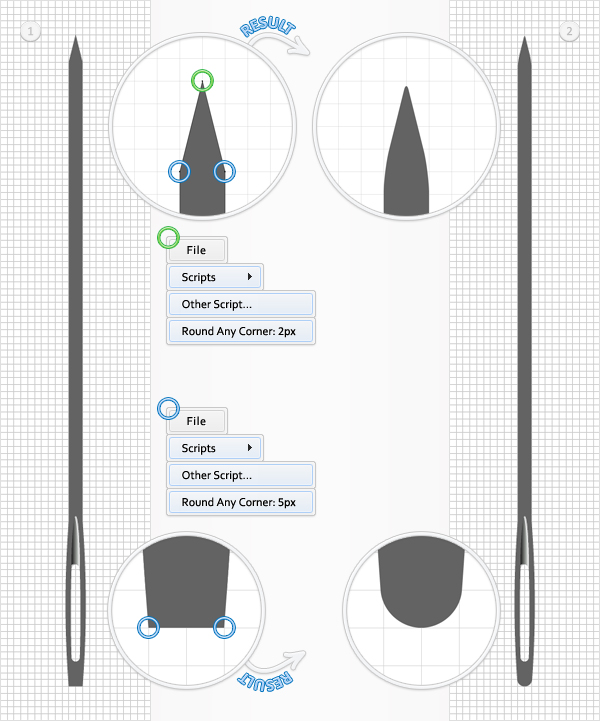
Step 25
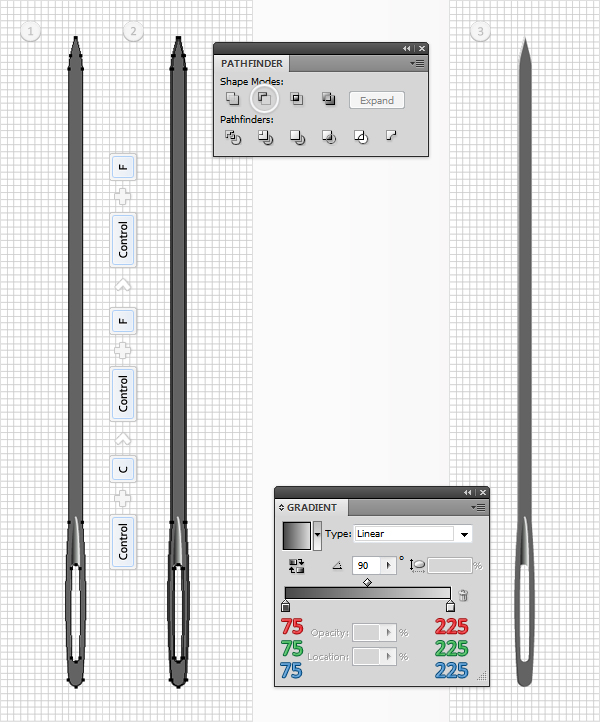
Select the compound path edited in the previous step and make two copies in front (Command+ C > Command+ F > Command+ F). Select the top copy and move it 1px to the right. Reselect both copies and click on the Minus Front button from the Pathfinder panel. Select the resulting group of shapes, turn it into a compound path and fill it with the linear gradient shown in the following image.
Step 26
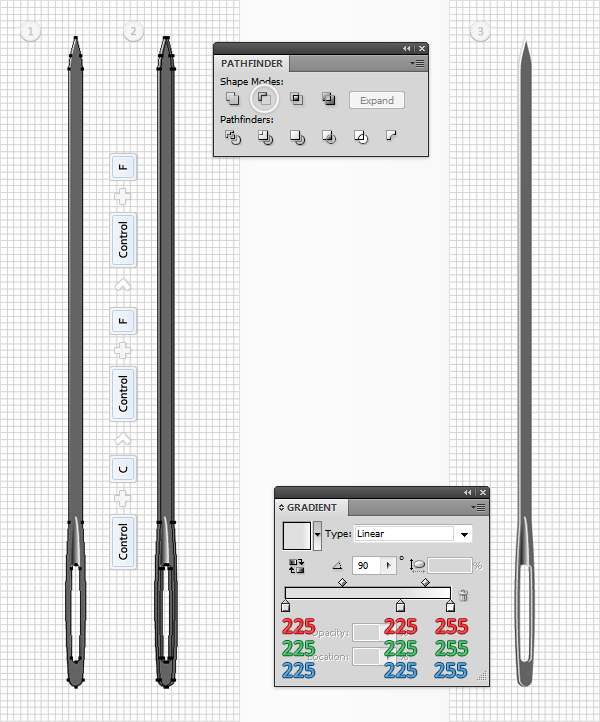
Reselect the compound path edited in step #24 and make two new copies in front (Command+ C > Command+ F > Command+ F). Select the top copy and move it 2px to the right. Reselect both copies and click on the Minus Front button from the Pathfinder panel. Turn the resulting group of shapes into a compound path and fill it with the linear gradient shown in the following image.
Step 27
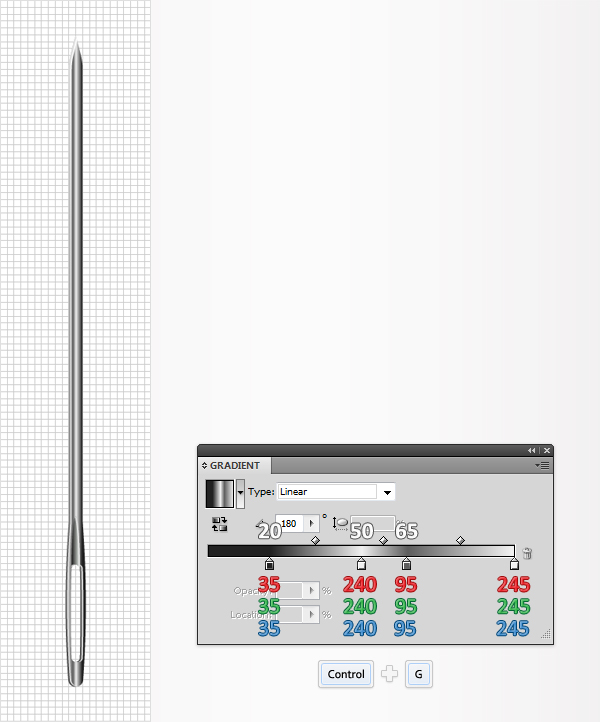
Reselect the main needle shape and replace the flat color used for the fill with the linear gradient shown in the following image. Select all the shapes that make up your needle and group them (Command+ G).
Step 28
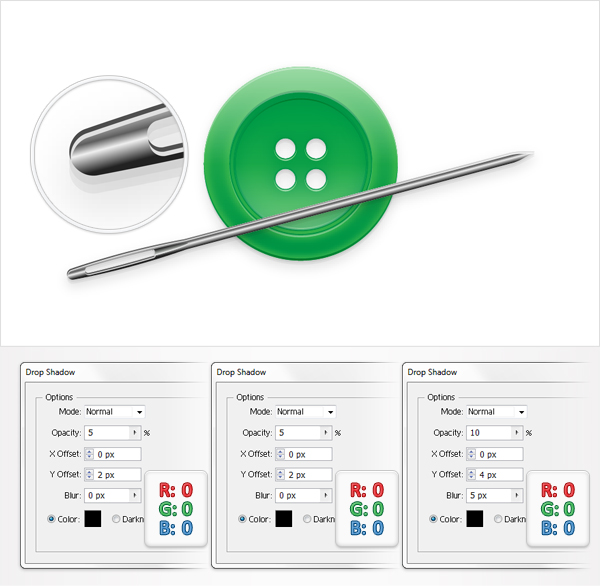
Select your needle group, rotate it and place it as shown in the following image. Reselect the main needle shape and add the three Drop Shadow effects shown in the following image.
Step 29
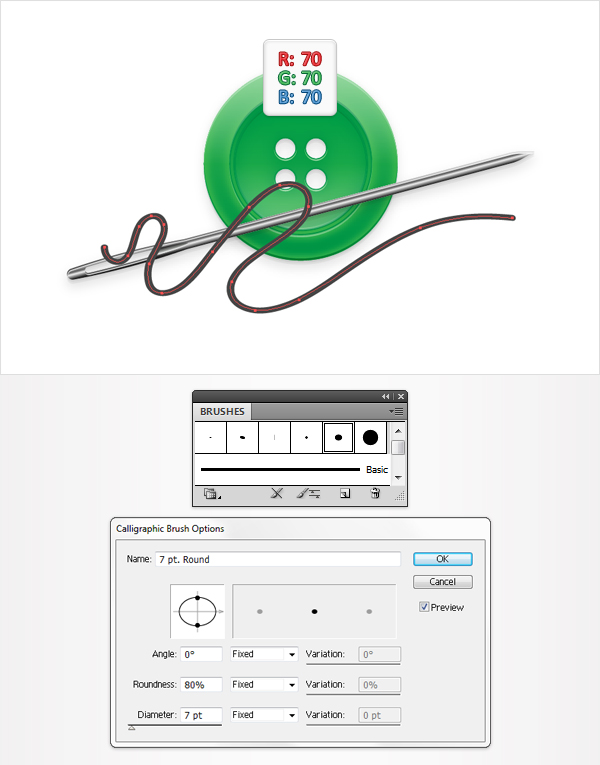
Finally, let’s add a piece of string. Open your Brushes panel and double click on the "7pt Round" brush. Decrease its Roundness to 80% and click OK. Now, pick the Brush Tool (B) and draw a wavy path as shown in the following image. Select it, remove the color from the fill and add the "7pt Round" brush for the stroke. Set its color at R=70 G=70 B=70.
Step 30
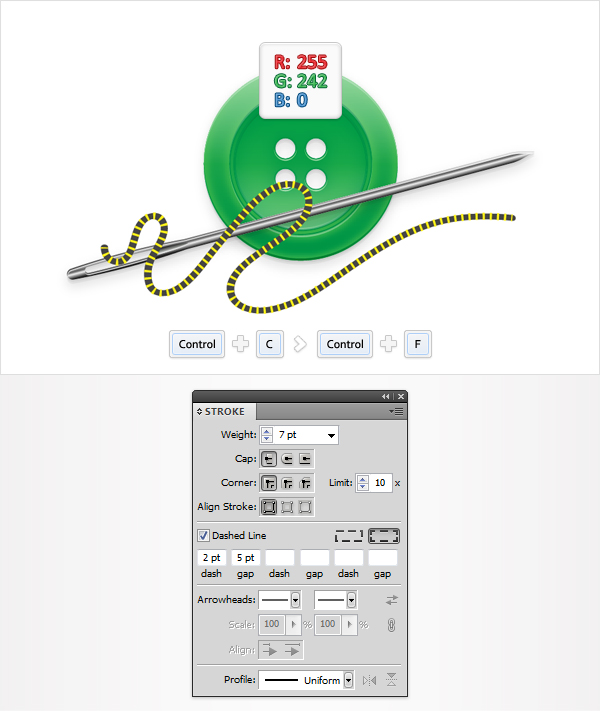
Reselect the path created in the previous step and make a copy in front (Command+ C > Command+ F). Select this copy, remove the brush from stroke and replace it with a simple stroke (R=255 G=242 B=0). Select it from the Appearance panel and open the Stroke panel. Check the Dashed Line box then enter 2 in the dash box and 5 in the gap box. In the end your dashed path should look like in the following image.
Step 31
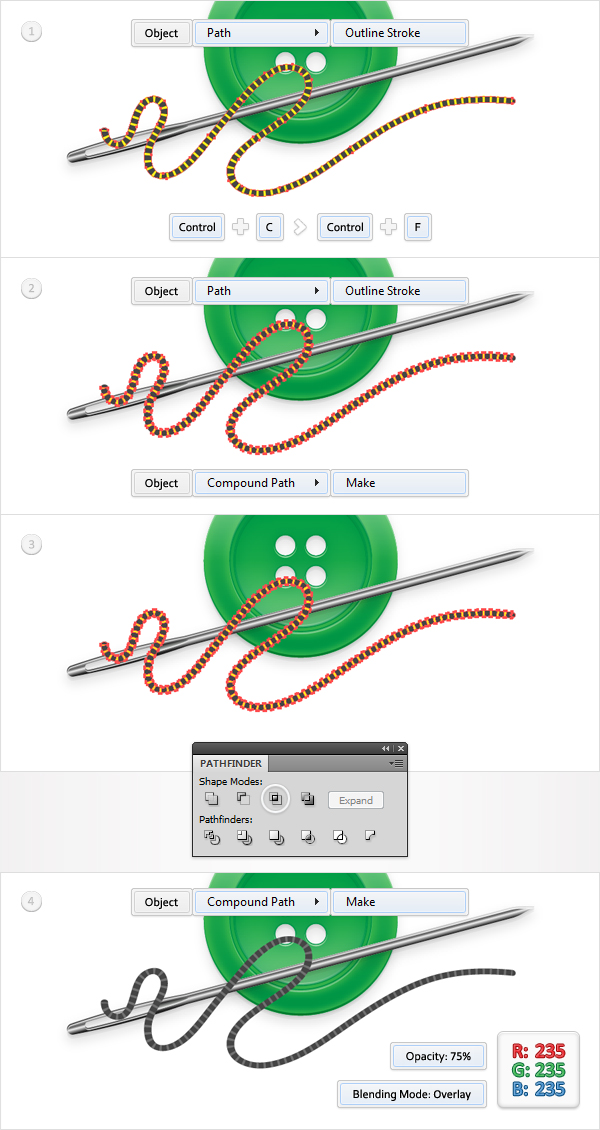
Reselect the path with the brush and go to Object > Path > Outline Stroke. Select the resulting path and make a copy in front (Command+ C > Command+ F). Reselect the path with the dashed stroke and go to Object > Path > Outline Stroke. Select the resulting group of shapes and turn it into a compound path (Object > Compound Path > Make). Select it along with the copy of the expanded brush and click on the Intersect button from the Pathfinder panel. Again, turn the resulting group of shapes into a compound path (Object > Compound Path > Make). Fill it with R=235 G=235 B=235, lower its opacity to 75% and change the blending mode to Overlay.
Step 32
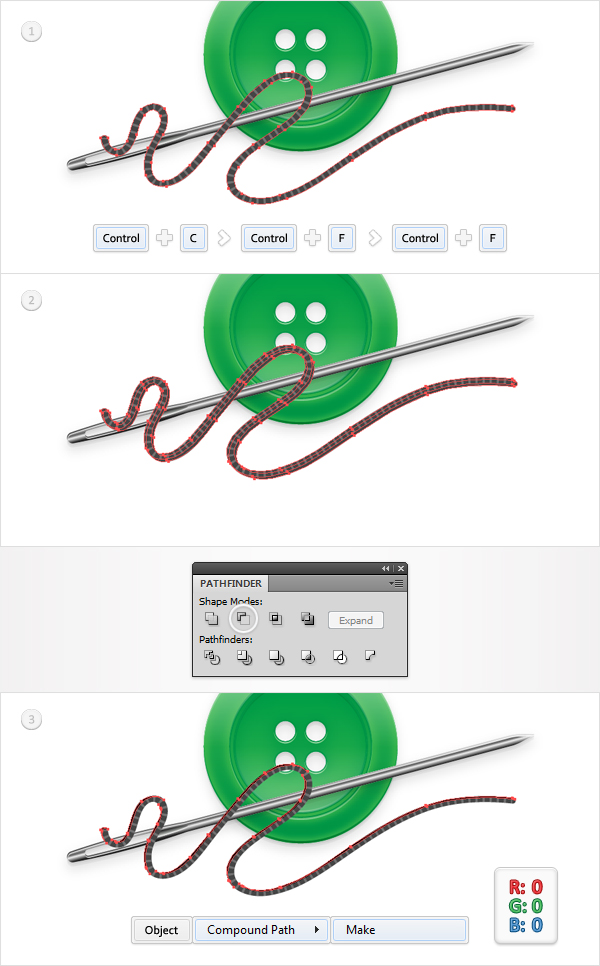
Reselect the expanded brush and make two copies in front (Command+ C > Command+ F > Command+ F). Select the top copy and move it 1px down and to the right. Reselect both copies and click on the Minus Front button from the Pathfinder panel. Turn the resulting group of shapes into a compound path and fill it with black.
Step 33
Reselect the expanded brush and make two new copies in front (Command+ C > Command+ F > Command+ F). Select the top copy and move it 2px down and to the right. Reselect both copies and click on the Minus Front button from the Pathfinder panel. Turn the resulting group of shapes into a compound path and fill it with R=120 G=120 B=120.
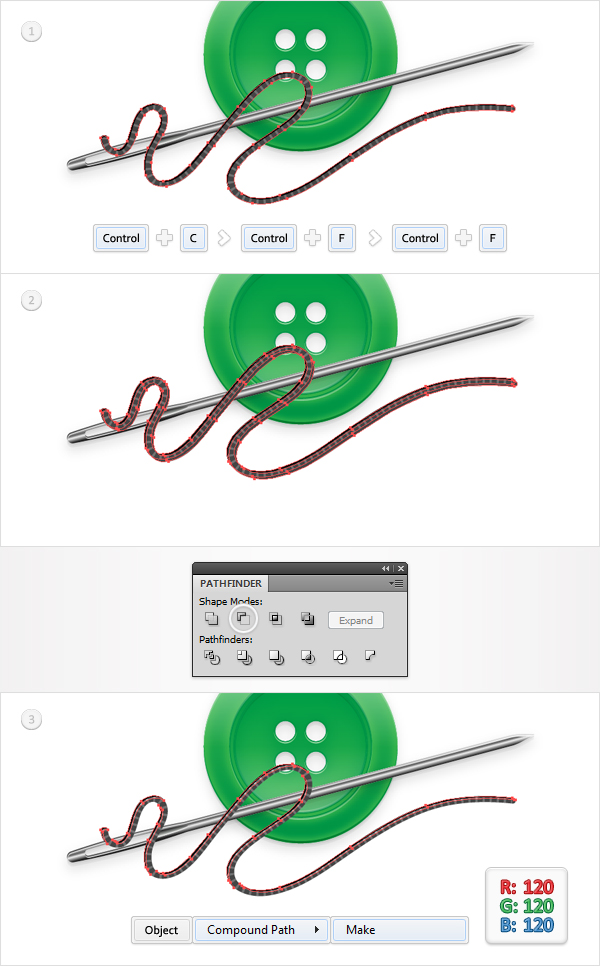
Step 34
Reselect the expanded brush and add the three drop shadow effects shown in the following image. Also, add a 2pt stroke, align it to inside and set its color at R=30 G=30 B=30. Select all the shapes that make up your string and group them (Command+ G).
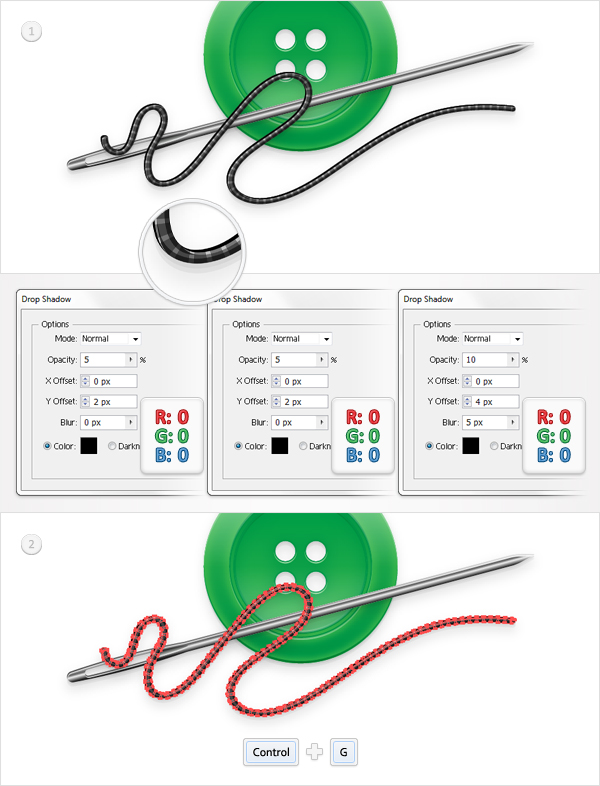
Step 35
Next, let’s make the string go through the needle eye. Pick the Rectangle Tool (M), and create a simple shape that covers the area of the string that would go behind the needle. Select the main needle shape and make a copy in front (Command+ C > Command+ F). Select it along with the the rectangle and click on the Intersect button from the Pathfinder panel. Fill the resulting shape with black.
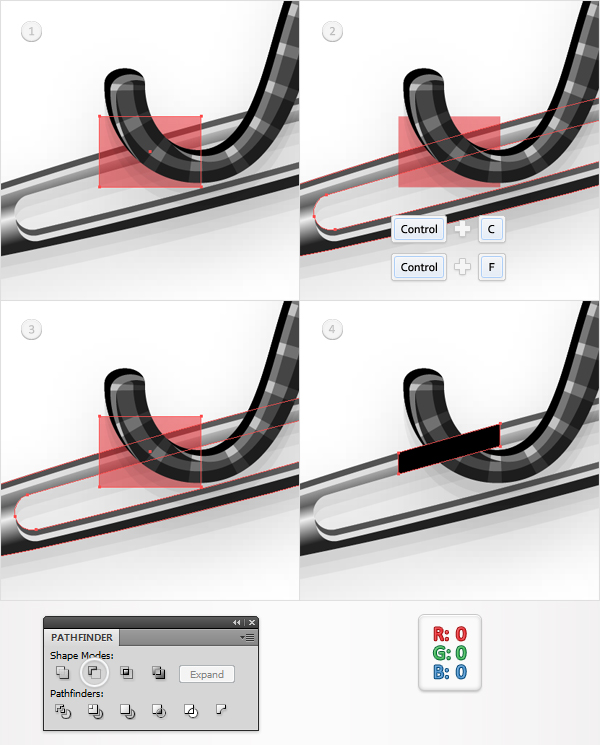
Step 36
Open the Transparency panel and select the black shape created in the previous step along with your string group. Open the fly-out menu of the Transparency panel, click on Make Opacity Mask then uncheck the Clip box. In the end your masked group should look like in the second image.
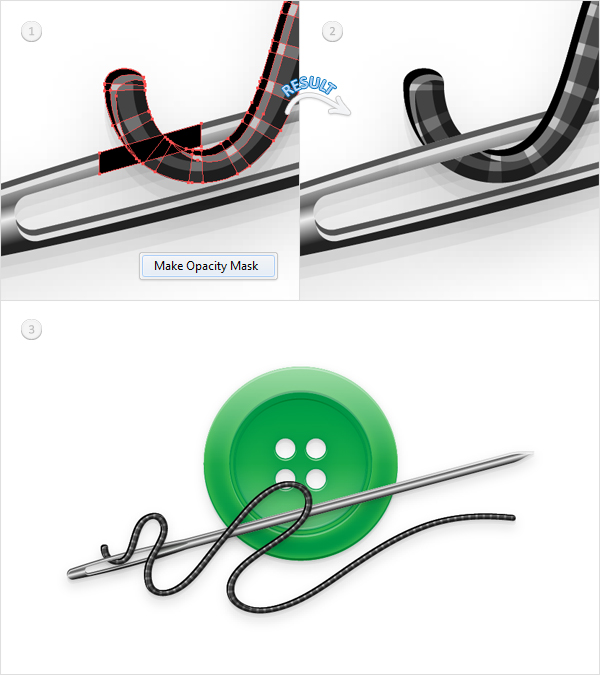
Step 37
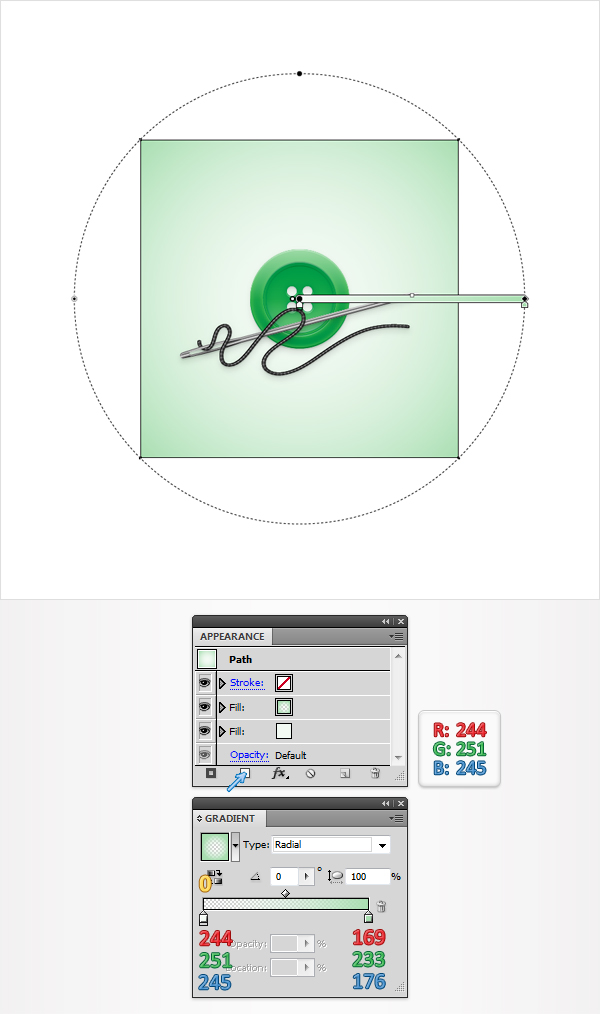
Finally, let’s a add a simple background. Pick the Rectangle Tool (M), create a shape the size of your artboard and send it to back (Shift + Command+ Left Square Bracket). Fill it with R=2444 G=251 B=245 then add a second fill using the Add New Fill button from the bottom of the Appearance panel. Use the radial gradient shown in the following image for this new fill.
Conclusion
Now your work is done. Here is how it should look.
