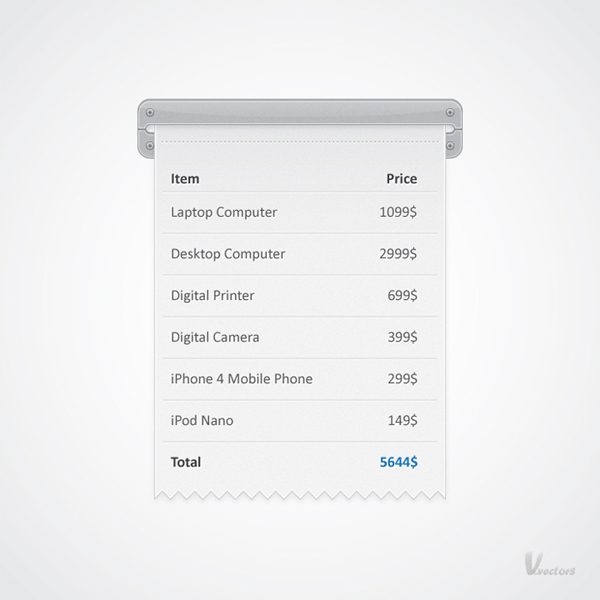
In the following tutorial you will learn how to create a simple receipt illustration. For starters, you will only need a rectangle and the Zig Zag effect. Next, using multiple fills and strokes along with some simple effects you’ll add the colors. Finally, various vector shape building techniques and some basic effects will help you create the small details that complete your illustration.
Step 1
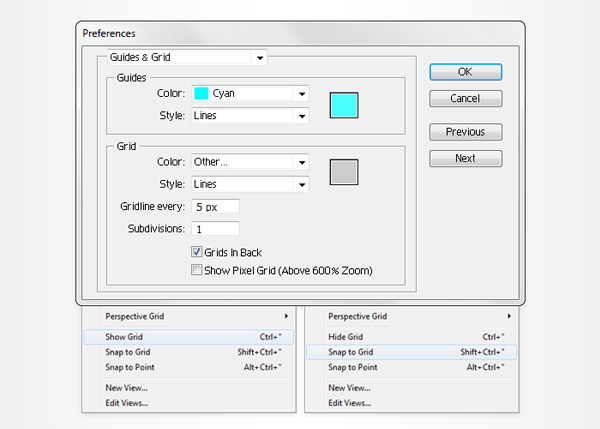
Create a 700 by 700px document. First, enable the Grid (View > Show Grid) and the Snap to Grid (View > Snap to Grid). Next, you’ll need a grid every 5px. Go to Edit > Preferences > Guides > Grid, enter 5 in the Gridline every box and 1 in the Subdivisions box. You can also open the Info panel (Window > Info) for a live preview with the size and position of your shapes. Do not forget to replace the unit of measurement to pixels from Edit > Preferences > Unit > General. Al these options will significantly increase your work speed.
Step 2
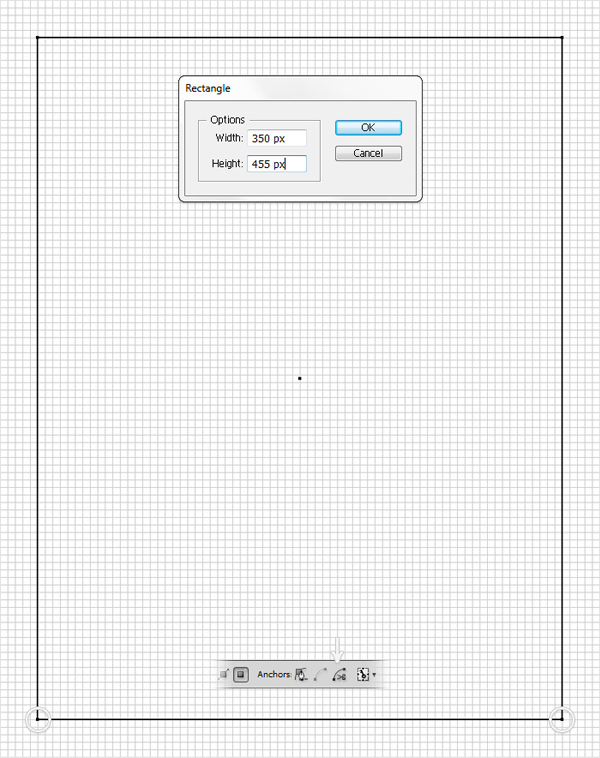
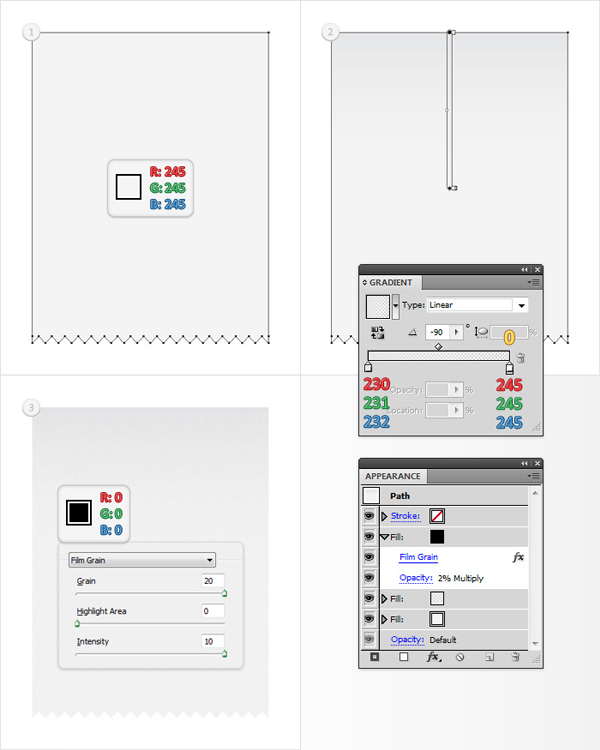
Pick the Rectangle Tool and click on your artboard. Enter 350 in the width box and 455 in the height box then click OK. This will create a 350 by 455px shape. Fill it with none and add a simple black stroke. Grab the Direct Selection Tool (A) and select the bottom anchor points then go to the the top bar and click on the Cut Path at Selected Anchor Points button. Now, go the Layers panel and you will notice that your shape is now divided in two separate paths.
Step 3
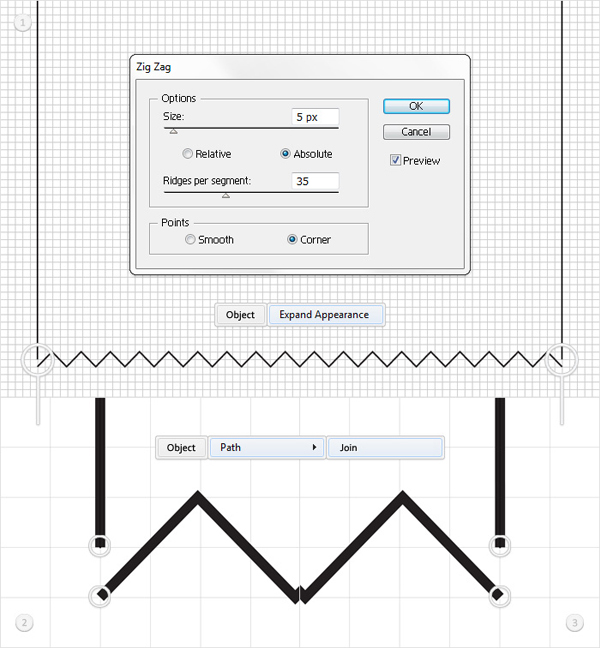
Select the horizontal path and go to Effect > Distort&Transform > Zig Zag. Enter the data shown below, click OK then go to Object > Expand Appearance. Next, pick the Direct Selection Tool (A), select the anchor points highlighted in the second image and go to Object > Path > Join. Continue with the Direct Selection Tool (A) and select the two anchor points highlighted in the third image. Again, go to Object > Path > Join. In the end you should have only one shape in your Layers panel.
Step 4
Add some color for the shape created in the previous step. First, fill it with R=245 G=245 B=245 and remove any stroke. Next, go to the Appearance panel, open the fly-out menu and click on Add New Fill. This will add a second fill for your shape. Select it from the Appearance panel and fill it with the linear gradient shown in the second image. The yellow zero from the gradient image stands for opacity percentage. This means that you need to select that gradient slider and lower its opacity to 0%. Add a third fill for your shape. Make it black, lower its opacity to 2% and change the blending mode to Multiply then go to Effect > Artistic > Film Grain. Enter the data shown in the third image then click OK.
Step 5
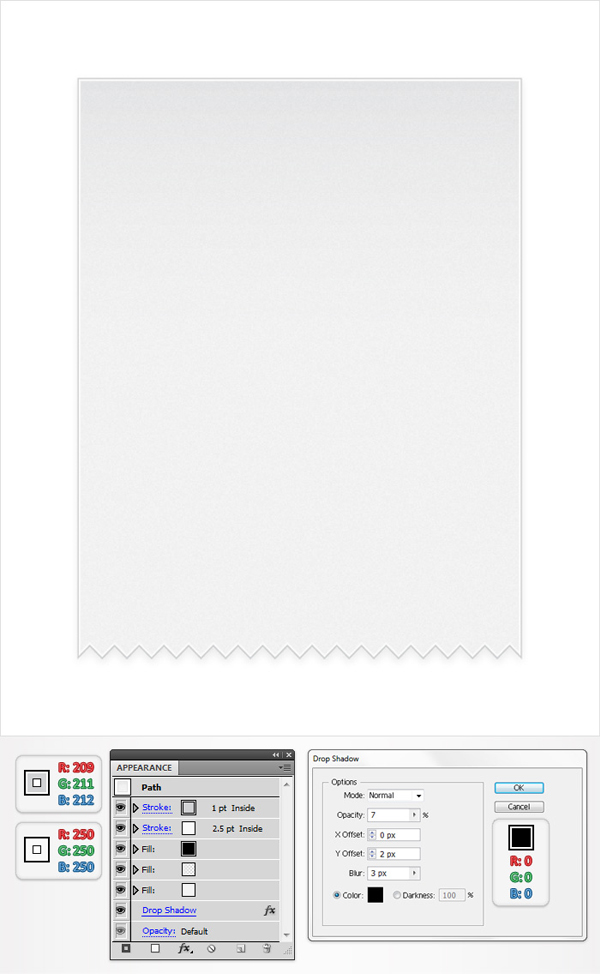
Continue with the shape from the previous step and add a first stroke. Make it 2.5pt wide, align it to inside and set its color at R=250 G=250 B=250. Select this stroke from the Appearance panel and click on the Duplicate Selected Item button from the bottom of the Appearance panel. Obviously, this will add a copy of your stroke. Select it, make it 1pt wide and set the color at R=209 G=211 B=212. Finally, reselect this entire path and go to Effect Stylize > Drop Shadow. Enter the data shown below then click OK.
Step 6
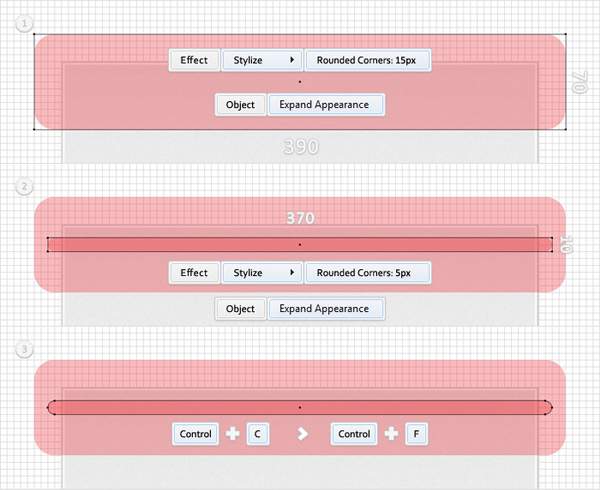
Focus on the top area. Pick the Rectangle Tool (M), create a 390 by 70px shape and place it as shown in the first image. The Snap to Grid will ease your work. Select it and go to Effect > Stylize > Rounded Corners. Enter a 15px radius, click OK then go to Object > Expand Appearance. Reselect the Rectangle Tool (M) and create a second shape. Make it 370px wide and 10px tall then place it as shown in the second image. Again, select this shape and go to Effect > > Stylize > Rounded Corners. Enter a 5px radius, click OK then go to Object > Expand Appearance. Select the resulting shape, make a copy in front (Control + C > Control + F) and turn off its visibility. You will need this shape later.
Step 7
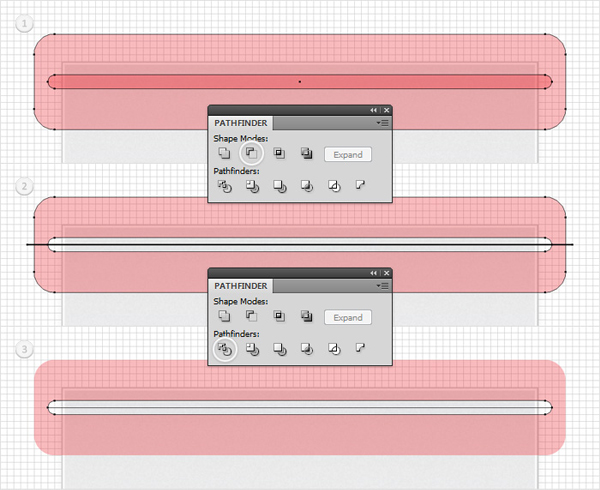
Select the two shapes created in the previous step and click on the Minus Front button from the Pathfinder panel. Next, pick the Pen Tool, draw a simple horizontal path and place it as shown in the second image. Once again, the Snap to Grid will come in handy. Select it along with the other fresh shape and click on the Divide button from the Pathfinder panel. You will get a group with four shapes. Select the two shapes selected in the third image and delete them then select the other two shapes and ungroup them (Shift + Control + G).
Step 8
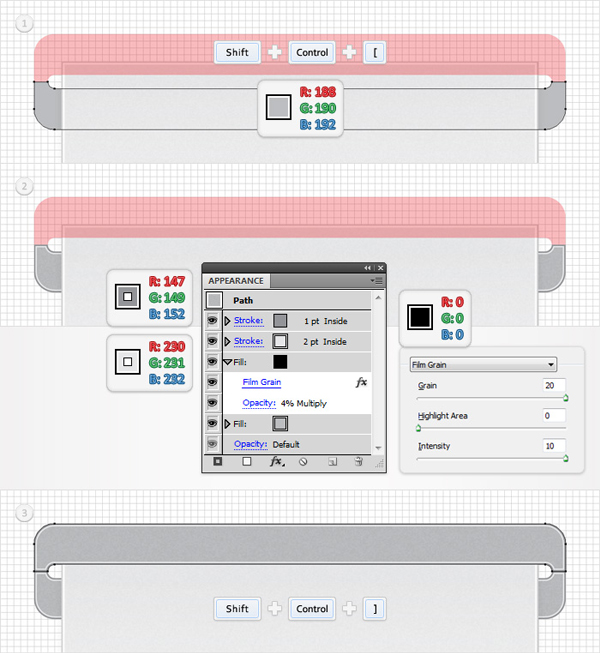
Focus on the bottom shape created in the previous step. Select it, send it to back (Shift + Control + Left Square Bracket) and fill it with R=188 G=190 B=192. Reselect this grey shape and add a second fill. Make it black, lower its opacity to 4% and change the blending mode to Multiply then go to Effect > Artistic > Film Grain. Enter the data shown below, click OK then add a stroke. Make it 2pt wide, align it to inside and set the color at R=230 G=231 B=232. Add a second stroke for your shape. Make it 1pt wide, align it to inside and set the color at R=147 G=149 B=152. Move to the top shape. Select it and bring it to front (Shift + Control + Right Square Bracket) then add the same properties used for the bottom shape.
Step 9
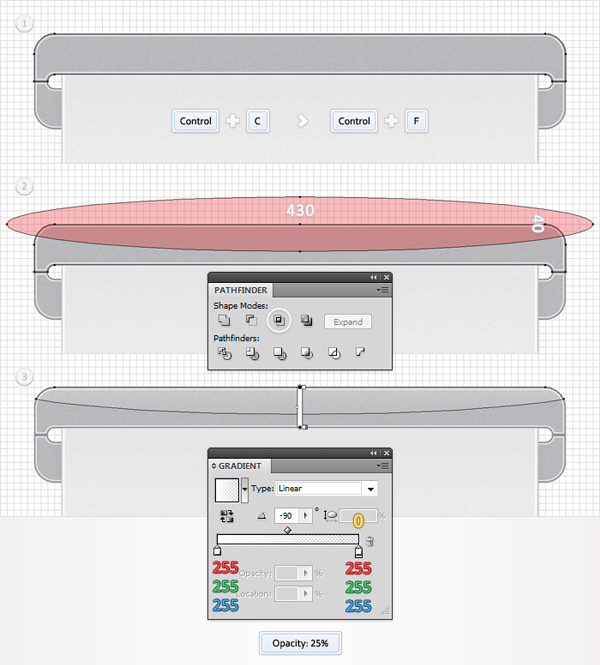
Select the top, grey shape and make a copy in front (Control + C > Control + F) then pick the Rectangle Tool (M) and create a 430 by 40px shape. Place it as shown in the second image then select it along with the fresh copy and click on the Intersect button from the Pathfinder panel. Fill the resulting shape with the linear gradient shown in the third image and lower its opacity to 25%.
Step 10
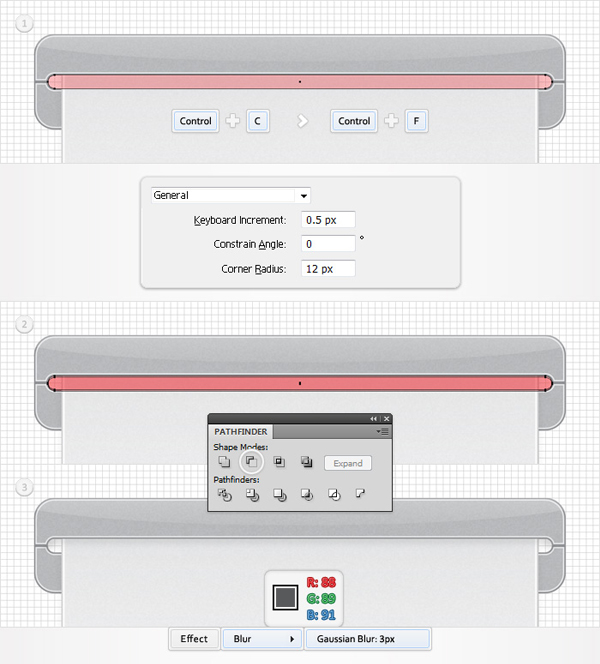
Turn on the visibility for the copy create in the sixth step. Select it and make a copy in front (Control + C > Control + F) then go to Edit > Preferences > General and enter 0.5 in the Keyboard Increment box. Disable the Snap to Grid (View > Snap to Grid) then select the fresh copy and hit the down arrow once (to move it 0.5px down). Reselect both shapes and click on the Minus Front button from the Pathfinder panel. You will get a pretty thin shape. Fill it with R=88 G=89 B=91 then go to Effect > Blur > Gaussian Blur. Enter a 3px radius, click OK then go the Layers panel. Reselect this blurred shape and move it below the top, grey shape.
Step 11
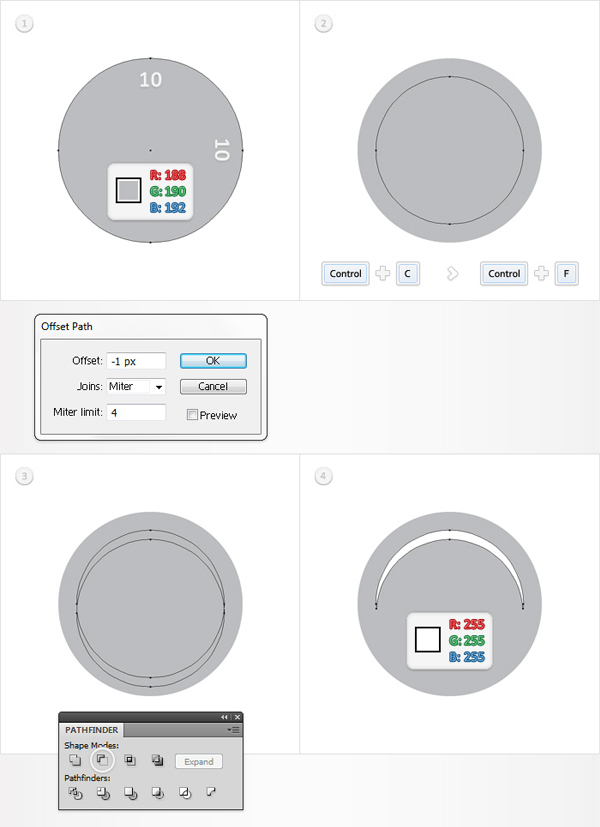
Pick the Ellipse Tool (L) and click on your artboard. Enter 10 in the width and height boxes then click OK. This will create a 10 by 10px shape. Fill it with R=188 G=190 B=192 then go to Object > Path > Offset Path. Enter a -1px Offset and click OK. Duplicate the resulting shape then select the copy and hit the down arrow once. Reselect these two shapes and click on the Minus Front button from the Pathfinder panel. Fill the resulting shape with white.
Step 12
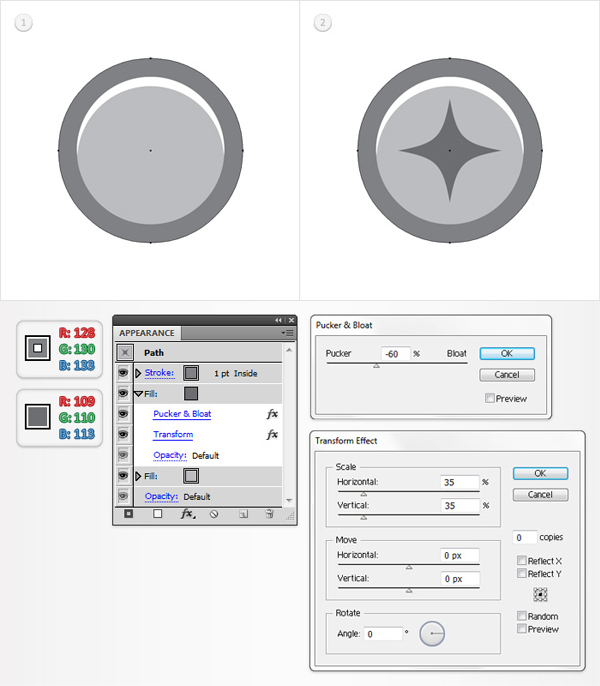
Reselect the grey circle and add a 1pt stroke. Align it to inside and set the color at R=128 G=130 B=133 then add a second fill for your shape. Set its color at R=109 G=110 B=113 then go to Effect > Distort&Transform > Transform. Enter the data shown below, click OK then go to Effect > Distort&Transform > Pucker & Bloat. Drag the slider at -60% then click OK. Select this final circle along with the shape created in the previous step and group them (Control + G).
Step 13
Select the group created in the previous step and make three copies. Enable the Snap to Grid then place your groups as shown in the following image.

Step 14
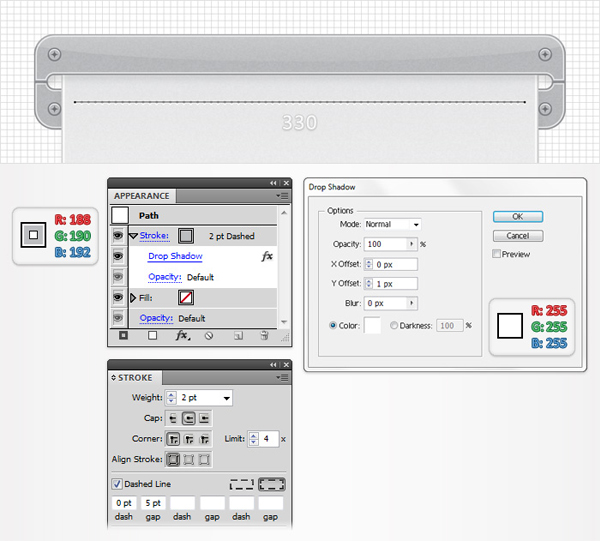
Pick the Pen Tool (P), draw a 330px path and place it as shown in the following image. Fill it with none then add a 2pt stroke and set its color at R=188 G=190 B=192. Select this stroke from the Appearance panel then go to the Stroke panel (Window > Stroke). Click on the Round Cap button and check the Dashed Line box then enter 0pt in the dash box and 5 in the gap box. Finally, go to Effect > Stylize > Drop Shadow. Enter the data shown below then click OK.
Step 15
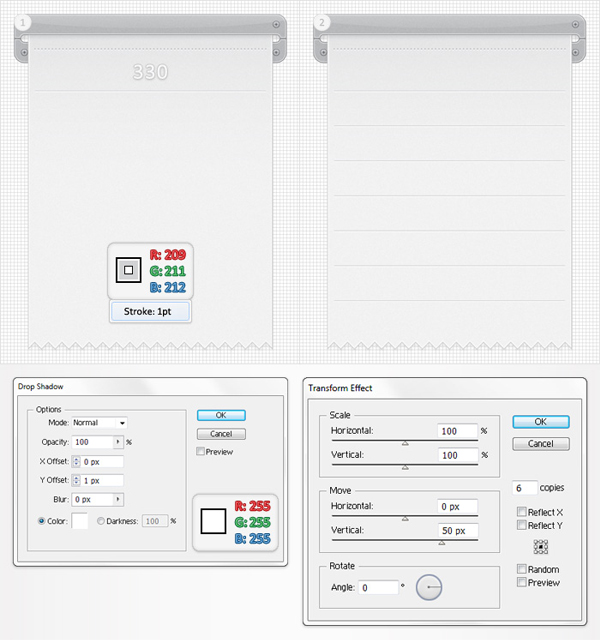
Reselect the Pen Tool (P), draw a 330px, horizontal path and place it as shown in the first image. Fill it with none then add a 1pt stroke and set its color at R=188 G=190 B=192. Select this stroke and go to Effect > Stylize > Drop Shadow. Enter the data shown below, click OK then go to Effect > Distort&Transform > Transform. Enter the data shown below the second image then click OK.
Step 16
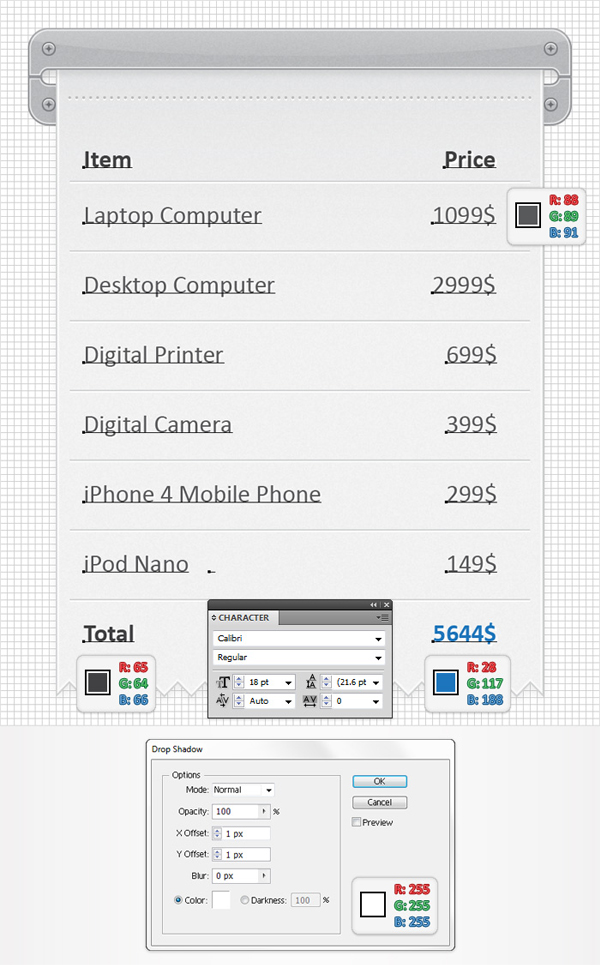
Pick the Type Tool (T) and add your text. Use the Calbri font and the colors shown below. Finally, select all the text and go to Effect > Stylize > Drop Shadow. Enter the data shown below then click OK.
Step 17
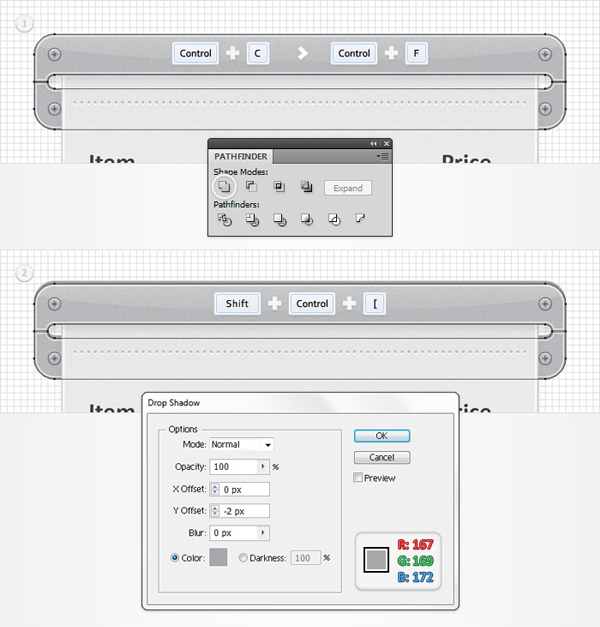
Select the two grey shapes and duplicate them then select the copies and click on the Unite button from the Pathfinder panel. Fill the resulting shape with a simple, flat color, send it to back (Shift + Control + Left Square Bracket) then go to Effect > Stylize > Drop Shadow. Enter the data shown in the final image, click OK and you’re done.
Conclusion
Now your work is done. Here is how it should look.
