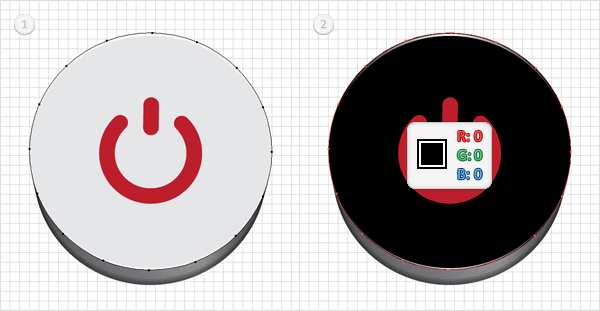
In the following tutorial you will learn how to create a steel vector power button set in Adobe Illustrator. A power button symbol can be used on a interface design or as a positive digital metaphor in your design work. Let’s get to work using numerous shape building techniques, combined with Illustrator effects, and learn to add nuanced lighting to make glossy buttons with steel plating. It’s time to turn on your own vector power button icon.
Step 1
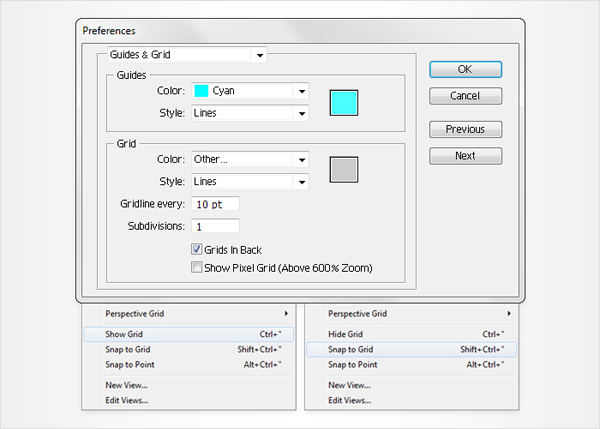
Create a 700 by 500px, RGB document. First, turn on the Grid (View > Grid) and the Snap to Grid (View > Snap to Grid). Next, you’ll need a grid every 10px. Go to Edit > Preferences > Guides > Grid, enter 10 in the Gridline every box and 1 in the Subdivisions box.
You can also open the Info panel (Window > Info) for a live preview with the size and position of your shapes. Do not forget to replace the unit of measurement to pixels from Edit > Preferences > Unit > General. All these options will significantly increase your work speed.
Step 2
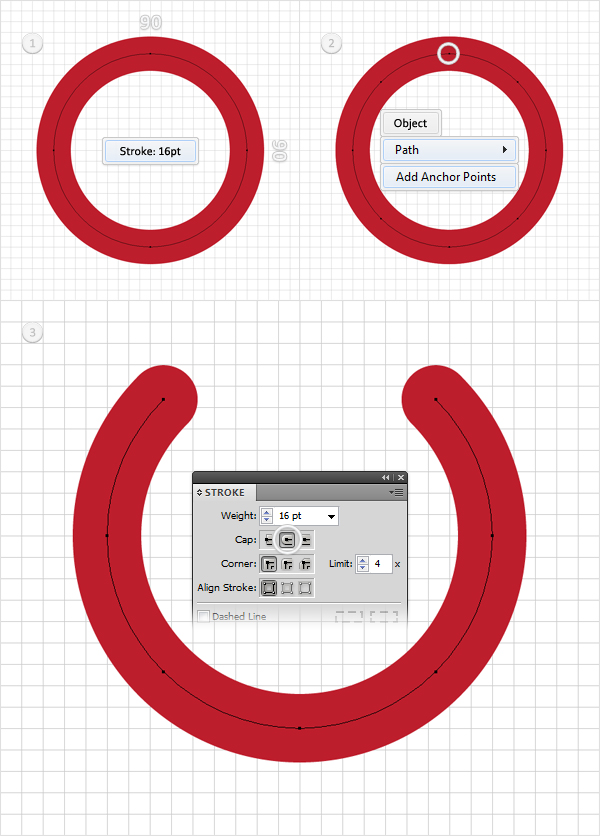
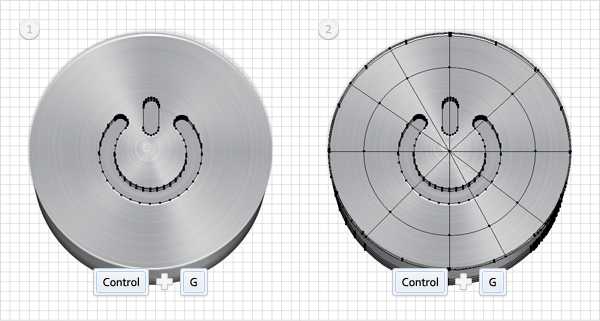
Start with the Ellipse Tool (L). Create a 90px circle, fill it with none, but add a 16pt stroke. The color is not important. Make sure that your circle is selected and go to Object > Path > Add Anchor Points. This will add four new anchor points for your path. Switch to the Direct Selection Tool (A), select the top anchor point and hit the Delete button from your keyboard. Obviously, this will remove that anchor point.
Now, you need to add a some roundness for the ending points of the remaining path. Select your path, go to the Stroke panel (Window > Stroke) and click on the Round Cap button from the Cap section. In the end your path should like the third image shown below.
Step 3
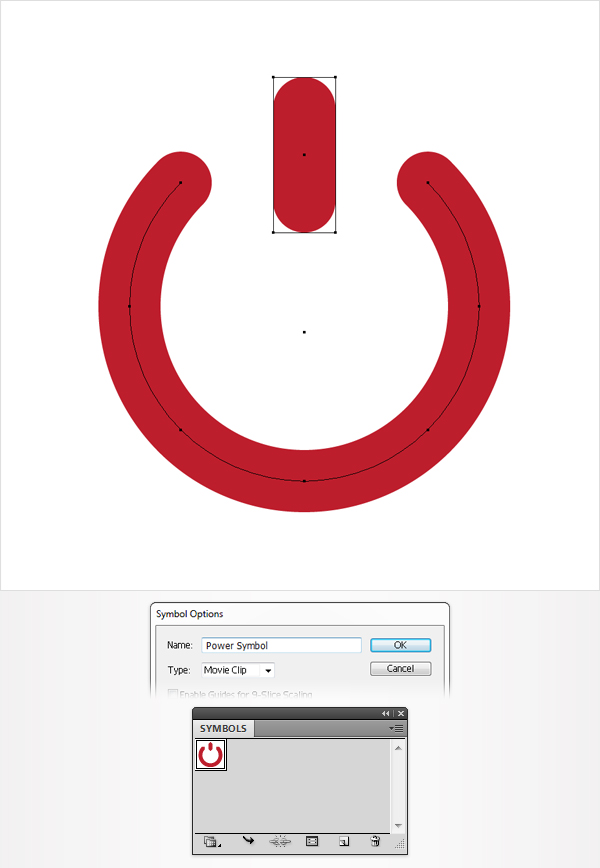
For the following step you will need a grid every 1px. Go to Edit > Preferences > General and enter 1 in the Keyboard Increment box. Pick the Rectangle Tool (M), create a 16 by 40 px shape and place it as shown in the following image. Fill it with the same color used in the previous step, then go to Effect > Stylize > Rounded Corners. Enter an 8px radius and click OK.

Step 4
Select the two shapes created so far, go to the Symbols panel (Window > Symbols) and click on the New Symbol button. It’s the little file icon from the bottom bar.
The Symbol Options window should open. Enter "Power Symbol" in the Name section, pick Movie Clip from the drop down menu and click OK. Have a new look at your symbols panel and you will find your fresh symbol. Go the the Layers panel and remove the existing symbol.
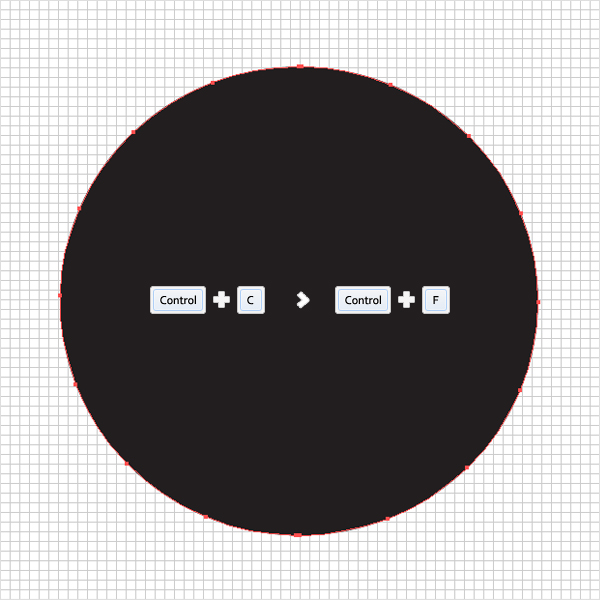
Step 5
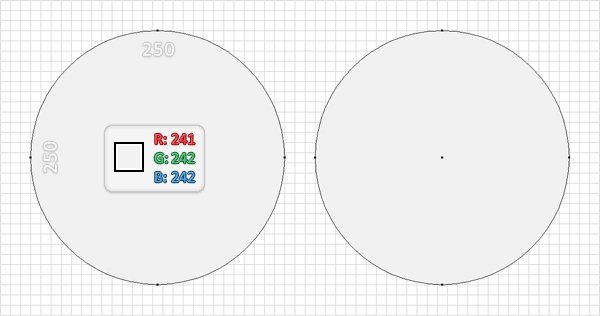
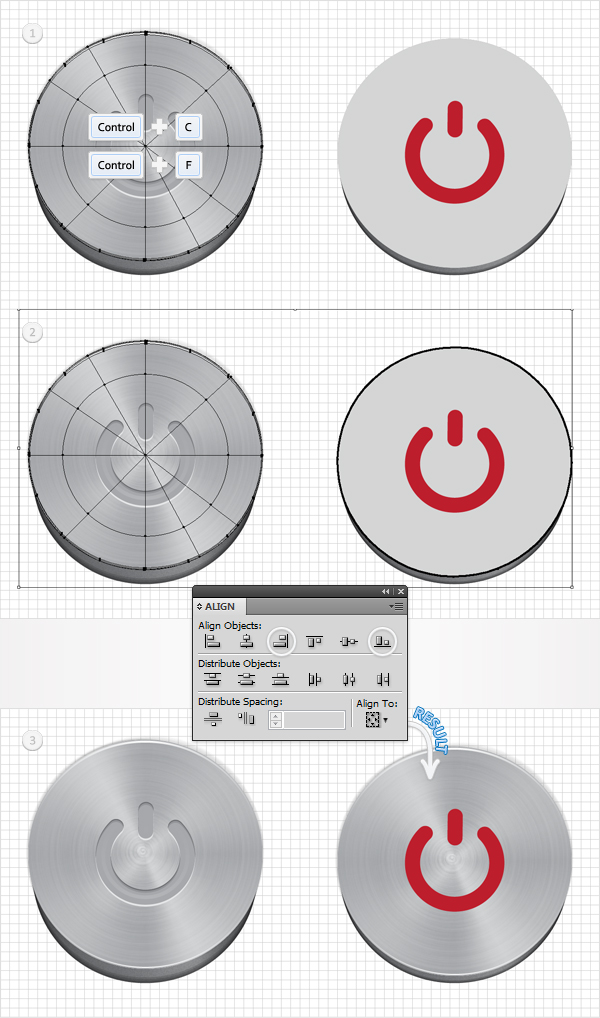
Return to "gridline every 10px". So, go to Edit > Preferences > General and enter 10 in the Keyboard Increment box. Pick the Ellipse Tool (L), create a 250px circle and fill it with R=241, G=242, B=242. Make a copy of this circle (Command + C > Command + F) and move it to the right, as shown in the following image.
Step 6
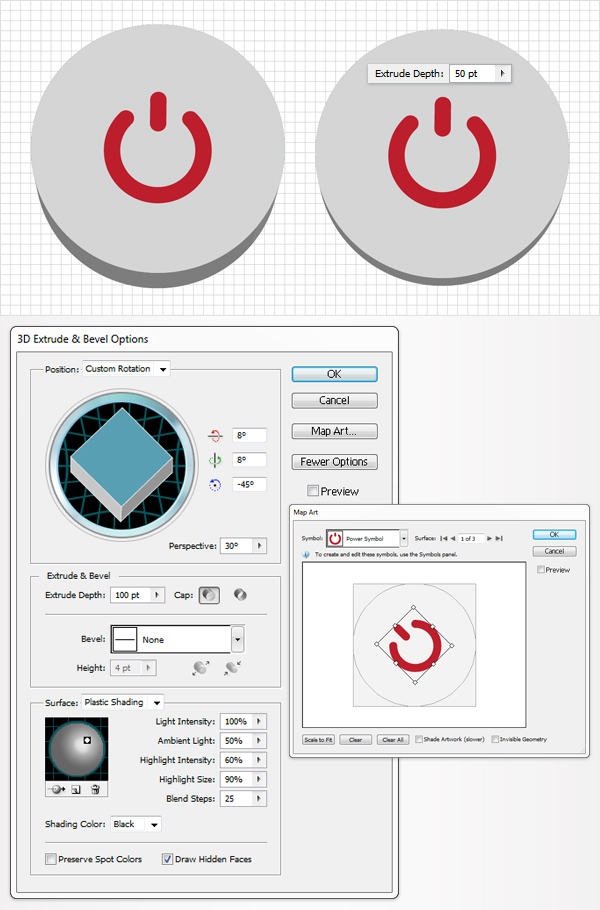
Select the left circle and go to Effect > 3D > Extrude & Bevel. Click on the More Options button then enter all the data shown below. Don’t forget to check the "Draw Hidden Faces" box from the bottom of the window.
Continue and click on the Map Art button. Go to "Surface 1" and select "Power Symbol" from the symbol drop-down menu. Rotate it as shown in the following image then click OK.
Select the right circle and hit Shift + Command + E. This will add the same 3D effect. You only need to make a small adjustment. Make sure that this right circle is still selected and go to the Appearance panel. Open the existing 3D Extrude & Bevel effect and decrease the Extrude Depth to 50pt.
Now, your shapes should look like the following image. The left shape will be the released button, while the right shape will be the pushed button.
Step 7
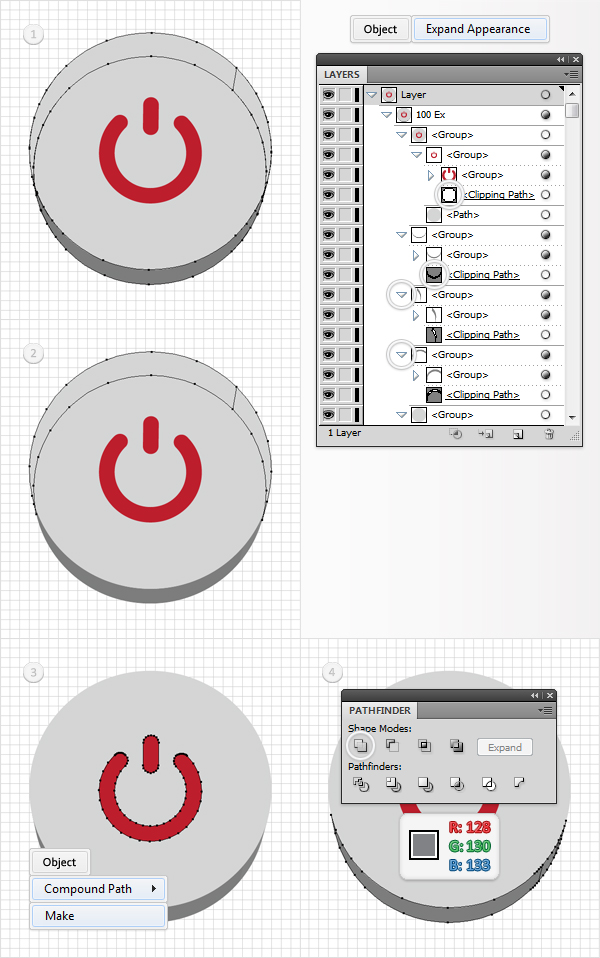
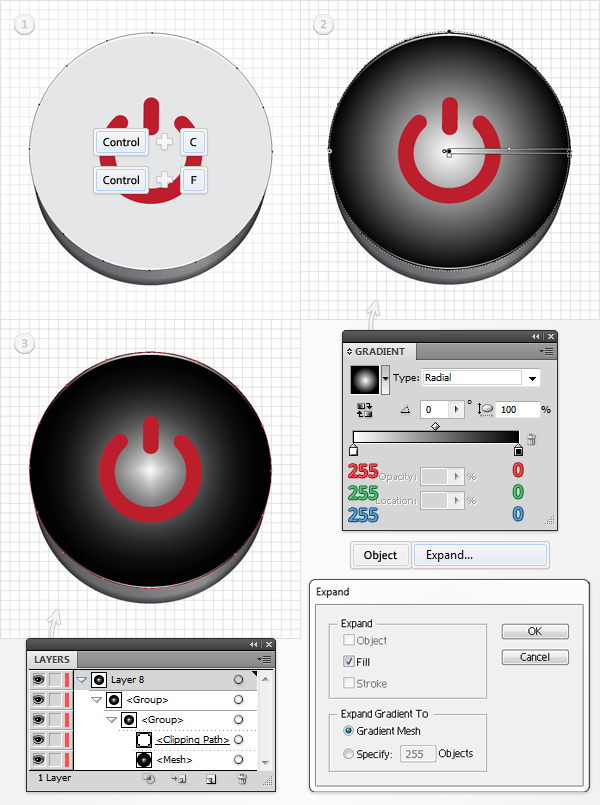
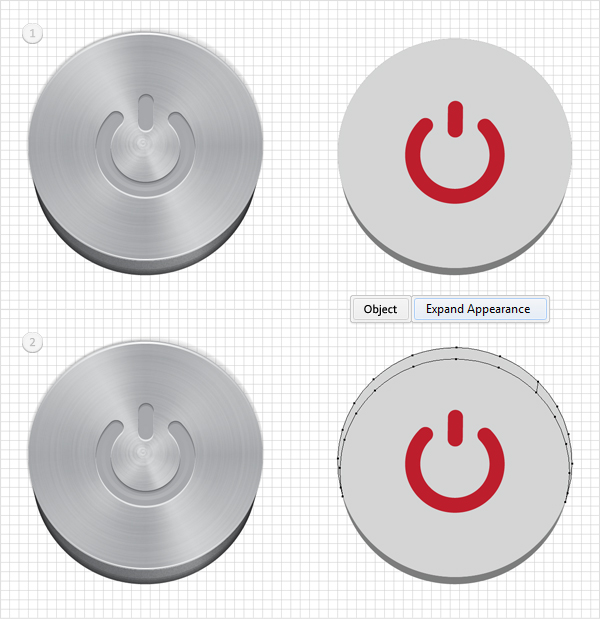
Now we’ll focus on the released button. Select it and go to Object > Expand Appearance. This will expand your 3D effect creating a group with a bunch of subgroups, shapes and clipping paths.
Go to the Layers panel and expand this group. Here is how you can easily do it. Hold the Alt key and click on the little arrow icon from the left of the group. Now that you can see all the content of your group, let’s make some changes.
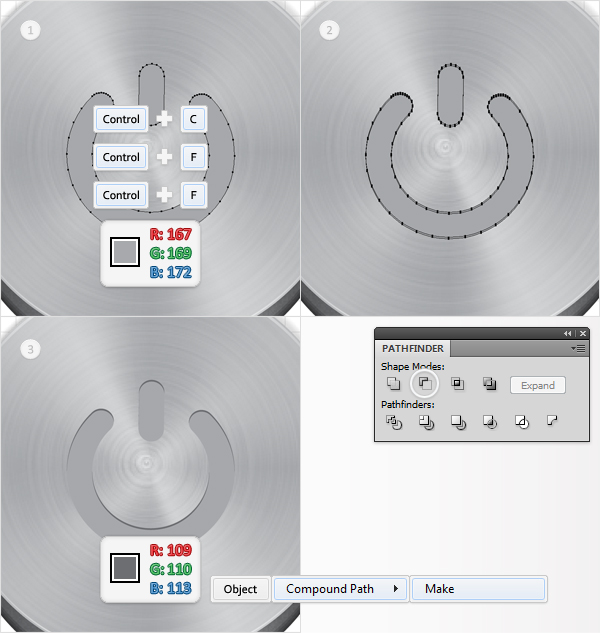
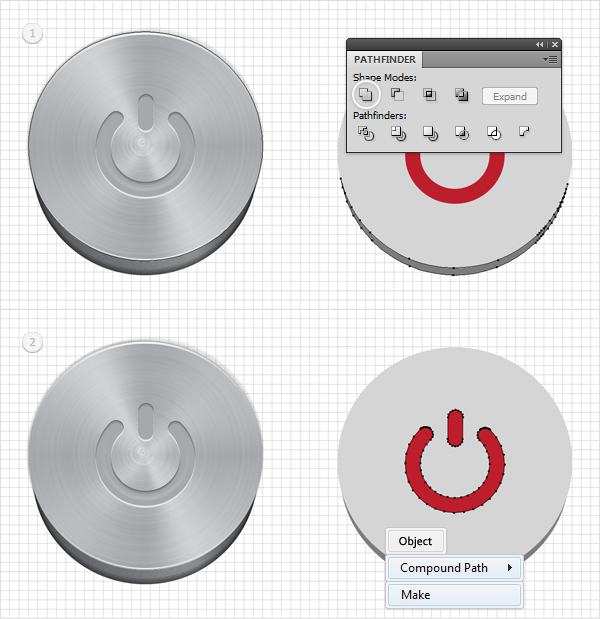
First, delete all the Clipping Paths. Next, delete the group of shapes selected in the second image. Select the two shapes that make up the power symbol and go to Object > Compound Path > Make. This will turn them into a single shape, a compound path.
Select the group of shapes from image #4 and click on the Unite button from the Pathfinder panel. Make sure that the resulting shape is filled with R=128, G=130, B=133. Reselect the main group and hit Command + Shift + G several times to get rid of all the groups and subgroups.
Now, let’s make a quick recap. You should have a light gray circle, a second circle hidden in the back (you’ll need this shape later), the power symbol and the dark, gray shape at the bottom.
Let’s focus for a second on the hidden circle. It’s an important piece of the final illustration so let’s make it noticeable. Go to the Layers panel, Double-click on this path and name it "Black". Also, to make sure that you don’t select/move it accidentally, lock it.
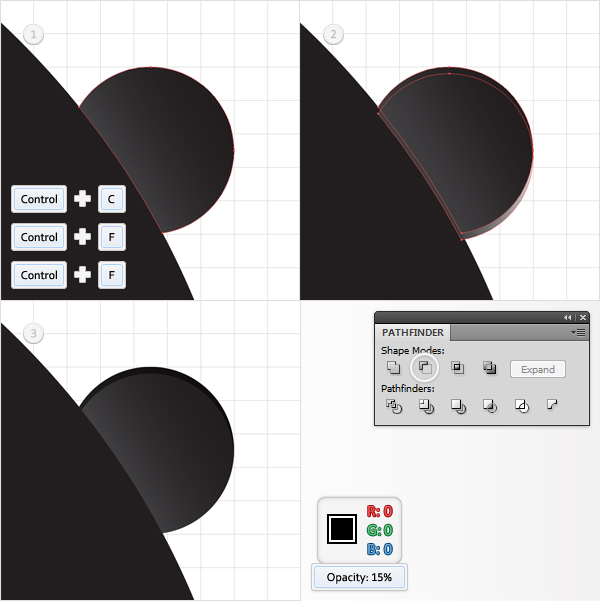
Step 8
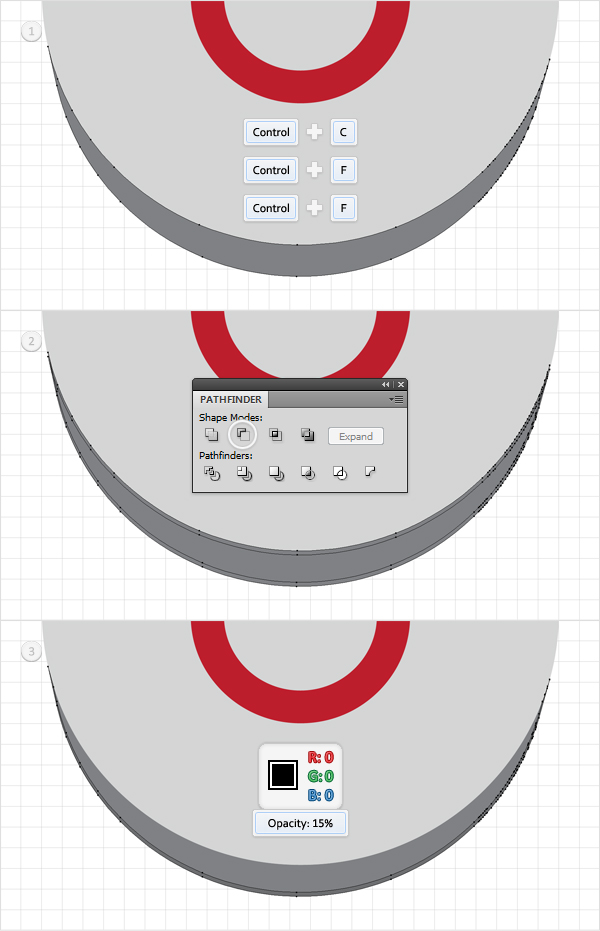
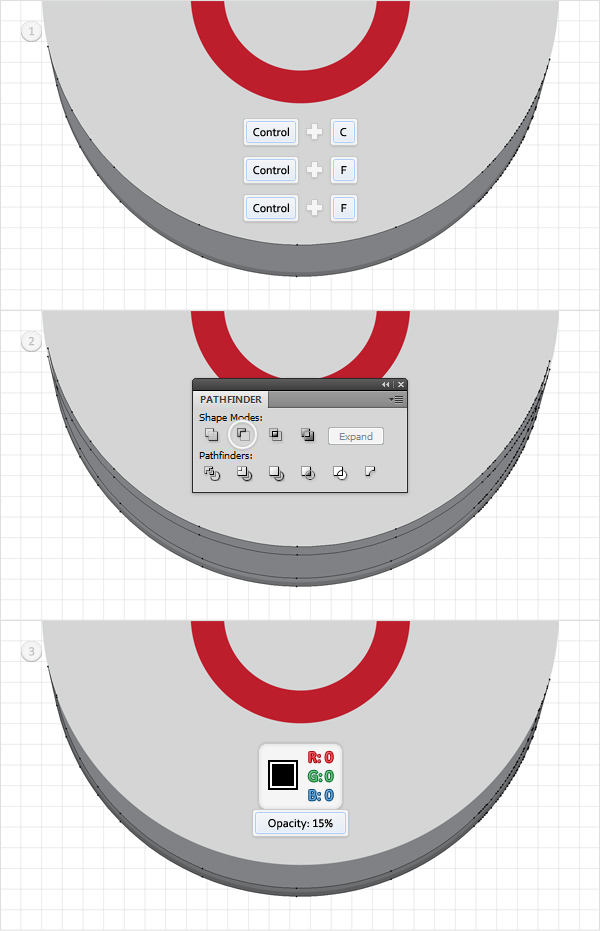
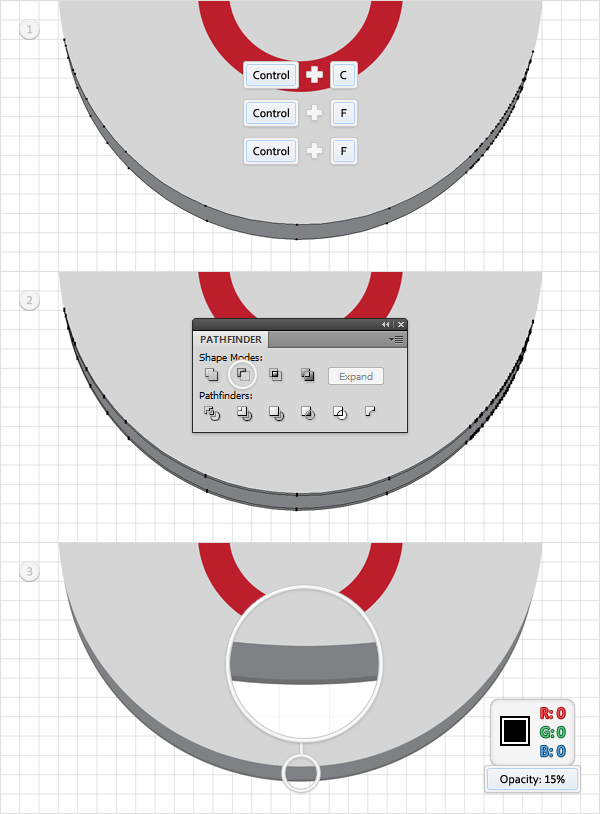
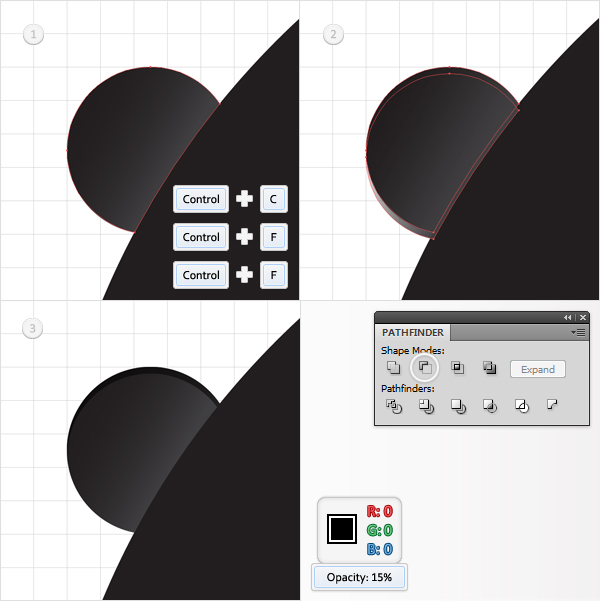
Disable the Snap to Grid and go to Edit > Preferences > General. Enter 1 in the Keyboard Increment box and click OK. Focus on the bottom, gray shape. Select it and make two copies in front (Command + C > Command + F > Command + F).
Select the top copy and hit the up arrow twice. Reselect both copies and click on the Minus Front button from the Pathfinder panel. Fill the resulting shape with black and lower its Opacity to 15%.
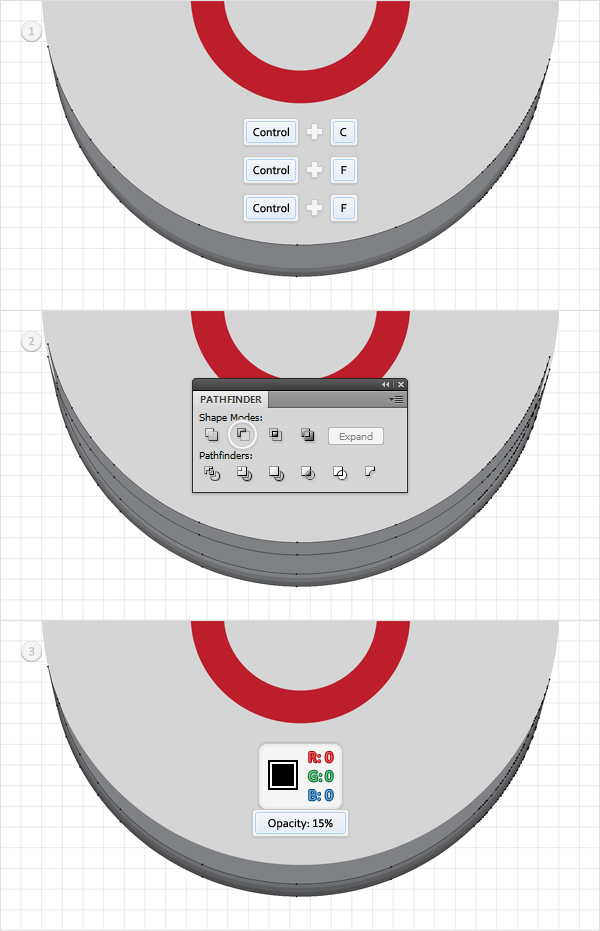
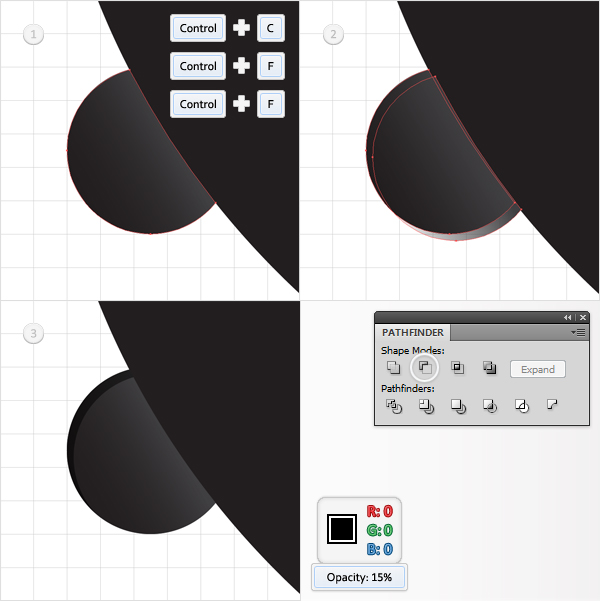
Step 9
Again, select the bottom, gray shape and make two copies in front (Command + C > Command + F > Command + F). Select the top copy and hit the up arrow four times. Reselect both copies and click on the Minus Front button from the Pathfinder panel. Fill the resulting shape with black and lower its Opacity to 15%.
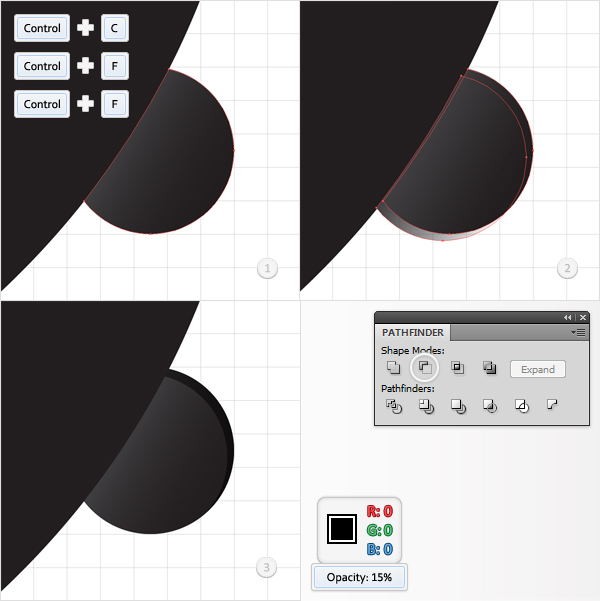
Step 10
Once again, select the bottom, gray shape and make two copies in front (Command + C > Command + F > Command + F). Select the top copy and hit the up arrow six times. Reselect both copies and click on the Minus Front button from the Pathfinder panel. Fill the resulting shape with black and lower its Opacity to 15%.
Step 11
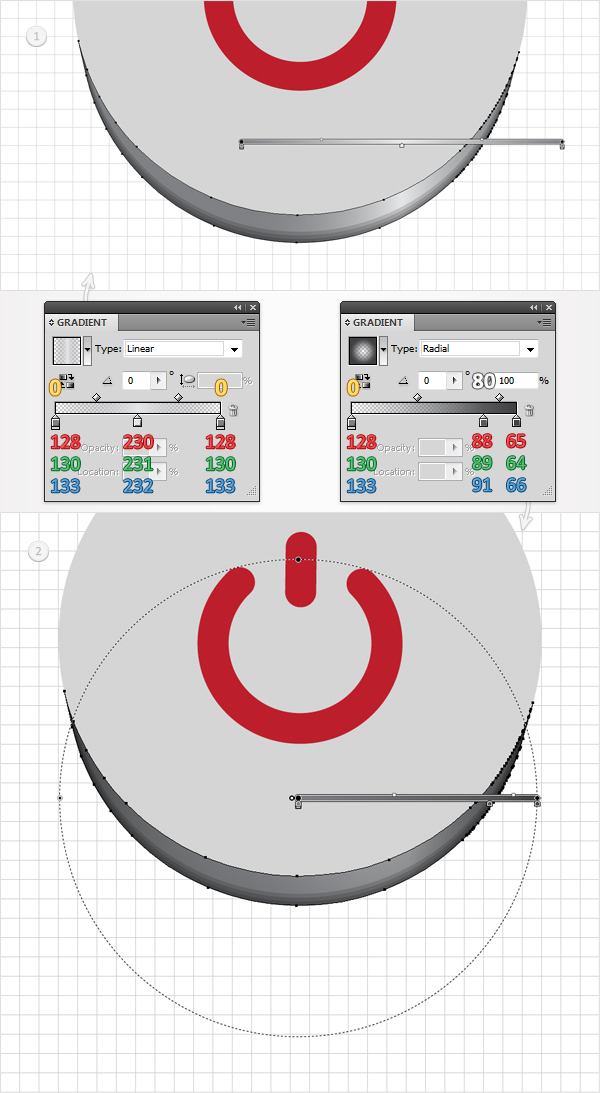
Next, you need so add some extra details for the bottom gray shape. Select it, go to the Appearance panel and click on the Add New Fill button (the little, white square from the bottom bar). Obviously, this will add a second fill for your shape.
Select it from the Appearance panel and use the linear gradient shown below. The yellow zeros from the gradient image stand for opacity percentage. Add a third fill for this shape and use the radial gradient shown below. Remember that the yellow text stand for Opacity percentage while the white text stands for location percentage.
Step 12
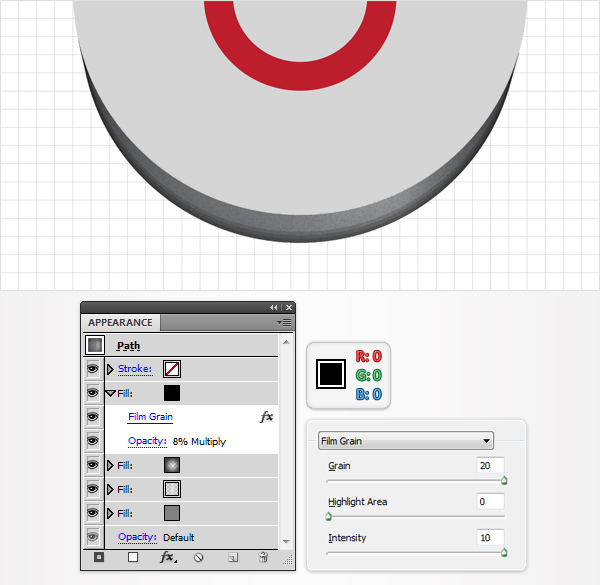
Keep focusing on the shape edited in the previous step. Select it and add a fourth fill. Select it from the Appearance panel and make it black. Lower the Opacity to 8%, change the blending mode to Multiply and go to Effect > Artistic > Film Grain. Enter the data shown below and click OK.
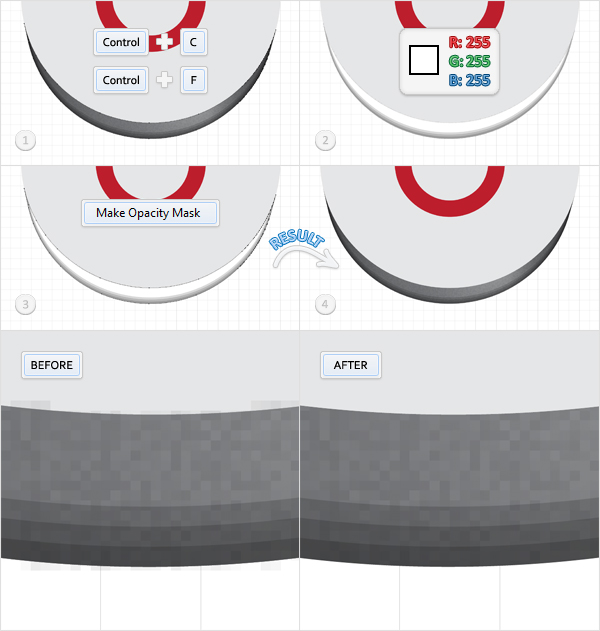
Step 13
Next, you need to mask the shape created in the previous step. This will hide the Film Grain effect that exceeds the edges of the shape. Select it and make a copy in front (Command + C > Command + F > Command + F).
Select this copy and hit the D key from your keyboard. This will add the default properties for your shape (a white fill and a 1pt, black stroke). Remove the black stroke. Now, select this white shape, along with the shape edited in the previous step and go to the Transparency panel (Window > Transparency). Open the fly-out menu and click on Make Opacity Mask.
Step 14
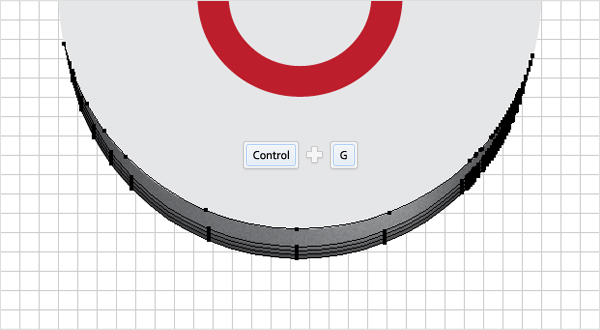
Select all the shapes that make up the bottom area of your button and group them (Command + G). Go to the Layers panel, Double-click on this group and name it "Bottom".
Step 15
Move to the top circle shape. Select it and go to Object > Path > Offset Path. Enter a -1px Offset and click OK. Select the resulting shape and make a copy in front (Command + C > Command + F).
Select this copy and hit the down arrow twice. Reselect both copies and click on the Minus Front button from the Pathfinder panel. Fill the resulting shape with the linear gradient shown in the fourth image. Don’t forget that the yellow zero stands for Opacity percentage.
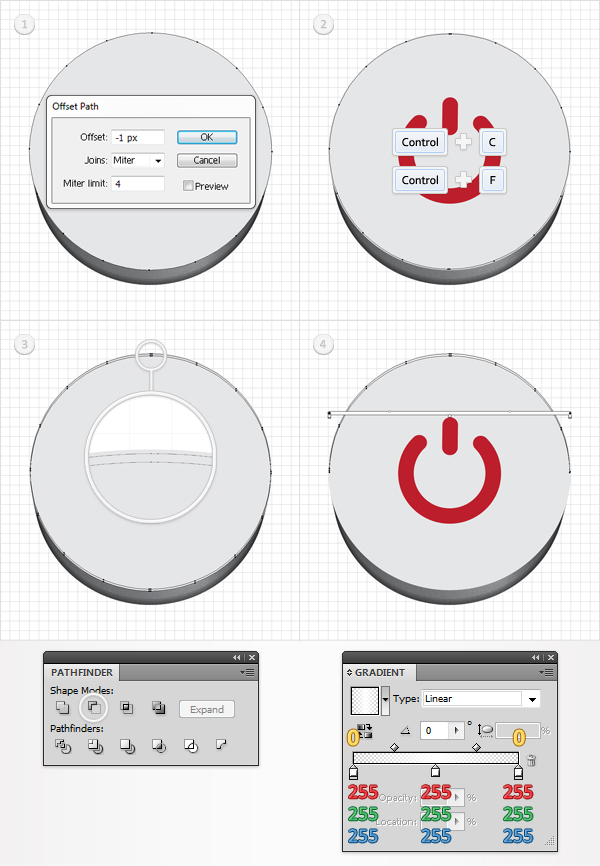
Step 16
Reselect the top circle and go to Object > Path > Offset Path. Enter a -1px Offset ad click OK. Select the resulting shape and make a copy in front (Command + C > Command + F). Select this copy and hit the up arrow once.
Reselect both copies and click on the Minus Front button from the Pathfinder panel. Fill the resulting shape with the linear gradient shown in the fourth image. It’s the same gradient used in the previous step.
Step 17
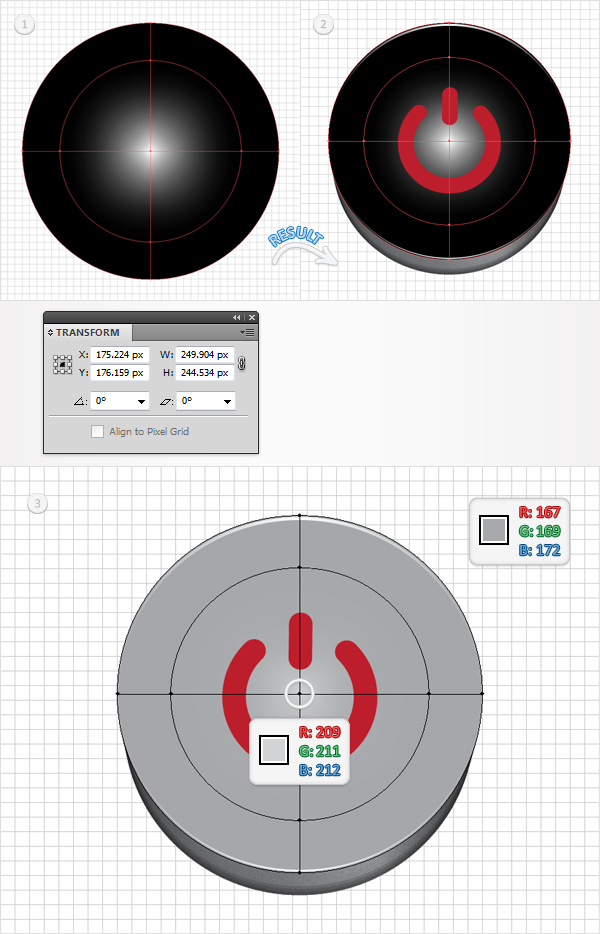
Reselect the top circle and make a copy in front (Command + C > Command + F). Go to the Layers panel and make this copy invisible. Reselect the remaining, visible circle and fill it with the radial gradient shown in the second image.
Make sure that this shape is still selected and go to Object > Expand. Check the Fill and Gradient Mesh boxes and click OK. This will create a new group with a gradient mesh a clipping path. Go to the Layers panel, find this group, remove the clipping path and ungroup the mesh (Command + Shift + G).
Step 18
You might have already noticed that the mesh is too large. You need to resize it. Select it and go to the Transform panel. Simply enter 249.904 in the width box and 244.534 in the height box. This will bring the mesh to the desired size.
Now, let’s add some color for this mesh. Pick the Direct Selection Tool (A), select all the mesh points and set the color at R=167, G=169, B=172. Continue with the Direct Selection Tool (A) and select the middle mesh points. Set their color at R=209, G=211, B=212.
Step 19
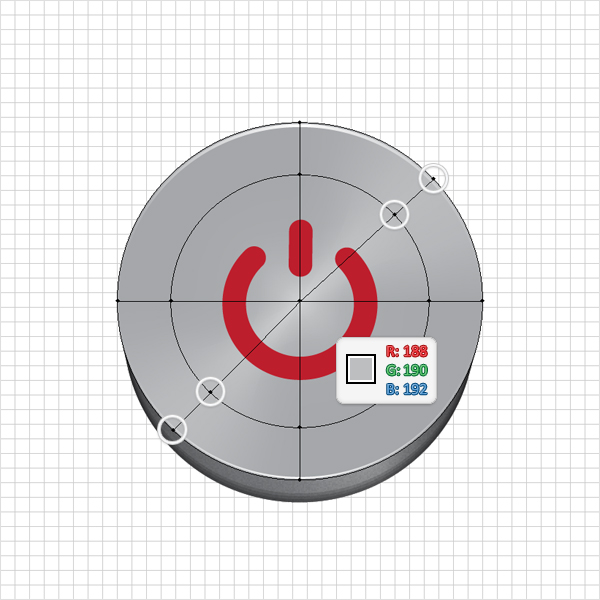
Pick the Mesh Tool and add a new mesh path as shown below. Switch to the Direct Selection Tool (A), select the four mesh points highlighted in the following image and set their colors at R=188, G=190, B=192.
Step 20
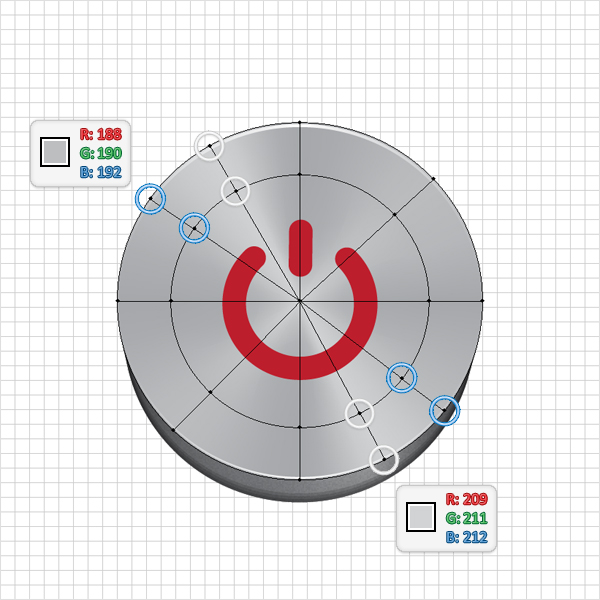
Continue with the Mesh Tool and add two new mesh paths as shown below. Switch to the Direct Selection Tool (A), select the four mesh points highlighted with white and set their colors at R=209, G=211, B=212. Select the four mesh points highlighted with blue and set their colors at R=188, G=190, B=192.
Step 21
Go to the Layers panel and turn the copy created in the seventeenth step back to visible. Move it right above the mesh and fill it with black.
Step 22
Select the black shape from the previous step. Lower its opacity to 60%, change the blending mode to Overlay and go to Effect > Artistic > Film Grain. Enter the data shown below, click OK and go to Effect > Blur > Radial Blur. Again, enter the data shown below and click OK. In the end your button should look like the following image.

Step 23
Select the mesh and all the shapes that make up the front side of the button and group them (Command + G). Name this new group "Front".
Step 24
Focus on the power symbol shape. Select it and make two copies in front (Command + C > Command + F > Command + F). Select the top copy and hit the down arrow once. Reselect both copies and click on the Minus Front button from the Pathfinder panel. Select the resulting group of shapes, turn it into a compound path (Object > Compound Path > Make) and fill it with R=109, G=110, B=113.
Step 25
Reselect the power symbol shape and make two copies in front (Command + C > Command + F > Command + F). Select the top copy and hit the down arrow three times. Reselect both copies and click on the Minus Front button from the Pathfinder panel. Select the resulting group of shapes, turn it into a compound path (Object > Compound Path > Make) and fill it with R=147, G=149, B=152.

Step 26
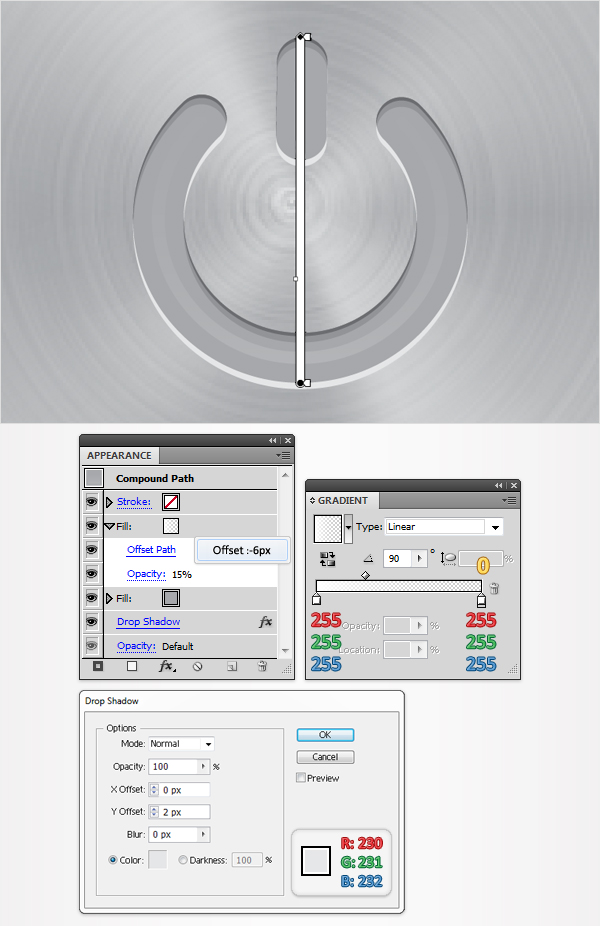
Reselect the power symbol shape and add a second fill. Select it from the Appearance panel. Fill it with the linear gradient shown below, lower the Opacity to 15% and go to Effect > Path > Offset Path. Enter a -6px Offset and click OK. Reselect the entire path and go to Effect > Stylize > Drop Shadow. Enter the data shown below and click OK.
Step 27
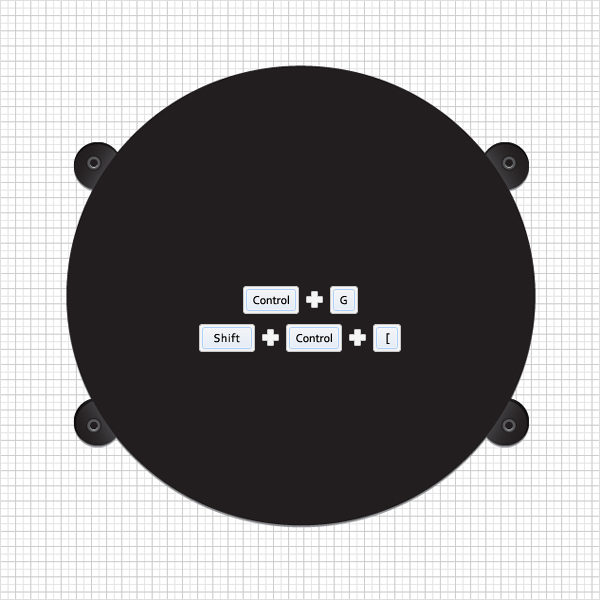
Select all the shapes that make up the power symbol and group them. Name it "Power Symbol". Now, select all the groups that make up this released button and group them (Command + G). Name this new group "Released Button".
Step 28
Move to the pushed button and expand the 3D effect. Again, focus on the resulting group, remove all the clipping paths and the shapes selected in the second image. You should also delete the circle shape hidden in the back, as you won’t need this one.
Step 29
Select the shapes highlighted in the first image and unite them. Select the shapes that make up the power symbol and turn them into a compound path.
Step 30
Focus on the bottom, gray shape. Select it and make two copies in front (Command + C > Command + F > Command + F). Select the top copy and hit the up arrow once. Reselect both copies and click on the Minus Front button from the Pathfinder panel. Fill the resulting shape with black and lower its Opacity to 15%.
Step 31
Again, select the bottom, gray shape and make two copies in front (Command + C > Command + F > Command + F). Select the top copy and hit the up arrow twice. Reselect both copies and click on the Minus Front button from the Pathfinder panel. Fill the resulting shape with black and lower its Opacity to 15%.

Step 32
Once again, select the bottom, gray shape and make two copies in front (Command + C > Command + F > Command + F). Select the top copy and hit the up arrow three times. Reselect both copies and click on the Minus Front button from the Pathfinder panel. Fill the resulting shape with black and lower its Opacity to 15%.

Step 33
Reselect the bottom gray shape and add the properties used for the released button. You can easily copy the properties from one shape to another. Here is how you can do it. Go to the Layers panel and find the bottom, gray shape from the released button.
Focus on the right side of the Layers panel and you’ll notice that every shape comes with a little circle. It’s called a target icon. Hold alt, click on this circle and drag onto the item to which you want to copy appearance attributes. Now that you transfered the properties mask this shape like you did in step thirteen. Don’t forget to group all the shapes that make up the bottom area of this pressed button.
Step 34
For the front side of the pressed button we’ll use a copy of the "Front" group. Go to the Layers panel, into the "Released Button" group and duplicate the "Front" group.
Drag this copy outside the "Released Button" group. Select this group copy along with the front circle from the pressed button and go to the Align panel. Simply click on the Horizontal Align Right and Vertical Align Bottom buttons. Now, your group copy should be placed as shown in the final image.
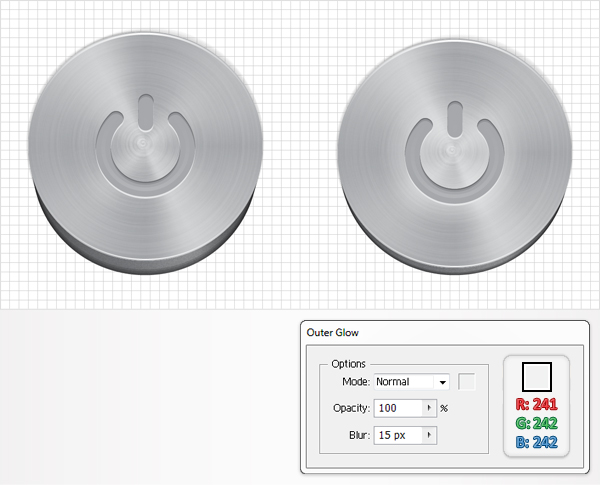
Step 35
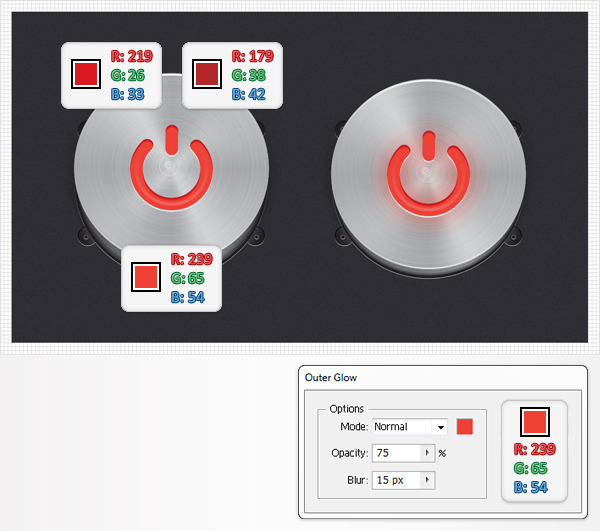
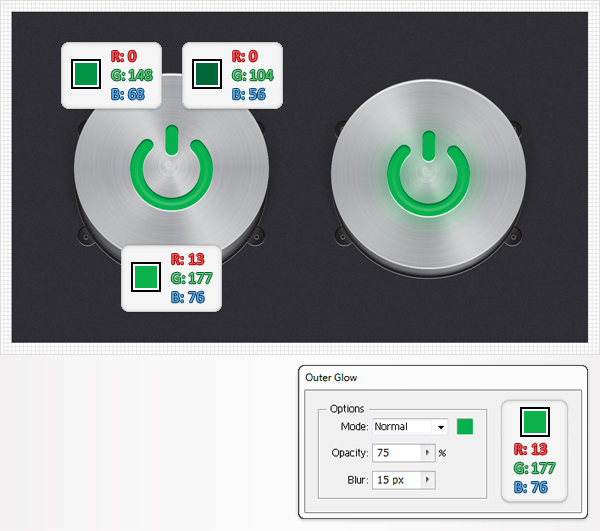
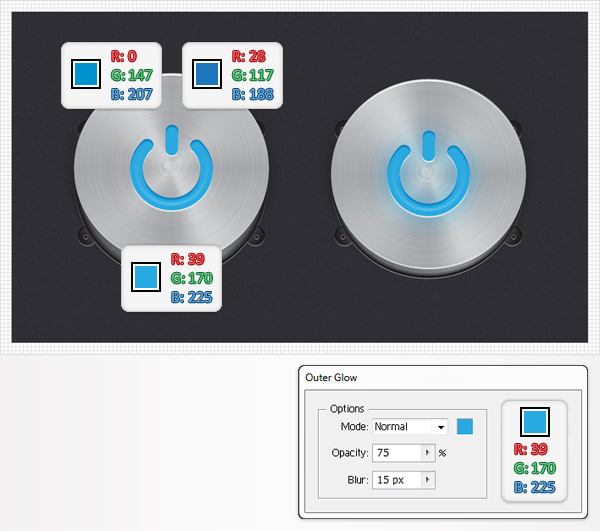
Move to the power symbol. Repeat steps 24, 25 and 26 or use the technique shown in the previous step. The symbol from the pressed button needs a nice Outer Glow effect. Simply select the power symbol shape and go to Effect > Stylize > Outer Glow. Enter the data shown in the second image and click OK.
If you choose to repeat those three steps don’t forget to group the final shapes that make up your power symbol. Finally, select all the groups that make your pressed button and group them. Name this final group "Pressed Button".
Step 36
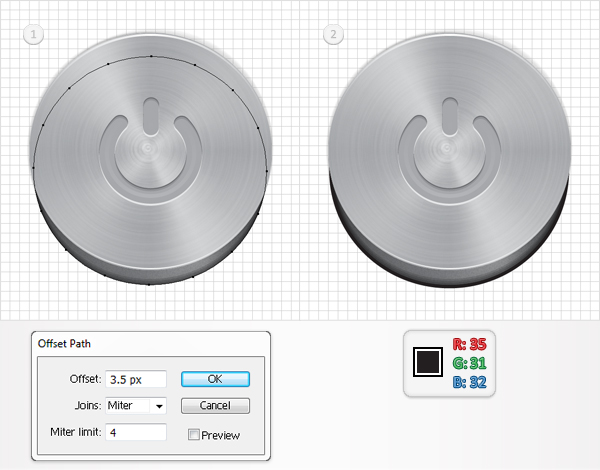
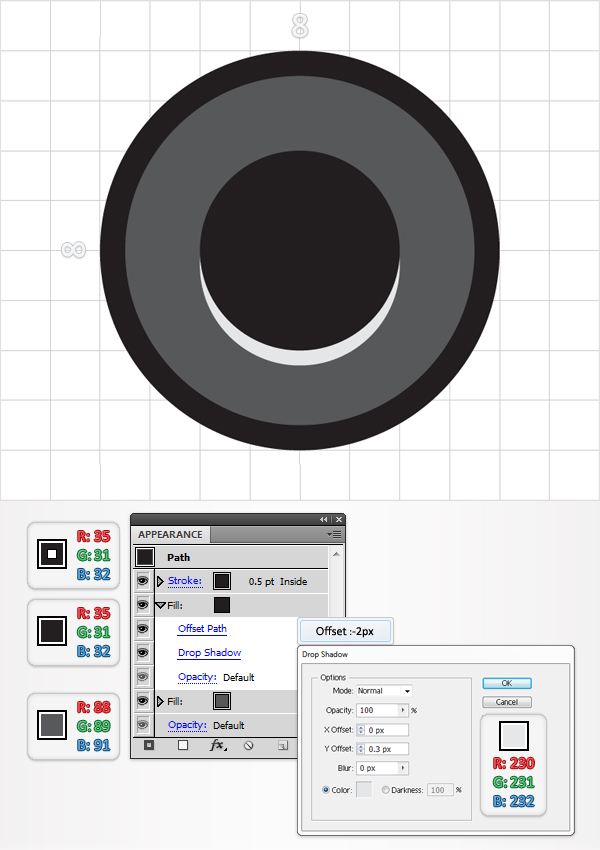
Return to the "Black" shape and unlock it. Select it, send it to the bottom of the Layers panel (Shift + Command + Left Bracket key) and go to Object > Path > Offset Path. Enter a 3.5px Offset and click OK. Fill the resulting shape with R=35, G=31, B=32, and delete the original "Black" shape.
Step 37
Go to the Layers panel and make the "Released Button" group invisible. Select the shape made in the previous step and make a copy in front (Command + C > Command + F).
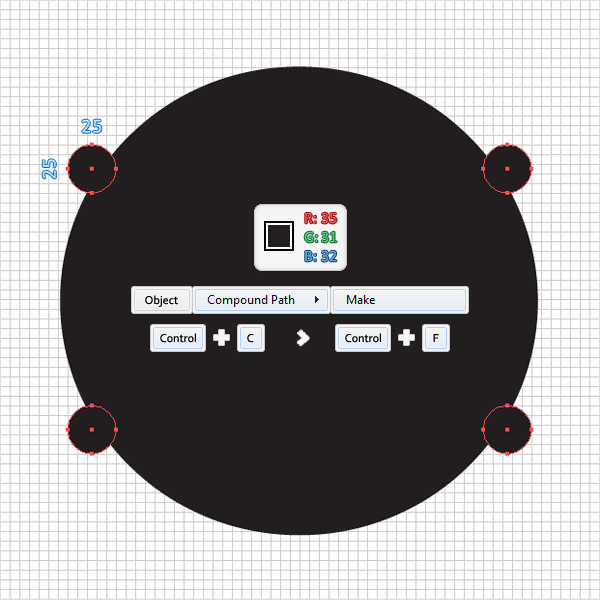
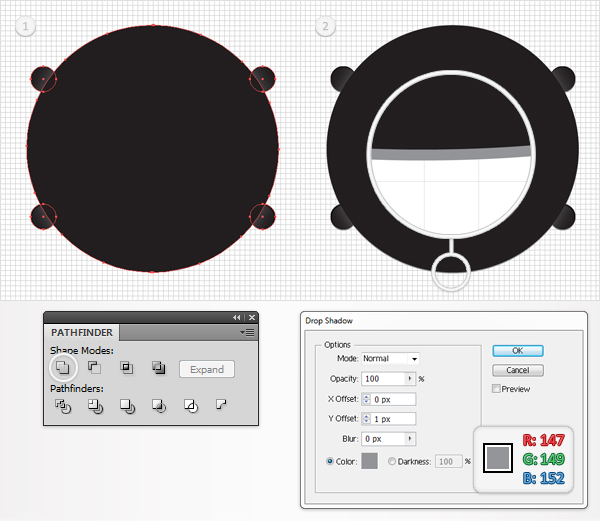
Step 38
Re-enable the Snap to Grid. For the following step you will need a grid very 5px. Go to Edit > Preferences > General and enter 5 in the Keyboard Increment box. Pick the Ellipse Tool (L) and create four, 25px circles. Fill them all with R=35, G=31, B=32. Now place them as shown in the following image, then turn them into a compound path. Select it and make a copy in front.
Step 39
Select the front, large circle along with the front compound path created in the previous step and click on the Minus Front button from the Pathfinder panel. This will create a group with four cut circles.

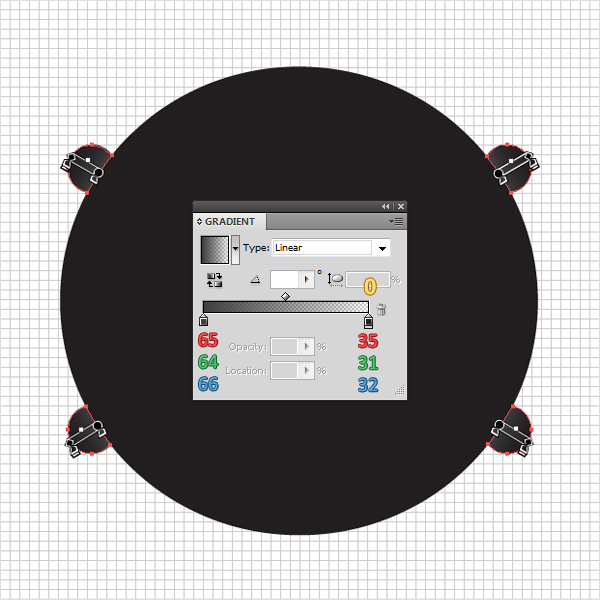
Step 40
Select the four shapes created in the previous step one by one and fill them with the linear gradient shown below. Don’t forget about the yellow zero.
Step 41
Disable the Snap to Grid. Select the top, left cut circle and make two copies in front. Select the top copy and hit the down arrow once. Reselect both copies and click on the Minus Front button from the Pathfinder panel. Fill the resulting shape with black and lower its Opacity to 15%.
Step 42
Select the top, right cut circle and make two copies in front. Select the top copy and hit the down arrow once. Reselect both copies and click on the Minus Front button from the Pathfinder panel. Fill the resulting shape with black and lower its Opacity to 15%.
Step 43
Select the bottom, left cut circle and make two copies in front. Select the top copy and hit the down arrow and the right arrow once. Reselect both copies and click on the Minus Front button from the Pathfinder panel. Fill the resulting shape with black and lower its Opacity to 15%.
Step 44
Select the bottom, right cut circle and make two copies in front. Select the top copy and hit the down arrow and the left arrow once. Reselect both copies and click on the Minus Front button from the Pathfinder panel. Fill the resulting shape with black and lower its Opacity to 15%.
Step 45
Select the other large circle along with the other compound path and click on the Unite button from the Pathfinder panel. Select the resulting shape and go to Effect > Stylize > Drop Shadow. Enter the data shown below image #2 and click OK.
Step 46
Re-enable the Snap to Grid. For the following step you will need a grid every 1px. Go to Edit > Preferences > General and enter 1 in the Keyboard Increment box. Pick the Ellipse Tool (L), create a 8px circle and fill it with R=88, G=89, B=91.
Add a second fill for this shape and select it from the Appearance panel. Set its color at R=35, G=31, B=32, and go to Effect > Path > Offset Path. Enter a -2px offset and click OK. With this second fill still selected go to Effect > Stylize > Drop Shadow. Enter the data shown below and click OK. Return to the Appearance panel and add a 0.5 stroke. Align it to inside and set the color at R=35, G=31, B=32.
Step 47
Select the shape made in the previous step and make three copies. Now, place these four circles as shown in the following image. The Snap to Grid will ease your work. Select all these dark shapes and group them. Name this group "Black" and send it to back (Shift + Command + Left Bracket key).
Step 48
Return to "gridline every 10px" and turn the "Released Button" group back to visible. Select the "Black" group and make a copy in front. Select this copy and move it below the pressed button as shown in the second image. Again, the Snap to Grid will ease your work.

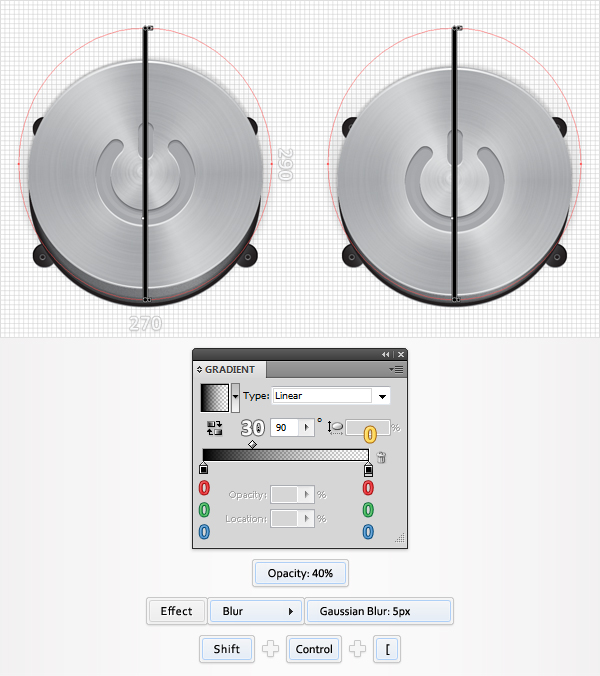
Step 49
Pick the Ellipse Tool (L), create a 270 by 290px shape and place it behind the released button, as shown in the following image. First, send this shape to back (Shift + Command + Left Bracket key) and fill it with the linear gradient shown below. Next, lower its Opacity to 40% and go to Effect > Blur > Gaussian Blur. Enter a 5px radius and click OK. Make a copy of this simple ellipse and drag it behind the pressed button.
Step 50
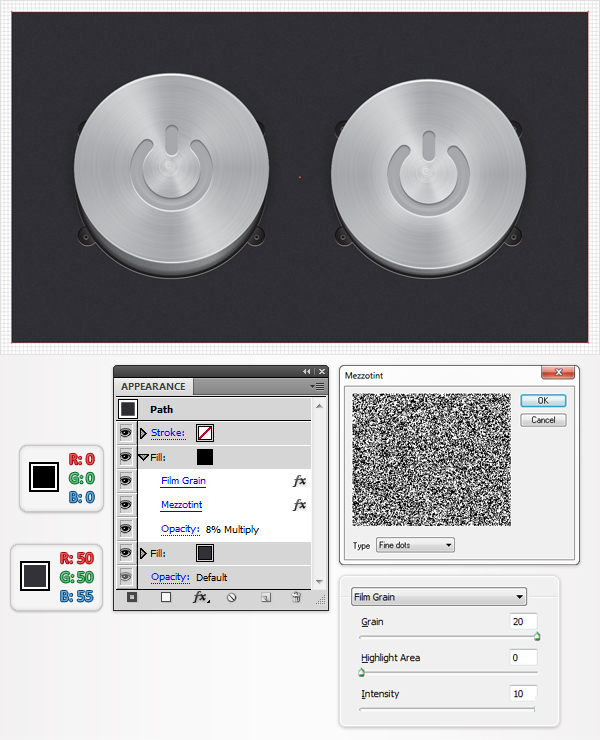
For the background use the Rectangle Tool (M). Create a shape the size of your artboard, fill it with R=50, G=50, B=50 and send it to back (Shift + Command + Left Bracket key).
Add a second fill for this shape and make it black. Select it from the Appearance panel and go to Effect > Pixelate > Mezzotint. Select Fine dots from the drop down menu, click OK, then go the Effect > Artistic > Film Grain. Enter the data shown below and click OK.
Step 51
Finally, you can replace the gray tints used for the power symbol with a different set of colors. In the following images you can find a few examples. Use the top, two colors for the thin compound paths and the bottom color for the overall power symbol. Don’t forget to edit the Outer Glow effect used for the pressed button.
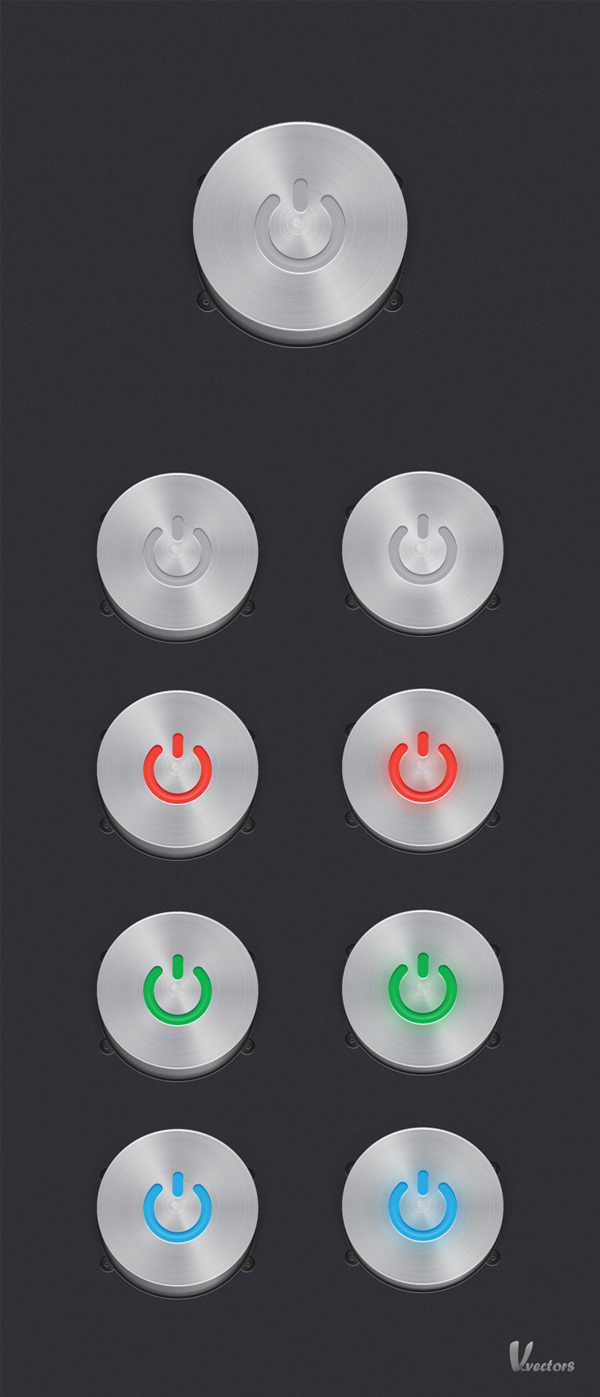
Conclusion
The final vector power button icon set is below.