In the following tutorial you will learn how to create a block game interface in Adobe Illustrator CS5. Vector game graphics allow for versatile artwork. The workflow presented in this tutorial will teach you how to create game graphics in Illustrator. These techniques can be applied to multiple interface design and game design projects. It’s time to jump in, learn to create these shapes, and give them colorful graphic depth.
Step 1
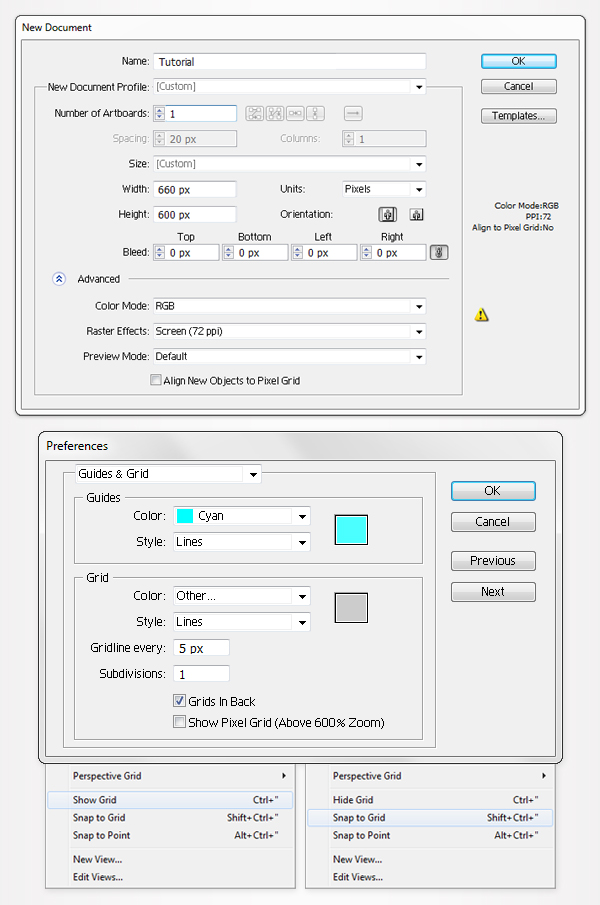
Hit Command + N to create a new document. Enter 660 in the width box and 600 in the height box, then click on the Advanced button. Select RGB, Screen (72ppi), and make sure that the Align New Objects to Pixel Grid box is unchecked before your click OK. Now, turn on the Grid (View > Grid) and the Snap to Grid (View > Snap to Grid).
Next, you’ll need a grid every 5px. Go to Edit > Preferences > Guides > Grid, enter 5 in the Gridline every box and 1 in the Subdivisions box. You can also open the Info panel (Window > Info) for a live preview with the size and position of your shapes. Do not forget to replace the unit of measurement to pixels from Edit > Preferences > Unit > General. All these options will significantly increase your work speed.
Step 2
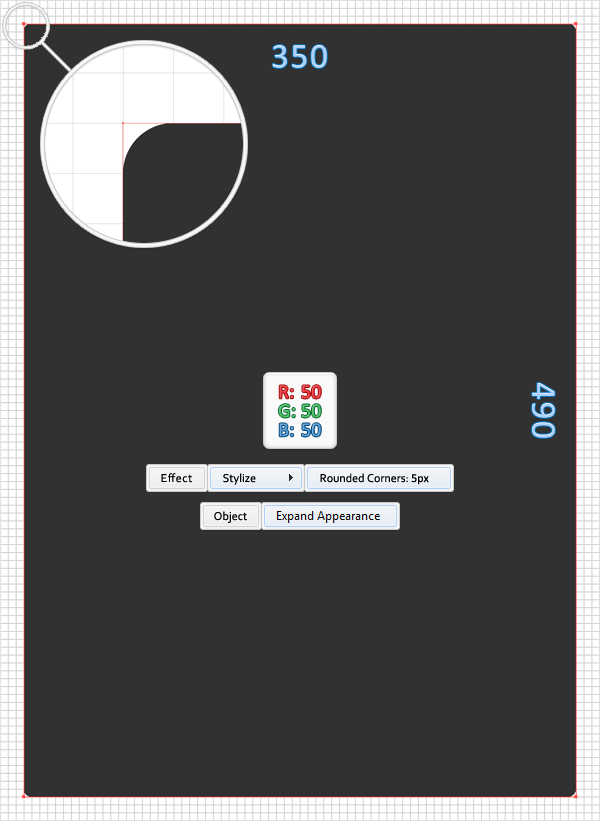
Pick the Rectangle Tool (M) and create a 350 by 490px shape. The Snap to Grid will ease your work. Fill it with R=50, G=50, B=50. Now remove the color from the stroke and go to Effect > Stylize > Rounded Corners. Enter a 5px radius, click OK, and go to Object > Expand Appearance.
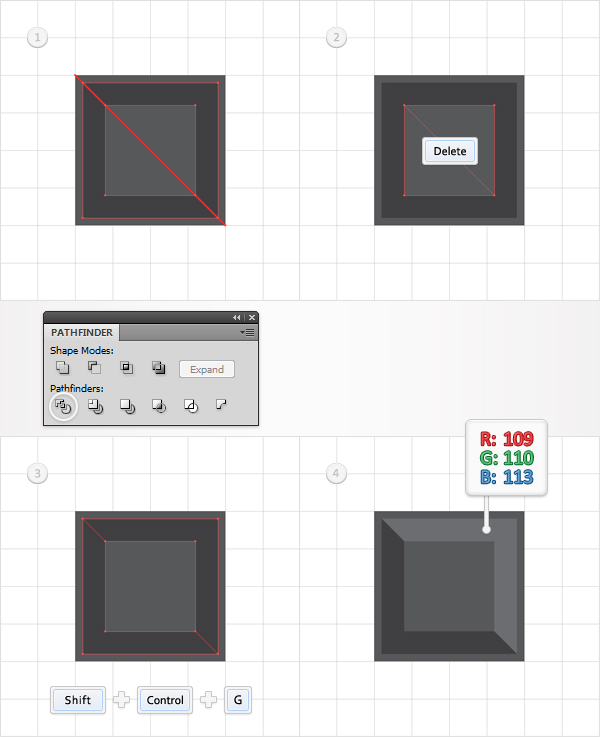
Step 3
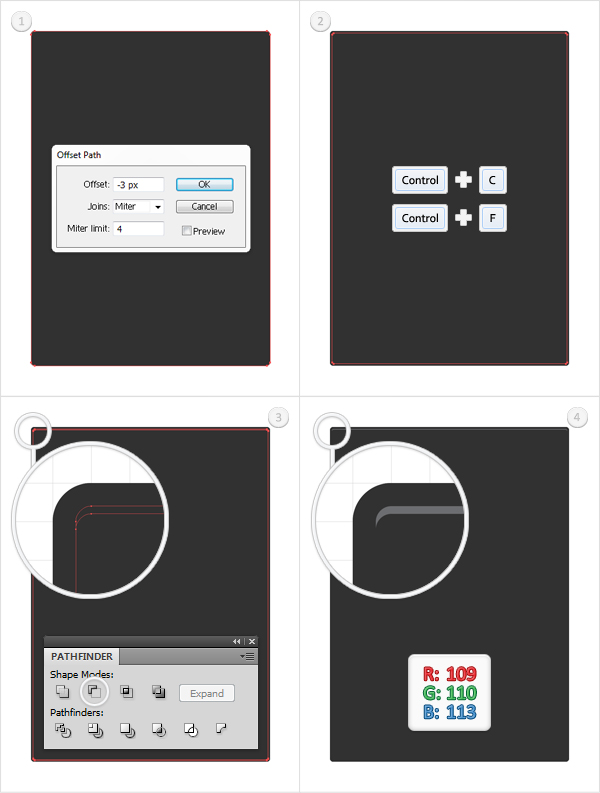
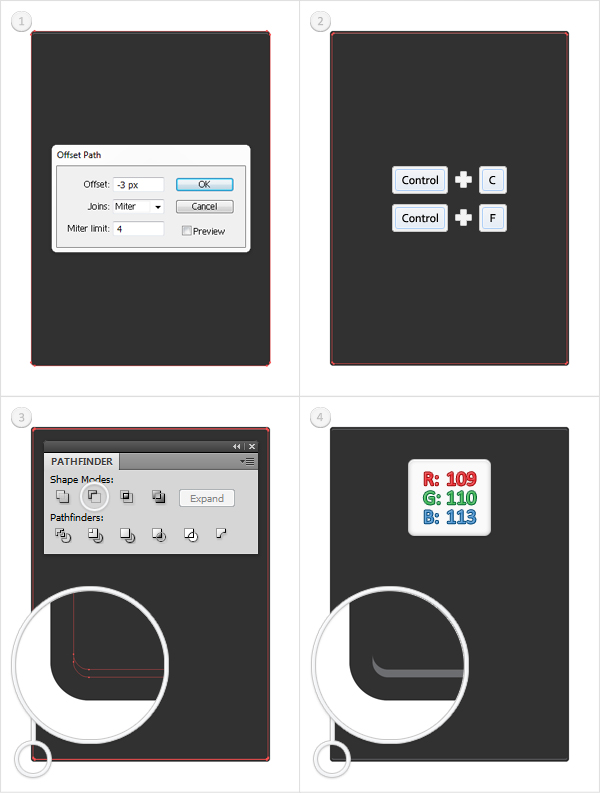
Disable the Grid (View > Show Grid) and the Snap to Grid (View > Snap to Grid). Go to Edit > Preferences > General and make sure that the Keyboard Increment is set at 1px. Reselect the shape created in the previous step and go to Object > Path > Offset Path. Enter a -3px Offset and click OK.
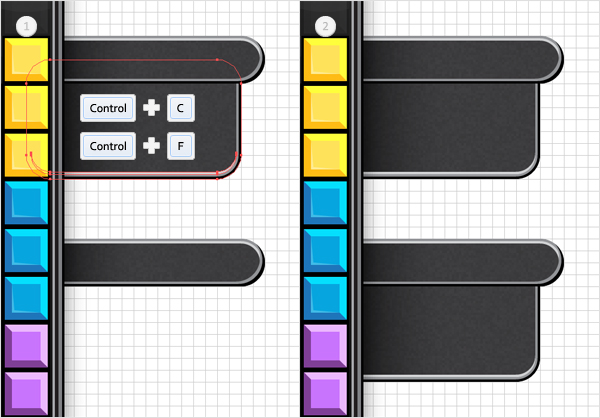
Select the resulting shape and make a copy in front (Command + C > Command + F). Select this copy and hit the down arrow once. Reselect the two shapes created in this step and click on the Minus Front button from the Pathfinder panel (Window > Pathfinder). Fill the resulting shape with R=109, G=110, B=113.
Step 4
Again, select the shape created in the second step and go to Object > Path > Offset Path. Enter a -3px Offset and click OK. Select the resulting shape and make a copy in front (Command + C > Command + F).
Select this copy and hit the up arrow once. Reselect the two shapes created in this step and click on the Minus Front button from the Pathfinder panel. Fill the resulting shape with R=109, G=110, B=113.
Step 5
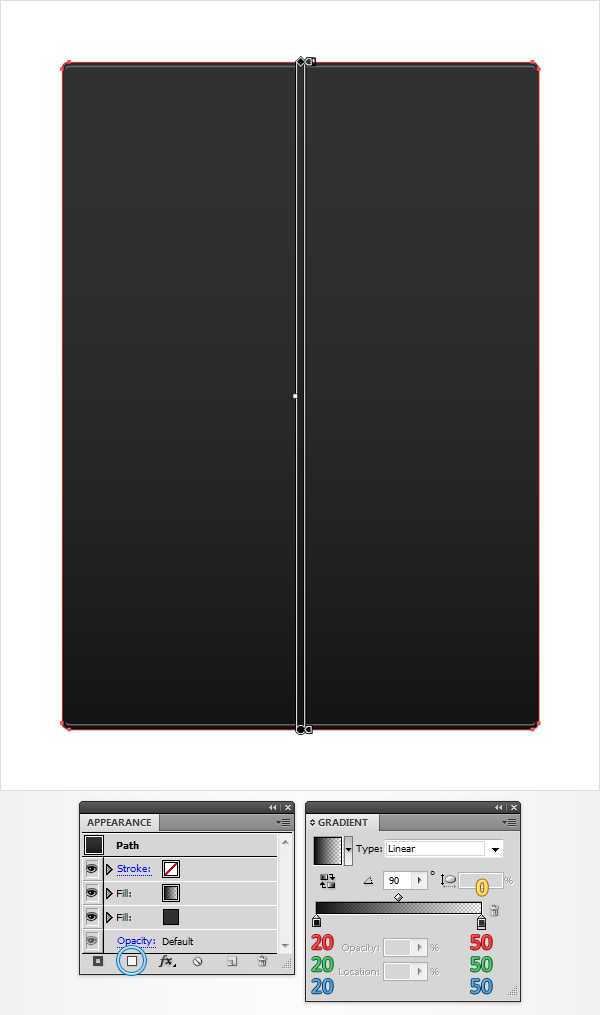
Reselect the shape created in the second step, move to the Layers panel, Double-click on it and name it "Main". Make sure that this shape is still selected, move to the Appearance panel (Window > Appearance) and click on the Add New Fill button. It’s the little white square from the bottom of the Appearance panel.
Obviously, this will add a new fill for your shape. Select it from the Appearance panel and use the linear gradient shown below. The yellow zero from the gradient image stands for Opacity percentage.
Step 6
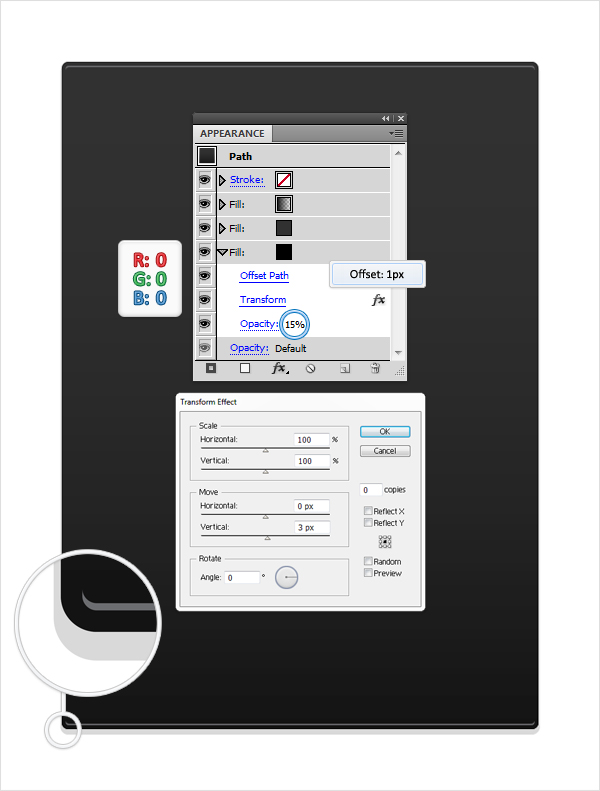
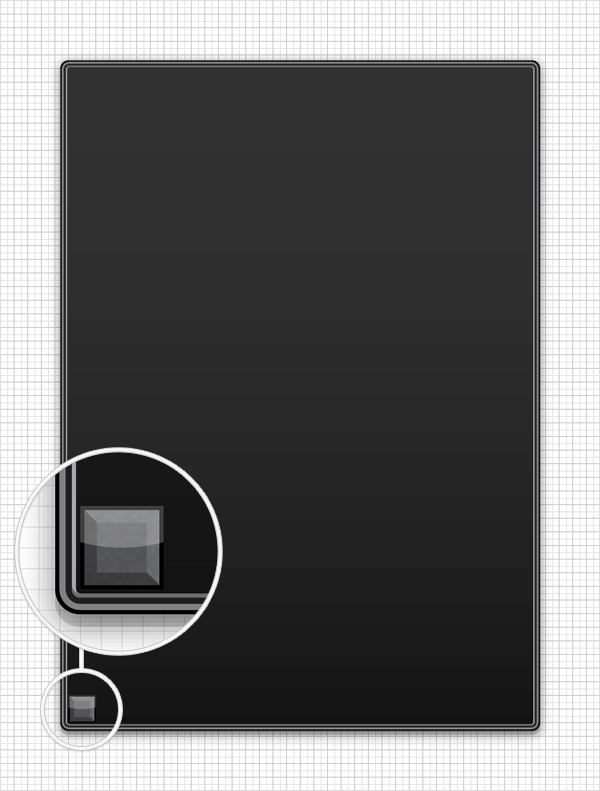
Reselect "Main", add a third fill and select it from the Appearance panel. Make it black, drag it in the bottom of the Appearance panel, lower its Opacity to 15%, and go to Effect > Path > Offset Path. Enter a 1px Offset, click OK and go to Effect > Distort & Transform > Transform. Enter the data shown below and click OK.
Step 7
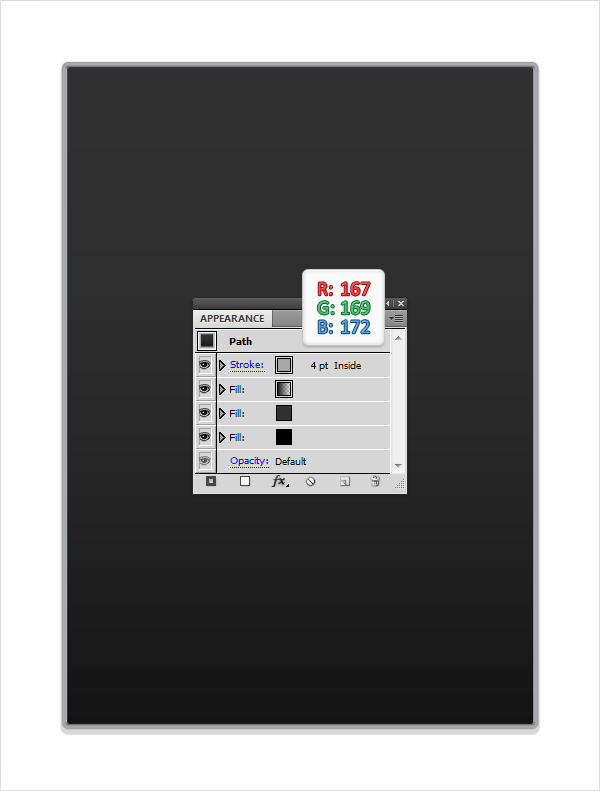
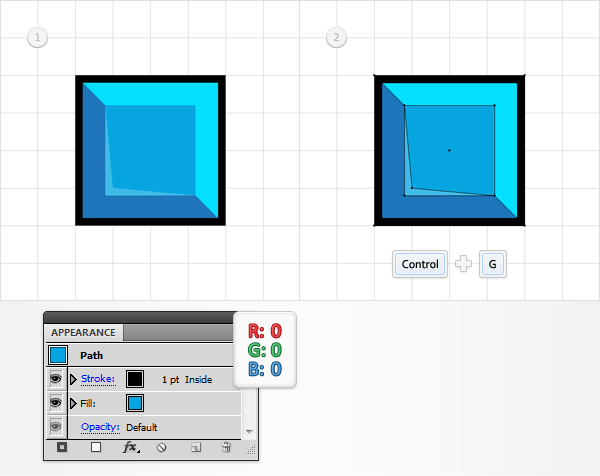
Reselect "Main" and focus on the Appearance panel. Set the stroke color to R=167, G=169, B=172. Make it 4pt wide and align it to inside.
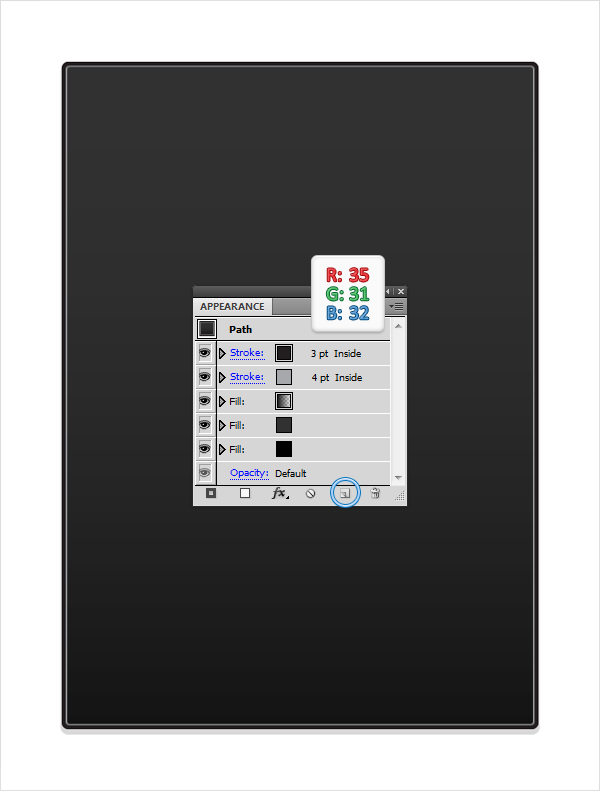
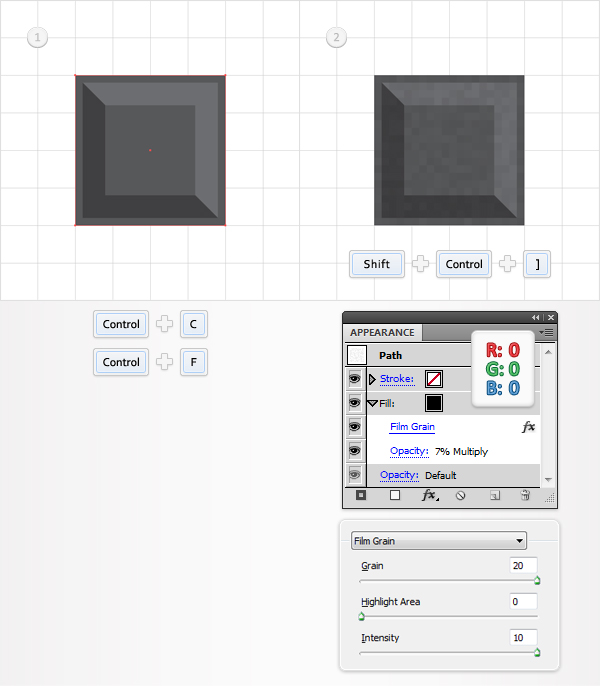
Step 8
Reselect "Main" and focus on the Appearance panel. Select the stroke added in the previous step and click on the Duplicate Selected Item. It’s the little file icon from the bottom of the Appearance panel. Obviously, this will add a copy of the stroke. Select this new stroke, set its color at R=35 G=31 B=32, and decrease the size to 3pt.
Step 9
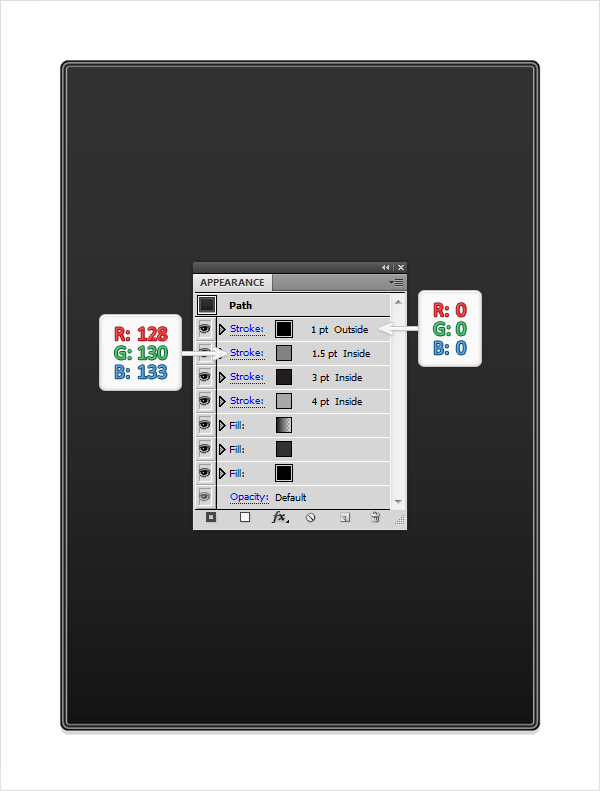
Reselect "Main", focus on the Appearance panel, and add two new stokes. Select the first one, set its color to R=128 G=130 B=133, and the size at 1.5pt. Select the other new stroke, make it black, align it to outside, and set the the size at 1pt.
Step 10
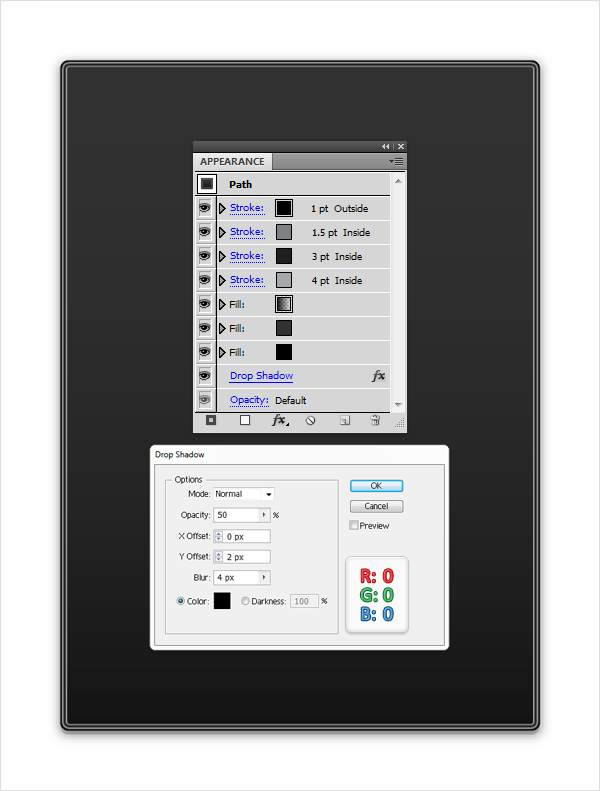
Reselect "Main" and focus on the Appearance panel. Make sure that no fill or stroke is selected and go to Effect > Stylize > Drop Shadow. Enter the data shown below and click OK.
Step 11
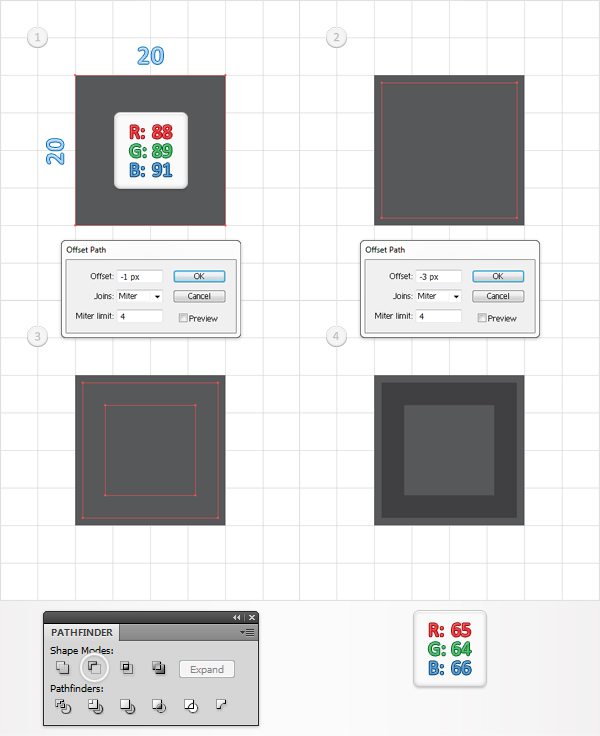
Re-enable the Grid (View > Show Grid) and the Snap to Grid (View > Snap to Grid). Pick the Rectangle Tool (M), create a 20 by 20px shape and fill it with R=88, G=89, B=91. Select this square and go to Object > Path > Offset Path. Enter a -1px Offset and click OK.
Select the resulting shape and go again to Object > Path > Offset Path. Enter a -3px Offset and click OK. Select the resulting shape along with the previously created shape and click on the Minus Front button from the Pathfinder panel. Fill the resulting shape with R=65, G=64, B=66.
Step 12
Pick the Pen Tool (P) and draw a simple horizontal path as shown in the first image. The Snap to Grid should ease your work. Select this fresh path, along with the darker shape created in the previous step and, click on the Divide button from the Pathfinder panel.
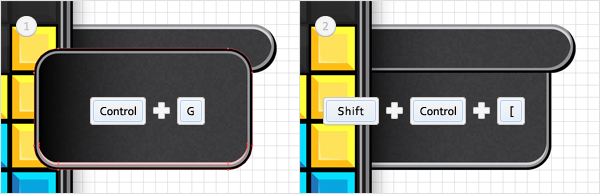
This will create a group with four simple shapes. Have a look into the Layers panel and focus on this group. First, select the two triangles and delete them. Next, ungroup the remaining two shapes (Shift + Command + G). Finally, fill the top, left shape with R=109, G=110, B=113. Make sure that the other shape is still filled with R=65, G=64, B=66.
Step 13
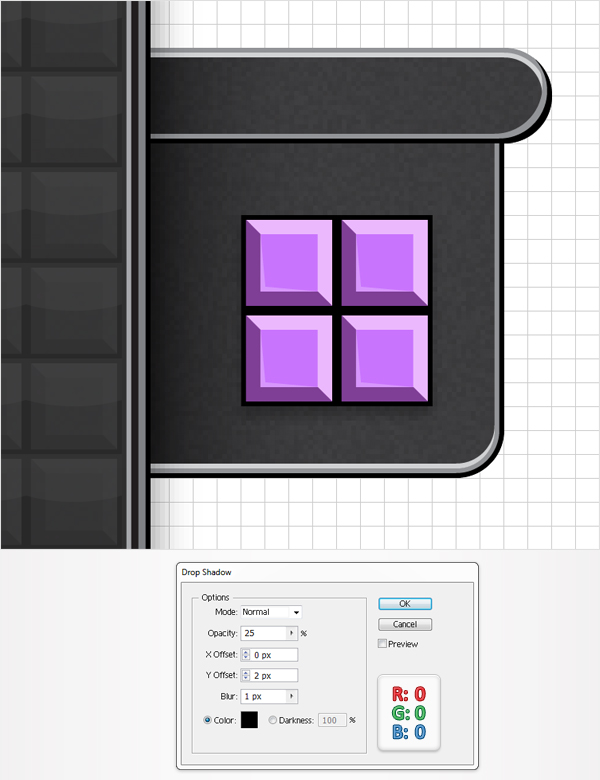
Reselect the gray square created in the eleventh step, make a copy in front (Command + C > Command + F), and bring it to front (Shift + Command + Right Bracket key). Fill this new shape with black, lower its Opacity to 7%, change the blending mode to Multiply and go to Effect > Artistic > Film Grain. Enter the data shown below and click OK.
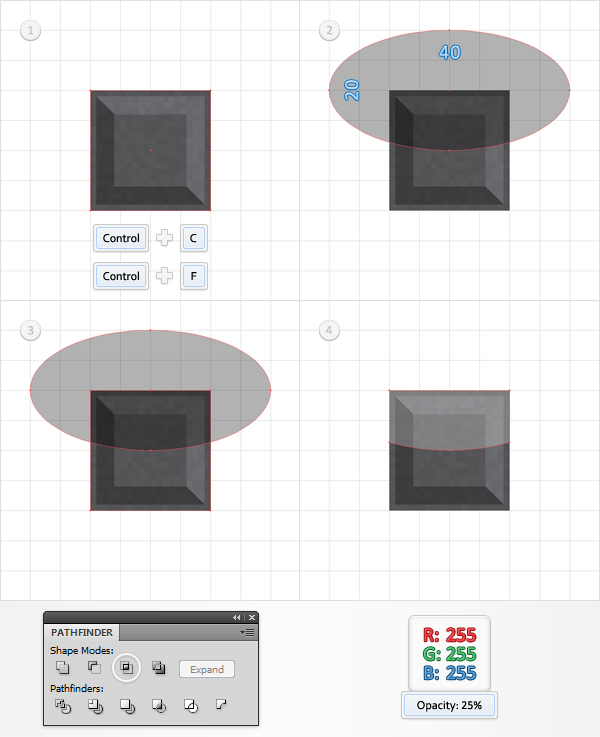
Step 14
Reselect the shape created in the previous step and make a copy in front (Command + C > Command + F). Pick the Ellipse Tool (L), create a 40 by 20px shape, and place it as shown in the second image. Select this squeezed circle, along with the fresh copy, and click on the Intersect button from the Pathfinder panel. Fill the resulting shape with white and lower its Opacity to 25%.
Step 15
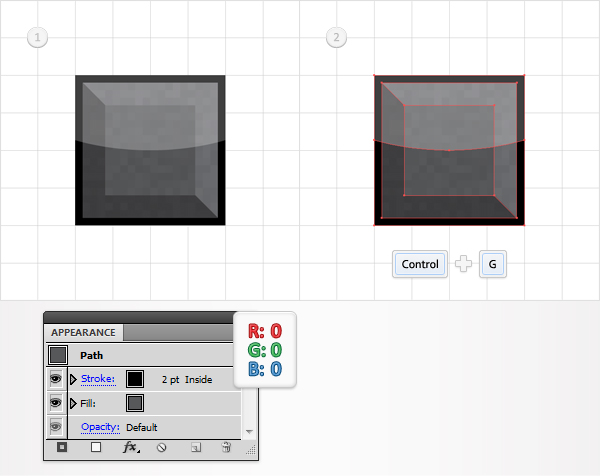
Reselect the gray square created in the eleventh step and focus on the Appearance panel. Add a 2pt, black stroke and align it to inside. Select all the shapes created in the last four steps and group them (Command + G).
Step 16
Select the group created in the previous step and place it as shown in the following image. Again, the Snap to Grid will ease your work.
Step 17
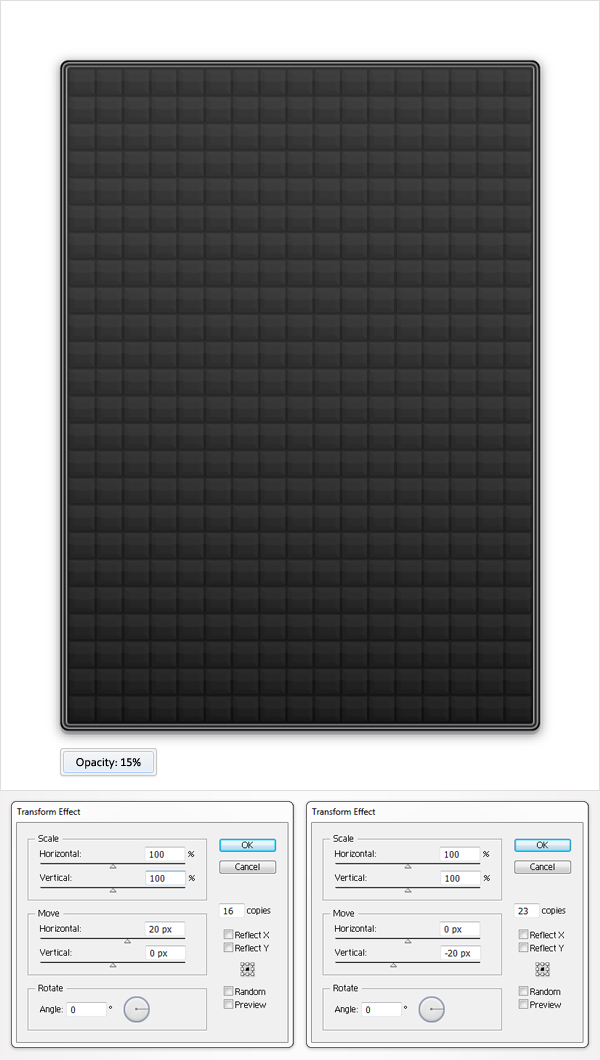
Reselect the group moved in the previous step, lower its Opacity to 15%, and go to Effect > Distort & Transform > Transform. Enter the data shown in the left window, click OK, then go again to Effect > Distort & Transform > Transform. Enter the data shown in the right window and click OK.
Step 18
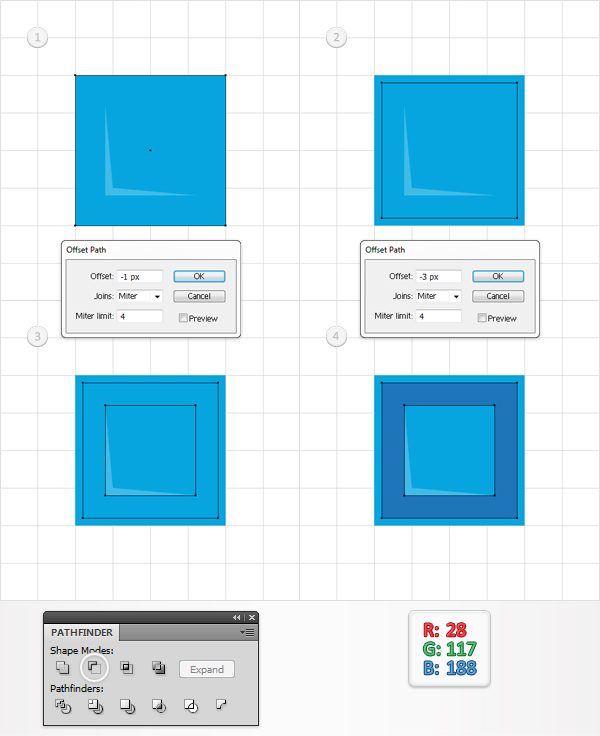
Pick the Rectangle Tool (M), create a 20 by 20px shape, and fill it with R=0, G=165, B=224. Select this blue square and go to Object > Path > Offset Path. Enter a -4px Offset and click OK. Select the resulting shape, make a copy in front (Command + C > Command + F), and disable the Snap to Grid (View > Snap to Grid).
Select this copy and hit the up arrow and the right arrow once. Reselect this copy, along with the original shape, and click on the Minus Front button from the Pathfinder panel. Fill the resulting shape with white, lower its Opacity top 25%, and grab the Delete Anchor Point Tool(-).
Make sure that this thin, white shape is still selected and click on the two anchor points (shown with arrows in the fourth image shown). In the end your shape should look like the fifth image shown.

Step 19
Reselect the blue square and go to Object > Path > Offset Path. Enter a -1px Offset and click OK. Select the resulting shape and go again to Object > Path > Offset Path. Enter a -3px Offset and click OK. Select the two shapes created so far and click on the Minus Front button from the Pathfinder panel. Fill the resulting shape with R=28, G=117, B=188.
Step 20
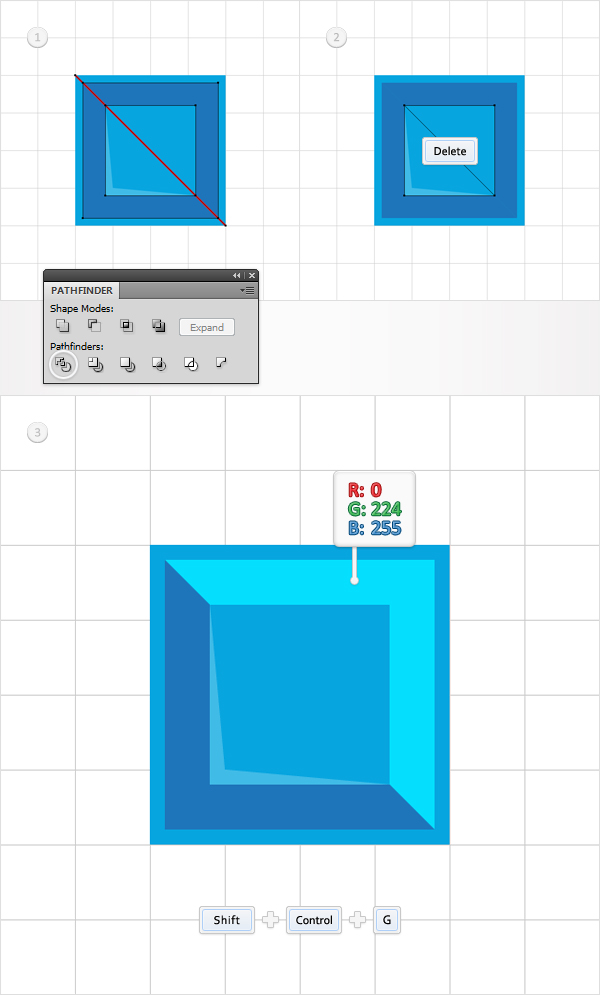
Re-enable the Snap to Grid (View > Snap to Grid). Pick the Pen Tool (P) and draw a horizontal path as shown in the first image. Select it, along with the shape created in the previous step, and click on the Divide button from the Pathfinder panel.
Have a look into the Layers panel and focus on the resulting group. First, delete the triangle shapes, then ungroup the remaining two shapes (Shift + Command + G). Finally, fill the top, left shape with R=0, G=224, B=255.
Step 21
Reselect the blue square, add a 2pt, black stroke and align it to inside. Select all the shapes created in the last three steps and group them (Command + G). Move to the Layers panel, Double-click on this fresh group and name it "BlueBlock".
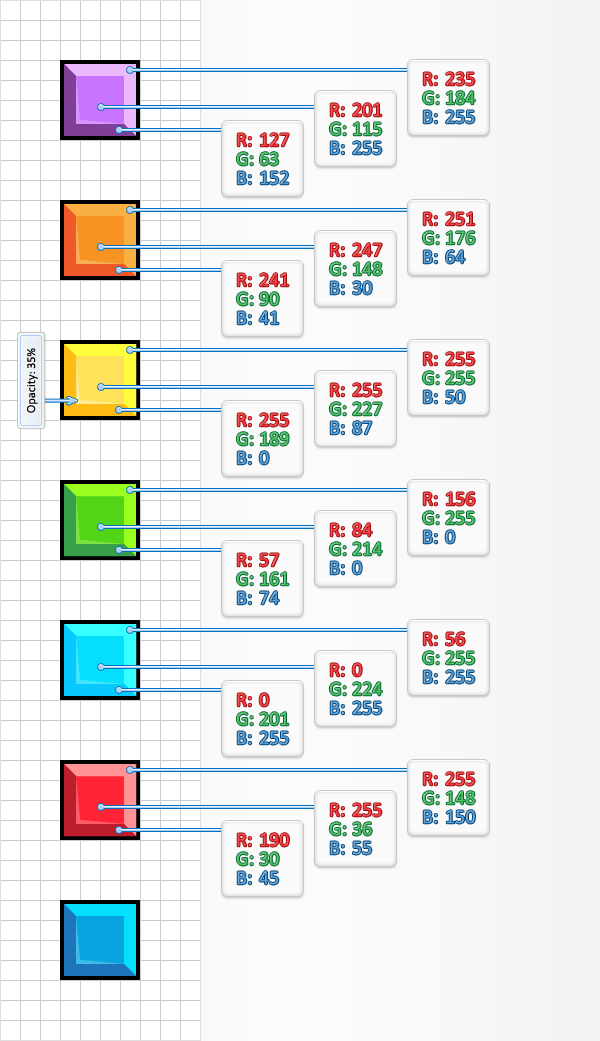
Step 22
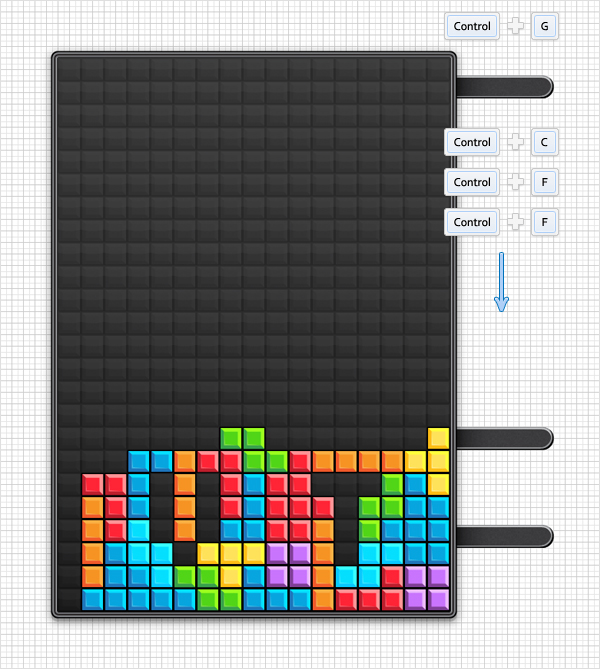
Select the "BlueBlock", make six copies and align them in a simple column (as show in the following image). Focus on these group copies and replace the existing colors with the ones shown below. When you’re done move to the Layers panel and rename these new groups depending on the color of the overall block.
Step 23
Now that you have all the blocks that you need let’s create the actual block pieces. Start with the blue blocks and continue with the rest. Always group the blocks that make up a block piece. It will ease your work in the later steps.
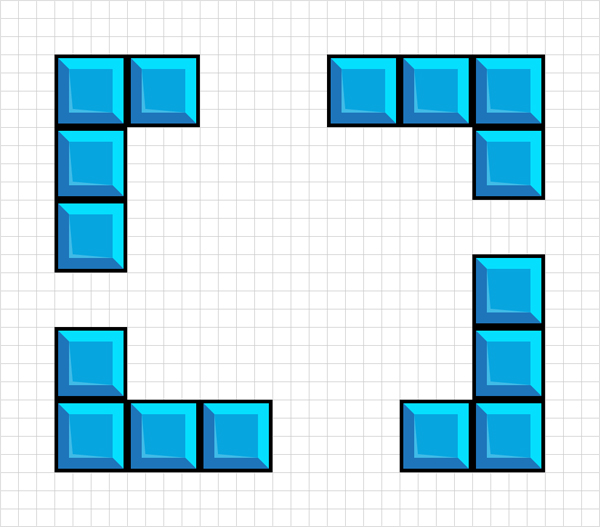
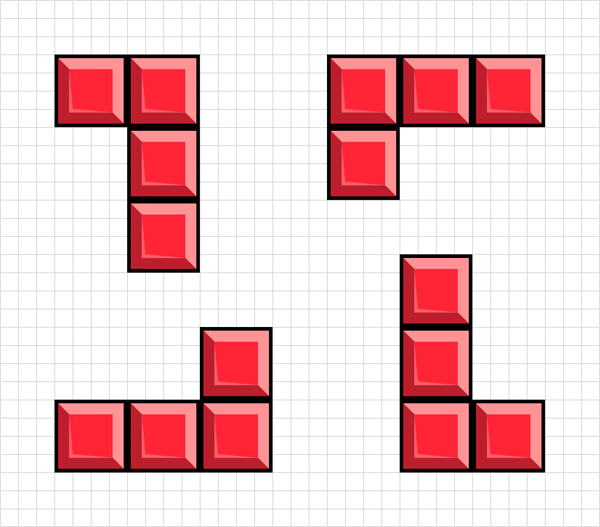
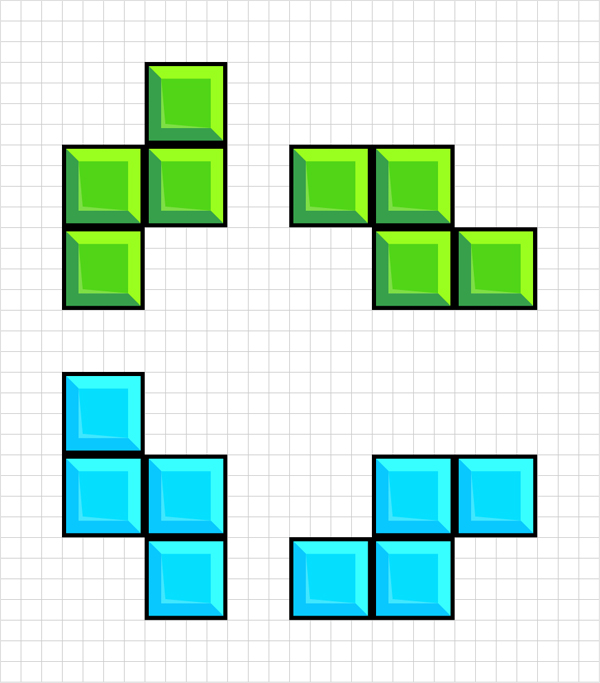
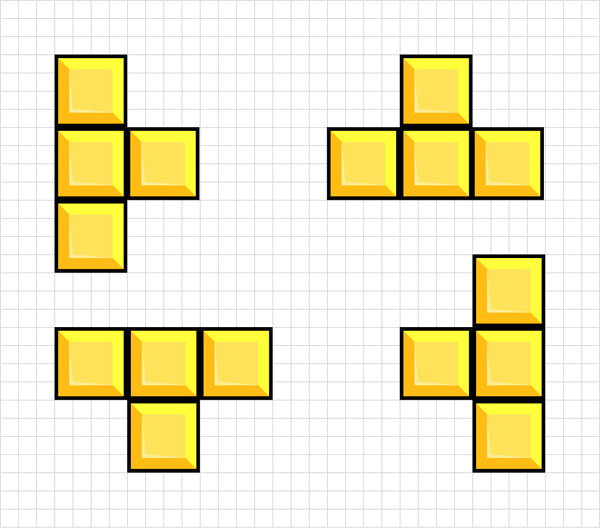
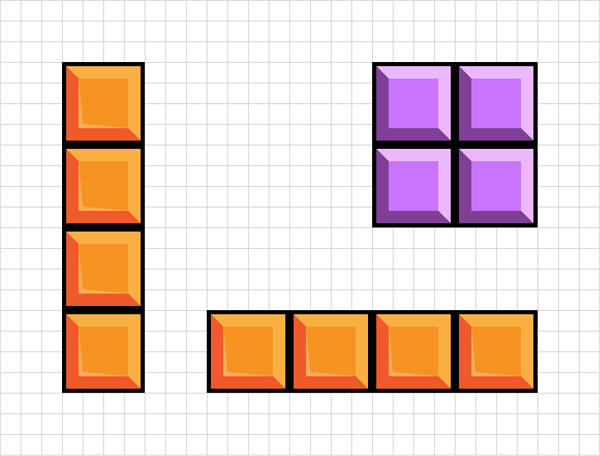
Step 24
Add some of those block pieces as shown below.
Step 25
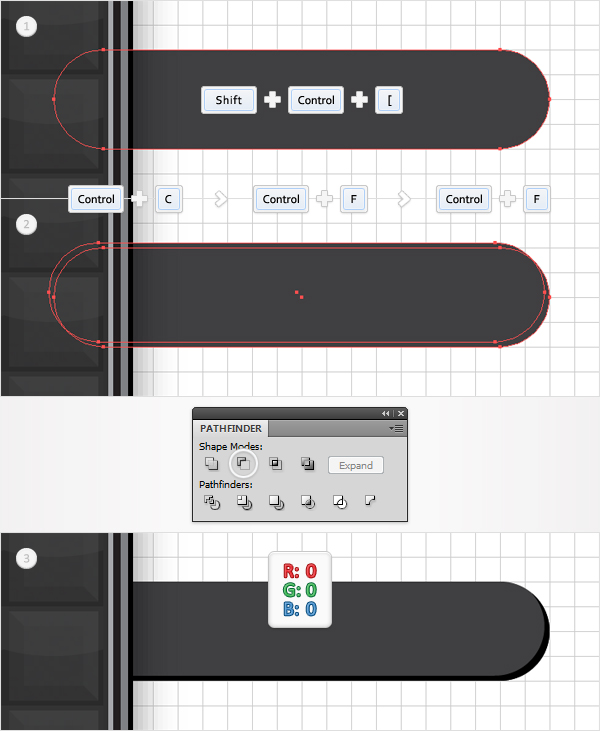
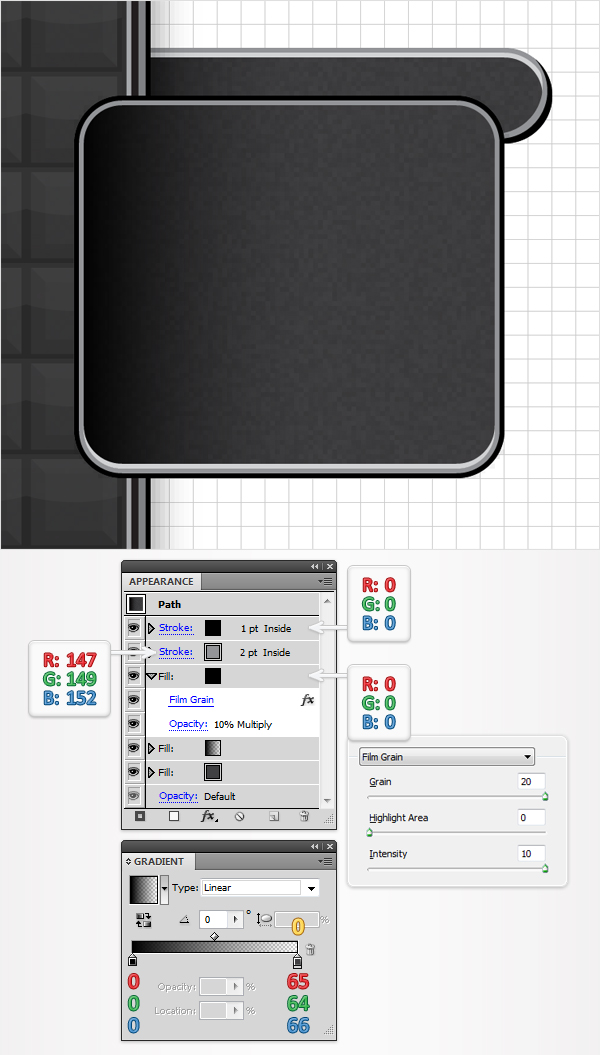
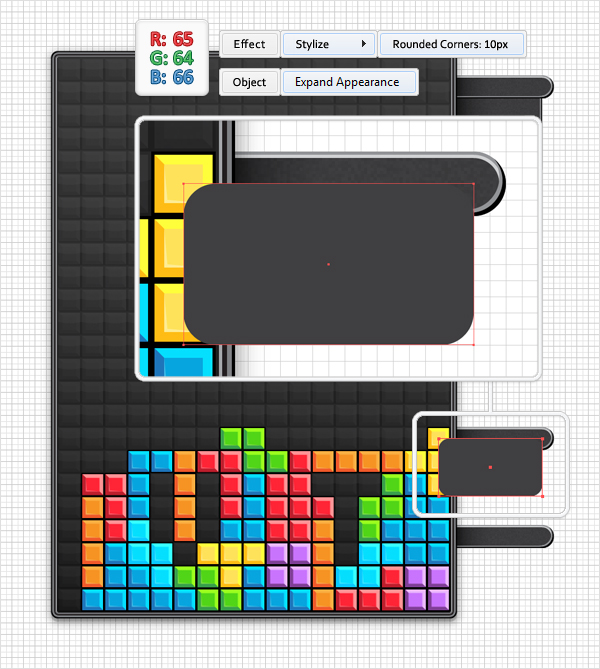
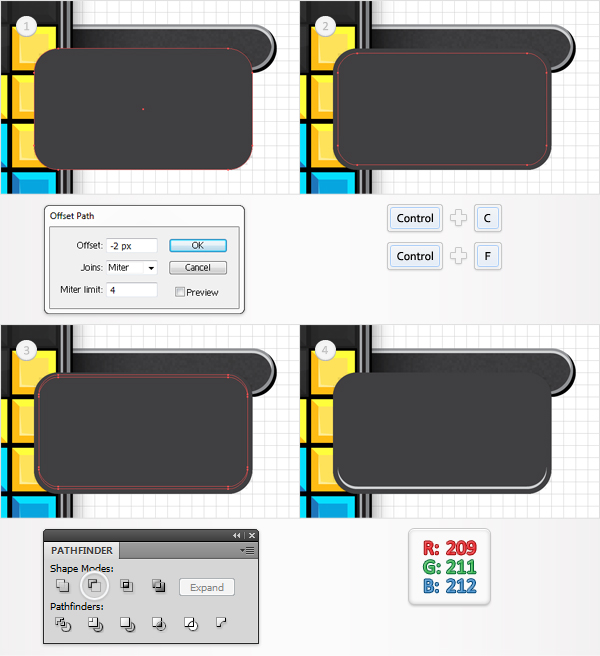
Pick the Rectangle Tool (M), create a 100 by 20px shape, and place it as shown in the following image. Now fill it with R=65, G=64, B=66. Remove the color from the stroke and go to Effect > Stylize > Rounded Corners. Enter a 10px radius, click OK, and go to Object > Expand Appearance.
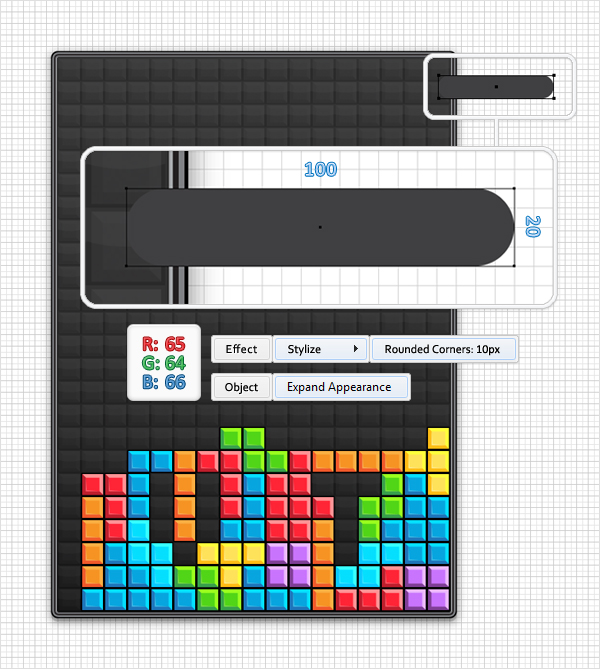
Step 26
Disable the Snap to Grid (View > Snap to Grid). Select the shape created in the previous step, send it to back (Shift + Command + Left Bracket key), and make two copies in front (Command + C > Command + F > Command + F). Select the top copy and hit the up arrow and the left arrow once. Reselect both copies and click on the Minus Front button from the Pathfinder panel. Fill the resulting shape with black.
Step 27
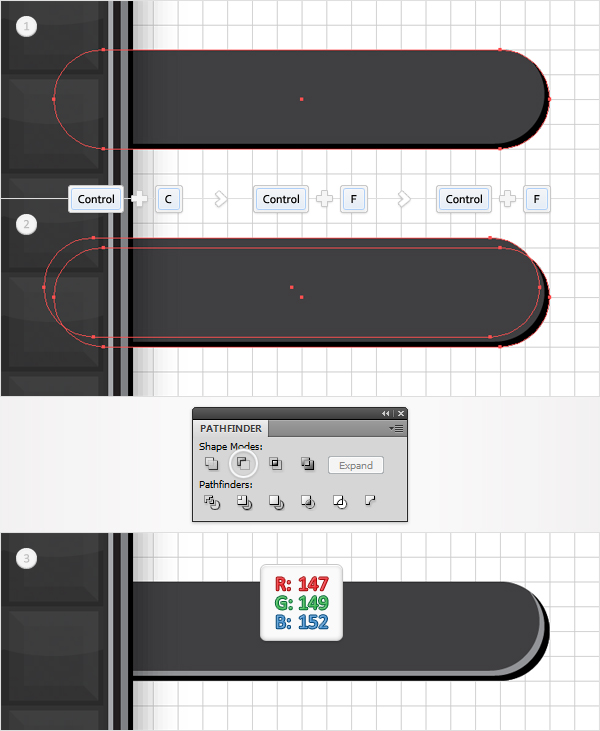
Reselect the gray shape created in step 25 and make two new copies in front. Again, select the top copy and this time hit the up arrow and the left arrow twice. Reselect both copies and click on the Minus Front button from the Pathfinder panel. Fill the resulting shape with R=147, G=149, B=152.
Step 28
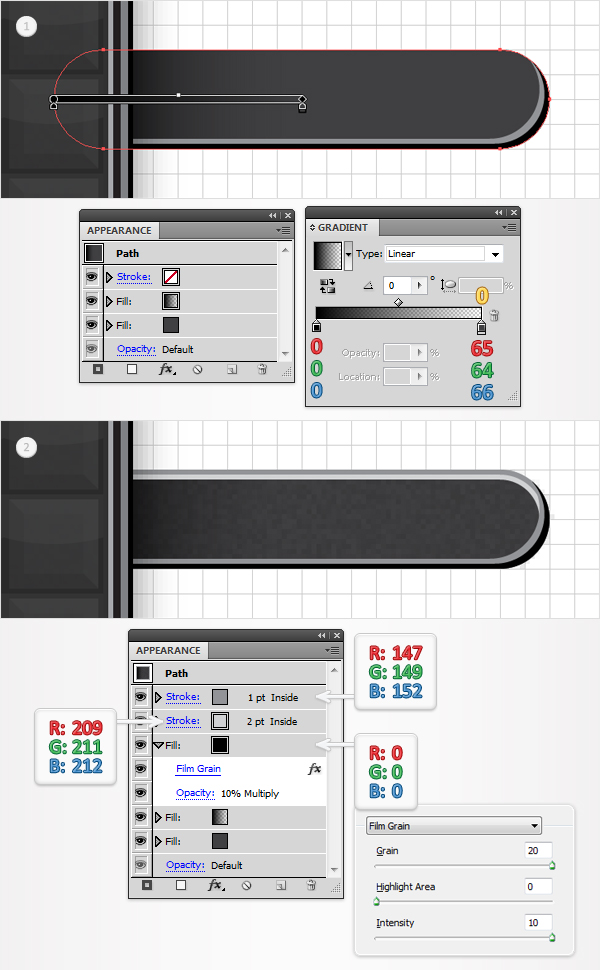
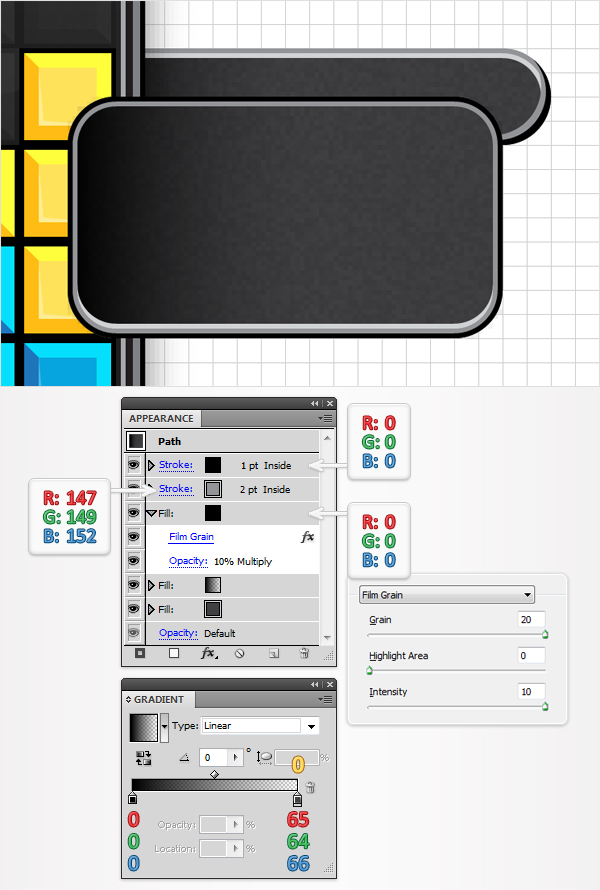
Reselect the rounded rectangle created in Step 25 and focus on the Appearance panel. Add a new fill and use the linear gradient shown in the first image. Add a third fill for this shape, make it black, lower its Opacity to 10%, change the blending mode to Multiply, and go to Effect > Artistic > Film Grain. Enter the data shown below and click OK.
Continue in the Appearance panel and add the first stroke. Make it 2pt wide, set its color at R=209 G=211 B=212, and align it to inside. Add a second stroke for this path, make it 1pt wide, and set the color at R=147, G=14, B=152. Make sure that its aligned to inside.
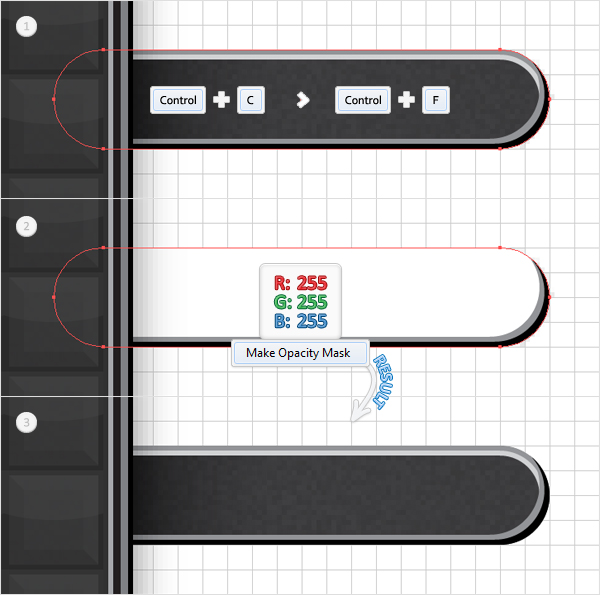
Step 29
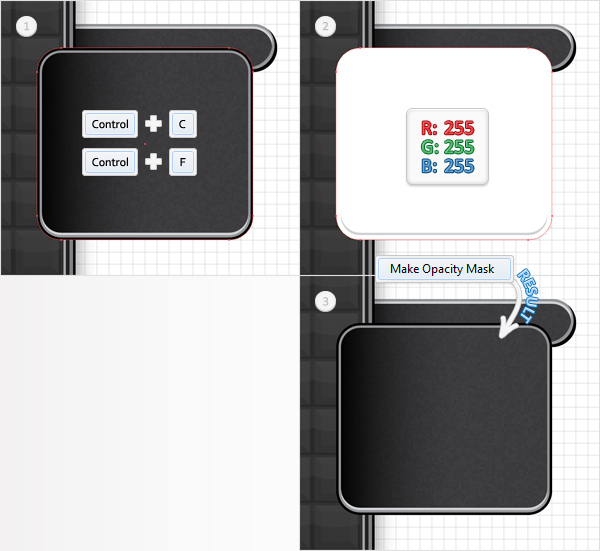
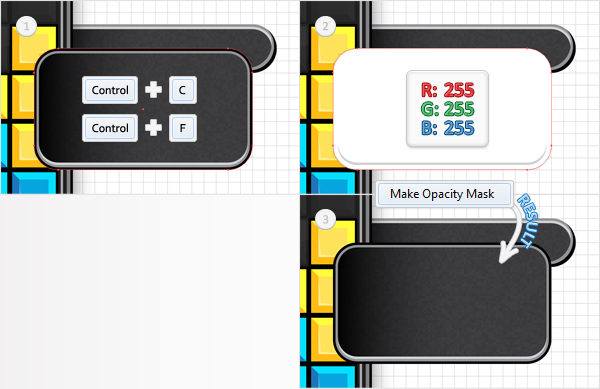
Reselect the rounded rectangle edited in the previous step and make a copy in front. Select this copy and hit the D key from your keyboard. This will add the default properties for your shape (white fill and a 1pt, black stroke). Remove the color from the stroke.
Now, select this white shape, along with the original rounded rectangle, and go to the Transparency panel. Open the fly-out menu and click on Make Opacity Mask.
Step 30
Re-enable the Snap to Grid. Select all the shapes created in the last five steps and group them. Make two copies of this group and place them as shown in the following image.
Step 31
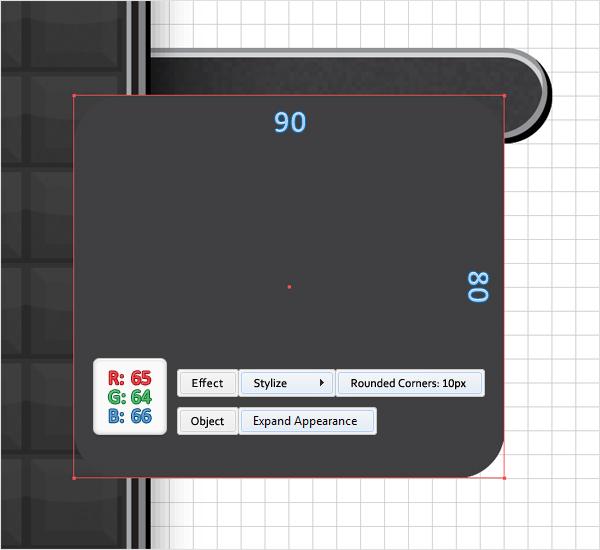
Focus on the top group created in the previous step and pick the Rectangle Tool (M). Create a 90 by 80px shape and place it as shown in the following image. Fill it with R=65 G=64 B=66, remove the color from the stroke, and apply Effect > Stylize > Rounded Corners. Enter a 10px radius, click OK, and go to Object > Expand Appearance.
Step 32
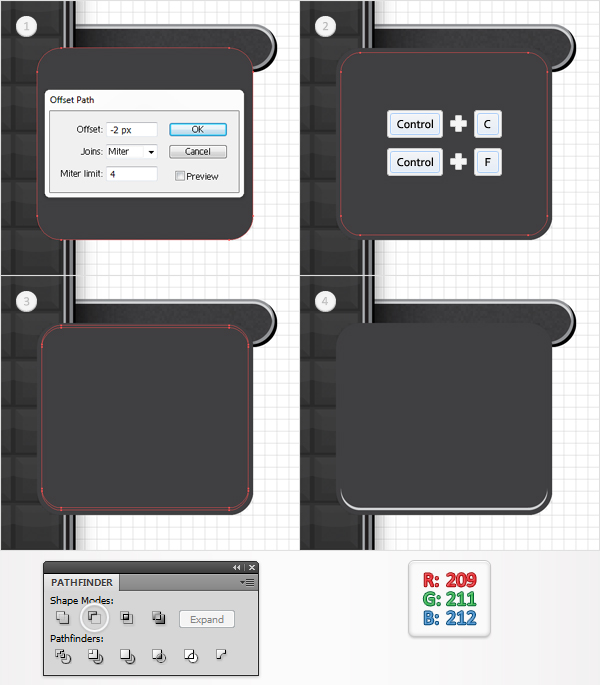
Disable the Snap to Grid. Select the shape created in the previous step and go to Object > Path > Offset Path. Enter a -2px Offset and click OK. Select the resulting shape and make a copy in front. Select this copy and hit the up arrow once. Reselect the two shapes created in this step and click on the Minus Front button from the Pathfinder panel. Fill the resulting shape with R=209, G=211, B=212.
Step 33
Reselect the rounded rectangle created in step 31 and focus on the Appearance panel. Add a new fill and use the linear gradient shown below. Add a third fill for this shape, make it black, lower its Opacity to 10%, change the blending mode to Multiply, and go to Effect > Artistic > Film Grain. Enter the data shown below and click OK.
Continue in the Appearance panel and add the first stroke. Make it 2pt wide, set its color at R=147 G=149 B=152, and align it to inside. Add a second stroke for this path, make it 1pt wide, set the color at R=0 G=0 B=0, and make sure that its aligned to inside.
Step 34
Reselect the rounded rectangle edited in the previous step and make a copy in front. Select this copy and hit the D key from your keyboard. Again, remove the color from the stroke and use the remaining white shape to mask the original rounded rectangle.
Step 35
Select all the shapes created in the last four steps and group them. Send this new group to back.
Step 36
Re-enable the Snap to Grid. Grab the purple block piece group, make a copy, and place it as shown in the following image. Select it and go to Effect > Stylize > Drop Shadow. Enter the data shown below and click OK.
Step 37
Pick the Rectangle Tool (M), create a 90 by 50px shape, and place it as shown in the following image. Fill it with R=65 G=64 B=66, remove the color from the stroke, and go to Effect > Stylize > Rounded Corners. Enter a 10px radius, click OK, and go to Object > Expand Appearance.
Step 38
Disable the Snap to Grid. Select the shape created in the previous step and go to Object > Path > Offset Path. Enter a -2px Offset and click OK. Select the resulting shape and make a copy in front. Select this copy and hit the up arrow once. Reselect the two shapes created in this step and click on the Minus Front button from the Pathfinder panel. Fill the resulting shape with R=209, G=211, B=212.
Step 39
Reselect the rounded rectangle created in step 31 and focus on the Appearance panel. Add a new fill and use the linear gradient shown below. Add a third fill for this shape, make it black, lower its Opacity to 10%, change the blending mode to Multiply, and apply Effect > Artistic > Film Grain. Enter the data shown below and click OK.
Continue in the Appearance panel and add the first stroke. Make it 2pt wide, set its color at R=147 G=149 B=152, and align it to inside. Add a second stroke for this path, make it 1pt wide, set the color at R=0 G=0 B=0, and make sure that its aligned to inside.
Step 40
Reselect the rounded rectangle edited in the previous step and make a copy in front. Select this copy and hit the D key from your keyboard. Again, remove the color from the stroke and use the remaining white shape to mask the original rounded rectangle.
Step 41
Select all the shapes created in the last four steps and group them. Now send this new group to back.
Step 42
Re-enable the Snap to Grid and duplicate the group created in the previous step. Select this group copy and move it down as shown in the second image. Once again, the snap to grid will ease your work.
Step 43
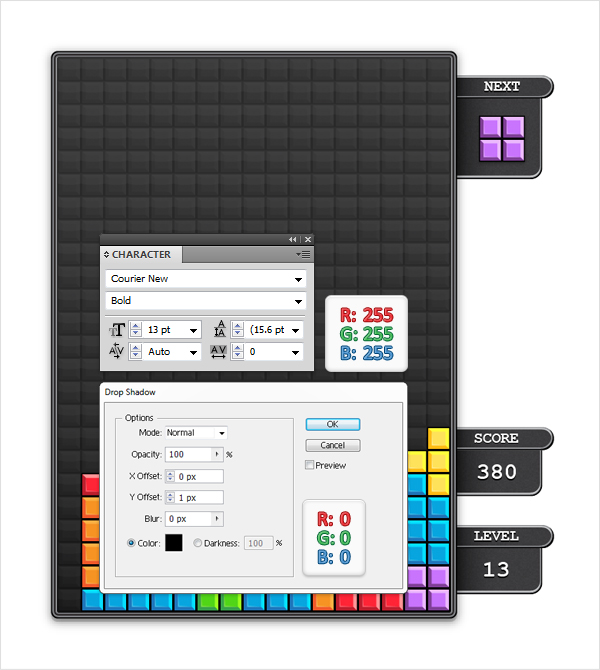
Disable the Snap to Grid. Pick the Type Tool (T) and add some white text and numbers. Use the Courier New font and make it Bold. For the text set the size at 13 and for the number raise it to 20pt. Select both the text and the numbers and go to Effect > Stylize > Drop Shadow. Enter the data shown below and click OK. Finally, group them all.
Step 44
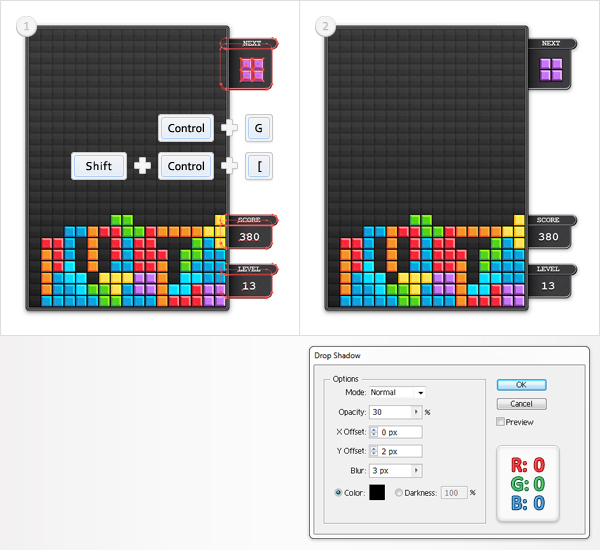
Select all the shapes created in the last nineteen steps and group them. Send this new group to back and go to Effect > Stylize > Drop Shadow. Enter the data shown below and click OK.
Step 45
Finally, let’s add a simple background. Pick the Rectangle Tool (M), create a shape the size of your artboard, and send it to back. Fill it with white, then add a second fill, and use the radial gradient shown below.
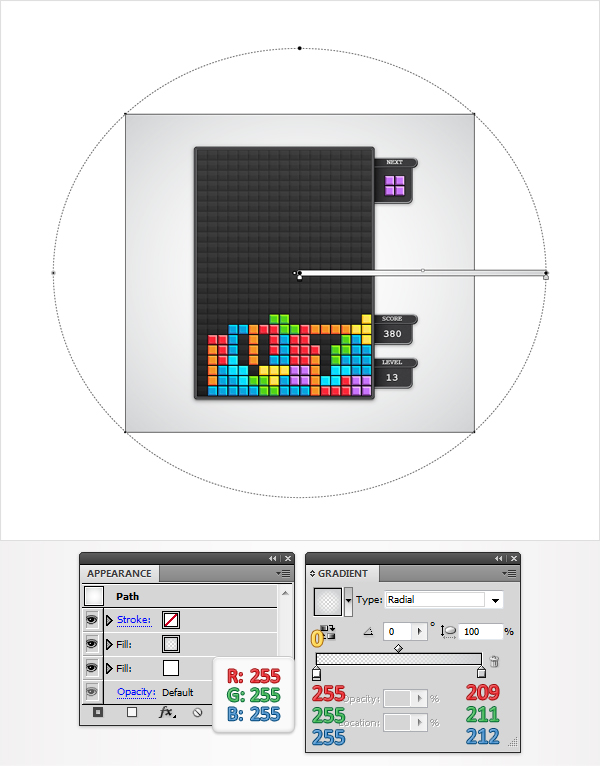
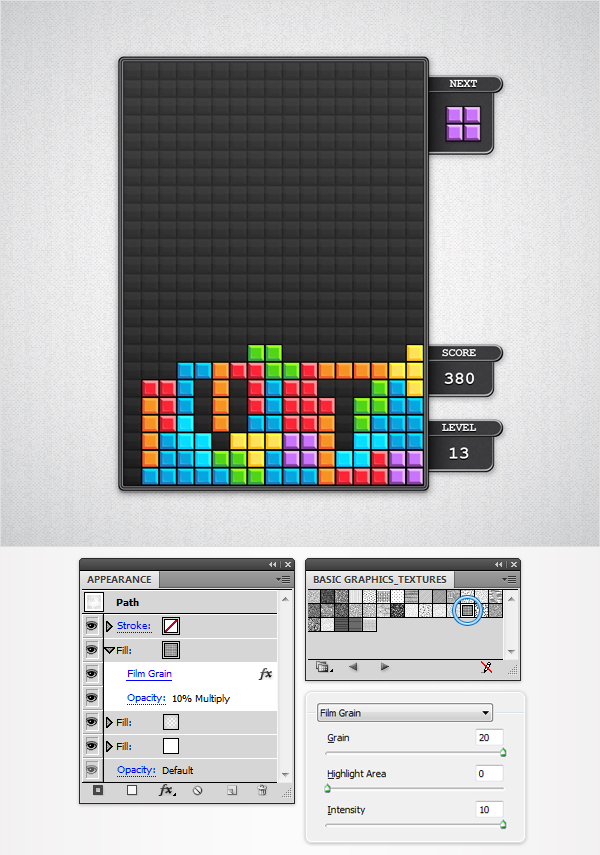
Step 46
Reselect the shape created in the previous step and add a third fill. Select it from the Appearance panel, lower its Opacity to 10%, and change the blending mode to Multiply.
Next, you will need a built-in pattern for this new fill. Go to the Swathes panel (Window > Swatches), open the fly-out menu, and go to Open Swatch Library > Patterns > Basic Graphics > Basic Graphics_Textures.
A new window with a bunch of nice patterns should open. Look for the "USGS 19 Land Inundation" pattern. Reselect that third fill, add the pattern, and go to Effect > Artistic > Film Grain. Enter the data shown below, click OK, and you’re done.
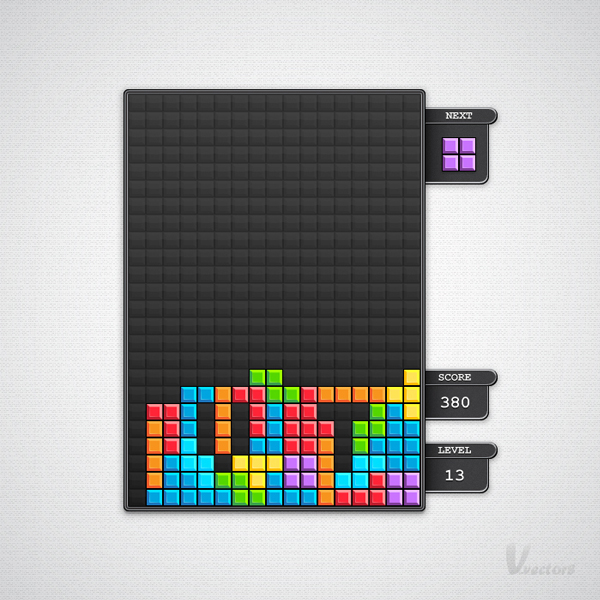
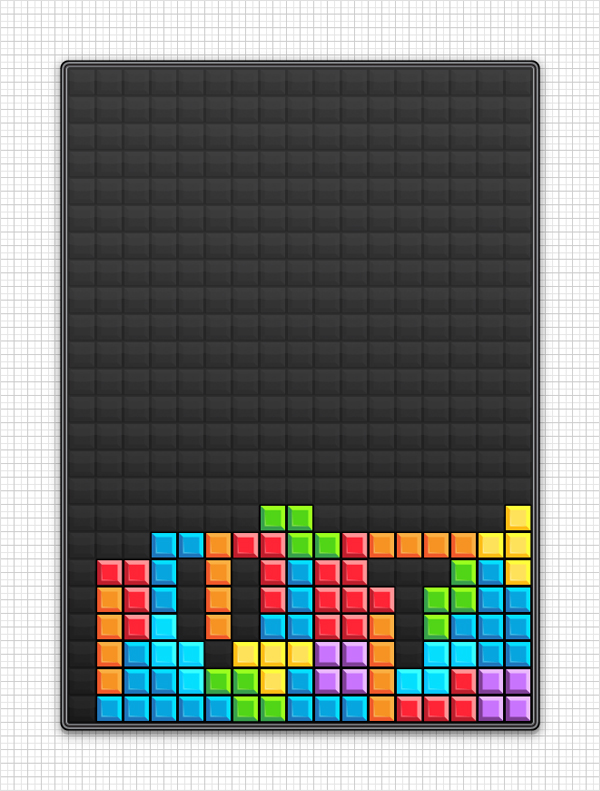
Conclusion
Now your work is finalized. Here is how it should look.