What can be more fun than helping Frenchy learn hair and makeup skills? In this tutorial we'll create icon assets and a cute portrait bust illustration perfect for a spa and makeup mobile app inspired by one of the cutest characters from Grease!
We'll build each asset with the help of a provided sketch and learn to render colorful designs quickly in Adobe Illustrator CC. Then, we'll create the final portrait and bring the design together in a completed illustration. As always, you can punch up your design with additional vector assets from Envato Market to make something unique. If you'd like to speed your process up, you can purchase makeup icons or a portrait base from the market while following this tutorial.
1. Make Some Cute Hair Accessories
Step 1
Let's start by preparing our document. Create a New Document in Adobe Illustrator CC and import the sketch seen below, which you can download to the right of this tutorial. My final design size was around 8 inches by 10 inches, though you are welcome to work with whatever size suits your design needs.
Additionally, you're welcome to sketch out your own design and use this tutorial as a technique guide. Lock the sketch object in your Layers panel and let's get creating!
Step 2
Starting with the cute purple comb icon, draw two overlapping rectangles with the Rectangle Tool (M). I've set the fill color to purple and the stroke color to null. Then, I selected each corner of the rectangles with the Direct Selection Tool (A) and pulled their Live Corners toward the center to round the corners out to my liking. You can see that result below!
Step 3
Unite the two rounded rectangles in the Pathfinder panel. Draw seven identical rectangles with the Rectangle Tool and overlap the comb with them. Unite the seven rectangles and hit Back Minus Front in the Pathfinder panel. Then, select the comb with the Direct Selection Tool and manipulate the Live Corners so the comb has rounded edges like the one shown below.
Step 4
Add a thick stroke in a dark color to your comb object. I chose brown. Dark purples or magentas look fantastic as well. Apply simple linear gradients to overlapping rectangles. My gradient goes from purple at 100% to 0% Opacity. Adjust the Opacity of a gradient in the Gradient panel.
Use the Shape Builder Tool(Shift-M) to delete overlapping shapes from each other. Select the gradient rectangle and the comb, then select the non-overlapping shape with the Shape Builder Tool. Finally, deselect and delete the extraneous shape. It's a simple technique I use often for rendering objects like this. Group (Control-G) all of your comb components together.
Step 5
To create that adorable heart on the comb (and several hearts throughout this tutorial), let's use the following technique:
Draw a circle with the Ellipse Tool (L).
Hold down Alt and drag the circle to Duplicate it. Place them side by side, slightly overlapping.
Unite the circles in the Pathfinder panel.
Delete the three bottom anchor points with the Delete Anchor Point Tool (-).
Add a new anchor point to the center of the bottom edge and pull it downward with the Direct Selection Tool.
Convert the bottom anchor point to a sharp point and adjust the handles of the side anchor points so the heart's sides are nice and rounded.
Now that you've made a fantastically perfect heart you can Copy (Control-C) and Paste (Control-V) it every time you need a heart within this design!
Step 6
The final hair accessory is the bobby pin! I've used my sketch as a guide to draw a wiggly pin shape with the Pencil Tool (N). Set the Caps and Corners to Rounded in the Stroke panel. With the Width Tool (Shift-W), adjust the width of the top edge of the bobby pin so it has a larger, bulbous end.
Convert the stroke to an object by going to Object > Expand, and give the bobby pin a stroke matching its fill color of 1-2 pt with Rounded Caps and Corners.
Alternatively you can draw the bobby pin with the Blob Brush Tool (Shift-B) with pressure enabled to get the variation seen below.
2. Create a Cute Makeup Set, Part One
Step 1
There's a lot of makeup in this design, so let's get going on the first half of the full set! To start, we have the cute little eyeshadow applicator:
Draw a long, thin rectangle. Overlap it with a short and thick rectangle.
Round out the corners of both shapes by manipulating their Live Corners.
Apply a Radial Gradient to the applicator tip that goes from light pink to white to show that it's been used to apply makeup. Adjust the gradient's placement with the Gradient Tool (G).
Add a thick outline outside of the object by Copying and Pasting the applicator design, Uniting it in the Pathfinder panel, and Aligning it behind the original applicator. Group your applicator components together.
Step 2
Next we have the eyeshadow compact!
Draw two rectangles: one white and one blue.
Optionally, you can draw a smaller rectangle within the blue one to show an indentation on the lid.
Round out the outer corners of the rectangles and draw two small rectangles between them to create a hinge for the compact.
Step 3
Now it's time to fill up the compact! Draw rounded rectangles for each eyeshadow pan and add a color-coordinated heart, drawn earlier, to each. For the reflections on the compact lid, draw three diagonal rectangles with the Pen Tool (P) and apply a linear gradient to each going from white at 100% to 0% Opacity.
Use the Shape Builder Tool to delete the extraneous portion of the shapes from the rounded rectangle lid. Select and Group all of your eyeshadow components together to complete the icon.
Step 4
We'll need some blush with that eyeshadow!
Draw two golden yellow circles with the Ellipse Tool.
Offset the circles' paths by going to Object > Path > Offset Path. I've entered in -0.1389 inches in order to get two perfect inner circles. Your offset amount will vary depending on the size of your original circles. Hit Preview to help you decide what size to make your circles, and hit OK when satisfied.
Draw a small rectangle overlapping the circles to create the hinge.
Step 5
Now let's complete the compact:
Set the fill colors of the inner circles to blue and pink. Add a cute heart in the center of the pink circle.
Draw darker yellow rectangles on either side of the hinge shape to add a small shadow. The highlights on the mirror are made the same way as the highlights on the eyeshadow compact lid.
For the shiny metallic bits of the compact, draw several orange and yellow diagonal rectangles and delete them from the compact circles using the Shape Builder Tool. Place them under the smaller circles in the Layers panel.
Draw highlights on the hinge that match the colors from the rest of the golden compact. Group everything together to complete the compact.
Step 6
Next, let's create a mascara wand:
Draw a small ellipse to form the bottom of the mascara wand.
Draw a rectangle that matches the ellipse's width.
Unite the rectangle and the ellipse in the Pathfinder panel. Draw a long rectangle to form the length of the wand itself.
Place the long rectangle behind the purple object. Apply a Linear Gradient that goes from dark purple to light purple and back to dark purple to keep the wand cap from looking flat. Draw a bubbly, fluffy object with the Pencil Tool to form the mascara wand's spoolie-like end.
Step 7
To round out the first part of our makeup icon creation section, we'll create a fluffy powder puff:
Draw two identical ellipses.
Draw a rectangle between the two ellipses.
Copy and Paste the top ellipse to create the top edge. Unite the other three shapes to create a disc object.
Draw a half circle whose bottom edge is slightly flattened out with the Pen Tool. Copy, Paste and Scale the shape down and delete it from the half circle to create a handle.
Place the handle shape beneath the disc object in the Layer panel.
Step 8
Now we need the powder puff itself:
Draw a fluffy cloud shape with the Pencil Tool and set the fill color to a light cream.
Use the Pencil Tool to draw some scallop shapes within the cloud puff to further accentuate how fluffy it is. Add a thicker outline to the entire object by Copying, Pasting and uniting the copy in the Pathfinder panel. Set the stroke weight to 2-4 pt, or so, and Align it behind the main powder-puff object.
Draw hearts, stars, dots, and sparkles on the puff.
Add a Linear Gradient to the puff base that varies between dark, medium, and light blues.
3. Create a Cute Makeup Set, Part Two
Step 1
To start our second makeup section, we'll work on creating a cute lipstick.
Draw a rectangle and fill it with a Linear Gradient much like the mascara wand has.
Draw a smaller, horizontal rectangle to overlap the first.
Draw an ellipse that matches the width of the bottom rectangle and Unite the two shapes in the Pathfinder panel. This rounds out the lipstick's container and makes it look less flat.
Draw another ellipse at the top of the lipstick container. Group these components together.
Step 2
Let's create the lipstick itself:
Draw a small ellipse in the top of the lipstick base.
Draw a rectangle that matches the ellipse's width. Draw a second ellipse and Rotate it so it cuts across the top of the ellipse on the diagonal.
Unite the bottom ellipse and the rectangle in the Pathfinder panel. Use the Shape Builder Tool to delete the upper left corner of the rectangle by selecting the diagonal ellipse and the rectangle, selecting the corner, deselecting, and then deleting the extraneous corner shape.
Select the top right corner with the Direct Selection Tool and pull the Live Corner toward to center to round off and complete the lipstick.
Set the top ellipse to a darker pink than the lipstick itself.
Step 3
Before we complete the lipstick, let's create a fun sparkling design behind it! Draw a bright yellow circle with the Ellipse Tool. Go to Effects > Distort & Transform> Zip & Zag and enter in either the following attributes or similar ones:
Size: 0.08 inches
Absolute
Ridges per Segment: 5
Points: Corner
Step 4
Place the Zig & Zagged circle behind the lipstick and add an outline with the thickness of your choice. Additionally, you can draw a highlight shape in the center of the lipstick if you wish.
To complete the lipstick, draw a series of white circles along the base to create cute little pearls on the lipstick container. Group everything together once you're satisfied with your design.
Step 5
Our final icon design is the little container of face cream.
Draw two identical ellipses, just like we did for the powder puff base.
Also like we did for the powder puff base, Copy and Paste the top ellipse and then Unite the other three shapes in order to create the full cap shape. Begin the container shape with a small cream-colored ellipse.
Using the Pen Tool, draw one half of the container design. Note how three sides are straight lines and the left side is curved.
Copy, Paste, and Reflect the left half of the container and Align it to the horizontal center of the left to create the right side.
Unite all three cream-colored objects together in the Pathfinder panel.
Step 6
Next we'll need to draw a rose. I used the Blob Brush Tool without pressure settings, but you are welcome to use whatever drawing tool you enjoy most.
Start with a rounded triangle and build petals around each side. Continue adding petals, rounded and pointy ones, between the last ring of Petals in order to draw a larger and larger flower. Note how the larger petals have points, dips, and curves in them. In total I drew six rounds of petals.
Group everything together and let's complete the face cream container.
Step 7
Draw a large pink shape beneath the rose group to fill it in. You can add tiny red and light pink shapes around the rose to shade and highlight it too. Place the rose in the center of the face-cream container.
Add shadow and highlight shapes to the face cream itself. I also added a thicker outline to the larger shape group to complete it and then Grouped everything together.
4. Draw the Portrait Base
Step 1
We're going to take a break from working with the cute makeup icons to create the portrait of Frenchy, the cutest character from Grease. Create a New Layer in the Layers panel so your document is organized and you can focus on creating a portrait. Let's start with the head:
Draw a circle.
Pull the lower anchor point downward to create a head-like shape.
Add two anchor points on either side of the jar and adjust the chin so it's more like the head shape below!
Step 2
Beneath your head shape, use the Pen Tool to start drawing the left half of the neck, shoulders, and bust. Copy, Paste, and Reflect the left half of the body to form the right side. You may need to adjust the center anchor points so the two objects overlap a bit more. Once satisfied with their placement, Unite the two objects in the Pathfinder panel.
5. Create a Lovely Face
Step 1
It's time to refer to the sketch again. Really, you may want to do so during the entirety of this tutorial, but that's up to you.
Use the Pen Tool to trace the right eye. Draw a couple paths for the eyelid.
I like to use the Pencil Tool to draw layers of eyelashes. Since this design is intended for a makeup and beauty themed poster or game, I think her lashes should be huge and quite full.
Add a Linear Gradient to the eye itself going from brown to white and back to brown. Use the Gradient Tool to adjust the color placement. You want darker colors at the corners of the eyes.
Draw additional transparent brown shapes over the corners and edges of the eyes to add more depth. Adjust the Opacity of objects in either the Appearanceor the Transparency panels.
Group all of these elements together to keep your Layers panel organized.
Step 2
I Copied and Pasted the right eye and Reflected it over a vertical axis to create the left eye. The nostrils of the nose are two little teardrops, just like the original sketch design.
The mouth was traced from the sketch using the Pen Tool. The teeth are the same gradient as the eyes, with little teardrops creating the corners of the mouth. The lips are like curving half circles that have Radial Gradients applied to them going from the base skin tone to a sweet, bright pink.
Step 3
I added a couple of dark brown circles to begin the eyes. Then, I drew shadow shapes similar to those drawn in the eyes to define the sides and bottom of the nose and the bottom of the mouth.
Step 4
For now, I hid the head and body in the Layers panel so I could trace the eyebrows and place the eyeshadow in the same spot as I did in the sketch. The eyeshadow is a rounded shape, drawn with the Pen Tool, set behind the eyes, with a Linear Gradient applied that goes from blue at 100% to 0% Opacity toward the outer edges.
I also added some sparkle shapes to the lips. I'll be adding a lot of sparkles to the final design as well.
Step 5
Set the fill color of the eyes to brown and the stroke color to dark brown. Place the circles beneath some of the eyelash objects in the Layers panel. It'll be easier to see in the final design, but I added light peach shapes to the corners of the mouth and chin to create simple highlights on the face.
Step 6
For the detail in the eyes, I drew a couple of small dark brown circles for the pupils and added some more transparent dark brown shadow shapes to the eyes to create more depth. Additionally, I drew some highlight shapes on the nose and in the corners of the eyes and added larger blush shapes on either cheek that match the gradient used on the lips but are a bit more transparent and lighter.
Step 7
Finally, I drew a couple of lighter-brown curved shapes on the bottoms of the irises and added sparkles to the eyeshadow. Group together all of your face components and Unhide the head and body so you can check out how cute the face you just created really is!
6. Draw Frenchy's Pink Hair
Step 1
Once again I've hidden the face and body. This is so we can focus fully on the hair and recreating it from the sketch.
Draw the hair in sections using the Pen Tool, starting with the middle of the bangs or fringe.
Work up sections on the left side focusing on the front portion of the hair.
Once the left half of the front is complete, start drawing those cute flippy bits of the back of the hair.
Copy, Paste, and Reflect the left half to create the right half as we've done countless times throughout this tutorial in order to speed up our design process.
Step 2
Place the non-bang or fringe sections of hair behind the head in the Layers panel. Now she no longer has pink facial hair!
I drew a shape in the top center of the hair and added a Radial Gradient that goes from dark pink to medium pink to start showing some depth in her hair.
Step 3
I've hidden the back of her hair so we can focus on the front section first.
Each section of her bangs/fringe has a Linear Gradient added to it in order to add a subtle sense of depth and shape to a relatively flat design.
I added an outline to the entire front section of hair in the same manner we've done previously.
Draw dark pink shadow shapes with transparent Linear Gradients to help define each section of hair. Try to focus these shadow shapes between sections or where parts of the hair indent.
Create shadow shapes on both sides and Group your hair components together.
Step 4
Repeat the previous step's process on the back section of hair. Define sections, some strands, and even some highlights in the hair with a lighter pink. Because I love glitter and glamour I've added sparkles to her hair, but may not keep them within the final design.
7. Create Some Cute Clothes
Step 1
Using the sketch as a guide, trace the shirt in two halves, as we did with the shoulders and bust. Unite the shapes in the Pathfinder panel.
Set the fill color to pink and the outline color can be brown or pink, depending on what you're using for outlines within the rest of the design.
I also used triangles for the collar shapes, which was drawn with the Pen Tool and follows the sketch itself.
Render the shirt in the same manner you did the hair: dark pink gradients for shadow shapes and light pink gradients for highlight shapes. Consider cast shadows from the collar and shadows to help define the puffy little sleeves of the shirt. Repeat for the other side.
Step 2
I changed the outline color to brown to match the rest of my design.
Draw a few white circles with brown strokes for her necklace.
I also added a bunch of sparkles to the design, but this is entirely optional. It's possible you're not as into sparkles and glitter as I am, and that's quite alright.
Step 3
Here's a quick look at the design so far. We need to create the banner and background, and bring it all together with the icons created earlier in order to complete the design. Group the entire bust portrait design together, and let's finish this up!
8. Complete the Design
Step 1
The banner has quite a simple design process. Draw a rectangle and Arc it by going to Effect > Warp > Arc. I've applied a Horizontal bend of -46% to my rectangle. How curved your shape will be is entirely up to you. Go to Object > Expand Appearance to expand the boundaries of the warp effect.
Step 2
For the fold and tails of the banner, draw a small rectangle the same height as the rectangle you drew in the previous step. Add an anchor point to the center of the rectangle's left side and move it inward with the Direct Selection Tool.
For the banner's fold, draw a triangle that connects to the inner top corner of the little flag shape and the outer top corner of the banner.
Repeat for the right side so you have a cute banner like the one seen below. Note that the triangle and flag shape are behind the curving banner shape in the Layers panel.
Step 3
Use the Type Tool (T) to write out a fun phrase or title for your design to be placed on the banner in a script font of some sort. Check out Fabulous, Zaila, or Melancolie from Envato Market.
Apply the same Arc to the type as you did to the banner's original rectangle and Expand its Appearance under Object.
Step 4
Draw a large light blue rectangle behind the design, over the Artboard in order to create the background for the design. Move, Rotate, and Scale your makeup and accessory icons around the portrait and banner to help fill up the space within the Artboard.
Great Job, You're Done!
At long last, we're ready to go back to high school! Or rather complete our design of this Beauty School cutie. I added a Radial Gradient to the background rectangle and moved the various icons outward from the portrait to give Frenchy lots of space within the design. Finally, I added a lot of sparkles and some additional details to the hair and face.
Share your completed design in the comment section below! What other cute characters can you create from Grease? Let's imagine a whole series of beauty and spa games featuring the movie's full cast of fun characters!
If you'd like to use other icons for your design, you can purchase them as stock assets from Envato Market:
If you’re a fan of Grease, you simply can’t forget the iconic dance scene, where Sandy and Danny attend a televised dance-off at their high school.
In this tutorial we’re going to recreate the magic of the film and create a fun poster with vintage appeal. You’ll learn how to recreate the retro look using typography, texture and color, and how to edit a full-color photo to give it that 1950s poster look.
For this tutorial, which is suitable for beginner-to-intermediate levels, you’ll need access to Adobe InDesign, Adobe Photoshop and Adobe Illustrator.
We’ll be using three Adobe programs to create our dance-off poster—InDesign, Photoshop and Illustrator.
We’ll lay out the poster itself in InDesign, using the Layers panel to organize the design, and use the other programs to edit some graphic elements for use on the poster.
Step 1
Open up Adobe InDesign and go to File > New > Document.
Set the Intent to Print. Keep the Number of Pages at 1 and deselect Facing Pages.
Under Width, type in 18 in, and for the Height type in 24 in. Don’t worry if this converts to millimeters—this is just dependent on your InDesign preferences.
18 x 24 inches is a standard US poster size.
Step 2
Moving down the New Document window, set the Margins on all sides to 20 mm and add a Bleed of 5 mm around the page too.
Click OK to create your new poster document.
Step 3
It’s time to get layered up! Expand the Layers panel (Window > Layers) and double-click on the default Layer 1 name to open the Layer Options window.
Rename the layer Background and click OK.
Go to the panel’s drop-down menu and choose New Layer. Create five more layers in the following order and with the following names: Color, Graphics, Photo, Stars, Typography.
Lock all layers except the Background layer, and click on the layer’s name to activate it.
Step 4
Select the Rectangle Frame Tool (F) and drag across the whole page, to create a frame that extends up to the edge of the bleed on all sides of the page.
Go to File > Place and select a papery background like this vintage paper image from PhotoDune. Click Open.
Arrange the image in the frame so that none of the paper edges are visible.
Take the Rectangle Tool (M) and drag across the page to create a rectangle at the same size as the image frame below it.
Expand the Swatches panel (Window > Color > Swatches), and choose New Color Swatch from the panel’s drop-down menu. Set the CMYK values to C=7 M=13 Y=29 K=0, and rename the swatch as Beige.
Set the Fill Color of the rectangle to Beige.
With the rectangle selected, go to Object > Effects > Transparency and reduce the Opacity to 65%.
Step 5
Return to the Layers panel and Lock the Background layer. Unlock the next layer up, Color. Zoom into the top section of the page and take the Pen Tool (P).
Click in the top left corner, close to the margin, then click straight down and click again across onto the other side of the page.
Click around until you have created a rough, narrow rectangle. Don’t worry about making it perfectly straight—a bit of imperfection will add to the vintage look of the poster.
From the Swatches panel, create a new CMYK swatch, with the values C=83 M=73 Y=64 K=93, and rename the swatch as Vintage Black.
Set the Fill of your new rectangle shape to Vintage Black.
Repeat the same process for a new shape at the bottom of the page. Make this rectangle a little chunkier, and set the Fill again to Vintage Black.
Step 6
Return to the Swatches panel and create a new CMYK swatch. Set the values to C=17 M=98 Y=100 K=8, and rename the swatch as Vintage Red.
Take the Pen Tool (P) again, and fill the center of the page with a new square shape. Allow a little gap between the edges of the top and bottom black shapes, and don’t expand the dimensions of the new shape past the margin edges.
Set the Fill of the new shape to Vintage Red.
Go to Object > Effects > Transparency and reduce the Opacity of the shape to 80%. Click OK.
Step 7
Take the Line Tool (\) and drag from the bottom of the top black shape to the top of the bottom black shape. Don’t worry about making it perfectly vertical—a little bit of variation will look more authentically retro.
Set the Stroke Color to Beige and the Stroke Weight (from the Stroke panel [Window > Stroke]) to 2 pt. Position the line on the left side of the page, as shown.
Copy and Paste the line over and over to create a series of parallel lines across the red section of the page.
Select all the lines and Right-Click (Windows) or Control-Click (Mac) > Group.
Then select the grouped lines and the red shape behind them, and Right-Click (Windows) or Control-Click (Mac) > Arrange > Send to Back.
Step 8
Return to the Layers panel and lock the Color layer. Unlock the next layer up, Graphics.
Take the Pen Tool (P) and click onto the red part of the page repeatedly, creating a rough spiked circle, as shown. Continue to click round until you can link the paths up into a whole shape.
Select the shape and go to File > Place. Choose a paper texture image, with a paler hue than the one you chose earlier. Try out this paper photo from PhotoDune.
Click Open. Fill the whole shape with the paper image.
Select the shape and Edit > Copy, Edit > Paste in Place. Directly select the paper image inside the pasted frame and delete it.
Set the Fill of the pasted shape to Beige.
From Object > Effects > Transparency, set the Mode to Multiply and Opacity to 55%.
Select both of the spiked shapes, and Right-Click (Windows) or Control-Click (Mac) > Group.
2. Give a Photo a Vintage Vibe
Now that you have your poster layout ready in InDesign, we can take a look at preparing some of the graphics that will help to bring the poster to life.
Our first task will be to take a full-color photo and edit it in Photoshop to give an authentic vintage look.
First up, go to Layer > New Adjustment Layer > Levels and increase the amount of black in the image by sliding the Black arrow to 8.
Then duplicate the background layer to create a copy of the original image.
Step 2
With the duplicated background layer selected, go to Filter > Other > High Pass. Apply a Radius of 14 and set the layer’s Blending Mode to Overlay.
Then, go to Layer > New Adjustment Layer > Brightness/Contrast, and reduce the contrast to about -20.
Step 3
Create a New Adjustment Layer from the bottom of the Layers panel and select Curves. Using the Channel dropdown menu, play about with the curves of each color channel (creating a rough S-bend shape for each) to create more contrast within the image.
Step 4
Create a new layer above the Levels Adjustment Layer and fill it with an RGB magenta (R=255 G=0 B=255).
Change the Blending Mode of this layer to Screen and reduce the Opacity to about 5%.
Create a new Hue/Saturation Adjustment Layer, and reduce the Saturation to -20.
Step 5
Duplicate the background layer again and go to Filter > Noise > Add Noise.
Deselect Monochromatic at the bottom of the Add Noise window, and select Uniform for the Distribution. Set the Amount to 2.45%.
Step 6
Select the duplicated background layer which has the noise filter applied to it; then go to Filter > Lens Correction.
Under the Custom tab, reduce the amount to -100 and increase the Midpoint to +40.
Step 7
To give your photo a final, truly vintage look, apply a Black & White Adjustment Layer, and move this layer to the top of the pile of layers.
Tick the Tint checkbox, and double-click on the color swatch next to the tint to adjust the shade. Choose a very pale yellow tint, like R=253 G=253 B=224. Click OK.
Step 8
To use the photo on our poster layout, we’ll also need to remove the background of the photo. Save the edited photo and export it to a JPEG format.
Open this JPEG image in a new window in Photoshop. Duplicate the background layer to keep a copy of the original image. You can turn off the visibility of the original background layer.
Next, take the Lasso Tool (L) and click around the top half of the image. Don’t worry about tracing the edge of the dancers perfectly, because we can tidy it up in a moment.
Continue across the top half of the image, and then unite the lasso so that the whole top half of the background is selected.
Click on the Refine Edge button in the control panel at the top of the workspace. In the Refine Edge window, check the box next to Smart Radius and increase the Radius to about 20 px.
Increase Smooth to 4, Feather to 0.3 and adjust the Shift Edge slider until you are happy with the accuracy of the line.
Click OK, and then delete the background that’s selected.
Step 9
Repeat the process detailed in the previous step for the remainder of the photo’s background, using the Lasso Tool (L) to trace the edge, refining the edge and deleting the selection.
Save the photo as a new Photoshop file, and name it ‘Edited Photo Without Background.psd’.
3. Create Authentic Retro Graphics
The difference between genuine vintage poster designs and modern attempts at vintage styles are usually found in the minute details. Lines that are too perfectly straight, blemish-free photos and a lack of texture in the design usually betray a vintage wannabe and can make it look too modern.
I’m going to show you a trick for making your photos look even more retro in style, by creating a pale shadow of the image set behind the photo. This imitates the process of pasting images directly onto posters in hand-drawn drafts, which gives vintage posters that hand-done, imperfect style that looks so good.
Step 1
For this part of the tutorial you’ll need to use Adobe Illustrator. Open it up and create a New Document.
File > Place the PSD file of the ‘Edited Photo Without Background.psd’.
Expand the Layers panel (Window > Layers) and create a new layer. Fill with a bright, contrasting color and set this layer behind the photo. Lock both this layer and the photo layer.
Create a second new layer, above the colored layer and behind the photo layer, sandwiched between the two. This is the layer we’ll work on.
Take the Pen Tool (P) and set the Stroke and Fill Color to a white swatch. Click around the edges of the dancers, tracing the image very casually and unevenly. Make sure the tracing is done slightly outside of the edge of the photo, so it’s visible.
Continue to trace the Pen Tool around the whole edge of the image, until you have a complete white border, as shown.
Step 2
Take the Smooth Tool (under the Pencil Tool’s drop-down menu) and drag over any jagged or overly sharp edges of the white border. The Smooth Tool will even these out nicely.
From the Brush Definition drop-down menu at the top of the workspace, choose the Brush Libraries Menu button and select Artistic > Artistic_Paintbrush.
From the selection of brushes that opens choose Dry Brush 9 and apply this to the Stroke of the white shape you’ve just created. Set the Stroke Width to 1 pt.
Step 3
Select the white shape and Edit > Copy. You can now Edit > Paste the shape directly into your InDesign document, into the Graphics layer.
Resize the pasted graphic, using Shift to maintain the proportions, and center it on the page, on top of the spikey circle, as shown.
Lock the Graphics layer and unlock the next layer up, Photo. Take the Rectangle Frame Tool (F) and drag to create an image frame on the center of the page. File > Place and choose your ‘Edited Photo Without Background.psd’. Resize until it matches the size of the white shape (with the white border still visible around the edges).
4. Use 1950s Type Styles
Typography is going to give your poster the biggest nod to the 1950s era. First up, download and install the following free fonts:
Return to your InDesign document, and lock the Photo layer. Unlock the layer at the top of the pile, Typography.
Create a text frame using the Type Tool (T) and type in ‘ROCK’. Set the Font to KiloGram, Size 230 pt, and Color to Vintage Black.
Rotate the frame slightly so that the text sits on a jaunty angle, as shown below. Position to the top-right of the photo.
Step 2
Return to the Swatches panel and create a new CMYK swatch with the values C=23 M=0 Y=12 K=0. Rename it Baby Blue.
Select the ‘ROCK’ text frame and Edit > Copy, Edit > Paste. Adjust the Font Color of the pasted text frame to Baby Blue.
With the pasted frame selected, go to Type > Create Outlines, to convert the text into an adjustable vector shape.
Right-Click (Windows) or Control-Click (Mac) > Arrange > Send to Back.
Set the blue text behind the black text and stretch the blue text a little, to make it match the size less perfectly.
Repeat the same steps, first typing ‘ROLL’ set in Vintage Black text, and then creating a vector version in Baby Blue behind. Position below the photo, as shown.
Step 3
Create a new text frame and type ‘ ‘N’ ’ into the frame, setting the type in Risque, 250 pt, and a [Paper] Font Color. Rotate the frame to match the angle of the other text frames, and position to the bottom-left corner of the photo.
Step 4
Add two other rotated text frames to the top-left corner of the red background, typing ‘our’ into one, and ‘ “swell” ’ into the other.
Set the Font to Grand Hotel, 130 pt and Font Color to Beige, Tint 70%.
Step 5
Add two text frames to the black rectangle at the top of the page.
Rotate one on the left side, and type in ‘Don’t miss out!’, in Grand Hotel, Size 65 pt, and Font Color Beige, Tint 70%.
Type ‘Come Along To’ in the right-hand text frame, set in KiloGram, 99 pt, All Caps and Font Color Beige, Tint 70%.
Step 6
Move down to the bottom of the page and create a new, small text frame, positioning it on the far-left side of the black rectangle.
Type in‘D’ and set the Font to Cartwheel, Size 160 pt, Vintage Red with a Tint of 85%.
Copy and Paste the text frame repeatedly, adjusting the letter in the frame as you go, and shifting the frames up and down a little to make the text appear more jaunty, until you have the full phrase ‘DANCE-OFF!’.
Set the exclamation mark at a smaller size and in Beige, Tint 70%.
As a final step in editing the poster’s typography, set a couple of extra details about the event (e.g. ‘Live Televised Event!’ and ‘Saturday 8th June 1957’) in separate text frames, and in the fonts Risque and Grand Hotel.
Step 7
To give your poster that final special touch, unlock the Stars layer in the Layers panel.
Take the Pen Tool (P) and, on the pasteboard next to the page, draw a rough star shape like the one pictured. Set the Fill to Beige, Tint 50%.
Copy and Paste the star shape repeatedly, and scatter over the emptier areas of the red background on the poster, varying the size, rotation and angle to give a bit of variation.
Your Finished Poster!
Great work! Your vintage-inspired poster is finished, and it’s looking fantastic—very retro!
Why not try mixing up the background color of the poster to create different effects? It will look great in a retro yellow, for example (try C=3 M=19 Y=78 K=0).
All that’s left for you to do now is export the poster for print.
Go to File > Export and save the poster as a Press Quality, Adobe PDF (Print) file. Be sure to include the Bleed on exporting if you’re going to send your poster to be professionally printed.
You’ve picked up some handy skills for recreating vintage-style posters in this tutorial. You now know how to:
Build up papery textures and vintage-inspired colors in InDesign to recreate an aged look in your designs
Edit full-color, modern photos to make them appear more vintage in style
Create vector graphics in Illustrator that help to enhance vintage-style photos on poster layouts
Work with retro-appropriate typefaces and give your typography an authentic 1950s look
Great work. Feel free to share your poster results in the Comments below!
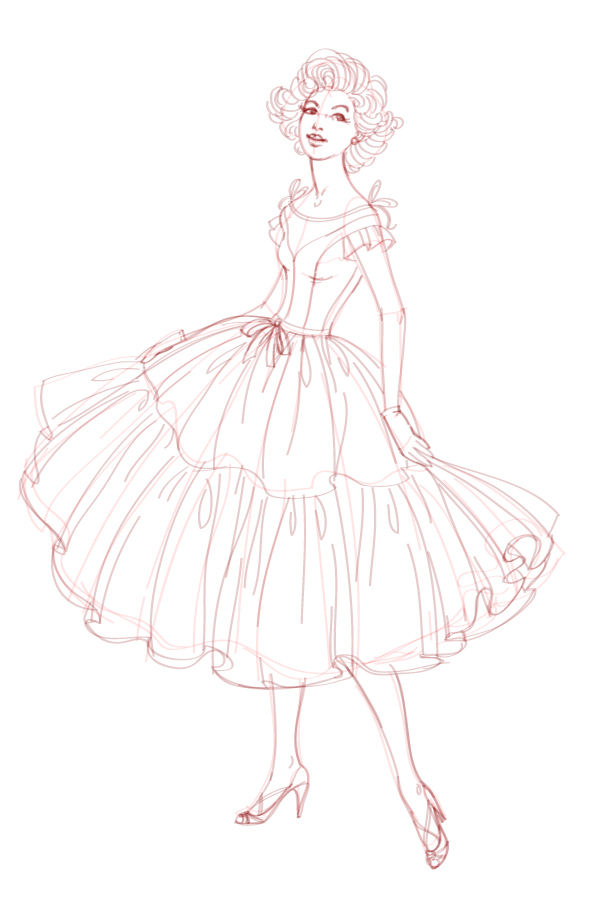
In this tutorial you’ll learn to create a vintage-style fashion illustration. The “Grease” movie with gorgeous costumes, wonderful music and a 50s atmosphere will serve as an inspiration for us. Let's fantasize together about how an ideal dress for a dance should look.
1. Make a Sketch
Step 1
Create a New document, 600 x 900 px, RGB. Change the first layer name to “sketch”.
Step 2
At the beginning, let's draw a schematic sketch using a silhouette and some attributes inherent to
this period. If you need more inspiration before you start sketching, you can get lots of ideas from looking at 50s dresses on Envato Market!
I create my sketch directly in Adobe Illustrator using my graphics
tablet. For the sketch, any brush from the default Brushes panel will be suitable. I chose the Oval
Calligraphic Brush with 2 pt diameter, 20% Opacity.
2. Create a Brush for the Contour
Step 1
Create a New Layer for the lines. We’ll draw all the lines in this layer, because the color of all the lines will be the same.
Step 2
First open the Paintbrush Tool Options by double-clicking on the Paintbrush Tool (B) icon. Use
the settings below and press OK.
Step 3
Now we need to create
a New Calligraphic Brush. Press the
icon New Brush on the Brushes panel and choose the Calligraphic Brush type. Then press OK,
and the window with brush options will appear. Use the settings shown below.
Step 4
Choose our new brush, and make a few trial lines. The thickness
of the line depends on the pressing force of the stylus. Try to sense the
lines.
Step 5
It's time to apply our skills in practice. Let’s
begin to create our line art.
Start drawing the face. Draw lines as smoothly as you
like. Don’t worry about crooked lines, because you can always fix them using the Direct Selection Tool (A). Our mission
is to draw “live” lines and imitate ink.
Step 6
Now draw the hairstyle. First make just the main
lines, and then add the details.
At once use our brush
to add some volume and deep contrast shadows to the hairstyle.
Step 7
Now draw the dress.
Let’s start with the bodice. Draw this way, making the lines thicker on the
shadowy area. The fabric on the sleeves will be transparent, so make the lines
of the folds thinner.
Step 8
Next let’s draw the hands and legs. Make the lines of
the body smoother. Decorate the shoes with straps.
Step 9
We still have to finish the underside of the dress. The
skirt consists of two parts: petticoat and upper transparent skirt. We’ll draw
the lower part with thinner lines to make them almost imperceptible.
Step 10
Make the “sketch” layer invisible. Add some deep
contrast shadows and admire the result.
3. Create the Main Shapes
Step 1
First let’s color the contours of our character. Select
all lines and go to Object >Expand
Appearance. Open the Pathfinder
panel and click Unite holding the Alt button. Then press OK to create one solid object.
Now fill the line art
with Bordeaux color.
Step 2
We need to create the swatch of the main colors.
I chose blue for the dress and pink for the accessories.
Step 3
Add a New Layer for the background. Create a 570 x 870 px rectangle using the Rounded Rectangle Tool, and fill it
with color from your swatch.
Open the Align panel and choose Align to Artboard, and then Align Objects: Horizontal and Vertical.
Step 4
Now it’s time to begin painting. Choose the colors
from your swatch. You can use the Pencil
Tool (N) or the Pen Tool (P), whichever you prefer. The Blob Brush Tool
(Shift-B) can be convenient for the main shapes.
Step 5
Use white for the petticoat, and the main blue with 50% Opacity for the upper skirt.
For a convenient work
process, we’ll create separate layers for each part of the character. Organize
the layers as shown in the screenshot below.
Step 6
And here’s what we’ve got at this stage.
4. Add Shadows and Highlights
Step 1
It’s time to draw the
beautiful face of our character. We’ll work on the “body” layer.
Let’s draw the blush
first. Create two shapes: a smaller pink shape on top, and a bigger shape in the main skin color. Then go to Object >
Blend > Blend Options, and choose Specified Steps: 50. And now go to Object > Blend > Make. We’ve got too bright a shade of the blush,
so reduce the Opacity to 75% on the Transparency panel.
This way, add some
blushes to the second cheek, nose, neck and elbow. So add some blushes to the
legs on the “body_back” layer too.
Step 2
Let’s add some shadows to the skin. Choose the color
of the contour, and reduce the Opacity
to 8%. We’ll draw basic shapes
on the shadowy area, using the Pencil
Tool (N) or the Pen Tool (P).
Step 3
Now draw deeper shadows on the eyes and neck, and under the nose and lips. Change the Opacity to20%.
This way, add some shapes of the shadows to the hands
and legs.
Step 4
Let’s add the falling shadows. Choose the same color
from the contour, and reduce the Opacity
to 50%. Draw shadows under the eyes
and hair growth line, on the neck, hands and legs, and under the folds of her dress.
Step 5
Next let’s add some highlights. Select a lighter
tint starting from the base skin color, and reduce the Opacity to 20%. We’ll
draw basic shapes on the lightened area.
Step 6
Change the Opacity to 60%, and add some bright highlights and twinkles to the outer edge
of the lightened area.
Step 7
Now choose blue color
with 60% Opacity, and draw
highlights on the left side of the character.
Step 8
Now we’ll get work on the eyes and lips on the “face”
layer. Draw eyeshadow using a blue color with 20% Opacity, and then add some bright twinkles with cyan color.
The left side of the face is in the shadow, so draw some
Bordeaux shapes with 8-20% Opacity on
the white part of the left eye.
Now add the Bordeaux shape with 50% Opacity between the lips, and the shape with 25% Opacity to the left side of the
lips. In the end draw a bright twinkle on the right side of the bottom lips.
Step 9
Let’s start coloring the hairstyle. First select the
shape of the hair and fill it with linear gradient from light brown to brown.
Next draw the shapes of the highlights, and then
select them and press Unite on the Pathfinder panel. Fill this solid
shape with vertical linear gradient from yellow to orange, reducing the Opacity to 60%.
In the end, add some blue shapes to the left side of
the hairstyle and some bright highlights to the right side. Just select these
colors from the skin using the Eyedropper
Tool (I).
Step 10
It’s time to add some volume to the dress. Let’s start
with the bodice. Draw the shapes of the shadows, and fill them with dark blue
color, 30% Opacity. Then add the
falling shadows using the same color with 60%
Opacity.
Now draw the shapes of the highlights, and fill them
with light blue color, 30-60% Opacity.
Let’s add some volume to the transparent details of
the bodice. First use the Eyedropper
Tool (I) to choose the main color from these details, and draw the shapes
on the area where the fabric folds. Then use the same colors
for the shadows and highlight from the bodice to draw volume on the sleeves and
neckline. Reduce the Opacity to 20%.
Add some blue shapes to the left side of the bodice
and some bright highlights to the right side. Use the Eyedropper Tool (I) to choose these colors from the body.
Step 11
Now we’ll draw the petticoat. First make the “skirt”
layer invisible. It will make our work on the white part of the skirt easier.
Add some shadows using the gray color with 50% Opacity. Here you can draw the
shapes not as neatly.
Choose the color from the contour, reduce the Opacityto 60%, and draw the deep shadows.
Now make the “skirt” layer visible. Here’s how the
skirt looks now.
Step 12
We’ll draw the skirt using the same principles as we
used on the transparent details of the bodice.
First we’ll draw the shapes on the area where the
fabric forms creases. Use the base blue color from
the dress with 35% Opacity.
Then draw the main shadows using the same dark blue
color from the bodice. Reduce the Opacity
to 20%.
Now add some deep shadows to the small folds using the
same color with 40% Opacity.
Choose the white color with 15% Opacity, and draw the highlights on the lightest area. Don’t forget to add some volume to the back side of
the skirt.
In the end, add some bright gloss to the right side of
the skirt.
Step 13
It’s time to add some volume to the accessories. Let’s
start with the gloves. Choose the gray color from the petticoat, and draw the
shapes of the shadows using 35-50%
Opacity. Then draw the blue shapes with 15% Opacity, adding some reflections from the skirt.
We’ll add some volume to the dress’s decorative
elements and shoes following this method. Use the Bordeaux color from the
contour for the shadows, reducing the Opacityto 50%.
Use the pink color for the highlights, and reduce the Opacity to 70%.
In the end, add some blue and bright reflections.
Step 14
Finally our character is ready!
5. Create a Pattern for the Dress
Step 1
Create a New
Layer over the “bodice” layer. Here we’ll draw a simple pattern for the
decoration of the dress.
Create two circles 3 x 3
px and 4 x 4 px using the Ellipse Tool (L). Draw some simple
flowers using our brush, 2 ptStroke. Select each of them, expand and press Control-G.
Step 2
Duplicate these shapes, pressing Alt, and place them
on the dress randomly as you like. Delete unnecessary details on the creases
using the Eraser Tool (Shift-E) with2-3 ptDiameter.
Step 3
Select the entire pattern and reduce the Opacity to 70%.
6. Create a Simple Background
Step 1
First fill the background with linear vertical
gradient from dark to light color based on the main color.
Step 2
Let’s draw a pattern. Create a 10 x 10
px rectangle
using the main color of the background.
Now
create two 5 x 5 px circles, and align them using
the Align panel as shown below.
Then
unite these circles, select both objects (circles and rectangle), and click Minus Front on the Pathfinder panel.
As a
result we’ve got a rectangle with two holes. Drag this shape to the Swatches panel.
Select
the background shape, press Control-C
and Control-F, and apply our pattern
from the Swatches panel.
Wow! We’re Finished!
I
like this old fashion style so much, and I hope you enjoyed the process. Thank
you for creating with me! Please, share your result!
In most of our tutorials and courses at Envato Tuts+, we aim to cover a topic in depth, giving you a comprehensive understanding of the concept or skill we're teaching.
But we also know that people don't always have time to read a long tutorial or watch a 15-part video series.
So we've been trying out something different: a series of quick video tutorials, in which we introduce you to a new subject in just 60 seconds. It's been quite a challenge for our instructors to tackle complex subjects like building a WordPress theme or filming a documentary video, and cram all that information into just a minute. But the results have been impressive.
So far we've created more than 35 video tutorials across a wide range of subjects. You can browse a selection of them below, and if you've got a minute, why not play one of the videos and see what you can learn?
Web Design
Build a WordPress Theme in 60 Seconds
Creating a basic WordPress theme can be easier than you might think. Here’s how, in 60 seconds!
CSS Preprocessors in 60 Seconds
CSS Preprocessors do a number of things and can massively improve your workflow. Here's a quick-fire explanation.
Your First HTML Document in 60 Seconds
Creating your first HTML document is one of the most satisfying moments for any new web designer. Here’s how to do it in 60 seconds!
Filming a documentary is all about telling a true story. It is your job to make that interesting and engaging. Find out how in this short video.
Macro Photography in 60 Seconds
If you'd like to photograph small subjects up close and personal, then you can learn how in this video.
Cinematic Drone Video in 60 Seconds
Light unmanned vehicles are opening the skies to brand new kinds of affordable aerial filmmaking. With drones you can achieve cinematic shots that were once limited to big-budget productions.
In this 60-second video, Kirk Nelson explores some of the amazing benefits of using Smart Objects in Adobe Photoshop.
Design in 60 Seconds: RGB and CMYK Color Modes Explained
If RGB and CMYK color modes have ever seemed confusing to you, this quick 60-second video will help out.
Illustrator in 60 Seconds: How to Use the Pathfinder Panel
Having trouble figuring out how to use the different Shape Modes found under the Pathfinder panel in Adobe Illustrator? Well, worry no more, since in this short video you’ll learn exactly how to use them!
The process of creating a WordPress plugin can be daunting, especially as you're just getting started. But before trying to create a large, multi-featured plugin, why not start off with the basics?
Gradle in 60 Seconds
Gradle is the de facto build system for Android Studio. It takes your project's source code, resources, and other dependencies, and packages them up into an APK file. But there's much more that Gradle can do. In this video, you'll learn what Gradle is and what it can do for you.
Create a React Class in 60 Seconds
React is a JavaScript library built and maintained by Facebook that aims to make it easy to build user interfaces using, you guess it, JavaScript.
In this video you'll learn about React as a library, and you'll see how you can begin implementing it in your projects.
Want to Learn More?
If you want to see more 60-second tutorials, here are those links to the overall series again:
Wanna have some fun in the amusement park? Then join me in this tutorial and create a retro-style flat funfair scene, inspired by the Grease movie! No special drawing skills are required here—we’ll be working with simple geometrical shapes and the Pathfinder operations of Adobe Illustrator. What is more, we’ll learn how to use the brushes and the Draw Inside mode in order to apply a grungy texture to the objects just in a few clicks.
Have you seen the Grease movie with John Travolta and Olivia Newton-John? Be sure
to check it out if you like the 1950s. It has all sorts of things to create a
proper retro atmosphere—clothes, hairdos, cars and music—everything you can
imagine. For me, one of the most memorable moments of the movie is dancing at
the funfair. So in this tutorial we’ll be creating a simplified and stylized
version of this amusement park from the movie.
Feel free to browse the Funfair section of Envato Market to find out what the funfair elements look like and to gather some
inspiration in case you want to make more objects in addition to those we’ll
be making in this tutorial. You can also find some nice Vintage Funfair
photo-references on PhotoDune that will give you a closer look.
Let’s start!
1. Make a Fun Striped Pavilion
Step1
A large striped tent is one of the first elements
that you think of when talking about retro funfairs. Let’s start building such pavilion from a triangle of 280 x 105
px, which we can make with the help of the Polygon Tool.
Then squash the shape with the Selection Tool (V) to make it flat.
Step 2
Take the Rectangle Tool (M) and form the wall of the pavilion, attaching it
to the triangle roof. And let’s align the wall to the roof, using the roof as
the Key Object. Select both shapes,
hold Alt and click the triangle
roof. You will see a thick selection outline, indicating the Key Object. Now we can head to the Align panel and click Horizontal Align Center.
Great! Now that the base is ready, let’s add
those stripes! Use the Rectangle Tool
(M) to make a 20 x 125 px narrow
vertical stripe, filing it with pale red color.
Step 3
Align the stripe to the left side of the wall, using the wall as the Key Object.
Copythe stripe and
Paste in Front (Control-C > Control-F). Align the copy to the opposite side
of the wall.
Select both stripes and go to Object > Blend > Make. Now we can
change the settings to our liking in Object > Blend> Blend Options. Let’s set the Spacing to Specified Steps
with 5 steps.
Go to Object> Expand Appearance to turn the Blend group into a set of separate
stripes. Change the color of the wall to light yellow.
Step 4
And now let’s add some stripes to the roof
as well. Duplicate (Control-C >
Control-F) the roof, hold Alt
and shrink the shape with the Selection Tool (V), making a narrow triangle. Fill it with red
color.
Duplicate the created stripe, select its
bottom anchor points with the Direct
Selection Tool (A) and drag them to the left, so that the triangle is skewed and its top anchor point remains attached to the top of the roof.
Make another copy of the triangle stripe
and move it further left.
Finally select the two copies that we’ve
made and double-click the Reflect Tool
(O) to open the options window. Flip the shapes over the Vertical Axis and click Copy to make the same stripes for the
right side of the roof.
Step 5
Apply slightly lighter colors to the roof
elements in order to separate the roof from the wall. And let’s add some more
details.
Take the Ellipse Tool (L), hold Shift
and make an even circle, fitting it to the width of the central stripe. Use theSmart Guides (View > Smart Guides)
to make it easier to “stick” the shapes to each other.
Align the shapes horizontally.
Step 6
Let’s add more circles! Now select the
circle and hit the Enter key to open
the Move options window. Set the Horizontal value equal to the width of
the circle. In my case, it is 28 px. If we want to move the circle to
the left, the value must be negative, so we need to set the Horizontal value to -28 px and click Copy.
Step 7
Great! Now just press Control-D several times to repeat the last action, creating more
circles.
And then repeat the same for the right half
of the tent, moving the copy of the central circle 28 px to the right and repeating the action.
Alternate the colors of the circles, making
them match the colors of the stripes on the roof.
Step 8
If you notice that some of the circles
don’t fit the stripes, just move them left or right a bit or use the Selection
Tool (V) to make the circles wider or narrower, squashing or extending the
shapes.
Step 9
Now let’s delete the unneeded pieces.
Select the side circles together with the roof and arm yourself with the Shape Builder Tool (Shift-M). Hold Alt
and click the pieces that you want to delete.
Finally, Group (Control-G) all the circles and place them beneath the roof (Control-[), making them a bit darker. Don’t forget to group the elements of the roof as well to make your work more
organized and neat.
Step 10
Add a dark-brown triangle for the entrance,
placing it in the center of the wall.
Step 11
Finally, let’s add a semi-transparent
flat-style shadow. Duplicate (Control-C> Control-F) the pavilion and, keeping the copy selected, Unite it in the Pathfinder, creating a flat silhouette.
Use the Line Segment Tool (\) to make a vertical line and Align it to the center of the
silhouette.
Keeping both shapes selected, Divide them in Pathfinder, splitting the silhouette into two equal halves.
Finally, delete the left half and switch
the right one to Multiply Blending
Mode, darkening the pavilion.
And that’s it! Our striped pavilion is
ready! Now we can move on to the next element of our fancy funfair.
2. Draw Fancy Vintage Carousels
Let’s make a couple of carousels for our retro
amusement park.
Step 1
Let’s make the top part of our carousel
from a 175 x 35 px rectangle of
turquoise color. Select the bottom left anchor point with the Direct Selection Tool (A) and hit Enter to open the Move options window. Set the Horizontal
value to 10 px in order to move the
point to the right. Click OK.
Repeat the same for the bottom right anchor
point, but this time set the Horizontal
value to -10 px, moving the point to
the left.
Step 2
Now duplicate
(Control-C > Control-V) the shape. Take the Selection Tool (V), grab the upper side of the shape and drag it
down, turning the shape upside down. Make it a bit smaller and fill with
light-yellow color.
Use the Direct Selection Tool (A) and the Move function to move the bottom anchor points closer to each other.
Step 3
Take the Rectangle Tool (M) and make a column, fitting the bottom of the yellow shape (in my case the column is about 50 x 75
px). Add darker vertical stripes to the column in the same way as we did it
with the wall of the striped pavilion.
Add a lighter stripe to the turquoise top of the
carousel, and use the Shape Builder Tool
(Shift-M) while holding Alt to delete the unneeded pieces outside the
carousel.
Step 4
Now let’s add stylized seats or cabins that
will be spinning around the carousel. Make a 15 x 15 px circle and pick the pale-red color from the tent, using
the Eyedropper Tool (I).
Select the created circle, hold Alt and drag the circle to the side,
creating a couple of copies. Use the Line
Segment Tool (\) to connect the cabins to the carousel.
Add more cabins and connect them to the carousel. Place the circles on top (Shift-Control-]),
so that the strings are hidden beneath the cabins.
Step 5
Let’s add a gentle shadow to the carousel.
Select the basic parts (without the cabins) and duplicate them. Unite the elements of the copy in Pathfinder, creating a merged
silhouette. Draw a vertical line across the silhouette and Align it to the center of the carousel.
Finally, Divide the line and the silhouette in Pathfinder, delete the left half, and switch the remaining part to Multiply mode.
That’s it! Let’s make another carousel.
Step 6
For our next carousel, let’s use the
triangle top of the striped tent and the column with cabins from the carousel
that we’ve just made. Remove the stripes from the roof and fill it with a pale purple color.
Step 7
Let’s adjust the roof a bit. Make a copy
and move it up a bit. Select both shapes and use the Shape Builder Tool (Shift-M), holding Alt, to delete the pieces outside the roof. Make the top of the
roof light purple-blue.
Step 8
Now let’s replace the circle cabins with
seats of a different shape. Grab the Pencil
Tool (N) and draw a small bean-shaped seat. If you want the lines to be
smoother while drawing, double-click the Pencil
Tool (N) and move the Fidelity
slider all the way to the right.
Make more copies of the seat and
arrange them around the column. Make some of the seats smaller and fill them
with lighter red color, creating distance between the objects.
Step 9
Finally, extend the column and make it taller by selecting its bottom anchor points with the Direct Selection Tool (A) and dragging them down. Add another stripe to the roof. Finish up by adding a
semi-transparent shadow to the right half of the object, making it look
complete.
3. Make a Colorful Ferris Wheel
Step 1
We’ll start by making the most detailed
part of the big wheel: the cabin. Make a light-turquoise rectangle of 20 x 15 px size.
Use the Live Corners feature to make the corners of the cabin rounded. To do this, switch to the Direct Selection Tool (A) and pull a
tiny circle marker closer to the center. If you’re working in earlier versions of
Adobe Illustrator, you can use Effect> Stylize > Round Corners instead, which gives the same result.
Duplicate the shape and make the copy
smaller, filling it with light-blue color, depicting the glass.
Keeping the glass selected, take the Eraser Tool (Shift-E), hold Alt and drag over the bottom half of
the shape to erase it.
Step 2
Make two vertical stripes of a lighter blue
color and rotate them 45 degrees
by holding Shift and using the Selection Tool (V).
Place the stripes above the window and use
the Shape Builder Tool (Shift-M) to
delete the unneeded pieces.
Finally, add a 2 x 12 px stripe in the center of the window to divide it into two
halves.
Place a darker-turquoise circle at the top of the cabin (Shift-Control-[).
Step 3
Now let’s form the wheel. Make a 270 x 270 px circle with grey Stroke and no Fill (you can set the Fill to none in the Color panel).
Place a 205 x 205 px circle inside the first one.
Continue by adding colorful details in the center, consisting of two circles. Take
the Scissors Tool (C) and click the
side anchor points of the red circle to split it apart. Make the bottom part a
bit darker.
Step 4
Use the Line Segment Tool (\) to make a vertical spoke of 270 px height (equal to the height of
the bigger circle). Double-click the Rotate
Tool (R) and set the Angle value
to 36 degrees. Click Copy and press Control-D several times, adding more spokes.
Now that we have enough spokes, place the cabins at the tips of each spoke.
Step 5
Recolor some of the cabins, making the
wheel look more colorful and festive. And, finally, add the base to the
wheel by making a 175 x 230 px
triangle with 6 pt Stroke and no Fill. Send it to Back (Shift-Control-[), beneath the wheel.
4. Create Additional Elements
Step 1
Funfairs are known for having a lot of
exciting attractions and entertainment, such as shooting galleries,
competitions, bumper car rides and so on.
Let’s create one of them, and later you can
actually make more of those, using the created base. We’ll be making a shooting
gallery shack.
Make a 270 x 150
px brown rectangle and Send it to Back(Shift-Control-[), beneath the canopy. Make a smaller and darker
rectangle for the inside of the shack.
And, finally, create the targets of the
shooting gallery. Make a 65 x 65 px
circle of light-yellow color and add smaller circles inside with 5 px red Stroke and no Fill.
Step 2
And now let’s make some plants and trees
that will help us to create a nice green scene.
Start with the crown of the tree by making
a 45 x 45 px circle. Use the Rectangle Tool (M) to make a narrow 3 x 55 px stripe for the tree trunk. Make
the top of the trunk slightly rounded, using the Live Corners feature.
Now take the Pencil Tool (N) and draw a rounded bubbled shape for the
cartoon bush. Use the Eraser Tool
(Shift-E) and hold Alt to erase
the bottom part of the bush to make it a straight horizontal edge.
5. Create a Retro Funfair Composition
Step 1
Now let’s combine all the elements into a
scene, making a balanced composition. Set the size of your Artboard to 900 x 500 px with the help of the Artboard Tool (Shift-O). Make a
light-blue rectangle of the same size for the sky and a smaller 900 x 70 px green rectangle for
the ground.
Use the Align panel to place the shapes properly, using the Align to Artboard and Align to Key Object features.
Place the created elements of the funfair
next to each other, making some of them overlap. You may need to scale the
objects, making some of them larger and others smaller.
Step 2
Fill up the spaces between the objects with
the trees and bushes that we made earlier. Make some of them smaller and others larger. Vary the colors of the tree crowns and bushes from
light green to dark green to separate them from each other, adding depth to the
image.
Step 3
Use the elements that we’ve made for the bushes
to add the fluffy clouds. Speckle the clouds over the sky and recolor them
into white and light-blue colors, varying the sizes.
Our composition already looks finished, and
you can actually stop at this step if you want to end up with clean and simple
flat design.
However, if you want to add more of a retro touch to our image, go on to the next part and learn how to add texture to the objects.
6. Add a Grungy Texture Using Brushes
Step 1
Let’s use our purple carousel as an example.
Duplicate its triangle roof and drag it to the very top of the carousel group
in the Layers panel.
Head to the Tools panel and find the Draw Inside button beneath the Fill and Stroke colors. You will see dotted corners around the selected
object, indicating that you will draw inside this shape as you would inside a Clipping Mask.
Step 2
Now let’s select a nice grungy brush
from the Adobe Illustrator library. Open the Brushes panel (Window >
Brushes) and go to Brush Libraries
Menu > Artistic > Artistic_ChalkCharcoalPencil. Select the Chalk brush on top of the list, take thePaintbrush Tool (B) and make a few
strokes at the bottom of the triangle roof.
Now let’s turn our brushstrokes into shapes
so that we can adjust them. Select the created strokes and go to Object > Expand Appearance. Fill the
shapes with a very light-purple color and switch to Multiply Blending Mode, creating a gentle grungy effect and adding
a shabby touch to the carousel.
Step 3
Use the same Chalk brush or any other
grungy brushes to your liking to add a gentle shabby effect to the other
objects as well.
You’re All Done! Our Retro Funfair Is
Finished!
Great job! We’ve created a nice
flat-style funfair composition, inspired by the Grease movie! We were using the basic shapes and simple
Pathfinder operations and even added a grungy retro touch using the built-in Adobe Illustrator brushes.
I hope you’ve enjoyed following this
tutorial and discovered some new tips and tricks, which will help you to create
more retro-style flat images, such as a carnival scenery or vintage circus and
so on.
If you want to take a closer look at the
illustration that we were making in this tutorial and you want to have the night version of it, feel free to get a Retro Funfair Flat Style Illustration at GraphicRiver.
Have fun and don’t forget to share your
result! Good luck!
Do you like pixel art? In this tutorial I will guide you through the process of creating pixel art, and we will make a magical creature known as a Pegasus. Lots of pictures will help you to get the idea of working with pixels in Paint Tool SAI. Let’s do it!
1. Create a Clean Outline
Step 1
Our first step is to create a New Canvas with 450 x 450 px resolution. We don’t need a big canvas, because we will work with pixels. Take the Pen tool and start sketching! Because generally a Pegasus is a horse with wings, find some references of horses and bird’s wings.
We can add motion to the image with a dynamic pose and flying locks of mane and tail. When an image has motion, it is always more interesting and fun.
Also remember: the clearer your sketch, the easier it will be to pixelate it, so try to make tidy lines.
Step 2
To create the basic structure, we will make a black outline. Set the opacity of the sketch layer to 20-30% and create a New Layer on top. Take our Binary tool (in some versions of the program it can be called the Pixel tool), and start to pixel the outline. Your brush should have 1 px size and 100% opacity—make sure of it. Try to make your lines as smooth as possible.
At first you can experiment on a different layer or canvases, until you feel confident working with the Binary tool and satisfied with your outline. Anyway, you can always erase all mistakes and move on.
Step 3
When drawing wings, it would probably be better to create another layer and draw pixels there, so you don’t have to worry about messing about with lines. Then Merge down all layers except the sketch layer—you can either delete it or turn off its visibility.
2. Pixel Coloring of the Pegasus
Step 1
Now that our pixel outline is complete, we can begin to fill our Pegasus with color. First, take the Magic Wand and select the part you want to color, such as the body or tail. Then create a New Layer on top and, using the Bucket tool, fill in the selected area.
Repeat these steps with all parts of the Pegasus. And it would be better if you make a separate layer for each big part, because it makes coloring work so much easier.
Step 2
Zoom in on your drawing to about 300-400%. While working with the Bucket tool, you can see that there are some gaps of single pixels in some places. We’ll have to paint them separately with the Binary tool.
Step 3
After finishing work with the base colors, we can move straight on to creating shadows. On top of our body base color layer, create a New Layer and Clipping group it to the base color layer. Now we can paint in this area without worrying about stepping out into other areas.
Step 4
When drawing with pixels, you can get a desire to use many colors to make it look more realistic, but try to avoid this. It is better to use two colors for shadows and two colors for light and also a base color. It will make your pixel art look cleaner.
Also, you can experiment with adding one more bright color for highlights. This new color can be completely different from your main color palette—for example, I chose this emerald green, and it worked well in creating an interesting appeal.
And pixel coloring of the tail is complete! Well done!
Step 5
Now get to the mane—basically repeat the same steps you used with the tail.Create a New Layer and Clipping group it to the base color layer, and then, using the Binary tool, make the base middle shadows and dark shadows. You can either stay on the same layer for drawing highlights, or create a New layer for them.
Gradually work on the highlights and add one more hue to make an interesting effect. I used the same emerald green as with the Pegasus tail.
Also it’s a good time to work on other details like the hooves and Pegasus's eye. We can make them look golden, just with the use of a dark yellow hue plus white.
Our progress, for now, looks pretty good. And as we've finished with the body of the Pegasus, let’s move to the wings.
Step 6
And again, create a New Layer on top of the wing base color layer and Clipping group it to the base color layer.
At first, choose a color palette to work with. Two main color variations are enough. In this case I chose purple and emerald green, as for the tail. At this stage you can draw without worries—we need this step only to lay down all base colors for the wing. You can also work on the basic pattern for the feathers, pointing out color placement.
When we have all the basic colors in their places, we can continue detailing the feathers. Also, to make the working process more comfortable, you can use the Rotate tool to achieve better access to some parts of the drawing.
And... done!
3. Continue Detailing
Step 1
We can make the wings more realistic by adding details to the feathers. Look at real-life birds—they all have these jagged edges on their feathers. Just create a New Layer on top of all layers and use the Binary tool to continue drawing.
Step 2
Also, to separate and distinguish the wings from each other, we can draw a white line
between them, and also with the mane. Generally, we may draw this line to separate
parts that have the same color palette, like wings, mane and tail.
Step 3
Also, there is a cluttered place on the drawing that we shall fix. Create a New Layer for that and take the Binary tool to draw on this spot. Make the wing look as if it is on top of the tail, and don't forget about a white separating line to distinguish the wing and tail.
Step 4
And finally, let's make a pale yellow stroke around our Pegasus to emphasise the drawing.
Awesome, We've Done it!
Now you know how to work with the Binary (or you may find it as Pixel) tool in the Paint Tool SAI program. I hope this tutorial was helpful and you learnt something new about the topic. Good luck, and have fun with pixels!
You may want to make a retro video game or help with making the graphics for one. Then you’ll need a sprite: a pixel art character, animated and in different stances.
Then check this lesson out, as we’ll make a cute little bunny and give it a running loop animation.
If you find doing the actual pixel work too difficult or tedious, feel free to shop for great ready-made sprites as well as any other game assets on Envato Market.
1. Design the Character
Before the animation, we’ll do a static view of the character, and before doing that, we’ll need to figure out what it will look like.
Step 1
It's not such a necessary step if you're going to follow this tutorial exactly, but it was part of my process: sketching the character.
I sketched only the head. I tried a few different options and chose this style.
Step 2
To turn the bunny into pixels, I started drawing the eyes directly in Adobe Photoshop. The sketch wasn’t used much other than for defining the style.
If you’ve never done pixel art, you’ll want to create a New File in Photoshop and not make it very large—it can be 400 px by 400 px. You’ll want to work with a lot of zoom (like 700%) and use the Pencil Tool to draw one pixel at a time. I recommend keeping a second window of the same file open at 100% or 200% zoom so you can cycle between the windows and you can check on progress without the zoom.
I won’t follow a predefined sprite size, but I will make the character about as small as it can be while maintaining its main features. That’s why the eyes are a good starting point.
The eyes will simply be two lines, next to each other. Each eye is 3 px tall by 1 px across, and nearly black in color.
Step 3
With the eyes done, you can proceed with the nose of the bunny plus a few other details. It’s ok if the lines are simple for now.
Step 4
Now we can soften some of those lines. Also I’m already adding some teeth in front of the mouth, because bunnies have big front teeth.
Step 5
Let’s give the mouth a smile.
Step 6
And let’s add some ears. Right now they’re pointing straight up, and that could work also for this character, but we’ll bend them a bit.
The ears are about as thin as possible, with just 1px for the inside and then the outline pixels on the sides.
Step 7
Here’s one ear folding over, flapping down.
Step 8
And the back ear folds down the same way.
Step 9
Now, to finish the head, we’ll give the bunny a relatively big puffy cheek.
Step 10
And now we can draw a body under the head. We’ll make our bunny anthropomorphic, or with a human-like shape. The torso will basically be like a teardrop shape.
Step 11
We’ll give the bunny short legs and big feet. We can start with just one leg.
Step 12
The back leg is the same as the front one, but moved slightly to the side as it would otherwise be completely blocked by the front leg.
Step 13
Finally I moved the legs one pixel to the left because I thought they looked a bit off-center, and I connected the front leg to the belly by removing the pixel separating them.
Step 14
We’ll only have one arm visible in the standing position. The arm will have a kind of teardrop shape.
It will block some of the torso.
Step 15
Let’s clean up by removing the lines of the torso behind the arm.
And now the basic outlines of the bunny character are complete.
2. Color the Bunny
Now we turn those character outlines into a finished static sprite.
Step 1
Pick a color.
What color would you like for your bunny? I went for a tan kind of color and applied it, for now, to all areas except the nose. You can fill the areas with the Bucket Tool.
Step 2
Let’s give the bunny a cute white belly. Also a white pixel for the front teeth. The nose will have a little touch of pink, but mostly it will be white, as highlight.
Step 3
We give the bunny some shading: a darker version of the main fur color applied to areas where less light reaches. This shading can help give texture on the cheeks if we apply it with a bit of a pattern.
We’ll be keeping the back limbs and ears darker than the front ones. So the back leg gets only the new darker shade and the back ear gets mostly this shade except on the tippy top.
Step 4
Extend the shading to the white belly. I added a light grey color with a slightly blue hue.
Step 5
Some features will look better with less contrast, so I replaced some of the near-black color with dark brown on some inside pixels, like the mouth and neck.
I also added more detail with this dark brown to accentuate the puffy cheeks.
And now the character, in its standing position, is finished.
3. Draw the Running Frames
Now let’s give the bunny some motion; we’ll make a running loop.
This animation can be done with any number of frames, but as this is a small character, six frames will do fine.
Step 1
Let’s get the limbs out of the way for now.
The bunny’s torso and head won’t change much while it's running, so we’ll get that ready and keep it pretty much constant while we work on all the frames.
I left a bottom line as reference for the leg height or ground position.
Step 2
Lean the torso forward, simply by selecting the head and an area below the neck with the Rectangular Marquee Tool and then nudging 1 px to the right (which can be done with the right arrow key while the Move Tool is active).
In the end I moved the head forward 2 px.
Step 3
We didn’t properly rotate the torso just now, which means we kind of stretched it, making it slightly longer. So to adjust it back, let’s shrink the torso vertically 1 px and clean up the lines.
Let’s also move the torso 1 px closer to the bottom line, because the legs will be flexed for most of the running animation, and thus they shouldn’t be the same height.
Step 4
To do the legs, we only really need to work on one leg motion, as the other one will move the same way.
So the movement will need to be like a pendulum: the leg is bent through most of the motion except for when it extends forward (which is the first frame here)
So these would be the six frames of the leg motion (feel free to check more references of running frames). Notice the position of the foot when doing these. They're done in a bright color for contrast.
Step 5
We’ll work on all six frames side by side.
Here are the leg frames placed over the bunny. Do this in a New Layer.
Notice that the leg is not fixed to one point of the waist; when the leg goes back, it’s coming out of the back of the bunny, and when it goes forward, it’s coming out of the front of the bunny, to an extent.
Step 6
Here’s a quick way to start turning our guide lines into the final legs. First, replace the color with the fur color (you can do this with the Bucket Tool with the contiguous setting checked off), and instead of drawing the outlines around the legs, select the blank area around them with the Magic Wand and contract the selection (Select > Modify > Contract…) by 1 px. Then invert the selection (Select > Inverse) and then with the Bucket Tool (contiguous checked off) fill in with outline color.
Step 7
The legs aren’t finished yet, but let’s add a little skip to the bunny now because that will affect finishing the legs.
We’ll add the skip because while running we can’t expect the character to stay always at the same level. So we’ll bump the bunny up 1 px on the third frame, when the back leg is most extended, pushing the bunny up, and we’ll also need to add the skip on the sixth frame, when the opposite leg will be pushing the bunny up.
The frames with the skip are marked here with purple bottom lines. The other bottom lines have been turned into 20% black lines that can serve as shadows. On a platform game, this shadow might not be needed, but for now it will make the animation look better.
Step 8
To finish the leg, we have to make the foot chubbier, connect the leg to the body and also do a bit of shading.
Also, all bottom lines are now turned to shadows.
Step 9
Now that one leg is finished, we just have to copy it.
After pasting it, we should move the new leg a couple of pixels to the right, just as the legs were slightly spread on the standing position.
Right now it looks a little bit funny because both legs are moving the same way, which is actually usable for this character, as bunnies tend to hop. But we’ll change that to make them look as if the bunny's running.
Step 10
To get the legs to run, they should cycle alternately, so that when one leg is extended to the front, the opposite leg is extended to the back.
Because we have six frames, that means one of the legs will move its frames three positions to one side (and then take the three disembodied leg frames and move them to the one-legged bunny frames).
The new legs layer should be behind the bunny body layer.
Step 11
To finish the back leg, you should simply shade it darker, if you want to keep the back limbs darker than the front as we did in the standing position.
This is how the frames are looking so far. Don’t worry about making this animation for now. We’ll finish the graphics and animate the running loop at the end.
Step 12
Now it’s time to add the arms.
They’ll move pretty much like this. They’re bent throughout the running cycle, only extending back a little bit in the first frame. However, you can try your own variants to this motion to achieve different running styles.
Step 13
Place the arms over the body frames in a New Layer, and give them the right color and outlines, as we did with the legs.
Step 14
And then give the arms some volume.
Step 15
And finally shade them to convey further volume.
Step 16
Then copy the arm. New Layer, behind the body.
Step 17
And finally shade the new arms and move them so that they cycle opposite to the original ones.
Remember that the arms move counter to the legs so that when the left leg is at the front the left arm should be at the back.
Now this is how the arms are looking.
Step 18
Let’s add a bit of motion to the head, as that may be conspicuously static for now.
We’ll make the ears respond to the bunny’s motion. Here, on the frames where the bunny slightly skips up, I made the ears point down as though inertia is keeping them down while the bunny is skipping.
Step 19
On the frames after the skip, I made the ears less bent and more open, pointing forward.
Step 20
And finally I made the cheek fur move as well. Like the ears, a bit lower when the bunny skips up and a bit higher after the skip.
And here’s how that is looking.
Step 21
The last bit of work on the frames we’ll do will be on the torso, first by animating the white spot on the belly. The chest should be turning slightly as the bunny runs, so the white spot should respond to that motion.
So when the front arm points to the back, there should more of the white spot visible, and less of it when the front arm points forward.
Step 22
We didn’t need to draw the tail when the bunny was standing up, but now that it’s running, it seems that the tail should show up.
So first I put a red square marking where I think the tail should go. It goes in a New Layer, and for now it can be on top of the other layers.
Step 23
Now give the tail some color, shading and outlines.
Step 24
An extra touch for the tail: it hides slightly behind the bunny’s body as the bunny’s chest is more visible.
Step 25
To finish the tail, move the layer to the back and finish any shading/cleaning you see fit.
And the work on the frames is complete. Here’s what it’s looking like in motion—the extra detail work pays off, doesn’t it?
Let’s turn those frames into a loop.
4. Make the Animation
We have six frames that will seamlessly loop into a running cycle. We just have to put them in motion.
Step 1
Copy the frames into a New File.
You’ll have to copy one frame at a time, in the proper order (left to right). To copy all layers at the same time, you have to copy merged (Edit > Copy Merged), and just remember to have no background color when copying.
You’ll want the new file dimensions to be only slightly larger than the bunny.
When you paste them they should line up properly; the bottom line stays the same on all layers, and the nose does too, except for the two frames in which the bunny skips up 1 px.
You should end up with a file with six total layers; one per frame. No background.
Step 2
To make the animation in Photoshop, you’ll need to open the timeline window (Window > Timeline). It has a Create Frame Animation button unless it’s set to Create Video Timeline, in which case you change it to frame animation using the drop-down button.
Step 3
Press the Create Frame Animation button, and then press the timeline window options button, in the top right corner…
… and select Make Frames From Layers.
Step 4
Then finally select all frames and adjust their delay if you want (I chose a 0.1 second delay) and set the looping options to Forever.
And you've got your bunny running loop!
You can now use this sprite in games or export the file to GIF.
Awesome Work, You're Now Done!
Congratulations, the bunny runs now! He’s ready to save princess bunny or cause mischief or whatever you might come up with for him.
This should help give you an idea of what it takes to design and animate sprites. You can have fun making your own, or get to work and apply these graphics to a game!
And if this was too tedious for you to do, remember you can find finished game assets on Envato Market!
Be sure to catch the eye of your love interest this Valentine’s Day with a beautifully designed card. In this article we’ll look at eight professional tips for making your cards look especially unique and design-forward, and share some great templates for achieving your perfect design.
Sending a Valentine’s card might be daunting, but there’s no need to worry when your card looks as good as these.
To find even more romantic inspiration for your card designs, check out the huge range of Valentine's templates over on Envato Market.
1. Add a Touch of Vintage Charm
Vintage-inspired design isn’t going anywhere this year, and kitsch 1950s styles are having a moment in particular. These retro Valentine’s cards have been given an Americana twist with script typefaces and signage-inspired callouts.
Keep text simple and concise, to make your declaration of love center-stage.
2. Not an Old-Fashioned Romantic? Go Modern!
Ahh, the charms of modern-day romance. If you met your partner on Tinder or eHarmony, you might want to pay tribute to the way you met with a suitably tech-forward card design.
This app-inspired card design discards traditional flowers, pink and roses in favor of a much more pared-back style that wouldn’t look out of place on a Facebook feed.
Modern card styles can be a breath of fresh air and refreshingly gender-neutral. Follow these tips for recreating a clean, modern card design:
Apply a palette of punchy primary colors and create an app-inspired layout with a grid of colored sections.
Say it with emojis—place a single icon, emoji or simple line graphic in each section.
Use clean, sans serif fonts and avoid fussy script type.
Keep things clean with a pared-back, white background.
3. Can’t Paint? No Problem!
Hand-crafted cards have a nostalgic charm, and have the added bonus of looking as if you’ve gone the extra mile to create a card with a hand-painted design. But if painting’s not your strong suit, you can still recreate this simple yet strong style digitally.
If you’ve created a graphic in Adobe Illustrator, go to the Brush Definition panel at the top of the workspace and open up the Brush Libraries Menu. Choose Artistic > Artistic_Paintbrush to open up a range of painterly brushes. You can apply the effect to the stroke of your graphic to give it a more hand-done feel.
Alternatively, make a genuinely hand-painted love-heart more flexible by scanning a copy of the painting into your computer. Switch up the color in Photoshop, or transform the drawing into a vector in Illustrator using the Image Trace panel (Window > Image Trace), which can be easily scaled, distorted or recolored.
4. You Don’t Have to Stick to Conventional Colors...
Sure, red might be traditional, but unconventional color choices can make your Valentine’s card really stand out from the crowd.
To show your potential beau how grown-up and glamorous you are, try a sophisticated combination of black, white and gold. Extra brownie points for adding a metallic foil to your design—guaranteed to dazzle your intended.
Team it with an abstract love-heart and calligraphic text, as in this beautiful Valentine’s card, for a very elegant take on the traditional Valentine’s.
Other unconventional color combinations with a sophisticated edge to try out on your card:
Jade green and black
Silver and midnight blue
Gold and deep purple
5. ... But When In Doubt, “Think Pink”!
There’s just something so enduringly romantic and vulnerable about a soft shade of pink. It may be a more conventional color choice, but it finds new relevance with vintage-style cards.
Give your cards a design that wouldn’t look out of place on the set of The Grand Budapest Hotel with sugary pastel shades of pink, cream, baby blue and mint.
Teamed with elegant calligraphic fonts and vintage-style touches, like ribbons and ornate borders, pink can look just right.
To give your cards vintage charm, avoid garish hot pink shades—you want to channel Marie Antoinette, not your mom’s Eighties makeup.
Looking for an easy-to-use template instead? Check out this sugary sweet confection from GraphicRiver.
6. Go Back to School With a Chalkboard Design
Remember back at school when you had your first crush? Emulate that nostalgic feeling of romance with a chalkboard-style Valentine’s card.
Chalkboard styles are super-easy to recreate. Simply set the background to a dusky board background, and layer chalky fonts over the top—set in an off-white swatch for the most authentic effect.
Take inspiration from this charmingly rustic card template, and use a circular stamp border to frame your header. Adding doodle-inspired illustrations of hearts and arrows will complete the look.
Sending your Valentine’s card can be scary enough, but how can you make sure that you get that elusive first date?
Avoid the awkward aftermath with an assertive card that has a quirky twist. Why not design your card as an event invitation? There’s no need for this to be the real ticket—just make sure you give some details about the place and time to meet.
Check out this Valentine’s event flyer for inspiration. Why not adapt this to create a Valentine’s card?
Create a custom layout in Adobe InDesign, Photoshop or CorelDRAW, and get the card printed and trimmed professionally. Add a glossy coating to the print job for an extra-special touch. Design extras like bar codes and dashed folds add that extra dash of authenticity to the ticket design.
Now all that’s left to do is to cross your fingers and hope your date shows up at the venue...
8. Send a Romantic Postcard
Looking for another quirky idea to make your Valentine’s card that extra bit special? Why not transform your card into a romantic postcard that looks as if it’s been sent from a far-flung, exotic place?
Postcards are super-easy to create from home and don’t need to be placed in an envelope. Create two rectangular canvases, for the front and reverse of the card, no more than 4 inches high and 6 inches wide.
Adorn the edges of your postcard design with vintage-style stamp graphics, and use the line tool to divide up the reverse of the card into two sections to make the card look authentic.
Print the card on a thick, matte card for a luxurious finish, and make sure to apply a real stamp in the top right corner to make sure it gets delivered!
Valentine’s cards don’t need to be conventional or dull; there are plenty of ways you can inject more personality into your cards and create something that’s both heart-stoppingly romantic and utterly memorable.
Whether you want to give your cards a vintage twist or a modern edge, incorporate dazzling metallics or dusky pastels, or give your cards a completely different layout as a postcard or event ticket, you’ll be sure to create something that’s going to completely wow your love interest.
Choose a design that reflects your personality and interests, and you can’t go wrong. With a bit of luck and a shot from Cupid’s bow, you might find that the recipient of your card finds your unique card suits them just perfectly too.
If you're still looking for Valentine's inspiration, be sure to check out the great range of card templates over on GraphicRiver. You'll be sure to find something up your street.
In this tutorial, you will discover how easy it is to create a pattern
with a knitted effect using just two basic shapes: the rectangle and the
ellipse. This pattern is seamless, so you can use it as a background or
wallpaper in your future projects. At the end of the process, I will
show you a simple way to recolor the artwork.
Check out other knitted patterns to enlighten your inner inspiration! Knitting is very traditional, looks cozy and reminds us of warm sweaters, hats, and scarfs. You can find a lot of patterns at Envato Market.
1. Create a Vector Pattern
Step 1
After opening your Adobe Illustrator and creating a New document 600 x
600 px Width and Height, we will start by drawing the background. Select
the Rectangle Tool (M) and draw a dark blue square with 600 px Width
and 600 px Height.
Step 2
Take the Ellipse Tool (L) and create a tiny blue ellipse. Tilt it
slightly to the left. Keeping the ellipse selected, take the Reflect
Tool (O); as you’re holding down the Alt key, click on the right side of
it. In the new dialogue window, select Vertical, Angle 90 degrees and
press Copy. You will get a reflected copy of your ellipse. Those are knitted loops.
Step 3
Take the Rectangle Tool (M) and create a square. As later we want to move the knitted loop a particular number of pixels, we need to create this square with a particular size of its sides. In the new dialogue
window, enter 20 px for the Width and the Height. Delete the fill color
and set the stroke to any color.
Place the knitted loop inside this square. Heads Up! Do not change
the size of the square—make the ellipses smaller or bigger so that they fit into the square.
Step 4
Open the Align panel (Window > Align) and check Align to Artboard.
First, align the background to the art board by pressing the Horizontal Align Left and Vertical Align Top buttons.
Place
the small square with the knitted loop in the top left corner of the
background by pressing the same buttons on the Align panel.
Step 5
Select the small square and the knitted loops, group them (right-click > Group) and then press the Enter button. We want to
move these objects to the right, but we want to be particular about the
number of pixels (the same number of pixels as the square side). So when the new dialogue window pops up, enter the
following options and then press Copy.
Keep pressing Control-D to repeat your last movement until you fill in the whole width of the background.
Step 6
Group the first line that you just created, without the background, and then
press the Enter key. Enter the following options, and then press Copy.
Keep pressing Control-D until you fill in the whole height of the background.
Step 7
Ungroup everything (right-click > Ungroup). Select the small square
which we created with no fill and with a stroke color, and then go to Select> Same > Fill color—this will help you select all the small
squares. Now, delete all the small squares by pressing the Delete key.
Step 8
Time to make this into our pattern! Select the entire pattern using the Selection Tool (V). Drag and drop it in the Swatches panel (Window >
Swatches).
Now, let’s see how we can change the colors of the pattern. This will be pretty quick too!
Create a few squares (no stroke color and any fill color) using the Rectangle Tool (M). Apply the knitted pattern that you just created from
the Swatches panel to each of these squares.
Select the first square with the knitted pattern and go to Edit >
Edit Colors > Recolor Artwork. In the new dialogue window, press the
Edit button, and then press the tiny button that looks like a chain, Link
harmony colors (located at the bottom right), and then simply drag the
color handles to your choice of color. Enjoy how the color is changing
on your pattern!
Conclusion
Awesome work! I'm sure you’ve successfully made a bunch of
adorable knitted patterns yourself as well. I hope you have enjoyed
this tutorial as much as I did making it. Can't wait to see your
creative results!
In this tutorial I'll show you how to create a winter landscape using a variety of photo-manipulation techniques. You'll learn how to combine different stock images together into a cohesive scene using adjustment layers, masking and brushes. You'll also learn how to paint the snow, make the sunlight, create lighting effects, take care of the details and more.
Tutorial Assets
The following assets were used during the production of this tutorial:
Create a new 1500 x 1000 px document in Photoshop with the settings below:
Step 2
Open the winter 1 image. Drag it into the white canvas using the Move Tool (V):
Step 3
Go to Layer > New Adjustment Layer > Hue/Saturation and set it as Clipping Mask. Reduce the Saturation value to - 93:
Step 4
Browse the winter 2 image and add it to the main canvas with the help of the Move Tool and the Free Transform Tool (Control-T).
Step 5
Click the second icon at the bottom of the Layers panel to add a mask to
this layer. Use a soft round brush with black color (soft black brush)
to erase the left side and make only the foreground, right mountain and trees in this image visible and blended with the background. Take care of the trees to make them blend naturally with the existing ones.
Step 6
Use a Curves adjustment layer (set as Clipping Mask) to darken these areas:
Step 7
Make a Hue/Saturation adjustment layer and bring the Saturation value down to - 85:
2. Add the Trees
Step 1
Open the trees image. Cut out the trees using the Magic Wand Tool (W).
Place it on the left side of the canvas:
Step 2
Add a mask to this layer and use a soft black brush to make the trees
appear behind the existing trees; remember to make them blurrier
and hazier. It helps to increase the depth of the scene.
Step 3
Create a Hue/Saturation adjustment layer and set the Saturation value to -85:
Step 4
Use a Curves adjustment layer to darken the trees, and also increase the haze on them:
3. Make Some Mist
Make a new layer on top of the layers. Use a soft brush with the color #a6a7aa with the Opacity about 30% to paint some mist on the edges of
the top left and right and near the middle section:
Change this layer mode to Multiply 100%:
4. Add the Mountain
Step 1
Isolate the mountain from the background using the Magic Wand Tool and add it to the top left of the scene:
Use a layer mask to make the mountain appear behind the trees and fade out into the mist:
Step 2
There is an unwanted detail on the mountain. Make a new layer and activate
the Clone Tool (S). Use this tool to remove the indicated detail:
Step 3
Create a new layer, change the mode to Overlay 100% and fill with 50% gray:
Select the Burn Tool (O) with Midtones Range, Exposure about 15-20% to
darken some details on the mountain. You can see how I did it with
Normal mode and the result with Overlay mode:
Step 4
Use a Hue/Saturation adjustment layer and reduce the Saturation value to maximum (-100):
5. Add the House
Step 1
Place the house image in the middle of the ground:
Add a mask to this layer and make only the house and the lower area visible using a medium-soft black brush:
Step 2
We aim to make the main light source from the top center. Create a
new layer with the same settings as in step 3 of the previous
section. Use the Dodge and Burn Tool to refine the light and shadow of
some details of the house, especially the lower right:
Step 3
Make a Hue/Saturation adjustment layer to desaturate the house. Bring the Saturation value down to - 84:
Step 4
Create a Curves adjustment layer to darken the house:
On this layer mask, use a soft black brush to reveal the lightness on
the parts in the light area:
6. Paint the Snow
Step 1
The first step in this stage is to add some bokeh. Make a new layer and
select a hard white brush. Press F5 to change the settings for this
brush:
Use this brush to paint some random bokeh over the picture:
Step 2
Lower the opacity of this layer to 80% and go to Filter > Blur > Gaussian Blur and set the Radius to 4 px:
Step 3
Add a mask to this layer and make the effect more subtle and faded using a soft black brush:
Step 4
Create a new layer and decrease the brush size. Change the settings of this brush as shown below:
Paint some random bits of snow over the picture with different sizes and forms. Feel free to experiment and test your fingers; it was really fun!
Step 5
Use a layer mask to reduce the snow intensity and opacity to create the
view from far to near, and remember to make the snowflakes in the mist area more
faded than the others.
Step 6
Paint some bigger snowflakes in the edges of the scene using the same brush:
Apply a Gaussian Blur of 6 px:
7. The Basic Adjustment
Step 1
Go to Layer > New Fill Layer > Solid Color and pick the color #270902. Change this layer mode to Exclusion 100%.
On this layer mask, select a soft black brush with the opacity from 20
to 50% to erase the foreground and the sky to reduce the effect there.
Here are the results on the mask and on the picture:
Step 2
Make a Color Balance adjustment layer and change the Midtones settings:
Step 3
Create a Curves adjustment layer and increase the lightness:
Select the mask of this layer and use a soft black brush to make the light visible in the middle section only:
Step 4
Create another Curves adjustment layer to darken the scene, especially the sides:
Use this layer mask to keep the light coming from the top center and the shadow occurring on the sides.
8. Make the Shadows
Step 1
We've
defined the main light, and now it's time to make the house shadow.
Create a new layer under the house one. Use the Polygonal Lasso Tool (L) to select the house only:
Fill
this selection (Shift-F5) with black and flip it vertically by choosingEdit > Transform > Flip Vertical. Move the shadow under the house
and use Control-T to make it fit the main light direction:
Lower the opacity of this layer to 40% and apply a Gaussian Blur of 6 px to this shadow:
Step 2
Add a mask to this layer and reduce the opacity of the shadow part of the roof:
Step 3
Create a new layer and use a medium-hard black brush to paint shadows
for the other elements in the light area: the snow pile, frozen string
(not sure what it is), and the trees. You should vary the brush opacity to get a
more natural result.
9. Add the Light
Step 1
Make a new layer on top of the layers. Use a soft brush with the color #3a1b06 to paint on the top center of the sky. Change the mode of this
layer to Linear Dodge 100%:
Step 2
Create a new layer and paint on the top center with the color #fff6ed to
make the highlight. Change this layer mode to Overlay 100%:
Step 3
Paint with the color #e7e4e6 on a separate layer to make the light
reflection on the edges of the mountains, house, snow pile, the roof,
trees (the middle ones behind the house and the big one in the left) and
the ground. Set this layer mode to Overlay 100%:
10. The Final Adjustment
Step 1
Create a Selective Color adjustment layer and change the White settings.
The aim is to add more saturation to the reflected light on the ground:
Use a soft black brush to erase the effect on the upper half:
Step 2
Create a new layer, change the mode to Overlay 100% and fill with 50%
gray. Use the Dodge and Burn Tool to refine the light and contrast of
some elements and add more details to the ground, the roof, and the
trees.
Step 3
Use a Vibrance adjustment layer to boost the final effect:
Congratulations, You're Done!
I hope that you've learned something useful for your future projects. Feel free to leave your comments in the box below—I'd love to see them. Enjoy Photoshopping!
In today's tutorial, I'm going to show you how to create a monochrome portrait from a photograph. Today's subject is the inspiring Aydian Dowling, who has given us permission to use one of his photos for this tutorial.
If you're not aware who Aydian Dowling is, let me introduce you to him. He is a transgender vlogger and activist, who has documented his transition on his YouTube channel ALionsFears. He's the creator/owner of Point 5cc, a trans style clothing company which helps those going through their own transition.
Aydian had a successful year in 2015 when not only did his take on an iconic Adam Levine photo become viral, but he also became runner up in the Men's Health cover competition, becoming the first transgender man to be considered as a finalist, even winning the public vote in the process! He has been featured in many places and even interviewed by Ellen DeGeneres.
So let's get into creating Aydian in vector.
1. Greyscale Your Reference Image
Step 1
Aydian was kind enough to provide us with a high-resolution image of himself for this tutorial. He's been photographed by many people, but I have chosen a selfie he took of himself as I know for sure he will hold the copyright to the image.
I've picked a photo of him which I feel is a true likeness of him. We all know there are photos of ourselves from certain angles in which we don't look ourselves. So as I want people to recognise Aydian from the portrait, I needed a true likeness.
Step 2
I'm going to use Adobe Photoshop to greyscale the image. I do this by going to Image > Adjustments > Black and White.
Depending on the image you're using, find the most appropriate preset or modify from the selection you have. I've opted for the Maximum White preset and then clicked on OK.
2. Set Up Your File and Create the Bases
Step 1
Open up Adobe Illustrator and create a New print document.
I've used File > Place to place our reference image onto the artboard. Then I added a white fill Rectangle (M) set to 50% Opacity in a new layer. Finally I created a layer for adding my base shapes.
Step 2
With the Pen Tool (P), I create bases for each one of the key areas—apart from the hair. I give each one a fill of the average mid-tone colour from those areas.
3. Create the Skin Shading
Step 1
When I'm working on skin shading, I tend to work on the mid tones first. With the reference image in greyscale, it makes it easier to see these mid tones.
The shapes for the mid tones would be very time consuming to create, so what I do is draw the highlights on the face and then remove them using Pathfinder > Minus Front from a duplicate of the face base shape.
So with the Pen Tool (P), I draw the highlights of Aydian's face.
Then I select the shapes and create a Compound Path (Control-8). This makes it easier to then select this single shape and a duplicate of the base to use Pathfinder > Minus Front.
Step 2
Using the first shape as a guide, I then repeat this process to create further shapes to render the skin. By setting the layer to outline mode, I can make sure that the boundaries of the new shapes are not exact duplicates of each other, and therefore create an even graduation in shadow.
Step 3
With the first four shading shapes created, I give them a grey fill and set them to Blending Mode Multiply, Opacity 15%.
Step 4
Now that the mid-tone shadows are done, I begin drawing the darker shadows. Again I'll be using the Pen Tool, but this time I won't be using the Pathfinder method. I'll just be drawing the overall shapes.
You'll notice on the screenshot below, I've gone beyond the face base. Don't worry about this as it will be rectified later.
Step 5
As before, I add further shapes for the darker shadows.
Step 6
I then select the dark shadow shapes and apply Blending Mode Multiply, Opacity 15%. Here is our shading so far.
Step 7
The shading shapes are then Grouped together (Control-G) and with a duplicate of the face base, I select both the group and the duplicate to create a Clipping Mask (Control-7).
Step 8
Now I add further darker shapes. These will use a darker shade of grey and will be smaller shapes. They'll then be set to Blending Mode Multiply, Opacity 5%. They'll be grouped together and then added to the clipping mask.
Step 9
Add highlights to the skin. These are done with transparent radial gradients, using an off-white colour. Gradients create a soft edge to the shapes, which make for a smoother transition in shadows and highlights.
These are set to Blending Mode Screen, Opacity 30%.
And this is how we're looking so far.
Step 10
I lay the shading and the reference image side by side and scour it for any obvious differences. Sometimes you may add too much shadow or too much highlight to areas, and by observing the original next to your shading, you can see where you need to make changes.
Of course this step only really applies if you're rendering someone you know or someone recognisable. This extra attention to detail can help push the likeness of your portrait closer to the photograph likeness.
4. Vector the Hair
Step 1
The first thing I'm going to do is create the hair base. I do this by tracing the reference image with the Pen Tool. I create a zig-zag line along the hairline but I don't make it exact, as I'll put more detailing into this soon.
Step 2
To add detailing to the hair, I'm going to create a tapered Art Brush from a black Ellipse (L).
Step 3
Using the Paintbrush Tool (B), draw small strokes around the hairline with the tapered brush. This is to give a more detailed hairline.
Then select all of the strokes and go to Object > Expand. While the strokes are still selected, select the base as well and use Pathfinder > Unite to combine all shapes to create one base shape for the hair.
Step 4
Now I have a more detailed hairline, the rest of the base needs more detailing. Fine hairs will be coming away from the base. In order to render these, use the Pen Tool (so that the strokes are more controlled) with the tapered brush to draw these fly-away hairs. Then repeat the process of Object > Expand and Pathfinder > Unite.
Step 5
The style of rendering I'm working towards is less detailed than my previous portraits. More detailing will go into the base and the subtle shading than in adding hundreds and thousands of individual strokes.
To achieve this, you'll need to use the Appearance panel to add gradients to darken around the edges of the base shape.
Step 6
As the base is darkened and Aydian's hair is blond, I'm going to need to add strokes to the hair which use Blending Mode Screen to create a lighter shade. I begin using larger strokes (3 pt) and a low Opacity and then as I add more refined details, I reduce the stroke weight (1 pt) and use a higher Opacity.
The initial strokes will be done with the Pen Tool so I have more control over the curves... then as I progress, I use the Paintbrush Tool.
Step 7
To help the hairline blend more into the skin and to give less of a harsh edge, I add loads of strokes along the hairline with a low Opacity. This helps add definition to some of the more defined strokes in the hairline and it helps show more gaps on the scalp.
Step 8
I notice that the roots of the hair and the sides of the hair aren't as dark as I'd like them. So what I do is create shapes to cover these areas set to Blending Mode Multiply to darken them. I then group them and use a duplicate of the hair base to create a Clipping Mask (Control-7).
Step 9
Finally, I add brighter strokes to the hair to create the peak highlights.
5. Add Details to the Face
Step 1
When I create the skin, I also render the majority of the shading on the lips. I try not to render the lips separately from the skin as the lips are skin and I don't want them looking as if they're floating on top of the skin.
However, when I come to adding the finer details, I'll need to add smaller shapes to intensify the contrast in the lips. I recommend using the Blob Brush Tool (Shift-B) to create these shapes.
Step 2
When adding the eyes, I use Ellipses within Clipping Masks of the shapes of the eyeballs. I use the Appearance panel with the help of Offset Path to create the effect needed for the pupil and iris.
Step 3
Again, I compare the portrait with the original image side by side so I can modify the shadows and highlights where required. When using such low opacities, it can sometimes be hard to balance the contrast correctly. So it's always best to check in with the original image and look at the key areas.
For instance, notice how there are dark shadows around the right eye. These shadows should be darker than the shadows on the nose and so on.
6. Refine the Hair
Step 1
Add darker strokes to the hair to help define it further. If you look at the original image, there are very definite strands and clumps of hair at the front of the hairline. This really needs to be replicated in the hair rendering in order to help make the portrait look more convincing.
Step 2
I then begin adding the facial hair and eyebrows. I start using Blending Mode Screen strokes with the tapered brush and Paintbrush Tool (B).
For the facial hair, I draw the strokes around the area first and then I fill in the strokes. This makes it quicker for me to render.
Step 3
I then use Blending Mode Multiply strokes to add shadowed strokes. I finish off by adding thinner Blending Mode Screen strokes to show some whiskers caught by the light.
Step 4
I finish off the portrait by adding eyelashes and highlights to the eyes. Everyone has eyelashes, although women may have more exaggerated lashes due to the use of mascara and cosmetics, so keep this in mind.
Awesome Work, You're Now Done!
I finished the portrait off by using a blue fill over the top to create a blue hue. I used Blending Mode Burn to help intensify the contrast.
Then, as a nod to Aydian walking 2015's LA Marco Marco show, I added dashes of bright yellow in the background.
Those who follow my portrait tutorials will know I like to add beauty spots to symbolise a narrative. Aydian doesn't have any... so I've added one near his mouth as he's an activist.
I hope you've enjoyed this tutorial as much as I've enjoyed creating it. A huge thank you to Aydian for granting us permission to use his image for this tutorial.
Want to create and export custom color swatches but don't know how? Well follow the steps presented in this little tutorial and you'll be able to master it in no time!
This is part of a new series of quick video tutorials on Envato Tuts+. We're aiming to introduce a range of subjects, all in 60 seconds—just enough to whet your appetite. Let us know in the comments what you thought of this video and what else you'd like to see explained in 60 seconds!
If you’re a sporty kind of a person or just looking for a motivation to start, this tutorial is for you! Let’s follow the process together and create a realistic set of icons, which will make you willing to start working out. We’ll be using basic shapes together with various effects and functions of Adobe Illustrator, which will allow us to create three-dimensional fitness gear. We'll be using the 3D effect with Map Art, textures, Blending Modes and more.
In this tutorial we’ll be creating fitness icons, depicting the items which are well-known by both beginners and advanced level athletes. These are a fitball, a dumbbell and weight scales. Let’s make them
one by one, starting with the fitball icon.
1. Make a Green Fitball Icon
Step 1
Take the Ellipse Tool (L) and let’s start by making a base of our fitball
from a 170 x 170 px circle of bright
green color. Make a copy of the circle (Control-C> Control-F) and keep it invisible (click the eye icon in the Layers panel), because we’ll need it later.
Take the Scissors Tool (C) and click the top and bottom anchor points to
split the shape apart. Delete the left half.
Step 2
Now let’s prepare a texture for the ball.
Take the Line Segment Tool (\), hold
down Shift and make a horizontal
line of about 232 px width.
Hold Alt-Shift
and drag the line down, creating a copy and leaving enough free distance between
the lines. Keeping the lines selected, go to Object > Blend > Make. And now let’s adjust the blend group.
Go to Object > Blend > Blend
Options and set the Spacing to Specified Steps with 15 steps value.
You can move the two initial lines inside
the blend group in the Layers panel
in order to make the spacing between the lines bigger or smaller.
Step 3
Now go to Object > Blend > Expand in order to turn all the elements of
the blend group into separate objects. Drag and drop the group onto the Symbols panel (Window > Symbols), leaving the Symbol Options as default.
Step 4
Now that we have the texture and base ready,
let’s turn our flat shape into a three-dimensional ball! Select the semi-circle that
we made earlier and go to Effect >
3D > Revolve.
You will see our semi-circle turns into a
nice sphere. Find the Map Art button
in the bottom of the window and click it.
Step 5
Now that we have the Map Art window opened, let’s apply the created texture! Select our
lines texture in the Symbol drop-down menu
and stretch it all over the map. Tick the Preview checkbox in order to make sure that the texture covers the
whole object.
When you’re satisfied with the result,
click the OK button to return to the 3D Revolve Options window.
Step 6
From here, you can rotate the fitball by
rotating the cube icon in the Options
window, setting your objects at the desired angle. I’ve rotated the ball as
shown in the screenshot below, making the concentric circles on top visible to
the viewer.
After you’ve selected the desired position of
the fitball, click OK and Object > Expand Appearance of the
shape to apply the effect. Then find your ball in the Layers panel and delete the sphere, leaving only the stripes texture. You
will probably find the sphere parts inside a Clip Group, so just select the whole
group and delete it.
Step 7
Let’s make
the base of the fitball visible again (the 170 x 170
px circle, which we made in the very first step). If you don’t have a
copy of the circle left, no problem—just create a new 170 x 170 px circle and Align
it to the stripes.
Select the stripes and apply a
three-colored radial gradient from light green to dark green and to light green
again, positioning it as shown in the screenshot below.
Duplicate the stripes on top (Control-C > Control-F) and fill the
copy with radial gradient from green to black, switching the Blending Mode to Screen, so that the black color becomes transparent, leaving only
the bright highlight spot.
It is actually hard to see any difference
in colors in this step, because the base of the fitball is too bright. Let’s adjust it
a bit.
Step 8
Select the circle base and fill it with radial
gradient from light green to darker green, placing the center of the gradient
closer to the top of the fitball.
Duplicate the circle base (Control-C > Control-F) and fill the
copy with three-colored radial gradient from white to green and to white again,
switching to Multiply mode. This
will darken the central part of the ball, giving it more contrast and dimension.
Step 9
Let’s make another copy of the circle base (Control-C > Control-F) and add a
nice glowing overtone at the edge of it. Fill the copy with a radial gradient
from black to green, moving the black slider almost all the way to the right,
as shown in the picture below. Switch the Blending
Mode to Screen.
Step 10
Let’s make the ball more glossy and vivid.
Draw a smaller circle on top of the ball and fill with radial gradient from
bright green to black, switching to Screen
mode. Now it looks like a bright highlight.
Step 11
Finally, the finishing touch! Let’s add an
ambient overtone at the edge of the ball, making it look more true to life.
Make another copy of the basic circle and fill it with dark radial gradient
from black to dark blue, switching to Screenmode, this way creating a subtle glowing effect.
2. Make a Chrome Dumbbell
Step 1
Now we’re moving to our second piece of
fitness gear—a dumbbell—and we’ll start by making its weight plates.
Use the Rounded Rectangle Tool to make a 10 x 70 px shape. Let’s fill it with a complex linear gradient,
varying the shades of grey in order to create a realistic chrome-looking
surface.
Step 2
Let’s add a couple more shapes to make the
plate more three-dimensional and thick. Make a copy and Paste it in Back (Control-C> Control-B). Scale it up to 12 x 70 px, set the Blending Mode to Screen
and lower the Opacity to 65% in the Transparency panel to make the shape light and semi-transparent.
Make another copy beneath the previous one (Control-C > Control-B) and increase
its size to 13.5 x 70 px. Apply
exactly the same appearance as we have for the main shape—the chrome linear
gradient in Normal Blending Mode, 100%
Opacity (you can pick it up with the Eyedropper
Tool (I)).
Step 3
Let’s add the last copy at the bottom,
extending it to 15 x 70 px size. This
time fill it with a three-colored linear gradient of dark-grey shades, making
the shape darker than the top elements.
Now that we have all pieces of the weight plate ready, go on and Group (Control-G) them.
Step 4
Hold Alt-Shift and drag the
plate to the right, creating a copy right next to the first group. Press Control-D to repeat the action,
creating another copy. Great, now we have three plates.
Vary the size of the copies, making each
new plate taller than the other.
Step 5
Let’s form a handle of our dumbbell from a 120 x 10 px rounded rectangle. Fill it
with a complex linear gradient with contrasting shades of grey, giving it a smooth
chrome look. Place the gradient vertically, as shown in the screenshot below.
Step 6
Let’s add a pair of 35 x 25 px rounded rectangles for the rubber holders. Fill them with dark-grey
linear gradient and Send to Back
(Shift-Command-[), partially hiding them behind the plates.
Step 7
Select the plates and double-click the Reflect Tool (O) to open the options
window. Flip the elements over the Vertical
Axis and click Copy to add the
plates to the opposite side.
Add a final detail to our dumbbell: a grip
in the middle of the handle. Make a light-grey rectangle, aligning it to the
center of the handle, and switch it to Multiply
mode.
Great! The dumbbell is done. Now we can
move on to our last icon.
3. Make the Bathroom Scales With a Large Dial
Step 1
Let’s start shaping the scales from an 80 x 85 px rectangle, filled with radial gradient from light grey on top to darker grey at the bottom.
Step 2
Let’s make the bottom of the shape
narrower. Take the Direct Selection Tool
(A) and select the bottom left anchor point. Hit Enter to open the Move
options window and set the Horizontal
value to 5 px (the Vertical value should be set to 0 px).
Repeat the same for the bottom right anchor
point, but this time set the Horizontal
value to -5 px, moving the point to
the left.
Use the Live Corners feature to make the corners a bit rounded (use
the Direct Selection Tool (A) to
pull the circle markers) or use Effect> Stylize > Round Corners for the same purpose.
Step 3
Now let’s add the mechanical dial to our
scales. Make a 20 x 20 px circle at the top of the rectangle and fill it with radial gradient from white in the
center to grey at the edges.
Step 4
Let’s add a balance pointer to the dial.
Make a small blue circle in the center of the dial face and use the Polygon Tool to make a narrow red triangle.
Use the Live Corners feature to make the triangle smoother, and shrink it down to 3 x 13 px.
Bring the
triangle to Front (Shift-Control-])
placing it on top of the dial.
Step 5
Take the Line Segment Tool (\) (or the Pen
Tool (P)) and make a short black stroke on top for the gradation line of the
scales. Add another line in the bottom, group
(Control-G) them both and Align Horizontally
to the base of the dial.
Double-click the Rotate Tool (R) and set the Angle
value to 90 degrees. Click Copy to create two more lines.
Step 6
Duplicate the first pair of lines (the
vertical ones) and make the copies thinner by lowering the Stroke Weight in the control panel on top (or in the Stroke panel).
Now, keeping the thin copies selected, open
the Rotate options window again and
set the Angle value to 360/60. Adobe
Illustrator will calculate the needed degree for you, so just click OK and keep pressing Control-D to get as many copies as you need.
Step 7
Now that the dial is almost complete, let’s
duplicate the circle dial base and Bring
it all the way to Front
(Shift-Control-]). Use the Pencil
Tool (N) to draw a wavy line across the circle and Divide the shapes in the Pathfinder.
Delete the lower half. Fill the upper half with linear gradient from light grey
to black and switch to Multiply
mode. Make it a bit smaller, forming a glossy highlight.
You can darken the dial edges a bit more,
making it more three-dimensional.
Step 8
Now let’s move to the scales and shape them
out. Select the rectangle that we’ve made and go to Object > Path > Offset Path. Set the Offset value to -3 px,
creating a smaller shape on top of the base.
Step 9
Fill the created shape with linear gradient
from light blue to darker blue.
Duplicate the circle base of the dial and
make the copy larger, expanding the circle around the dial. Create a thin stripe with the Rectangle Tool (M), placing it right in
the center of the blue shape.
Finally, select both the big circle and the
stripe and Unite them in the Pathfinder, merging them into a single
lollipop-shaped silhouette.
Step 10
And let’s cut it out. Select the lollipop
shape and the blue shape and use the Minus
Front function of Pathfinder
to cut the blue shape into two equal pieces. Press Control-8 to turn the pieces into one Compound Path. Use the Live
Corners feature to make the shape rounded and smooth.
Step 11
Let’s make the surface of the scales a bit
more textured. Duplicate the blue shape and head to the Swatches panel. In the Swatch Libraries Menu, go to Patterns > Basic Graphics > Basic
Graphics_Patterns and find a lined pattern USGS 8 Sewage Disposal.
Step 12
Double-click the selected pattern in the Swatches panel and now you can edit it!
Fill the strokes with bright blue color and double-click anywhere outside the Tile square to exit the Isolation mode. Set the Blending Mode to Multiply and play with the Opacity
value in order to make the pattern fit and look true-to-life.
Step 13
Let’s add some more details to make the
scales three-dimensional and glossy!
Select the blue shape and go to Object > Path >
Offset Path. Apply a 0.5 px Offset, creating a thin outline around the blue shape, and fill it with darker
gradient, so that it looks like a rim.
Make another Offset Path, but this time set the Offset value to -2 px,
creating a smaller shape inside. Fill it with dark linear gradient from
dark blue to black. Switch to Screen
mode, turning the shape into a glossy highlight.
Step 14
Make three stripes, using the Rectangle Tool (M), and turn them into
a Compound Path by pressing Control-8. Fill the stripes with linear
gradient from dark blue to black, and switch to Screen mode.
Rotate the stripes 45 degrees and place them over the weight scales, making a
highlight on the glossy surface. Use the Minus
Front function of the Pathfinder
to cut the highlight, making it fit the blue shape.
Step 15
Finally, let’s make the silver base of our
weight scales realistic as well. Copy
the base and Paste in Back twice (Control-C > Control-B > Control-B), making the lower copy larger and
darker. Select two copies and go to Object> Blend > Make. If the blended shape is not smooth enough, go to Object > Blend > Blend Options
and set the Spacing to Smooth Color.
Select the third shape (which is on top) and fill it with linear gradient from white to black, switching to Screen mode in order to make the shape
vivid and bright.
Step 16
Now that our icons are finished, we can add
a light background to make them pop out. And we can also put a gentle shadow
beneath each icon by making an oval and filling it with squashed radial
gradient from light-pink to white. Switch the shadow to Multiply mode in order to make it semi-transparent.
You’ve Got It! The Realistic Fitness Icons
Are Finished!
Awesome job! We’ve managed to
make a set of fitness icons, making them glossy and detailed by using
various effects of Adobe Illustrator, such as the 3D effect, and applying simple
textures. I bet this was tricky and fun! I hope you’ve found some new tips and
tricks that inspire you and can be useful in your future work.
You can try using these techniques while
creating a new set of icons on a different topic or go ahead and expand the existing setup to nine icons or even more. If you want to see what other icons can be made,
check out the full Fitness Icons Set, which is available in both AI
and EPS formats, including raster PNG versions of each icon.
For this article in the international artist series we turn to Russia, featuring five illustrators and designers who create fantastic work, from illustration to surface design to interior design and more! I asked each artist how their country and culture inspired their work, and they delivered fantastic answers. Enjoy!
Fil Dunsky
Fil is an illustrator from Saint Petersburg, Russia, who focuses on character design and advertising. His work, which you can check out in full in his portfolio, is colorful and wonderfully expressive.
Here and Now
"You know it might be strange but I really love Russia: cold winters, a lot of snow, and I love people here. I have traveled to many, many countries. It was beautiful and nice there, but everytime I got back to Russia I felt so much love and something expands inside. This is what I can’t explain at all.
"I get a lot of inspiration from Russia. Russian nature is awesome. One of the best. We have four seasons which are completely different and fantastically beautiful. And there is something special in Russian places; some feeling.
Logo Machine is a design studio in Saint Petersburg, Russia, that provides logo design, packaging design, branding services, and more. Anastasiya Kiseleva works as an illustrator within the studio and took time to answer my questions. You can check out Logo Machine's work below or in their studio portfolio. Additionally, you can check out Anastasiya's personal portfolio as well.
Logo Collection #1
"If we’re taking the country as an environment that forms taste, then here in Russia, the situation was pretty sad. I was growing up in the time when people were only discovering different graphic editing programs and rushed to use ALL of the features offered at once in a single design.
"This, of course, led to the eye-hurting terrible works that, unfortunately, became normal and acceptable. Those who didn’t have Photoshop used the unlimited power of WordArt. It took a while to get rid of this desire to use inappropriate gradients and effects. You can still see such things on the streets though. Especially the streets of small towns.
"All these things are visual garbage and nowadays more and more designers think about getting rid of bad design in the streets of Russian cities. They develop special rules of billboard placement, make the rebranding of entire cities. Under a thick layer of poor design the cultural heritage and beautiful architecture of the cities were lost. To understand it and decide to do something about it we had to learn a lot of things from the more advanced western countries.
"Since childhood I always had different creations of the Soviet era before my eyes: cartoons, toys, movies, books and illustrations from these books. At the same time many western products also became available for us and we instantly became Disney and Lego fans. Everything looked different, better and cooler. Perhaps our generation was influenced much more by the Western culture.
"As I child I was always drawing characters from western cartoons, Barbies and Kinder Surprise toys because when you’re a kid all you’re doing is replicating the things you see. In high school I was greatly influenced by Russian literature and poetry. I loved Dostoevsky, his grim, dark stories and lonely, lost characters. I tried to make illustration for Pushkin poems.
"At the time it helped me a lot to form some sort of visual style and the main theme of my works. I can’t exactly say how much the Russian culture influence my works now but I’m pretty sure it has created a certain foundation and helped me to form a personal view on the world."
Anastasia is an interior and digital artist based in Saint Petersburg, Russia. Her work combines retro sensibilities in aesthetically pleasing compositions both in interior mock-ups and 3D art. You can check out her portfolio for more fantastic work, and you'll also see a selection from it below!
The Life Aquatic
"I think that almost every person is affected by his surroundings: nature, architecture, people and their stories. However, it can work in a very interesting way: you can merge with what you see and reflect this mood in your works, but sometimes you want to portray something that is the complete opposite of the reality surrounding you.
"I think, both approaches are good. Anyway, you have an opportunity to show people the world the world the way you see it.
"Most of all I am influenced by literature and of course art. I try to go often to exhibitions and to art galleries. I like to study art. It seems to me, the more you know, the more simply you can interpret what is seen. That gives you creative freedom."
Evgeny is an artist also based in Saint Petersburg. His work is often abstract and perfect for a variety of surface designs, posters, and products as you'll see in his portfolio. Check out a selection of his work below!
Martini Soda Flirt Box
"In the early 2000's, the country had a very low level of contemporary visual culture. But against the emptiness in the background I had a strong interest in everything new and unusual.
"The foreign design community on the internet had become, for me, a breath of fresh air at the time. It was a powerful stream of visual information that greatly impressed me and has influenced my work.
"In my early childhood, I was a big fan of the works of Russian avant-garde artists of the early twentieth century. In our family, there were great books with works by Rodchenko, Malevich, Kandinskiy, and Filonov. Even then, these artists became my main authorities.
"Years later, I was interested in the rich heritage of Russian folk art with a lot of different techniques and styles. I often mention the folk ornaments in my work and always try to breathe new life into them, make more modern and bright."
Roman is an illustrator and graphic designer based in Tolyatti, Russia. His work has a fluid and fun quality to it that especially shines through with his character design. You can check out more of his art in his portfolio or in the small selection of pieces below!
Summertime Gals
"I don't want to offend anybody but I truly believe that Russia is one of the most multicultural countries. And don't forget it's the biggest country in the world. Europe and Asia, ice-cold North and tropical South - we have it all.
"So, when I say that the Russian culture has influenced my works, it means that the whole world with the diversity of cultures has influenced them as well. And I think it's great!
"The great Russian landscape painters for example [influence me]. Painters such as Isaac Levitan, Alexei Savrasov, Ivan Shishkin etc has influenced me in some way."
We are going to create this fun canine cowboy character using Affinity Designer. As we'll only be employing vector shapes and effects, this illustration can be used for everything from online purposes to full colour t-shirts and beyond.
We'll be creating this stylized portrait using the sketch below to guide us, combining simple vector shapes utilizing Affinity Designer's Pen Tool and shading effects to simulate light and shadow.
We'll start by drawing all of the main shapes in an organized layer based workflow and then fill the shapes with solid flat colour and add effects and shading to create a semi-realistic, believable cartoony character.
Some knowledge of Affinity Designer's Pen Tool and basic shape creation will be beneficial but not absolutely necessary as we'll cover what is needed as we go.
Let's get started...
1. Prepare the File
Step 1
Right-click on the sketch to download it.
Let's start by creating a new single-page RGB colour Affinity Designer file with the approximate dimensions of 20 cm x 20 cm (any square shape size will work).
Step 2
Use the Place Image Tool from the Toolbar on the left-hand sideto choose and place the sketch from your desktop or hard drive into your file.
Step 3
Scale (resize) the sketch up or down if needed to fill the area by selecting the sketch with the Move Tool (V) (the black filled cursor top left on toolbar) and clicking and dragging on any corner handle of the selected sketch.
Step 4
Locate the Layers panel and you should see a new image type layer called Canine Cowboy.
Step 5
Go the top of the Layers panel to the right of the word Opacity, click and hold on the pull-down with Normal on it and select Multiply, the fourth option down the list.
This will make the sketch transparent and allow us to see our sketch as we create all of the shapes.
Step 6
Now lock this layer for now by making sure the layer is selected and clicking the lock icon in the top right of the panel.
Or you can right-click on the layer to access a menu of options, one of them being Lock.
Step 7
After placing and sizing the sketch, I like to organize my Layers panel before starting to create any shapes.
Having your main elements organized on individual layers keeps everything manageable as the illustration develops.
In Affinity Designer shapes on a layer below will appear behind shapes on a layer above.
Have a look at the sketch and try to decide which elements should be on separate layers, or which shapes are in front and which are behind.
Step 8
Starting with the background on the bottom layer, I create and name the layers: Hat, Head, Nose, Front Ear, etc.
You create new layers by clicking the new vector layer icon in the bottom right corner of the Layers panel.
Make sure you are adding Vector Layers with this icon asthe other icon is for adding Pixel Layers and we won't be using those in this tutorial.
When you add a new layer this way, the layers are still empty as we haven't created any shapes yet. After adding and naming your layers, you now have a structure to build on.
The following screenshot shows how I choose to set up my layers for this project based on the provided sketch.
Step 9
Before we start making our shapes, let's make sure that the sketch layer is the topmost layer.
Most likely all of the new layers were added on top of this layer.
To move this layer up to the top, click to select it and drag it up in the layer stack to the top position in the panel.
You should see a horizontal light blue highlight indicating its position.
Let go when it's seated at the top.
Step 10
Bring the Opacity of this layer down to 50% to see the artwork a little better as we create the shapes and element underneath it.
Earlier we set the Canine Cowboy layer to Multiply so it will be visible as we create the illustration. Ensure this is still the case as it may have changed back to Normal after moving it.
2. Draw Your Shapes
The Pen Tool(P) is the heart and soul of Affinity Designer.
It allows you to create smooth curves and corners as well as straight lines, sharp corners and everything in between.
In my experience, success with the Pen Tool is knowing when to click and when to un-click, and the more you use it, the easier it gets.
If you don't create the perfect line or shape straight off, you can easily make adjustments.
Step 1
When starting to draw the vector shapes in an illustration, I usually start with the easier, less complicated shapes.
Any shapes that repeat are also a good place to start as you can see results more quickly.
Step 2
Let's start this tutorial with the front ear shape.
Making sure the front ear layer is selected in the Layers panel, chose the Pen Tool (P) and begin at the top of the ear.
Click once and un-click to place a Node to start the shape at the top of the ear
Step 3
Then (without clicking) move your cursor down to the bottom left side of the ear and click, hold and drag near the bottom of the ear shape and keep holding and dragging until you have a smooth curve from the first node that roughly lines up with the sketch...
... then un-click.
One single click and release with no hold will create a single sharp node.
Clicking and holding while dragging creates a curve and a curve-based node.
We will be utilizing this technique for most of the creation of this tutorial.
Step 4
Let's finish the path for this ear shape.
If your path is still selected, click, hold and drag just to the right of the last node, following the sketch to form the bottom part of the ear.
Step 5
Un-click and finally return up to the first node (you should see a little circle shape near the Pen Tool cursor as you hover over the first node, indicating the path will be closed if you click on it.
Step 6
Click to close the shape path. You should now have an ear-shaped vector path.
Step 7
Let's go back and adjust the path.
Depending on how you clicked, you may have to make some adjustments.
If you have a sharp corner where you want a smooth corner, with the Pen Tool click and drag on the node and it will change to a smooth node.
Keep dragging to make the adjustment. If you have smooth node where you wanted a sharp corner, click the node with the Pen Tool and Option key pressed.
To select a node on the path, press A or select the Node Tool in the Tool panel.
Step 8
To add a node to an existing path, select the Node Tool (A) and simply click on the path to create a new node.
You can even click and drag on the path itself with the Node Tool to move the path.
It's usually good practice to create all of the main shapes before thinking about colour.
Some shapes will need to be created as we develop the illustration, but for now let's get all of the main elements blocked in.
Here is my closed and adjusted ear shape. I use a 1 pt magenta line width to draw the shapes, as it's easy to see any areas I may have missed when it comes time to add colour.
Step 9
Using the same Pen and Node Tool techniques, let's continue drawing the inside shape of the ear and the rest of the main shapes, paying close attention to the sketch and making sure we are drawing on the correct layer.
When building your shapes, only create the part of the shape that will be visible.
For example, the bottom portion of the back ear will not be seen behind the hat, so there is no need to draw the whole ear.
The laurel leaves and branch will be duplicated and flipped once they are drawn and shaded, so let’s just create the left side for now.
3. Apply a Base Colour Scheme
Let’s concentrate next on applying colour to all of the basic shapes we’ve just drawn.
Step 1
Import the supplied colour palette by downloading the attached file to your hard drive or desktop.
Step 2
Find your swatches panel in Affinity Designer (View > Studio > Swatches) and by clicking on the Three Small Horizontal Lines in the top right corner.
Go to Import Palette > as Document Palette.
Step 3
Navigate to where you saved the colour palette and it should show up in your Swatches panel.
Alternatively you can use your own colour scheme.
Step 4
Once you have the Colour Palette imported, you can start selecting shapes and filling with flat colour.
Do this by selecting each shape or Shift > Selecting multiple shapes and then clicking on the desired colour swatch.
Step 5
Follow the finished illustration as a guide or choose your own colour scheme for each shape.
Continue filling in all of the shapes until all of the magenta lines are gone.
Another quick way to fill in shapes with the same colour is to pick an already filled-in shape of the colour you want.
Shift > Select all of the shapes to colour, and then Command > Shift > V to paste that colour into all of the selected shapes.
This technique is very powerful in Affinity Designer as it will also paste any copied effects or gradient attributes from one element to another.
Step 6
After I have coloured everything, I decided to apply some varying thickness to the branch.
To do this, first select the branch.
In the Stroke panel, change the line thickness to 15.5 pt.
Step 7
Then click on Pressure in the lower right corner and you will see two nodes at the top of a pop-up window with a line connecting them.
The distance between them represents the length of the line selected.
Clicking and dragging a node up or down will change the whole line width.
Step 8
To change the line width independently, Option-Click each node and drag.
For even more control, click the line anywhere to add more nodes, and adjust accordingly.
Click Reset or delete a node if needed.
4. Shading and Effects: The Hat
The next part of the tutorial involves adding shading, lighting, and effects. This is the phase that brings the character to life. I generally use a combination of gradients, transparency, inner shadows, gaussian blurs, etc. We will cover the essential techniques involved along with the various settings I use.
At this point, we can hide the sketch for now as it will just get in the way.
Step 1
Click on the Checkmark on the right side of the Canine Cowboy layer to hide the sketch.
Step 2
Let’s start by adding an Inner Shadow effect to the hat.
Inner shadows are a great way to add a sense of dimension to any element quickly and easily.
Select the main or middle part of the hat and locate the Effects panel (View > Studio > Effects).
Step 3
Enable an inner shadow by ticking the box beside the Inner Shadow effect and apply the values and settings from the screenshot.
Pick a slightly darker colour than the hat’s base colour from your Colour panel.
Step 4
To do this, click on the Colour Swatch in the inner shadow drop down, and a Colour Picker system will pop up.
Step 5
Click on the colour system and pull down to access the Swatches mode.
Your Colour Palette will show up in the List.
Step 6
You may need to select the actual Document Swatch Palette from the second pulldown in this popup…
Step 7
Adjust the Opacity and Radius of the inner shadow to something that works for you.
Step 8
Play around with Offset and Angle too (although I didn’t add these on mine).
There's an almost unlimited array of combinations possible with these settings.
Opacity controls the overall value of the effect.
Radius controls the size of the effect and its blur.
Offset and Angle usually work hand in hand and allow for the effect to be offset or shifted and/or rotated (angle). We will cover this on the brim of the hat next.
Step 9
Select the front brim of the hat.
Apply the values and settings from the screenshot.
Step 10
To simulate more of a shadow underneath the brim, add some offset and an angle of 90 degrees to shift the inner shadow effect towards the bottom to add more shadow below and towards the back of the hat.
This helps to suggest the curve of the brim as it turns under.
Step 11
With these settings, you have a lot of control here. If you feel you want a sharper shadow, reduce the Radius to something that feels right.
Step 12
For the colour on this shadow, add a bit of red to simulate some bounce colour off the fur below the hat.
Step 13
Now select the far brim of the hat. Here we will use a Gradient to add a shadow to the bottom and right side.
Step 14
Select the Fill Tool (G) and click and drag on the selected shape similar to the screenshot, and assign a colour to the second Gradient Node similar to what I have here.
This adds a nice shadow that simulates the space between the brim and the peak of the hat.
Step 15
I would like to adjust this shadow colour a bit, so with the shape and the Second Node of the Gradient Tool still selected, change the colour system from wheel to HSL.
Step 16
Move the L Slider to 32 to darken the level and the S Slider to 29 to add some saturation back into the colour.
Now our hat is starting to take shape.
Let's add some thickness to the brims because right now they appear to be paper thin.
Step 17
With the Pen Tool (P), click in behind the front ear along where the ridge of the brim behind it is and, making sure you are still on the hat layer, create a path along the brim going from right to left.
It doesn’t have to be exact as it will be covering the current brim edge when finished.
Step 18
Make any positioning adjustments if needed with the Node Tool (A).
Step 19
Make the line width 2 pt in the Stroke panel.
Step 20
Change the colour if need be to something light as this is going to be the edge of the brim that will catch the light.
Now we will adjust the thickness along the line to complete the effect of a nice edge. We want the front of the hat edge to come to a point as it dips down in the front.
Step 21
With the path you just made still selected, in the Stroke panel click on the Pressure icon and adjust according to the screenshot.
Step 22
Once you’ve done this, let’s move over to the second brim and do the same basic process.
The reason that we are doing this as two separate paths instead of one is because on the second path we need the top end of the path to be behind the centre portion of the hat.
Step 23
With the Hat Layer still active, select the Pen Tool (P) and draw along the edge of the second brim.
Step 24
This time, because the brim is a little further back, let’s make the line width 1.5 pt.
Notice that your new path is in front of the main centre hat element. Let’s move that in behind but still in front of the back brim.
Step 25
In the Layers panel, drag the path layer down so it’s underneath the main centre hat shape.
Step 26
Now, as we did earlier, let’s adjust the line width along the line with the Pressure adjustment.
Depending on which end of the path you started the line, the pressure pop-up may look different than the one shown here. If it is the opposite to the screenshot, just flip the settings.
The hat is almost complete, but there are a couple more final touches we can add to really finish it off.
Step 27
Let’s add some dimension to the band and the top of the hat.
We’ll start on the band by adding a shadow to the right side of it as it goes in behind the front brim.
For this shadow, let’s try a different technique. Instead of the Gradient method we used earlier, we will add a duplicate band shape above and apply a dark colour and a transparency effect to it.
Step 28
Select the band shape and Copy (Command-C) and Paste it (Command-V).
You should now have an exact copy directly on top of the original shape.
Step 29
Fill it with a dark colour and change the Layer Mode to Multiply.
Step 30
Select the Transparency Tool (Y) in the Tool panel—it looks like a wine glass.
Step 31
Click and drag on the shape from the top left of the shape to the bottom right.
Step 32
With the Transparency Tool (Y) still selected, notice on the gradient thumbnail there are two endpoints and a slider in the middle.
The two End Points show the amount of transparency applied along the gradient.
The solid black end point indicates 0% Transparency while the white end point indicates 100% Transparency.
Step 33
Adjusting the Points positions or the Slider by clicking and dragging will adjust the transparency effect.
You can add Points in between by clicking on the Line but we won’t do that for this shape.
Step 34
Since we dragged from the top to the bottom, we’ll need to reverse the gradient direction to achieve the proper effect we’re after.
To do this, simply redraw the gradient by clicking from the bottom right and up to the top left.
It’s now flipped and looks more natural, as if there is a shadow going in behind the brim.
Step 35
Let’s reduce the amount of shadow a bit as it looks a little too dark at the moment.
There are a few ways to do this.
You can select the bottom End Point and move it further away, you can select the bottom End Point and adjust the level of transparency Opacity as shown, or you can move the Slider to adjust the gradient.
By using a Transparency Gradient here instead of a Colour Gradient to make the shadow, we are able to quickly select the original coloured shape below and change its colour without having to adjust the shadow as the shadow effect is sitting on the layer above and will affect the shape below instantly.
Step 36
One last thing we will do to the hat band is to add a subtle highlight as it’s feeling a little flat currently.
With the Pen Tool (P), create a path 2 pt wide horizontally left to right along but just below the top of the hat band.
Choose a colour that will make a nice highlight colour for the band.
Step 37
To soften the effect, give the path Rounded End Caps and add a 0.9 px Gaussian Blur to the path from the Effects panel.
Step 38
Finally, select the Transparency Tool (Y) and create a transparency effect similar to the screenshot by clicking and dragging the tool from left to right across the stroke.
Step 39
By adding a third point on the line and adjusting its position and level of Opacity, we are able to create a nice highlight effect exactly where we need it.
The left and right points have 0% Opacity so the highlight appears to disappear. We will reuse this technique on the front and top of the centre portion of the hat shortly.
Step 40
With the Pen Tool (P), create a path with an 18 pt line width and the same colour as the previous highlight colour.
Step 41
Apply Pressure settings as shown to change the path shape.
Step 42
Apply an 11 px Gaussian Blur and reduce the Opacity to around 75%.
Very quickly we added a nice highlight on the front of the hat, giving it a tangible quality.
Step 43
On the sketch, there is an area at the top of the hat that forms an indentation.
This will be the final detail on the hat before moving on to the glasses.
With the Pen Tool (P), create the shape that will become the indent at the top of the hat and fill with a slightly darker colour than the hat base.
Step 44
Select the Transparency Tool (Y) and drag from below the shape to almost the top of the shape.
Adjust until the shadow appears to disappear towards the top of the shape.
Step 45
To add the highlight, we’ll reuse the earlier technique for the last time on the hat.
Select the Pen Tool (P) and draw a curved horizontal 2.5 pt wide path just below the bottom of the indent and apply Pressure settings that bring the line ends to a point.
Step 46
In the Effects panel, with the path selected, apply a 4 px Gaussian Blur.
Congratulations! You’ve just created an awesome cowboy hat. Let’s move on to the sunglasses next.
5. Shading and Effects: The Sunglasses
The sunglasses are a big part of what makes this character so appealing, and they are a pretty simple setup.
They are mainly all dark shapes with some key highlights.
Let’s start with the lenses.
Step 1
Select the right inner lens and Command Click > Shift and Drag a copy of the right lens off to the right side.
Step 2
With the Pen Tool (P), create a shape that will be used to create the highlight shape.
Step 3
We will use a Boolean command to create a new shape based on the original shape so it will fit precisely on top of the lens.
Ensure that the new shape is a closed path or the Boolean won’t work.
Select the copied right lens and Shift-Select the new shape.
You should have both shapes selected.
Step 4
Locate the Boolean row of tools in the upper tool shelf and, with both shapes still selected, click the Divide or second to last icon in the row to chop the two overlapped shapes.
Step 5
Now we will select and delete the shapes we don’t need.
Select the remaining shape and drag it with the Shift key pressed to keep it lined up horizontally with the original lens shape.
Step 6
Place it back on top of the original lens shape.
This will be our right lens highlight.
Step 7
Fill the new shape with a light pink colour to add a little warmth to the glasses highlight.
Step 8
Using the Transparency Tool (Y), click just outside the top left of the shape and over to the right until you achieve the amount of reflected highlight you like.
I’m going to increase the contrast by darkening all of the sunglass elements slightly.
Step 9
Now let’s repeat the previous steps for the left inner lens.
Copy Drag the lens off to the left this time, creating a shape used to chop up this shape into the left lens highlight.
Step 10
Select both shapes and click the Divide Boolean Command as before from the upper Tool Shelf.
Step 11
Move the shape into position over the left inner lens and apply the light pink highlight colour.
Step 12
Using the Transparency Tool (Y), create a Linear transparency gradient similar to the right lens.
Wow! These lens highlights are really giving the glasses a nice plastic sunglass look.
Just a few more well-placed highlights will really bring them to life.
Using the same technique as with the hat brim highlights, we’re going to use a few light-coloured strokes with pointy ends and well-placed transparency effects to suggest sunlight on the frames.
Step 13
Using the Pen Tool (P), on the back frame layer draw a path similar to the one shown, make it around 1 pt in width and use the same pink colour from the lens highlights.
Step 14
With the path selected, click on the Pressure setting and apply pressure to make both path ends go to a point.
Step 15
The path needs to softly fade to nothing, so let’s use the Transparency Tool (Y)again.
This time we’ll go diagonally across the path as shown, allowing each end to fade out and keeping the highlight at 100% in the top left corner where the light source is coming from.
Step 16
Let’s continue to add a few more highlights on the Glasses Back Layer as shown.
These are ultra-thin lines, and because these are so thin (0.3 pt) we don’t really need the transparency effect here.
Step 17
Let’s go back to the glasses front layer and add a few highlights in the same manner.
For the bottom and right highlights I used a darker colour as these areas of the glasses aren’t catching as much of the sunlight.
Step 18
One last adjustment and we will be done with the glasses.
Let’s add a subtle soft highlight to add some dimension to the middle section. This was achieved in exactly the same way as the lens highlights.
I created a shape to fit just inside the middle section, filled it with our pink highlight colour and then applied a transparency effect that just adds a nice, subtle highlight pulling that shape out a bit.
Now that these awesome sunglasses are complete, let’s move on to the head.
6. Shading and Effects: The Head
With the dog’s head, not only do we need to add shading to define it, we also need to think about the shadows created from the objects adjacent to it, specifically the glasses, hat, handkerchief and front ear.
Currently, without shadows, these objects seem to be floating in place and need to be grounded or visually connected to the head.
Step 1
Let’s start by adding an inner shadow to the head shape.
Pick a fairly dark, almost black colour, and apply these settings to the shape.
This instantly adds interest and believability to the head. It’s a great start but we need to do a bit more.
Step 2
Next, we’ll create a shape to add some shading along the top of the handkerchief.
Using the same dark colour, create a shape that starts out just under the bottom jaw and curves up to just behind the ear before continuing down along the back of the neck and under the top of the handkerchief.
Step 3
Adjust the Opacity to 36% and apply a 21 px Gaussian Blur.
Step 4
Let’s create the dark shadow under the hat.
Draw another shape that starts under the hat and completely covers the area of forehead between the hat and halfway down the back of the glasses as shown.
Step 5
Using the Transparency Tool (Y), let’s soften the hard edge at the bottom of the dark shape so it fades to nothing gradually.
Step 6
Next we’ll define the glasses shadow.
Because we want the shadow to fall on the nose under the glasses, create the following shape on the Nose Layer.
Start it under the right lens and sweep in a nice curve to behind the bottom of the ear and continuing up behind the arm of the glasses and back down, making sure to hug just inside the outside edge of the glasses.
Step 7
Fill the shape with the same dark shadow colour.
Step 8
Apply a 12 px Gaussian Blur and adjust the transparency as shown.
Step 9
We need to add a bit more of a shadow to the lens, so let’s select the outer lens and add an outer shadow with the settings as shown.
This adds a nice solidity to the shadow. There is one more trick that will finish this shadow.
Step 10
To define a bit of an edge where the glasses are closest to the nose, create a shape similar to the screenshot, fill it with the shadow colour, and then apply the Transparency Tool (Y) to fade the shadow to transparent as shown.
No blur this time as we want the edge to be seen. It’s a subtle addition, but I think it adds a sense of weight to the glasses.
Step 11
Let’s add a shadow under the jaw to extend its length and give it some dimension.
The same techniques apply here. Create the shape as shown, fill it with the dark shadow colour and apply the Transparency Tool (Y). No blur this time.
So far we’ve only been adding shadows to the head. Let’s add a couple of highlights to pull out some definition on the jawline and cheek areas.
Step 12
Create a shape similar to the one shown and fill it with a browny red colour that is lighter than the brown of the head base colour.
Step 13
Add a 9 px Gaussian Blur to the shape and apply the Transparency Tool (Y) as shown to fade the highlight to 0% as it goes up the jaw.
Step 14
Let’s do a similar thing with the cheek.
Create a shape similar to the one shown and fill it with the same light browny red as the jaw line highlight.
Step 15
Apply a 35.5 px Gaussian Blur to create a nice, soft, large cheek bulge.
7. Shading and Effects: The Ears
Let’s continue with the ears. This will be a quick setup. There isn’t really a need to add an inner shadow to the ears.
Step 1
Let’s start on the front ear by adding a small transparency gradient right down at the bottom of the ear to hide the edge where it would join the head.
This transparency gradient is applied with the Transparency Tool (Y) to the original front ear shape, but the transparency part of it is only right down near the bottom as shown.
Step 2
While we still have the Transparency Tool (Y) active, select the inner dark shape of the ear and apply a gradient from left to right.
Step 3
All that’s left is to add a vertical highlight on the left side of the ear to add a bit of dimension to the overall shape.
Create a path in a light browny red colour around 3 pt in width and apply a Pressure setting as shown.
Step 4
Finish the highlight by applying a 7 px Gaussian Blur to the stroke.
Step 5
For the back ear, we will simply add a duplicate shape on top of the existing shape with a transparency gradient applied.
Copy (Command-C) and Paste (Command-V) the back ear shape.
This copies and places an exact duplicate directly in front of the original shape.
Step 6
For this copied shape, let's fill it with the dark shadow colour and apply a transparent gradient with the Transparency Tool (Y) to it as shown.
That’s it, we’re all done with the ears!
8. Shading and Effects: The Nose and Snout
Continuing with the nose area, we will keep applying the same techniques as before.
Let’s tackle the main part of the nose first before moving on to the tip.
Step 1
Select the main shape and let’s apply an Inner Shadow.
Step 2
This Inner Shadow will need to be offset somewhat as we don’t want a hard edge to show up in the area that attaches to the head shape.
Step 3
In the Inner Shadow settings, select the same dark shadow colour and apply the shadow settings as shown.
This applies a nice shading on the top and left side of the shape but avoids the right side, which is perfect.
Step 4
I’d like a little more shadow underneath the front section of his nose so let’s copy and paste the nose shape to create a copy directly on top of the original.
Fill it with the shadow colour and apply a transparency gradient with the Transparency Tool (Y) as shown, making sure to start the gradient low enough to not add a line to that area that connects with the head.
That looks good.
Now let’s add some volume to his snout.
Step 5
Create and position a shape similar to the one shown and fill it with the same colour used in the cheek bulge shape from earlier.
Step 6
Apply a 30 px Gaussian Blur to the shape.
Step 7
Let’s add a similar effect on the top plane of his nose where the light would definitely be hitting.
Create a shape similar to the one shown, in a lighter colour than the last shape because it would be catching more light.
Step 8
Place it just under the top ridge of the nose and just to the left of his glasses, making sure that it is behind the nose tip shape.
Step 9
Apply a transparency gradient with theTransparency Tool (Y) as shown.
Step 10
To finish it off, apply a 9 px Gaussian Blur.
Step 11
To complete the main nose shape, let’s add a nice bright highlight to the top plane.
In a light highlight colour, create a shape as shown and apply a linear transparency gradient with theTransparency Tool (Y) from left to right with an extra point in the middle set to 100% and the outside two points set to 0%.
Step 12
Let’s soften this as it’s a little too hard-edged currently.
Apply a 2.5 px Gaussian Blur to the shape. That will complete the main part of the nose.
Step 13
Let’s move on to the nose tip now.
Select the nose tip shape and apply a dark inner shadow effect as shown.
Notice the Offset applied to shift the darker portion down and to the right.
Step 14
Let’s add a soft highlight to create some dimension for this nose tip shape.
Create a shape as shown and fill it with a mid-tone highlight colour.
Step 15
Make sure the nostril shapes are in front of this shape.
Step 16
Apply a transparency gradient with theTransparency Tool (Y) top to bottom, and then apply a 12.5 px Gaussian Blur to the shape.
The effect we want is subtle to suggest a soft, smooth surface.
Step 17
To continue the softness effect, let’s add a small Gaussian Blur of 1.5 px to the nostrils.
Step 18
To suggest a three-dimensional quality to the nostril, let’s add a soft highlight where the light would sit on the bottom ridges.
Create these two shapes, fill with a light brown colour and apply a transparency gradient with theTransparency Tool (Y) to both that fades each end to 0%.
Step 19
For the right nostril, create one more shape as shown and apply similar effects as the last two shapes, except here for the Gaussian Blur let’s make it a little sharper at only 0.5 px.
We are almost done with the nose tip.
Step 20
As dogs' noses are usually wet, let’s add one last highlight to the top of the nose tip.
With the same light pink colour from the sunglasses highlights, let’s create a shape similar to the one shown, positioned just below the top edge of the nose tip.
Step 21
Add a vertical transparency gradient with theTransparency Tool (Y) as shown.
We’ll leave it as is, without a Gaussian Blur this time, to suggest a wet, glossy nose.
Congratulations—you just finished the nose!
We’ll tackle the tongue, teeth and inside the mouth next.
9. Shading and Effects: The Mouth and Tongue
The tongue presents a bit of a challenge, but with what we’ve covered so far and the techniques we’ve learned, I think we’re up for it!
Step 1
Let’s start by adding a bit of shadow to the top section of the tongue or the part inside the mouth.
Duplicate the tongue shape by Copying (Command-C) and Pasting (Command-V).
Step 2
Fill the shape with a dark brown, not quite black.
Step 3
Apply a transparency gradient with theTransparency Tool (Y) as shown and reduce the shape's overall Opacity to 60%.
Step 4
We are now going to cut a copy of the tongue shape into two pieces.
Copy (Command-C) and Paste (Command-V) the tongue shape.
Step 5
Create a shape to use as shown, as a Boolean, to create two pieces. We'll cut it behind the front tooth.
Step 6
Select both the tongue shape and the new boolean shape and apply the Divide function from the top Tool Shelf as we did earlier.
Step 7
Discard the right half and the extra piece left over from the Boolean.
Step 8
To start adding some definition to the tongue, let’s create a shape for the indent that goes down the middle of the tongue.
We're using the front tooth as a place to hide the top border of this shape.
This will give us a little more flexibility for shading. (Unhide the Sketch Layer if you need to see the line for creating this shape.)
Step 9
Apply a dark red Inner Shadow to this new shape and a transparency gradient with the Transparency Tool (Y) that starts near the horizontal centre and extends left and down.
We want to fade out the Inner Shadow here.
We don’t want the centre indent line to appear to go all the way down to the end of the tongue.
Step 10
On the left portion of the separated tongue shape, apply an Inner Shadow.
Step 11
Then apply a transparency gradient with theTransparency Tool (Y), this time from the bottom up as shown.
This adds a nice shadow contour around the bottom edge of the tongue and a subtle shadow that stops just before the tongue curves up and into the mouth.
Step 12
Let’s create the indent on the upper portion of the tongue.
Create the shape as shown and fill it with the same pink as the tongue base colour.
Step 13
This appears to be too bright. That’s because it’s on top of that shadow shape that we first created and will have to be moved underneath. We’ll do that shortly. First, let’s add an Inner Shadow to this shape.
Select the shape and apply an Inner Shadow as shown, using a dark red colour.
Step 14
Notice the Offset settings.
This shifts the effect towards the bottom or the indent.
Step 15
Let’s move this shape in behind the shadow layer we created earlier.
Select the shape, and in the top tool shelf click either the first icon or the second icon as shown.
Either one will work here. Now notice how it looks correct with the dark shadow on top. The tongue is really looking like a tongue now. Just a few carefully placed highlights and we’ll be finished.
Step 16
At the end of the tongue, I’d like to add a highlight to suggest that the tongue is curling up a bit here.
Create a shape similar to the one shown, and position it so the left side is along the centre of the tongue or the indent and the right side is hugging but not quite at the right edge.
Step 17
Fill it with a bright yellowy white colour.
Step 18
Add a 0.5 px Gaussian Blur and a transparent gradient with theTransparency Tool (Y). Note that the gradient has a centre Point added and is set to an Opacity of 28% and the two End Points are set to 0%.
By keeping the shape away from the right edge of the tongue, it now appears that the tongue has some thickness to it.
Step 19
Let’s continue adding highlights to the tongue.
Create these two shapes in the same light highlight colour and reduce their Opacity to 45%.
Step 20
Apply a 1.4 px Gaussian Blur and a similar transparency gradient setup with theTransparency Tool (Y) as the previous highlight.
Step 21
This time I made the Centre Point opacity 53%.
Step 22
Add one more single highlight with similar settings to the last two as shown.
Step 23
Let’s add a nice bright highlight to the tip as it turns up at the end, using the same procedure as before.
Create a similar shape to the one shown, and add a 1.9 px Gaussian Blur and a three-point transparent gradient with theTransparency Tool (Y), setting the Centre Point on this one to 100% Opacity.
A couple more highlight tweaks and we’ll be finished with the tongue.
Step 24
To add a bit of dimension to the inner tongue, create the following shape with the same light colour.
Set the shape's Opacity to 45%.
Step 25
Apply a 9 px Gaussian Blur to it and a transparency gradient with theTransparency Tool (Y) as shown with the Centre Point set to 47%.
Step 26
For the last highlight on the tongue, add a shape as shown, using a similar setup as before.
Step 27
Fill with the same light colour with a 45% Opacity.
Step 28
This time apply a 1.4 px Gaussian Blur and the same transparency gradient with theTransparency Tool (Y) as previously.
Step 29
For the throat opening shape, this is just going to be a simple Colour Gradient.
Select the throat shape and then select the Fill Tool (G).
Step 30
Click on the top part of the shape vertically down as shown.
Step 31
On the bottom end point, apply a deep red colour.
Step 32
Let's finish the mouth with the teeth.
Apply an Inner Shadow as shown on the front tooth with the same colour we used for the hat’s shadows.
This is a great example of the Offset function working perfectly for what we need here.
Step 33
To do the back tooth, Copy the front tooth (Command-C), select the back tooth and Paste Style (Command-Shift-V).
As mentioned earlier—and it's worth saying twice in the same tutorial—this is a great way to transfer effects and colour that are the same to another shape or multiple selected shapes.
That’s the mouth done! We are getting close now. Just the handkerchief, neck and leaves to finish off.
10. Shading and Effects: The Handkerchief
Step 1
Select the main section of the handkerchief and apply an Inner Shadow as shown, with the same colour as the teeth.
Step 2
Let’s add a shadow under the jaw that falls onto the handkerchief.
Create a shape similar to the one shown, fill it with the dark almost black shadow colour used earlier, and adjust the Opacity to 35%.
Step 3
Apply a transparency gradient with theTransparency Tool (Y) as shown.
Step 4
For the top front knot in the handkerchief, let’s apply a Colour Gradient with the Fill Tool (G).
Step 5
Then apply an Inner Shadow with the colour and settings as shown.
Step 6
It's the same idea for the bottom knot. Apply a Colour Gradient with the Fill Tool (G) and an Inner Shadow with the colour and settings as shown.
Step 7
For the actual round knot, apply an Inner Shadow as shown.
Step 8
Apply a transparency gradient with theTransparency Tool (Y)to both folds as shown and make duplicate copies of each these fold shapes.
Step 9
On the first fold, apply a Gaussian Blur of 23.5 px, and on the second fold apply a 16.5 px Gaussian Blur.
Step 10
We are going to add a bit more depth to the shadows of these folds.
Make duplicate copies of each these fold shapes again—Copy (Command-C) and Paste (Command-V) (there should now be three copies in total on top of each other).
Step 11
Remove the Gaussian Blurs of these latest copies by selecting each and deselecting the Gaussian Blurs in the Effects panel.
Step 12
Change the colour to 40% Opacity of the dark shadow, almost black colour and set the mode to Multiply. Then apply transparency gradients with theTransparency Tool (Y)to each as shown.
Step 13
Let’s add one more shadow to the handkerchief just under the knot area before moving on.
Select the main handkerchief shape and Copy (Command-C) and Paste (Command-V) to duplicate it in place.
Step 14
Fill with the same dark shadow colour and set to 57% Opacity and Multiply mode.
Step 15
Apply a transparency gradient with theTransparency Tool (Y) as shown.
Let's continue with the neck.
11. Shading and Effects: The Neck
Step 1
Select the neck shape and apply an Inner Shadow with the dark shadow colour as shown.
Because the neck shape was drawn close the edge of the handkerchief, the Inner Shadow will make a nice drop shadow for the handkerchief.
Step 2
To fade the neck into the background for the final look, let’s add a transparency gradient with theTransparency Tool (Y) to the bottom of the neck shape as shown.
12. Shading and Effects: The Laurel Leaves and Branch
Step 1
Select the top leaf and Copy Drag using the Command Key to make a duplicate off to the side, leaving the original leaf in place.
We are going to cut this new leaf in two halves so we can shade each side according to the lighting we’ve established.
Note: This process will be repeated for all of the leaves. Although I will demonstrate the process on one leaf, the steps are the same for each leaf.
Step 2
Once you have a duplicate copy of the leaf off to the side, create a path that we will use to cut the leaf roughly down its centre. Usually this would be a slight curve as opposed to a dead straight line.
Step 3
Let's cut the leaf in half. Select both the duplicated leaf and the new shape and apply a Boolean Divide function from the top Tool Shelf as shown.
Step 4
Delete the extra piece and drag the leaf shapes back on top of the original leaf.
Step 5
Select the right half shape and fill with a light green colour.
Step 6
Apply a transparent gradient with theTransparency Tool (Y) as shown, keeping in mind the light source direction, which, as mentioned earlier, is coming from the upper left and down to the lower right.
Step 7
Using the same colour, apply a similar transparent gradient with theTransparency Tool (Y)to the left-hand leaf shape.
Step 8
Repeat these steps for the remaining leaves, keeping in mind the light direction.
Step 9
When they are all complete, we will add an Inner Shadow to the branch and then Copy Drag and Flip Horizontal all of the leaves to complete the laurel branches setup.
Step 10
Let's add an Inner Shadow to the selected branch as shown.
Step 11
Now we will select all of the leaves and branch, Copy Drag out duplicate copies and then in the Tool Shelf locate the Flip Horizontal icon and press to Flip the selection.
Step 12
Drag into position to roughly mirror the left-hand leaf position.
Step 13
We’ll want to put these on their own Layer, so before deselecting them, Right Click and select Cut from the Menu, and then go to your Layers panel and select the Leaves Right Layer.
Step 14
Go back to the document window, Right Click again and choose Paste.
The leaves will be pasted exactly in the same place, except now they will be on the correct layer.
While it’s not exactly necessary to do that last step, it’s good practice to keep everything on its own layer.
Step 15
The last thing to do on this group of leaves is to update the light direction of the new leaves.
Since we flipped them all horizontally, the light directions will need to be adjusted as well.
Step 16
I’d like to adjust the centre oval a bit because I am finding it a little flat and dark.
Let's change the colour and add an Inner Shadow to give it some dimension to match the branches.
Step 17
Now let’s add a subtle shadow to the inside shape to make it appear to be sitting back and inside the outer oval.
13. Finishing Up
Step 1
For the finale and to pull everything together visually, let’s add an oval in behind everything in a complementary light purple to frame our friendly fellow and put a lid on this long tutorial.
On the Background Layer, create a large oval using the Oval Tool (L).
Step 2
I am filling mine with a soft gradient of light blue to light mauve (purple) colour using the Fill Tool (G).
Step 3
Apply a 43 px Gaussian Blur to the oval to soften the edges and push forward the sharper contours of the character.
Awesome Work, You're Done!
Well, that is going to be a wrap on this Canine Character tutorial.
I hope you enjoyed this tutorial and have picked up some pointers or learned something new along the way. Thanks for hanging in to the end—it was a long tutorial but worth it I hope.
We learned how to place a sketch into the document, organize a layer structure to keep our project manageable, how to wield the mighty Pen Tool and make use of some of the basic shape tools to create shapes and elements, how to concentrate on one stage at a time going forward, and how to block in a carefully chosen colour scheme.
We also learned that by using and repeating just a few key techniques and effects, we are able to create almost any kind of visual element we require.
Here is a final “post finish” screenshot of some tweaks I made to push the image little further.
With all of the ground we covered in the tutorial, perhaps you could add these adjustments or some tweaks of your own to your final image?
In this tutorial, I'll show you how to create a dark photo manipulation in Adobe Photoshop, featuring a creepy lady with a foggy forest, a dark gate, flying bats and an eerie atmosphere.
First we'll add the forest and gate and darken them to define a night background. We'll add the model later after doing some retouch and match her with the rest using adjustment layers, masking and then with the Dodge and Burn Tool. We'll decorate the dark night with some bats, smoke and random particles. After that we'll change the color, contrast and light of the whole scene and do some makeup on the model to complete the tutorial.
Tutorial Assets
The following assets were used during the production of this tutorial:
Create a new 1500 x 1500 px document in Photoshop with the settings below:
Step 2
Open the forest image. Drag this image into the white canvas using the Move Tool (V):
Step 3
Go to Filter > Blur > Gaussian Blur and set the Radius to 6 px:
This step is to add some depth to the scene.
Step 4
Use an adjustment layer to darken the forest. Select Layer > New Adjustment Layer > Curves and decrease the lightness:
Step 5
Open the gate image. Place it in the front of the forest using the Free Transform Tool (Control-T):
Step 6
Create a Curves adjustment layer and set it as Clipping Mask. Reduce the lightness of the gate to match it with the forest background:
2. Prepare the Model
Step 1
Open the model image and isolate her from the background using the Polygonal Lasso Tool (L). Make a new layer between the background and
the extracted model one and fill it with a dark brown color. There are
some unwanted details of the hair I want to remove:
Create a new layer (set as Clipping Mask) and activate the Clone Tool (S). Use this tool to clean up the indicated hair detail:
Step 2
Create a new layer and use a hard round brush with the color #363135 and size about 3-5 px to fix the model's hair:
Step 3
The cloak's form does not look very good, so we'll retouch it a bit. Hide
the background and the fill layer and press Control-Shift-Alt-E to merge
all the visible layers into a new one.
Use the Polygonal Lasso Tool to
select a part of the lower right of the cloak (the right from the
viewer). Click the second icon at the bottom of the Layers panel to add a
mask to this new layer and then press Control-I to invert the mask. We
have this result:
Step 4
Merge all the transparent layers again using Control-Shift-Alt-E. Use the Polygonal Lasso Tool to select the upper part near the hair:
Right-click this selection and choose Layervia Copy. Use Control-T to fill in the lower missing part of the cloak:
Add a mask to this layer to blend it with the existing cloak.
Step 5
Use the same method on the other side of the cloak, to make the cloak larger.
3. Add the Model
Step 1
Merge all the transparent layers into a new one using Control-Shift-Alt-E. Place the merged model on the left side of the gate:
Step 2
Create a new layer and set it as Clipping Mask. Use the Clone Tool to remove the nail and some wrinkles on the cloak:
Step 3
Make a
new layer (set as Clipping Mask) and use a soft brush with the color #a67b72 and the Opacity and Flow about 20-22% to brighten and soften the
model's face. Paint on the chin, cheeks, nose and forehead:
Step 4
The model looks too hazy compared to the background. To correct it,
create a Curves adjustment layer and increase the contrast of the model.
On this layer mask, use a soft black brush with the Opacity varying from10% to 30% to reveal the light on the model and define some details for
her. Here are the results on the mask and on the picture:
Step 5
The model's head, especially the face, looks too obvious, so use another Curves adjustment layer to fix it. The selected areas show where to
paint on the layer mask:
Step 6
Create a new layer (set as Clipping Mask), change the mode to Overlay 100% and fill with 50% gray:
Use the Dodge and Burn Tool (O) with Midtones Range, Exposure about 10-30% to paint and define more details for the model, especially the
clothes. You can see how I did it with Normal mode and the result with Overlay mode:
Step 7
To desaturate the blue on the cloak, create a Hue/Saturation adjustment layer and bring the Saturation of Blues down to -83:
4. Add the Bats
Step 1
Open the bats image. Isolate the bats from the background using the Magic Wand Tool (W) or any tools you prefer. Add some of them to the
current document using the Move Tool and Control-T and set these
layers under the gate one. Make the bat on the right side of the scene bigger:
Step 2
Apply a Gaussian Blur of 4px to the bats in the middle and on the left and3 px to the big bat on the right (it's meant to be closer to the
foreground so should be less blurred and more visible than the others):
Step 3
Select the bat layers and press Control-G to make a group for them.
Change this group mode from Pass Through to Normal 100%. Make a Hue/Saturation adjustment layer to desaturate the bats:
Step 4
Create a Curves adjustment layer and decrease the lightness. We're aiming to
add a light source on the top left behind the model's head. So on this
layer mask, paint on the sides of the bats where the light should be
reflected.
5. Create the Dark Atmosphere
Step 1
Make a new layer on top of the layers and press D to turn the
foreground/background to default (black and white). Go to Filter >
Render > Clouds:
Lower the opacity of this layer to 30% and use a layer mask to clean up
the smoke effect on the upper half of the image and leave it visible somewhere on
the bottom:
Step 2
Drag the particles image into our working file and change the mode to Multiply 100%.
Step 3
Add an Invert adjustment layer to reveal the black particles:
Step 4
Add a mask to the particles layer and reduce the particles' intensity,
especially on the face and body of the model. We don't need too much.
Step 5
Apply a Gaussian Blur of 3 px to make the effect subtle.
6. Add the Branches
Step 1
Cut out the tree from the original image and select the branches you'd like to add to the bottom sides of the working document. Here are the
ones I've chosen:
Step 2
Apply a Gaussian Blur of 6 px to these branches to increase the depth of field.
Step 3
Make a group for the branches layers. Create a Hue/Saturation adjustment layer and bring the Saturation value down to -89:
Step 4
Add a Curves adjustment layer and reduce the lightness. You can see how I masked off the branches with the screenshots below.
7. The Basic Adjustment
Step 1
Create a Gradient Map adjustment layer on top of the layers and pick the
colors #e10019 and #00601b. Lower the opacity of this layer to 20%.
Step 2
Make a Color Balance adjustment layer and change the Midtones and Highlights settings:
Step 3
Add a Photo Filter adjustment layer and pick the color #47f4de:
Step 4
Create a Levels
adjustment layer and bring the Midtones value up to 1.34. Paint on the areas around the middle of the scene to make the middle (shown in the screenshot below) brighter.
8. Add the Color and Light
Step 1
It's time for the most interesting stage of the tutorial. Use the Lasso
Tool to select an area of the bottom right and set the Feather to 80:
Go to Layer > New Adjustment Layer > Channel Mixer and change the Red channel settings:
Step 2
Repeat the previous step with a Hue/Saturation adjustment layer to bring more red to the bottom right area:
Step 3
Do the same with the top left, but make it blue instead of red:
Step 4
Increase the light on the top left, behind the model, using a Curves adjustment layer in the same way.
Step 5
Use a Vibrance adjustment layer to enhance the color effect:
Step 6
On a new layer, use a medium-soft brush with the color #0c9ec7 to paint
the light reflection on the big bat and the contour of the model, especially
the parts illuminated by the blue light.
Step 7
Paint the light on the left side of the gate using the same brush. It might not be so
easy and requires some patience, so I recommend that you use a tablet pen to
achieve a better result.
Step 8
Time for the red light. Make a new layer and paint on the bottom of the
cloak with the color #1e0203. Set this layer mode to Color Dodge 100%:
Step 9
Paint on the bars of the right side of the gate and the branches, the
bottom of the big bat, and the lower part of the cloak, especially the wrinkles with the color #df151a. Make the effect on the
parts nearer to the light stronger and more visible.
Step 10
Use the same brush to paint inside the model's eyes to create an evil look.
Step 11
Change the brush color to #fb9e5a to paint the highlights of the eyes. They
should follow the original direction of the look, so paint them on
the bottom of the red areas.
Step 12
Use a brush with the color #332841 to paint some dark makeup for the eyes and increase the terrible effect.
Step 13
To make the model's skin paler, use a soft brush with the color #08b4d3 and Opacity and Flow about 10-15% to paint on the face and the uncovered
skin area on the breast:
Congratulations, You're Done!
I hope that you've learned something useful for your future projects.
Feel free to leave your comments in the box below—I'd love to see them.
Enjoy Photoshopping!
Welcome to my unusual tutorial, which mixes an Illustrator tutorial and a bit of
botany. You will learn how to draw four different spring flowers using
basic shapes, some warp effects and moving anchor points. You will also
learn the botanical names of their parts. You won't have to make any
sketches before we start—meaning that you don't need to have drawing
skills, you just need to love spring and flowers!
It's an easy tutorial without the Pen/Brush/Pencil Tools, but I assure
you that it won’t be a simple, six-petal-flower made from the Polygon
Tool, as we did before. In the end, you’ll be surprised that you created
beautiful flowers that you normally see during the spring.
If you like to go to the forest in the springtime to pick early spring
flowers, if you love to see colorful flowers on your dining table, if
you enjoy gardening, then this tutorial is just for you! By the
way, you will love the big collection of spring flowers on Envato
Market. Let’s get straight to it!
1. Create the Snowdrop Flowers
Step 1
We’ll start by making the petal of our first flower, a snowdrop.
Using the Ellipse Tool (L), draw an oval. In the image below, you can
see which fill color you need. Then we will warp it so that it resembles
a petal. Go to Effect > Warp > Inflate. Enter the options you see
below.
Step 2
Expand this shape (Object > Expand Appearance). We want to give the
petal more volume, so make a lighter copy behind and lighter, smaller
copy in front. You don't need the stroke color that’s shown in the image
below—it’s just marked to show the boundaries of the ellipses.
Step 3
Let's create the veins of the petal. First, draw an ellipse, and then you
will need to get a sharp corner with the help of the Convert Anchor
Point Tool (Shift-C). Simply click on the top and bottom anchor points.
While keeping this shape selected and holding the Shift and Alt keys
together, move it to the right. You will get a copy of this sharp shape.
Press Control-D twice more and you will get two more copies. Group
these four sharp shapes (right-click > Group).
After that, go to Effect > Warp > Bulge. In the new dialogue window, adjust the
options as you see in the image below.
Place the veins on the petal.
Step 4
To create another petal, we will warp the previous one. So make a copy
of the petal and warp it (go to Effect > Warp > Arc).
Step 5
Place the petal that you just created in the previous step on the left side and behind the original petal that is straight.
Create a copy of two veins and place them on the petal on the left.
If you want, you can select the entire left petal including the veins and
group it together to make it easier to maneuver (right-click >
Group). Hit the Reflect Tool (O) and click on the middle of the first
petal, while holding the Alt key. In the new dialogue window, check Vertical, Angle 90 degrees and press Copy. You will get a third petal on
the right.
Step 6
Now we will create a part of the flower where all petals sit—the
receptacle. I told you that I mixed in some botany! So start with an
ellipse with vintage green fill color. Then warp it. Then expand it
(Object > Expand Appearance). Finally, add a lighter, smaller copy of
it in front.
Step 7
Place the receptacle over our petals from earlier. Add a line using the
Line Segment Tool (\)—this is our stem. Make sure that the Round Cap on
the Stroke panel is checked and the stroke weight is thick.
Step 8
Create a few more snowdrops by copying-pasting. Flip them around so that they are looking in different directions.
Step 9
We still need leaves, and we will make them from our friendly ellipses, of course.
Delete the stroke color and set the fill color. Draw a few ellipses in
different sizes and warp them as you want. You need to go to Effect >
Warp > Arc, check Vertical in the new dialogue window and move the
slider in the Bend section in different directions.
Expand each leaf (Object > Expand Appearance).
Step 10
Place the leaves close to the stem.
2. Create the Willow Branches
Step 1
Let’s move on to our second set of flowers—the willow branches. We will start by creating a branch.
Draw an ellipse and move down the left and right anchor points. First
you need to select the anchor points using the Direct Selection Tool
(A), and using the arrows on your keyboard, move them down. That's the willow branch.
Step 2
Next up is the willow catkin. Using the Ellipse Tool (L), create an ellipse. Move down the left and right anchor points to make it more like an egg shape.
Add lighter copy in front (Control-C, Control-F) and make the copy smaller.
Change the fill color to dark brown and draw a smaller ellipse on the bottom, which needs to be slightly rotated to the left.
At the end, add a few yellow circles over the catkin. We’ve just made a
willow catkin. Better group it now, as it will be easier to move them
later.
Step 3
Place this willow catkin on top of the branch.
Create a copy, and then place it on the top left side of the branch. Rotate this slightly to the left.
While holding down the Alt key, move this catkin down. Keep pressing Control-D and the copy of the catkin will move along the branch.
Once you fill up the left side of the branch, right-click and
press Transform > Reflect. Check Vertical in the new dialogue window
and Angle 90 degrees. Then hit Copy. Now you should have a willow
branch full of catkins.
Step 4
You can make a new one by rearranging the catkins.
Step 5
Rotate and warp the branches to show that they are flexible.
3. Create the Bluebell Flowers
Step 1
Go ahead and create a violet ellipse to start the first petal of our bluebell.
Keep this petal selected, and then take the Convert Anchor Point Tool
(Shift-C) and click on the bottom anchor point—you will get a sharp
corner.
Next, use the Direct Selection Tool (A) to select the top and bottom anchor points and move them up.
Copy-paste behind (Control-C, Control-B) the first shape, and make it wider and darker.
Step 2
Copy-paste the first petal that you created and warp it. This is the
left petal of the bluebell. Expand this shape (Object > Expand
Appearance).
Now we're going to create the right petal. Make sure that the new copy
stays selected and right-click with your mouse. Press Transform >
Reflect, select the Vertical axis of reflection and press Copy. Move it
to the right.
We’ll now create the back petals. Simply copy the first straight petal,
make a copy of it, change the fill color to a darker color, and place it
in the back. Add another dark petal for the back.
Step 3
Remember the receptacle we used for the snowdrops? Go ahead and take a
copy of it now for the bluebell. Remember the leaves we used for the
snowdrops? Let’s take a copy of it for the sepal of the bluebell. Voila!
We’ve just created our first bluebell flower!
Step 4
Now that we have the bluebell flower, let’s create the flower bud of the
bluebell. In the image below, you can see that we first take a violet
ellipse, and then warp it, add a smaller, lighter copy in front, and add a
receptacle and sepals. That's all for the bud. And you guessed it right!
Better group them now (right-click > Group).
Step 5
Let’s go ahead and add stems to our bluebell flowers and buds. Delete
the fill color and set the stroke color. Using the Line Segment Tool (\), we will draw stalks. The stroke weight should be thick and Round Cap on
the Stroke panel should be checked off.
Place flowers on each stem.
Then add small leaves, just like the real bluebell flowers. You can take
the sepals and turn them into regular leaves.
4. Create the Anemone Flowers
Step 1
Make sure that you have deleted the stroke color and set up the fill
color. The last flower that we’ll be creating today is the anemone.
After creating a light beige ellipse, which is our first petal, warp it
using the options shown below. Expand the appearance. To show the volume
of the petal, let's create a copy behind and make it lighter. Again, I
just marked the outlines with the black stroke so that you can see
better—you don't need the black stroke for your piece.
Step 2
Take a copy of the veins from the snowdrop and place them on our anemone petal. Group it—our first petal is complete.
Now we need to make five of them. Keep it selected, take the Rotate Tool
(R) and while holding down the Alt key, click under the petal. In the
new dialogue window, enter Angle 72degrees and hit Copy. Press Control-D
three more times to get the rest of the petals.
Step 3
Place a yellow circle in the middle as a stigma, the middle part of flower.
To make our anemone more realistic, let's create stamens. Stamens
actually consist of two parts: a filament (a tiny stalk which grows on a
stigma) and an anther (where the pollen is stored).
Take the Arc Tool, delete the fill color and set the stroke color. It
has to be slightly darker than the stigma. Draw many small filaments as
shown in the following image. After that, remove the color from the
stroke, make the fill color light yellow, and draw many small circles for
the anthers.
Your finished artwork should look close to the last flower in the following image.
Step 4
Now I'm pretty sure you know how to create the anemone's bud. Try to do it by yourself, so you can get some practice.
Step 5
Draw in a few stems—the stoke color is the same as for the stem of the snowdrops. Place flowers and buds (as many as you want) on each stem.
Step 6
Using the Eyedropper Tool (I), take the same fill color as the leaves of
snowdrops. Make sure that you don't have any stroke color. The image
below has the stroke color to show you the boundaries and that the
entire leaf is made from different sizes of ellipses.
So let’s go ahead and draw three ellipses as shown below. Then add three on the bottom. Select all of them and press the Unite button on the Pathfinder panel (Window > Pathfinder).
On the third leaf down below, you can see two marked anchor points which
you want to delete using the Delete Anchor Point Tool (-).
Using the shapes you just got and maybe adding a few extra ellipses, form a leaf.
Step 7
Select all the ellipses you used to form the leaf (everything from the
previous step) and press the Unite button on the Pathfinder panel
(Window > Pathfinder). Delete the unnecessary anchor points using theDelete Anchor Point Tool (-).
If you’d like, you can move the handles of the anchor points to make the leaf little bit smoother.
Step 8
Add a long, dark green ellipse as the stem. Then go to Effect > Warp > Arc and warp the leaf.
You can create a few of them, but be sure to expand every leaf.
Step 9
Place the leaves close to the stems of the anemones.
5. Create the Backgrounds
We’re almost there! Let’s draw four darker circles in which to place our beautiful flowers.
Awesome Work, You're Done!
Phew! That was some hard work, right? But you did an awesome job!!
I hope that the spring has already blessed your city with nice weather and a pocketful of sunshine. I wish you all a bright and happy spring, filled with beautiful flowers. See you next time!
Whether you're a photographer, a painter, or a web designer, one thing remains a constant: You need a portfolio. After all, portfolios are the time-tested, best way to give potential clients a look into your work history and methodology.
I'll give you an example. A photographer needs a portfolio to display his best work with categories for featuring different types of photos like black and white or nature-themed. Likewise, a web designer needs a creative portfolio that can be used to show off her latest client projects and even provide space to write about the development process.
Portfolios can take on many shapes and many styles. But the important commonality here is that they are, in fact, important. If you want to ensure your work resonates with its target audience, and pick up a few new clients or customers, you can use WordPress portfolio themes to build a stunning representation for your work on the web.
Useful WordPress Portfolio Theme Features
While the best portfolio themes can vary widely in presentation style, they often include a similar feature set. Getting familiar with what is offered aids in the decision-making process. It let's you know what to expect in a solid portfolio theme purchase and allows you to quickly compare creative options. A few popular features include:
Dedicated portfolio page layouts. These give you the ability to customize the look of your portfolio without having to dig into code.
Masonry, grid, and list options. Because varied presentation options are the spice of life and can help maintain visitor interest.
Portfolio item descriptions. This lets you describe each project and give visitors insight into how you work.
Slideshows. Adding an interactive element can pique visitor interest.
Parallax sliders and backgrounds. More smooth moving parts create visual interest and support for your work.
Video backgrounds. Inclusion of video backgrounds can help engage visitors if you're taking a storytelling approach to displaying your portfolio pieces.
Galleries. Act as a nice supplement to portfolios and let you display more than one image or video per portfolio piece.
These are just a sampling of what many creative WordPress portfolio themes include. Your mileage may vary. But now you have a better appreciation of what to expect as you begin browsing through the many WordPress portfolio themes currently available on ThemeForest.
The WordPress themes included here are some of the very best options for creating a portfolio out there right now. And best of all, these are the top sellers, the themes that many people have already tried and loved.
Best Portfolio WordPress Themes - To Display Your Creative Work Online
With a good understanding of what makes up the very best portfolio WordPress themes available for creatives of all types, we can move on to the theme showcase. Here you'll find 15 of the very best (and the best-selling) portfolio themes money can buy:
If you need to display your creative work online with a robust canvas of options, Ronneby is a great choice! It's dubbed a high-performance WordPress theme and for good reason. It can be used to create just about any kind of site you want, and is certainly up for the task of making a stunning portfolio.
It comes with a versatile set of display options, with over 40 layouts, plenty of portfolio options, numerous demo layouts, and several plugins like Slider Revolution, Visual Composer, and Ultimate Addons for Visual Composer.
This responsive and retina-ready theme includes one-click installation, 8 pre-made headers, Mega Menu options, modern typography, portfolio hover variants, 23 portfolio page types, 48 styled widgets, over 1,700 font icons, and it's WooCommerce-ready. Support and updates are included as well.
The Kalium theme was designed with creative people in mind, offering a host of features for creative professionals that help them get their work in front of prospective clients. It comes with many pre-made demos that can be installed with a single click, saving you a considerable amount of time.
It's packed with numerous plugins that make designing custom layouts a breeze including Visual Composer, Revolution Slider, and LayerSlider. Plus it comes with shortcodes, can be translated, and supports unique portfolio options including hover styles, Dribbble Portfolio integration, and over 30 portfolio types. Other features include over 700 Google Fonts, unlimited skins, over 800 icons, multiple footer styles, and the whole thing is responsive and retina-ready.
This theme packs the features you need to create a stunning portfolio to showcase your creative work!
Porto is another fantastic portfolio theme that offers a multitude of options for building a website that's a bit more corporate in its presentation style. It comes with 25 unique homepage versions, light and dark skin options, RTL support, and a super powerful admin panel that let's you customize to your heart's content.
This theme is super fast, is compatible with WooCommerce, supports unlimited header layouts and Mega Menus, is mobile and retina optimized, and comes with full support and documentation. Visual Composer and Master Slider are included as well.
TheFox is a multipurpose WordPress theme that offers plenty of options for creating a stylish portfolio that suits the needs of creatives from all walks. This theme is responsive and super flexible, allowing for numerous customizations to build the perfect site to suit your needs.
It comes with loads of demos, plenty of documentation, support, and a video tutorial for quick setup. Also included are 30 homepage designs, over 250 design details, a robust theme options panel, Visual Composer, Premium Slider, and a shortcode generator. You also get a one-click demo importer, Mega Menu, WooCommerce compatibility, CSS3 animations, unlimited colors, header options, and so much more. A flexible and robust WordPress folio theme to display your best creative work.
Unicon was made with designers in mind, offering plenty of customization options without bogging down users. It comes with a Drag & Drop Page Builder, a responsive and retina-ready design, 50 Page Builder elements, and one page layouts. It also features multiple headers, sticky headers, Revolution Slider, Mega Menus, one-click setup, over 650 Ultrasharp icons, and over 50 premade layouts. It packs high-quality code, numerous features, free updates, as well as the display options you need to make a rockstar online portfolio!
Another best-selling WordPress portfolio theme worth checking out is Uncode. This theme is multi-use, so it can be configured to suit just about any purpose. However, it comes packed with loads of portfolio features sure to please creatives of all types: designers, illustrators, photographers, and more. It also includes several high-quality plugins like Visual Composer, Layer Slider, Revolution Slider, and iLightbox.
It's WooCommerce compatible and WPML ready. It comes with 20 homepage layouts, a full admin options panel, grid layouts, over 6 menu styles, and dedicated portfolio and blog templates for total control over your design.
While the primary focus of the Atelier theme is e-commerce, it's also perfect for portfolios and comes with the features to back up that claim. It comes with 12 demos that can be installed with one click, a minimal design, speed and SEO optimization, and a responsive design.
It also packs in 10 different header types, animated headers, 5 cart animations, multiple product display types, and drag-and-drop page builder. It features Visual Composer compatibility, numerous page types including portfolio and blog. You can make quick use of it's shortcodes, RTL support, Mega Menus, and more.
Rhythm is another theme that can be whatever you want it to be, from a one-page portfolio to a multi-page experience. It comes with Mega Menu, Fullscreen Menu, and Side Menu, and multiple page layouts to suit a variety of needs.
This flexible creative WordPress theme also comes with Visual Composer, Revolution Slider, over 10 blog pages, and multiple shop pages. It packs in 38 different demos, one-click installation, a full theme options panel, and Google Fonts.
With over 40 different portfolio pages and a multitude of layout options, you can display your portfolio with poise—and be backed by the power to extend your site as you grow!
Scalia is another best-selling WordPress theme that offers multi-concept solutions for businesses, shops, and creatives. This theme's numerous portfolio layouts and gallery options make it a great choice for displaying your creative work. It features five different designs to suit varying tastes and includes 100 unique page templates.
There are 8 blog styles, multiple shop pages, quick finders, and more. It also comes with Visual Composer, Mega Menus, and a responsive design. It's robust and ready to be extended with WPML, sliders, and WooCommerce compatibility.
Borderland is a creative WP theme that can be used for a variety of purposes, but we're focusing on its portfolio features today.
It comes with 12 beautiful demos that can be imported with a single click, WooCommerce shop compatibility, Ajax page transitions, Fullscreen Elated Slider, a clients carousel, and a testimonials shortcode.
It features numerous layout options, such as portfolio single templates, portfolio list layouts, hover animation effects, multiple blog layouts, sliders, and custom post formats. You can also put parallax backgrounds, video backgrounds, and a number of additional features to work. Grab this WP theme today to create a stylish portfolio and to standout on the web!
If photography is your outlet of choice, you'll love the PhotoMe theme. It comes jam-packed with over 50 gallery and portfolio layouts, one of which is certain to fit your next project.
It also comes with 8 demos, all of which can be imported with a single click and supports a multitude of options and portfolio templates for customizing your site to best display your work.
This theme supports the Live Customizer, features a responsive layout, comes with a Content Builder, blog templates, and a one page layout. It also packs in Revolution Slider, WooCommerce support, and includes support and documentation. PhotoMe is a feature-rich theme you can use to set up your photography portfolio online!
This is a WP theme that's ideal for photographers and is aptly named Photography theme. This responsive theme comes with 24 demos that can be installed with just one click, dark and light style options, as well as over 70 gallery and portfolio templates—to display your best work.
It also features, infinite scroll, a photo proofing section with password protection, Live Customizer support, a Content Builder, 8 menu layouts. It comes with support, documentation, and professional files to get your photography portfolio started right.
Kinetika is a fullscreen photography theme that includes numerous gallery and portfolio features that allowa for the creative display of your latest and best works. If you're a photographer or need to display your work at full-screen, then this is a great WordPress portfolio theme to start with.
It includes a promotion box, a portfolio and blog carousel, fullscreen slideshows and videos, and a proofing gallery. You'll also get slideshow text, multiple headers, video page backgrounds, and a fullscreen menu. And it packs in Revolution Slider, WooCommerce compatibility, WPML compatibility, as well as optimization for speed and SEO.
Foundry is another multipurpose theme that can be used to create a knockout portfolio to impress your clients. The design here is flat, responsive and totally professional, all while being super easy to customize thanks to the inclusion of Visual Composer, and numerous page builder elements.
It also comes with great display options, such as: fullwidth and boxed layouts, ready-to-use demo pages, over 20 homepage designs, coming soon pages, Mega Menus, and multiple menu styles. It has easy to customize components like one-click color changes. It includes features like, page notifications, Google Fonts, WooCommerce compatibility, and well as documentation and video tutorials.
You can have your portfolio online quickly, but also all the WordPress theme features you need to work with as you grow your reputation and expand your folio of professional work.
The last theme to make our cut of the best-selling portfolio WordPress themes is Vigor. This theme is easy to customize and ideal for creating a compelling portfolio that truly captures attention. If you want your portfolio to stand out online, this is the theme to grab!
It comes with a powerful admin interface, multiple header layouts, Edge Slider, parallax, animations, a masonry gallery, fullscreen menus, Mega Menu, and video backgrounds. As well as great visual display options, like LayerSlider, Visual Composer, portfolio lists, single items, and sliders, a client carousel, and pretty much everything you'd ever need to display your work in-style online.
How to Make a Portfolio Using Creative WordPress Themes
1. Carefully Install Your Theme
After picking the right theme for your situation, make sure you install it correctly. This means following the theme's included documentation as well as following general theme installation best practices.
It's a good idea to create a child theme for the portfolio WordPress theme you select as well, since this will ensure that the customizations you make won't be deleted when a theme update is released.
2. Use The Theme's Customization Settings
Speaking of customization, it's a fantastic idea to get familiar with how you can customize your chosen theme. Most good themes come with thorough documentation, so be sure to read that to find out all of the little things you can modify or adapt to suit your needs.
Whether it makes use of the theme options panel, Live Customizer, or includes a custom settings screen, familiarize yourself with what's included and make use of it to the greatest extent possible.
3. Optimize Your Portfolio Items
While you're perusing your theme's documentation, you'll likely come across some specifications about how to approach your portfolio items. That is, you should pay attention to the sizing specifications, formats accepted, and your layout options. Then, you can go through all of the items you'd like to feature in your portfolio and optimize them accordingly.
A great portfolio layout won't help you if your items don't fit the format correctly. Everything will look "off." To avoid this, take the appropriate time to resize and format your images. A pristine end result will be worth it.
4. Keep Your Portfolio Up-to-Date
Once your site is up and running with your new WordPress portfolio theme, be certain to keep your portfolio up to date. Set aside some time each month to review your work and see if something new should be included in the lineup. Doing this keeps your site fresh and ensures you're always putting your best face forward.
Pick the Right Portfolio WordPress Theme Now!
Trying to cobble together a portfolio site can feel maddening when starting from scratch. But with a fantastic selection of creative portfolio WordPress themes to choose from, you can't go wrong. With a little research, you're certain to find the perfect theme to suit your personality and to act as your representation on the web. We have a whole lot of choices on ThemeForest, brought to you by the largest global community of creatives.
Artists are fussy. Whether we're dealing with composition, color, or lighting, we tend to change our minds a lot. Luckily, with Photoshop, you can make dramatic changes to your portraits in a fraction of the time. In this tutorial, I'll show you several ways you can light any digital portrait quickly and easily.
1. The Initial Black and White Portrait
Step 1
In order to demonstrate these different lighting scenarios, I'll be using one digital portrait as the main base for each effect. Get started by converting your photo reference to a sketch using a Hard Round Brush.
Next, use the Brush Tool (B) to begin painting the initial grayscale tones of the painting. Stick to black and white in order to effectively illustrate the lighting setup from the original reference. If you're a beginner, this is the easiest way to learn light and shadow without the distraction or intimidation of color.
Notice that the light source comes straight from the upper left side just like the original reference.
Step 3
Now that you have the base tones all set, begin painting more shadows. Keep your layers separate according to my blend mode method for easy shading. Since the light source comes from the top-left corner, I'll keep this in mind when moving on to the next lighting scenarios.
Continue refining your painting. Use a Hard Round Brush to clean up each area for a well-defined portrait. Keep the portrait on a layer separate from the background in order to experiment with future lighting effects from behind.
Here's the final portrait. If you keep the painting minimal, it will act as a great base for the next lighting effects.
2. The Spotlight Effect
Step 1
The first setup we'll create is a simple spotlight effect. The inspiration comes from this portrait on Envato Market, and it'll be easier to recreate this using the light source in the current position. Create a New Layer and set it to Multiply. Use a dark gray to begin painting soft shadows on the right side of our subject with a Soft Round Brush.
Paint more shadows onto the neck and hair, paying special attention to the direction of the light to cast an angular shadow. Black out some of the hair just like the reference for added drama.
Step 2
Now incorporate some more light into the scene. On a New Layer set to Overlay, paint white highlights across the left side of the face and hair. Use a Hard Round Brush at 100% Hardness to make your brush strokes incredibly crisp. You can also create brilliant shine by simply using the Eraser Tool (E) to delicately soften any hard edges.
Place a layer underneath your portrait to paint some soft white light onto the wall behind our model. This will reinforce the lighting scheme because light has a tendency to bounce onto nearby surfaces.
And that's it! This is probably one of the easiest ways to create intense lighting for any portrait. Now let's move on to our next effect!
3. The Dramatic Blinds Effect
Step 1
We're all probably guilty of taking cheesy photos in front of a window. Since the blinds block out the natural sunlight coming in, the shadows give a cool and mysterious touch to any portrait. Let's recreate this effect using most of the spotlight effect as our first step. Simply delete the original highlight layer because we'll need custom highlights for this scenario.
I'll be studying this Envato Market picture for the blinds reference.
Create a New Layer above your previous shadows. Using a Hard Round Brush, begin drawing straight lines across your subject while holding down Shift. Hit Control-T to Free Transform, rotating the lines so that they're now at an angle.
Step 2
Let's blur the lines for a subtler effect. With the layer selected, go to Filter > Blur > Gaussian Blur, and blur the lines with a Radius of 20 pixels. If the lines are too strong on her face, simply use the Eraser Tool (E) to lift some of the shadow.
Instantly the blur makes this effect look more realistic!
Step 3
Now it's time for the highlights! Pay special attention to the areas in which sunlight is hitting the model. Emphasize the highlights in those areas and don't forget to include some on the right side for a nice contrast against the shadows. Continue to add subtle highlights towards the left side. There isn't as much light with this effect so you don't have to go overboard with it.
Sometimes dust has a way of catching the light. So to finish this lighting scenario, paint tiny white dots gathered near the light source for a cool effect.
How easy was that? I love recreating fun scenarios like this because they're easily recognizable.
4. Rim Lighting
Step 1
Rim lighting is a really cool effect when the subject is outlined with bright light. Many instances of rim lighting can be found in combination with silhouettes, but the effect is also possible with natural lighting.
For this example, I'll be using this gorgeous Envato Market reference as a guide. For this scenario, we'll dramatically change the direction of the main light source. On a layer underneath the model, first paint some soft white light behind her.
Step 2
Next, let's paint some shadows. Just like our previous scenarios, begin painting shadows on a New Layer set to Multiply. This time, concentrate the shadow on the background as well as her face to create a slight silhouette effect. Keeping the background darker will also allow for better contrast when we add the rim light.
Continue adding more angular shadows to effectively illustrate the lighting scheme. Concentrate them on the face and neck to help carve out a more 3D look in this step.
Notice that the angle of the shadows changes because the light source is in a different position.
Step 3
Once all the shadows are done, you can begin outlining the model with rim light. Use a tiny HardRound Brush to sketch white light all around the model. Try not to make it look too perfect or else it won't look natural.
Don't just outline the edges. Bounce highlights onto the hair to make your painting appear more 3D.
Continue to add more shine and crisp details. Add even more light by setting a New Layer to Overlay and using white to paint bright highlights all around her head and the edges of her hair.
Here's the completed effect. Just by casting shadows onto her face, we've completely changed the original lighting scheme.
5. Colorful Lighting
Step 1
Who doesn't love color? When I saw this retro reference on Envato Market, I knew I had to recreate the effect! To do this, we'll use the original grayscale portrait as a base.
First, fill a New Layer with white underneath your gray background and decrease the Opacity of the gray one to 35%. Using a bright peach color, paint it
all over the hair and lips. Afterwards, set the layer to Subtract. This mode automatically makes the hair appear black as night without losing its detail.
Step 2
Time for color! Fill a New Layer with a bright blue color and set it to Color Burn, adjusting the Opacity to 25%. Then, on a separate layer, paint a nice bright red softly at an angle and set it to Pin Light with an Opacity of 39%.
Always experiment with color and Layer Blend Modes for interesting effects!
Create the colorful artificial light by painting the colors baby blue and pink on a layer set to Overlay. Duplicate the layer twice to intensify the effect by hitting Control-J.
Always use Overlay to incorporate more colorful lighting into your paintings!
Because we're incorporating color into the portrait, we'll now need to make sure that the colors are reflected onto the skin and hair. Paint bright red and blue hues on a layer set to Color across the face. A touch of red to the lips will also add to the color scheme.
By making the red color softly touch the skin, this painting now truly fits the scene.
Step 3
Turn up the drama in your portrait with intense shadow. Just like in the previous steps, use Multiply to emphasize shadows on the right side and towards the bottom for added style.
Shadows add instant realism! Always experiment to find new ways to add style and intensity to your painting.
Time for highlights! Use a Hard Round Brush to paint bright, beautiful highlights across the hair. Dance both colors on each side, experimenting with how much the red and blue colors are reflected onto the opposite side.
Continue tweaking the colors and highlights to make all the elements in this scenario more cohesive.
Completely different from the rest of our examples, this final portrait stands on its own because of its beautiful two-toned color effect!
Conclusion
You can add drama to any boring portrait by painting intense light and shadow.
Even if you start with a much simpler portrait, challenge yourself to experiment with as many lighting setups as you can. Keep referencing new and exciting photos to push your skills even further.
Practice makes perfect. And these quick examples are simple yet effective.
I really hope you've enjoyed this tutorial. Feel free to ask me any questions in the comments! For more tips on digitally painting portraits in Adobe Photoshop, check out these tutorials below:
Ever wondered how you can add more depth to your designs? Well, wonder no more, since in the following moments you'll see how you can do just that using Adobe Illustrator's Drop Shadow effect.
You will learn how easy it is to create interesting shadows that you can use and apply on any future designs with just a couple of clicks.
So without wasting any more time, let's get to it!
This is part of a series of quick video tutorials on Envato Tuts+ in which we introduce a range of subjects, all in 60 seconds—just enough to whet your appetite. Let us know in the comments what you thought of this video and what else you'd like to see explained in 60 seconds!