Layering textures and brushes can give detail and depth to simple designs, making them look more interesting. This tutorial will show you how to do that, with the help of some blur filters and simple layer styles, in order to create a nice grungy text effect in Adobe Photoshop.
Tutorial Assets
The following assets were used during the production of this tutorial:
Create a new 1920 x 1080 px document, set the Foreground color to #2a1e20 and the Background color to #1a0f13, then go to Filter > Render > Clouds, and duplicate the Background layer.
Step 2
Double-click the Background copy layer to apply the following layer style:
Opacity: 50%
Color: #d0fbc1
Size: 15
Step 3
In the Gradient Overlay section, choose the following settings:
Blend Mode: Hue
Opacity: 70%
Angle: 107
Scale: 138%
Click the Gradient box to create the gradient
You can click the Opacity Stops at the top of the gradient bar or the Color Stops below it to modify their values. The gradient is created using the colors #016f6e to the left and #fee847 to the right, and the right Opacity Stop value is set to 0.
Step 4
After applying the layer style, click the Create new fill or adjustment layer icon on the Layers panel and choose Levels.
Step 5
Set the Shadows value to 8 and the Gamma value to 1.21. This will brighten up the corners and the edges a little bit.
2. Adding the Grunge Brushes to the Background
Step 1
Set the Foreground color to #2b1c1f, pick the Brush Tool (B), and choose one of the brush tips from the Dirty Grunge pack. Then create a new layer on top of all layers and change its Blend Mode to Screen.
Add the brush to the background, but make sure not to overwhelm it. You can add the brush to the corners and edges instead of filling the center. You can also use different tips from the pack if you like.
Step 2
Go to Filter > Blur > Gaussian Blur, and change the Radius to 2 to soften the result.
Step 3
Set the Foreground color to #857276, create a new layer on top of all layers, pick the Brush Tool, and choose the tip below from the Roughed Up Grunge Brushes pack.
That brush will be used to add some more grunge to the corners and at the bottom of the document. To do so, you'll need to rotate the brush and then flip it. Open the Brush panel (Window > Brush) to modify those settings.
Step 4
The brush can be rotated by changing the Angle value under the Brush Tip Shape tab to 90.
Step 5
To flip the brush, check the Flip Y box. Use those options to add the brush to the background.
Step 6
Set the Foreground color to #121212, pick a big, soft, round tip, create a new layer on top of all layers, call it Center, and change its Opacity to 55%. Then add the big brush in the center of the document to darken up the area behind the text we're going to create later.
3. Adding the Texture and Finishing Off the Background
Step 1
Place the 7 texture image on top of all layers, resize it as needed, then rename its layer to BG Texture, and change its Blend Mode to Multiply.
Step 2
Go to Image > Adjustments > Hue/Saturation, and change the Saturation value to -50.
Step 3
Set the Foreground color to #6e5f40, create a new layer on top of all layers, change its Blend Mode to Screen and its Opacity to 35%, then use some more big, soft, round brush tips to add a bit of a bright color to the bottom corners.
Step 4
Create another new layer on top of all layers, change its Blend Mode to Screen and its Opacity to 65%. Use the brush tips below from the Monster Splatter Brush Set to add some splatter to the sides of the document.
You can flip the second brush by checking the Flip X box in the Brush panel to apply it to the right side. You can also move these brushes up and down later after adding the text if needed.
Step 5
Double-click the layer to apply a simple Inner Glow effect.
Blend Mode: Vivid Light
Opacity: 50%
Source: Center
Size: 7
Step 6
Go to Filter > Blur > Gaussian Blur, and change the Radius to 1.5.
Step 7
Select all the layers you have except for the original Background layer, then group them and name the group BG to keep things organized.
4. Creating the Text, Styling It, and Adding the Texture
Step 1
Create the text in All Caps using the font SI Font (or you can use Impact instead). The font color is #e6d5b5, the Size is 225 pt, and the Tracking value is set to -10.
The text at the top is optional, but it is created using the font Gill Sans MT Condensed, and the font Size85 pt. You can use any other similar condensed font for that part as well.
Step 2
Double-click each text layer to apply a simple Inner Glow effect.
Opacity: 30%
Color: #d5c09f
Step 3
Select the text layer(s) you created, then go to Filter > Convert for Smart Filters, and rename the smart object's layer to Text, then duplicate it, and drag the copy below it.
This will help with applying non-destructive filters to the text, as well as keeping the text editable for any further changes.
Step 4
Place the grunge-background3.jpg image from the Grunge-Backgrounds pack on top of the original text layer, then right-click it and choose Create Clipping Mask.
Step 5
Go to Image > Adjustments > Hue/Saturation, change the Hue to 4 and the Saturation to -30.
5. Darkening the Text
Step 1
Pick the Brush Tool, open the Brush panel (Window > Brush), pick a soft, round brush tip, and then modify its settings as shown below:
Brush Tip Shape
Shape Dynamics
Color Dynamics
Transfer
Step 2
Create a new layer on top of the grunge texture layer, call it Brush, change its Blend Mode to Multiply, right-click it and choose Create Clipping Mask, then set the Foreground color to #a5a196 and the Background color to #b8976c.
Now start painting the upper part of the text, and randomly inside it to create some darker spots along the top edges and inside the letters.
6. Adding the Grunge Inside and Around the Text
Step 1
Set the Foreground color to #fffada, create a New Layer and call it Splatter, create a Clipping Mask for it, change its Blend Mode to Screen and its Opacity to 70%, then pick the brush tip shown below from the Roughed Up Grunge Brushes pack.
Click as many times as needed to fill the text with the selected brush tip, but make sure not to click and drag.
Step 2
Command-click the Text layer's thumbnail to create a selection.
Step 3
Make sure that the Splatter layer is selected, then press Command-J to duplicate the selection in a new layer.
Rename the duplicated layer to Horizontal and change its Blend Mode to Screen, then duplicate it and change the copy's name to Vertical.
Select the Horizontal layer, zoom in a bit, then hit the Left Arrow Key six times to move the brush 6 px to the left.
Step 4
Create a text-based selection again, then hit the Delete button to get rid of the part inside the text and keep the edges, and go to Select > Deselect.
Repeat the same steps to move the Vertical part 4 px upwards.
Step 5
Pick the Eraser Tool, choose a soft, round tip, and delete some parts of the horizontal and vertical edges you've just created.
Step 6
Convert each of the Horizontal and Vertical layers to Smart Objects, and change their layers' Blend Modes to Screen.
Then select each smart object's layer, and go to Filter > Blur > Gaussian Blur, and change the Radius to 0.7.
Step 7
If needed, you can change the Opacity values as well to create a subtler effect.
7. Finishing Touches
Step 1
Select the Text copy layer, then go to Filter > Blur > Motion Blur, change the Angle to 90 and the Distance to 10.
Step 2
Pick a 1 px hard round brush, and make sure that its Spacing value in the Brush panel is set to 1.
Step 3
Create a new layer on top of all layers, call it Line, and set the Foreground color to #f26d7e.
Click once at the top of the left edge of the letter in the middle of your text, press and hold the Shift key, then click once more at the bottom.
Step 4
Go to Filter > Blur > Gaussian Blur, and change the Radius to 0.7.
Congratulations! You're done.
In this tutorial, we used a couple of grunge brushes and a texture and layered them to build up a simple grungy background, then added some coloring.
We then created some text and converted into a smart object, added another grunge texture and brush, and used the brush to create some grungy outer edges around the text.
A couple of Gaussian and Motion Blur filters helped soften the effect, and finally we added a bright red line to one of the letters to finish off the effect.
It is all about building up the grungy effect using different textures and brushes, along with some color adjustments and different layer Blend Modes, as well as Blur filters to avoid any harsh lines.
Please feel free to leave your comments, suggestions, and outcomes below.
Halloween is fast approaching, and suitably gothic Victoriana designs are back in vogue. Celebrate your upcoming Halloween gathering with a vintage-style, steampunk-inspired poster. Here we’ve advertised a Victorian Seance event (spooky!), but you can edit the text to suit your own purposes.
You’ll need Adobe InDesign for this tutorial. You may also want to use Adobe Photoshop for minor photo-editing, though this isn’t essential.
Let’s get creating!
1. Create a New InDesign Document
We’ll be setting the poster up as A3 size (297 mm by 420 mm), for ease of printing in-house if preferred.
Step 1
Open InDesign and select File > New Document. In the New Document window, set the Intent to Print and set the No. of Pages to 1. Deselect Facing Pages.
Under Page Size select A3 from the drop-down menu and keep the Orientation as Portrait.
Set the Margins on all sides to 16 mm and set the Bleed to 5 mm on all sides. Click OK.
Step 2
To keep elements on your poster easily editable and separate from each other, we’ll create a set of layers.
Go to Window > Layers and double-click on the default Layer 1 name that is already in the panel. In the Layer Options window that opens, rename the layer Background and click OK.
Create a new layer by going to the drop-down menu (find this at the top-right of the Layers panel) > New Layer... and name this Paper. Click OK.
Repeat the above process for four more layers, naming each in this order: Frame, Images, Text, and finally Text on Path.
Lock all layers except Background by clicking in the empty space next to the eye icon beside each layer’s name, and click once on the Background name to ensure you’re working on that layer.
2. Create a Vintage Backdrop
Step 1
Select the Rectangle Tool (M) from the Tools panel(Window > Tools if not already visible, or reset your Workspace to Essentials from the top control panel).
Drag across the page, extending the frame up to the edges of the bleed on all sides. From the Character Formatting Controls panel at the top of the screen, set the Stroke Color to [None] and the Fill to a new CMYK swatch (Window > Swatches, then New Color Swatch from the drop-down menu), C=2 M=2 Y=9 K=0.
With the frame selected, go to Object > Effects > Gradient Feather. Set the Type to Linear. You may need to reverse the gradient by clicking on the icon to the right of the slider bar, so that the color gets darker towards the edges of the frame. Click OK.
In the Layers panel, Lock the Background layer and Unlock the next layer up, Paper.
Step 2
From the Tools panel,select the Rectangle Frame Tool (F) and drag to create a frame that extends up the margins on all sides (Width 265 mm, Height 388 mm).
Go to File > Place and select a textured background image to give the poster some depth. Here I’ve used a grungy paper image to give an authentic vintage look to the poster. You could also experiment with other textures: how about peeling paint, or old wooden boards?
Click Open. Arrange the image in the frame (select Fill Frame Proportionally from the top control panel) and then go to Object > Corner Options. Set the Size to 18 mm and the Shape to Inverse Rounded, on all corners of the frame. Click OK.
With the frame selected, go to Object > Effects > Transparency, and set the Mode to Multiply and the Opacity to 50%. Click OK.
Go to the Layers panel, Lock the Paper layer and Unlock the next layer up, Frame.
Step 3
Using the Rectangle Tool (M), create a frame with the same dimensions as the frame you just created in the previous step (Width 265 mm, Height 388 mm).
From the top control panel, set the Stroke Weight to 3 mm and the Stroke Color to [Black]. Maintain the Fill Color as [None]. As before, go to Object > Corner Options. Set the Size to 18 mm and the Shape to Inverse Rounded, on all corners. Click OK.
In the Layers panel, Lock the Frame layer and Unlock the next layer up, Images.
3. Create a Steampunk Image for Your Poster
Step 1
Using the Rectangle Tool (M), drag to create a small frame 89 mm in Width and 24 mm in Height. Position this on the left-hand side of the poster, resting against the border at Y position 92 mm.
Set the Stroke Weight to 3 mm, Stroke Color to [Black], Fill Color to [None] and Type to Thick-Thin.
Step 2
Select the Type Tool (T) and drag to create a text frame 85 mm in Width and 19.5 mm in Height. Position this directly over the frame you created in the previous step. Set the Fill Color to a new CMYK Swatch (Window > Swatches, then New Color Swatch from the drop-down menu), C=15 M=92 Y=89 K=5. You can rename this swatch Vintage Red.
Go to Object > Text Frame Options and set the Inset Spacing to 4 mm on all sides. Click OK.
Step 3
A great way to insert decorative elements in your InDesign projects is to make good use of the symbols offered to you in a number of typefaces. Here I’ve used Rhomus Omnilots and selected a nice star symbol from the Glyphs panel (Window > Type & Tables > Glyphs) and double-clicked the glyph to insert it in the text frame, then repeated the glyph five times.
Set the Font Size to 40 pt and the Font Color to [Paper]. Keep the Orientation as Align Left.
Step 4
Select both the frames you’ve created in the Images layer and go to Edit > Copy and Edit > Paste. Position this second group of frames to the right of the page. Edit the Orientation of the text to Align Right.
Step 5
Select the Ellipse Tool (L) and hold Shift while dragging to create a perfect circle, 95 mm in diameter.
Set the Stroke Weight to 0.5 mm, Stroke Color to [Black] and Fill Color to [Paper].
Step 6
Select the Ellipse Frame Tool and, again holding Shift, drag to create a second circle 89 mm in diameter. Position this centrally over the top of the circle you created in the previous step. Set the Stroke Weight to 1 mm, Stroke Color to [Black] and Fill Color to C=2 M=2 Y=9 K=0.
Step 7
You can insert any vintage-style image you like in the circle. A great new resource is the Internet Archive Book Images collection on Flickr, which hosts 12 million rights-free images. There are all sorts of Victorian-era images to choose from. Simply take your pick, and edit out the background pigment in Photoshop using the Magic Wand tool and Refine Edge function. Save as a transparent-background PNG file.
Here, I used an image of an old lamp to give a spooky seance feel to the poster.
With the circle selected (from Step 6, above) go to File > Place and select your edited image. Click Open and then arrange the image in the frame. You can double‑click inside the frame to select and resize the image directly.
Step 8
Use the Type Tool (T) to create a small, square text frame, and position this at the top-left corner of the page, within the curved corner of the border. Select a suitable symbol from the Victorian Free Ornaments Two glyphs set (Window > Type & Tables > Glyphs), set the Font Size to 60 pt and the Font Color to [Black].
Select the text frame and Edit > Copy and Edit > Paste. With this new text frame selected, Control-Click (Mac OS) or Right-Click (Windows) > Transform > Flip Horizontal, and position in the opposite corner, on the right-hand side of the page.
Select both the text frames you’ve just created and Edit > Copy, Edit > Paste. Control-Click (Mac OS) or Right-Click (Windows) > Transform > Flip Vertical. Position these in the two bottom corners of the page.
Select the two lower text frames and go to Window > Text Wrap to open the Text Wrap panel. Set the wrap to Wrap Around Object Shape and set to 6 mm on all sides.
Your poster’s looking great!
Return to the Layers paneland Lock the Images layer and Unlock the next layer up, Text. Now let’s create some Victorian-style typography...
4. Introduce Some Victorian Typography
Step 1
Select the Type Tool (T) and drag to create a text frame 262 mm in Width and 103 mm in Height. Position centrally on the page at Y position 153 mm.
Type: "And you are cordially invited to a (paragraph break) Victorian (paragraph break) Seance". Set the Orientation to Align Center.
Set the Font of all the text to a new typeface, Hustlers Rough. You can also get a demo version of the font for free.
Highlight the first line of text and set the Font Size to 47 pt, Leading to 83 pt. Set the Font Color to Vintage Red, C=15 M=92 Y=89 K=5.
Highlight the second line of text and set the Font Size to 180 pt, Leading to 104 pt. Set the Font Color to [Black]. Highlight the final line of text, set the Font Size to 265 pt, Leading to 145 pt and again set the Font Color to [Black].
Step 2
Select the Line Tool (\) and, holding Shift, drag to create a horizontal line 235 mm in Length. Go to Window > Stroke to open the Stroke panel. Set the Weight to 1 mm, Cap to Round Cap, Type to Solid and, from the top control panel, set the Stroke Color to [Black].
Position the line centrally on the page below the text frame you created in the previous step.
Step 3
Create a new text frame using the Type Tool (T) 262 mm in Width and 15 mm in Height. Position this centrally on the page below the line created in the previous step.
Type: "Join us for an evening of ghoulish entertainment at", and set the Orientation to Align Center. Set the Font to a new typeface, Old Newspaper Types (mixing up different typefaces is a great way to give blocks of text an authentic vintage look). Set the Size to 28 pt and Font Color to [Black].
Step 4
Create another text frame below this one, typing "Event Location" and setting the Font to Hustlers Rough, and Size to 128 pt.
Step 5
To create an additional text frame with the date set in Old Newspaper Types, Size 21 pt, you can introduce a pair of framing lines.
Select the Line Tool (\) and, holding Shift, drag to create a line 72 mm in Length. In the Stroke panel (Window > Stroke) set the Weight to 1.3 mm, Type to Thick-Thin and End to CircleSolid. Set the Stroke Color to [Black].
With the line selected, go to Object > Effects > Gradient Feather and apply a simple Linear Gradient at 0 degrees. Position the line just below the location text frame, to the left of the page.
Select the line and Edit > Copy, Edit > Paste and Control-Click (Mac OS) or Right-Click (Windows) > Transform > Flip Horizontal. Position in the opposite position on the right-hand side of the page.
Step 6
Select the Type Tool (T) again and create another text frame 118 mm in Width and 74 mm in Height. Position it below the other text frames on the left-hand side of the page, nestled in the bottom corner. You can drag a vertical guide from the Left Ruler (View > Show Rulers) to 27 mm and line the frame up against this.
Select the frame and Edit > Copy and Edit > Paste,and position on the right-hand side of the page, so you have two columns.
Click the small, white square at the right-hand corner of the left-hand column, and click again in the second column to connect the two frames (go to View > Extras > Show Text Threads to see if you’ve connected them correctly).
You can now enter text to fill the two columns. Set the Font to Old Newspaper Types, Size 19 pt, Leading 22.8 pt (Auto) and Font Color to [Black]. Use this space to give more specific details about your Halloween event. Make it sound as enticing and spooky as possible!
In the Layers panel, Lock the Text layer and Unlock the next layer up, Text on Path.
Step 7
In the Text on Path layer, we’ll create a simple yet effective text effect to give a final vintage flourish to the poster.
Navigate towards the top of the page. Select the Ellipse Tool (L) and drag to create a flat oval roughly the width of the page.
Choose the Scissors Tool (C) from the Tools panel, and snip the oval shape at the left and right central points. Select and Delete the bottom section of the oval.
Then go to the Tools paneland select the Type on a Path Tool (Shift + T), which you can find in the drop-down menu when you click on the Type Tool icon.
Hover over the curved half of the oval until a + icon appears next to the cursor. Click once and the line is transformed into a text path. Type: "Halloween is here". You will notice that the text appears upside down, so let’s rectify that.
You’ll notice a short line pointing downwards at the center-point of the half oval. Grab this and pull it above the half oval. The text will flip to run along the top.
Set the Stroke Color of the half oval to [None] and set the text Orientation to Align Center. Set the Font to Hustlers Rough, Size 100 pt, and Font Color to [Black].
You’ve finished your poster! Great work!
Now all you need to do is decide how best to circulate it. If you’re sending to a professional printer, you can export the poster as a PDF (File > Export > selecting Adobe PDF (Print), checking All Printer’s Marks and Use Document Bleed Settings under the Marks and Bleeds menu).
You can also circulate the poster online or on email by going to File > Export > and selecting Adobe PDF (Interactive) from the drop-down menu.
Whether you're fresh to vector, or you're an Adobe Illustrator user expanding your vector horizons, learning the basic tools of CorelDRAW is a worthy task. We're going to start with drawing tools such as the Pen Tool, Freehand Tool and 3-Point Curve Tool, as well as a review of some commonly used dockers and toolbars.
1. The Pen Tool
Step 1
Start by creating a New Document (Control-N) at your preferred work size (you can change this any time while working), in RGB color mode, and at 300 dpi. These are my preferred settings, but if you'd rather work in CMYK for printing purposes, do so (while remembering to switch to RGB when exporting for web use).
Step 2
Let's start with the Pen Tool (you'll find it in the Toolbox, to the left, under the Bézier Tool). This tool works just like the Pen Tool found in Adobe Illustrator and Adobe Photoshop.
You place Nodes and draw curves in segments. We're going to start with a cute little ghost shape:
Place one Node and curve up and to the left. This is the start of the tail.
Continue curving around to the right to form the top of the ghost and back down to the right to join with the original Node. Notice that while you're placing anchor points, you get a preview of the curve you're drawing. It's quite helpful.
You can edit your Node handles with the Shape Tool (F10), and you'll find additional options for editing within the PropertyBar(Window > Toolbars > Property Bar).
Step 3
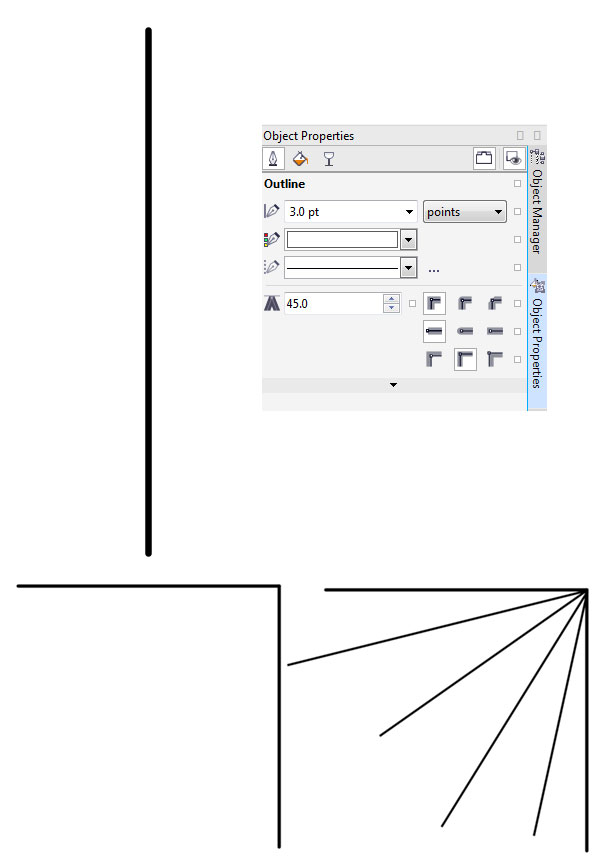
To edit your newly drawn object, go to Window > Dockers > Object Properties or hit Alt-Enter. In this docker you'll find an assortment of options for your selected object.
For the purposes of this tutorial, select Outline and change the width of your stroke to 2.0 pt, color to black, and both Cap and Corner for the Rounded options.
Select the next option within the docker, Fill, select Uniform Fill, and change the color to white. We'll explore other options within this docker in future tutorials and quick tips.
2. Freehand and Bézier Tools
Step 1
Using the Freehand Tool (F5) is fairly simple if you're drawing with a graphics tablet. Draw an additional ghost shape. Instead of choosing where your Nodes appear, they'll be added automatically depending on what level of Freehand Smoothing you've set in the Property Bar.
I started with a low setting of 12 for Freehand Smoothing. This example was quickly drawn with a mouse. Note how it has an abundance of Nodes and is quite choppy in shape.
I changed the Freehand Smoothing setting to 97. Again, this was drawn quickly with my mouse. It has 3 Nodes in total.
Note how smooth the second, object is compared to the first. Your settings in the Property Bar matter quite a bit when using drawing tools in this program.
Step 2
Now that we have a second little ghost, we want its stroke and fill attributes to match. Instead of changing the new object's attributes in the Object Properties docker, use the Attributes Eyedropper found within the Toolbox.
Select the first ghost with the eyedropper.
Select the second ghost, and all of its attributes are copied over into the second shape. For extremely simple objects like those seen below this seems hardly worth it, but when you're using a variety of transparency, gradient, and blending mode settings it'll save you so much time in the long run when you need to create similar items within your artwork.
Step 3
To illustrate the further use of drawing tools, we'll work with the Bézier Tool to draw a face onto the first ghost. As with the Pen Tool, you draw curves in segments.
Start with a small mouth. Draw a curve that dips downward. Hit Enter or Shift to stop the curve.
Repeat for the eyes. Change the weight of all lines drawn in the Object Properties docker.
I prefer the Pen Tool over the Bézier Tool for shapes like the ones created for the second face: two funny little circle eyes and a wide, open mouth. You'll notice it's difficult to draw curving shapes that stop sharply at a Node and move into the next curve. Which tool you use for projects will depend on your needs in drawing.
Set the Fill color to black for all three new shapes.
3. B-Spline and Smart Drawing Tools
Step 1
These little ghosts need crowns. Using the B-Spline Tool, start with a line that curves to the right and up. Notice that the further inward to the center you place your Nodes, the more curved your edges and corners become.
The shape drawn below has 7 Nodes in total. Set the Fill color to bright orange in the Object Properties docker.
Step 2
The Smart Drawing Tool (Shift-S) is quite similar to the Freehand Smoothing options of the Freehand Tool.
In the Property Bar, you'll find two options with drop-down menus: Shape Recognition Level and Smart Smoothing Level. To start, set both to None.
With both level options set to None, I've drawn another simple and quick ghost-like shape with my mouse. It takes a moment for the smart drawing to load. Note how choppy and Node-filled it is.
Set both level options to Highest and redraw the same shape. Note how smooth and simple it is with only 2Nodes.
See the difference between the two shapes and the extremes of their settings below.
4. 2-Point Line and 3-Point Curve Tools
Step 1
We're going to give the ghosts a long overdue rest and draw a spider web with the final two tools we'll review in this tutorial.
Start with the 2-Point Line Tool and draw a long vertical line. In the Object Properties docker, change the line weight to 3.0 pt, color to black, and Cap and Corner to Rounded.
Keep the vertical line selected and start the horizontal line at the top Node. This will continue the object without having to draw a new one.
Draw four thinner, diagonal lines radiating outward from the corner of the previous object. Group (Control-G) your objects together.
Step 2
Using the 3-Point Curve Tool, start on the top horizontal line and draw a straight line to meet the first diagonal line (this creates the first two points).
Next, the line will curve toward the corner of the cobweb (this creates the third point). Set the width of the line at 1.5 pt.
Continue drawing curved lines between each section of the cobweb. When possible, select a curved line and continue it by picking up an open Node and creating another 3-Point Curve.
Your web is complete when each section is filled with curves.
Step 3
Finally, here's a quick review of the Object Manager docker. This docker is comparable to the Layers panel in Adobe Illustrator. In the case of the Object Manager, however, you can not only create multiple objects, layers, and groups of layers (and objects), but also multiple pages.
Note that next to each layer there are three icons:
Show or Hide: Toggling this changes the visibility of a layer within the active document.
Enable or Disable Printing or Exporting: Toggling this changes whether or not a layer will be included in a printed or exported document. Even if you have a layer hidden, if this isn't toggled off, your exported image will still show whatever is on the layer.
Lock or Unlock: Toggling this allows for your layer to be editable or not. It's quite useful for making sure objects remain untouched while working with multiple, overlapping elements within a document.
Sadly, individual objects or object groups have to be on separate layers if you want some to be hidden, some to be unprintable, or some to be locked.
Great Job, You're Done!
For now, anyway. You've learned how to use various drawing tools within CorelDRAW such as the Pen Tool, B-Spline Tool, and the 3-Point Curve Tool, and familiarized yourself with several toolbars and dockers. This is just the tip of the iceberg, so we'll have more CorelDRAW tutorials in the coming weeks. In the meantime, show us what you've drawn with these tools in the comments below!
In this tutorial, you will create a spooky jack-o-lantern from scratch, rendered entirely in pixels (the building blocks of digital art). Learn how to use Adobe Photoshop's Timeline panel to animate a smiling, winking face that blows a kiss at the viewer and lights up both inside and out.
1. Drawing the Pumpkin
Step 1
Throughout this tutorial I'll be working in Adobe Photoshop CC 2014. Open your program and create a New Document. My final artwork measured 36 px by 30 px, so I made my document 50 px by 40 px at 72 dpi with a Transparent background.
Step 2
Let's start by building the basic pumpkin shape. Zoom (Z) in on your document 1600% or so.
Using the Pencil Tool (B) with a 1 px hard brush, draw 7 pixels in a vertical line.
Draw 2 pixels on either side of the first line.
On the top of the design so far, draw an additional vertical line of 2 pixels followed by 1 pixel at the right diagonal of the previous two. On the bottom of the design, draw 2 diagonal pixels in succession (see below).
Complete this section with 1 diagonal pixel at the top and two more pixels to the right on both top and bottom.
Step 3
Continuing on with the Pencil Tool and our basic pumpkin shape:
With what was created in Step 2, add on 3 pixels horizontally to the top and bottom of the design. Draw 1 diagonal pixel above the line of three drawn previously.
Continue building the pumpkin's shape on the top of the design with 3 horizontal pixels. On the bottom, draw 1 diagonal pixel below the other and 2 pixels to the right.
The top line is 8 pixels across. The bottom line is 10 pixels across.
The other half is a mirror image of everything to the left of the two straight horizontal lines. Use the Rectangular Marquee Tool to Select, Copy (Control-C), Paste (Control-V), and mirror (Edit > Transform > Flip Horizontal) the left half in order to complete the basic pumpkin shape.
Step 4
Our pumpkin needs a face. Create a New Layer in the Layers panel and using the Pencil Tool, let's begin:
The eye starts with 3 pixels in a line and 1 pixel above them and in the center.
Complete the eye with the third line of pixels consisting of 3 pixels and the fourth line consisting of 5 pixels.
Three pixels to the right from the bottom line of the eye starts the nose. It's comprised of three rows: 1 pixel, 3 pixels, and 3 pixels.
Repeat the eye shape again for the right eye.
Make sure the eyes and nose have 3 pixel spaces separating them. The mouth begins two rows down with 3 pixels across.
Step 5
This entire step consists of completing the mouth:
The start of the mouth, building off the last step, is 9 pixels arranged in a 3 x 3 box.
Draw 3 pixels in a vertical line on either side of the box drawn previously.
Next are two columns of 2 pixels each on either side of the mouth.
Draw two L-shapes on either side made up of 3 pixels each.
Add 1 pixel on either side, diagonally and going outward. The top edges of the mouth consist of 4 pixels in a horizontal row.
To complete the mouth, place 1 pixel diagonally and downward, toward the center of the mouth, and fill in the left and right sides (see below for exact shape). At this point, the mouth looks a bit like a flying bat.
Since my pumpkin will be made up of various oranges and yellows, I've decided to change the color of my line art to brown (#6b0f02).
2. Coloring the Pumpkin
Step 1
The colors used in my final artwork differ from the ones I began with below (they're more saturated and were changed later in the process). Consider this to be a small lesson in easily creating a harmonious color palette. In order to create your own (or do this with other colors), reduce the Opacity of the color to the percent listed, place it over the 100% Orange color, and select the new color with the Eyedropper Tool (I). Save new colors in the Swatches panel and make sure the Opacity is set back to 100% for the rest of the tutorial.
Brown 100%: #760b03
Brown 75%: #902b0d
Brown 50%: #ae4a18
Brown 25%: #d1692a
Orange 100%: #f2842b Used as the base color.
Orange 40%: #faa912
Orange 20%: #ffcc01
Yellow 100%: #fff25d
Merge the face layer and the pumpkin line art and fill in the pumpkin using the Paint Bucket Tool and Orange (#f2842b).
Step 2
Our pumpkin needs a stem.
Using Brown (#760b03), and the Pencil Tool, draw two vertical lines of 3 pixels each, two rows apart.
Fill in the two columns with Brown 75% (#902b0d) and close the shape with 2 pixels of Brown.
Use Brown50% (#ae4a18) as the highlight color on the top of the stem.
Step 3
Since this is a jack-o-lantern, we'll need to cut open the top of the pumpkin.
I've started with the same Brown used on the stem. From the top of the stem, the middle of the pumpkin's lid is 9 pixels down. Draw 8 pixels across in that center point with 3 pixels on the next row up on either side of the center line.
Connect the 3 pixels across on either side with 1 pixel up.
Cover the corner pixel with Orange and shade the lid and below it with Brown25% (#d1692a) from Step 1 in this section.
Place those dark orange pixels in the corners of the lid line art and below the stem (see below).
Step 4
Concentrate on what's being done with shading in the pumpkin below:
Carefully draw curving lines of Brown 25% (#d1692a) starting at the indents of the bottom of the pumpkin. The curves should mimic the contour of the pumpkin itself.
Line the bottom of the pumpkin and begin to stagger dark orange and orange pixels in the lower half of the pumpkin.
Outline the bottom of the mouth, nose, and eyes as well.
Optionally, you can choose now to use a yellow-orange from Section 2, Step 1 in order to add highlights to the pumpkin lid, eyes, nose, and mouth.
The colors for this portion of the tutorial are more subtle than the ones I chose to use in the next step. If you like this tone better, simply use the next step for tips on further shading and highlighting and keep the color palette created in Section 2, Step 1.
Step 5
If you'd like a brighter, more saturated pumpkin, check out the steps below:
Replace all instances of Brown 25% (#d1692a) on the pumpkin's surface with Bright Red (#ff1300).
Change the base orange color to #ff7700.
Make sure the top stem contains shades of brown and light brown rather than red (we're changing the pumpkin rather than the wood color of the stem).
For the line denoting the pumpkin lid, use the light browns from Section 2, Step 1. For highlights, use Yellows (#ffcc00) and (#fba912) to draw small boxes and stagger lines of pixels in the upper left of the design.
Carry the darker of the two yellows over to the very tops of each pumpkin section. Highlight the bottom of the mouth. Soften the bright red shadow pixels with Red-Orange (#ff4500).
Use a Dark Brown (#3e0702) on the outline of the pumpkin's bottom and right side. Lighten up the upper left side of the pumpkin's line art with assorted browns (see below).
3. Creating the Animation Frames
Step 1
Each step in the animated icon that we're making will require a separate layer that contains the change within the icon. This includes any glowing eyes, changes in the mouth's shape, or glow around the pumpkin itself.
Make sure your pumpkin components are all on the same layer. Use the Magic Wand Tool (W) to select outside of the pumpkin and go to Select > Inverse (Shift-Control-I) and then Select > Modify > Expand and Expand by 1 pixel.
Create a New Layer beneath the pumpkin icon in the Layers panel. Fill in the selection with bright yellow using the Paint Bucket Tool. I also filled in another layer below the other two with black so the pumpkin icon would pop off the screen more.
Step 2
Create a New Layer and cover the first two rows of the left eye with orange pixels. Cover the last row with 5 pixels of red (and the previous red row with orange pixels). The eye should now be 4 pixels across, 1 diagonal pixel on the left side, and two yellow pixels in the center of the winking eye shape.
Step 3
There are three new mouth layers we have to draw in order to create the final animation.
Make a New Layer above the others and use the Pencil Tool to draw three columns of pixels comprised of 1 pixel, 3 pixels, and 2 pixels. This is the left corner of the mouth.
For the center of the mouth, draw 2 pixels to the right of the mouth corner drawn previously. Add 1 pixel down from the previous two drawn. Finally, draw a square of 3 pixels by 3 pixels for the center of the mouth.
Mirror the left mouth corner for the right side.
Use dark orange to outline the corners of the mouth. See the image below for exact pixel placement.
Use the base orange color to fill in most of the negative space around the mouth.
The bright red that's been placed in this part will sit directly below the pumpkin's nose.
Finally, fill in the empty spaces with yellow highlights.
Place the new mouth over the original mouth. The previous mouth should be completely covered. Hide this new layer for now.
Step 4
The mouth is getting smaller and changing from an open smile to cute pursed lips (minus the lips since this is a pumpkin).
Once again, we'll start with the left corner of the mouth, which is comprised of 5 pixels in three rows.
Draw a square of 3 pixels by 3 pixels for the center of the mouth.
Mirror the left side of the mouth for the right side.
Using dark orange, draw two lines of 4 pixels and place additional pixels in the corners of the mouth shape.
Once again, use bright red for the bottom of the pumpkin's nose (this will help you line it up) and the bottom of the mouth.
Fill in the negative space with orange.
Place this layer over the pumpkin's mouth, making sure the original mouth does not show through. Hide this new layer for now.
Step 5
The mouth is now in full kiss-blowing mode. Once again, create a New Layer and let's get going.
The entire mouth is two rows of 3 pixels and a single pixel in the center of the final row.
5 pixels are drawn on the left side: 2 pixels down, 2 pixels diagonally, skip a space, and 1 pixel off the corner of the mouth. Mirror this on the right side and draw 5 pixels across on the top of the mouth.
Using red, draw 3 pixels across that will one again be the bottom of the pumpkin's nose. Draw 5 pixels across the bottom of the mouth and scatter a few pixels in the corners of the design.
Fill in the area with orange.
Place the new mouth over the old mouth, making sure the pumpkin's original mouth is fully covered. Once again, hide this layer in the Layers panel for the time being.
Step 6
For the lit-up eyes and mouth, one layer will be needed.
Zoom in on the pumpkin's face to 1600%, or so.
Create a New Layer and fill in the eyes and nose with yellow. Line the left sides of them with red to easily see the inner edge of the facial features.
Use light brown on the left edge of the eyes and mouth. Use a lighter brown on the bottom edge.
Fill in the mouth with bright yellow, repeating the previous steps for what colors are used within the design.
A shot of the pumpkin when "fully lit".
4. Animating the Pumpkin
Step 1
Open the Timeline panel and choose Create Frame Animation from the drop down menu in its center.
In order to change what's happening in each frame, you'll have to hit New Frame in the panel's options and adjust the design in the Layers panel each time. Notice the change below with the second mouth layer visible in the second frame and hidden in the first.
Step 2
See the image below for a visual breakdown of the frames used in the animation. Each step corresponds with a layer. I've also broken down what's happening in each frame below:
The basic pumpkin with all additional layers hidden. The time is set at 1 second.
The yellow outline layer (from Section 3, Step 1) is visible in this frame, but it's at 25% Opacity. The time is set at 0.1 second.
The third frame has the yellow outline layer at 50%Opacity and the mouth layer from Section 3, Step 3 is now visible. The time is set at 0.1 second.
The yellow outline layer is at 100% Opacity. The mouth from Section 3, Step 4 is visible. The time is set at 0.1 second.
The mouth from Section 3, Step 5 is visible. The time is set at 0.1 second.
The winking eye layer from Section 3, Step 2 is now visible. The time is set at 0.1 second.
This frame is identical to Frame 5. The time is set at 0.1 second.
This frame is identical to Frame 4. The time is set at 0.1 second.
This frame is identical to Frame 3 except for the yellow outline layer whose Opacity is set to 100%. The time is set at 0.1 second.
All additional eye and mouth layers are hidden in this layer. The time is set at 0.1 second.
The lit up eyes and mouth layer is now visible in this frame. The time is set at 1 second.
All additional eye and mouth layers are hidden. The yellow outline layer is set to 50%. The time is set at 0.1 second.
The yellow outline layer is set to 25%. The time is set at 0.1 second.
Step 3
When setting the time delay on your frames, you can select multiple frames and change them at one time. Also make sure your Loop Options are set to Forever.
Step 4
When exporting your animated file, go to File > Save As and select .gif. As there aren't many colors in this file and we're not too concerned about a large file size, keep the colors at 256 and the other settings at their default.
If enlarging your file (in case you want it as large as my final image), make sure Quality is set to Nearest Neighbor so there's no loss in hard-edged pixel quality. Again, Looping Options should be set to Forever (unless you want your .gif to loop a set amount for whatever reason).
Fantastic Work, You're Through!
Great job in creating a fun, animated pumpkin. I've got both of my original enlarged versions below so you can see the difference between the sizes as well as details within the pixel icon.
For more pixel art tutorials here on Tuts+, check out this small list:
If you want to maximize your type skills in Adobe Illustrator, our new course is ideal for you. In Illustrating with Type: Typographic Posters & Word Clouds, you'll learn how to use a variety of type tools and techniques, before putting your new knowledge into practice with a couple of hands-on creative projects.
What You'll Learn
In this comprehensive video course, you'll learn how to use Adobe Illustrator’s type tools to add impact to your designs. You’ll understand how to work with paths and type, how to warp type, and how to use strokes and colors on type.
You'll then work through two type-based design projects: a word cloud and a typographic poster. Tuts+ instructor Gary Simon will take you through the full process for creating these powerful images, and will show you how the creative use of type can help you communicate meaning through design.
By the end of this course you’ll have completed two typographic projects, and will be ready to use Adobe Illustrator’s type tools for your own creative work.
Watch the Introduction
Start Learning With a 14 Day Free Trial
You can take our new design course straight away with a completely free 14 day trial of a Tuts+ subscription. Start your free 14 day trial today, to access this course and hundreds of others.
Through the combination of drawn elements and scanned pieces, we'll create a Halloween-inspired collage that looks as if it's been sewn, crocheted, and appliquéd rather than the digital artwork it really is. Download the asset pack included in this tutorial and let's get crafting with Adobe Photoshop.
1. Setting the Stage
Step 1
Starting with the "stock-crochet-01.jpg" file included in the downloadable assets folder attached to this tutorial, choose one of the white crocheted flower motifs.
Select around the design with the Lasso Tool (L) and Copy (Control-C) and Paste (Control-V) it into a New Document measuring 8 inches by 10 inches at 300 dpi. This will be our working document in which we'll create our design and edit scanned imagery.
Use the Pen Tool (P) to carefully draw a path that outlines the crochet motif. In the Paths panel, hit Load Path as a Selection.
Select the Inverse (Shift-Control-I) of the current selection and Delete the rest of the background. Touch up the motif with the Eraser Tool (E) set to Brush.
As a small aside, I crocheted the scanned elements seen above from vintage lace patterns found on Pinterest and books my great grandmother and grandmother owned.
Step 2
Open the image titled "stock-felt-01.jpg". Create a New Layer in the Layers panel.
Use the Pen Tool to draw the left half of a tree. I improvised in the design, but you can always refer to a stock photo of a tree or check out the shape of some outside your window (or wherever you encounter trees in the wild).
Fill the path with the color of your choosing.
Copy and Paste the half of your tree and mirror the copied half by going to Edit > Transform > Flip Horizontally. Use the Move Tool (V) to align the two halves and Merge Down (Control-E) when satisfied with their placement. Draw additional branches as wanted with the Pen Tool, making sure to fill in paths and Merge Down layers that are a part of the tree silhouette.
Select the tree silhouette with the Magic Wand Tool (W) and Copy the selection from the felt image layer. Paste the copied felt tree into the main design document created in Step 1.
Step 3
Create a New Layer behind the other layers and fill it in with your chosen shade of tan, taupe, or brown. Go to Filter > Noise > Add Noise and add 15.19% of Monochromatic Gaussian Noise to the background in order to make it look like textured material.
Step 4
The crochet motif from Step 1 will be turned into a pattern. To do so, Copy and Paste the motif into a New Document (the size should be determined by the copied element. Go to Image > Canvas Size, and enter a width and height that is larger than the design element and square in dimension.
Paste two instances of the crochet motif. With the second layer motif selected in the Layers panel, go to Filter > Other > Offset and enter 452 in the Horizontal box and 421 in the Vertical box so your second motif appears in all four corners of the document.
Create a pattern by going to Edit > Define Pattern, and save your pattern with a name. You can also resize your image for the pattern under Image > Image Size if you find you'd like to have smaller crochet pieces within your design. We will implement this pattern later in this tutorial.
2. Creating the Composition
Step 1
Now that we've got the basics of editing the fiber element scans and have started to add elements into our working document, let's focus on the composition of our illustration itself.
Select the felt tree layer, Right-Click, and hit Blending Options. In Drop Shadow, enter the following attributes:
Blend Mode: Multiply
Opacity: 75%
Angle: 139°
Distance: 17 px
Spread: 5%
Size: 24 px
Step 2
Use the Pen Tool to draw curving, rolling hill shapes in the background. Fill it with the color of your choosing. Since I wanted the background's graininess to be utilized, I filled the path on a new layer above the background with dark blue and selected Overlay in the Layers panel so it would appear as a shade of green. How Blend Modes affect your selected layer also depends on what colors and attributes are used in the layers beneath.
Step 3
In the file "stock-crochet-01.jpg", Select, Copy, and Paste some of the crochet leaves into our working document. Scale, Rotate and Move the pasted crocheted leaf elements around your composition as desired. Keep them on separate layers for now.
Repeat with the drawn leaf in the file "stock-drawing-01.jpg". Select the leaf with the Lasso Tool in the original stock document. Copy and Paste it into our working document. Use the Magic Wand Tool to Select and Delete the white background of the leaf (making sure Contiguous is selected in the tool's options).
Again, Scale, Rotate, and Move the drawn leaves as needed. Optionally, you can also draw your own leaves and other drawn elements in a separate document or scan them in after drawing them out with a black pen on white paper.
Step 4
Open the second drawn elements document, "stock-crochet-02.jpg", and grab some pumpkins in the same manner the leaf was Copied, Pasted, and prepared in the previous step. Place them around your composition as desired.
Check out the other stock file stock-crochet-01.jpg for additional elements to fill in your composition. Mix and match faces, various doodles, etc. Alternatively, you can draw your own pumpkins, ghosts, etc., in order to give your version of this project a more personal touch.
3. Coloring the Scanned Photographic Assets
Step 1
We'll start by coloring the scanned crochet leaves. On a layer above each crochet leaf layer, use the Brush Tool (B) to paint over the leaf in varying shades of red, orange, and yellow (think harvest colors).
Set the layer's Blend Mode to Color Burn and adjust your chosen colors as needed. When satisfied with your change in colors, Select both the painted layer and the corresponding crochet leaf and Merge Down (Control-E). Repeat for each crocheted leaf element throughout your composition.
Step 2
I decided to place the pattern created in Section 1, Step 4 within a circle to represent a full moon within my design.
Using the Elliptical Marquee Tool (M), draw a circular selection on a New Layer above the background. Use the Paint Bucket Tool (G) to fill in the pattern created previously (mine was reduced in size 50%).
Select the fill pattern, create a New Layer, and fill the selection with a hue of orange or yellow.
Set the orange fill color layer's Blend Mode to Linear Burn in the Layers panel.Merge the layers when satisfied with the color change.
Step 3
Let's create a quick framing feature within our composition.
Cut out one of the little circular crochet frame pieces from the stock-crochet-01.jpg asset file and Paste it into the working document.
Use the Rectangular Marquee Tool (M) to select the lower third of the element and Delete it.
Rotate the element 180° and then Copy and Paste several additional cut-off crocheted circle frames. Line them up at the top edge of the composition. I wound up using five of the circles in total. Merge the crochet frame elements together so they're in one easy-to-move layer.
Step 4
Quick break from the tutorial itself to show you my composition so far. We have both scanned photographic elements and illustrated elements along with manipulations by way of Blend Modes. I added a Drop Shadow to both the crocheted moon layer and the teal frame layer using the same attributes as those done in Section 2, Step 1 with some slight changes in the shadow's angle.
Step 5
In order to color the drawn design elements, make a New Layer above the entire composition and set the Blend Mode toMultiply. Then, using the Brush Tool and the default Hard Round brush, color in the drawn elements in shades of orange, yellow, brown, and gray.
Step 6
Once again, here's my piece so far with drawn elements colored in (almost completely). Note how the drawn leaves are in tones of brown and gray, whereas the crocheted leaves are yellows, oranges, and reds. This keeps these layered leaves from being lost amongst each other and brings some of the blue and green tones of the background into the main composition.
4. Creating Sewn Elements
Step 1
Make a New Layer above all of the others and apply a Gradient Overlay within the Blending Options of the layer with the following attributes:
Blend Mode: Multiply
Opacity: 100%
Gradient: Transparent to light brown at 100% Opacity.
Style: Linear
Angle: 90°
Scale: 100%
Additionally, add a Drop Shadow to the same layer with the following attributes:
Blend Mode: Multiply
Opacity: 75%
Angle: 146°
Distance: 5 px
Spread: 0%
Size: 5 px
Step 2
On the newly created layer, draw a path along the contour of the felt tree within your design. Set the stroke's color to light brown or white. Set the stroke's Weight to 1 pt and the Stroke Options to Dashed Line. If you hit More Options within Stroke Options, you can create an assortment of customized dotted or dashed lines by changing the size of dashes and gaps.
Step 3
Use the dashed lines and layer style created in Steps 1–2 of this section to draw stitched lines that follow the contour of the felt tree. I found it easiest to do this with the Pen Tool, but you can skip the previous step and simply draw small dashes with the Paint Brush Tool if you'd rather.
Step 4
Use the Ellipse Tool (U) to draw a large circle path over the orange moon element in your design. Stroke the path with a dashed line in the same way you did for Step 2 of this section. Set the stroke color to white, though, and the layer's Blend Mode to Overlay. I also added a subtle Drop Shadow to this layer.
Step 5
Outline the hills, leaves, and moon elements in either dashed lines or quickly drawn hatch lines along the contour of the photographic elements. Make sure the lines are white and that you set the layer (Rasterize path layers and Merge them together into one embroidered style layer) to Overlay in the Layers panel. Apply a subtle and simple Drop Shadow to this layer as well (I used the same settings from Section 2, Step 1).
Well Done, You're Through!
Another fun Halloween-inspired tutorial has come to an end. I hope you enjoyed using drawn and photographic elements to create an illustrated collage piece. Show off your design in the comments section below. Or, create your own craft-inspired design elements and share that piece instead! If more crafting takes your fancy, learn sewing and crochet techniques over at our Crafts & DIY section here on Tuts+.
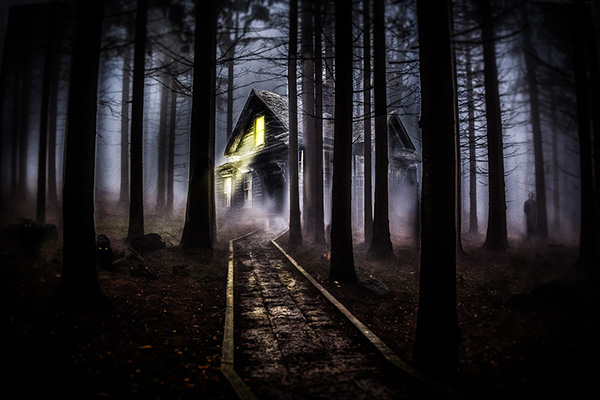
In this tutorial, you'll be creating a spooky cottage in the woods using Adobe Photoshop. You'll learn about a range of photo manipulation tools, and will see how you can add visual effects to convey a Halloween mood. So get ready to add an atmosphere of terror and dread to this quaint little cottage in the woods!
Tutorial Assets
You will need to download the following images to follow along with this tutorial. They are free from www.pixabay.com but do require a user registration.
Before we can just drop any old house into a forest, we need to do a bit of remodeling. Of course, the house needs to look dilapidated and abandoned. But it also needs to fit the environment we aim to set it in.
Step 1
Open the abandoned house image called abandones-house-177105.jpg in Photoshop. Craft a selection around the main portion of the house, ignoring the additions to the structure on the far left and right.
Step 2
Copy the house selection to a new layer with Layer > New > Layer Via Copy (Control-J), and then delete the original background layer. This is so that the resulting smart object isn't carrying additional pixels.
Step 3
Create a selection around the door and copy it to new layer. Then go to Edit > Transform > Flip Horizontally and reposition the door to cover the first window on the left side of the house.
Step 4
The bright shine on the rest of the windows will not work for our dark forest setting. Momentarily hide the door layer and create a selection around the top portion of the first window (the one without a bright shine on the glass). Copy that to a new layer and reposition over the top portion of the second window. Use Edit > Transform > Distort to fit the window into the new position. Copy the layer twice more and position over the other windows too.
Step 5
We are done with the basic house preparations. Now we can place our creepy house into a spooky forest setting. Reveal the door layer again and save this file as House.psd and close the file.
2. Enter the Forest
Forests are a beautiful slice of nature! Perfect for a quaint little cottage. Except, of course, on a dark and foggy night! Then they are truly terrifying.
Step 1
Open the misty forest scene file, pine-273828.jpg. Then deposit the house as a smart object by going to File > Place > Place Embedded and choose the House.psd file. Position and scale the house so that the path appears to lead up to the doorway.
Step 2
Duplicate the background layer with Layer > Duplicate Layer and place the copy over the top of the house layer so that it hides the house completely. This will serve as the foreground forest area.
Step 3
To create the semi-transparent areas of the fog, set the image Luminosity by going to the Channels panel. Control-Click on the composite RGB channel to load the bright areas as a selection. Then return to the Layers panel and hold down the Alt key while pressing the New Layer Mask icon. This will turn the selection into a layer mask, but invert it too!
Step 4
The foreground trees need to be completely opaque, and right now they are semi-transparent. Make sure the layer mask is still selected and go to Image > Adjustments > Levels (Control-L). Pull the right-most handle towards the center to increase the contrast until the house is not visible through the tree trunks.
Step 5
Some of the tree trunks that should be behind the house appear faintly in front of it. Correcting this requires manually brushing the mask with a soft-edged brush. Set the paint color to black and the brush Opacity to 10% and slowly build up the effect, using multiple strokes, until the wayward tree disappears behind the house.
Step 6
Enhance the effect by creating a duplicate forest layer. Set the blending mode to Multiply and reduce the Opacity to 66%. Then use a large, soft-edged, black brush on the mask to make the doorway area of the house slightly more visible.
Step 7
To start creating the atmospheric effects, add a Photo Filter Adjustment Layer and set the filter to Deep Blue and the Density to 33%
Step 8
Duplicate the Photo Filter and set the blending mode to Soft Light and reduce the Opacity to 36%. Then use a Radial Gradient on the mask going from Black to Transparent, to remove the effect from the foreground path area.
Step 9
The house is slightly off color from the rest of the forest scene. So add a Hue/Saturation Adjustment Layer and clip it to the House layer. Leave the Hue at 0, and set the Saturation to -27 and Lightness to -21.
Step 10
Even in this heavy fog, the house appears a little too washed out. Increase the contrast by adding a Curves Adjustment Layer clipped to the top of the house layer as well. Then adjust the curves to create a gentle S-shape. Be careful not to brighten the house, instead keeping the curve points below their original position so the overall effect is darker.
3. The Fog Creeps In...
The mist obscuring visual elements is part of what makes the scene so spooky. The very idea that there arethings out there that we can't see. We always assume they can see us through the same fog though. Maybe ghouls have "fog-vision"?
Step 1
Add a new layer over the house adjustment layers called Gradient Fog. Use a Linear Gradient set to Foreground to Transparent. Set the foreground color to 756860 and create a gradient rising up from the bottom of the scene. Because this layer is still behind the foreground tree layers, it won't be as visible along the path, but mostly seen at the base of the house.
Step 2
The fog is too smooth and perfect; it needs some variation to appear more realistic. Go to Filter > Noise > Add Noise. Set the Amount to 10%.
Step 3
Target the House layer and create a selection just around the top window. Go to Layer > New > Layer Via Copy (Control-J) to copy the window onto a new layer. Move that layer up over the Gradient Fog layer.
Step 4
Give the window an unearthly yellow glow by clipping a Hue/Saturation Adjustment Layer to the Window layer. Check the Colorize box and set the Hue to 55, Saturation to 100 and Lightness to -21.
Step 5
The yellow window needs a spooky glow. Add an new layer to the very top of the stack called WindowGlow. Create a rough selection around the window frame and fill it with the bright yellow ebe47a. Cancel the selection with Select > Deselect (Control-D) then set the Blend Mode to Screen. Go to Filter > Blur > Gaussian Blur and use a Radius of 20 pixels.
Step 6
A light of that brightness would cast a visible area glow in the heavy fog. Add a new layer, AreaGlow, then use the Polygonal Lasso Tool (L) to create a selection in the shape of a light beam shining out from the window. Use a Radial Gradient from the same yellow color, ebe47a to transparent. Start the gradient up in the window and stretch it out to the end of the beam selection.
Step 7
Set the Blend Mode to Soft Light and reduce the Opacity to 60%. Then go to Filter > Blur > Gaussian Blur and use a Radius of 5 pixels.
Step 8
The light beam should have more impact on the appearance of the house behind it. Control-click the AreaGlow layer to create a selection and then add a Brightness/ContrastAdjustment Layer. The selection automatically becomes the Layer Mask on the adjustment layer. Set the Brightness to 33 and the Contrast to -50.
Step 9
The fog could use some variation to break up the solid appearance. So let's create a swirling, undulating fog texture of our own! First create a new layer, FogSwirlTexture. Then tap the D key to set the colors to Default black and white. Go to Filter > Render > Clouds to fill the canvas with the cloud texture.
Next go to Filter > Filter Gallery and choose the Chrome filter from the Sketch folder. Set the Detail to 0 and Smoothness to 10.
Then finish off the texture with Filter > Blur > Gaussian Blur using a Radius of 10 pixels.
Step 10
Create a rectangular selection over the fog texture and copy it to a new layer with Layer > New > Layer Via Copy and name it AreaGlowTexture. Hide the original texture layer and transform the AreaGlowTexture layer to roughly fit over the window area glow. Brighten the texture with Image > Adjustments > Levels (Control-L) by sliding the right-most handle towards the left.
Step 11
Set the Blend Mode to Overlay and reduce the Opacity to 80%. Then Control-click on the AreaGlow layer to create a selection to use as a Layer Mask.
Here's how your project should look at this point. Things are starting to get seriously creepy! But they are about to get even worse!
4. Create Spooky Lighting Effects
The fog plays with light and shadows in interesting ways. creating another subtle nod towards spookiness, because the way the light dissipates in fog feels unfamiliar to us.
Step 1
Create a new layer called DarkerMist and set the Blend Mode to Hard Light and the Opacity to 62%. Control-click the House layer to create a selection and go to Select > Inverse to select the area other than the house. Grab a large, soft-edged brush and keep the Brush Opacity at around 15%. Hold down the Alt key and sample a dark color from the fog. Then gently paint in darker areas surrounding the roof of the house.
Step 2
Cancel the selection with Select > Deselect (Control-D). Add a new layer just under the WindowGlow layer and name it HouseShadows. Set the Blend Mode to Multiply and the foreground color to default black. Still using the soft brush, paint in darker shadows on the house. Focus on creating shadows under the eaves and inside the doorway. If the shadows develops too quickly, reduce the layeropacity.
Step 3
Create another layer over the HouseShadows layer and name it YellowGlow. Set the Blend Mode to Color Dodge. Go to the Channel panel to select the image Luminosity again by Control-clicking on the RGB thumbnail. Then use this selection as a Layer Mask on the new YellowGlow layer.
Step 4
Make sure the YellowGlow layer is the active layer, not the mask. Use the brush now to paint in spills of yellow light (paint color bbb84e) along the pathway and the inside edge of the trees. The luminosity mask makes sure the paint is only applied to the highlight areas, which makes this step considerably easier!
5. What Lurks in the Dark?
To make the scene truly terrifying, it needs a few hidden surprises. The bright window always draws the eyes, but once the viewer begins to explore the scene, let's reward them with a few spine tingles!
Step 1
Add a new layer named Silhouette over the YellowGlow layer. Hold down the Alt key to sample a darker grey color from one of the tree trunks. To the far right, near one of the trees, use a soft-edged brush to sketch in a vague human shape.
Step 2
Let's turn the shadow into a ghoul. Go to Edit > Place Linked and choose the skull image named skull-219795_1280.jpg. Set the Blend Mode to Color Dodge and the Opacity to 20%. Scale and position the skull layer so that it fits inside the hood area of the shadow. Then add a Filter > Blur > Gaussian Blur with a Radius of 1.0 pixels.
Step 3
Open the image of the cat named cat-174526.jpg. (That's the file name, I highly doubt that's the cat's name). Use the Quick Selection Tool to select the cat's eyes and go to Edit > Copy (Control-C).
Step 4
Back in the main project file, go to Edit > Paste (Control-V) todeposit the eyes as a new layer. Change the Blend Mode to Screen, so that only the bright yellowish-green is visible. Scale the eyes down to an appropriate size and hide them in the shadow area. A quick touch of Filter > Blur > Gaussian Blur with a 1.0 Pixel Radius will help the eyes blend in more seamlessly.
Step 5
Duplicate the eyes layer to put in other shadows around the woods. The idea is to give a sense that the viewer might be surrounded by unseen creatures of the night!
Step 6
Add some swirling mist to the walkway by duplicating the FogSwirlTexture layer. Use the Edit > Transform > Perspective tool to make the texture generally match up with the walkway's perspective. Set the Blend Mode to Overlay and the Opacity to 29%. If hard edges are visible, use the Eraser (E) tool with a soft-edged brush tip to remove them.
Step 7
Reveal the original FogSwirlTexture layer again. Set the Blend Mode to Overlay and the Opacity to 27%. Add a Layer Mask and use a Linear Gradient going from Black to White on the mask to fade the texture away as it moves further up from the ground.
6. Finishing Effects
To cap off the piece, let's use a technique that makes the scene feel as if even the trees are reaching in to get us!
Step 1
Hold down the Alt key and go to Layer > Merge Visible to create a merged layer at the top of the layer stack. Then go to Filter > Camera Raw Filter. In the Basic tab set the Clarity slider to 100 and the Vibrance to 5.
After applying the Camera Raw settings, your scene should now look similar to this.
Step 2
Add a layer named Burn above the Merge layer. Go to Edit > Fill and choose 50% Gray from the Content options and hit OK. Change the layer's Blend Mode to Overlay so the gray fill is rendered completely invisible. Then using the soft-edged brush, loaded with black paint, gently start darkening the main shadow areas.
Here you can see the areas we chose to darken with this technique.
Step 3
Add a new layer named Dodge. Fill it with 50% Gray the same way the Burn layer was filled. Again, set the Blend Mode to Overlay. This time, use white paint on the layer to accentuate the highlights of the glowing window and the reflection of light along the path.
Here's a clear look at the Dodge layer to see the painted highlight areas.
Step 4
Create another merged layer by holding down the Alt key while going to Layer > Merge Visible.
Step 5
Go to Filter > Camera Raw Filter. In the Basic tab, set the Contrast to +42 and the Clarity to +39.
Switch to the Lens Corrections tab and set the Distortion to -25 and the Vertical to +10. This adds a subtle distortion effect that makes the trees appear to be bending inwards, which adds to the disconcerting appearance of the scene.
In the Effects tab, set the Grain Amount to 30 with a Size of 25 and Roughness of 50. This adds a film grain effect, which is another subtle nudge towards the overall creepiness of the scene.
Step 6
The final effect to add is a lens blur vignette that will blur the outside edges of the scene, and help to keep the focus on the center. Go to Filter > Blur Gallery > Iris Blur. Keep the Blur set to 15 px, and draw out the blur ellipse to fit just inside the bounds of the canvas area.
Conclusion
So here's our final Spooky Forest scene.
I hope this has been as fun and exciting a project for you as it was for me. I love finding new ways to communicate mood and expression visually. The wide range of photo manipulation tools in Photoshop can be used greatly for this effect. At several points in this project we used subtle visual effects to communicate the desired mood. Usually, the goal in a project like this isn't to make something look realistic, but rather idealistic. So we end up with sharper details, more vivid colors, and ultimately a more interesting scene.
If you'd like to see more examples of fun photo manipulation projects, be sure to check out my profile here at Tuts+.
This CorelDRAW tutorial focuses entirely on creating elements from basic shapes using a small selection of the program's shape tools. Additionally, we'll play with some of the tools, toolbars, and dockers dedicated to altering said shapes. Join me in firing up CorelDRAW X7 to create a simple harvest pumpkin with rectangles and ellipses.
1. From Rectangle to Pumpkin
Step 1
Create a New Document and draw a rectangle with the Rectangle Tool (F6). Select the newly drawn rectangle and in the Property Bar, you'll find options for altering the shape and radius of its corners. Choose Round Corners and enter 2.0" for the Corner Radius.
Step 2
In order to adjust the shape's nodes, select the rounded rectangle and hit Convert to Curves (Control-Q). Using the Pick Tool, Scale the rounded rectangle inward so it's thinner. Then, use the Shape Tool (F10) to adjust the shape's nodes so the top of the shape is narrower than the bottom (see below).
Step 3
Copy (Control-C) and Paste (Control-V) the rounded rectangle shape and, using the Pick Tool, Double-Click the copied object so you can rotate it toward the center of the design.
Copy and Paste the shape on the left and hit Mirror Horizontally in the Property Bar. Once again, adjust the nodes of each shape with the Shape Tool so you've got more of a lumpy pumpkin look.
In Object Manager, place the two side shapes behind the center shape. Paste another pumpkin section behind the three objects already drawn. Rotate it to the center, Scale it down, and adjust the nodes as needed.
I opted for six objects total. Group (Control-G) your pumpkin shapes together.
Step 4
Select each section of the pumpkin in Object Manager and in Object Properties (Alt-Enter),change the Outline to null and each object's Fill color to a varying shade of orange. From front to back, I chose these four shades:
#FFB02D
#FF9C1E
#FF862C
#FF782C
Copy and Paste the pumpkin group and Ungroup (Control-U) the objects. With all of them still selected, hit Weld in the Property Bar. When you Copy and Paste an object, you'll notice it's already aligned with its parent item. Push the welded object behind the pumpkin group in the Object Manager and set the Outline to dark orange (#F74A00) at 4.0 pt Weight.
2. From Ellipses to Leaves and a Stem
Step 1
Use the Ellipse Tool (F7) to draw a circle (hold Control to keep it uniform in shape).
Hit Convert to Curves in the Property Bar and use the Shape Tool to pull the right node out to the right, extending the shape into a sideways teardrop.
With the Smear Tool, select Pointy Smear in the Property Bar and bring the right side to a point. Adjust the tool's size and pressure to your liking.
Switch to Smooth Smear and carefully brush it across the leaf shape so it looks longer and more like a wiggling, waving leaf.
How extreme of a shape your ellipse becomes is up to you. My final shape is seen below.
Step 2
Place the leaf on the top of the pumpkin. Scale and Rotate as needed. Copy and Paste the leaf so you have two of them. Add an Outline of 2.0 pt Weight in the Object Properties docker.
Draw an ellipse that bisects the first leaf.
In the Property Bar, change the drawn shape from Ellipse to Arc. Set the Outline color to match the leaves' outline color.
Select both the arc and leaf, and hit Intersect in the Properties Bar. Delete the arc object in the Object Manager and set the newly created shape's Outline to 2.0 pt Weight.
Copy, Paste, and Rotate for the second leaf. Make sure the leaf's vein is behind the first leaf in the Object Manager.
Step 3
For the stem, we'll use two alternate shape tools.
Start with the 3-Point Ellipse Tool and draw a line that takes up the width of your stem.
After clicking with your mouse, drag the tool upward to create the ellipse. Keep it horizontal and relatively narrow.
Set the Fill color to brown (#996633).
Use the 3-Point Rectangle Tool to drag a line across the width of the ellipse and pull a rectangle down to the length of your stem.
Set both of the objects at brown for the Fill color and null for the Outline color.
Copy and Paste the ellipse twice and place one at the bottom of the rectangle. Weld one of the top ellipses, the rectangle, and the bottom ellipse together.
Step 4
Change the welded object's color to a darker brown (#663300).
Use the Shape Tool to select the nodes of the bottom of the stem shape and bring them inward.
Keep the bottom rounded by adjusting both nodes and node handles. Group the two objects together.
Place the stem underneath the first three sections of the pumpkin (you will likely have to Ungroup these objects to place it). Add a dark brown Outline to the main stem shape of 2.0–3.0 pts Weight.
Step 5
Under the Polygon Tool (Y) in the Toolbox, there are a plethora of custom shape tools. Grab the Spiral Tool (A), set the number of Spiral Revolutions to 2, and chose Logarithmic Spiral. Draw a couple of spiral shapes and place them near the stem and leaves.
Great Job, You're Done!
You've learned the basics of CorelDRAW, running through the Ellipse Tool, Rectangle Tool, Property Bar, Object Manager, Object Properties, and Smear Tool. What other objects can you create with assorted polygons and custom shapes? Show us your pumpkins or other Halloween designs in the comment section below!
Have you found your excuse to paint gore today? Well here it is! With Halloween just around the corner it's exquisitely tempting to find a balance between horror, gore, and beauty. And in this tutorial, I demonstrate the evolution of a digital painting from start to finish by creating a hauntingly beautiful Egyptian goddess. My tools of choice are Adobe Photoshop CS3 and an off-brand pen tablet I purchased on eBay. My process involves a whole lot of experimentation, a little bit of hope, and a handful of adjustment layers. Learn the techniques to bring out the best in your next piece!
Tutorial Assets
The following asset was used during the production of this tutorial.
Let's begin! Many start with a resolution of 300 dpi but since I want this sketch done as quickly as possible, I'll begin with 72. In the long run, this step bypasses the initial lag I sometimes experience when preparing a new painting.
Next, the canvas and de-saturated reference are placed side by side so that it's much easier to look over and draw my subject. Realize the full potential of your references! By simply duplicating and flipping the image, I am able to utilize her hand in the position I prefer.
Though the background layer is set to the traditional white, I'll be using a gray, round brush with a hard edge to illustrate my sketch.
2. Prepare the Sketch
Step 1
Not quite beautiful yet, but getting there. It's important to recognize the imperfection here. I focus on the general position of all the elements before moving onto likeness.
Step 2
Changing the color from gray to black, I outline the major details using my initial sketch as a guideline. A bit of gray peeking underneath helps train my eyes to notice depth, and surrounding the subject with a darker background furthers this trick.
With the sketch finished, I can finally set the resolution to 300 dpi for the remainder of this piece.
3. The Initial Grayscale
Step 1
Simply put, painting in grayscale is a lifesaver! By focusing on the tonality of a piece first, color doesn't become a distraction. Keep in mind, however, that color will be an important element of the piece later on. But for now, the combination of a great chalky brush and gray values sets me on a clear path.
Chalky brushes remind me of traditional art. I like to start with them because they allow me to build the kind of texture I can't normally achieve with smooth, round brushes.
Step 2
New adjustment layers are great for adjusting the entire piece, especially when you're working with more than one layer. I could spend a huge amount of time painting darker tones to deepen my subject, but in this case I'll just cheat by using Layer > New Adjustment Layer >Curves. With the RGB Channel selected, I pull down to give my subject the darker feel I originally intended.
Step 3
See, now the painting pops out and she's slowly coming alive! After the Curves adjustment I grab the chalky brush again to give the goddess definition.
4. Smoothing Out the Texture
Blending with textured brushes isn't really ideal, especially with female subjects. This is about the time when I would grab a soft, round brush to smooth out all the tones applied. A brush with a lower opacity (usually 1–50%) is great for blending, while a heavier brush tends to overwhelm the underlying tonal work.
5. Defining Facial Features
Step 1
Although her skin is smoother, Cleopatra's face is now sadly flat. So it's time for surgery! I decided to paint in stronger cheek bones to emphasize the light and shadows, and filled out her lips.
The painting starts to pull away from my reference's likeness over time. When new lighting conditions and features are introduced into the equation, you must change gears in your approach. Only then will you find balance in making these new elements work.
Step 2
Now I can't forget the blood! On a new layer I paint several long strokes that drip down the neck. I set this layer to Multiply to give it a filmy, opaque texture. This layer will be hidden until I need to transition into color.
Step 3
Cleopatra's mega lashes have got to be my absolute favorite detail! Quick tip: paint one set of lashes first. Make sure to use a hard, round brush set to Pen Pressure. Duplicate the layer, flip it (Edit > Transform > Flip Horizontal), and adjust it for the other side! Feel free to use this quick trick whenever you need two perfect copies of one detail. Voilà, now she's a true goddess!
6. Refine the Structure
Step 1
When you've been painting for a long time, sometimes it's hard to recognize problems. Step away from your art and come back to it with fresh eyes. Here I noticed the face was too wide and didn't complement the features well, especially the eyes.
To correct this, first I merge all the layers together. Using the Marquee Tool (M), I select around the face, and choose Filter > Liquify. The Forward Warp Tool (W) is great for pinching in the temples and cheeks, as well as straightening the nose and jawline.
Step 2
Cleopatra is looking pretty confined to the tight walls of this canvas size, so I go to Image > Canvas Size and add an inch to the width and height, making it now 11 by 13 inches. I create a new background layer by filling it with a Gradient of transitioning gray tones.
7. Add Character Through Detail
Details are what sell the story! Though I want Cleopatra to be beautiful, she's still pretty dead. The way I see the story unravel, I suspect that when she died, Cleopatra's body embarked on the traditional Egyptian mummification process. But lo and behold! She awakened from her sleep with a thirst she couldn't quite quench!
Okay, enough storytelling! My point is, throw in details that add to the richness of your story. In this case, I added more fabric bands to her arms and neck to sell the mummy look without taking away from her beauty.
8. Clean Up the Grayscale
Step 1
Through loads of trial and error, I've learned that I can save myself the headache of poor quality by cleaning up the grayscale. This forces me to commit to a solid composition before moving onto color. Using a variation of textured and smooth brushes, I continue to tweak the painting to give her more life, more detail. I also introduce a circular element behind her because strong geometric shapes are so very important to Egyptian themes.
Step 2
Using the Color Dodge blending mode, I lift out some of those darker tones in the hair by adding a soft film of white. Now I can really see the hair I painted, as well as continue to improve upon its shape.
9. Transition to Color
Finally, it's time for color! Transitioning from grayscale to color takes a lot of experimentation. And unfortunately, color mode doesn't always cut it.
Here I take five separate layers of different Blend Modes to apply the initial color to this painting. I start with a layer of brown set to Color, a layer of green set to Pin Light, a dusting of blue set to Color, and a purple filled layer set to Color. I finish this initial trial run with an Overlay of red for the best part—the blood. Although it might seem like a wacky way to apply color, I take these steps in order to save the integrity of my tonal work.
10. Correct With Layer Adjustments
I have a pretty intense love for Adjustment Layers—they always save the day. A new layer of Color Balance added balance and contrast by favoring highlights of green, while a layer for Curves brought back some of the blue I lost. The experimentation doesn't stop here. Adjustment layers simply put me one step closer to landing the color scheme I desire.
11. Add Brightness With Layer Modes
This painting is meant to be scary and dark, but not this dark. It's time to bring out the Blend Modes again! I use a warm orange color set to Vivid Light to burst out some brightness towards her head and neck. And to color the jewelry, I apply a layer of yellow set to Color Burn. Since I've lost her hair amidst the darkness again, I Overlay a dusting of pink which creates a nice golden hue.
12. De-Saturate Overbearing Colors
Step 1
I never meant to keep Cleopatra with bright orange hair. But when you apply color, you not only change the hue but also the tone. To dial back the unwanted colors but keep the lifted tone, I use a layer of white set to Color to de-saturate across the board. But I don't want to lose all of the color of course! With the Eraser Brush (E)selected, I erase the middle to show a peak of the beautiful greens, golds, and reds created from previous adjustments.
Step 2
Whenever I see the painting getting too dark, I whip out an Adjustment Layer.Layer > New Adjustment Layer > Levels is one of the easiest fixes for super-dark compositions. As I draw closer to committing to a bluer color scheme, Layer > New Adjustment Layer > Color Balance comes in handy to make these changes quickly.
13. Commit to a Color Scheme
Step 1
It's official, I want Cleopatra to be mostly blue. And that ghostly skin tone will prove to be a beautiful contrast against her golden jewelry. Oddly enough, I achieved this bluer value by setting a fill of dark brown to Difference, dialing the Opacity back to 75%.
Step 2
Time for the border! Stretching the canvas gave me more space, but I want to keep this space minimal. For the mid to lower half of the border, I dust a beautiful yellow color and set it to Color Dodge. This creates a nice complementary effect that doesn't take away from my subject.
14. Clean Up the Details in Color
Step 1
Time for clean up! This stage is crucial to sharpening details. I use a Standard Round Brush (B) with a heavier opacity (50–100%) to refine the overall painting. It's important to make sure the edges are clean and crisp, so this is when I really begin zooming in and defining everything. I paid close attention to the light and shadows, and further highlighted the face and surrounding areas like the hands and jewelry.
Step 2
Blood just screams gore! I studied the characteristics of anything liquid, from blood to water. My studies conclude that blood is darker when it's thick, and easier to see through as it thins out. I added these characteristics as the blood trickles down her neck, changing the consistency as it travels from skin, to cloth, to metal. Blending in skin colors also helps to illustrate its translucent quality, while bright white spots create beautiful, glossy shine.
15. Color Correct and Define the Crown
I want to make sure the entire color scheme makes sense, and right now the crown feels out of place. I never stop color correcting with Blend Modes, and here is where I lightly paint in some orange and set it to Pin Light. Now the color looks more authentic to gold jewelry.
Using the chalky brush from the beginning, I added texture to the crown with bits of shine so that it reads better as metal. I also decided on a beautiful red jewel to match the blood.
16. Add Texture to the Skin
Cleopatra's skin is looking pretty silky, so I want to distress it by adding veins. First I draw squiggly strokes of veins all over the skin, including the hands. Then I take a low opacity Eraser Brush (E) and gradually erase for a better transition across the skin. Remember the warrior paint from the sketch? I definitely didn't want to forget the mood it created, so I added in this detail as well.
17. One Last Color Balance Adjustment
I couldn't help myself! I focused this last Color Balance layer on punching out the red and blue tones.
18. Finishing the Details
Grabbing a hard, round brush again, I get back to sharpening the remaining details of the painting. I mostly focus on the hair and face, but quickly transition to a chalky brush.
I blend the top portion of the background with more texture, while the bottom portion is still a border. I think this gives a unique effect to the painting.
Cleopatra Is Complete!
Cleopatra is known for her seductive prowess and now her unquenchable thirst for blood!
I hope you enjoyed and had fun with this tutorial! It's important to take away that experimentation is incredibly influential on the digital art process. Don't limit yourself to rules or guidelines. Photoshop is packed with tools and settings that can bring out the best qualities in your work. Good luck, and stay hungry (just not for blood)!
Dragons are scary, zombies are scary, and what's more frightening than an angry zombie dragon? But it's just one of all these fascinating creatures you can see in your mind! In this tutorial I'll show you the process for creating a monster from scratch, from the idea, sketch and anatomy to the final clean lines. You'll learn how to bring one of your great concepts to life, making it readable for others and ready to be re-created in any other form. By the way, you'll also learn how to create a believable anatomy on the fly. You don't need any software—a pencil and a few sheets of paper will be enough.
1. Define the Pose
Step 1
Having a nice design in your mind isn't everything—your creature needs a base, a kind of skeleton to support it. The problem is it's not easy to create a skeleton for something that doesn't exist yet.
There's a rule that can help us here. Pose makes a big part of the image—it's far more important than details. It's the first thing a viewer notices, so if it's not interesting enough, your whole illustration will suffer. Here's the advice: create an interesting pose without considering the design yet.
First, describe your design in terms of actions and emotions, like: "ready to attack", "still", "alert", "disturbed", "confident", "shy", "nonchalant", "furious", etc. Second, try to picture these terms with thick, messy lines. Don't limit yourself to one pose—just transfer your elusive ideas to paper and see how they work.
For my zombie dragon I used the keywords:
furious
restless
insane
blinded with anger
So, that's your assignment: draw a few lines that are furious, restless, insane, and blinded with anger. Sketch them on a small scale, don't zoom in, and don't add any details. Don't judge, just draw them all, one by one.
Step 2
Now we need to elaborate these "lines of motion". We've got spines and maybe heads, so it's time to add some more to it. We don't need a full skeleton yet, or any details. Just add a base for legs and wings, obeying the emotion.
Having a problem here? A basic body for our dragon will be built of these simple elements. Just use them, obeying the emotions and actions you have chosen.
Head
Wing
Spine
Hips
Tail
Neck
Chest
Front legs
Hind legs
Step 3
The other criterion for concept art is to show the body features clearly, without concealing them by a complicated pose. Which of your sketches meet this requirement? Which are dynamic and interesting, but without covering important parts with a wing or neck? Choose a few, then decide which of them looks the closest to your vision.
Dynamism: 2/5; Clarity: 1/5 = 3
Dynamism: 3/5; Clarity: 5/5 = 8
Dynamism: 4/5; Clarity: 3/5 = 7
Dynamism: 3/5; Clarity: 3/5 = 6
Dynamism: 1/5; Clarity: 5/5 = 6
Sometimes you'll value clarity over dynamism, sometimes conversely. It doesn't matter what you choose—what matters is whether you know why you choose it And the winner is...
Step 4
Once we've got a basic pose, we can polish it. It's time to build a base for all the body features. This is the moment when we need to take a look at anatomy of the animal. With a dragon, it may be hard to find a good reference—every artist creates their own version. If you need some help, check my tutorial about dragons, paying special attention to the skeleton and joints. If you want to do it quickly, here's a cheat sheet.
In fact, you don't need to learn it. These are the same joints you've got in your body!
Use the previous sketch as a base and polish its lines, fixing less obvious structures.
Step 6
The pose is finished—that's the first thing your viewers will see. How do you like it?
2. Refine the Guide Shapes
The pose still needs a bit of work. When you look at it now, it could be a fat pegasus, or some weird winged lion. We need to make the shapes more readable, so that the details have no influence on the "soul" of the illustration.
Step 1
We need poses for the smaller parts too. First, wings. To understand them better, check this tutorial. Also, my tutorial on bats may be helpful here.
If you want to draw wings without any tutorial, imagine they're hands with elongated fingers The membrane will probably be torn, but we need a reference of its original look
Step 2
We need to define the head also. The position of the jaws adds a lot to the general emotion. To learn more about drawing dragon heads, check my tutorial on this topic. If you want to make it quickly, just follow these steps:
Start with the cranium Add the upper jaw and eye line Add the lower jaw by rotating the upper jaw in your mind Draw the eye socket ridges Plan the horns Sketch the horns Clean the lines
Step 3
We also need to define the exact position of the claws before going any further.
Step 4
The sketch is complete now. If you're drawing traditionally, it's good to redraw it on a bigger
scale on a new sheet. Use subtle strokes—the pose should not be visible
on the finished lineart.
3. Build the Dragon Anatomy—Skeleton
We're entering dangerous territory now—we're going to picture the anatomy of an animal that doesn't exist. The good news is, with a settled pose it's going to be very hard to break the illustration, no matter what you do now. So let's build the skeleton, bone by bone.
Step 1
The skull is the second most difficult and, in a visual sense, the most important part of the skeleton. To get it right it's good to study real animal skulls first and then construct a dragon skull out of them. I've based my skull on big cats. Do you see how I used lines to define 3D forms? I've explained this trick in this tutorial.
Once again—if you've never drawn a skull in your life, don't expect that you'll be able to draw it now. Find a reference, analyze it, draw, then repeat with another picture. When you feel that you've understood these structures, you can go further and draw something without a reference—like the skull of non-existent creature.
Step 2
Draw the main part of the straight bones by surrounding the guide lines between "joints" with straight lines.
The forearms and calves need one more bone.
Step 3
Connect the bones with a thickening of the joint. Imagine the tip of the bone as a ball with a concave or convex top—it will help you in places where a 3D view is necessary.
Step 4
Claws can be done exactly the same way.
Step 5
Do you remember what I told you about the skull? Hips are the only bones that are even harder to draw. It's because they don't have clear top/bottom and side views. In other words, classic 2D views of hips won't help you understand their shape.
I simplified the hip structure for you, but if it's still too complicated, just get around it somehow—create a placeholder for it and then cover it with muscles or skin. This way you'll finish the illustration without learning complicated stuff you won't use any more.
Step 6
Let's prepare the space for the ribcage. Draw a circle linking both arms and wings. The spine will be stuck to it on the back of the circle—use this point to draw a line connecting the shoulder girdle with the hips. In the front, draw a line that will make the sternum.
Step 7
Draw two clavicles between an arm and the top of the sternum.
Step 8
Here we've got a problem with the shoulder blades. An arm needs them to move, but wings are nothing but modified arms. Therefore, we need two pairs of scapulae! Again, this is a fantasy creature and you can just ignore this issue by adding only one pair, or even cover these bones later to avoid confusion. Draw the sternum made of two parts.
Step 9
Time for the spine. Draw it as a long, thin snake from the back of the skull to the tip of the tail.
Step 10
The spine is made of vertebrae. Each of them has a very complicated structure, but let's start with something simple. Use two ellipses for the top and bottom of a vertebra. The neck and the end of the tail will have the longest vertebrae.
Step 11
Use the guide lines to sketch the vertebrae.
Step 12
Before we go any further, we need to define the thickness of the neck and tail. We can do it simply by drawing circles, big at the core and then smaller and smaller to the tip.
Step 13
Use the circles to draw the neck and tail. Don't forget to define the sides!
Step 14
Let's come back to the vertebrae. Prepare guide lines for the appendixes with a simple line ended with a circle.
Step 15
Stress the shape they have created. Ribs will be attached under the hind pair.
Step 16
Now things will be a bit different for the neck, back, and tail.
Back
Tail
Neck
Step 17
The neck needs special treatment. Add a pair of sharp, elongated appendixes.
Step 18
Clean the shapes.
Step 19
The ribcage is the last part we need to take care of. We can borrow it from any big animal, or just use this simplified scheme:
Start by defining the space the ribcage takes. Then draw the lines for the ribs, keeping in mind the bending points (black dots).
Step 20
Our skeleton is done! It looks pretty good and you can use it as it is, but I'll show you how to make a complete zombie out of this. If your sketch has got messy by now, it's good to copy it to a clean sheet.
4. Build the Dragon Anatomy—Muscles
Let's bring some life—or death, actually—to our dragon. To make it easy we're going to use a simplified pseudo-anatomy that will look proper to a layman, but without paying too much attention to its functionality. Our goal is to create a disintegrating body, with both bones and muscles visible, so we don't need to make the musculature complete.
Step 1
Muscles are a kind of lever used to move a bone to one side or another. For this mechanism to work properly, we need to connect two bones with one or more muscles.
Create levers on the skeleton. They don't need to be very accurate, so just use your intuition! Imagine a kind of string pulling the bones closer to each other.
Step 2
Draw muscles all along the lines you've just sketched. They mostly bulge in the middle and taper at the ends. You don't need to include all the muscles—it's a zombie, after all. Leave the most eye-catching of the bones uncovered—for example, we've spent a lot of time on the spine and it would be a shame to cover such a fascinating structure.
Step 3
Time to tear the wings. You should find it easy, just remember about gravity.
Step 4
Clean the lines and add any details you like. The lineart is finished! If you want to, you can shade it to finish it as a complete illustration.
This Is Not the End!
We've created an undead dragon, but we're not finished yet! This lineart will be used for the next part of this tutorial, in which we'll create a complete digital concept art in Adobe Photoshop. Stay tuned!
In this tutorial you will learn how to create a simple spider web illustration in Adobe Illustrator. You'll start by creating the group of paths that will make up your spider web, using three paths and a basic blend, along with some Transform and Warp effects. Next, using the Appearance and Stroke panels and some basic blending techniques, you will add color and subtle highlights for your paths. Moving on, you will learn how to add a dark, subtly textured background and how to easily use a built-in symbol. Finally, you'll learn how to add a few more subtle details and how to darken your entire illustration.
1. Create a New Document and Set Up a Grid
Hit Control-N to create a new document. Select Pixels from the Units drop-down menu, enter 600 in the Width box and 540 in the Height box, then click on the Advanced button. Select RGB, Screen (72 ppi) and make sure that the Align New Objects to Pixel Grid box is unchecked before you click OK.
Enable the Grid (View > Show Grid) and the Snap to Grid (View > Snap to Grid). You will need a grid every 10 px, so simply go to Edit > Preferences > Guides > Grid, enter 10 in the Gridline every box and 1 in the Subdivisions box. Try not to get discouraged by all that grid: it will make your work easier. Keep in mind that you can easily enable or disable it using the Control-" keyboard shortcut.
You should also open the Info panel (Window > Info) for a live preview with the size and position of your shapes. Don't forget to set the unit of measurement to Pixels from Edit > Preferences > Units > General. All these options will significantly increase your work speed.
2. Create the Group of Black Paths
Step 1
Pick the Pen Tool (P) and focus on your Toolbar. Remove the color from the fill, then select the stroke and set its color at black (R=0 G=0 B=0.) Move to your artboard and simply create a 150 px vertical path. The Snap to Grid option should make this easier.
Step 2
Make sure that your black path is selected and go to Effect > Distort & Transform > Transform. Set the Angle at 30 degrees, enter 11 in the Copies box, check the middle, bottom reference point, and then click the OK button.
Step 3
Reselect your vertical path and go to Object > Expand Appearance. Make sure that the resulting group of paths stays selected and go to Object > Transform > Rotate. Set the Angle at 15 degrees and then click the OK button. Move to the Layers panel, open the existing layer, make sure that the your group is still selected, and hit the Shift-Control-G keyboard shortcut twice to Ungroup it. You will end up with a column of twelve simple paths.
3. Create the Group of Blue Paths
Step 1
Return to your Toolbar and replace the existing stroke color with R=39 G=170 B=225. Focus on the top side of your black paths and grab the Pen Tool (P). Create a 80 px horizontal path and place it exactly as shown in the first image. Once again, the Snap to Grid option will make things easier. Using the same tool, create a 20 px horizontal path and place it exactly as shown in the second image.
Step 2
Disable Snap to Grid (Control-") and enable the Smart Guides (Control-U). Focus on your top blue path and grab the Direct Selection Tool (A). Select the left anchor point, hold the Shift button from your keyboard and simply drag that point to the right until you get the "intersect" smart guide. This smart guide lets you know that your selected anchor point intersects with the black path that lies underneath. Move to the right anchor point, select it, and drag it to the left until you get that same "intersect" smart guide. In the end your entire path should match the second image.
Step 3
Focus on your bottom blue shape and make sure that the Direct Selection Tool (A) is still active. Once again, use that "intersect" smart guide to squeeze your path as shown in the second image.
Step 4
Select both blue paths and go to Effect > Warp > Arc Lower. Enter the properties shown in the following image and click OK.
Step 5
Focus on your Toolbar and click on the Blend Tool to open the Blend Options window. Select Specified Steps from the Spacing drop-down menu, enter 3 in that white box, and click OK. Reselect the two blue paths and hit Alt-Control-B (or go to Object > Blend > Make) to create a simple blend.
Step 6
Disable the Smart Guides (Control-U) and enable the Snap to Grid (Control-"). Focus on your Toolbar and replace the existing stroke color with a random red. Using the Pen Tool (P), create a 150 px vertical path and place it as shown in the following image. Select this new path along with the existing blend and simply Group them (Control-G).
Step 7
Make sure that the group with the red and blue paths is selected and go to Effect > Distort & Transform > Transform. Again, set the Angle at 30 degrees, enter 11 in the Copies box, check the middle bottom reference point and then click OK.
Step 8
Make sure that your group with red and blue paths is still selected and go to Object > Expand Appearance. Move to the Layers panel, select the resulting group, and Ungroup it (Shift-Control-G). This time you will have to hit this keyboard shortcut four times. Return to your artboard, select one of your red paths, and go to Select > Same > Stroke Color which will select the rest of the same with similar stroke color. Now that all your red paths are selected simply hit the Delete button from your keyboard to get rid of them.
4. Create the Background
Step 1
Focus on your Toolbar, remove the color from the stroke, and then select the fill and set the color at R=114 G=102 B=88. Pick the Rectangle Tool (M), and click on your artboard to open the Rectangle window. Enter 620 in the Width box and 560 in the Height box and click OK. Make sure that the resulting shape stays selected and send it to the back (Shift-Control-[ ). Move to the Layers panel, double-click on the name of this new path, and rename it "Background".
Next, you will need to center your "Background" shape, so open the Align panel (Window > Align). Set the aligning to Artboard (open the fly out menu and go to Show Options if you can't see the Align To section as shown in the following image), make sure that your shape is selected, and then simply click the Horizontal Align Center and Vertical Align Center buttons. In the end your rectangle should cover the entire artboard.
Step 2
Making sure that your "Background" shape stays selected, focus on the Appearance panel (Window > Appearance) and add a second fill using the Add New Fill button. Focus on this new fill, set the color at black, and click on the Opacity piece of text to open the Transparency fly-out panel. Change the Blending Mode to Multiply, lower the Opacity to 10% and return to the Appearance panel. Make sure that your black fill is still selected and go to Effect > Artistic > Film Grain. Enter the properties shown in the following image and click OK.
Once you're done, move to the Layers panel and lock your "Background" shape to make sure that you don't accidentally select/move it.
Step 3
Focus on your Toolbar and replace the existing fill color with white (R=255 G=255 B=255). Using the Rectangle Tool (M), create a 250 x 560 px rectangle and place it as shown in the first image. Switch to the Direct Selection Tool (A) and focus on the top side of this new rectangle. Select the left anchor point and drag it 190 px down, as shown in the second image. Make sure that this white shape stays selected, lower its Opacity to 20% and change the Blending Mode to Soft Light.
Move to the Layers panel, lock the white shape made in this step and simply drag it in the bottom of the panel, right above your "Background".
Step 4
Focus on your Toolbar and replace the existing fill color with a black. Using the Rectangle Tool (M), create a 620 x 190 px rectangle and place it as shown in the first image. Switch to the Direct Selection Tool (A) and focus on the right side of this new rectangle. Select the bottom anchor point and drag it 250 px to the left as shown in the second image. Making sure that this black shape stays selected, lower its Opacity to 20% and change the Blending Mode to Soft Light.
Move to the Layers panel, lock the black shape made in this step, and drag it to the bottom of the panel, right above your "Background".
5. Add Transparent Strokes for Your Group of Paths
Step 1
Using the same Select > Same > Stroke Color option we used earlier, select all your black paths and focus on the Appearance panel. Select the stroke, replace the existing color with white, lower its Opacity to 15%, and click on Stroke to open the Stroke fly-out panel. Increase the Weight to 2 px and select Width Profile 2 from the Profile drop-down menu.
Step 2
Make sure that the set of paths edited in the previous step are still selected, and focus on the Appearance panel. Select the existing stroke and duplicate it using the Duplicate Selected Item button. Select the newly added stroke, increase its Opacity to 30% and decrease the Weight to 1 px. Once your're done, simply hit the Control-G keyboard shortcut to Group all these paths.
Step 3
Using that same Select > Same > Stroke Color option, select all your blue paths and focus on the Appearance panel. Select the stroke, replace the existing color with white, lower its Opacity to 20%, and then open the Stroke fly-out panel. Focus on the Profile drop-down menu and select Width Profile 1.
Step 4
Make sure that the set of paths edited in the previous step are still selected and focus on the Appearance panel. Select the existing stroke and duplicate it using that same Duplicate Selected Item button. Select the newly added stroke and decrease its Weight to 0.5 px. Once you're done, Group all the paths edited in this step (Control-G).
6. Distort Your Spider Web and Add Subtle Shading and Highlights
Step 1
Select the two groups of paths that make up your spider web and Group them (Control-G). Move to the Layers panel and rename this new group "spiderWeb". Make sure that this group stays selected and go to Effect > Warp > Bulge. Enter the properties shown in the following image, click OK and go to Effect > Warp > Fish. Enter the attributes shown in the following image and click OK.
Step 2
Make sure that your "spiderWeb" group is still selected and go to Effect > Stylize > Drop Shadow. Enter the properties shown in the following image and click OK.
Step 3
Reselect your "spiderWeb" group and make a copy in front (Control-C > Control-F). Select this new group and focus on the Appearance panel. Select the existing Drop Shadow effect and simply remove it using the Delete Selected Item button.
Make sure that your group copy is still selected, go to Object > Expand Appearance and then open the Pathfinder panel (Window > Pathfinder) and click the Unite button. Fill the resulting shape with a random orange and make sure that it doesn't have a color set for the stroke.
Step 4
Make sure that your orange shape is selected, open the Gradient panel (Window > Gradient), and click on the gradient thumbnail to replace the existing fill color with the default black-to-white linear gradient.
Keep focusing on your Gradient panel, set the angle at 45 degrees, and then move to the gradient colors. Select the left slider and make sure that the color is set at white. Then select the right slider, set the color at white, and lower its Opacity to 0%. Keep in mind that the yellow zero from the Gradient image stands for Opacity percentage. Make sure that this shape stays selected, and focus on the Appearance panel. Select the existing fill, lower its Opacity to 50% and go to Effect > Path > Offset Path. Enter a -0.5 px Offset and click OK.
7. Add a Vertical Spider Web and the Spider
Step 1
Using the Pen Tool (P), create a 190 px vertical path and place it as shown in the following image. Make sure that this new path stays selected and focus on the Appearance panel. Add a 2 px white stroke and make sure that there's no color set for the fill.
Step 2
Make sure that your vertical path is still selected and focus on the Appearance panel. Select the existing stroke, lower its Opacity to 15% then open the Stroke fly‑out panel and select Width Profile 2 from the Profile drop-down menu.
Step 3
Make sure that your vertical path stays selected and focus on the Appearance panel. Select the existing stroke and duplicate it using that same Duplicate Selected Item button. Select the newly added stroke, increase its Opacity30% and decrease the Weight to 1 px.
Step 4
Make sure that your vertical path stays selected and focus on the Appearance panel. Select the bottom stroke and duplicate it using that same Duplicate Selected Item button.
Keep focusing on the Appearance panel and select the bottom 2 px stroke. Replace the existing color with black, lower its Opacity to 10% and go to Effect > Distort & Transform > Transform. Enter the properties shown in the following image (make sure that you check the top left reference point), click OK and go to Effect > Blur > Gaussian Blur. Enter a 1 px Radius and click OK.
Step 5
Disable the Snap to Grid (Control-") and open the Symbols panel (Window > Symbols). Open the fly-out menu of this panel, go to Open Symbol Library > Nature, and a new window with a bunch of symbols will open. Select the one called "Taratula" and simply drag it on your artboard. Rotate and resize this symbol then place it roughly as shown in the following image.
Step 6
Make sure that your "Tarantula" symbol stays selected and go to Effect > Stylize > Drop Shadow. Enter the properties shown in the top left window (in the following image), click OK, and add the other four Drop Shadow effects shown in the following image.
8. Add Several Subtle Details and Darken Your Illustration
Step 1
Grab the Ellipse Tool (L) and click on your artboard to open the Ellipse window. Enter 4 in the Width box and 2 in the Height box, and then click the OK button. Make sure that the resulting shape stays selected and focus on the Appearance panel. Set the fill color at white, lower its Opacity to 40%, change the Blending Mode to Soft Light and then go to Effect > Stylize > Outer Glow. Enter the properties shown in the following image and click OK.
Step 2
Multiply the tiny, squeezed circle made in the previous step (Control-C, Control-F) and spread the copies across your spider web roughly as shown in the following image.
Step 3
Enable the Snap to Grid option (Control-"). Using the Rectangle Tool (M), create a new 620 x 560 px rectangle and center it using the Horizontal Align Center and Vertical Align Center buttons from the Align panel.
Select this new shape and fill it with the radial gradient shown below. Use the Gradient Tool (G) to stretch your gradient as shown in the following image, and don't forget that the yellow zero from the Gradient image stands for Opacity percentage. Make sure that the rectangle made in this step stays selected, and focus on the Appearance panel. Simply select the existing fill, lower its Opacity to 70% and change the Blending Mode to Multiply.
Congratulations! You're Done!
Here is how it should look. I hope you've enjoyed this tutorial and can apply these techniques in your future projects.
In the following tutorial, you will learn how to create a purple monochrome portrait from a photograph, for GLAAD's Spirit Day, in Adobe Illustrator.
Millions go purple on Spirit Day in a stand against bullying and to show their support for lesbian, gay, bisexual and transgender (LGBT) youth. Observed annually since 2010, individuals, schools, organizations, corporations, and public figures wear purple, which symbolizes 'spirit' on the rainbow flag.
1. Prepare Your Photograph
Step 1
I'm going to be using a reference image of a friend from Envato Studio, Jordan McNamara, taken by fellow Envato staff member, Natasha Postolovski.
I've chosen this image as it's a clear, high-quality image (see the tutorial assets for a higher resolution download) and Jordan is smiling! For such an occasion, I feel we need a nice positive image.
Step 2
After cropping the image in Adobe Photoshop, I'm going to change the colour scheme of the image.
If you're creating a basic, line art style portrait with minimal shading, I would recommend turning your image black and white to make it easier to work from. I went to Image > Adjustments > Black & White and used the preset Maximum White to neutralise as much of the shading as possible. I then used a purple tint to get some palette inspiration.
Once I'm happy with the minor change to the image, I'm going to save it and get ready to use it in Adobe Illustrator. I'll also save a copy of the photograph in the original colours so that I can work from both images.
2. Set Up Your Adobe Illustrator File
Step 1
Create a new document and File > Place your photographs onto the artboard. If you're going to resize your images, be sure to select them both and resize them together so they are both aligned.
I then set up my layers as shown below. In the "BG" layer, I include a white filled rectangle set to Opacity 50%. This is so that I can easily see the images underneath. I prefer to work in this way rather than dimming the layer, as I can easily turn the layer on and off by using hide/unhide.
Step 2
Using the Artboard Tool (Shift-O), I change the dimensions of the artboard edges and effectively crop the image. When doing this, pay attention to your Navigation panel as this will give you a clearer idea of the composition.
3. Create Taper Brushes
Step 1
As this style requires the use of lines, it's worth creating your own taper brushes. I have a collection of home-made art brushes I use for such occasions.
The two main ones I'm going to be using are tapered at both ends and are a triangle taper brush. They both originate from a simple circle and have had their points modified and height reduced.
Step 2
Then via the Brushes panel, I create two new art brushes with the following settings:
4. Create Your Line Art
Step 1
Let's start creating the line art for our portrait. I always start by drawing the largest shapes first. When drawing these shapes, be sure that your lines intersect with each other, as we'll be using the Live Paint function later on.
I'd recommend using the Pen Tool (P) for maximum control with these lines, even if you've got a tablet. I've increased the stroke weight so that you can see the lines more clearly.
Step 2
I then continue to add the more minor lines and detailing. Don't worry about your portrait not looking true to the photograph right now. There's no style applied to the lines and they are basic shapes.
Step 3
Let's apply the custom-made art brushes to the illustration. I use the Taper Brush in places where the ends of the line do not touch other lines (pink). I use the Triangle Taper Brush in places where one end intersects with another line (blue).
Adjust the Stroke Weight of the lines in the Stroke panel depending on how delicate or deep the lines are on the portrait.
5. Render the Hair in Line Art
Step 1
I'm going to use the Paintbrush Tool (B) and the Taper Brush to render the hair on the portrait. Depending on the location of the hair, it will dictate the Stroke Weight, so adjust accordingly. For instance, the eyebrow hairs are thicker than the eyelashes.
I start with the eyebrows. While using the reference image to show you the direction of the hairs, draw around the outside first and then fill in the centre.
Step 2
I then use the reference image to begin drawing in the facial hair. You don't need to place a stroke for every single whisker, just enough to give the impression of facial hair. Be sure to follow the direction of the hair.
Step 3
I use a thicker Stroke Weight to create hair along the edges of the jawline and at the sides of the face. This will be quicker than adding a larger number of thinner strokes along these edges.
Step 4
Men have eyelashes, so remember to add them. I use a thinner stroke to avoid making it look as if he's wearing mascara. I also change the pupils to a black fill.
6. Add Purple to Your Portrait
Step 1
Time to add purple to your portrait to stick to the Spirit Day theme. I'm going to use the modified reference image and the Eyedropper Tool (I) to pick out the darkest and lightest shades of purple. I use them to fill two Rectangles (M).
I then Blend (Control-Shift-B) the shapes together to create two shades of purple in between. Once done, I Object > Expand them and add all four colours to my Swatches panel ready to be used.
Step 2
After changing the stroke colour of my line art to the darkest purple, I duplicate it and then select the core line art and Object > Expand Appearance and Object > Expand it. I then use the Pathfinder panel and select Unite to combine all the lines into one shape. This is ready to use with the Live Paint Bucket (K).
Step 3
I use the Live Paint Bucket (K) to fill in the shapes using our restricted palette. I've used all purple fills, apart from the whites in the eyes and teeth, for which I've used a white fill.
Step 4
Select your Live Paint group and go to Object > Expand. Drill into the group in the Layers panel, and remove your line art. You'll still have your original line art in another layer.
Duplicate the shapes for the face and the neck/chest area and fill them with a transparent radial gradient to create shadow around the facial hair regions. Use the Gradient Tool (G) to place the gradient sources where necessary.
I've changed the weight and colour of the line art to create a more subtle style. You'll notice that I keep on tweaking these as I go along.
7. Add Small Details
Step 1
As I'm coming to the end of my portrait, I'm going to add some small details to help refine it. The first is to use two circles with a white fill and a purple stroke to create a reflection in the eyes. The second is a circle to represent a mole on the neck. I add moles to all my portraits, even if the person doesn't have them.
Step 2
I then add a button to the shirt and use dashed lines with the Taper Brush to create stitching around the shirt. This helps balance out the level of detailing, because in the face you have plenty with the hair rendering, and there's little in the lower part of the composition.
Step 3
Finally, I use a line pattern from the Illustrator default texture pattern libraries (accessible via the Swatches panel) to add a subtle texture to the fabric of the shirt.
Before I apply the texture, I modify the pattern via Pattern Options, just to change the colour of the pattern so that it fits with the colour scheme.
Awesome Work, You're Now Done!
Thank you for joining me in this tutorial, and I hope you'll consider wearing purple for Spirit Day to show your support.
Line art is a fun style to play with in vector portraits, as it's quick and easy. Show me your line art portrait in the comments!
In this tutorial, you'll learn techniques for creating sketchy, hand-drawn line art with a stock photo, using gradients and noise effects to imitate airbrushing techniques, and using custom shape tools to create quick and easy stencil designs within their illustration. Grab your graphics tablet, open up Adobe Photoshop, and let's begin.
This tutorial design has been made to coincide with GLAAD's Spirit Day and Blog Action Day 2014's theme "Inequality".
1. Setting Up Your Document
Step 1
Create a New Document in Adobe Photoshop (I'll be using version CC 2014) measuring approximately 8 inches by 10 inches at 300 dpi. This file size is arbitrary and you are welcome to work at whatever size you feel accommodates your stock photo and design.
Open up your stock photo. I'll be using the photo seen below, which can be purchased from PhotoDune. Select All (Control-A), Copy (Control-C), and Paste (Control-V) your photo into your New Document. In the Layers panel, reduce the Opacity of the stock photo layer to 60% and select Lock All in order to lock the layer.
Step 2
The brush we'll use for the line art is an altered default brush. I've selected the Hard Round brush from the Brush Presets panel and, in the Brush panel, narrowed the brush's shape into a thin ellipse and changed the angle to 39° or so. This brush will serve as a chiseled, calligraphic-style tip for our line art. Under Shape Dynamics, select Control: Pen Pressure from the drop-down menu beneath Size Jitter.
2. Starting the Line Art With the Face
Step 1
Create a New Layer and, using the Brush Tool (B) and the brush created in the previous step, begin tracing your model's eyes. Use a dark color that isn't black. I chose dark purple (#362641). I like to start with the crease of the eyelid and the outer corners of the lashes. Doing so, I carefully drag my line, making it thinner toward the center of the face.
Go over your lines a couple times in order to straighten them out, thicken them up, and make sure they're steady. Don't worry about too many details. We're carefully selecting facial features so the detail won't overwhelm the overall design.
Step 2
Continue down the face. Draw in a thin line to indicate the bridge of the nose, nostrils (sides and openings), and ball of the nose. For the mouth, use thin lines for the top lip and thicker lines in the corners and center of the mouth. To mimic shadow, thicken up the lines under the bottom lip.
Use the Eraser Tool (E) to make sure your lines are cleaned up and steady. This is why I work at 300 dpi: I can zoom in and work on line art with the finest detail.
Step 3
For the eyebrows, I increased the size of my brush and in Shape Dynamics within the Brush panel, I set the Angle Jitter's Control at Pen Pressure. Start the brows at the center of the face and drag them outward in two movements. Even them out with the Eraser Tool and a smaller version of the same Brush Tool as we've been using.
Keep in mind what the brows look like on the stock photo. Arguably, you could carefully trace them, but I find drawing them in a couple of motions keeps your lines dynamic and full of motion.
3. Drawing the Earrings
Step 1
The earrings in my piece were created with a few simple shapes and without reference. Let's use the Brush Tool and draw them now:
Draw a simple circle. You can also use the Ellipse Tool (U), but I like how charming an imperfect circle can be.
Copy and Paste the circle. To mirror the shape, go to Edit > Transform > Flip Horizontal. Use the Move Tool (V) to drag the circle to the right. Merge Down (Control-E) your copied layer and draw a straight line (hold down Shift) in the center of the two circles.
Draw a short straight line on either side of the circles and use the Brush Tool to carefully draw a curve from the left side of the circle to the center line.
Repeat the curve on the right side.
Step 2
Continuing with the heart earring line art and using magenta (#ce3681) for the final earring line art:
Copy and Paste the shape drawn in the previous step and Scale it down by 50% or so. Place it in the center of the larger heart shape. Merge both layers down. Use the Pen Tool to trace the outline of the heart from top center around to bottom center.
Create a New Layer. Select the brush tool and make sure you're using the same chiseled custom brush created earlier in this tutorial. Set the brush Size to 4 px. In the Paths panel, hit Stroke Path with Brush.
Copy, Paste, and Flip your new heart half Horizontally. Hide the heart construction layer in the Layers panel and Merge the two new heart outlines together. Touch up your heart line art with either the EraserTool or the Brush Tool.
Copy, Paste, and Scale the heart outline down to form the central heart shape. Use the heart construction layer to align the central shape properly. Create a New Layer and use the Brush Tool to draw a straight line from the bottom of the inner heart. Draw another line perpendicular from the first line to the right of the heart design (see below).
Complete the bar shape with a third straight line on the right side of the horizontal line.
Step 3
Make another New Layer in the Layers panel. Use the Pen Tool to draw a simple plus-sign shape using the rectangle drawn previously. Delete any layers with construction lines, clean up the earring design, and Merge any layers containing earring components down.
4. Completing the Line Art
Step 1
Continue tracing your stock photo. In this case, I originally wanted to use the same hairstyle as that worn by the model in the photo. It's at this point that you can decide which parts of the photo you'll continue utilizing for your final art piece. Make sure components like hair, hands, etc., are drawn on a separate layer (for now) so they're easy to edit if and when you change your mind.
Step 2
Place the earring within your composition. Use the Ellipse Tool to draw small circles above the earring charm, and stroke the lines in the Paths panel.
Step 3
If you're changing the hair of your stock photo's model, you'll find the next few steps helpful. Create a New Layer and use a small brush (again, it's the same chiseled brush I've been using throughout the tutorial) to begin drawing in the model's bangs.
I started at the top of the head and drew out and downward toward her eyebrows. Optionally, you can use another photo reference for your hair design.
Step 4
To help with the placement of my model's hair, I hid the stock photo layer, created a New Layer, and drew lines to loosely define the placement of her head and facial features. This allowed me to get the correct angle of her hair. I deleted the construction line layer when I no longer needed it.
Step 5
I completed my line art below. Note how the lines toward the outside of the design are thicker and more playful than some of the other lines within (especially those in the hair). Once your line art is finished, Merge Down your layers, delete any construction line layers, and get ready to continue on with airbrushing effects.
5. Coloring the Figure
Step 1
My main color choice for this design is pale purple (#ecd4f6). I created a New Layer and used the Pen Tool to trace the contour of the model, filling in the closed shape with a flat color in the Paths panel.
Step 2
Make a New Layer above the others and use the Gradient Tool (G) to drag a Linear pastel gradient across your document. I chose the Yellow, Pink, Purple gradient found under Pastels in the Gradient Tool's options.
Set the layer's Blend Mode to Soft Light in the Layers panel. I've hidden the purple color layer so that you can see the gradient's layer's effect below. It'll be more apparent in the next step.
Step 3
I highly recommend using gradient colors that complement the fill color chosen for your model's skin tone. In this case, it's all about pastels. Use the Move Tool to drag the purple fill color layer down and to the right slightly to offset it from the line art.
Step 4
Make a New Layer under those already being used. Grab the Brush Tool and in the Brush Presets panel, select the default Chalk brush and lower its Opacity to 60% and Flow to 75%.
Step 5
Using a light color, such as yellow (#fffdda), draw a stroke around the contour of your design. I like to use this step as a way to introduce new color, sketchy lines, and texture to the piece.
6. Soft Colors with Gradients
Step 1
Create a New Layer above the purple skin layer and below the line art layer. Use the Brush Tool and chalk brush to fill in the earrings and carefully draw eyeliner on the model. Then go to Filter > Noise > Add Noise and apply the settings of your choice.
I opted for a Uniform amount of 10%. Make sure to also select Monochromatic in the dialog box that pops up.
Step 2
Create another New Layer above the one made in the previous step. Grab the Gradient Tool and in its settings, choose Radial Gradient that goes from Foreground to Transparent with White as the foreground color.
Draw small Radial Gradients on the mouth, carefully layering them. Repeat on the eyes for a light dusting of eye shadow. Use the Eraser Tool to clean up the white gradient from outside of the eyelids and mouth.
Step 3
Let's use soft gradients to mimic airbrushing on the body.
Once again, make a New Layer and use the Gradient Tool to draw small, layered Radial Gradients in purple (#9e57d7) on the shoulder and hands.
Lower the Opacity of the tool or the layer if you find the gradient color is too intense.
Erase the gradient from the chest where it meets at the hand.
Use the Move Tool to drag the purple gradient layer down and to the right a bit, just as we did in Section 5, Step 3.
Step 4
Much like the white gradients on the face, we'll layer them up on the hair too. Make a New Layer above the other gradient ones and use the Gradient Tool to draw soft White to TransparentRadial Gradients in the hair. Erase any portions of these gradients that appear on the face.
7. Stenciling Butterflies
Step 1
Create a New Layer and use the Gradient Tool to layer small, soft Radial Gradients that go from Foreground Color to Transparent. I chose various shades of purple, blue, teal, and pink, and scattered the gradients around the model's head.
Step 2
Use the Custom ShapeTool and choose a butterfly from the Nature shape set.
Draw a butterfly with the Custom Shape Tool and hit Load Path as Selection in the Paths panel. Copy and Paste the selected gradient section.
On the colorful gradient layer, repeat the process of drawing butterfly-shaped paths, loading them as selections, and Copying and Pasting the butterflies into the document. Vary the sizes and locations as you see fit.
Use the Move Tool to move the butterflies around your composition. Rotate them by selecting their layer and going to Edit > Transform > Rotate. When satisfied with their placement, Merge all butterfly layers together and hide the gradient layer made in the previous step.
8. Creating a Spray-Paint Effect
Step 1
Create a New Layer and once again, make several colorful Radial Gradients around the figure. Use white in the center of the figure in order to diffuse the gradients themselves. So far, it looks as if you've used an airbrush to draw several spots of color onto your design.
Step 2
Add Noise to the new colorful gradient layer. Choose 10–15% and select Gaussian for Distribution. Once again, make sure Monochromatic is selected. Hit OK when finished.
Step 3
Place this layer behind the purple skin tone layer. Note how the noise added to the gradients makes them look as if they've been spray-painted now, rather than airbrushed into the picture plane.
9. Creating Additional Stencils
Step 1
On a New Layer above the one created in Section 8, use the Custom Shape Tool to draw another shape chosen from one ofPhotoshop's shape sets. I chose Floral Ornament 2 in the Ornaments set.
Draw the ornament shape in the upper right corner of your picture plane, overlapping the edge of the document.
Hit Load Path as Selection in the Paths panel.
Step 2
Using the Gradient Tool once again with a White to Transparent Radial Gradient, carefully drag the gradient through the selection. Layer it slightly so it's not too light, but also not completely white.
Step 3
Repeat Steps 1–2 of this section to layer flowery, doily-like designs in the corners of the design. Optionally, you can complete one corner of the design then Copy, Paste, and Rotate the gradient shapes to be placed in the opposite corner.
Well Done, You're Through!
It's over! And what an end we've met. Push your design further by adding more stenciled, layered, or spray-painted elements to the design. What would your piece be like with a painted figure rather than the simple colored line art employed below? Show us your modified portraits in the comment section below. Use stock photos from PhotoDune, or make it a self portrait using your own images.
If you want to learn more about creating shapes in Adobe Illustrator, check out our new design course. In Shape Creation in Adobe Illustrator, you'll gain a thorough understanding of Illustrator's shape creation tools, giving you the confidence to create any design with relative ease.
What You'll Learn
This course will teach you how to use a variety of shape creation tools in Adobe Illustrator. From the Pen Tool to the Pathfinder, Tuts+ instructor Gary Simon will cover it all.
You’ll learn both basic tools and more advanced techniques in this course. You'll also create two projects to give you some hands-on practice: an oceanside illustration, and a poster for a coffee shop.
By the end of the course you’ll have learned all about using the Pen Tool, the Shape Builder Tool, the Pathfinder and more. You'll also have completed two hands-on creative projects, and will have the skills to start making better use of Adobe Illustrator’s shape building tools for your own design work.
Watch the Introduction
Start Learning With a 14 Day Free Trial
You can take our new design course straight away with a completely free 14 day trial of a Tuts+ subscription. Start your free 14 day trial today, to access this course and hundreds of others.
This Halloween, get your party howling with some
eyeball-popping homemade popcorn boxes. Gather a bunch of friends, turn the
lights out, and host a “Scary Movie Night”. I recommend playing “The
Exorcist”, “Texas Chain Saw Massacre” or “Dawn of the Dead”. And what more better
party prop for this celebration than a gory, single-serving popcorn box for each
of your friends, to get them screaming in
fear?
I have crafted up this tutorial for a popcorn
box printable, to bring the spook to your party. You will learn to create a
template for your work, use freehand art brushes, and take advantage of some Adobe Illustrator tips and tricks. I'll cover traditional Illustrator tools as well as new features like Perspective Distort, and will teach you how to share work on Behance, how to use Live Corner Widgets, and more.
Let’s get the party started!
1. Create and Set Up a Template
Step 1
To start, we need to create our template. Creating
a template can save you time, and you won’t need to reinvent the layout
every time you need to decorate a popcorn box. Create a new file: File > New (Command-N). Name it “Popcorn” for now, set the Size to A4, and make sure orientation is Horizontal. Click OK.
We will begin by drawing the first side of our
box template. I did the homework for you, so you won’t have to calculate the
dimensions.
I wanted to create a medium-sized popcorn box, and
because most people have A4 printers, I came up with the solution of designing
half a box template, with two sides instead of four. This way, we'll
get a bigger volume of popcorn for our guests. All we have to do is print the template
twice, and stick it together. If we created a four-sided popcorn box on A4
paper, you would need to arrange a party for small monsters.
Let’s start by selecting the Rectangle Tool (M). Click the artboard once to open the Rectangle
Dialogbox, and enter a Width of9.4 cm and Height of 14.7 cm, to define
the shape.
You need to open the Info panel (Window > Info or Command-F8) so that we can follow the measurementsfor our template.
With the Free
Transform Tool (E) chosen, you will notice you get a transparent widget
on your board, which you can grab and move around. The widget contains four icons;
choose the third one, Perspective
Distort. Perspective Distort is
always constrained, so no need to hold the Shift
key when moving the anchors.
Select the lower anchor points and subtract your
width until you reach Height of 78% (preview measurements from Info Window). If you are wondering why
we are subtracting from the base, it is to give the box a cone-like shape, so
the guests can hold the box more easily.
Now we need to create the lower fold of the
popcorn box. That will be the fold that
closes the box from underneath, so your popcorn doesn’t fall out. To get the
diameter of the base, you need to measure the distance between two base points.We can do that using the Measure
Tool. Select
the Measure Tool by pressing
and holding the Eyedropper Tool to
see it in the Tools panel.
Click
the two points to measure the distance between them, by clicking over the first
point and dragging your Measure Tool to
the second point (Shift‑drag to constrain the tool).
TheInfo panel will not only show you the
horizontal and vertical distances from the x and y axes, but also the total
horizontal and vertical distances, the total distances, and the angle measured.
So you'll see that our base distance is about W: 6 cm.
Knowing
that our base has a total of 6 cm, select the Rectangle tool (M) and create a rectangle with a Width 6 cm and Height 3.5 cm and position it under our first rectangle. The 3.5 cm
height is calculated using a little bit of basic math. Our base is a 6 x 6
square, so you need to divide the diameter of the base in half, and add an
extra 0.5 cm for the flaps to overlap, so that you can glue the folds properly later on.
Select the Free
Transform Tool (E) again, and Perspective
Distort the lower points until you reach H: 88.55%.
Step 2
To
create the second side of the box, Group
(Command-G) the top and lower rectangles of the first side together. Then drag
the group, by holding down the Shift-Altkeys. Hold down the Shift key
and you‘ll notice that the shape is constrained to moving only on a horizontal
or vertical plane. Hold down Altand
it will make a copy that is lined up horizontally or vertically. So drag the
group until the generated copy base points meet in the middle as shown below.
From the second side group, we need to shorten
the length of the bottom fold so the box close is flexible. Use the Direct Selection Tool (A) to select the
lower base anchor points. Hold down the Shiftkey and drag the two anchor points until about 1 cm is subtracted from the
height. These folds look something like this:
Close the Infopanel; we will no longer need it.
Select the second side group, then select the Rotate Tool (R). You will see the
center reference point (light-blue circle) appear in the middle of your
selection; the rotation will originate at that point. Drag it to the meeting
point of the two box sides and rotate the selection until both sides meet on
the top box fold.
The only element left out in our box template is
the side fold, which connects the top folds together. Select the Pen Tool (P), and freehand draw an
approximate 1 cm fold on the end of the second side. It doesn’t need to be perfect,
because this fold will be on the inside of the box.
Group all the elements together, center them in
the middle of your canvas, and give them all a grey Stroke of 0.15 pt, from
the Stroke panel.
In Layers
panel, double-click “Layer 1” and name the layer “Template” and lock it.
We also need to create two other layers besides
the “Template”. At the bottom of the Layers
panel, you will see the Create New
Layer icon. Click and
a new layer will appear. Change the layer's
name to “Artwork”. Drag the “Artwork” layer under the “Template” layer.
Then create another layer under “Artwork” and name it “Sketch”.
Step 3
File> Save (Command-S), and save it as Illustrator Template, which has the extension “.ait”. Or you could just
select File > Save as Template, and it
will select the “.ait” format in the dialog
box for you automatically. You will see the icon for the
file is a little different from an AI file; it has a fold on the right-hand
corner of the icon.
Step 4
Now we print the file, and sketch
the scary, gory elements on it. Or you have the option of exporting the file, File > Export. Export
into PNG format, with Use Artboards selected. The PNG Options panel will open; set Resolution as Medium (150 ppi) with Background Color of White. Open the file
in Adobe Photoshop, and start your sketching using a pen tablet, if you have one at
hand.
One one side I drew a rotting zombie eating raw intestines, an eyeball, and a finger, and on the other side I wrote the word “Scary” in slimy, melting text.
After
you are done, scan your illustration or save the file as “Popcorn_Sketch.png”.
2. Brush Setup
Step 1
File > Open (Command-O) the template "Popcorn_Box_Template.ait". When you do this, you will see that the
document’s name is “Untitled”. That’s
because when you open a template, you open a new version of it, so you can
create a brand new document with it, without overwriting any existing work and
settings.
Select the “Sketch”
layer in the Layers Panel. Then File > Place, and select “Popcorn_Sketch.png”. A graphics pointer will appear with a small
preview of your selected image. Drag the loaded graphics pointer, and place it
on the upper left corner of your canvas. This will place your image exactly
under your template. If you don’t get it right the first time, just select
your image and drag it into position.
Double-click the “Sketch” Layer, and the Layers
Optionspanel will open. Select Lock and Dim Images to 50%. Click OK.
File> Save (Command-S), and save the file as AI. Name it Zombie_Popcorn_Box.ai. Now that our file is imported, we can prepare our art brushes.
Step 2
Before we begin tracing, we need to create a couple
of freestyle art brushes.
Make sure you are on the “Artwork” layer.
Select the Pen
Tool (P), which will allow you to draw all sorts of straight and smooth
lines, curves, and closed shapes.
Start
rendering some gothic-looking brush strokes, with spikes or blood-like drool
lines.
Tip: you can group several shapes
together and create a single brush for a more deadly effect. Check out the
shapes I created.
Step 3
Open
the Brushes panel (F5 or Window > Brushes).
Select
each shape you wish to make a brush out of, drag and drop onto the Brushes palette, and a New Brushwindow will pop up. Select Art Brush, and OK. The Art Brush Options
panel will open. There is no need to name each stroke, since you will identify
them by their preview. Just select Stretch
to Fit Stroke Length, set the Width as Fixed,and set the ColorizationMethod asTints, so that we can give it color at a later stage.
Voila, your art brush
is created!
Now do
the same steps for all the other shapes, and fill your Brushes library.
Delete
all the shapes from your artboard after, or select all the shapes and hide
them; Object > Hide (Command-3), in case you wish to edit them
later.
Tip: Test the art brushes to make sure they
capture the effect you need, and delete the ones you don’t need from your Brushes
panel.
3. Tracing
Step 1
Let’s
start tracing! Select the Paintbrush Tool (B), and pick a brush from the Brushes panel with a black stroke and a size of 1 pt. Then start tracing over the lines on your sketch. The key is to vary the stroke weight with your brushes. It’s all a matter of variety. Use a bit of trial and error, and see what
works for your design.
Have a look what I accomplished with just the Paintbrush Tool
(B).
Step 2
You will notice that we left some parts out while tracing the illustration. That’s because we will fill those
parts in with the Pen Tool (P).
We need to Select > All (Command-A) to
single out all the line-work, and lock these lines so that we can trace freely over
the artwork. Object> Lock > Selection (Command-2).
Select the Pen
Tool (P), with a black fill and stroke set to none, and trace over the rest of
the sketch.
Step 3
After filling out the larger parts, unlock your
strokes: Object > Unlock All (Command-Option-2).
Now you can add in the finishing touches to your
tracing and edit the shapes.
Illustrator CC (update 17.1) has a feature in
which you can easily edit the corners and paths of objects.
Take the Direct
Selection Tool (A), select an object, and on the corners you will see some new control
elements appear. These are called Live
Corner Widgets, and are displayed by a circle with a point at the center. You
can select a Live Corners Widgetand
change the shape of the corner by double-clicking on it. A Cornersdialog window will appear. Here you
can choose from three types of corner: Round, Inverted Round, orChamfer. You can also set the value and type of rounding Radius you need.
Note:
When dragging the Live Corner Widgets, note
that when the highest possible point
of the rounding is reached, it will be highlighted in red.
Step 4
Once you have finalized the details of the
artwork, lock your “Artwork” Layer. Then delete the “Sketch” layer, by dragging
it from the Layers panel to the
trash icon on that panel.
Want to show off your work in progress? You can
upload your new artwork directly to
Behance from Illustrator, if you are signed in with an Adobe ID. Click the Behance icon at the lower-left corner of
the active window, or click File> Share on Behance, fill in all the details of the work on the Share on Behance dialog, and post it as
a Work in Progress on Behance! If you don’t want to, just move on to the
next step.
4. Color
Step 1
Once we have finished tracing, we can color in the
creepy artwork.
Select
the Create New Layer icon at the bottom of the Layers
panel. Double-click the layer, and name it “Colors”. With the Pen Tool (P) selected, fill
in the space with the Fill color of
your choice, no stroke. The trick is to divide the illustration into blocks of
color at first. There is no need for perfection when tracing. All you need is
the Pen Tool (P), and learn to Arrange objects in your layer:
Arrange > Bring to Front (Command-Shift-])
Arrange > Bring Forward (Command-])
Arrange > Send Backward (Command-[)
Arrange > Send to Back (Command-Shift-[)
Step 2
Once you have filled in the main color blocks,
start adding in darker shades, by selecting a shade/hue
darker than the one originally chosen. The darker parts will make the artwork pop,
and should be applied where there are wrinkles, folds, and deeper areas to the
artwork.
Take the Eyedropper
Tool (I), and click on one of the color shades. Then double-click theFill from the Tools panel. The Color Picker
dialog window will open, and you will see a circle icon selecting the color
gradient. Drag the circle icon around to select a darker shade, and click OK. Then select the Pen Tool (P) and add a darker shade to the artwork.
Step 3
After adding in the deeper hues, we need to add
highlights to the artwork. Follow the same process as in Step 2, except select
lighter shades, and apply.
Step 4
The final step is to lock the “Colors” layer, and
give colors to some of the strokes and shapes you have in black. For example, I gave the eye veins red strokes, and added white shiny
highlights and drops to the intestines.
And We Are Done, Design-Wise!
Print your file. File >
Print (Command-P).
Cut out the template, glue the parts together, and pop
your popcorn. Fill the box and serve with a spook!
Advice: Print on A4 printing paper that's thicker than 80g/m2. Once you print and craft, make sure the glue and ink has been dry for a long time before putting in
the popcorn, or the popcorn will smell and taste like glue!
With Illustrator CC (17.1), designing and illustrating has become much easier and faster. The live corners, shortcuts and enhancements make it a fantastic
program, helping you work faster and edit your design with ease. I hope you enjoyed this
tutorial, and have learned to work with templates, render art brushes, and layer your artwork with simplicity.
For a limited time only when you purchase an InMotion Hosting plan for just $3.49/mo you'll also receive a free yearly subscription to Tuts+ (worth $180).
What Will You Get?
Your hosting plan with InMotion includes:
24/7 top rated in-house tech support
Free Softaculous one-click auto installer (includes over 310 applications)
Free cPanel server management included
Upgrade options available—check out their Reseller & VPS hosting plans
You can host the latest CMS platforms, including WordPress, Joomla, Drupal, PrestaShop, Concrete5, and many more on InMotion’s Shared Hosting platform—now with SSD Drives.
Your free yearly subscription to Tuts+ (normally $180) includes:
Unlimited access to all 400+ video courses
No ads on all 18,000+ written tutorials
5 eBook downloads per month, choosing from over 170 titles
Plus, you’ll also have access to our subscriber benefits program
In this beginner tutorial, we'll combine drawing tools and simple shape-building tools to create a spooky, Halloween-inspired pattern. All three designs within the pattern are formed from basic shapes: circles, squares, and triangles. Fire up CorelDRAW and let's bring on All Hallows' Eve!
1. Drawing the Moon
Step 1
Start by creating a New Document. I prefer to work out patterns within a square document of 8 inches or so. Your document's size is entirely up to you. Since I'm posting these designs online, I've chosen RGB for the color profile, and 300 dpi in case I'd like it to be printed or easily resized later.
Step 2
Use the Ellipse Tool (F7) to draw a simple circle. Hold down Control while drawing the circle to keep it uniform. Draw a second, smaller circle, and overlap the top right of the first circle.
Step 3
Select both shapes in the Objects Manager docker and, in the Property Bar, hit Back Minus Front to delete the smaller circle from the larger circle. You'll be left with a lovely crescent moon.
2. Drawing the Bat
Step 1
The bat begins the same way as the moon did: with a circle. Once again, grab the Ellipse Tool and draw a circle.
Using the Polygon Tool (Y), set the number of Points or Sides (in the Property Bar) to 3, and draw a triangle.
Don't worry about getting the shape just right on the first go. Using the Pick Tool, you can Scale or Rotate your triangle as you see fit.
Place the triangle on the circle, Rotated slightly to the left (Double-click an object with the Pick Tool to toggle between Scale or Rotate).
Step 2
Copy (Control-C) and Paste (Control-V) the triangle and, in the Property Bar, hit Mirror Horizontally. Place the copied ear on the right side of the circle. Use the Align & Distribute docker to Align the two triangles as you see fit (usually by hitting Align Top).
Step 3
The bat's wings are constructed from three triangles. You can draw them with the Polygon Tool, or take more control over the design and use the Pen Tool.
Each triangle has Three Nodesor Points.
Make sure your triangles are closed shapes, where you return to the origin point with the Pen Tool.
Overlap the first triangle slightly while drawing the second.
Make sure the top points of the triangles are Aligned.
Adjust the triangles with the Pick Tool to make sure they overlap and line up at the top point of each and at their bottom corners.
Step 4
Select all three shapes and hit Weld in the Property Bar. Your triangles will now be united into a single shape.
Step 5
I've Zoomed (Z) in on the top corner of the new shape created in the previous step. Using the Shape Tool (F10), Double-click to delete any extraneous nodes. Make sure that any you delete don't drastically change the overall shape of your five-sided figure.
Step 6
Now that your object is free of extra, unneeded nodes, its ready to turn into a bat wing.
Use the 3-Point Ellipse Tool draw a line along the bottom left side of the bat's wing.
Pull the ellipse outward to get the elliptical shape of your choice for the scallops on the bat's wing.
Repeat on the other two sides.
Select the main wing object and the first circle. Hit Back Minus Front in the Property Bar.
You've successfully deleted the circle from the bat wing! Let's continue.
Repeat with the other two circles and the main bat wing shape. Delete any extraneous nodes.
Step 7
Place the bat's wing next to the bat's head, overlapping slightly. Copy and Paste the left wing, Mirror Horizontally, and Align the two wings. Select all five objects and hit Weld in the Property Bar.
3. Drawing the Cat Eyes
Step 1
Start with the Rectangle Tool (F6), drawing a wide rectangle. In the Property Bar, select Chamfered Corner and enter 2" in the Corner Radius boxes. You'll be left with a simple hexagon.
Step 2
Draw a circle in the center of the hexagon. Make sure that it's large enough to nearly hit the top and bottom sides of the shape.
Use the Pen Tool to draw a curve that starts on the left corner of the hexagon, curves along the edge of the circle, and stops at the right corner of the hexagon.
Close the shape with a straight line at the origin point on the left side.
Step 3
I chose arbitrary colors so that each shape was a bit more visible for this step.
Copy and Paste the half curve shape drawn in the previous step.
Delete the hexagon object. In the Property Bar, hit Mirror Vertically.
Place the circle off to the side of your other shapes. Align the two shapes and Weld them together.
Step 4
Back to simple black outlines and white fill color for now. Make sure the circle is Aligned in the center of the almond shape.
Copy and Paste the almond shape. Use the Pick Tool to Scale the copied shape down so it fits within the circle.
Rotate the copied, small almond shape so it's sitting vertically within the circle. You've successfully drawn a simple cat's eye.
4. Completing the Design
Step 1
To complete your cat eyes, Group (Control-G) the three objects and Rotate them to the right. Copy, Paste, and hit Mirror Horizontally in the Property Bar for the second eye. Now that we have all three of our designs ready, let's add simple, flat colors to them.
Step 2
Ungroup (Control-U) any grouped components. Copy and Paste the almond shape of the eyes and set the copied shapes to a black, 3–4 pt Weight Outline in the Object Properties docker, with the fill color set to null. The other fill colors are as follows:
Almond eyes: white (#FFFFFF)
Iris of the eyes: orange (#FF9933)
Pupils: black (#000000)
Bat: purple (#9933CC)
Moon: orange (#FF9933)
Group together all of the objects below.
Step 3
I drew a large rectangle behind my main designs so that the next step is visible. Use the Star Tool to draw many five-pointed stars of varying sizes to fill up the gaps in the design. Make sure to Copy and Paste the moon and bat so you can Scale and Rotate them around the pattern.
5. Creating the Pattern
Step 1
Select everything within the design except for the black rectangle. Go to Tools > Create > Pattern Fill.
Select Vector in the dialogue box that pops up and hit OK. Once you do so, select the pattern area using the marquee provided. It's like cropping an image or drawing a rectangle over the design.
Save your new pattern with a name and tags, and decide if you'd like the pattern to be shared with other users or not.
Step 2
Draw a large rectangle and select Vector Pattern Fill under Fill in the Object Properties docker. Choose your newly made pattern in the File Picker under Personal, and choose either Shared or Private.
Your new pattern may be warped a bit. Adjust the Fill Width and Fill Height as needed.
To vary your pattern further, select either Horizontal or Vertical Row Offset and offset your design's pattern tile to the level you'd prefer. I offset my design by 30.
Fantastic Work, You're Done!
For a background, draw another rectangle behind your design. Vary your object colors further and create a whole range of Halloween pattern designs! What other holiday items can you create with basic shape tools in CorelDRAW? Flex your vector muscles and show off your work in the comment section below!
This A-Z list breaks down each tool within Sketch, including links to relevant tutorials here on Tuts+ and descriptions of what each tool can do. This list will be continually maintained and updated, so make sure you check back regularly!
#
9-Slice Image:Slice your bitmap images into nine different sections to aid scaling. You can click and drag any of the four points in the middle to adjust these sections. With this feature, your bitmap image will scale up the middle area proportionally, deforming the edges and corners as little as possible.
A
About Sketch (Sketch > About Sketch): A dialog window displaying your current Sketch version.
Align (Arrange > Align Objects): Also located on the Inspector panel. Align selected objects in a variety of ways.
Arrow Tool (Insert > Shape > Arrow): Use this when you need to create a line with a pointer at one end.
Artboard Tool (A) (Insert > Artboard): Click and drag inside Sketch’s canvas to create a new Artboard. Artboards are optional fixed frames within Sketch’s infinite canvas. You’ll find them especially useful for UI and web design when you need to limit your work area. Each artboard has its own rulers and grids.
B
Background Blur: One of the Blur options available via the Inspector Panel (for vector shapes). Pick a vector layer, check this option and it will blur all the contents behind the layer. In order for this to work effectively, you’ll need to adjust the opacity of the fill, not the layer opacity.
Background Color: Located on the Inspector Panel. Applies a background color to artboards.
Bitmap Editing: Although Sketch has little in the way of advanced bitmap editing tools, you can still perform some adjustments to pixellated content. Select an image on the canvas and double-click. You will notice the Inspector Panel update with a few special tools to perform different types of selections and actions.
Boolean Operations (Layer > Combine): You’ll find these located on the Toolbar, thought they aren’t visible by default. They present an easy way to combine shapes and create more complex paths. There are four types of boolean operations in Sketch, union, substract, intersect and difference. See their definitions for more details.
Blur: Select an object and hit the Blur option within the Inspector Panel. Choose between four different modes: Gaussian, Motion, Zoom and Background.
C
Canvas: The infinite workspace in Sketch. To center the canvas view hit Cmd-1.To zoom in or zoom out, hit Cmd-+ or Cmd-- respectively.
Close Path (Layer > Paths > Close Path): Sketch paths can be either closed or open, like any other vector editing program you may be familiar with. When a path is closed, the last anchor point in the path connects with the first. When it’s open, there’s a gap between the last point and the first. Be aware that any fills applied to an open path will be rendered as if the path was closed.
Color (Ctrl-C): The control panel to set your fill or stroke color properties. To make this visible, select a vector shape, enable the fill or border and click on the color swatch in either of them. You can also reveal the OS X color panel using the Color icon on the Toolbar (not visible by default). In Bitmap Editing Mode there’s another option named Color which fills the selected area with a chosen color.
Color Adjust: You can perform minor color adjustment tweaks when working with bitmap images in Sketch. Select an existing image on the canvas and use the Color Adjust Panel in the Inspector to do so. You can alter the Saturation, Brightness, and Contrast.
Combine Icon: All the Boolean Operations grouped into one single icon on the Toolbar (not visible by default).
Convert Text to Outlines (Shift-Cmd-O) (Type > Convert Text to Outline): This option converts the selected text layers into vector shapes. By doing this you can edit each path as you would any other shape. The same happens when using the Outline tool on the Toolbar (not visible by default).
Copy CSS Attributes (Edit > Copy CSS Attributes): Especially useful for web design, this option creates CSS declarations for borders, fills (also gradients), shadows and text styles used in the selected objects.
Crop Selection: In Bitmap Editing Mode, this removes portions of an image leaving only the selected area.
Customize Toolbar: To create your own custom toolbar right-click on the Toolbar and select this option. A new panel will appear where you can select which tools and options should be directly visible in your toolbar.
D
Difference (Alt-Cmd-X): One of the boolean operations available in Sketch. This is the inverse of an Intersect operation, showing only the are where two vector objects don’t overlap.
Distances: Get exact pixel measurements of distances between objects by holding down the the Option (⌥) key on the keyboard while keeping the objects selected.
Distribute (Arrange > Distribute Objects): You can also find this on the Inspector Panel. Distribute selected objects horizontally or vertically.
E
Edit Shape: Located on the Toolbar. Use the Edit tool to edit each of the anchor points on a shape. Alternatively, hit the Enter key while the shape is selected or double-click on it. In this way you can go through different options to edit the shape and limit the movement of the vector points using the available modes: Straight, Mirrored, Disconnected and Asymmetric. You can also round each point individually.
Export (File > Export): Also available via the Export icon on the Toolbar. Use this option to export your content to any of the available file formats: .png, .jpg, .tiff, .pdf, .eps and .svg.
Export Group Contents Only: This option is available on the Inspector Panel when you have selected a slice within a group. When checked, you will only export the layers within the group, discarding any overlapping layers outside it, or any layers behind it.
F
Fills: Sketch can fill shapes with a solid color, gradient, an image (pattern fill) or Noise. Located on the Inspector panel, you can add multiple fills to a single shape, each one with its own blending mode and opacity properties.
Find layer (Cmd + F): You can filter objects on the Layer list to find them easily. Go to Arrange > Find Layer and start typing to see how it works.
Flatten: Layer > Paths > Flatten. Also on the Toolbar. Merge a compound shape (as a result of multiple subpaths) into one single path. Use Flatten when you're happy with the appearance of your shape to keep it clean and remove any unnecessary vector point. But remember you will lost any subpath edit capability.
Flatten Selection to Bitmap: Layer > Flatten Selection to Bitmap. It works in a similar way like Flatten tool but this time, turning your content into a single bitmap layer. You can use it with one single object and multiple selections.
Flip: Layer > Transform > Flip Horizontal (and Vertical). Also right-clicking when hovering the object. Use this option to flip content right/left (mirror image) or vertically up/down.
Fonts: View > Show Fonts. Also in the Toolbar (icon not visible by default). Opens the OS X fonts panel where you can see what fonts are available on the system. Use it when you have text layers selected to change the font automatically.
Forward (Alt + Cmd + ↑) / Backward (Alt + Cmd + ↓): You can reorder layers on the Layer list by grabbing and moving it around with the mouse but you can use these options as an alternative. They're located on the Toolbar and the Arrange menu. Forward sends the currently selected layer one position further to the top. Backward sends the layer further to the background and moves it one position down on the Layer list.
G
Gaussian Blur: Apply this effect to blur an image with a Gaussian function. Located on the Inspector panel.
Gradient: Different gradient modes can be applied to fills and borders. To give a shape a gradient fill select it and click on the Fill button. At the top of the panel you can choose between a color, gradients, pattern or noise fill. The available gradients are linear, radial and angular. You will also have the option to edit gradients directly on the canvas, using the line with dots which appears over the shape.
Gradient Bar: Located on the Gradient Options Panel showing the gradient from left to right, with any additional stops in between.
Grid (Ctrl + G) (View > Show Grid): Also available on the Toolbar, this will show the default grid which has 20px squares and dividers (thick lines) every 10 squares. You can change its properties using Grid Settings option.
Grid Tool (Arrange > Make Grid): Also available on the Toolbar (not visible by default). Use this option when you have at least one object selected to create multiple copies across the canvas.
Group (Cmd + G) (Arrange > Group Layers): You can also group layers in your document using the Group icon on the Toolbar. Once you have created a group, double-click on it to view and edit its contents. The grouped content will also appear as one layer in the Layer List.
Guides: When resizing or moving layers Sketch will help you align them with other layers, automatically showing smart guides around your objects. Use Rulers to create custom fixed guides on the canvas.
H
Help: Access to Sketch’s documentation, Welcome Screen and Customer support.
Hide (Shift-Cmd-H): Also available via the Arrange menu, this option hides the current layer. It also works with multiple objects.
I
Image (Insert > Image): Also located on the Toolbar (not visible by default). Insert images into your Sketch document. If you import images while keeping an artboard selected your image will automatically become masked using the artboard dimensions.
Import: Sketch supports multiple formats for importing. Drag and drop files onto the Sketch icon in the dock, or directly into an open document. Supported files formats are: .png, .jpg, .tiff,.pdf, .eps and .svg. You can also open .psd and .ai files, but as flattened bitmaps.
Inner Shadows: Set Inner Shadows and set associated properties via the Inspector Panel to achieve a shadow effect within the selected object.
Insert: The first icon to be encountered on the Toolbar and arguably one of Sketch’s main menus. All the main tools for adding objects into the Canvas can be found here.
Inspector Panel (Alt-Cmd-2): This is the panel you'll find on the right side. It lets you adjust the settings for every aspect of your content: layers, artboards, export, tool options and much more.
Intersect (Alt-Cmd-I) (Layer > Combine > Intersect): Also available on the Toolbar.Intersects two vector shapes to create a vector comprising the areas where the original shapes overlapped.
Invert: In Bitmap Editing Mode, inverts the current selection. The area previously unselected will now be selected, and vice versa.
K
Keyboard Shortcuts: Visit Sketchshortcuts.com to get a quick reference of available keyboard shortcuts in Sketch and instructions explaining how to add custom shortcuts.
L
Layer list (Alt-Cmd-1): The Layer List located to the left contains a list of all layers (including slices and artboards) on the current page. It also shows a small preview for each item.
Layout Grid (Control-L) (View > Show Layout): Alternatively known as Layer Guides. Also available via the View icon on the Toolbar. Every artboard or page has its own layout grid which can be customized using the Layout Settings option.
Line tool (L): Creates a single stroke. Hold down Shift as you drag to constrain the angle.
Lock Layers (Shift-Cmd-L) (Arrange > Lock Layer): Extremely useful for avoiding mistakes and unexpected movements. Small padlock icons on the Layer List indicate which objects are locked.
M
Magic Wand: Available when editing bitmap layers. Use this tool to select similarly colored areas.
Make Exportable: Prepares the current layer or grouped layers for exporting.
Masks (Ctrl-Cmd-M): Used to show specific parts of other layers. For example, putting a rectangular mask on an image will only show the part within the rectangle. To create a mask, pick a shape and go to Layer > Use as Mask. From this moment any content above that mask are clipped to its boundaries. Put the mask and the layers you want to be clipped into a group if you don't want all subsequent objects to be clipped. Alternatively use the Ignore Underlying Mask option.
Mask With Selected Shape (Layer > Mask with selected shape): This automates the steps listed above. Pick two or more objects and hit the Mask icon on the Toolbar. A new group with all selected layers will be created using the bottom one as a mask.
Mask Mode: By default a mask shows specific parts of other layers. This is what we know as Outline Mask mode. However, you can tweak how masks reveal content by changing the mode to Alpha Mask (Layer > Mask Mode) and applying a gradient fill to the mask. In this case the gradient opacity dictates what is visible and what shouldn’t be.
Mirror: This connects to devices running Sketch Mirror. Mirror lets you preview your designs directly on connected iOS devices.
Motion Blur: Apply this effect to blur an image in one single direction.
N
Noise Fill: Fills the current layer with a grainy texture, giving a more realistic effect by adding a texturized style to the object. Sketch 3 comes with three additional noise effects: White, Black and Color.
O
Offset Pasted and Duplicated Objects (Sketch > Preferences > Layers): Turn this option on to offset duplicated objects from the original by 10px.
Oval Tool (O) (Insert > Shape > Oval): Use this to create ellipses on Sketch’s canvas. Hold down the Shift key while dragging to constrain movement and make a circle.
P
Pages: In addition to artboards Sketch supports multiple pages within the same .sketch file giving you multiple ways to manage and organize your content. You can add, remove or switch to other pages using the Pages section in the Layer List. Keep in mind that the Layer list only shows layers belonging to the current page.
Paste (Cmd-V): Paste contents from the clipboard onto Sketch’s canvas.
Paste in Place (Shift-Cmd-V): Use Paste in Place if you want to paste contents maintaining their original positions.
Pattern Fill: Fills the current shape using an image. You can choose between Tile (pattern) and Fill (stretched).
Pick Color (Ctrl-C) (Edit > Color Pick): Move cursor over the entire screen to pick up a color sample.
Pick Layer: Right-click on an object to take advantage of this option. Extremely useful when you have overlapping contents or grouped layers.
Plugins: Sketch supports custom plugins to expand its functionality. Use the Plugins menu to reveal all the installed plugins, to make your own custom plugin and to reveal the Plugins folder.
Polygon Tool (Insert > Shape > Polygon): Available on the Toolbar (not visible by default). Insert, by default, a pentagon onto the Canvas. Hold down the Shift key to constrain proportions. Use the Inspector panel to change the number of points and get a different polygonal shape.
Presentation Mode (Cmd-.) (View > Presentation Mode): Turn on full screen, hiding the inspector, toolbar and all other chrome.
Print: Sketch doesn’t support CMYK color mode, but you can still print your contents by going to File > Print. Note that only contents within artboards or Slices can be printed.
Q
Quit Sketch (Cmd-Q): Closes Sketch. A dialog will ask you to save your open documents.
R
Radius: Change the border radius of a rectangle or rounded rectangle shape by changing this on the Inspector Panel. Use the Corner property when you’re editing other vector shapes like Triangles or Polygons to achieve a similar effect.
Rectangle Tool (R) (Insert > Shape > Rectangle): Also available on the Toolbar (not visible by default). Select this tool then drag upon Sketch’s canvas to create a new rectangle. Hold down the Shift key to make a square.
Reflection: Creates a mirrored copy from the current object, placing it directly under the original. Use the Inspector Panel to alter its properties.
Rename / Rename Layer (Cmd-R): This changes the object’s (and therefore the layer’s) name. Also visible by right-clicking upon artboards.
Replace (Layer > Image > Replace): Changes the current image with a different one.
Reverse Order (Layer > Paths > Reverse Order): This switches the start point of a path with the end point, changing its direction. This can be useful when working with text on paths.
Revert to (File > Revert To): Sketch lets you dial your document back to previously saved versions.
Rotate Tool (Shift-Cmd-R): Also available on the Toolbar, use this tool to manually rotate selected layers. Note that every object will rotate relative to itself. Make a group to rotate multiple objects around a shared axis.
Rotate Copies (Layer > Paths > Rotate Copies): Also available on the Toolbar (not visible by default). This tool takes the current layer and rotates multiple copies of it around a certain point. All shapes will be added as subpaths to the original shape.
Rounded Rectangle Tool (U) (Insert > Shape > Rounded): Creates a rectangle with rounded corners. Change the radius via the Inspector Panel.
Round to Nearest Pixel Edge (Layer > Round to nearest pixel edge): This helps to get back your sharp edges while editing vector shapes if you suddenly notice that the edges are no longer pixel-perfect.
Rulers (Ctrl-R) (View > Show Rulers): Also on the Toolbar under View icon. Click on the ruler to add manual guides. You can move the Rulers by dragging and moving them around. You can also move your own guides in a similar way. To remove guides, drag them out of the view and you’ll see they disappear.
S
Save as Template (File > Save as Template): Save your current document as a template. To use it on a new document you can choose it from File > New from Template.
Scale Tool (Edit > Scale): Available on the Toolbar. Use this tool to proportionally scale the selected objects . You can set the height, width or the scale factor.
Scissors Tool (Layer > Paths > Scissors): Select an existing shape and select the Scissors icon on the Toolbar (not visible by default). Click on a path section in your vector shape to cut it away.
Shadows: Located on the Inspector Panel, use this to create a new shadow effect under the selected object. You can set its color, position and spread. Remember, you can apply multiple shadows to a single object, but be careful and keep an eye on Sketch’s rendering performance.
Shared Style: Select a single object then click the No shared style option on the Inspector panel. Now click on Create New Shared Style. Now you will have access to a new shared style. Use it on every object in your document to share fills, borders and special effects. Every change you make to one Shared Style is immediately reflected on all the others linked objects. Shared Styles works similarly to Text Styles and Symbols and they’re available through all pages in your document.
If you don’t want to apply a shared style but still want to replicate the same effects, you can make use of the Copy Style option by going to Edit > Copy Style. Paste it on the object you want through Edit > Paste Style.
Show Artboard Preview (View > Show Artboard Preview): Lets you preview your current artboard in a separate window.
Show Pixels (Ctrl-P) (View > Show Pixels): Turn this on to reveal the Pixel Grid. You'll see it when you zoom in.
Slice Tool (S) (Insert > Slice): Also available on the Toolbar (not visible by default). A Slice is a special layer which allows you to export a defined area on the canvas to a single file.
Special Characters (Ctrl-Cmd-Space) (Edit > Special Characters): Opens the OS X special characters dialog.
Spelling: Gives access to the spelling and grammar tools from OS X.
Star Tool (Insert > Shapes > Star): Also available on the Toolbar (not visible by default). Adds a star vector shape to your document. You can set the amount of points and radius using the sliders in the Inspector Panel.
Strip Text Style (Sketch > Preferences > Layers): When turned on, Sketch removes all font, paragraph and color information from text you paste in from other sources like web browsers or text editors.
Stroke Width (Layer > Paths > Stroke Width): The Stroke Width Tool allows you to set different widths to your borders by setting width points. You can drag these points out from the border to make the width larger or smaller.
Styled Text (Insert > Styled text): Inserts a new Text Layer based on one of the Text Styles available in your document.
Subpath: A subpath is one single part of a more complex shape. Generally, you will see the term Subpath when reading about Boolean operations and compound vector shapes in Sketch.
Substract (Alt-Cmd-S) (Layer > Combine > Substract): Also available on the Toolbar.Select two vector shapes and hit the Substract icon on the Toolbar. The result will be a vector where the area of the top shape is removed from the one under it.
Symbols: Groups of reusable content across pages and artboards in your document. Create a new Symbol by hitting the Create Symbol icon on the Toolbar while an object is selected, or through Layer > Create Symbol. Symbols are displayed as a group in the Layer List, but with a purple folder icon instead of a blue one. A Symbols icon is available in the Toolbar (not visible by default) to get direct access to them.
If you create a lot of symbols in your document you may want to organize them. Go to Insert > Symbol > Manage Symbols to do so.
T
Templates: There are a few iOS and web design templates, with symbols and styles, which come with Sketch by default. Remember you can create your own custom templates by saving your documents using the Save as Template option located in the File menu.
Text tool (T) (Insert > Text): Also available on the Toolbar. Adds a Text Layer to the canvas. Use the Text Inspector optionsor Type menu to set its properties.
Text on Path (Type > Text on path): Turn this on then move a text layer over a vector shape to see how it adapts to the path. The text layer has to be above the vector shape on the Layer List to make it work.
Text Styles: These works similarly to Shared Styles. See their definition to find out more.
Toolbar (Alt-Cmd-T): The Toolbar contains all the main tools you will need to make your documents come to life. Customize it by right-clicking and choosing Customize Toolbar.
Transform Tool (Cmd-Shift-T) (Layer > Transform > Transform Layer): Alternatively, click the Transform icon in the Toolbar then distort the shape by moving the dots in the middle and corner areas. The Transform tool can be used with multiple layers at the same time.
Triangle Tool (Insert > Shape > Triangle): Also in the Toolbar (direct access not visible by default) this adds a triangular vector shape to the canvas. Hold down the Shift key when dragging to constrain proportions.
Trim Transparent Pixels: Turn this option on if you need your exported files to have transparent pixels trimmed away from the edges.
U
Union (Alt-Cmd-U) (Layer > Combine > Union): Also on the Toolbar.Use this while keeping two vector shapes selected to get a vector built as the sum of both.
Ungroup (Shift-Cmd-G) (Arrange > Ungroup Layers): Also on the Toolbar (not visible by default). Split the current group into separated layers.
V
Vectorize: In Bitmap Editing Mode, it turns the current selection into its own shape layer. The original image remains untouched.
Vectorize Stroke (Layer > Paths > Vectorize Stroke): Also available on the Toolbar (not visible by default). Expands the border of the selected shape, creating a solid outline.
Vector Point Tool (V) (Insert > Vector): Also available on the Toolbar. Instead of using regular shapes, you can use the Vector tool to draw a vector shape from scratch.
W
Welcome Screen: Shows you interesting links to templates, support and other resources related to Sketch. You can access it again through the Help menu.
Z
Zoom In (Cmd-+) and Zoom Out (Cmd--): For zooming in and out of the document. Also available via the View menu and the Toolbar (magnify glass icon). You can make a Zoom Selection using Cmd-2.
Zoom Blur: Apply this effect to add a zoom blurred effect. Located on the Inspector Panel.
Now You Know Your ABCs
The above list gives a taste of what Sketch has to offer for creating brilliant interfaces and graphics. You can learn more about Sketch by following the regular tutorials here on Tuts+.
What is the most exciting and delightful part of Halloween? No doubt, it's trick-or-treat! In this tutorial we are going to depict a cute, furry monster who has already gathered a basketful of yummy treats. We will use basic shapes and Warp effects, Pathfinder functions, and some simple freehand drawing with the Pencil Tool. Unwind your imagination and let’s get started!
1. Start
Shaping the Monster From Scratch
Step 1
I’ve
prepared before starting my work in Adobe Illustrator by making this pencil sketch
on regular office paper. You can use my sketch for practice, or go ahead
and create your own fancy monster! Follow
this tutorial as a sample guide, learning some techniques that you can apply to your
drawing.
Start by placing
(File > Place) your sketch in the blank document.
Grab the Ellipse Tool (L), set the Fill color to None and the Stroke to any bright color (we will change that later anyway), and make an even circle
in the head area of your monster. Select all the anchor points (except the
upper one) of the circle with the Direct
Selection Tool (A) and drag them down, extending the shape.
Step 2
Repeat the
same move for the body, this time forming a bigger shape.
Step 3
Draw two
tiny arms by picking the Pencil Tool (N)
and outlining them above your sketch.
Step 4
Add two
small ellipses for the ears. Use the Rectangle
Tool (M) to add a rectangle, and then turn it into a curved shape
with the DirectSelection Tool (A)
by moving its anchor handles around.
Step 5
Go on and
add a pair of quirky horns! Make a simple pointed shape out of a circle, as we
did for his face and body. Go to Effect> Warp > Arc and set the Bend
value to about -16%, Vertical. Apply
another effect to the same shape, but this time it should be Arch Style with -22% Bend value, Vertical. You can apply as many
effects as you like and then edit every applied effect in your Appearance Panel by clicking on it. When you are satisfied with the result, go to Object > Expand Appearance to create a new shape.
Step 6
Place the
horns on the monster’s head according to your sketch.
Step 7
Add three ellipses of different sizes to form the fingers of a paw. Use the horns that we created in the previous step
to make tiny claws. Decrease the horns’ size, rotate them, and place above the
ellipses to fit the sketch. Don't forget to add the second paw.
The base
for our character is ready! Let’s start coloring it!
2. Enliven
Your Monster by Adding Colors
Step 1
I’ve made a
simple three-colored palette for the base of our image (stay tuned and you’ll see how to create the cute skulls a few steps
later!). These colors will help us to create a proper Halloween mood, and at
the same time will make our artwork vivid and eye-catching.
As you can see, I’ve made the arms and paws a
bit darker to detach them from the body. I'm going to make the circle background invisible for a while, so that it doesn’t distract me while I'm working on the character.
Step 2
Take the Pencil Tool (N) and use the basic body color to freehand a tuft of hair.
You can
switch to Outline Mode (Control-Y)
any time to check your sketch, which makes the drawing process more convenient.
Step 3
Add similar tufts of hair onto the ears to make them furry.
Step 4
Apply a
gentle linear gradient to his hands so that they blend nicely with the body.
Here is how
our funny guy looks with the basic colors applied.
Step 5
Let’s move
on and work with his face. Start rendering his nose by switching to the Outline Mode (Control-Y) and making two
ellipses: one for the nose bridge and the other for the nose tip.
Return to normal mode and apply the proper colors to the nose.
Step 6
The next
important yet simple element is the eye! And again we’ll use the Ellipse Tool (L) to create two objects perpendicular to each other.
Copy the
horizontal shape and move the upper copy down a bit. Use the Minus Front function of the Pathfinder
Panel to delete the parts you don't need.
Step 7
Select both shapes and use the Shape Builder Tool (Shift-M)
to delete the lower part of the eyeball by holding down the Alt key and clicking it. This way we’ve
created a simple eyelid! Switch its color to green, slightly darker than
the basic body color.
Step 8
Add some
minor details to the face to make it more friendly. Put a funny hair tuft above
the upper part of the nose and use the Eyedropper
Tool (I) to pick the color gradient from the monster’s arms. Add two pink spots to create a gentle blush on his cheeks, and don't forget his eyebrows.
Step 9
Now we need
to add a big smiling mouth, which is the primary element of the monster’s
face. Use the Rounded Rectangle Tool
with a 50 pxCorner Radius to add a basic shape that will form the mouth.
Step 10
Apply Effect > Warp > Arc with -37% Horizontal Bend value, making a
curved smile.
Look at your sketch in Outline Mode to put the mouth in the right place and switch its fill color to dark red to depict the inner part of the opened mouth.
Step 11
Now we need
to create a row of bright shiny teeth, making a friendly smile. Check out my Crazy Retro Poster Tutorial, starting from Part 4, Step 2, to find out how to create teeth
with the Blend Tool (W) in a few clicks.
Add the lower row of teeth in the same way.
Step 12
Object > Expand the teeth and make a pair of fangs, by
selecting a tooth and dragging its lower anchor point down with the Direct Selection Tool (A)
Step 13
Let’s make a furry tummy! Outline one half of the tummy over your sketch, using the Pencil Tool (N).
Use the Reflect Tool (O) to reflect the created
shape over the Vertical Axis and put
it on the other side of the body.
Step 14
Select both
halves and press Control-J to
combine them into a single shape. Play with the color, making the tummy
light yellow.
3. Create a Basket Full of Sweets & Candies
Step 1
Start with simple shapes by using the Ellipse Tool (L) and Rectangle
Tool (M) to form the upper part of the basket.
Step 2
Apply the Arch effect (Effect > Warp > Arch) with -13% Horizontal Bend value to the rectangle part of the basket,
making it slightly curved, so that our basket looks more three-dimensional.
Step 3
Continue
shaping out the basket: add a square with the Rectangle Tool (M) for the body of the basket, and modify its bottom
by moving the lower anchor points closer to the center.
Step 4
We have a
pile of sweets in our basket, but you don’t have to draw every single candy.
Make a few of them using squares and circles, and then just rotate and resize
the objects, putting them one above the other to create the impression of a
basketful of sweets.
Step 5
Our monster
should look as if he is holding the basket in his hands, so we need to rearrange
the objects. Press Control-[ several times to move the basket, placing it under the hands.
Add matching colors to the sweets, preserving the overall palette. Make a dark-brown ellipse in the center of the upper part, showing the inside cavity. Duplicate this shape, because we will need its copy in the next step.
Step 6
We need to
hide the lower parts of the sweets, placing them into a basket. This can be
easily solved by putting our objects into the Clipping Mask. For this purpose, take the Add Anchor Point Tool (+) and add a group of anchor points on the
upper part of the dark-brown ellipse that we created in the previous step.
Use the Direct Selection Tool (A)
to move the added points so that the shape surrounds the candies. Don’t in any way move or change the lower part of the ellipse. Put the created shape on top (Shift-Control-]).
Step 7
Finally,
select your group of candies and the brown shape and click the right mouse button
to reveal the pop-up menu. Make Clipping
Mask and—voila!—all the candies are in the basket.
Great work!
This is how it looks all together.
Step 8
Our basket looks
quite boring at this stage. To make it more of a basket than a bucket, we need to add some texture. Remember those good old wicker baskets made of wood? That’s right, we’re going to make the same interlaced pattern in vector.
Start by
drawing a narrow stripe with the Rectangle
Tool (M). Add vertical and horizontal copies of the stripe and let them
cross each other, creating a square grating. Make the horizontal
stripes slightly lighter and place them above the vertical ones by pressing theShift-Control-] key combination.
Step 9
Select all
stripes and Divide them in the Pathfinder panel, thus creating a group
of separate tiny squares. Select the odd squares in the first row and pick the
color from the vertical stripes with the Eyedropper
Tool (I), making the squares darker.
Step 10
Move on to
the next row and continue recoloring odd and even squares next-but-one,
creating a look of interlaced wooden stripes.
Here’s how
the pattern looks now:
Let’s
select it and go to Object > Pattern> Make. Move the Pattern Tile (the blue frame) as shown on the
screenshot: the right vertical stripe
should stick to the edge of the Pattern Tile,
leaving the tips of the horizontal stripes outside. The Tile frame itself should remain square. Exit the Pattern Mode and you'll find the created texture in the Swatches panel.
Step 11
Copy the basket shape and Place it in Front (Control-C > Control-F). Apply the newly created
pattern by selecting it in the Swatchespanel.You can resize the pattern to fit the basket by double-clicking on
the Scale Tool (S) to call out the
pop-up menu. Tick the Transform Patternscheckbox, set the Scale to 70% and click OK to apply the effect.
Step 12
Proceed by double-clicking the Rotate Tool (R), revealing
the Rotate Options menu. Set the Angle to 45 degrees and check the Transform
Patterns box. Click OK, thus
changing the direction of the stripes.
Step 13
You can
edit the colors of your pattern any time by selecting it and
going to Object > Pattern > Edit
Pattern (Shift-Control-F8), thus returning to Pattern Mode.
4. Add
Minor Details to the Character
Step 1
To make the
monster furrier, we should add some hair to his body. Take the Blob Brush Tool (Shift-B) and draw
several short strokes. You can see my brush settings on the screenshot. However, if you leave them as default, there won’t be any big difference in
drawing such small details. The only thing you might need to change here is the
size of your brush. I’ve used the smallest 1 px
size.
Step 2
Add more
fur strokes all over the monster’s head, according to the initial sketch.
Spread small pink spots over the nose to make it more detailed.
Step 3
Let’s also
add some details to the horns, making them notched. Use the Polygon Tool to make a thin triangle
and apply the Arch effect with -56% Vertical Bend value. Object > Expand the shape to apply
the changes.
Step 4
Rotate the created
shape and place it on the horn, creating a notch. Copy the notch a few times
and place the copies along the horn. Use Pathfinder or the Shape Builder Tool (Shift-M) to cut off the unwanted pieces and add
a drop-shaped highlight, making the
horn slick.
Step 5
Let’s
return to our candies. We need to separate them from
each other by adding shadows. Copy
the base of the candy and Place it in Back (Control-C > Control-B),
switching to Multiply Mode in the Transparency panel.Cut off the unneeded parts as we did before with the Shape Builder Tool (Shift-M).
Step 6
Add the
shadows under the character’s arms in the same way, thus separating them from
the body. Cut off the unneeded part by clicking it with the Shape Builder Tool (Shift-M) while holding down the Alt key.
Add the
shadows from the basket and nose, making these objects pop out more.
Step 7
Make the body
and horns more picturesque by switching the Fill
color to linear gradient. Use turquoise and light-green tones for the body, and
raspberry-orange tones for the horns.
Step 8
Make the
sweets yummy and shiny by adding the overtones in the
following way: draw a freehand shape
with the Pencil Tool (N), covering a
part of the candy. Fill it with some bright color and use the Shape Builder Tool (Shift-M) to cut off the
piece outside the candy. Switch the Blending Mode to Screen and adjust
the color, making it vivid and semi-transparent.
Here is how
our sweets look. Shiny, smooth and slick!
5. Render Details on the Background
The background of our sketch contains some small yet important
details, such as bats, ghosts, skulls, and bones, creating a creepy
Halloween atmosphere.
Step 1
The first
element of the background will be a bat. I was inspired by the Negative Space
technique while creating this object (check out some information about negative
space here on Wikipedia, if you’re interested).
It may be hard to imagine at first, but it’s much easier to create a symmetrical shape
like this, rather than freehanding it with a pencil or other tools. Let’s try it
out!
We’ll start by making three even circles of various sizes (each next circle should be smaller than the
previous one). The fourth larger circle should be placed above the first three, as shown on the screenshot.
Select all
the circles and use the Reflect Tool (O)
to mirror them over the Vertical
Axis and press the Copy button. Move the reflected copies to the right side, holding down the Shift key. Select all circles and press Control-8 to create a Compound
Path, making one single shape.
Step 2
Proceed by
taking the Pencil Tool (N); switch
the Fill color to None and the Stroke to some contrast color (dark red in my example). Draw a rounded stroke, crossing the circles, as
shown on the screenshot below. Select your stroke and Reflect it to the other side, creating a copy.
Keeping both strokes selected, press Shift-X to Swap Fill and
Stroke colors and Unite two
pieces of the dark-red shape in Pathfinder
to make a single shape.
Finally,
select all the created elements and use the Minus
Back function in Pathfinder to
form a bat silhouette.
And here is
the result of all our manipulations! Looks like a true bat silhouette considering that
it was just a group of circles. Notice that I’ve deleted two side anchor points
on the bat’s “tail” to make it more pointed.
Step 3
The next
element will be a ghost. Start shaping it from an ellipse by dragging its lower
anchor point down with the Direct
Selection Tool (A).
Change the
position of the anchor handles on the “tail” of our ghost to make it pointed.
Pull the handles with the Convert Anchor
Point Tool (Shift-C) if you need to move them separately. Add circles for
the eyes and mouth of our ghost.
Step 4
We still have a fancy skull in our “to do” list of Halloween
elements. Firstly, make an even circle and then squash it slightly. Add three more tiny circles at the bottom of the head shape, depicting the teeth.
Step 5
Add white
shapes for the eyes and nose (these are modified ellipses as well – I've just changed the position of the anchor handles slightly). Copy the eyes,
keeping them in your clipboard for a
while. Turn the white shapes into a Compound
Path by selecting all of them at once and pressing Control-8. Finally, use the Minus
Front function of Pathfinder to
cut out the holes.
Step 6
Paste in Front(Control-F) the eye shapes that you copied earlier, and move them a few pixels to the right. Cut off the unwanted part and fill the
newly created shape with darker color, showing the depth of the eye-pit.
Step 7
When all the elements are ready, spread them over the background, as in your
sketch. Add several tiny bones, tracing them with the Pencil Tool (N).
Step 8
Still
with the Pencil Tool (N) in hand,
outline a purple puddle under our monster. You can create a group
of overlapping ellipses for the same purpose as well, if it feels more
comfortable than using a pencil. Reveal
the big background circle behind the monster, which we created earlier, to see how our
character looks against the contrast backdrop.
Step 9
Change the
color of our ghost to the same shade of purple as on the background. Go to Object > Path > Offset Path and
create a 5 px outline, filling it
with white color to detach the ghost.
Step 10
Edit the other
ghosts and switch the color of our bats to white as well.
Step 11
Play with the
colors of the skulls, making some of them ivory-colored and adding
gradients to others.
Step 12
Finally,
select all parts of our monster and apply Offset
Path with 5 px Offset value
in order to create an outline.
Step 13
As a result
of the Offset Path, you’ll
have a lot of new shapes created and selected. Keeping this selection, press
the Unite button in Pathfinder and then place the created
outline under the monster by Sending it to Back it with the Shift-Control-[ key combination.
Step 14
Add a
subtle-colored background (beige, for example) to emphasize the composition without
distracting the viewers from the character. I’ve played with the colors of the background elements to see which one is better.
Boo! Your
Trick-or-Treat Candy Monster is Finished!
Great job! You’ve
successfully managed to create your own monster! Feed him well with the
yummy sweets to make him happy and smiling. I hope you’ve enjoyed
this tutorial and felt the bewitching spirit of this creepy yet exciting
holiday! Have fun and continue creating art!
Dragons are scary, zombies are scary, and what's more frightening than an angry zombie dragon? But it's just one of all these fascinating creatures you can see in your mind! In this tutorial I'll show you the process for creating a monster from scratch, from the idea, sketch and anatomy to the final clean lines. You'll learn how to bring one of your great concepts to life, making it readable for others and ready to be re-created in any other form. By the way, you'll also learn how to create a believable anatomy on the fly. You don't need any software—a pencil and a few sheets of paper will be enough.
1. Define the Pose
Step 1
Having a nice design in your mind isn't everything—your creature needs a base, a kind of skeleton to support it. The problem is it's not easy to create a skeleton for something that doesn't exist yet.
There's a rule that can help us here. Pose makes a big part of the image—it's far more important than details. It's the first thing a viewer notices, so if it's not interesting enough, your whole illustration will suffer. Here's the advice: create an interesting pose without considering the design yet.
First, describe your design in terms of actions and emotions, like: "ready to attack", "still", "alert", "disturbed", "confident", "shy", "nonchalant", "furious", etc. Second, try to picture these terms with thick, messy lines. Don't limit yourself to one pose—just transfer your elusive ideas to paper and see how they work.
For my zombie dragon I used the keywords:
furious
restless
insane
blinded with anger
So, that's your assignment: draw a few lines that are furious, restless, insane, and blinded with anger. Sketch them on a small scale, don't zoom in, and don't add any details. Don't judge, just draw them all, one by one.
Step 2
Now we need to elaborate these "lines of motion". We've got spines and maybe heads, so it's time to add some more to it. We don't need a full skeleton yet, or any details. Just add a base for legs and wings, obeying the emotion.
Having a problem here? A basic body for our dragon will be built of these simple elements. Just use them, obeying the emotions and actions you have chosen.
Head
Wing
Spine
Hips
Tail
Neck
Chest
Front legs
Hind legs
Step 3
The other criterion for concept art is to show the body features clearly, without concealing them by a complicated pose. Which of your sketches meet this requirement? Which are dynamic and interesting, but without covering important parts with a wing or neck? Choose a few, then decide which of them looks the closest to your vision.
Dynamism: 2/5; Clarity: 1/5 = 3
Dynamism: 3/5; Clarity: 5/5 = 8
Dynamism: 4/5; Clarity: 3/5 = 7
Dynamism: 3/5; Clarity: 3/5 = 6
Dynamism: 1/5; Clarity: 5/5 = 6
Sometimes you'll value clarity over dynamism, sometimes conversely. It doesn't matter what you choose—what matters is whether you know why you choose it And the winner is...
Step 4
Once we've got a basic pose, we can polish it. It's time to build a base for all the body features. This is the moment when we need to take a look at anatomy of the animal. With a dragon, it may be hard to find a good reference—every artist creates their own version. If you need some help, check my tutorial about dragons, paying special attention to the skeleton and joints. If you want to do it quickly, here's a cheat sheet.
In fact, you don't need to learn it. These are the same joints you've got in your body!
Use the previous sketch as a base and polish its lines, fixing less obvious structures.
Step 6
The pose is finished—that's the first thing your viewers will see. How do you like it?
2. Refine the Guide Shapes
The pose still needs a bit of work. When you look at it now, it could be a fat pegasus, or some weird winged lion. We need to make the shapes more readable, so that the details have no influence on the "soul" of the illustration.
Step 1
We need poses for the smaller parts too. First, wings. To understand them better, check this tutorial. Also, my tutorial on bats may be helpful here.
If you want to draw wings without any tutorial, imagine they're hands with elongated fingers The membrane will probably be torn, but we need a reference of its original look
Step 2
We need to define the head also. The position of the jaws adds a lot to the general emotion. To learn more about drawing dragon heads, check my tutorial on this topic. If you want to make it quickly, just follow these steps:
Start with the cranium Add the upper jaw and eye line Add the lower jaw by rotating the upper jaw in your mind Draw the eye socket ridges Plan the horns Sketch the horns Clean the lines
Step 3
We also need to define the exact position of the claws before going any further.
Step 4
The sketch is complete now. If you're drawing traditionally, it's good to redraw it on a bigger
scale on a new sheet. Use subtle strokes—the pose should not be visible
on the finished lineart.
3. Build the Dragon Anatomy—Skeleton
We're entering dangerous territory now—we're going to picture the anatomy of an animal that doesn't exist. The good news is, with a settled pose it's going to be very hard to break the illustration, no matter what you do now. So let's build the skeleton, bone by bone.
Step 1
The skull is the second most difficult and, in a visual sense, the most important part of the skeleton. To get it right it's good to study real animal skulls first and then construct a dragon skull out of them. I've based my skull on big cats. Do you see how I used lines to define 3D forms? I've explained this trick in this tutorial.
Once again—if you've never drawn a skull in your life, don't expect that you'll be able to draw it now. Find a reference, analyze it, draw, then repeat with another picture. When you feel that you've understood these structures, you can go further and draw something without a reference—like the skull of non-existent creature.
Step 2
Draw the main part of the straight bones by surrounding the guide lines between "joints" with straight lines.
The forearms and calves need one more bone.
Step 3
Connect the bones with a thickening of the joint. Imagine the tip of the bone as a ball with a concave or convex top—it will help you in places where a 3D view is necessary.
Step 4
Claws can be done exactly the same way.
Step 5
Do you remember what I told you about the skull? Hips are the only bones that are even harder to draw. It's because they don't have clear top/bottom and side views. In other words, classic 2D views of hips won't help you understand their shape.
I simplified the hip structure for you, but if it's still too complicated, just get around it somehow—create a placeholder for it and then cover it with muscles or skin. This way you'll finish the illustration without learning complicated stuff you won't use any more.
Step 6
Let's prepare the space for the ribcage. Draw a circle linking both arms and wings. The spine will be stuck to it on the back of the circle—use this point to draw a line connecting the shoulder girdle with the hips. In the front, draw a line that will make the sternum.
Step 7
Draw two clavicles between an arm and the top of the sternum.
Step 8
Here we've got a problem with the shoulder blades. An arm needs them to move, but wings are nothing but modified arms. Therefore, we need two pairs of scapulae! Again, this is a fantasy creature and you can just ignore this issue by adding only one pair, or even cover these bones later to avoid confusion. Draw the sternum made of two parts.
Step 9
Time for the spine. Draw it as a long, thin snake from the back of the skull to the tip of the tail.
Step 10
The spine is made of vertebrae. Each of them has a very complicated structure, but let's start with something simple. Use two ellipses for the top and bottom of a vertebra. The neck and the end of the tail will have the longest vertebrae.
Step 11
Use the guide lines to sketch the vertebrae.
Step 12
Before we go any further, we need to define the thickness of the neck and tail. We can do it simply by drawing circles, big at the core and then smaller and smaller to the tip.
Step 13
Use the circles to draw the neck and tail. Don't forget to define the sides!
Step 14
Let's come back to the vertebrae. Prepare guide lines for the appendixes with a simple line ended with a circle.
Step 15
Stress the shape they have created. Ribs will be attached under the hind pair.
Step 16
Now things will be a bit different for the neck, back, and tail.
Back
Tail
Neck
Step 17
The neck needs special treatment. Add a pair of sharp, elongated appendixes.
Step 18
Clean the shapes.
Step 19
The ribcage is the last part we need to take care of. We can borrow it from any big animal, or just use this simplified scheme:
Start by defining the space the ribcage takes. Then draw the lines for the ribs, keeping in mind the bending points (black dots).
Step 20
Our skeleton is done! It looks pretty good and you can use it as it is, but I'll show you how to make a complete zombie out of this. If your sketch has got messy by now, it's good to copy it to a clean sheet.
4. Build the Dragon Anatomy—Muscles
Let's bring some life—or death, actually—to our dragon. To make it easy we're going to use a simplified pseudo-anatomy that will look proper to a layman, but without paying too much attention to its functionality. Our goal is to create a disintegrating body, with both bones and muscles visible, so we don't need to make the musculature complete.
Step 1
Muscles are a kind of lever used to move a bone to one side or another. For this mechanism to work properly, we need to connect two bones with one or more muscles.
Create levers on the skeleton. They don't need to be very accurate, so just use your intuition! Imagine a kind of string pulling the bones closer to each other.
Step 2
Draw muscles all along the lines you've just sketched. They mostly bulge in the middle and taper at the ends. You don't need to include all the muscles—it's a zombie, after all. Leave the most eye-catching of the bones uncovered—for example, we've spent a lot of time on the spine and it would be a shame to cover such a fascinating structure.
Step 3
Time to tear the wings. You should find it easy, just remember about gravity.
Step 4
Clean the lines and add any details you like. The lineart is finished! If you want to, you can shade it to finish it as a complete illustration.
This Is Not the End!
We've created an undead dragon, but we're not finished yet! This lineart will be used for the next part of this tutorial, in which we'll create a complete digital concept art in Adobe Photoshop. Stay tuned!