Are you new to digital painting? Today we're going to go over basic features in Adobe Photoshop's Brush panel to introduce you to this incredible medium. Learn the essentials before becoming a master, or use these tips to refresh your memory.
Meet... Your Brush Panel
Let's name it, "Jack". Every digital artist needs a Jack in their life. In fact, without Jack digital paintings just wouldn't be the same. I mean, imagine walking around life knowing you only had one brush to work with. No give or fancy textures—just a plain, boring brush.
Sounds pretty devastating if you ask me.
Do You Like to Draw or Paint?
Well, I do too. But have you ever felt limited by traditional art? For many years I felt like no matter what I made, nothing turned out the way I imagined. That is, at least, until I started digitally painting.
You see, Jack's got a lot going for him, but when people first meet him they're often intimidated, especially traditional artists. They find him tricky and complicated, even finicky at times. They think there's no way in the world they'll ever understand a Brush panel like Jack.
And that makes Jack very, very sad...
... Keep it together Jack.
Digital Painting 101
In Digital Painting 101, we're going to battle all your concerns head on. Because if you're truly interested in digital art, half the battle is simply getting to know the software.
But Before We Get Started...
Let's meet Jack's friend, "Bob,"—the Pen Tablet.
Now these two are pretty close—you could even call them "besties." They go hand in hand in creating some of the most beautiful art I've ever seen. And even though digital artists can certainly make do without the likes of Jack and Bob, it's never a bad thing to have a little extra help.
Get to Know Your Brush Panel
If you want to be successful with your digital paintings, you should definitely get to know your Brush panel. After all, Jack's pretty cool.
Here are some of the top features you need to know:
The Essentials
Keyboard Shortcuts
First things first. For your own convenience, memorize these keyboard shortcuts:
Hit F5 for the Brush panel.
Hitting B on the keyboard selects the Brush Tool.
Hit Dto paint with the Default Foreground and Background Colors (Black and White)
[ or ] to Decrease orIncrease theBrush Size (respectively).
{ or }(Shift-[ or Shift-]) to Decrease or Increase the Brush Hardness.
Holding Alt while the Brush Tool(B) is selected will bring up the Eyedropper Tool (used for blending).
Right-click while the Brush Tool (B) is selected to bring up a mini panel for Brush Presets as well as Size/Hardness.
Standard Round Brush
Generally speaking, the main brushes you use are all just some variation of the Standard Round Brush. Unlike the boring, static brush I mentioned in the beginning, the Standard Round Brush can be customized to your painting needs.
By changing the settings you create an infinite amount of painting possibilities with just one brush.
Brush Presets
Brush Presets is the home for all your brushes. Apart from the Standard Round Brush, Photoshop also includes a variety of shapes and textures for you to enjoy.
Brush Tip Shape
Brush Tip Shape is where to find the main settings for your brushes, like Size, Hardness, Angle, and Spacing. Get familiar with these settings and experiment with a couple of different strokes.
Now I know what you're thinking, Brush Size is pretty self evident right? Well, it may seem obvious to use a smaller or larger brush whenever you need it, but we all need reminding. Large brushes are great for blocking in colors and applying atmosphere, while smaller brushes are essential for details and refinement.
0% Hardnessmakes brush edges soft and fuzzy like a warm sweater. On the opposite side of the spectrum, 100% Hardness creates a hard edge perfect for detailing. Here's a tip: no two brush effects are alike. Constantly change the hardness of your brush according to your needs.
1%Spacing creates a seamless stroke perfect for your default brush settings. Increase the spacing for a continuous row of one brush. See how Tuts+ author Rowena Aitken used this method to create a string of acorns for her Winter Scene Line Art Tutorial.
Rotating a brush is fairly easy. Simply adjust the Angle. Always remember to return to the original angle when you're finished.
Shape Dynamics
Remember Jack's friend, Bob, the Pen Tablet? The beauty of using a pen tablet is that not only does it give you greater control than a mouse, but you can also tap into the Pen Pressure settings on the Brush panel. With the Shape Dynamics option checked, selectPen Pressure from the drop down menu next to Control.
This option creates beautifully tapered ends that are perfect for that traditional sketch effect. Personally, I try to use this option strictly for sketches and finishing details because it can slow your computer down a bit.
Not Included in the Brush Panel
Not included but equally important are: Painting Mode, Opacity, and Flow. These settings automatically come up on the top toolbar whenever accessing the Brush Tool (B).
Painting Mode
If you're already familiar with Layer Blend Modes, then you'll understand how Painting Mode could be used to create interesting color effects. As a rule of thumb, however, always set the default mode to Normal.
Opacity and Flow
Opacity controls the "opaqueness" of your brush and Flow controls the speed at which the brush builds color. For beginners, concentrate your focus on only adjusting the Opacity while your Flow isset to 100%.Opacity and Hardness go hand in hand with achieving certain effects like fluffy clouds and smoke. Constantly experiment with these two settings while asking yourself this question: "What kind of details can I paint at these settings?"
Other Brush Panel Settings
You can make do without knowing many features of the Brush panel for quite some time. In fact, the reasons for using other settings are often purely circumstantial.
Scattering
Let's say you want to create a cool Bokeh effect. Sure, you could plant every circle on the screen yourself, but after a while that would get annoying. By adjusting Scatter and Count on the Brush panel, you can achieve a randomized scattering effect without all the hassle.
Texture
Texture Brushes come in many different styles, from dirt and grunge to paint splatter and custom shapes. Once you get familiar with the more standard brush settings, working with textures is a breeze.
Create Your Own Custom Brushes
There's no limit to the number of brushes you can paint with. Search far and wide online to experiment with new textures or even create your own. At Tuts+ our instructors have already built a great selection of tutorials for Photoshop Brushes Made From Scratch. Here are just a few:
Trust me, the Brush panel is not as scary as it seems. And for the most part, you adjust the same core settings throughout the duration of your digital painting. Just knowing Size, Hardness, and Opacity alone is more than enough to get you very far in technique.
Stay Tuned for More Tips
Stay tuned for more tips with Digital Painting 101. Next up, we'll cover blending with the Brush Tool! Good luck!
Our new course, The Fundamentals of Adobe Illustrator, will give you a solid introduction to Adobe Illustrator and walk you through the fundamentals of it.
Tuts+ instructor Simona Pfreundner will take you through the key features such as drawing and manipulating shapes and lines, adding colors and effects, mastering the Type Tool, and exporting a document in various formats.
At the end of the course you will be comfortable with using the program and inspired to learn more about it.
You can take this new Illustrator course straight away by subscribing to Tuts+. For just $15 a month, you get access to this course and hundreds of others, with new ones added every week.
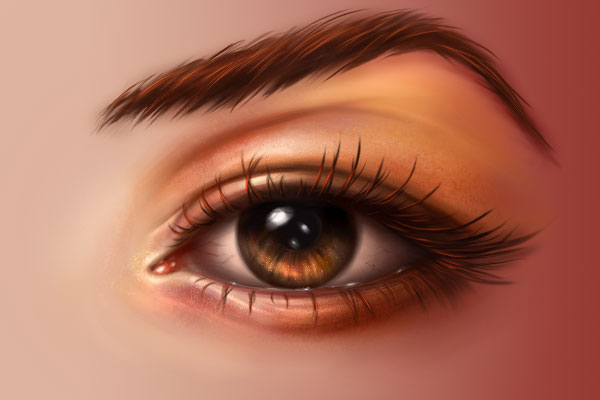
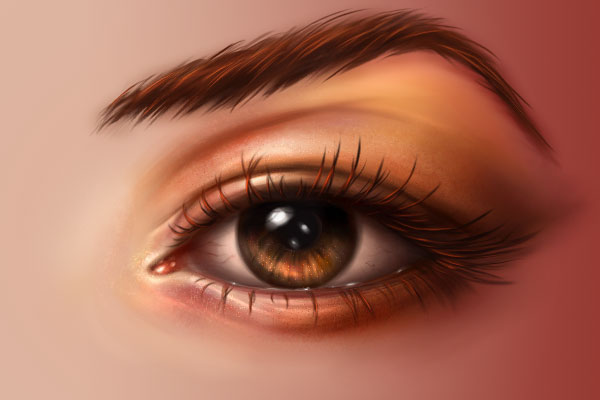
The Winged Hussars were an elite cavalry unit of Poland, invincible for almost two centuries, often defeating enemies many times more numerous. They're the national pride of Poles—a symbol of the greatest time in our history. Besides that, they simply look epic, so they're a great topic for an epic painting.
Now, I've never painted a hussar before. Therefore, it will not be only a
tutorial about digital painting, but also about preparation for drawing something accurately, even if you have no previous experience at this.
I'll show you how to prepare the composition and how to shape basic lighting into full detail shading. Then you'll learn how to add vivid colors to a grayscale painting, and how to manage recurrent details without having to copy and paste them. I'll also explain the difference in shading different materials, like metal, horse hair, and cloth.
The most important lesson you may take from this tutorial, though, is how to manage the whole process of painting to keep control over it in every phase.
1. Sketch a Horse Rider on a Rearing Horse
I can't stress how important it is to work from the whole to the part when it comes to painting. We may want to draw a hussar on his horse, but it's not what we should start with! There are various levels of details of this picture that our vision system will recognize one by one:
a dynamic scene
a rider on a horse
a rider in an armor—a knight
the armor of a Polish winged hussar
And that's how we need to take them, one by one. Let's start with a sketch of a rider on a horse. To make it dynamic, the horse will be rearing.
Step 1
Get yourself a bunch of references of rearing horses and sketch them quickly, loosely. It's not only about looking for this perfect pose, but also about warming up before serious drawing.
Step 2
Now, take a good look at all the poses and find the one that will present the rider in a clear way. I've chosen this one, because it brings Napoleon Crossing the Alps to mind. You can also sketch your own pose based on what you've just learned about rearing horses!
Step 3
Our horse is ready, and now we need to put a rider on it. If you don't ride, you should definitely do some research on this topic before trying to draw it. Our intuition sometimes has little to do with reality, and it's so much easier to fix the pose now than later, when the picture is colored and shaded.
Normal pose: the rider is sitting with his back, hips, and heels in one line. The heel is pointing down.
Rearing pose: the rider leans to the front and lifts a bit, so as not to pull the horse back with his own body. The reins should be loose, and the rider uses his legs (calves and heels) to stay on top.
Let's use this information for our picture. Lower the Opacity of the horse and create a New Layer above it. Add a few guide points: the line of leaning, and the spots for the knees and feet. The hussars' horses weren't very big, so keep that in mind here.
Add the rest of the body. Our rider isn't leaning too strongly, because he's obviously not afraid of falling—he's a hussar, after all! (And he still has it better than Napoleon.)
Step 4
To break the side view imposed by the horse, we can turn the upper body of the rider towards the observer. It will make the whole picture less static, and the hussar will also look as if he is fully controlling the situation.
2. Adjust the Composition
At the moment we've got a nice, squarish composition. It can't stay this way, though. The hussar lance was five to six meters long, which means it's not only longer than the body of the rider, but the horse, too! It can't be added to the picture without disrupting the composition we have now. The question is: how to add this long, obtrusive lance and keep the composition attractive?
Step 1
First, create a New Layer and paint a sloppy silhouette of the horse and the rider. As long as there is no color and shading, the "inside" and "outside" of the drawing only make the composition.
Step 2
How many straight lines can you find in this shape? (You can draw them, but you don't need to; you should be able to imagine them as well.) In my case the lines prove the dynamism—if they were perpendicular or parallel, they would make the silhouette static.
The circle around the rider's shoulder describes the reach of the arm. The lance must cross it if it's to be held in the right hand.
Step 3
Let's see a few possibilities for the placement of the lance. We'll make it a bit shorter than in reality, because otherwise this side-view composition wouldn't stand it.
Step 4
Let's close the whole shape with lines:
Step 5
Now, if we inscribe the silhouette into a rectangle divided according to the rule of thirds, we'll be able to see what should be fixed to create a proper composition.
Let's see what needs to be changed in terms of a dynamic, single character composition:
None of the elements should touch the edges of the picture.
If one of the rectangles is empty, its neighbors aren't allowed to be.
The main focus shouldn't be on the center of the horse's body, but somewhere between it and the rider.
There are two elements we can add quite freely to modify the perspective: the two-tailed flag and the horses' tail. They're both very flexible, so you can do what you want with them to shift the focus and the weight of the composition to the right place.
Now, the attractiveness of a composition is very subjective. At this point it's hard to say that any of the propositions is incorrect, though each of them may have its flaws.
I've decided I like the vertical frame better. Now I have to decide which of these two works the best for me. I noticed the first one creates an odd, very obtuse angle, while the second one has it acute (of course, if we use the direction the rider's heading). When it comes to dynamism, streamlined shapes look better: imagine both of these angles as the front of a sports car. Isn't it obvious which one should we choose?
Step 6
Crop (C) your canvas to adjust it to the composition we have chosen.
Step 7
Now we can add the other arm. It may be partially covered by the mane, but it shouldn't stop us from defining it!
3. Clean Up the Anatomy
For now we have managed to establish a pose, both for the horse and the rider, and even the lance. However, a pose isn't a body, since there may be a lot of understatements hidden in the sketch.
Step 1
Create a New Layer and make the previous ones more transparent. Use images from my tutorial about horses as a reference for the simplified skeleton.
Step 2
Use the same tutorial to draw the outline of the muscles. Be careful in the neck area, because there's—gasp!—perspective going on.
Step 3
Finish by adding the muscles. They're going to be very useful for shading!
Step 4
You can find a reference for drawing the human body in my tutorial about creating an anthro-wolf. The rider shouldn't be too skinny—hussars were mostly magnates, representatives of the highest class that never suffered from hunger.
Step 5
Clean up the overlapped areas and Merge (Control-E) the detailed sketches. You can now delete the previous versions.
4. Draw the Armor of a Winged Hussar
You may have some elusive concept of what a winged hussar looks like, but it's not a good idea to start drawing him without any preparation, especially if you're working for a client. Let's analyze the equipment of this warrior step by step, keeping in mind that the Polish Hussars weren't a uniform formation, and they changed over the centuries. We're going to analyze a more recent type of armor.
The Horse Tack
As we mentioned before, hussars came from the highest class, equal to the king. Taking part in a war was not only their duty, but also a privilege. It was a great honor to fight as a hussar; we can say they were the elite warriors of that time. To accentuate how wealthy the knight was, all his equipment had to be expensive and decorative.
Let's see how a typical horse tack could have looked.
a saddle of Eastern type (influenced by the Turks)
an ornamental blanket
a harness studded with gold
Two additional weapons were placed here:
one or two guns (in the latter case, strapped at both sides)
the kancerz—a very long saber used to pierce the enemies once the lance had been crushed
As before, lower the Opacity of the sketch and draw every part on a New Layer. Sketch the tack without any decorations for now.
The Breastplate
As a charging cavalry unit, hussars typically wore only breastplates, with their backs protected by animal pelts. However, for the wings to be attached to the back, the backplate had to be present, too.
The Pauldrons
They protected the shoulders and arms, and also concealed the gaps in the breastplate.
The Armguards
Used for protecting the forearms: the long part covered the outer side, and the shorter part protected the inside.
The Helmet
There were many types of hussar helmet. Here I'm presenting the one with a "crest". Notice the covering on the face was screwed to the helmet and could be rotated to be put on the forehead instead, leaving a small, rectangular covering for the nose only. The hearts cut on the "ear-flaps" didn't seem funny at that time at all! If you want to make your picture more serious, though, you can use simple holes for this part.
The Tunic
This long robe made of thick cloth was worn as a base for the armor. Chainmail hauberks were more rare.
The Boots
Hussars wore standard, long rider's boots, yellow or red.
The Saber
A curved saber was strapped to the belt and used in a direct encounter.
The Wings
The iconic hussar wings are a controversial issue. The most probable story about them is that they were used for ceremonies mainly, and if any were worn during fighting, there was only one, straight wing, with a few feathers, strapped to the back of the saddle, not the rider's back. However, since our hussar looks pretty iconic even now, let's add these double wings to his back, as a crucial part of hussar legend.
The Lance
A hussar without wings can be perfectly fine, as long as he has a lance with a long flag. A flapping flag with two tips, sliding through the air like two snakes, was supposed to (and it successfully did) frighten the enemy horses.
When you're done with the sketch, clean up the overlapping parts and Merge the layers.
Lower the Opacity of the sketch and use a New Layer to draw proper line art. Use a sharp, pointed brush—thanks to this you'll make sure you don't leave any unclear lines for guessing later.
A line art drawing isn't always necessary, but it's crucial if we know exactly what we want to paint. It doesn't need to be overly scrupulous, but it should leave nothing to imagination.
5. Prepare the Shading
I'll show you a digital painting technique that I call 2D sculpting. It's a great method for painting from imagination, which is all about asking your subconscious: "Is it how it's supposed to look? Can I keep going?" This technique will help you manage light, shadow, textures, and color.
Step 1
We need to prepare a Clipping Mask first. Create a New Layer and use a hard brush to draw the outline of the silhouette. You can ignore the wings and the hair—we're going to paint them with a different method.
Step 2
Use the Magic Wand Tool (W) to select the area outside, and press Control-Shift-I to Invert the selection. Create a New Layer and fill it with the Paint Bucket Tool (G). You can now Merge both layers.
Step 3
Lower the Saturation (Control-U) to neutralize the color—it should be about 50% gray. The shape we've created will be our Clipping Mask. Every future layer should be clipped (Control-Alt-G) to it.
Step 4
We're going to use a nice painterly brush we can create out of the default ones. Select the Chalk brush, and go to its Settings (F5). Give it a size of 30 px, just so that we get identical effects.
Step 5
Check off Texture, because we don't need it.
Step 6
In Transfer, select Pen Pressure for Opacity Jitter.
Step 7
For the second brush, built in as a Dual Brush. Select Sampled Tip 41 for it, and then adjust the Spacing and Scatter as below.
Create a New File and test the brush. If something doesn't feel right about it, play with the settings once again. Then Save the brush by clicking the white card icon in the lower right corner.
Step 8
Create a New Layer over the Clipping Mask, and don't forget to clip it (Control-Alt-G). Change the Blending Mode of the layer to Multiply. Use our new brush to paint the shadow area very roughly, in a big zoom out. Squint your eyes and see if the 3D form starts to appear. Treat the base color as the shade of the fully illuminated area.
Step 9
Sculpt more details in the shadow. In Multiply mode white works like an eraser, and every gray darkens the background. Use a whole palette of grayscale to paint the shadow, and clean up the light area. With every step, zoom in a bit and add more details. Imagine you're sculpting in a gray stone—both the rider and the horse should be made of the same material.
A couple of tips: in the first steps see the big picture, don't zoom in to details, and pay attention to the form all the time. Save 100% black for crevices only, change the shades often, and if you want to pick them from the picture, set the Sample option of the Eyedropper Tool (I) to Current Layer.
Notice how little is needed for the form to appear
Your goal is to define the form so strictly that the line art won't be needed any more. It may take some time, but don't hurry—this is far more important than all the colors and details you'll add later.
Step 10
Add a New Layer and set it to Screen mode. You can treat it as the opposite of Multiply—black works like an eraser, and every gray makes the background brighter. Do the same as before, this time working in the light area. Remember: from the whole to the part!
What's important, it's also time to draw basic textures, because it's the light that creates them. Attention: by texture I mean the pattern you paint with your brush, not a photo pasted into the picture. What you draw in the light area determines the surface of the material.
Step 11
To see contrast better, change the color of the background to a neutral, 50% gray. Create a New Layer, this time in Normal mode, and polish all the details. We're almost there!
6. From Grayscale to Color
Painting in grayscale first helps manage the lighting properly, but adding the colors later may be problematic. There is no Blending Mode that will color a picture in grayscale with one click—using Color or Overlay alone will not give you the effect you want. However, it's not really that hard to fix what these modes can't. Just follow me and see for yourself!
Step 1
Create a New Layer and use some solid brush to paint the flat colors. Use the line art layer to see the borders correctly. Use the local shades of color—just as if it was an overcast day.
Step 2
Now, if you change the Blending Mode to Color, the colors will be applied to the shading, but in a very weird way. Is it what we wanted? What is wrong with it—why does it look so odd?
Take a moment to fix any places where the color was applied differently to the shading and the line art, and then continue.
A bit of theory now. Let's say we want to apply the colors from the right to the shaded ball on the left.
If we do this with the Color mode, we get this unpleasant effect. As you can see, some of the colors got darker, and some brighter, instead of getting all brighter in the light and all darker in the shadow. Just... each of the colors does what it wants!
Why is it so? Value isn't only about brightness. These two shapes are both 100% bright, which means they can't get any brighter. However, it doesn't mean their value is equal to white! If you check it, the value of yellow turns out to be much brighter than the value of blue. This relative brightness brought by color is called luminosity or luminance.
You can check the value of something by placing a New Layer over it and setting its Blending Mode to Saturation. So, if we check the value of the colored ball, it turns out the colors disappear! What does this mean?
The Color mode uses the value of its background only, ignoring the luminosity of the colors. That's why yellow (requiring high value) gets darker when receiving the same, medium value as red (requiring low value). On the right you can see the values the colors require to look as intended.
OK, so the Color mode isn't very useful for coloring. But maybe some other one is?
Overlay—a very good candidate: color values are definitely used here. However, there is a brightness issue here—the colors get washed off in the brightest areas, which means their saturation gets lower. We don't want that!
Multiply—very neat, uniform change, with one obvious flaw: it makes the colors darker.
Soft Light—a softer version of Overlay; too much washing off.
But... what about Hard Light? It makes the colors darker in the shadow, as intended, and yellow in shadow isn't as dark as green, just as in the real world...
.... and when you look at the light area, the values are simply perfect!
Step 3
Change the Blending Mode of the colors to Hard Light and see the magic happen!
Step 4
But, as I mentioned, this isn't the end. It would be too easy! The reason why Hard Light mode often gets overlooked in tutorials about digital painting is that it definitely looks as if it has a darkening effect on the shading. However, if you understand color theory, it's obvious it must have a darkening effect.
When we were sculpting the shading, we used the same bright value for every part, be it a brown strap or a gold ornament. They had the same brightness when illuminated, but it's not true about all colors. Since, as we've just learned, gold has a higher value than brown, brown needs to have a darker value than we have used for it when shading. Hard Light mode simply does this job for us!
Why doesn't the picture look complete, then? Doesn't it look a bit as if it has been put underwater? This is a clear indicator that we applied only diffuse reflection to it. What the picture is lacking is specular reflection and reflected light.
Let's start with specular reflection. It reveals the glossiness of a surface and its texture. Most materials are partially shiny, and they would look weird without brightening them in some areas.
Here's how to do it: pick a color from the area, add more Brightness to it, and slide the Hue slightly towards yellow. Then use this tint to draw tiny details, like individual hairs. Draw them sparingly and only in the light area!
Then you can make the tint even brighter and add details to these details. Use this method until you're happy with the effect. Save white for 100% glossy or wet surfaces!
Step 5
Metal is all about nothing but specular reflection. Let's work on the golden parts. First, pick their color and slide the Hue slider towards green—it will make this part colder. Then lower the Brightness almost to black, and use this shade to draw hard lines.
Step 6
Now, pick the main color and slide Brightness up, and Hue towards yellow/red to make it warmer. Draw bright stripes here and there.
Step 7
Use white (or very bright yellow) to add the final shine to the gold. Remember, the more you use it, the less effect it has!
Step 8
Use the same technique to finish the metal elements.
Step 9
Add more light to the rest of the elements. The brighter the color you use, the less of it should be used, and the glossier the material will look. Don't ever use white to brighten a matte material!
An important hint:
Use gradual change for matte materials.
Use sharp change for glossy materials.
Use rapid change for metals and other mirror-like surfaces. Beware not to use this method for matte or textured materials!
Step 10
The next effect we need for an object above the water is reflected light. For now we took care of direct diffuse reflection, direct specular reflection, and what's left is reflected light—the indirect lighting. For example, if direct light hits a metal, it reflects it so strongly that it can illuminate a nearby object. Non-specular objects reflect light too, although it's not so apparent.
Look at our picture and try to guess where to put reflected light. It's visible only in shadow, because it's never stronger than the direct light. You should also treat it as colored light—to simplify it, if "yellow" light gets reflected on a brown surface, that surface will become brighter, less saturated, and shifted in hue towards yellow.
Keep in mind there's also ambient light: diffuse light reflected from the atmosphere. So imagine there's a giant blue dome somewhere above and on the right, and make it reflect light, too.
7. Add the Final Details
Our hussar looks pretty good! Time to finish the picture with more or less necessary details.
Step 1
We left the mane and tail of the horse for later, because it needs to be drawn with a different technique. Create a New Layer and use a smooth, pointed brush to draw big strokes of hair.
Tip: I used the DP Smooth brush from DP Presets, which you can open in the Window > Tool Presets tab.
Step 2
Make the brush smaller and draw thinner strokes. You can use a slightly brighter shade of gray for it.
Step 3
Now we're going to shade it as before. Create a New Layer and paint light using Screen as Blending Mode.
Step 4
Then lower its Opacity and make the shading more detailed.
Step 5
Another element waiting for our attention is the hussar wings. We're going to paint them using one feather.
Create a New Layer and draw the shaft.
Use a New Layer and Clipping Mask to color and shade the shaft.
Create a New Layer under the shaft and paint the vane.
Use a New Layer and Clipping Mask to shade the vane.
Step 6
Merge all the feather parts. Right-click the feather and select Convert to Smart Object. It will make it immune to quality drop during modifications.
Duplicate (Control-J) the feather and use the Free Transform Tool (Control-T) to place the feathers in the bars. Change their size lightly when doing this to make them more variable.
Step 7
Select the layers of the lower feathers and use the Free Transform Tool again. Hold Control and drag the corners to fix the perspective.
Step 8
Merge all the feathers and duplicate them for the other wing.
Step 9
Add the Layer Mask to the first wing. Draw with black over the parts that should be covered. You can also use this as an opportunity to add more details to the feathers.
Do the same with the other wing.
If your picture seems too dark, select the layer that's causing it (in my case, colors and details) and use the Curves editor (Control-M) to fix it.
Step 10
Let's decorate the horse. Create a New Layer and paint a single golden tassel.
Step 11
Select the Mixer Brush Tool, and change it to Dry, Heavy Load. Then select any round brush from your list, make the stroke big enough to fit the tassel inside, and press firmly when holding Alt. The sample has been taken!
Step 12
Create a New Layer and try to paint the tassels along the blanket. If they're placed too thickly, change the Spacing in the Settings (F5) of the brush. You can also check off all the other options, like Transfer or Shape Dynamics, because we don't need them here.
Step 13
You can use the same method to hem the blanket with gold.
Step 14
Because the Mixer Brush Tool doesn't support rotation, we need to create a new brush for floral ornaments. Create a New File and paint a single ornament, any way you want.
Go to Edit > Define Brush Preset, and change the settings (F5) as below:
You can now draw the ornaments using the brush.
Step 15
Feel free to mix both methods when decorating the blankets!
Step 16
Merge all the decorations and put the Layer Mask on them. Paint with black over areas that you want to hide.
By using a brush with lower Flow, or gray instead of black, you can simulate the shading of the decorations.
Step 17
Let's add golden studs here and there, just as before.
Step 18
Now, knowing of the methods you can use, add any decorations you can imagine!
Step 19
Now it's time to fix everything you don't like about the picture and to refine the details as you see fit. As you can see, I almost forgot about the animal pelt that hussars wore on their backs!
We've Galloped to the End!
Today you've learned how to paint digitally in Photoshop, but not only this—I hope you also realized why the "Oh, I've got an idea, I'm going to draw it!" approach so often leads to disappointment. If you've got a good concept of what you want to draw, planning is crucial to achieve the desired effect.
Remember to always divide your process into steps, like: free sketch, adjusting the pose to composition, basic lighting, detailed shading, coloring, adding reflections, adding details, and finishing up. If your whole process can be described as "painting", it will be very hard for you to find the elements you should work on. Feel free to use this tutorial as a process-reference for your future works!
Topics of Interest: Graphic Art, Print Design, Hand-Lettering
Occupation: Graphic Artist and Printmaker
Last month, we unveiled South African graphic artist Catherine Dawes as the winner of the grand prize from our 2014 survey. Here's a chance to meet her and discover how she made the amazing journey from a job in restaurant management to fulfilling her dream of a creative career.
And if you live in a remote location where opportunities seem hard to come by, read on. Catherine lives in a dusty farming town on the edge of the Kalahari Desert, and built her skills and her business using online resources.
Tuts+ survey grand prize winner Catherine Dawes
Growing up in the bustling
seaside town of Knysna in the Western Cape, Catherine always knew that she wanted to pursue a career in the visual arts. But like many people, she initially struggled to make that dream a reality.
She started off by studying photography at college while working in restaurant management to
support herself and pay for equipment. But her college focused mainly on film photography.
Although they did
teach us the basics of Photoshop, I knew that I had to learn more! This is when I first came into contact with Tuts+.
Studying online helped Catherine hone her digital photography skills, but as time went by, she discovered that although she enjoyed photography, it wasn't something she wanted to pursue as an everyday career.
So she made two big changes in her life. One was to move from the seaside to a small town on the other side of
the country, on the edge of the Kalahari Desert. The other was to start studying graphic design, both on Tuts+ and via an online course in graphic design
with the University of Cape Town.
Here, I made good use of Tuts+ again. I
also spent a lot of time practicing my calligraphy and hand-lettering.
Hand-lettering piece by Catherine Dawes
At this point, her studies began to bear fruit. She focused on calligraphy and hand-lettering, and began to win clients who admired her work.
Typographic poster by Catherine Dawes
I didn’t know that hand-lettering was a
“thing” until I studied! I just thought that drawing words was some weird thing
that I did… And that’s what I do now.
Besides client work, Catherine makes typographic posters and art prints that she sells. She also designs and makes modern calligraphy invitations, envelopes and save-the-date cards, as well as putting together entire wedding suites.
Wedding calligraphy suite by Catherine Dawes
Now, Catherine is planning to open her own print shop using
silk-screen printing, woodblock/lino, etc.
I have my ears to the ground hoping
to hear about a letterpress printer I might buy, but they seem pretty rare here
so I know that I’ll be waiting for a while. Also, I’ll be moving into a bigger
studio to accommodate these plans as I’m quickly outgrowing my current one!
Hand-lettering piece by Catherine Dawes
Catherine has one final, practical piece of advice for anyone who wants to do what she's done:
Make sure that you’re properly registered with all the
appropriate authorities in your country! And have proper contracts drawn up detailing
everything that is expected between you and your clients — I’ve seen too many
talented people fall because they don’t take this into account.
Want to know more? You can connect with Catherine at:
Working with the numbers 6 and 12 introduces us to hexagons, hexagrams, dodecagons (twelve-sided polygons) and a number of dodecagrams, but it also includes triangles as a matter of course.
The first operation we're looking at is likely the oldest geometric construction known to mankind, because it only requires a compass or its ancient equivalent, a rope. I remember discovering it spontaneously as a child, while playing idly with my compass, an experience of astonished delight which I'm sure many have had.
Dividing the Circle Into 6
We start with a circle.
Step 1
Keeping the same compass opening, place the dry point at the top or bottom of the circle and draw another circle.
Step 2
Move the dry point to either of the intersection points just created, and draw another circle.
Step 3
Walk around the whole circle in this way. The sixth circle passes through the top of the first (black) circle, and so completes the figure. The circle is now divided into 6.
Dividing the Circle Into 12
Start with the steps shown above to divide it into 6. Then connect the furthest intersection points as shown here. These lines cut the circle at six more points, so that
it is now divided in 12.
Shapes
Hexagon and Hexagram
They are created on a circle divided into six, by joining the six points marked on the circle. If we start the division at the top or bottom of the first circle, as we did here, the shapes are dynamic.
To make them static, either start the division from the left or right of the circle, or carry on till it's divided in 12, and connect this second set of six dots instead.
Note how the hexagram is formed of two equilateral triangles, but also of a smaller hexagon and six small triangles.
Tiles from Egypt or Syria, 15th century.
Dodecagon
Simply join the twelve points on the circle.
Alternative
A different way of dividing a circle in twelve is one we have already learned in our lesson on Working With 4 and 8: Follow the steps for drawing a static square, and stop short of drawing the square itself. Join the points on the circle and you'll discover a perfect dodecagon.
How is this possible? This is a glimpse of the magic of numbers. 12 is a multiple of 4 as well as of 6 or 3, and therefore it is "related" to square constructions as much as to triangular ones. The dodecagon is where the hexagon and the square can meet. This is even more visible in the next shapes:
Dodecagrams
Four different twelve-pointed stars are generated, depending on whether we join every second, third, fourth or fifth point, and they are respectively formed of hexagons, of squares, of triangles, and finally of a single continuous line.
One More Hexagram
The last dodecagram can serve as a grid to draw a different six-pointed star, either static or dynamic depending on which points are omitted.
Patterns
The Seven-Circle Grid
Previously we learned to draw the five-circle grid, which generates a grid of squares. For 6 and 12, we will construct a seven-circle grid, to create root three (√3) patterns.
Steps 1–3
Follow the steps to divide the circle into six.
Step 4
Draw six more circles centered on the outermost intersection points. The compass opening never changes throughout the construction.
Step 5
Repeat at the new intersections for six more circles. These circles, plus the original one that they surround, are the seven circles of the grid, but we need to complete the "flower" inside each of them so that the grid is fully functional.
Step 6
Again place the dry point on each of the new, outermost intersection points (there are now 12), but only draw the arc that is inside the previously drawn circles.
Step 7
Finish with the last missing arcs.
Here is the finished grid with the seven circles proper highlighted.
Without adding anything else, the grid itself provides many simple patterns. Simply pick out some lines (or colour in areas) to create repeating shapes. Underlying circles can be added ad infinitum to extend the pattern.
Grid of Hexagrams
Drawing a hexagram in each of the circles produces a derivative grid that is equally versatile. The hexagrams don't need to be drawn one by one—they appear when certain overall lines are added.
Start with one set of diagonals. To avoid confusion, remember they pass through the top or bottom of the seven circles (ignore intermediate circles).
Now the next set, same idea.
Finally the horizontals, which complete the hexagrams. Note they do not pass through the centre of any of the seven main circles.
Here's the finished grid, made up of hexagons and triangles.
Selective colouring creates all sorts of patterns, including unusual ones like the third one below. The grid can be extended indefinitely to extend the pattern.
Too angular? Here's how to make this grid/pattern curvy!
Curved Hexagrams Pattern
Step 1
Place the dry point as indicated and draw just the two arcs show. Think of it as pushing out the sides of that hexagram into curves.
Step 2
Repeat with the point mirroring the first.
Step 3
Continue all around the hexagram.
Step 4
Repeat with each hexagram in the grid.
Grid of Equilateral Triangles
This is an additional step to break the grid down further, which creates even more flexibility in patterns. Start with the grid of hexagrams:
Add one set of diagonals...
... then the other.
Finish with the missing horizontals.
Here's the finished grid.
Such a basic grid offers infinite possibilities. It's like pixel painting, but with triangular pixels. The popular puzzle game of Tangram is based on this. Two examples are shown below, with the grid showing and without it (which considerably attenuates the presence of the triangles).
Dodecagram Pattern
Here's a different use of the seven-circle grid. Instead of dividing the surface into tiles to be individually filled, we're going to construct more complex shapes.
Our starting point is a grid of hexagrams:
Step 1
Ink or at least darken the outer outline of each hexagram, as these are final lines. The details in the seven circles can be rubbed out for clarity, but we need their outlines.
Step 2
We need to divide each circle into 12. To do this in bulk, add the diagonals as if constructing a grid of triangles, first one way...
... then the other...
... and finally the horizontals.
Step 3
Working in the highlighted circle, connect the six new points so as to form a second hexagram.
Step 4
Now ink the outline of the hexagram.
Step 5
Repeat steps 3 and 4 in each circle. This final design can be filled in, or given a woven effect (how to do this will be covered in an upcoming lesson.)
Pattern With Squares, Triangles, and Hexagons
Let's finish with a slightly tricky, but different-looking pattern. As a basis, it requires the seven-circle grid plus the full triangular grid. This pattern looks best on an extended grid, where it can repeat more, but we'll stick to the seven circles for the demonstration.
Here is our starting grid, using different colours for the circles and triangles, for clarity.
Step 1
We'll start with the central circle. Look for and mark the intersections below. They are tricky because they are not the intersection of straight lines, or of circles, but four points on the outline of this central hexagon where it is cut by arcs.
If you got the correct points, joining them produces a perfect square.
Step 2
All we're going to do for this pattern is draw these squares. It is finding them that is tricky, with this complex grid, and the latter needs to have been drawn very accurately.
Let's now spot the squares in the top and bottom circles. They are also static, so the points are easy to spot.
Join the points:
Step 3
The same squares can be found in the last four of the seven circles, all static.
Step 4
Now we move on to the intermediate circles below, which produce tilted squares. Knowing that two of the four points coincide with corners of the dynamic squares, we can locate the other two points for each of these. The intersections are the same as before, but at an angle.
Joining the points, here are the squares:
Step 5
It is now easy to visualize the remaining squares when we turn to the remaining intermediate circles—in a fuller pattern, their four corners would be already defined, as they are in the two closer to the centre below.
Here is the pattern without the grid (I have added four outer squares to "close" it, so it's more clear). Notice that where three squares touch, they enclose an equilateral triangle, and each circle of six squares creates a hexagon. Of course, you can also achieve the same result by finding the hexagons and/or triangles instead.
It is just a portion of pattern, really: the proper way to draw this one
is to continue the grid of circles to the edge of the surface you're
filling, draw an equally extensive grid of triangles, and then find all the
squares involved.
You would then get the following, and the way it is coloured can change the shapes dramatically.
That will do for 6 and 12! We've not only learned to work with triangles, hexagons and dodecagons (and related stars), we've also seen how to bring them together with squares, and how a seven-circle grid can yield not only various patterns, but other grids.
Next month we will work with a final pair of numbers, 5 and 10, and also some odd numbers such as 7 and 9.
In the series on Creating Photoshop Brushes from Scratch, I showed my process for creating Custom Shattered Glass Brushes. If you haven't had a chance to read over that tutorial, I recommend you take a few minutes and take a look at it now. Still not convinced? Well, it involves actually using a hammer to bust the glass! Really, you should go take a look.
Tutorial Assets
To follow along with this tutorial you will need the background stock image of an angry woman.
You will also need the custom Shattered Glass Brushes. Download the ShatteredGlassBrushes.abr file attached to this tutorial. To install the brushes, go to Edit > Presets > Preset Manager. In the Brushes section, use the Load button to navigate to the downloaded file.
This will add 12 new shattered glass brushes to your Brush Presets.
1. Create the Glass Image
The idea is to create the illusion of a pane of glass in front of the model. One of the most effective techniques for this is to create another version of the background that is visually different. It needs to be just different enough that when the broken areas reveal the original image, it is obvious the two are different.
Step 1
Open the stock image and duplicate the background layer with Layer > New > Layer Via Copy (Control-J).
Step 2
Darken the layer by using Levels. Go to Image > Adjustments > Levels (Control-L). Push the left slider handle towards the right until the number beneath it is at 100.
Step 3
Now blur the layer by going to Filter > Blur > Gaussian Blur. Use a Radius of 10 pixels.
Step 4
Set the foreground color to a pale blue #dbfaff. Add a new layer with Layer > New > Layer (Shift-Control-N) and then press Alt-Backspace to fill the layer with the blue color. Set the Blend Mode to Multiply.
Step 5
This step is optional. If you have the Adobe Paper Texture Pro extension (found under Windows > Extensions), you can find a good texture to use to simulate a dirty, dusty window surface. I used the Gertrude_Jekyll texture, set the Blend Mode to Linear Burn, and reduced the Opacity to 70%.
2. Break the Glass
Now we have a convincing glass pane for our heroine to break through. The idea is to use the shattered glass brushes to craft a jagged hole in the glass surface.
Step 1
Add a New Layer and select one of the shattered glass brushes—I started with the Shattered Glass 03 brush. Make sure the paint color is set to Black and just a single click will stamp the image neatly onto the layer.
Step 2
Use the Polygonal Lasso Tool (L) to carefully select a cutout portion of the center of the glass shatter, along with the lower right area, and press the Delete key to remove those pixels. Remember to then cancel the selection with Select > Deselect (Control-D).
Step 3
Grab the Move Tool (V) and hold down the Alt key while dragging the shattered glass layer's thumbnail downwards. This will create a duplicate of the layer and place it below the original.
Step 4
Press the small checkerboard icon above the layer thumbnails to Lock the Transparency of this layer. Make sure your background color is set to White and press Control-Backspace to fill the layer with the background color. The locked transparency means only the visible pixels receive the fill. This is a quick and easy method of changing the color of the pixels in a layer without affecting the other properties.
Step 5
Tap the Up Arrow Key three times, then the Left Arrow Key twice, to slightly nudge the white copy. This provides the impression of thickness to the broken glass.
Step 6
Repeat the process of adding shattered glass completely around the model's face. Here I used four different pairs (one dark, one light) of shattered glass layers.
Step 7
Hold down the Shift key and select all the layers except the original photo background layer. Go to Layer > Group Layers (Control-G) to place them all into a single layer group.
Step 8
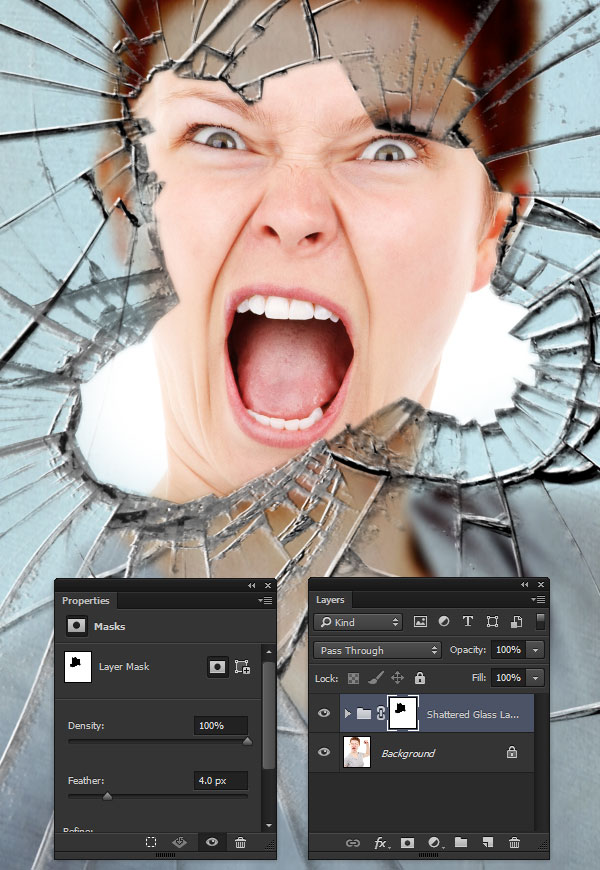
Use the Polygonal Lasso Tool again to select the inside area of the hole in the glass. Go to Layer > Layer Mask > Hide Selection to add a mask to the group and allow the original background to show through. In the Properties Panel for the mask, set the Feather to 4.0 pixels so the edge of the glass still appears to have some thickness.
3. Flying Fragments
If this woman were to actually break this glass, there would be tiny shards of glass flying out. The custom brushes contains several glass shard brushes just for this purpose. Let's use those to add a bit of convincing flair to this project.
Step 1
Repeat the same process as above to create a black and white layer pair using the glass shard brushes.
Step 2
Create a New Layer above the glass shards. Use the Polygonal Lasso Tool to craft a selection of the inside of the glass shards. Fill the selection with a bluish-green hue—I used #bbd2d9—and set the blending mode to Overlay. Don't forget to cancel the selection with Select > Deselect (Control-D).
Step 3
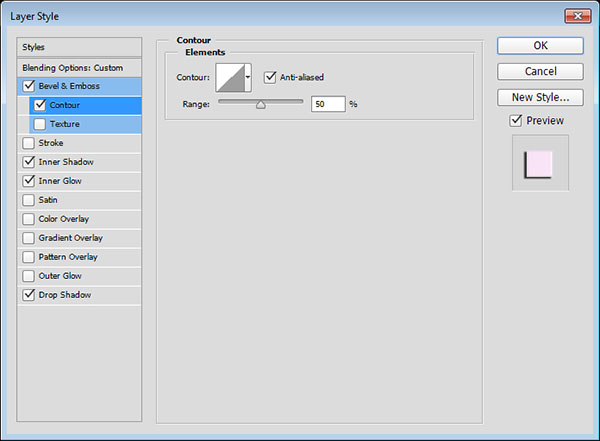
Select the shard layers and group them together with Layer > Group Layers (Control-L). Then double-click on the area to the right of the group's name to open the Layer Style dialogue box. Add a Gradient Overlay with the following settings.
Blend Mode: Multiply
Opacity: 57%
The result should look like this.
Step 4
Create more shards by using the same process to craft additional layers, or simply duplicate the first group and use the Edit > Free Transform tool to move, scale and rotate the duplicates into new positions.
Then here's the final effect!
Want More?
A project like this shows just how useful custom brushes made from scratch can be. Imagine trying to illustrate all those cracks and chips in the glass! If you want to see more like this, be sure to check out the rest of the series on creating Photoshop Brushes From Scratch. I'd love to see how you've used these brushes in your own works, so please share them below in the comments!
Also, feel free to browse through my other tutorials, quick tips, and courses here at Tuts+. You can find them all linked in my profile.
Perfect for Chinese New Year! In this tutorial you'll learn how to draw animal characters from the ground up, trace over their contours, and add details in Adobe Illustrator CC 2014. Additionally, we'll prepare them for printing, making sure there are only two objects per icon design, so that they're ready to be compiled into a zodiac calendar with Grace Fussell.
1. Setting Up Your Document
Step 1
Open up Adobe Illustrator CC 2014 and create a New Document. Mine measures 800 px by 600 px and has the color mode set to RGB. You can change both of these settings at any time when working in Illustrator.
Step 2
Select the Rectangular Grid Tool from the Toolbar and Left-Click the Artboard to bring up the tool's options. Enter in the following attributes:
Width: 800 px
Height: 600 px
Horizontal Dividers: 2
Vertical Dividers: 3
Hit OK and Align your newly made grid to your Artboard. Now you've got 12 cells in which to draw each icon. Lock the rectangular grid in your Layers panel.
2. Sketching Animals: Rat, Ox, and Tiger
Step 1
Let's start sketching out our animal icons! You can do this in Adobe Illustrator, Adobe Photoshop, another drawing program, or on paper and import them into the program.
If you're working in Illustrator, I've found it easiest to use the Blob Brush Tool (Shift-B), keeping the Fidelity in the center of the slider, a round brush, and both the Size and Pressure Variation at 6 pt.
Draw each icon in one of the rectangular grid's cells and Group (Control-G) together the icon's components before moving on to the next design in order to keep your Layers panel organized.
Step 2
We'll start with the rat!
The head is a lumpy circle or apple-like shape. Consider the two lower sides to be the rat's chubby little cheeks.
I drew large ellipses for the ears. Make the rightmost ear smaller and obscured by the head.
The body is an ellipse. Note how imperfect these shapes are. You definitely have the option of using shape tools or templates as needed.
Follow the curve and contour of the body shape and bring it to a point, curving toward the body itself. This will help you create the rat's tail, legs, and the bulk of the body.
Step 3
Now we'll draw the rat's legs, tail, and details.
Continue the outer contour of the rat's body to form the tail. It's thin, whip-like, and forms a C shape.
The feet are curved triangles. The outer leg is a half circle.
Both forefeet are curved triangles missing one side (see below).
The face is simple: two U shapes for the eyes, an X for the mouth, and three little whiskers on either side. I'll be using the same (or similar) eye shapes for the entire icon set.
Step 4
Next up is the ox.
Start with a triangle whose leftmost corner is rounded.
Cut out a triangle from the left side. This forms the mouth. If working in Adobe Illustrator, use the Eraser Tool(Shift-E) or just draw a small triangle on that side. Start the body by drawing a circle on the right side, near the face.
Connect the circle to the triangle with a curving line at the top and a large curve at the bottom of the body. Draw an elongated U for the ox's ear.
The legs start with simple lines: three straight and one curved.
The legs sort of look like elongated Ws. Draw a small line on the right side of the ox's bottom for the tail.
Finally, draw two horns, a face, and consider scallop details to later be incorporated into the final design.
Step 5
Our next zodiac symbol is the tiger.
The bottom of the head is a wide V shape.
The top is a connecting curve.
Start the body with the two front legs: two slightly curving lines on either side of the head.
The bottom of the feet are brought in at two points with a curve in the center for the bottom of the chest.
Start the rest of the body with a curve extending toward the right.
The leg and feet are similar to those of the rat, which we drew earlier.
Step 6
Let's continue with the tiger.
The ears are rounded triangles on either side of the head.
When drawing the tail, consider a loose S shape with the end being bulbous and thick and tapering downward.
I drew the tiger's stripes as little triangles scattered along the edges of the design, pointing inward.
Finally, the face has U-shaped eyes, and triangles for the nose and mouth.
3. Sketching Animals: Rabbit, Dragon, and Snake
Step 1
The rabbit, or hare, is the next icon in our set of icons.
The rabbit's face is similar to the rat's: sort of circular with a flat bottom (or close to flat).
The ears are like a very rounded M. Note how they're angled to the upper right corner.
Since the rabbit is sitting, its body starts with the right side as a backward C.
Draw a straight line on the bottom of the design going to the left and little curving lines to make a note of each (visible) limb.
Step 2
Add straight and angled lines for the rabbit's feet and scalloped details for the rabbit's tail. The face is similar to that of the rat's, drawn previously in this tutorial.
Step 3
Let's move on to the dragon.
The head starts with a triangle.
Add a square on to the right side of the triangle.
Starting with the right side, draw a long, bumpy curving shape that forms the dragon's body.
Draw a smaller line on the left side of the first to show how thick the dragon's body is.
Add triangles for spikes and horns all over the dragon's body.
Add a bat-like wing to the right side of the body.
Finally, fill in details like limbs, an eye, and a nostril.
Step 4
The snake is constructed like the dragon: from triangles and curving S shapes.
Start with a triangle whose bottom point is a flat edge.
Starting at the leftmost corner, draw a curving S shape around to the right side to form the snake's body.
Add a bumpy rattle to the tip of the snake's tail.
Draw a forked snake tongue to give the snake more personality. In my final image, I decided to place the tongue to the left side so it could be more easily seen. Your design's composition, however, is entirely up to you.
Finally, thicken up the snake's body and draw a small face. Remember to Group together each icon's components as you complete each design.
4. Sketching Animals: Horse, Goat, and Monkey
Step 1
The horse has a similar design to the ox.
Start with a triangle whose leftmost end has been flattened out.
Continue the horse's head with two straight angled lines going to the right and downward (note it does not form a perfect 90° angle).
The horse's body is a jellybean or kidney-like shape.
Like the ox, the horse's leftmost leg curved inward and is picked up.
The other legs are rectangles.
Two triangles form the horse's ears.
Finally, add in details like the face, mane, tail, and saddle.
Step 2
We're going to construct the goat, another similar design to the horse and ox, differently since we're already familiar with their construction.
The head starts as a less-than (<) symbol.
Two triangles form the ears along with a straight line for the top of the head between them.
The eye is a V or U shape.
Curving, pointy shapes form each of the goat's horns.
Step 3
The top of the goat's body is a U shape while the tail is feather-like and drawn to the right side.
Start the leftmost leg with a long, curving line from the center of the head and indicate the goat's chest and belly with two curves.
Like the ox, the goat has four hooved feet.
Finally, add details like fur lines or scalloped edges along the goat's body.
Step 4
Let's move on to the ninth design in our Chinese zodiac icon set: the monkey.
Start with a heart for the face (similar to a Snub-nosed monkey or Snow monkey).
Draw two C shapes for each ear and a curve for the top of the head over the heart face.
The body begins with the back to the tail, drawing a curve from the center of the face heading down. Also note the leg begins with a curve as we all, similar to how the legs were drawn for the rat and rabbit.
The feet are wedge-like and the arms start with two lines at a 90° angle.
Continue with hatch-like notations for the monkey's hands and feet.
Finally, add in details like the face and S-shaped tail.
5. Sketching Animals: Rooster, Dog, and Boar
Step 1
And so we begin the final set of our Chinese zodiac icons, starting with the rooster.
Like many of the designs before it, the rooster starts with a triangle, this time forming a beak.
The bottom of the body is a wide U shape while the tail is similar to that of the goat's.
Draw assorted points that curve around the top of the of the design for the rooster's comb.
Another wide U shape forms the rooster's wing.
A small, curvy W forms the rooster's wattles, while two little legs were drawn from Vs and straight lines.
Finally, add a U and straight line to form the rooster's eye and mouth respectively.
Step 2
Next up is the dog.
Start with a U shape for the ear.
Two curving lines that meet in the center form the top of the head and face.
The dog's snout is a curved V shape.
Its body is similar to the rooster's in that its formed from wide U shapes, or curves starting near the head. Note how long the body looks when compared to the shapes of the rooster.
Add a small tail on the right side of the design, similar to the shape of the dog's snout.
I drew a quick collar so that the design looked more dog-like than duck-like.
Step 3
Finally, details like little pointy Vs for the legs and a small face finish the dog design splendidly.
Step 4
Our final icon design is that of the boar. Mine is more like a cute little pig, keeping in line with the design style of the rest of the set.
The ear of the boar is leaf-like or heart-like.
Draw a slightly curved line from the right to the left to form the top of the head.
This small curve forms the top portion of the boar's snout.
A large curved line, starting at the underside of the boar's nose, moves down and around to complete the boar's head.
Step 5
The boar's body is a large oval or ellipse that starts at the end of the head and curves around to the middle of the ear.
Draw a little spring-like shape for the boar's tail.
Its legs are elongated Ws.
Finally, its face is similar to those of the previous icons: a U for the eye and a small curving line for the mouth (if desired). Add small scalloped lines or flowers to the body of the boar to complete your design.
Step 6
Here's a final look at my animal icon sketches. I cleaned each of them up while keeping the sketches loose and have Grouped each animal design's components together so that there are 12 separate groups in my Layers panel. Create a New Layer for each icon design and place the corresponding sketch group on it.
6. Tracing the Contours of Each Icon
Step 1
Instead of going through every icon design, I'll demonstrate how I broke down each design's contour to create a simple red silhouette. I'll use the tiger icon as an example below.
Using the Pen Tool (P), start with the head and trace its contour. This is the time to make sure each side is as symmetrical as you want it to be.
My next step was to take each ear as separate shapes. I traced the left one, Copied (Control-C), Pasted (Control-V), and Reflected it over a Vertical Axis.
Continue tracing each component of the animal. Next are the chest and legs.
Then you'll trace the body and tail.
Breaking down the design by parts allows you greater control with its silhouette, especially if your sketch was as loose as mine. If you sketch was more polished, you may want to simply trace the contour of the design in one go. Repeat this step for each of the 12 icon designs.
Step 2
Some of the animal designs may benefit from the use of other tools.
Once the head of the snake is drawn, use the Paintbrush Tool (B) with a 5 pt Calligraphic Brush selected from the Brushes panel to outline the snake's body.
You can either draw the rest of the snake's body with the Pen Tool, or quickly draw the squiggle with the Paintbrush Tool and Join the paths together at their ends.
When you've closed your path, set your stroke color to null and the fill color to the same color you're using for the rest of your design.
Step 3
Another quick technique to use is Copying and Pasting identical limbs and Reflect them over a Vertical Axis in the same manner that I described with the tiger's ears previously. Doing so will not only speed up your production time, but also continue your use of the same drawing style throughout each icon.
Step 4
When you're satisfied with each design, Select its individual red components and hit Unite in the Pathfinder panel in order to merge them together into a single Compound Shape. Repeat this for each of your 12 designs.
Step 5
Here's a look at all 12 of my zodiac silhouettes. Note how most of the details of the sketches' contour are intact, though some details changed including the snake's tongue, the dog's neck, and the shape of the dragon's feet.
7. Drawing Surface Details
Step 1
To begin, set the Fidelity of the Blob Brush Tool closer to Smooth than was set previously. Change the Size and Pressure Variation of the brush to 4 pt. If you're not using a pressure-sensitive tablet, this step won't be useful to you and instead you may want to use the Pencil Tool (N) or Pen Tool (P).
Step 2
Move the sketch group over your compound silhouette shape in the Layers panel and lock both of them. Using the Blob Brush Tool, or the drawing tool of your choice, to trace the simple face details we drew previously for each icon design. Note how I've begun to add additional details, like those on the ears of the rat.
Step 3
To show the separate between limb and body, Zoom (Z) in on the icon and carefully draw curving sliver shapes to denote the space between each arm and leg and the animal's body itself. Make sure the end of each white shape lines up with the edge of the red silhouette. Your sketch should help inform you where these shapes need to be.
Step 4
As a means to unite each design in style, I've taken to drawing little dots for eyebrows, eyelashes on some, and flowers on each animal. Additionally, many of the animals have scallop-like designs on their backs. It's up to you on what sort of designs you add to each animal that unite the whole set with one style. Flowers, triangles, tiny clothes; whatever you use, make sure each zodiac symbol is connected in some way.
Step 5
As an example, see the three designs below for a small explanation on some of their defining features:
The ox has a pointed, scalloped scruff. This shows where its head ends and body begins. It sort of works like a collar.
The dragon has its nostrils and some scales defined. Later it will also have flowers drawn on it.
The monkey has a wreath of flowers drawn on its head. Its face is also white while its facial features are red. You'll have to Unite the red facial features and hit Minus Front in the Pathfinder panel in order to Subtract the features from the white face.
8. Prepare Your Designs for Printing
Step 1
At this point, you could call your designs complete. Note how each has a similar style and you can tell that they are a cohesive set. Or you can follow the next few steps below in order to simplify your designs and the number of paths and points that make up each.
Step 2
You'll want to repeat the following four steps for each of the 12 zodiac designs.
Select and Unite the white details in the Pathfinder panel. Make sure, before doing so, that any stroked paths are Expanded into objects.
Copy and Paste the red silhouette, change the color to white, and set it aside. Select the white details group and the red silhouette and hit Minus Front in the Pathfinder panel in order to Subtract it from the red design.
Place the white silhouette you set aside previously behind the red cut-out shape in the Layers panel.
Align the white silhouette behind the red cut-out shape to their centers in the Align panel.
Great Job, You're Done!
Finally, add a white stroke to each of the icons' white silhouette of 6 pt or so (the thickness is up to you) to really make them pop from whatever background color you've chosen for your icon set.
Now that you've completed your Chinese zodiac symbol set, continue this project in Adobe InDesign with Grace Fussell in "Creating a Zodiac Calendar to Celebrate Chinese New Year". Share your design results in the comment section below of each of these related tutorials.
Ever wanted to feel like an architect
and create a model of a city with fancy buildings? This tutorial is exactly for
you! Learn how to make trendy flat style houses with basic shapes, Pathfinder operations and the Shape Builder Tool, change color
saturation and brightness in a few clicks with the Recolor Artwork function, and make up your own color schemes. Let’s
get started!
1. Build Up a Set of Flat Houses With Basic
Shapes
Step 1
Let’s start building our first house. Make
sure you have the Smart Guides(View> Smart Guides) turned on. They help you to arrange and move objects
more easily, with the help of the alignment guides and snapping feature.
Take the Rectangle Tool (M) and single-click with your left mouse button on
the Artboard. Define the size of your rectangle by setting its Width to 45 px and Height to 60 px. Fill it with light gray color
(about 20% black).
Step 2
One of the main elements of any building is
a roof. Form a narrow rectangle of a lighter gray color and rotate it to 45 degrees by holding the Shift key. Double-click on the Reflect Tool (R) to reveal the options
window and reflect the shape over the Vertical
Axis, clicking the Copy button
and thus creating a second half of the roof. Move both parts closer to each
other, creating a 90-degree angle between them.
Step 3
Select all the created shapes with the Selection Tool (V), hold the Alt key and click on the house base.
The selection becomes thicker, indicating you're now aligning to the Key Object. Head to the Align
panel and click the Horizontal
Align Center button.
Step 4
Let’s get rid of the gap between the house
and the roof. Select the house base and go to Object > Path > Add Anchor Points. Select the upper middle
anchor point with the Direct Selection
Tool (A) and drag it straight up, holding down the Shift key, till it becomes hidden behind the roof.
Step 5
Add a small square to the left part of the
house for the chimney and Send it to Back (Shift-Control-[).
Add the border of the chimney and create a
similar border for the foundation of our building.
Step 6
Let’s form the entrance door of our house.
Start by placing a rounded rectangle shape of a light gray color in the bottom
middle part of the building. Grab the Eraser Tool (Shift-E), hold down theAlt key, click and start dragging your mouse over the bottom part of the door
shape. The part covered by the white frame of the Eraser Tool will be deleted after you release the mouse button.
Step 7
Add the staircase by forming
a narrow rectangle at the bottom of the door. Copy the rectangle and place it
under the first one, making it slightly longer. Finally, add as many stairs as
needed to reach the bottom of the house foundation.
Step 8
Align the staircase and the foundation to Vertical Align Bottom in the Align panel.
Step 9
Let’s make the stairs more three-dimensional by
adding shadows. Duplicate the stairs and move the copies up a bit. Then select
the lower stair and its copy and use the Minus
Front function of Pathfinder to
cut off the unneeded part. Fill the remaining shape with darker gray color,
thus creating a shadow, and add shadows to the other stairs, using the same method.
Add a darker border across the center of
the building for decoration.
Step 10
Let’s move on and add windows. Select the
door shape, hold both the Shift and Alt keys and drag the shape up, thus
creating a copy right above the door. Create two more copies of the windows and
align them with the basic house shape if needed.
Step 11
Add several bricks to the front of our
building, making the exterior more detailed.
Add a small round window in the top part of
the house with the Ellipse Tool (L).
Step 12
Let’s make the entrance more detailed.
Select it, go to Object > Path >
Offset Path and set the Offset
value to -1 px, thus adding a
smaller shape inside the doorway. Extrude the shape down so that it touches the stair and fill it with darker gray color. Add a simple round door-handle.
Make a rectangle and rotate it to about 45 degrees, half-covering the door.
Duplicate the door, select both the door copy and the rectangle, and use the Intersect function of Pathfinder to cut the shape. Fill the
newly created shape with darker gray, creating a diagonal shadow on our door.
Step 13
Let’s return to the windows and use the
same Offset Path technique to create
window frames. Add a narrow rectangle, dividing our window into two halves. Use
the Rotate Tool (R) to set the
rectangle perpendicular to its initial position and click the Copy button in the Rotate options window, thus creating a copy, so that we have two
crossing stripes.
Add a diagonal overtone above the window,
as we did with the door, and edit two other windows, making them detailed.
Step 14
Add dimension to the attic window by adding
a smaller, darker circle inside the first one. Duplicate the smaller
circle twice (Control-C > Control-F> Control-F) and move the upper copy up and to the right. Cut off the
unwanted parts with the help of the Pathfinder
and fill the inner circle with dark gray to show the depth of the window
opening.
Step 15
Place a gentle shadow under the decorative
edging, making the facade more three-dimensional. Fill the shadow shape with linear
gradient from white to light gray, and switch it to Multiply Blending Mode.
Use the same technique to put a shadow
under the roof. Copy the roof shape and move it down a bit. Delete the unneeded
parts with the help of the Shape Builder
Tool (Shift-M) by selecting both the house base and the roof shadow and clicking
the pieces while holding down the Alt
key.
Step 16
Let’s move to our next building: a small grocery. Start by making a rectangle of 55 x 40 px size and attach a foundation and a staircase as we did
with our previous house. Make a wide, light gray rectangle for the window and
render the window frame by adding three smaller, darker rectangles, defining the
glass parts. Add shadows to make the window more detailed.
Step 17
Start forming a striped sunshade by placing
a narrow rounded rectangle in the upper left corner of our store, and copy it by
holding both the Shift and Alt keys and dragging it to the right.
Press Control-D several times, adding more copies and entirely covering the upper part of the
building. Make some copies darker to alternate the colors one by one.
Erase the upper part of the sunshade, making it flat. Put a shadow in Multiple Blending Mode under the sunshade, separating it from the
facade, and add a few lighter bricks to maintain the style of our first
building.
Step 18
Let’s make another living house with a big garage
in its front part. Create the house base from a 50 x 80 px rectangle, and start forming the garage door with the help
of the Rectangle Tool (M) and the Offset Path function.
Add a narrow plank on top of the garage
door and make it more three-dimensional by filling it with linear gradient from dark gray
to lighter gray. Add more planks, covering the surface of the garage door.
Step 19
Make a simple flat roof on top of our
house. First of all, create a lighter gray rectangle and then select its lower
right anchor point with the Direct
Selection Tool (A). Press the Enter key
to call out the Move options window
and set the Horizontal Position
value to 3 px, while the Vertical value is set to 0 px. Leave all other options as
default and click the OK button, thus
moving the point farther to the right. Repeat the same with the left anchor
point, this time setting the Horizontal
value to -3 px to move the point to
the left, making the bottom edge of the roof much wider.
Step 20
Add a couple of windows in the same way as
we did with our first house, but this time make the window frames square so
that the houses look different.
Finally, make an additional wing in the
right part of our house for the entrance. Add gentle shadows in Multiple Blending Mode in the bottom
part of the house, under the roof and wherever you find it necessary. Form an inclined roof above the entrance and add a tiny square door with a staircase.
Decorate the house with several groups of bricks.
Step 21
Now let’s move to a taller building with an unusual roof. Create a rectangle, this time making it a bit higher than
the previous ones (50 x 85 px), and
start forming the roof by placing a narrow rectangle on the top, making it
shorter at the edges. Create two more rectangles, one above the other, making each next shape shorter than the previous one (the same as we did while forming the staircases). Add
the foundation in the bottom of the building and separate it from the house with the help of a
gentle shadow.
Step 22
Take the decorative edge and the rounded
windows from our first house, make more copies and arrange them on the facade in any symmetrical position which you find interesting. Unite
the roof elements in Pathfinder and
add an outline at the edges with the help of the Offset Path.
Edit the top part of the roof by filling
the created thin outline with light gray color, and finish up with the building
by placing lighter gray bricks here and there.
Step 23
Let’s render another living house with a
tiled roof. Make a 45 x 85 px
rectangle for the house base and add two narrow planks on both sides of the
house, creating a side view of our future roof. Add another rectangle in the
upper part of the house, and start forming the tile in the same way as we did
the sunshade for our store building: put a tiny rounded rectangle in the upper
left corner of the roof and move it to the right, making a copy. Press Control-D as many times as needed to
cover the roof from side to side. You can swap the colors, making the
building darker than the roof, or leave it as you like.
Duplicate the created string of tiles and
drag it down, placing it partly under the first one (Control-[). Hide the unneeded parts of the tiles by erasing them
with the Eraser Tool (Shift-E) or
hiding them under the side planks by placing them on top (Shift-Control-]). Make some tiles darker and the others lighter to
alternate the colors, making the tiled roof more fancy.
Step 24
Add the entrance, decorative front border
and a group of windows by taking them from another house and put a gentle
shadow in Multiply Blending Mode
under the roof.
Here’s our living house with the tiled roof.
We’ve added some separate bricks to the facade and formed a decorative brick
border along the bottom part of the building.
Step 25
Let’s move on to the last building of our
set: the clock tower. This will be the tallest and the narrowest building, with a
25 x 100 px size. Add a foundation,
emphasized by a semi-transparent shadow, and start forming the clock face by
putting an even circle at the upper part of the tower with the Ellipse Tool (L) by holding the Shift key. Add a smaller circle inside
the clock face and define the edging by making it darker.
Step 26
Put two thin stripes for the hour
graduation of our clock face and align them to the vertical center of the inner
circle. Keeping both stripes selected, take the Rotate Tool (R) and rotate them by 90 degrees. Click the Copy
button in the Rotate options window to
create two more gradations. Use the Polygon Tool and set the Sides value to 3
to form a triangle. Squash and extend the created triangle to make a clock hand.
Select the clock hand and move it by dragging
it with the Rotate Tool (R). Add
a longer triangle for the minute hand, moving it with the Rotate Tool (R) as well. Put a light
reflection on the clock face to make it more true to life.
Step 27
Let’s add a fancy tiled roof to the tower. Combine
a triangle and a string of tiles by Uniting
them into a single shape in the Pathfinder
panel. Take the tile group from the previous house and place it under the
created triangle shape. Select both the tiles group and the roof shape, click the right mouse button and Make Clipping Mask, making the unwanted
parts invisible.
Here’s the final view of our clock tower.
We’ve added a small attic window on top, decorated the tower with a border and
several groups of bricks, and placed a door with a staircase at the bottom of
the building.
2. Render a Set of Flat Trees
Step 1
We need to create some environmental details,
such as trees, to enliven our cityscape. Start by forming an even circle and
highlight its left part with a lighter crescent-shaped stripe. Group both
objects, duplicate them and place a couple of smaller copies on the side of the
basic shape, making the tree bushy. Copy the basic shape and erase its left
half. Switch the remaining half to Multiply
Blending Mode, making a shadow. Add a narrow tree trunk and place some more
trees in front and at the back, creating a group of bushy trees.
Step 2
Let’s make a simple bush by drawing an
ellipse and dragging its side anchor points down with the help of the Direct Selection Tool (A). Click the
upper anchor point with the Convert
Anchor Point Tool (Shift-C) to make a sharp angle. Place a rectangle covering one half of the bush shape. Select both objects and delete the
rectangle piece outside the bush by clicking it with the Shape Builder Tool (Shift-M) while holding the Alt key. Erase the rounded bottom part of the element with the Eraser Tool (Shift-E) and form a shrub
by adding smaller elements on both sides.
Step 3
Move on to the next tree—a cone-shaped
fir. Create a triangle base and put a gentle shadow above, covering the right half of
the tree. Add a narrow trunk and form a group of fir trees.
Here is the full set of elements that we’ve
created for our future composition.
3. Create a Cityscape Composition and Edit
the Colors
Step 1
Let’s line up our houses and add the
created trees and bushes among them. Use the Align panel to align the objects by the bottom line.
Step 2
The elements look a bit pale at this step,
so we need to add some contrast, making them more vivid. Select one of the
houses and click the Recolor Artwork icon
in the control panel above. Click the Edit
button in the pop-up options window to reveal a color wheel. Find a chain link
icon in the bottom right corner and click it to Link harmony colors so that you can change all colors at once while
changing any color from the group. Set the Brightness(B) slider value to 65% or less, making our
house darker. Make sure you have the Recolor
Art checkbox ticked to see the result in real time.
Edit other buildings as well, making some
of them darker and others lighter, alternating the colors.
Step 3
Render a flat cloud by combining a group of
even circles and a rounded rectangle, placed at the bottom of the group. Select
all parts and Unite them in Pathfinder, creating a single shape.
Step 4
We need to add a road in order to form the main
street of our city. Put three dark rounded rectangles one above the other in
the bottom of the buildings line and Unite
them. Add two more rounded rectangles, partially covering both sides of the
middle rectangle. Use the Minus Front
function of Pathfinder or the Shape Builder Tool (Shift-M) to cut out
the middle shapes, creating rounded holes.
Step 5
Add a horizontal line along the upper part
of the road to create a separating strip. Head to the Stroke panel and set the Weight
value to 2 px. Select the Round Cap and Round Joint and check the Dashed
Line box, setting the dash to 6 px
and the gap to 8 px.
Step 6
Let’s render a simple car and put it on the
road in order to made our city more alive. Form the base of the car with the
help of rounded rectangles, and draw two even circles for the wheels. Add
minor details, such as the headlights, tires, door handle, and any other parts that you find necessary for making our car more realistic.
Step 7
Move on and start forming a long shadow
effect to add more depth to our artwork. Create a big rectangle (I’ve filled
it with red color just to make it more noticeable) and rotate it to 45 degrees. Combine the edges of the
rectangle with the side points of the road, and Sendto Back
(Shift-Control-[).
Add more diagonal rectangles beneath every
part of the road and every cloud.
Now select both the object and the
rectangle and delete the unneeded piece with the Shape Builder Tool (Shift-M) by pressing the Alt key.
After you’ve deleted all the unwanted
parts, select the rectangles and fill them with linear gradients from gray to
white, switching to Multiply Blending Mode and thus turning the rectangles into
semi-transparent long shadows.
Step 8
You can enliven your cityscape by creating
a vivid color palette. Select your color group and click the New Color Group icon in the Swatches panel to create a user-defined
palette from the Selected Artwork.
Select your city and go to the Recolor Artwork options window. Here
you can find your palette in the Color
Groups section on the right. Click it to apply new colors to your artwork
and use the Randomly change color order
function to find the best combination of the selected colors.
You can limit the number of colors used in
your artwork by setting the desired value in the Colors box to achieve a nice
contrasting color effect.
Otherwise, if you’re happy with the initial
result, just leave your cityscape in grayscale, maintaining a trendy retro
style.
Voila! Our Cityscape Flat Illustration Is Completed!
Great job, guys and girls, we’ve managed to
create a trendy flat style cityscape with some additional details, which added dimension and made our artwork more alive. I hope you’ve learned some new simple
tips and tricks for your future artworks. Stay tuned for more, and let the
inspiration guide you!
This
tutorial will teach you what final transforms in the Apophysis
fractal program are, and how to visualize their effects and utilize
them. This special form of transform is very powerful and can
completely change the look of a fractal. We'll first build a base
fractal so that you can visualize each variation easily, and then
we'll look at the practical application.
What
Are Final Transforms?
A
final transform is a very special form of transform in Apophysis. As
the name implies, there can be only one. It acts as a funnel would.
All of the regular transforms are funneled through this one transform
so that the effect you see is whatever variations are found on the
final transform. The final transform can so drastically change your
original fractal that you may not even recognize it.
Why Use Final Transforms?
The
simple answer: because they make things easy. There are other ways to
accomplish the same effect that the final transform gives a fractal,
but they are very complicated and not necessary in most instances.
The sheer speed and power afforded you by the final transform is
enough incentive to learn how to use them.
Lets
get started by building a test fractal and then looking at the effect
a final transform has on the fractal.
1. Creating a Test Fractal
Step
1
Load
Apophysis and open the Editor. Click the button for a New Flame.
This will give us a blank canvas to with which to start.
Step
2
Before
we proceed any further, close the Editor window and open theGradient Adjustment window. We will assign a gradient to the
fractal so that the colors are clear and evident when we make changes
to the final transform.
Choose
a gradient that includes several bright and contrasting colors. I
have selected 531_Dark_Rainbow.
Step
3
Open
the Editor again and switch to the Variations tab. Removelinear from your fractal by changing the value to 0. Look for
the blur_square variation and add 1 to the value. Older
versions of Apophysis might include the square variation and
you should use this if blur_square is not available. If
neither is an option in the version of Apophysis you are using, usesinusoidal and blur both with values of 1. The effect
is nearly identical, with slight nuances.
Step
4
Click
the button in the toolbar to turn on the Post Transform option
for Transform 1. This is the button with a PX and a Triangle beside
it. Switch to the Triangle tab. Change the unit size for themove box (the box with the up and down arrows on the left; and
left and right arrows to the right) to 1 unit. Move this transform up
1 and to the left 1. At this point, you will not see any
change in your preview window.
Step
5
Click
the Duplicate Transform button in the top of the toolbar. Move
this transform to the right two units. Switch to the Colors
tab. Change the Color speed to -1. Choose a new color for this
transform by adjusting the value in the Transform color box.
I've selected 0.740.
Step
6
The
process is very similar for the next two transforms. Again, clickDuplicate Transform. This time move Transform 3 down two units. Change to the Colors tab and adjust the color. I chose
1.000.
Step
7
Duplicate
this transform as well. Move it to the left two units. In theColors tab, choose one more color. This time I've selected
0.406.
I
would highly recommend you save the fractal at this point.
Congratulations, you've created your test fractal. Now we'll apply
the final transform and take note of its effect.
2. Applying the Final Transforms
Step
1
In
the Editor window, click the FX with a triangle icon in the
toolbar which is the Enable Final Transform button. You will
not notice an immediate change in the preview window because Linear
is the default variation. You will, however, have a new grey-colored
transform in the editor. Switch to the Variations tab and setlinear equal to 0. You will notice that your fractal
disappears completely from the preview window.
Step
2
Add
1 to the swirl variation. Notice the change. Try adding more
and taking away from swirl. Take note that in this instance
the size and shape does not change, but the lighting and hue of the
fractal do. Remember this trick and use it to your advantage when you
need to increase or decrease the lighting in your fractal.
Step
3
Take
some time to explore and try out different variations on the final
transform. Next, mix two different variations together and see how
the effect changes the fractal as a whole. Below are a few
examples.
This is the effect of applying Polar = 1 to the final Transform.
Below is LazySusan = 1 applied to the final transform.
Here I have mixed both Elliptic and Auger with a value of 1 on the final transform.
Feel
free to spend some more time exploring the Final Transform. Don't
forget that you can move it, rotate it, and even apply a post
transform to it just as you would any other fractal transform.
3. Using a Final Transform on Fractals
Step
1
For
ease of use, we will stick with our base fractal. Turn the final
transform off by clicking the button in the toolbar to disable the
final transform. Select Transform 1 from the Transform
dropdown menu. Click the Clear button at the bottom of theVariations tab to remove all variations. Add a value of 1 to
the linear variation. Finally, change the Weight of
this transform to 1.
Step
2
Repeat
this for transforms 2 through 4 so that all transforms now have
linear equal to 1. We just created a very simple square tile.
Step
3
Add
a new transform to the fractal by clicking the New Transform
button in the toolbar. Remove linear from the Variations
tab by changing its value to 0 and add blur_square (or your
square variation) by changing its value to 0.5. Change the Weight
of this transform to 2.
Step
4
Duplicate
Transform 5. In the Triangle tab or at the top of the toolbar,
activate the post transform. Move this transform over to the
right 1 unit.
4. Activating the Final Transform
Step
1
In
the toolbar of the Editor, Enable the Final Transform.
In the Variations tab, click the Clear button to remove
all previously used variations. Experiment with different variations
and combinations.
Step
2
I
decided to use a combination of variations on the final transform.
The combo is checks = 1 and Circlize = 1.17. I also
flipped the transform vertically along its axis.
5. Rendering the Fractal
Step
1
Now
all that is left to do is to clean up the fractal and adjust the
lighting. Close the Editor window as you will no longer need
this window. Open the Adjustments window and switch to theRendering tab. The fractal looks quite dull and I want it to
really pop. Change the Gamma to 5 and the Brightness to
20. Notice how much “stronger” the fractal now looks.
Step
2
Use
the move, rotate and zoom tools in the main window to adjust the
framing and fractal position as you see fit.
Step
3
Click
the Render button (purple gear) in the toolbar of the main
window to open up the rendering dialog. Choose the path to save your
fractal. I chose unusual render settings for this fractal, but it
gives it a very nice appearance. Oversample of 3. Filter
of 1.6. Density of 20,000. Of course, you should feel free to
experiment with different settings and compare the results.
Here
is my result.
Congratulations!
You have just designed your own fractal from scratch and applied a
final transform to it. Not only that, but now you have a working
knowledge of final transforms, how to test them, and how to apply
them to your own fractal designs. Have fun!
Blending, by far, is the most important thing you need to know in order to paint in Adobe Photoshop.
Today we're going to break down blending with the Brush Tool step by step. Try to get as comfortable with this process as possible, because it will be the backbone of all your digital paintings.
First, let's go over some quick Do's and Don'ts beginners should keep in mind while using the Brush Tool.
The Do's
Do: Keep color swatches for your overall color scheme.
Do: Vary the settings for Hardness/Opacitybased on what the painting needs.
Do: Study the difference between painting with a "hard" or "soft" edged brush.
Do: Use "heavier" brushes (50–100% Opacity) for blocking in colors, the main painting, and finishing details.
Do: Use "lighter" brushes (0–50% Opacity)for smoothing out details, adding atmosphere (like smoke/fog), and softening textures.
The Don'ts
Don't: Color pick from a reference photo.
Don't: Get stuck making an entire painting on one setting (for Hardness/Opacity).
Don't: Use Soft Brushes for details that need clean edges.
Don't: Forget to keep blending!
And Don't: Give up!
The number one problem beginners have is choosing the rightOpacity and Hardness for the different stages of their painting. Naturally, they either start with a brush that's too hard with a really high opacity, or a brush that's too soft with a low opacity.
You see, Hard, High Opacity Brushes are much harder to blend, while Soft, Low Opacity Brushes tend to muddy up a painting really quickly. And if you're not careful, they can also give off that super "airbrushed" look that doesn't always work well. So simply put, the best advice I can possibly give is to get used to changing the Hardness and Opacity constantly. Like-every-couple-of-minutes-kind-of-constantly. There really is no perfect setting.
Brush Settings
To show you this technique, let's keep the brush settings super simple:
Hardness set to 50%. Opacity set to 50%.
The Two Keyboard Shortcuts You Have to Know
The Brush Tool (B) ...Obviously.
The Eyedropper Tool (Hold Alt while the Brush Tool is already selected).
Speed painting videos are great to learn from, but unfortunately they're sped up so much that viewers don't see the little Eyedropper Tool that pops up while blending. It happens that quickly! In the next few steps I'll show you how to interchange these tools for a perfect blending effect.
And for now, don't touch any other options! Experimenting with every imaginable setting in the Brush panel is very tempting but I don't want you to run into any confusion. I would hate for you to end your learning experience early just because you didn't understand a more advanced setting. As a general rule, dive right into the basics, try out these next examples a couple dozen times, and then see what the other settings can do for you.
How to Blend: The Basics
Step 1
First, pick one color from the Swatches panel, and plant it on the canvas using the Brush Tool (B) at 100%Opacity and 100% Hardness. Once it's on the canvas, drop the Hardness and Opacity each to 50%.
Step 2
With the original color still selected as a Foreground Color, paint a small swatch next to it. This swatch should appear more opaque with softer edges because of changing the brush settings.
Step 3
Use the Eyedropper Tool now to color pick the opaque stroke you made. Swatch a new stroke next to it. Repeat this process, making sure to slightly overlap the strokes as you go.
Eventually, the color will start to fade and show signs of blending together. Try to think of it as the first stages of a gradient effect.
Step 4
How you "blend" is to color pick two colors next to each other and overlap them with more and more opaque layers. Essentially, the Eyedropper Tool becomes the right hand man to the Brush Tool during this process. Continue these steps until your colors are all blended together.
Let's See This Technique in Grayscale
Painting in grayscale is a technique you'll eventually get to know in digital painting. Many people, myself included, like to use it as a way to set up a lighting scenario before adding color. Try a couple of gray swatches to see how well you blend the tones together.
Let's See It Again With Other Colors
Here are some variations of color combinations with this technique. Experiment with more to get a better grasp of what to expect.
Now It's Your Turn: Blending Exercise!
I have included a couple of color swatches for you to try out below. Copy and Paste this image into Photoshop and have a go at blending with the Brush Tool. Add more colors to the canvas if you'd like, and feel free to upload your blending skills to the comments section.
Conclusion
I really hope you've enjoyed today's quick tip lesson for digital painting. If you have any questions at all, don't hesitate to ask them in the comments below. Keep up with our Digital Painting 101 series as we'll continue to provide more tips and resources on a topic I absolutely adore. Remember to keep at it, stay confident, and never give up. Good luck!
Vouchers are everywhere! They're in your mailbox and they're on the websites you visit. Companies use vouchers to drive more business their way by offering a discount in exchange for goods or services.
Our new course, Effective Voucher Design, will give you a great understanding of how to design truly effective vouchers both in the print world and the digital world.
What You'll Learn
In this course, you’ll learn how to design truly effective vouchers by completing three separate voucher design projects, using both Adobe Illustrator and Adobe Photoshop, and designing both for print and web.
Tuts+ instructor Gary Simon will give you step-by-step instructions in 23 detailed videos, helping you create three beautiful, professional-looking vouchers.
By the end of the course, you'll have the skills and confidence to be able to create effective, revenue-generating vouchers for your own business or for clients.
Watch the Introduction
Start Learning for Just $15
You can take our new course straight away by subscribing to Tuts+. For just $15 a month, you get access to this course and hundreds of others, with new ones added every week.
Tuts+ Is Looking for a New Course Producer (Audio/Video Production)!
We’re looking for a new Course Producer to help instructors produce top-quality video and audio for their Tuts+ courses.
In this key role, you will primarily focus on working with new instructors, bringing them up to speed with Tuts+ course creation. You’ll be a friendly, knowledgeable member of our team, coaching them through their first few courses with Tuts+ and making sure that their audio, video, course assembly and overall presentation meets our standards. You will also help our existing instructors with setup, equipment, editing, post-production and presentation advice.
You'll work 40 hours a week, and you'll have the flexibility of working from home to your own schedule. As part of our global Tuts+ Course Production team, most of your interactions will be remote, meaning you’ll meet with colleagues and instructors on a regular basis via Google Hangouts and/or Skype. Your instructors will be spread predominantly across Europe, US and UK time zones, so ideally you’ll be from a location that makes communication with them easy to arrange and conduct.
What We're Looking For
With a minimum of three years experience in quality video and audio production, you will be excited about reviewing current standards and sourcing cost-effective ways to continuously improve the quality and educational value of Tuts+ course content.
The ideal person to fill this rewarding, flexible role would have:
3+ years proven experience in quality video/audio production
Excellent written and verbal communication skills (you’ll be explaining to instructors how to create/improve courses via video, not in person)
A background in education is preferable
A proven history of self-driven productivity and superior time management
Understanding and appreciation for remote, global working, including willingness to work outside of traditional hours and be flexible with the timing of meetings
The confidence to initiate conversations, and the tact to tailor advice to differing experience levels
Patience when working with individuals and groups to achieve a desired quality outcome
Comfortable when presenting on camera
A preparedness to become extensively familiar with Tuts+ standards and guides
A personable warmth, sense of humour and respect for individual team members
A clear sense of fairness and a consistency of set expectations
Familiarity with Basecamp and Trello (nice to have)
We're hoping to get the process moving fairly quickly with this role. So if you're thinking of applying, please do so as soon as possible. The deadline for applications is 20th February.
To apply, please submit a cover letter to jobs@envato.com with the subject line “I’m your ideal Course Producer because…” along with a current copy of your resume.
In your email application, along with why you're right for this role, please answer the following questions:
What is your current country of residence?
How many years experience do you have in a similar role?
When are you available to start?
What is your expected daily rate in USD?
Tell us in 100 words or less why you’d love to work at Envato.
Regardless of all the crazy snow storms, yes, spring is on its way, and
soon we will see the first flowers. Let’s try to recreate the beauty of
spring on your art board. In this tutorial, you will learn how to create
special brushes to draw flowers. Also, you'll learn how to create a
brush from a flower illustration. At the end of this tutorial, you will be a
professional florist!
1. Drawing a Stalk Using a Special Brush
Step 1
Open Adobe Illustrator and create a new document (Control-N). First, we
are going to create the special brush which you will use to draw the
branches. Set the fill color to black, delete the stroke color, if you
see it, and hit the Ellipse Tool (L). Draw a very long and narrow
ellipse, but not too big. The size of the ellipse doesn't matter, because
later you can increase or decrease the weight of stroke. After that,
hit the Direct Selection Tool (A), select the top and bottom anchor
points of this ellipse, which are marked in the image below, and move
them to the left. Hold the Shift key to move the anchor points straight.
Now you need to turn this ellipse into a brush. For this, grab
the ellipse and move to the Brushes panel. In the new dialogue window,
select New Art Brush and press OK. Again a new dialogue window will
pop-up, where you need to select Direction from right to left and make Colorization Method Tints. At the end, press OK.
Step 2
So now we are going to start creating a willow. Double-click on the Brush
Tool (B) and adjust the brush options. In the new Paintbrush Tool
Options window, make Fidelity 3 pixels, Smoothness 50 percent, and in
the Options section check Fill new brush strokes. Click OK.
Delete
the fill color and set the stroke color to R=125 G=108 B=90. Take your
recently created brush and draw the branch of the willow. Start to draw
from bottom to top. If your hand is shaking, you can draw a very short line
and, using the Direct Selection Tool (A), select the top anchor point of
this line and move it higher. Draw four branches. If you see that your
branches are very thin or thick, you can go to the Stroke panel and
increase or decrease the Weight of the stroke.
Step 3
Make the stroke thinner (decrease the Weight of the stroke on the Stroke panel) and draw a few smaller branches.
2. Drawing the Willow Catkins
Step 1
Delete the stroke color and set the fill color at R=172 G=188 B=167.
Using the Ellipse Tool (L), create an ellipse. Make the fill color
lighter (R=189 G=201 B=185) and draw a smaller ellipse inside the first
one.
Step 2
Create another ellipse, smaller than the previous two, and set the fill
color at R=94 G=83 B=73. While keeping it selected, use the Convert
Anchor Point Tool (Shift-C) and click on the right anchor point—you will
get a sharp corner. Then, using the Direct Selection Tool (A), select the
top and bottom anchor points and move them to the left. Copy-paste the
shape you got, and make it smaller and lighter (R=114 G=101 B=90). Place
this copy over the previous shape.
Step 3
Put all the shapes together as in the image
below. It's a willow catkin. Select the whole willow catkin and drag it to
the Brushes panel. In the new dialogue window, select New Art Brush and
press OK. Again, you will get another dialogue window, where you need
to select Direction from left to right and make Colorization Method
None. Press OK.
Step 4
Delete the fill color and make any stroke color. The stroke color
doesn't matter, because before you set Colorization Method to None. Take
this newly created brush and draw the willow catkins.
For a better understanding of how the brushes work, you can go to View > Outline. You will see something like the image below. To return to
the previous view, go to View > Preview.
Step 5
With the help of the Ellipse Tool (L), draw a circle. Hold the Shift key
to create an even circle. Set the fill color at R=244 G=243 B=238 and
make sure that you don't have a stroke color. Grab this figure and move
it to the Symbols panel (Window > Symbols). In the new dialogue
window, make sure that you select Movie Clip for Type and press OK.
Step 6
Now double-click on the Symbol Sprayer Tool (Shift-S), and adjust the
options. In the new window, make Diameter 200 px, Intensity 8 Fixed, Symbol Set Density 10, and check Show Brush Size and Intensity. Click OK.
Using the Symbol Sprayer Tool (Shift-S), spread the recently created
symbol over the willow catkin.
Step 7
Spread the symbol all over the willow catkins. Expand the symbols
(Object > Expand) and then ungroup them (right-click > Ungroup),
because all the symbols will be grouped. For your convenience, you can
group (right-click > Group) every willow branch, so later you can
manage them more easily.
3. Drawing the 'May Lilly’—Lily of the Valley
Step 1
Take the brush you used for the branch of the willow and set the stroke
color at R=141 G=139 B=66. Draw two stalks of the lily of the valley.
Step 2
Decrease the stroke Weight and draw a few more tiny stalks which will connect the blossom.
Step 3
Let's create another brush to draw the lily of the valley. Start with a
long, narrow ellipse with black fill color. Take the Convert Anchor Point
Tool (Shift-C) and click on the right anchor point of this ellipse to
make a sharp corner. Using the Direct Selection Tool (A), select the top
and bottom anchor points of the ellipse, and move them to the left. Now
make a new brush from this shape as you did for the branch of the
willow.
Step 4
Now that your brush is ready, we need to draw the lily of the valley and
make another brush from this flower later. First, let's draw the
flower. Set the stroke color at R=245 G=249 B=239 and draw a short line
using the brush you created from the previous step. You probably will
need to increase the stroke Weight to make a nice shape like in the image
below. Then draw two side petals. Don't worry about the very light color of
the petals, as we will have a darker background later.
Step 5
Make the stroke color a little darker (R=236 G=244 B=222) and draw two
more petals. Place them behind (Control-X, Control-B). Decrease the
stroke Weight and draw a few lines on the top of the flower to show the
volume.
Then select the whole flower and create a new brush from
it, as you did for the willow catkin. Remember to make the Colorization
Method None.
Step 6
Using the brush you created in the previous step, draw the lily of the valley. Group every branch for your convenience.
Step 7
Place the lilies of the valley into the bouquet.
4. Drawing the Forget-Me-Nots
Step 1
Take the brush you are using for the branch and stalk, and change the stroke
color to R=93 G=122 B=66. Draw the stalks of the forget-me-nots. For longer
stalks, make the stroke Weight thicker, and for shorter ones use a thinner stroke
weight.
Step 2
To draw the forget-me-nots, we will use the brush which you have used
for lily of the valley. So change the stroke color to R=84 G=174 B=184.
Draw five petals. Then decrease the stroke Weight and make the stroke
color lighter (R=172 G=214 B=217), and draw a few lines inside the flower
as shown in the image below.
Step 3
For the middle part of the forget-me-not, we will use an existing Illustrator brush, which you can find in the Brushes panel. Click on theBrush Libraries Menu and select Artistic > Artistic_Calligraphic.
Choose a 1 pt Round Brush, make the stroke color R=230 G=204 B=35 and
draw the middle part of the flower. Then make the stroke Weight thicker and
put one gray (R=75 G=82 B=79) dot in the middle. The forget-me-not is
finished.
Step 4
Create a second, lighter forget-me-not by changing the color of the petals to R=149 G=216 B=216.
Select
the original blue flower and drag it to the Brushes panel. Create New
Scatter Brush with Colorization Method None. After that, do the same
with the light blue flower.
Step 5
Switching between the blue flower brush and the light blue flower brush,
place forget-me-nots on the stalks. To create the buds of the forget-me-nots, just draw ellipses in blue and light blue fill colors.
Group every branch (right-click the mouse > Group).
Step 6
Place the branches of the forget-me-nots in the bouquet.
5. Drawing the Leaves of the Forget-Me-Nots
Step 1
Let’s create a brush to draw the leaves of the forget-me-nots. Create a long black ellipse. Make the left and right anchor points sharp using
the Convert Anchor Point Tool (Shift-C).
Step 2
Increase the stroke Weight, set the stroke color at R=78 G=99 B=55 and
draw a leaf. Decrease the stroke Weight, make the color lighter (R=93
G=122 B=66) and draw the stalk of the leaf. Group the leaf (right-click > Group) and put it on the branch of the forget-me-not.
Step 3
Now, using the same techniques as described in the previous step, add more leaves.
6. Drawing More Willows
Copy-paste two more willow branches and place them over the whole bouquet.
7. Drawing a Ribbon
Step 1
Take the 1 pt Round Brush, make the stroke color R=84 G=174 B=184 and
draw a ribbon around the bouquet as shown in the image below.
Step 2
Add the curly ends.
8. Creating the Background
Step 1
Take the Rectangle Tool (M) and, while holding the Shift key, draw a square
with the fill color of R=228 G=226 B=213 and width and height of 600 px.
Step 2
Take a look at the Appearance panel. Press the pop-up menu in the top
right hand corner and select Add New Fill. Now look at the Swatches
panel. Click on the Swatch Libraries Menu in the bottom left corner and
select Patterns > Basic Graphics > Basic Graphics_Textures. ChooseBird Feet. Return to the Appearance panel and make the Opacity for this
second new fill Overlay.
Step 3
Here is how your spring bouquet should look now!
Conclusion
Congrats, your spring bouquet is ready and you just need to put it in a
vase. If you want to create a vase or cozy room to go with this
bouquet, check this tutorial. I hope some tricks were helpful for you and you can use them in your future projects!
On 19 February, one in six people in the world will be marking the end of the Year of the Horse and celebrating the start of a new year. The timing of the Chinese New Year festival is based on a lunar calendar, and the Chinese rotate through a cycle of 12 animals, one to represent each 12-month period. These animals are thought to have characteristics which are taken on by individuals born in the relevant year.
2015 will be the Year of the Goat/Sheep, and people born in this year are thought to be diplomatic, family-centric and good-natured.
Zodiac (Sheng Xiao) calendars are an age-old design for mapping out the 12 animals and the years they are associated with. In this tutorial, we’ll be giving a modern update to the traditional calendar, using Adobe InDesign to put the calendar together, and using illustrated assets from Mary Winkler’s Adobe Illustrator tutorial.
You’ll need access to both InDesign and Illustrator for this tutorial.
1. Create a New Adobe InDesign Document
Step 1
Open InDesign and select New Document from the Welcome window, or go to File > New > Document.
In the New Document window set the Intent to Print, No. of Pages to 1 and uncheck Facing Pages. From the Page Size drop-down menu select Custom... to open the Custom Page Size window.
Set the Width to 420 mm (the width of a landscape A3 document) and the Height to 420 mm too. Type ‘Zodiac Calendar’ into the Name text box and click Add, and then OK.
Step 2
Back in the New Document window, set the Top Margin to 37 mm, the Bottom Margin to 23 mm, and both the Left and Right Margins to 30 mm. If you’re going to want to send your calendar to print, instead of just creating a digital image, set the Bleed to 5 mm on all sides. Click OK.
2. Set Up a Sequence of Layers
The calendar’s design is based on a sequence of layered shapes, text and images. The best way to manage these, and be able to edit them easily, is to sit elements on a different layer. You can then easily lock the layers you’re not currently working on, and nothing will shift about while you work.
Step 1
Open the Layers panel (Window > Layers) and click on the default Layer 1 name to open the Layer Options window. Rename the layer as Background and click OK.
Click the Create New Layer icon at the bottom right of the panel, or open the panel’s drop-down menu and select New Layer... to create a second layer above Background. Double-click the layer to rename it as Circles 1. Click OK.
Repeat the same process a further eight times to create a sequence of ten layers: Circles 2, Images, Circles 3, Circles 4, Strokes, Central Circles, Typography and, at the top, Layered Typography.
Step 2
Once you’ve created the layers, click in the blank space next to each layer name, to the right of the eye icon, to Lock every layer except Background.
Click Background to activate it.
3. Think About Color and Prep Your Zodiac Images
We’re going to use only four color swatches across the design: a bright red, a metallic gold, black and white. Let’s get these set up before we start putting the calendar together.
This tutorial uses illustrated assets which you can learn how to create in this Illustrator tutorial. If you are using your own drawings, or stock images, ensure they are in vector format, and saved in a format with a transparent background.
Step 1
Open up the Illustrator document that contains your zodiac illustrations. They are all grouped together, but we need to treat them as individual drawings.
Edit > Copy one of the illustrations and Edit > Paste them onto a separate artboard. Go to Object > Artboards > Fit to Artwork Bounds to fit the artboard closely to the drawing. Then go to File > Save As... and select Illustrator EPS (eps) from the window’s drop-down menu. Name the file, e.g. ‘Rat’, and click Save. Under the Format options, keep Transparent checked.
Create a New Layer from the Layers panel (Window > Layers), locking and switching off the view of the layer below it, containing the first zodiac image. Paste a second zodiac image onto the second layer, altering the dimensions of the artboard if required, and repeat the above process, saving the image as an EPS file.
Repeat for all the other zodiac images, until you have a set of 12 EPS files, each an animal drawing.
Step 2
Remaining in Illustrator, drag your mouse across the page to select one of the zodiac images.
Go to Window > Swatches to open the Swatches panel. Click the New Swatch icon at the bottom right of the panel to open the selected color in the New Swatch window. Adjust the Color Mode to CMYK if you need to, and rename it as something like ‘Zodiac Red’. The values for the red swatch used here are C=0.45 M=99.14 Y=97.32 K=0.09. Then click OK to add the color to the Swatches panel.
Add a second swatch to the swatches panel, setting the CMYK values to C=15 M=46 Y=96 K=4. This is a gold color.
Duplicate the layer containing the sheep illustration. 2015 is the year of the sheep, so we’re going to do something special for him and set him in gold! Highlight the vector and adjust the Fill to the gold swatch.
Save the gold sheep as a separate EPS file, naming him something like ‘Sheep_Gold.eps’.
Still in Illustrator, select both the red and gold swatches in the Swatches panel (hold Shift to select both), and from the panel’s drop-down menu select Save Swatch Library as ASE (Adobe Swatch Exchange). Name it something like ‘Zodiac Swatches.ase’, and then Save it in your project folder.
Step 3
Leave Illustrator and return to your InDesign document.
Open the Swatches panel and, from the panel’s drop-down menu, select Load Swatches. Select your Adobe Swatch Exchange file, ‘Zodiac Swatches’, and click Open. The red and gold swatches will load into the Swatches panel.
Now you’re ready to start putting your calendar design together!
4. Build Up the Background of the Calendar
Step 1
With the Background layer still unlocked and active, drag a guide down from the top ruler (View > Show Rulers) to 210 mm. From the left-hand ruler drag a vertical guide out to 210 mm, meeting the two guidelines at the center point of the page.
Step 2
Select the Rectangle Tool (M) from the Tools panel and drag to create a square shape that extends across the whole of the page, up to the edges of the bleed.
Select New Color Swatch from the Swatches panel and create a new CMYK Swatch, an off-black color, values C=74 M=65 Y=60 K=79. Click OK.
Set the Fill of the square shape to this new swatch, and the Stroke to [None], from the Character Formatting Controls panel running along the top of the screen.
Step 3
Return to the Layers panel and Lock the Background layer. Unlock the next layer up, Circles 1.
Select the Ellipse Tool (L) and, holding Shift, drag to create a perfect circle that fits snugly within the margins (360 mm in diameter), and sits centrally on the page.
Set the Fill to the gold swatch, C=15 M=46 Y=96 K=4, and the Stroke to [None].
With the circle selected, go to Object > Effects > Outer Glow to open the Effects window. Set the Mode to Darken and reduce the Opacity to 80%. Set the Technique to Softer and the Size to 12 mm. This gives the circle a slightly lifted, 3D effect, and a slight drop shadow effect around the outside edge.
From the left-hand menu check the box next to Inner Glow and set the BlendingMode to Normal and the Opacity to 75%. Set the Technique to Softer, Source to Edge and Size to 13 mm. Click Preview in the bottom left-hand corner of the panel to view the effect as you edit. Click OK. The circle now has a slightly metallic sheen.
Step 4
Select the Ellipse Tool (L), as before, and, holding Shift, create a second, smaller circle, 329 mm in diameter. Position centrally on the page, using the guides to sit the center of the circle on the center point of the page.
Set the Fill to the red swatch, C=0.45 M=99.14 Y=97.32 K=0.09, and the Stroke to [None].
With the circle selected, go to Object > Effects > Outer Glow. Set the Mode to Color Burn, to create a darker shadow around the outside of the circle, and click the swatch to the right of the Mode menu, adjusting the color to the gold swatch.
Keep the Opacity at 100%. Set the Technique to Softer, Size to 5 mm and Spread to 18%. Click OK.
Step 5
Lock the Circles 1 layer and Unlock the next layer up, Circles 2.
Select the Ellipse Tool (L), as before, and, holding Shift, create a third, even smaller circle, 300 mm in diameter. Position centrally on the page. Set the Fill to [Paper] and the Stroke to the red swatch.
Step 6
Lock the Circles 2 layer and Unlock the layer two layers up, Circles 3.
Again, select the Ellipse Tool (L) and drag to create a perfect circle 200 mm in diameter. Position centrally on the page, and set the Fill to the red swatch and the Stroke to [None].
Go to Object > Effects > Outer Glow to open the Effects panel. Give the red circle a lifted, 3D look by setting the Mode to Normal, the Color to your gold swatch, and the Opacity to 75%.
Set the Technique to Softer and Size to 5 mm. Click OK.
Step 7
Lock the Circles 3 layer and Unlock the Circles 4 layer above it.
Select the Ellipse Tool (L) again and drag to create a perfect circle 177 mm in diameter. Position centrally on the page. Set the Fill to [Black] and Stroke to [None].
Switch to the Preview Screen Mode by hitting W on your keyboard. This is how your page should look.
Now we can start to introduce the zodiac graphics to the calendar.
5. Place Your Zodiac Graphics
Step 1
Lock the Circles 4 layer and Unlock the Images layer a little further down in the sequence of layers.
Select the Rectangle Frame Tool (F) from the Tools panel and drag to create a small square frame about 50 mm in Height and Width. Position at the top right of the white circle, close to the central vertical guide.
Go to File > Place and select one of your red zodiac animals, which you saved earlier as separate EPS files. Click Open.
Arrange in the frame using the Fill Frame Proportionally option from the top control panel, or double-click inside the frame and hold Shift while you resize.
With the image frame selected, Right-Click (Windows) or Control-Click (Mac OS) > Transform > Rotate. If you divide a 360 degree circle into 12 equal parts (for the 12 zodiac animals) you get 30 degrees. So type in -30 into the Angle text box to rotate the image frame a little to the right.
Step 2
Select the frame and Edit > Copy, Edit > Paste, positioning this second image frame below and to the right of the first frame. Again, select the frame and Right-Click (Windows) or Control-Click (Mac OS) > Transform > Rotate. Keep the value as -30 degrees again, and click OK.
Repeat, editing and copying each new frame, and rotating -30 degrees until you’ve created a sequence of six equally-spaced images running along the right-hand edge of the white circle.
Step 3
Return to the first image you placed—in this case, the rabbit—and Edit > Copy, Edit > Paste, moving the pasted image frame to the top left of the white circle. File > Place, selecting another red zodiac image, and Open.
Right-Click (Windows) or Control-Click (Mac OS) > Transform > Rotate, but this time set the Angle value to 30 degrees, to rotate the image frame to the left.
Continue to copy and paste new frames, rotating each a further 30 degrees, until you have a sequence of six images running around the left-hand side of the white circle.
6. Divide the Calendar Into Sections
Step 1
Lock the Images layer and Unlock the Strokes layer a couple of layers above.
Take the Line Tool (\) and, holding Shift, drag downwards to create a straight vertical line 300 mm in Length. Position centrally on the page, the top of the line meeting the top edge of the white circle, and the bottom of the line sitting on the bottom edge of the white circle.
Set the Stroke Color to the gold swatch, the Stroke Weight to 2 mm and the Type to Thick-Thick (edit from the top controls panel, or from the Stroke panel (Window > Stroke)).
Step 2
Select the line and Edit > Copy, Edit > Paste in Place.
Right-Click (Windows) or Control-Click (Mac OS) > Transform > Rotate the line 30 degrees. Position so that it crosses the first line along the central point of the page.
Select the second line and Copy, Paste in Place and Rotate 30 degrees again. Repeat the process until you have a sequence of six lines criss-crossing the calendar.
Step 3
Take the Scissors Tool (C) and snip each line at the point where it meets the edge of the inner black circle. You should end up with 12 outer lines that you can select separately from the inner gold lines.
Set the Stroke Color of these outer lines to your red swatch.
7. Create a Central Gold Medallion
Step 1
Lock the Strokes layer and Unlock the Central Circles layer.
Take the Ellipse Tool (L) and, holding Shift, drag to create a small circle 77 mm in diameter. Set the Fill to your gold swatch, and the Stroke to [None]. Position centrally on the page.
Go to Object > Effects > Inner Glow and keep the Mode as Normal. Reduce the Opacity to 75%. Set the Technique to Softer, Source to Edge and Size to 6 mm.
Check the box next to Satin from the left-hand menu in the Effects window. Keep the Mode as Normal, and adjust the color to your red swatch. Reduce the Opacity to 70%, set the Angle to 120 degrees, Distance to 2.469 mm and Size to 4 mm.
Click OK.
Step 2
Select the Ellipse Frame Tool (find it under the Rectangle Frame Tool’s drop-down menu in the Tools panel) and drag to create a circular frame about the same size as the gold central circle.
Go to File > Place and select the EPS image of the gold sheep. Click Open and arrange the image in the frame so that it sits centrally on the page. Allow a little space around the edge of the gold circle. We’ll place some text there a little later.
8. Apply Typography to the Artwork
Step 1
Lock the Central Circles layer and Unlock the Typography layer above it.
We’re going to use one font across the calendar design, the free-to-download Zalamander Caps. Download and install the font, and then return to InDesign.
Select the Type Tool (T) and drag to create a tall, narrow text frame 25 mm in Width and 42 mm in Height. Position it inside the black circle, within one of the sections, under the top right zodiac image.
Using either the final calendar image at the beginning of the tutorial or a useful list of dates, type in the relevant corresponding years for the animal, beginning with the most recent year and ending with the least recent.
Set the Font of all the text to Zalamander Caps Semibold, Align Center and Font Color to [Paper]. Vary the FontSize from the top of the text to the bottom from 22 pt to 12 pt.
Select the text frame and Right-Click (Windows) or Control-Click (Mac OS) > Transform > Rotate; rotate the line -30 degrees and click OK.
Create a second smaller text frame, and type in the title of the animal. Rotate -30 degrees as well, and position within the red circle, just above the years text frame.
Step 2
Select both text frames and Edit > Copy, Edit > Paste. Right-Click (Windows) or Control-Click (Mac OS) > Transform > Rotate; rotate the line -30 degrees and click OK.
Edit the text to read the correct years, and edit the animal’s name. Position the frames under the next animal along to the right.
Build up the text, continuing to copy, paste and rotate, positioning each pair of text frames under the next animal image. Eventually you will have a set of 12 pairs of text frames, each corresponding to its own animal image.
Step 3
Remaining on the Typography layer, zoom in to the centre of the calendar.
Select the Ellipse Tool (L) and, holding Shift, drag to create a small circle that fits inside the central gold circle. Select the Type on a Path Tool (Shift-T) and click once on the right-hand side of the circle. Type ‘The Sheep (x26 spaces) Year Of’ and set the Font to Zalamander Caps Semibold, Size 25 pt and Font Color to [Black].
Rotate the circle if needed, to get the text to align on either side of the gold sheep.
Step 4
Lock the Typography layer and Unlock the top layer, Layered Typography.
As we did in the previous step, select the Ellipse Tool (L) and, holding Shift, drag to create a small circle that fits inside the central gold circle. Using the Type on a Path Tool (Shift-T), click once on the bottom edge of the circle to transform it into a text path.
You’ll notice a small line projecting out from the circle. Pull it into the inside of the circle to move the text path to run inside the edge of the circle.
Type ‘2015’ and set the Font to Zalamander Caps Semibold, Size 28 pt and Font Color to [Paper].
Rotate the circle if needed, to get the text to align centrally under the gold sheep.
Great work! Your zodiac calendar is finished, and it’s looking fantastic!
You can export your design for printing (File > Export, selecting Adobe PDF (Print) from the drop-down menu in the Export window).
Or you can save it as an Interactive PDF, JPEG, PNG or TIFF file for use across online documents (File > Export, selecting your chosen option from the drop-down menu in the Export window).
Let’s recap what we’ve covered in this tutorial...
What Have We Learned?
You’ve created a Zodiac Calendar in InDesign, to celebrate Chinese New Year. However, you can easily take some of the tips and tricks covered here and apply them to your other InDesign projects. We’ve explored:
How to prepare colors and images using Illustrator, before beginning work in InDesign.
How to build up a layered image, using the Effects available in InDesign to give a 3D look to shapes and frames.
How to create geometric, symmetrical designs, and use the Rotate window to divide the graphic into even sections.
Anatomy. It seems so simple, yet it's so complex. It is the bane of every artist—you just cannot go over a certain level of professionalism without having at least some notion of anatomy. Most people never thoroughly study it, and that leads to shaky art foundations that leave them permanently unsure of their own artistic strength.
That is why it is wiser to dedicate a little bit of your daily artistic time to studying anatomy. It might seem overwhelming at first, but if you break it down into pieces it becomes actually fun and easy to do!
1. The Basics: Functions and Anatomy
All eyes, in humans, have similar shapes and setups: an oval with pointed edges, eyelids, eyelashes, eyebrows. You can do a quick sketch of an eye and any human being will recognize it as such:
In this picture we show the following elements, from top to bottom:
Eyebrow: they protect your eyes from dirt and drops of sweat running down your forehead.
Eyelid crease: created by the eyelid when it folds over the eyeball. It forms both above and under the eye.
The actual eye opening: the skin is parted to create an oval-shaped opening for the eyeball.
The eyelashes: they protect the eye from dirt, strong light or sensory perception. In art, they emphasize femininity.
The white of the eye: this is the main ball of the eye.
The iris: actually muscles, go figure! They contract or expand to allow more or less light to go in the eye through the....
Pupil: the black opening in the center. We actually see through this thing, since this is where the light enters to form an image inside our eyeball.
The lacrimal nodule: at the inner corner of each eye. We cry through this, and it is a pinkish color!
The lacrimal nodule's skin crease: on the outside of the inner corner of the eye, just next to the nodule itself.
2. The Different Eye Shapes
While the above is a quick sketch that can be recognized as a human eye, eye shapes vary by race, geographical position and even age!
Let's cover the most important one: race. If you look at pictures of various peoples you will definitely notice differences. Let's go over a few more basic shapes, to see the difference:
3. Various Angles and Perspectives
Here are a few angles to show how the basic apparent shape of the eye changes with the angle it is viewed from:
4. Eyes: The Mirror of the Soul
We express a lot of emotions with our eyes. Regardless of our eye shape or size, we as humans have instinctive ways of reacting to stimuli, ways which involve modifications of our eyes.
We squint in focus, we stare in stunned awe, we widen our eyes in amazement or fear—just to name a few examples.
Below are several expressions that can be achieved by any human eye. Go ahead and try quickly identifying each emotion expressed and sketch them out. Practice them so that you can later give your characters more emotion:
5. Sketch Out the Eye
Now that we have some notion of the sheer variety that can be obtained with a single eye, let's go ahead and start putting everything together.
Take the quick sketch we made above to actually start doing some serious artsy stuff here and begin our journey to being the new Michelangelos!
Create a new canvas, name the existing layer "Background", and set your foreground color to #dcb6a3 and your background one to #963931.
Using the Gradient Tool (G) set to Foreground to Background, drag from the left to the right to create a skin-toned gradient. Then take a hard, round Brush (B), set its Size Jitter and Opacity Jitter to Pen Pressure, and set your foreground color to #000000.
Create a new layer, name it "Sketch", and sketch out a base shape of your liking. You can use the initial one we did, or you can pick any of the ones we've covered so far!
6. Fleshing It Out: The White of the Eye
Step 1
Let's start with the base—aka the white of the eye.
Despite its name of "white", the eyeball is anything but pure white. It varies in shades of light grey, beige and red, with various blood vessels running through it.
To start on it, create a new layer, move it between your "Background" and "Sketch" ones and name it "Eyewhite". Use a dirty white #ddc6bc and a hard, round brush to paint the base color on it.
Step 2
Create a new layer above the "Eyewhite" one, and right-click on it and choose Create Clipping Mask to the "Eyewhite" layer. We will use this layer to paint the shading.
The eyeball is a spherical structure, so the center will always receive the most light since it is a convex surface. On the same line of thought, the further from the center we get, the less light will reach it due to eyelids/eyelashes shadowing it, so you will have to use darker colors.
Thus, let's take the Brush Tool (B) again, set it to a hard, round shape, and have its Opacity and Size Jitter turned on. Adjust the size as needed, and then set your foreground color to #4f241e. Paint on the clipping mask layer, around the edges, to create the illusion of light and shadow, and 3D.
Step 3
Take a darker tone, like #220b07, and paint around the top of the eye white, to create the intense shadow the upper eyelid and the eyelashes give.
7. Painting the Lacrimal Nodule
Step 1
Around this area, the skin doesn't cover the flesh so we'll have a much more pinkish tone. Remember, there is no clear delimitation between the eyeball itself and the flesh and muscles that keep it in place—they all react and fuse into one another. So our pink will bleed into the white of the eye a bit, as you'll see in a moment.
Set your foreground color to #853c2e and your background one to #5e2218.
Using the same brush from before, paint around the inner edge of the eye with the lighter color, and then shade with the darker one around the edges. Add a few touches of pink into the white area as well. Below you can see the results with and without the sketch:
Step 2
Next set your foreground color to #d77661 and your background one to white #ffffff and lower the size of your brush. Zoom in and add detailed highlights around the lighter areas —first using the light pink and then adding a drop of white for a final touch. This will give the appearance of moisture.
8. The Iris and Pupil Bases
Step 1
Go ahead and create a new layer and move it between your "Eyewhite" and the "Sketch" ones. Name it "Iris".
Set your foreground color to #6b3826 and brush a round shape, following the sketch.
Step 2
An eye with a white pupil is a bit creepy, so let's take a black #000000 and paint a round shape in the middle—again, following your sketch—to create the pupil.
9. Adding in Iris Details
Step 1
It's time for a new layer! Place it just above your "Iris" one, and name it "Iris Detail".
The iris and the pupil blend into each other, and into the white of the eye. More simply put... they just love to mingle!
So set your foreground color to a nice #240b02 and, adjusting the size of your brush, paint around the edges of the iris and the pupil to blend them together nicely. While you are at it, also shade the topmost part of the iris, to show the area where the upper eyelid and the eyelashes cast a shadow. Don't be afraid to go over the edges a tiny bit.
Step 2
Set your foreground color to #54382a and your background one to #3f2315 and, adjusting the size of your brush to a pretty small one, zoom in and paint random strokes of lighter and darker color around the brownish part. Try to make them all radiate from the center.
Step 3
Next, we will add more details to the iris. Set your foreground color to #9b643f and your background one to #511f05 and, lowering your brush size to only a few pixels, paint in tiny strands of muscle detail. Switch between your colors constantly by pressing the X key. Also feel free to add in your own sampled colors, which you can easily sample using the Eyedropper Tool (I).
10. Painting the Eye Highlights
Since now our eye is a bit flat, let's give it a few highlights!
Create a new layer, place it above your "Iris Detail" one and name it "Highlights". Set your foreground color to white #ffffff and brush lightly at first and harder afterwards, to create a fuzzy large white dot. Repeat the process to add a couple of smaller ones:
11. The Upper Eyelid: Folds and Creases
Let us step away for a second from the eyeball itself, and make some progress with the eyelids and skin surrounding the eye. From my experience illustration always works best when you can see the bigger picture—yes, pun intended—not when you work on separate tiny pieces.
Step 1
So create a new layer above all your others, and name it "Skin". Take a dark brown #2c0b02 and set it as your foreground color, and a light pink #d3a594 as your background one. Adjust your brush size as needed and begin to paint around the outline of the eye, always minding the original sketch.
Brush with the darker color first, and then press X to switch your swatches and paint gently with the lighter color around the inner areas of the eye, where the background skin gradient is lighter too.
Step 2
Following your original sketch, use the darker brown to paint the eye crease in.
Step 3
Next, set your foreground color to #2b130d and your background one to #bc8370. Brush first using the darker color, around the outer ends of the eye and gently around the creases, to make your outlines look less sharp. Again, we are not working with precise and sharp lines and outlines here, but with soft shapes.
Step 4
Next, set your foreground color to #d5a197 and your background one to #fcead8 and fade out the sharpness of the creases even more, going from the darker pink to the lighter one and constantly switching colors according to need by pressing X. If needed, you can also use the Dodge Tool (O) set to a soft, round brush and Highlights mode with Protect Tones unchecked, to obtain shinier highlights. Don't overdo the dodge though.
12. Adding the Lower Lid
Step 1
Time to switch to the lower lid. We will paint it using the same techniques as before.
If you find it easier, you can go to Image > Image Rotation and rotate your image 90 degrees, for an easier time drawing vertical lines. Or not—again, this is up to you.
On to the coloring itself! Set your foreground color to #9e5b4a and your background one to #fecfbb. Brush lightly around the bottom of the eye, to blend the dark outline in, and on top of it brush with the lighter color to paint the highlights.
Step 2
We are going to refine this rough lower lid.
We'll be working with four main colors: #260f0b , #642e22 , #c88a7c and #eac0a9.
I suggest you paint four swatches on your canvas, so that they are easy to sample with the Eyedropper Tool (I).
Let's start by defining the lower-right outer edge of the eye with gentle strokes of #260f0b, and then move on to the minor crease to add a #eac0a9 highlight.
Step 3
Take a nice #d18465 and brush below the eye, as if with a real-life concealer. You can go ahead and brush on the upper side as well, if you think necessary.
Then using the light #eac0a9, paint around the outlines of the bottom-left eye and of the lacrimal corner, to add a tiny bit of highlight, just like below. Notice the second image—it is animated to show the difference between the previous step and this one:
13. The Skin: Finishing Color Touches
The whole skin still looks a bit plastic, doesn't it?
Time to change that!
Pick up a nice brick color, like #c54432, and gently paint detail color spots around the eyelids, more on the bottom lid around the inner half. Don't make them too visible—this is not a zombie eye so it's not bloodshot. Just a couple of gentle brush strokes to give it more life.
Once you finish doing that, switch your foreground color to a gentle violet such as #937fa3 and your background to #b5544d.
Paint the eyeshadows close to the bottom inner corner of the eye. This should help make your eye look much more natural and alive!
At this stage you can add other minor lighting details. Again, see below for the jpg result and the animated comparison to the previous step.
JPG result:
Animated comparison:
14. The Skin: Finishing Texture Touches
The skin is still too smooth—let's spice it up a bit!
Set your foreground color to #f2c8a0 and your background one to #b5544d. Use the "Skin Texture" brush provided in the .ZIP file to brush lightly around the skin, constantly pressing X to switch your color swatches. You should get a soft texture such as this:
15. Painting the Eyelashes
Step 1
Time to create a new layer and name it... "Eyelashes", of course!
Set your foreground color to #1a0906 and your Brush Tool (B) to a hard, round shape with both Size Jitter and Opacity Jitter set to Pen Pressure mode.
On the Eyelashes layer start drawing random lashes. Some points to remember when drawing eyelashes:
They are never straight. Always draw them a bit curved.
They follow a chaotic order. Try looking up a reference image of an eye with mascara on: eyelashes tend to stick to one another, they tend to bend, to curl.
They are always thinner at the tip than at the root.
Step 2
Next, we actually need to give our eyelashes a bit of a 3D look. Set your foreground color to #e7410e and brush lightly on each eyelash.
Step 3
Next, we need to add a few eyelash shadows at the outer corner of the eye.
Create a new layer and name it "Eyelashes shadows". Set it to Multiply mode, and lower its Fill to around 70%. Then take the same brush from before, set it to #1f0b07 and brush a few eyelashes around the lower outer corner. Then go to Filter > Blur > Gaussian Blur and give it a soft 1.5 blur.
16. Eye Details: Depth Shadows
Now that we have a more solid idea about our eye, let's go back to the eyeball and iris, as well as refining any areas that seem to need it.
Let's start that off by giving our eye more "pop factor".
Create a new layer and move it on top of your "Skin" one. Then set it to Multiply mode.
Set your foreground color to #6f2719 and brush lightly at the bottom-left corner to increase the amount of shadow. See below for a comparison:
17. Eye Details: Iris
Compared to the rest, the iris is still pretty flat. Let's work on that!
Step 1
Take a small, hard, round Brush (B) with both Pressure and Opacity Jitter turned on. Adjust the size to a small one and create a few radial strokes close to the pupil, like so:
Step 2
To create a highlight, make a new layer and place it above the "Iris" one. Set it to Color Dodge mode and lower its Fill to around 40%.
Next, set your foreground color to #f2c7b4 and brush a half-moon shape to the bottom right of the iris:
Step 3
Create a new layer above the your "Iris Detail" one, set it to Color Dodge mode and lower its Fill to around 30%. Take a soft, round Brush (B) and set it to Dissolve mode. Brush lightly around the iris area. Then you can press Control-E (Command-E on a Mac) to merge it with the main iris layer:
18. Painting Finer Details
Time for the finishing touches!
Step 1
First we'll add blood vessels.
Set your foreground color to #5e2219 and take a hard, round Brush (B) with both Pressure and Opacity Jitter on.
Adjust the brush size to 2 px and lightly brush tiny blood vessels around the corners of the eye, over the white of the eye.
Step 2
Now for some depth shadows.
Create a new layer and move it right below your "Skin" one.
Set it to Multiply mode and lower its Fill to around 80%. Name it "Shadows".
Set your foreground color to #3e1408 and with a hard, round brush with only Opacity Jitter on, brush around the edges of the eye white.
Then adjust the size of your brush to a very small 2 px one, and brush over the Highlight to create the illusion that the upper eyelashes are reflecting into the pupil:
Step 3
Moisture glimmers.
Create a new layer, name it "Moisture" and move it above your "Skin" layer.
Then set your foreground color to white #ffffff and brush a few light points along the bottom of the eye white:
19. Adding the Eyebrow Base
Step 1
It also needs an eyebrow, doesn't it?
Create a new layer, name it "Eyebrow" and place it on top of all your other layers.
Set your foreground color to #47190b and take a hard, round brush with Opacity Jitter turned on, and brush the rough shape of the eyebrow.
Step 2
Take the Smudge Tool and set it to a hard, round brush with Size Jitter set to Pen Pressure. Smudge around to create a hairy detail look:
20. Adding Eyebrow Detail
Step 1
Next, take the Brush Tool (B) and set it to a hard, round brush with Size Jitter set to Pen Pressure. Brush away detailing hair strands:
Step 2
Set your foreground color to #9a3d1e, give your brush Opacity Jitter set to Pen Pressure and make it a bit larger by a few pixels, and then brush a few rough lighting details. You can keep these strokes a bit random, soft and wide, to add variety.
Step 3
As a last amount of detail, make your brush very small again—1 or 2 pixels—and brush several very thin, very light highlight hair strands:
21. Eyebrows Blending With the Base Skin
Our eyebrow looks nice, but a bit glued on. To blend it more with the skin around it, create a new layer and place it under your "Eyebrow" one. Set it to Multiply or Linear Burn mode, depending on own taste. Then lower its Fill to around 40% and name it "Eyebrow Blending".
Make your brush larger, set your foreground color to a dark, desaturated brown such as #502520, and brush around the edges of the eyebrow. Then go to Filter > Blur > Gaussian Blur and give it a soft 3–4 px blur effect to obtain something like this:
22. Optional: Adding Makeup
Even more, we can now add makeup to our eye!
I for one chose soft autumn colors: #e88f04 and #572013.
Step 1
For the orange, create a new layer above your "Skin" one, set it to Color blending mode, and brush around with a soft, round brush. Lower Fill to taste.
Step 2
Next, the shadow. New layer, set it to Multiply mode. Brush the eye "tail" and around the top-right upper eyelid. Go to Filter > Blur > Gaussian Blur if you feel your strokes are too sharp.
Step 3
Create a new layer yet again, set it to Color Dodge and lower Fill to around 30%. Set your foreground color to #f7b283. First take a soft, round brush and set it to Dissolve mode, and then brush around to create the glitter effect. Then grab the Makeup brush from the brush pack provided and paint a few texture variations.
Awesome Work, You're Done!
That is it! You can now paint your own realistic eye. I hope you enjoyed the little journey and learned something useful! Feel free to let me know if there is any bump along the road that you'd like me to explain in more detail, and happy artsing!
If you've been to any of our Tuts+ meetups in the past, you know they're a great way to meet fellow creatives in your industry, share ideas, and make connections.
Now our parent company Envato is launching a Global Meetup Program, giving you the chance to connect with people in an even larger, more diverse community. And to celebrate, we're going to send special merchandise to the organisers of the first five meetups created in February. Read on to find out how you can get involved.
What Are Envato Community Run Meetups?
Envato Meetups are self-organized events for members of the Envato community. Whether you’re an author on Envato Market, a client on Envato Studio, or a learner on Tuts+, get together, talk shop, trade war stories, make new friends, and see the faces behind the avatars. They can be casual, coffee-shop get togethers, or epic full-day events. It’s up to you.
Searching for an Envato Meetup in Your Hometown?
Check out our new Upcoming meetup pages on envato.com and discover if there is one happening near you.
Do You Want to Host Your Own Envato Meetup?
Organizing a successful Envato meetup takes time, a passion for the community, a bunch of creativity, and oodles of energy. If you have these things to spare then we'd love to help you host your first (or 10th!) Envato meetup. Head over to our new meetup pages on envato.com, and follow the simple steps! Boom! You’re on your way to hosting your first Envato Meetup. We will even add some extra cool merchandise for the first five meetups created in February.
Remember, it's easy to take part. Just browse the Meetups page on the Envato website to see if there's an event happening in your area. And if there isn't, then make it happen! Email meetups@envato.com if you need help getting started.
In the following steps you will learn how to create a detailed key illustration in Adobe Illustrator, with a romantic message perfect for Valentine's Day.
For starters you will learn how to set up a simple grid and how to create the main shapes using basic tools and techniques. Next, you will learn how to add shading and highlights for these shapes using basic blending and vector shape building techniques, along with a bunch of effects and the Appearance panel. Finally, you will learn how to add a nice ribbon using a simple calligraphic brush, some linear gradients, and the Type on a Path Tool.
1. Create a New Document and Set Up a Grid
Hit Control-N to create a new document. Select Pixels from the Units drop-down menu, enter 600 in the width and height boxes and then click on the Advanced button. Select RGB, Screen (72ppi), and make sure that the Align New Objects to Pixel Grid box is unchecked before you click OK.
Enable the Grid (View > Show Grid) and the Snap to Grid (View > Snap to Grid). You will need a grid every 5 px, so simply go to Edit > Preferences > Guides > Grid, and enter 5 in the Gridline every box and 1 in the Subdivisions box. Try not to get discouraged by all that grid—it will make your work easier, and keep in mind that you can easily enable or disable it using the Control-" keyboard shortcut.
You should also open the Info panel (Window > Info) for a live preview with the size and position of your shapes. Don't forget to set the unit of measurement to pixels from Edit > Preferences > Units > General. All these options will significantly increase your work speed.
2. Create the Main Shapes
Step 1
Pick the Ellipse Tool (L) and focus on your Toolbar. Remove the color from the fill and then select the stroke and set its color to R=255 G=166 B=28. Move to your artboard and simply create a 55 px circle—the Snap to Grid should make your work easier.
Make sure that your shape stays selected and move to the Appearance panel (Window > Appearance). Select the existing stroke and increase its Weight to 6 px. Reselect the Ellipse Tool (L), create a 10 px circle and place it as shown in the second image. Make sure that this new shape stays selected, return to the Appearance panel and add that same 6 px orange stroke.
Step 2
Reselect the two circles made so far and go to Object > Expand Appearance. Make sure that the resulting shapes remain selected, open the Pathfinder panel (Window > Pathfinder) and click the Unite button. Move to the Layers panel, open the existing layer and simply double-click on the name of your shape. Rename it "rightRing" and then click the OK button.
Step 3
Pick the Ellipse Tool (L), move to your artboard, create a 55 px circle and place it as shown in the first image. Make sure that this new shape stay selected and focus on the Appearance panel. Remove the color from the fill and then select the stroke. Set its color to R=255 G=166 B=28 and increase the Weight to 6 px. Reselect the Ellipse Tool (L), create a 20 px circle, place it as shown in the second image, fill it with that same orange color and make sure that there's no color set for the stroke.
Switch to the Pen Tool (P), create a 120 px horizontal path, and place it as shown in the third image. Make sure that it stays selected and focus on the Appearance panel. First, remove the color from the fill and then focus on the stroke. Use that same orange for the color and then click on that "Stroke" piece of text to open the Stroke fly-out panel. Increase the Weight to 6 px and check the Round Cap button.
Step 4
For this step you will need a grid every 1 px, so go to Edit > Preferences > Guides & Grid and enter 1 in the Gridline every box.
Focus on the left end of your horizontal path and pick the Rectangle Tool (M). Create two 10 x 15 px shapes and place them exactly as shown in the first image. Fill these new rectangles with that same orange color and then turn them into a compound path using the Control-8 keyboard shortcut.
Pick the Ellipse Tool (L), create a 5 px circle and two 6 px circles, place them as shown in the second image and set their fill color to R=96 G=56 B=19. Select these three circles and turn them into a new compound path using that same Control-8 keyboard shortcut.
Step 5
Reselect the two compound paths made in the previous step and click the Minus Front button from the Pathfinder panel. Select the resulting shapes and turn them into a new compound path (Control‑8).
Step 6
Keep focusing on your compound path and pick the Direct Selection Tool (A). First, select the four anchor points highlighted with the green annotation, focus on the top bar and enter 3 px in that Corners box. Next, select the eight anchor points highlighted with the purple annotations, return to the top bar and this time enter 1 px in the Corners box. In the end your compound path should look like in the second image.
The Live Corners feature is only available for CC users. The best solution to replace this effect would be the Round Any Corner script that can found in this article: 20 Free and Useful Adobe Illustrator Scripts. Save it to your hard drive, return to Illustrator and grab the Direct Selection Tool (A). Select the pointed anchor points and go to File > Scripts > Other Script. Open the Round Any Corner Script, enter the values mentioned in the Corners box and click OK. The end result might look a bit different. Feel free to try a different value for the radius. In some cases you will have to increase/decrease the value mentioned in that Corners box.
Step 7
Return to gridline every 5 px, so simply go to Edit > Preferences > Guides & Grid and enter 5 in the Gridline every box. Reselect the horizontal path and the circle highlighted in the first image and go to Object > Path > Outline Stroke. Select the resulting shapes along with your compound path and the 20 px circle, and then click the Unite button from the Pathfinder panel. Move to the Layers panel and rename this newly created shape "leftRing".
Step 8
Pick the Ellipse Tool (L), create a 55 px circle, and place it as shown in the first image. Make sure that this new shape stay selected and focus on the Appearance panel. Remove the color from the fill and then select the stroke. Set its color to R=255 G=166 B=28 and increase the Weight to 6 px. Once you're done, go to Object > Path > Outline Stroke. Move to the Layers panel and rename this newly created shape "topRing".
Step 9
Pick the Ellipse Tool (L), create a 55 px circle, and place it as shown in the first image. Make sure that this new shape stay selected and focus on the Appearance panel. Remove the color from the fill and then select the stroke. Set its color at R=255 G=166 B=28 and increase the Weight to 6 px. Once you're done, go to Object > Path > Outline Stroke. Move to the Layers panel and rename this newly created shape "bottomRing".
3. Add Subtle Highlights
Step 1
Switch to gridline every 1 px, so go to Edit > Preferences > Guides & Grid and enter 1 in the Gridline every box.
Make sure that your "bottomRing" shape is selected and make a copy in front (Control-C > Control-F). Using the Rectangle Tool (M), create a 67 x 1 px shape, make it black (R=0 G=0 B=0), and place it as shown in the first image. Select this thin rectangle along with the copy made a few moments ago, and click the Intersect button from the Pathfinder panel.
Turn the resulting group of shapes into a compound path (Control-8), make sure that it stays selected, and move to the Appearance panel. Lower the Opacity to 30% and change the Blending Mode to Soft Light.
Step 2
Make sure that your "bottomRing" shape is selected and make a new copy in front (Control-C > Control-F). Using the Rectangle Tool (M), create a 67 x 1 px shape, make it white (R=255 G=255 B=255) and place it as shown in the first image.
Select this thin rectangle along with the copy made a few moments ago and click the Intersect button from the Pathfinder panel. Turn the resulting group of shapes into a compound path (Control-8), make sure that it stays selected and move to the Appearance panel. Lower the Opacity to 50% and change the Blending Mode to Soft Light.
Step 3
Make sure that your "bottomRing" shape is selected and make a new copy in front (Control-C > Control-F). Using the Rectangle Tool (M), create a 67 x 1 px white shape and place it as shown in the first image.
Select this thin rectangle along with the copy made a few moments ago and click the Intersect button from the Pathfinder panel. Turn the resulting group of shapes into a compound path (Control-8), make sure that it stays selected and move to the Appearance panel. Lower the Opacity to 25% and change the Blending Mode to Soft Light. Now select the compound path made in this step, along with the other two compound paths made in the last two steps, and simply hit the Control-G keyboard shortcut to Group them.
Move to the Layers panel, find this new group and simply rename it "subtleSeparator".
Step 4
Duplicate your "subtleSeparator" group (Control-C > Control-F), select the copy and place it as shown in the following image.
Step 5
Again, duplicate your "subtleSeparator" group (Control-C > Control-F), select the copy, rotate it 90 degrees and place it as shown in the first image. Duplicate this rotated group (Control-C > Control-F), select the copy and place it as shown in the second image.
4. Add Shading and Highlights for Your Main Shapes
Step 1
Disable the Snap to Grid (Shift-Control-') and then go to Edit > Preferences > General and make sure that the Keyboard Increment is set at 1 px.
Make sure that your "rightRing" shape is selected and make two copies in front (Control-C > Control-F > Control-F). Select the top copy and move it 1 px down using the down arrow button from your keyboard. Reselect both copies made in this step and click the Minus Front button from the Pathfinder panel. Make sure that the resulting group of shapes is selected and turn it into a compound path (Control‑8).
Step 2
Make sure that your "rightRing" shape is selected and go to Object > Path > Offset Path. Enter a -1 px Offset and click OK. Make sure that the resulting shape is selected and make a copy in front (Control-C > Control-F). Select this copy and move it 1 px down. Reselect both shapes made in this step and click the Minus Front button from the Pathfinder panel.
Turn the resulting group into a simple compound path (Control-8), make sure that it stays selected and focus on the Appearance panel. Replace the existing fill color with a simple white (R=255 G=255 B=255), lower its Opacity to 75% and change the Blending Mode to Overlay.
Step 3
Make sure that your "rightRing" shape is selected and make two copies in front (Control-C > Control-F > Control-F). Select the top copy and move it 1 px up, using the up arrow button from your keyboard. Reselect both copies made in this step and click the Minus Front button from the Pathfinder panel.
Turn the resulting group of shapes into a simple compound path, make sure that it stays selected and focus on the Appearance panel. Select the fill and replace the existing color with R=231 G=120 B=17.
Step 4
Make sure that your "rightRing" shape is selected and go to Object > Path > Offset Path. Enter a -1 px Offset and click OK. Make sure that the resulting shape is selected and make a copy in front (Control-C > Control-F). Select this copy and move it 1 px up using the up arrow button from your keyboard. Reselect both shapes made in this step and click the Minus Front button from the Pathfinder panel.
Turn the resulting group into a simple compound path (Control-8), make sure that it stays selected and focus on the Appearance panel. Replace the existing fill color with a simple white and chnage its Blending Mode to Soft Light.
Step 5
Make sure that your "rightRing" shape is selected and go to Object > Path > Offset Path. Enter a -1 px Offset and click OK. Make sure that the resulting shape is selected and make a copy in front (Control-C > Control-F). Select this copy and move it 2 px up using the up arrow button from your keyboard. Reselect both shapes made in this step and click the Minus Front button from the Pathfinder panel.
Turn the resulting group into a simple compound path (Control-8), make sure that it stays selected and focus on the Appearance panel. Replace the existing fill color with R=145 G=67 B=25 and change its Blending Mode to Soft Light.
Step 6
Make sure that your "rightRing" shape stays selected, focus on the Appearance panel, and select the existing stroke. Set its color to R=145 G=67 B=25, increase the Weight to 2 px, align it to inside and then lower its Opacity to 50% and change the Blending Mode to Soft Light. Make sure that this stroke is selected and duplicate it using the Duplicate Selected Item button. Select the newly added stroke and simply decrease its Weight to 1 px.
Step 7
Now, focus on your "leftRing" shape and repeat the techniques used for the "rightRing" shape. In the end things should look like in the first image.
Move to the "topRing" shape and do the same thing. Once you're done, things should look like in the second image. Finally, focus on your "bottomRing" shape, repeat those same techniques, and things will look like in the third image.
Step 8
Reselect your "leftRing" shape, focus on the Appearance panel, and add a second fill using the Add New Fill button. Select this new fill, replace the existing color with a simple white, change its Blending Mode to Soft Light and then go to Effect > Path > Offset Path. Enter a -4 px Offset, click OK and go to Effect > Blur > Gaussian Blur. Enter a 1 px Radius and click OK.
5. Add a Tiny Diamond
Step 1
Enable the Snap to Grid (Control-'). Using the Ellipse Tool (L), create a 10 px circle, fill it with the linear gradient shown below, and place it as shown in the following image.
Step 2
Make sure that your tiny circle is selected and make two copies in front (Control-C > Control-F > Control-F). Select the top copy and move it 1 px down. Reselect both shapes made in this step and click the Minus Front button from the Pathfinder panel. Make sure that the resulting shape stays selected and focus on the Appearance panel. Replace the existing fill color with R=145 G=74 B=29, lower its Opacity to 50% and change the Blending Mode to Soft Light.
Step 3
Reselect your tiny circle and go to Effect > Stylize > Drop Shadow. Enter the properties shown in the following image, click OK, return to the Appearance panel and select the existing stroke. Set its color at R=145 G=74 B=29, make sure that the Weight is set at 1 px, align it to inside and then lower its Opacity to 30% and change the Blending Mode to Soft Light.
Step 4
Using the Ellipse Tool (L), create a 6 px black circle, place it as shown in the following image and go to Effect > Stylize > Drop Shadow. Enter the attributes shown in the following image and click OK.
Step 5
Using the Ellipse Tool (L), create a 6 px red circle and place it as shown in the following image. Switch to the Pen Tool (P), create a 10 px vertical path, and place it as shown in the second image. Add a white stroke for this path only, to make it more noticeable. Make sure that this path stays selected and go to Object > Transform > Rotate. Set the Angle at 90 degrees and then click the Copy button. This should create a horizontal path as shown in the third image.
Step 6
Select your horizontal and vertical paths along with the red circle and click the Divide button from the Pathfinder panel. Select the resulting shapes one by one and simply replace the existing fill color with the colors shown in the second image.
Step 7
Using the Ellipse Tool (L), create a 6 px circle, place it as shown in the first image and focus on the Appearance panel. Make sure that there is no color set for the fill and then select the stroke. Make it black, make sure that the Weight is set at 1 px, align it to inside and then change the Blending Mode to Soft Light. Reselect the Ellipse Tool (L), create a 2 px white circle, change its Blending Mode to Overlay and place it as shown in the second image.
6. Add Extra Shading and Highlights
Step 1
Duplicate (Control-C > Control-F) the shapes made so far, select these copies, and click the Unite button from the Pathfinder panel. Make sure that this new shape stays selected, send it to back (Shift-Control-[) and then focus on the Appearance panel.
Remove the color from the fill and then select the stroke. Set its color to R=231 G=132 B=23, make sure that the Weight is set at 1 px and align it to outside. Move to the Layers panel, find the shape made in this step and rename it "Shadow".
Step 2
Make sure that your "Shadow" shape stays selected, focus on the Appearance panel, and add a second stroke using the Add New Stroke button. Select this new stroke, make sure that the Weight is set at 1 px, align it to outside, change the Blending Mode to Overlay and then replace the existing color with the linear gradient shown in the following image. Keep in mind that the yellow numbers from the Gradient image stand for Opacity percentage.
Step 3
Reselect your "Shadow" shape, focus on the Appearance panel, make sure that the entire path is selected and go to Effect > Stylize > Drop Shadow. Enter the attributes shown in the top left window (in the following image), click OK and then add the other four Drop Shadow effects shown in the following image.
7. Add a Red Ribbon
Step 1
Open the Brushes panel (Window > Brushes) and click the New Brush button. Check the Calligraphic Brush box and click OK. Name your new brush "Red Brush", enter all the attributes shown in the following image, and then click the OK button. Pick the Brush Tool (B), select your "Red Brush" from the Brushes panel, move to your artboard and draw a simple path roughly as shown in the following image. Don't forget to set its color at R=237 G=28 B=36.
Step 2
Return to gridline every 5 px, so simply go to Edit > Preferences > Guides & Grid and enter 5 in the Gridline every box. Make sure that your "Shadow" shape is selected and make a copy in front (Control-C > Control-F). Using the Rectangle Tool (M), create a 15 x 10 px black shape and place it as shown in the first image. Select this rectangle along with the copy made in the beginning of the step, and click the Intersect button from the Pathfinder panel.
Step 3
Reselect the black shape made in the previous step along with your red path and focus on the Transparency panel (Window > Transparency). Click the Make Mask button and then uncheck that tiny Clip box. In the end things should look like in the second image.
Step 4
Make sure that your "Shadow" shape is selected and make a copy in front (Control-C > Control-F). Using the Rectangle Tool (M), create a 15 x 10 px shape, set the fill color at R=57 G=181 B=74, and place it as shown in the first image. Select this green rectangle along with the copy made in the beginning of the step, and click the Intersect button from the Pathfinder panel.
Disable the Snap to Grid (Control-'), grab the Pen Tool (P) and draw a simple path roughly as shown in the third image. Add a 1 px green stroke for this path, and make sure that the fill is disabled.
Step 5
Reselect your masked red path and make a copy in front (Control-C > Control-F). Select it and go to Object > Expand Appearance. Make sure that the resulting group is selected and click the Unite button from the Pathfinder panel.
Step 6
Now select the shape made in the previous step along with your green shape and green path, focus on the Pathfinder panel, and click the Divide button. Make sure that the resulting group is selected, and simply hit Shift-Control-G to Ungroup it.
Move to the Layers panel and focus on the set of shapes and paths made in this step. Remove the tiny ones and then select the three main shapes one by one and replace the existing fill color with the colors indicated in the second image.
Step 7
Select the orange shape that makes up your ribbon and focus on the Appearance panel. Select the fill, lower its Opacity to 20%, and then replace the existing color with the linear gradient shown in the following image. Don't forget that the yellow zero from the Gradient image stands for Opacity percentage, while the blue number stands for Location percentage.
Step 8
Select the green shape that makes up your ribbon and focus on the Appearance panel. Select the fill, lower its Opacity to 30%, and then replace the existing color with the right linear gradient shown in the following image. Add a second fill for this shape, lower its Opacity to 20%, and use the left linear gradient shown in the following image.
Step 9
Select the blue shape that makes up your ribbon and focus on the Appearance panel. Select the fill, lower its Opacity to 10%, and then replace the existing color with the right linear gradient shown in the following image. Add a second fill for this shape, lower its Opacity to 30%, and use the left linear gradient shown in the following image.
Step 10
Reselect your masked path, focus on the Appearance panel, make sure that the entire path is selected, and simply add the five Drop Shadow effects shown in the following image.
Step 11
Reselect your masked path, make a copy in front (Control-C > Control-F) and bring it to front (Shift-Control-]).
Make sure this copy stays selected, grab the Type on a Path Tool and simply click on the selected path. Add your piece of text, make it white and then open the Character panel (Window > Type > Character). Select the Ignis et Glacies Extra Sharp Bold font and then enter the rest of the attributes mentioned in the following image.
Congratulations! You're Done!
Here is how it should look. I hope you've enjoyed this tutorial and can apply these techniques in your future projects.
In this tutorial, you will learn how to create a baby cupid angel
with a cute bow and arrow, using primarily the Ellipse Tool. You will
see how a complicated illustration can be composed of simple
elements, without any pre-sketches.
1. Creating the Head and Face
Step 1
We will start with the head. Take the Ellipse Tool (L) and
draw an ellipse, but not too long. Set its color to R=207 G=158 B=118.
Take the Direct Selection Tool (A) and select the left and right anchor points, and then move them down.
Step 2
Choose a brown fill color (R=87 G=28 B=31) and use the Ellipse Tool (L) to draw another ellipse. Create a small white circle as a highlight. Then
create two eyes: select the whole eye and move it to the right while holding the Alt and Shift keys. Group these eyes for your convenience
(right-click > Group).
Step 3
Because the body and the head of the cupid are facing in different
directions, place the eyes on the head and rotate them just a little bit to the left using the Selection Tool (V).
Step 4
And now for the nose. Let's start with a long ellipse with fill color R=173 G=117 B=80. Keep it selected and, using the Convert Anchor Point
Tool
(Shift-C), click on the right and left anchor points to make them sharp.
Still keep them selected and go to Effect > Warp > Arc. In the new window, adjust the options: Style Arc Horizontal, Bend 50%, Distortion Horizontal 0% and Vertical 0%. Click OK. Now expand this shape with Object > Expand Appearance.
Step 5
Put the nose on the face and rotate it in the same way as you did with the eyes.
Step 6
Now we will make the mouth from the nose. So select the nose and
create a horizontal reflection with it (right-click>
Transform> Reflect). In the new window, select Horizontal Axis of reflection
and
press Copy. Hold Alt (for making a copy) and Shift (for
dragging the shape straight) together and drag this mouth shape down a little
bit. You will get two identical shapes overlapping each other.
Make
another copy of your first shape which you made from the nose, before
dragging it down (Control-C, Control-F). Keep this third copy selected,
hold down the Shift key and select the copy you moved down. Now go to the Pathfinder panel and press the Minus Front button. Color this newest shape
in a white color. You just created the teeth.
Image 2. Draw a white ellipse like in the image below, which overlaps the teeth. I marked the ellipse with a red stroke color for
better visibility, but you need just a white fill color without any stroke
color. Select the teeth and the white ellipse together (hold the Shift key to
select two or more shapes together). On the Pathfinder panel, press Intersect. The teeth are done.
Step 7
Let's add the tongue. Draw a pink ellipse over the bottom side of the
mouth. Set its color to R=246 G=156 B=154. Make one more copy of the
brown moon shape (Control-C, Control-F) and hold together the pink
overlapping ellipse; now, press the Intersect button in Pathfinder.
Step 8
Group the whole mouth (right-click > Group) and place it on the
face. Rotate a little to the left, as you did with the eyes and the nose.
Step 9
On to the cheek. Draw one ellipse, and using the Eyedropper Tool (I), take the
same fill color as on the face of the cupid. Exactly in the middle of it,
draw another small ellipse (with the help of the Eyedropper Tool (I),
take the same fill color as the tongue).
To align the two ovals, use
the Align panel (Window > Align) and click the Horizontal Align
Center and Vertical Align Center buttons. Select both of them and on theTools panel (Window > Tools) click on the Blend Tool (W). After that,
using this tool, click on one anchor point on the pink ellipse and
one anchor point on the light brown ellipse.
If you have a hard time using the Blend Tool, you can use a Radial Gradient for the cheek.
Step 10
Make two cheeks by copying and pasting, and place them where they should be.
Rotate the left cheek a little to the left, and the right cheek to the right
(both of them are rotated with the mouse).
2. Creating the Ears
Two identical ellipses will make the ears. The fill color should be like the fill color of the face.
3. Creating the Hair
Step 1
Set the fill color at R=242 G=225 B=139 and draw many, many circles to
create the hair. Remember to hold the Shift button to create equal
circles. Please notice that some of them need to be behind the head, so put them behind with Control-X, Control-B.
Step 2
Make the fill color lighter (R=245 G=232 B=167) and draw a few more circles in the hair.
Step 3
Select a few circles like in the image below. Keep them selected and go
to Object > Path > Offset Path. In the dialogue window,
enter Offset: 10 px, Joins: Miter, Miter Limit: 4, OK. Keep it selected
and, using the Eyedropper Tool (I), take the same fill color as on the
nose of the cupid. Still keeping the circles selected, on the Pathfinder
panel press the Unite button. You will get something like a caterpillar.
Then you need to press right-click > Arrange > Send
Backward a few times to see the bangs of the hair.
Create another copy of the head (Control-C, Control-F). Select the
caterpillar shape together with the new copy of the head and press the
Intersect button in the Pathfinder. You get a shadow which divides the
face from the hair.
4. Creating the Body
Step 1
Make the fill color the same as the face, and draw an ellipse. Rotate it
using the Selection Tool (V). After that take the Direct Selection Tool
(A) and move the handles to create the shape as in the image below.
Step 2
Now we will create a shadow on the body. Draw an overlapping ellipse
which is marked in the image below with a red stroke, but actually the
stroke and fill don't matter. Make another copy of the body (Control-C, Control-F); keeping it selected along with the red stroke ellipse,
press Minus Front in Pathfinder. Fill the resulting shape with darker
color R=201 G=150 B=111. Group the body and shadow together so that they don't move separately (right-click > Group).
Step 3
Put it under the head (Control-X, Control-B).
5. Creating the Right Arm
Step 1
Now we will create the upper part of the arm. Again, draw an
ellipse (the same fill color as the face). With the help of the Direct Selection
Tool (A), move the handles to achieve the shape shown in the image below.
Step 2
Let's create the hand. Again, use the same fill color and a slightly more
rounded ellipse. Move the handles to get the shape shown below. Hold the
Alt key while moving the handles on the thumb.
Step 3
Put together the upper part of the arm with the hand.
Step 4
Make a copy of the upper arm (Control-C, Control-B) and fill it with
color R=193 G=140 B=101. Shift the new darker copy down a little. We
do this to divide the arm from the body and make it more visible.
Group the whole arm.
Step 5
Place the arm on the body.
6. Creating the Left Arm
Step 1
The left arm is just a darker copy of the right arm (same fill
color, R=193 G=140 B=101, as the shadow under the bang on the face).
Just
add an ellipse like in the image below to show that the hand is holding
something. Set the fill color at R=207 G=158 B=118 for this ellipse.
Step 2
Place the left arm behind the body.
7. Creating the Right Leg
Step 1
Keep the same fill color as in the previous step and draw an ellipse.
Take the Direct Selection Tool (A), select the left and right anchor
points and move them up.
Step 2
Create a copy of the shape made in the previous step, and then make it
narrower, but not too much, because we want to create a chubby cupid.
Compose two ellipses as shown below.
Step 3
Now we will create the foot. Draw a little oval and move the handles
to achieve the result shown in the second image. After that, add five tiny
ovals—these are the toes.
Step 4
Place the foot on the leg. Group the whole leg.
Step 5
Put the right leg on the body.
8. Creating the Left Leg
The left leg is a copy of the right leg, but with a darker color. So make a copy of the right leg, take the Eyedropper Tool (I), and take the
same fill color as on the left arm. Then put the left leg behind the
body.
9. Creating the Briefs
Step 1
Now you know how to move the handles of some shapes, so draw a pink
ellipse (R=248 G=175 B=174). Move the handles as shown in the image
below to cover the bottom of the cupid.
Step 2
Create a few lighter (R=250 G=193 B=192) circles as ruffles. After you
finish the ruffles, place the briefs over them (Control-X,
Control-F).
Step 3
Now for the last part of the traditional cupid's outfit: the ruffles on the
left leg. Draw a few more circles (R=239 G=156 B=156) on the left leg, and
then put the briefs and ruffles on the right leg over it. For this, you
need to select the briefs and ruffles on the right leg and click Control-X, Control-F.
Step 4
A few light pink ellipses will make the wing. It doesn't matter how many
ellipses you use for this. Set the fill color at R=251 G=210 B=209.
Group the wing so that it doesn't move separately.
Step 5
Place the wing on the back of the cupid. We will assume that the second wing is not visible.
10. Creating the Bow
Step 1
Draw a brown ellipse (R=87 G=28 B=31). Keep it selected and go to Object > Path > Offset Path. In a new dialogue window enter Offset: -10 px, Joins: Miter, Miter limit: 4, OK. You will get two
ellipses, which you need to select and then go to Pathfinder panel and
press the Exclude button.
Step 2
Did you notice that we are almost at the end of the tutorial and we
still are using just the Ellipse Tool? You created a person using just
one basic shape!
But be patient! Now we need to divide the ellipse we created in the
previous step, and for this we will use the Rectangle Tool (M). Draw a
long, narrow rectangle in the middle of this ellipse. The rectangle needs to be longer than the ellipse. Select the two shapes
together and press Minus Front in Pathfinder. Ungroup the divided
ellipse (right-click > Ungroup) and delete the unnecessary left part.
Draw the long, narrow rectangle again, as in the image below. Add two tiny
circles. Now the bow is ready.
Step 3
We will create the tip of the arrow now. Keep the same fill color and
draw one more ellipse, and move up the left and right anchor points.
Step 4
Rotate to the left and then right-click your mouse. In the pop-up
window, select Transform > Reflect. Then in the new dialogue window,
enter Axis Vertical, Angle 90 degrees, Copy. Shift the new shape to the
right. Select the two shapes and press the Unite button in Pathfinder. Hit the
Convert Anchor Point Tool (Shift-C) and click on the lowest anchor point
of the resulting shape. You will get a sharp corner for the tip of the
arrow. Now make one more copy of this heart, and drag it somewhere on your
artboard to keep it for later.
And the last step: move down this sharp corner of the tip using the Direct Selection Tool (A) to show how sharp an arrow of love can be!
Step 5
Using the Rectangle Tool (M), create a long rectangle and put the tip of the arrow on it.
Step 6
Draw another rectangle, take the Direct Selection Tool (A) and move the two upper anchor points to the left. You will get a parallel piped
shape. Keep thishard-to-say shape selected, and right-click > Transform > Reflect. Enter Axis Horizontal, Angle 0 degrees, and press Copy.
Move it down as shown in the image below.
Step 7
Compose the whole arrow. Also you can add a white circle as a highlight.
Step 8
Give the weapons of love to the cupid. Be careful with the arms: the right
arm must be over the bow and the arrow, and the "fingers" of the left arm as
well.
11. Creating the Background
Step 1
Create a blue (R=184 G=223 B=255) square behind the cupid, 600 px width and height.
Step 2
Change the color to R=221 G=242 B=245 and use circles to draw clouds.
Then change the color to R=232 G=247 B=249 and draw a few more circles
over the clouds, just as you did for the hair of the cupid. Group every cloud separately.
Step 3
Put the clouds behind the cupid, but in front of the background.
Step 4
Remember that copy of the heart which you saved for later? Now is the
time! Change the fill color to R=131 G=185 B=231 and spread them around
by
copying and pasting. Place one heart (fill color R=251 G=210 B=209) on the briefs of the cupid.
Conclusion
Congrats, your cupid illustration is ready! Now you can confess your love to your crush this Valentine's Day!
In this tutorial we'll transform circles and polygons into a brightly colored field of flower designs with CorelDRAW's Distort Tool. Create simple daisies and leaves perfect for a seamless pattern as a sweet reminder of springtime, no matter the time of year. Additionally, you'll layer custom patterns and shape styles to bring complexity into the final design.
1. Distorting Shapes Into Flowers
Step 1
Open a New Document and let's begin with the first flower-making technique.
Draw a circle with the Ellipse Tool (F7).
Using the Distort Tool, select Push and Pull Distortion in the Property Bar and drag the tool to the left from the center of the circle (this is the Push distortion).
Continue dragging the Push distortion until you have four flower petals whose shape you like.
Step 2
Let's build that "pushed" shape into a simple flower!
Duplicate (Control-D) the flower petal shape and Rotate it 90°.
Align the two shapes by their centers in the Align and Distribute docker.
Draw a circle with the Ellipse Tool and place it in the center of your flower.
Set your shapes' fill and outline colors in the Object Properties docker and Group (Control-G) together your flower components.
Step 3
An alternate method of creating simple daisies is using a polygon to start.
Draw a ten-sided figure, or a decagon, with the Polygon Tool (Y). Set the number of sides in the Property Bar.
Once again, use the Distort Tool to Push the decagon into a petaled flower shape.
Draw a circle and place it in the center of the design.
You'll notice that before and after distortion, you can change the number of sides so long as you haven't converted your object to curves.
Step 4
Another style of flower or flower-like shape starts with a circle as a base.
Draw a circle with the Ellipse Tool. Using the Distort Tool, select Zipper Distortion from the Property Bar. You can either drag the tool out from the center of the circle, or enter 81 for Zipper Amplitude and 5 for Zipper Frequency.
Switch to Push and Pull Distortion and either Push (to the left) your shape into a flower-like shape, or enter -60 into Push and Pull Amplitude.
Step 5
There are a lot of fantastic shapes that can be made with the Distortion Tool. For now, we'll set our final one at a jagged leaf.
Draw a circle with the Ellipse Tool.
Select the circle and Convert to Curves (Control-Q). Use the Shape Tool to pull the topmost node upward.
Use the Distort Tool to apply a Zipper Distort with 34 for Zipper Amplitude and 5 for Zipper Frequency.
2. Create a Pattern From Your Shapes
Step 1
Layer flower shapes on top of each other. Some can be filled while others simply outlined. Note how the amount and depth of petals is different for each. Additionally, create sparkles by using the Pull Distortion instead of Push on circles and polygons.
Step 2
Use the Pen Tool to draw veins on the leaf we drew previously.
Place it beneath the other flower shapes in the Object Manager docker.
Step 3
When satisfied with your pattern components and their placement, Group them together. Then, go to Tools > Create > Pattern Fill... and select Vector as your pattern type. You'll have to select your pattern area after this, so it works best if you're zoomed in on your pattern design.
Hit Accept when satisfied with the marquee around your design and you'll be prompted to name, tag, and save your pattern (you'll also have the option to share your pattern through Content Exchange).
Step 4
You'll find your pattern in the Object Properties docker under Pattern Fill. Select it from the Personal header within your Fill Picker and apply it to any shape. I applied it to a rectangle drawn with the Rectangle Tool (F6). Adjust your pattern as needed under Transformations. It's here you can change how the pattern tiles behave: whether they're stretched out or aligned differently, and the spacing between each tile.
Step 5
In order to give the pattern more complexity, I placed a solidly filled rectangle beneath it in the Objects Manager docker. Additionally, I created a simple sparkle pattern and placed it over the first, also applied to the same size of rectangle.
Great Job, You're Done!
Well done you! Now that you've played with the Distort Tool and created a floral pattern, what other shapes and designs can you create with other settings or presets of the tool? Share your creations with us in the comment section below!
Layering glow and gloss effects can help create nice, shiny objects. This tutorial will show you how to modify a brick texture for the background, and then use layer styles with the Pen Tool to add some bright, glowing neon text and a simple cable over it. Let's get started!
Tutorial Assets
The following assets were used during the production of this tutorial:
Create a new 1500 x 950 px document, and set the Resolution to 300.
Go to File > Place Embedded, and open the BrickOldRounded0061 image. Resize it as you like, and then tap the Return key to accept the changes.
Step 2
Click the Create new fill or adjustment layer icon at the bottom of the Layers panel and choose Levels.
Step 3
Click the Clip adjustment to layer icon at the bottom of the Properties panel, and then change the Shadows value to 85.
Step 4
Click the Create new fill or adjustment layer icon again and choose Hue/Saturation. Click the Clip adjustment to layer icon at the bottom of the Properties panel, and then change the Saturation to 11, and the Lightness to -83.
2. Creating the Text
Step 1
Create the text in All Caps using the font Beon Medium. The color is #a33e88 and the Size is 103 pt.
Step 2
Duplicate the text layer and make it invisible by clicking the eye icon next to it. Then right-click the copy and choose Rasterize Type.
What we'll be doing next is separating the vertical and diagonal parts of the letters from the horizontal ones, in order to apply the effects using different Angle values.
Step 3
Pick the Rectangular Marquee Tool (or any selection tool you like), click the Add to selection icon in the Options bar, and select all the horizontal parts of the letters you have.
Step 4
Go to Edit > Cut, and then Edit > Paste Special > Paste in Place. This will place the selected parts in a separate layer. Rename the layers to Vertical and Horizontal.
Step 5
Change both the Vertical and Horizontal layers' Fill values to 0.
Step 6
Duplicate each of the Vertical and Horizontal layers twice, and then place each set of layers in a group that has its name (Vertical/Horizontal).
Step 7
Place the Horizontal group below the Vertical one.
3. Styling the Original Horizontal Layer
Double-click the original Horizontal layer to apply the following layer style:
Step 1
Add a Bevel and Emboss with these settings:
Size: 10
Uncheck the Use Global Light box
Angle: 0
Altitude: 70
Check the Anti-aliased box
Highlight Mode: Linear Light
Shadow Mode - Opacity: 0%
Step 2
Add a Contour with these settings:
Check the Anti-aliased box.
Step 3
Add an Inner Shadow with these settings:
Blend Mode: Screen
Color: #e658d4
Angle: 30
Distance: 0
Step 4
Add an Inner Glow with these settings:
Opacity: 85%
Color: #fe66f1
Source: Center
Size: 18
Step 5
Add a Drop Shadow with these settings:
Distance: 13
Size: 7
This will style the first layer of the horizontal part.
4. Styling the First Copy Horizontal Layer
Double-click the first copy Horizontal layer to apply the following layer style:
Step 1
Add a Bevel and Emboss with these settings:
Size: 16
Uncheck the Use Global Light box
Angle: -36
Altitude: 42
Contour: Cove - Deep
Check the Anti-aliased box
Highlight Mode: Vivid Light
Shadow Mode - Opacity: 0%
Step 2
Add a Contour with these settings:
Contour: Cone - Inverted
Check the Anti-aliased box
This will add more gloss to the text.
5. Styling the Second Copy Horizontal Layer
Double-click the second copy Horizontal layer to apply the following layer style:
Step 1
Add a Bevel and Emboss with these settings:
Size: 16
Uncheck the Use Global Light box
Angle: 18
Altitude: 58
Contour: Half Round
Check the Anti-aliased box
Highlight Mode: Vivid Light
Shadow Mode - Opacity: 0%
Step 2
Add a Contour with these settings:
Contour: Sawtooth 2
Check the Anti-aliased box
Step 3
Add an Inner Glow with these settings:
Blend Mode: Linear Light
Noise: 5%
Color: #ffdcfa
Source: Center
Size: 38
Step 4
Add an Outer Glow with these settings:
Color: #7f2d65
Size: 15
This will style the final horizontal layer, adding even more gloss and glow.
6. Styling the Original Vertical Layer
Step 1
Right-click the original Horizontal layer, choose Copy Layer Style, and then right-click the original Vertical layer, and choose Paste Layer Style.
Double-click the original Vertical layer to adjust the Bevel and Emboss's Angle and Altitude values, by changing them to 90 and 74.
Step 2
For the Inner Glow, just change the Size to 15.
This will adjust the effect to suit the vertical and diagonal parts.
7. Styling the First Copy Vertical Layer
Copy and paste the first copy Horizontal layer's layer style to the first copy Vertical layer, and then double-click the Vertical copy layer to change the Bevel and Emboss effect's Angle to -76, and its Altitude to 53.
That's it for the first copy layer.
8. Styling the Second Copy Vertical Layer
Copy and paste the second copy Horizontal layer's layer style to the second copy Vertical layer, and then double-click the Vertical copy 2 layer to change the Bevel and Emboss effect's Angle to -82, and its Altitude to 53.
That concludes styling both parts of the text.
9. Adding More Glow and Creating the Cable
Step 1
Create a new layer below the original invisible text layer, call it Background Light, and change its Blend Mode to Linear Light.
Set the Foreground color to #98338b, pick the Brush Tool, and choose a very big, soft, round tip. Then click once to add spots of color behind the text (don't click and drag, just dot the color).
Step 2
Create another new layer below the Background Light layer and call it Cable. Pick the Pen Tool and choose the Path option in the Options bar.
What you'll need to do next is create the paths where you want to add the cable. You can click to add corner anchor points, and click and drag to create curves. Keep in mind that the path created doesn't have to be perfect, as you can pick the Direct Selection Tool at any time later to adjust the anchor points or the direction handles.
Step 3
To separate the paths, press and hold the Command key, and click outside the path you've finished creating so that it won't be connected to the path you create after it.
Step 4
Take your time with this step to get a neat outcome.
Step 5
Pick the Brush Tool, and then open the Brush panel (Window > Brush), and choose a hard round 7px tip with Spacing set to 1.
Step 6
Set the Foreground color to #252525, pick the Direct Selection Tool, right-click the path and choose Stroke Path.
Step 7
Choose Brush from the Tool dropdown menu and uncheck the Simulate Pressure box.
Step 8
This will stroke the path. Hit the Return key to get rid of the work path.
10. Styling the Cable
Double-click the Cable layer to apply the following layer style:
Step 1
Add a Bevel and Emboss with these settings:
Check the Anti-aliased box
Highlight Mode: Vivid Light
Color: #ec6ab7
Opacity: 24%
Step 2
Add a Contour with these settings:
Check the Anti-aliased box.
Step 3
Add a Pattern Overlay with these settings:
Blend Mode: Multiply
Pattern: 8
Step 4
Add a Drop Shadow with these settings:
Opacity: 60%
Distance: 13
Size: 10
This will style the cable.
11. Creating the Clips
Step 1
Pick the Rectangle Tool and create an 11 x 15 px rectangle.
Step 2
Pick the Add Anchor Point Tool and click to add two points in the center of both vertical sides of the rectangle.
Step 3
Pick the Direct Selection Tool, click and drag to select the center points you added, and then press the Left Arrow Key once to move them 1px to the left.
Step 4
Duplicate the Rectangle layer and then go to Edit > Transform > Rotate 90° Clockwise. Rename the Rectangle layers to H (for horizontal) and V (for vertical).
12. Styling the Clips
Double-click the H layer to apply the following layer style:
Step 1
Add a Gradient Overlay with these settings:
Opacity: 42%
Click the Gradient box to create the gradient using the colors #151515 to the left, #6d6d6d in the center, and #161616 to the right.
Step 2
Add a Drop Shadow with these settings:
Opacity: 60%
Distance: 13
Size: 10
This will style the horizontal clip.
Step 3
Copy and paste the H layer's layer style to the V layer, and then double-click the V layer to change the Gradient Overlay's Angle value to 0.
Step 4
Next, duplicate and place the clip layers wherever you want to add clips to the cable you created.
13. Adding One More Coloring Layer
Click the Create new fill or adjustment layer icon and choose Solid Color. Use the color #a34799, place the adjustment layer below the Cable layer, and change its Blend Mode to Vivid Light. This will apply the color to the bricks behind the text, and enhance the glow and lighting of the final result.
Congratulations! You're Done
In this tutorial, we modified a brick texture background and darkened it a little bit. Then we created the text, rasterized its layer, and separated the horizontal parts from the vertical and diagonal ones.
After that, we duplicated and grouped the separated text layers, and styled all of them to achieve the glossy-glowing effect.
Once the main text was created and styled, we added some more glow to the background, and used the Pen Tool to create the cable's path. We stroked the path and styled it to give it a 3D look.
Finally, we used the Rectangle Tool to create some clips for the cable, modified and styled them, and added one last adjustment layer to enhance the coloring of the final result.
Please feel free to leave your comments, suggestions, and outcomes below.


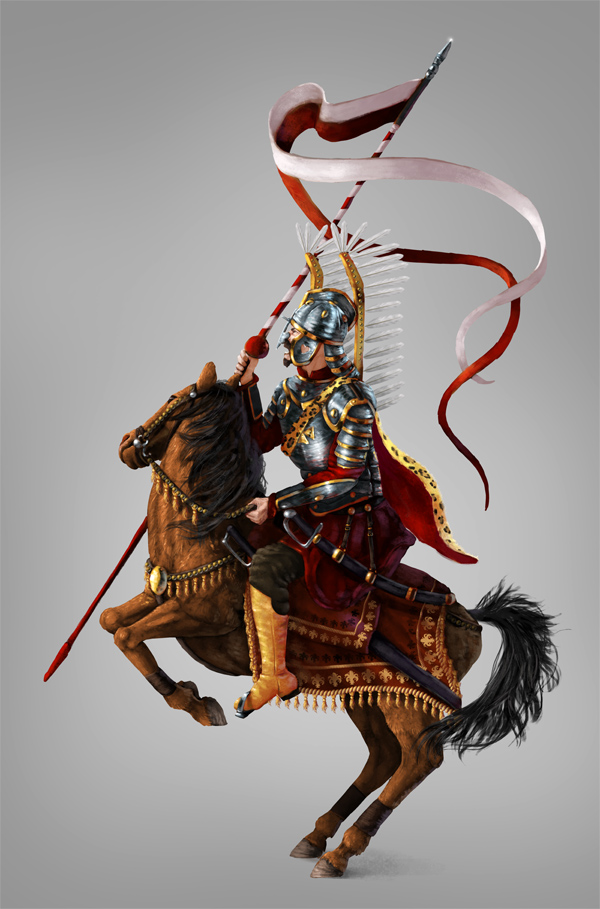


.jpg)